Official DIY: Changing Spark Plugs (L15A VTEC)
#1
 07-25-2009, 02:09 AM


Official DIY: Changing Spark Plugs (L15A VTEC)
Alrighty folks, it seems that there isn't a DIY for changing spark plugs on the Fit, so when I changed them the other day, I went ahead and took a bunch of photos.
Remember, neither myself nor IB, nor FitFreak.net are to be held liable for any problems that may arise from following this DIY. Please use common sense, and proceed at your own peril!
I did the switch on my 2007 Honda Fit Sport, and I know this DIY will work for most any GD3 with the L15A VTEC engine. I do not know at this time if it will be exactly the same on the GE8 L15A i-VTEC engine. It should be pretty close. The i-DSI L series engines found in JDM vehicles will have a different course of action since they have 8 plugs to worry about.
So first off, here are the tools you will need:
Here we have tools and parts needed. I forgot to get some anti-seize for the plugs, so I used some Castrol synthetic oil I had in the garage.
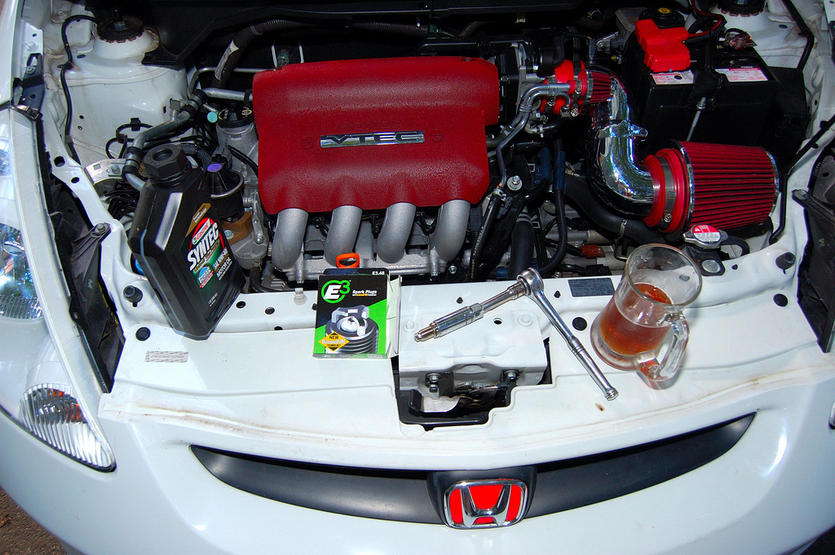
I went with some E3 DiamondFire plugs. I have heard so many good things about these new plugs. Every test I have seen, they make real power on both an engine and chasis dyno. sometimes as much as 12-14hp! They are also able to be used in forced induction and nitrous applications, which of course you can't do with platinum plugs. I got mine from Summit Racing High Performance Car and Truck Parts l 800-230-3030 for less than $5 each.

I figured out afterward, that I didn't really need to remove the cam cover, but I had already done it. You can skip that step since it would appear that it really doesn't get in the way much.


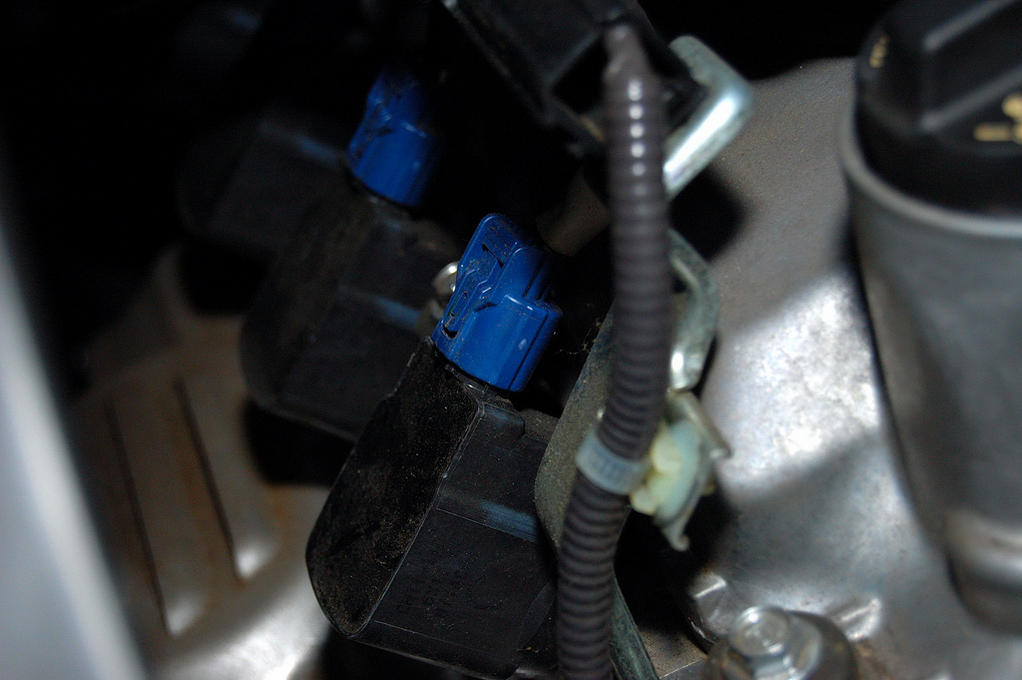
Looking on the rear of the engine above the exhaust manifold heat shield, you will see the 4 coil packs with blue wiring harness clips attached.

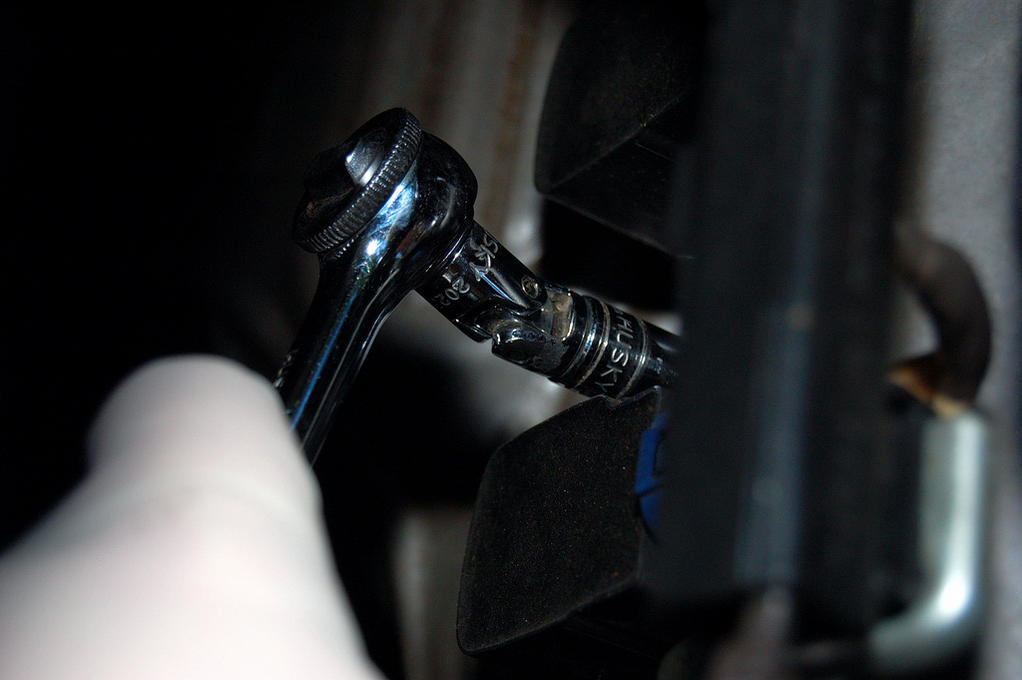
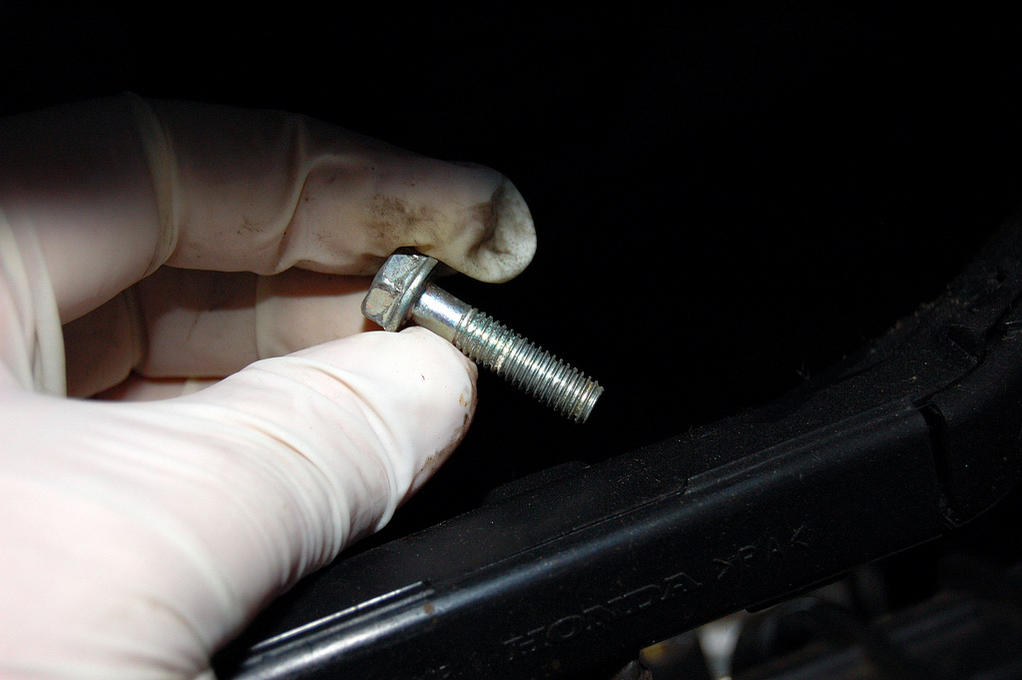
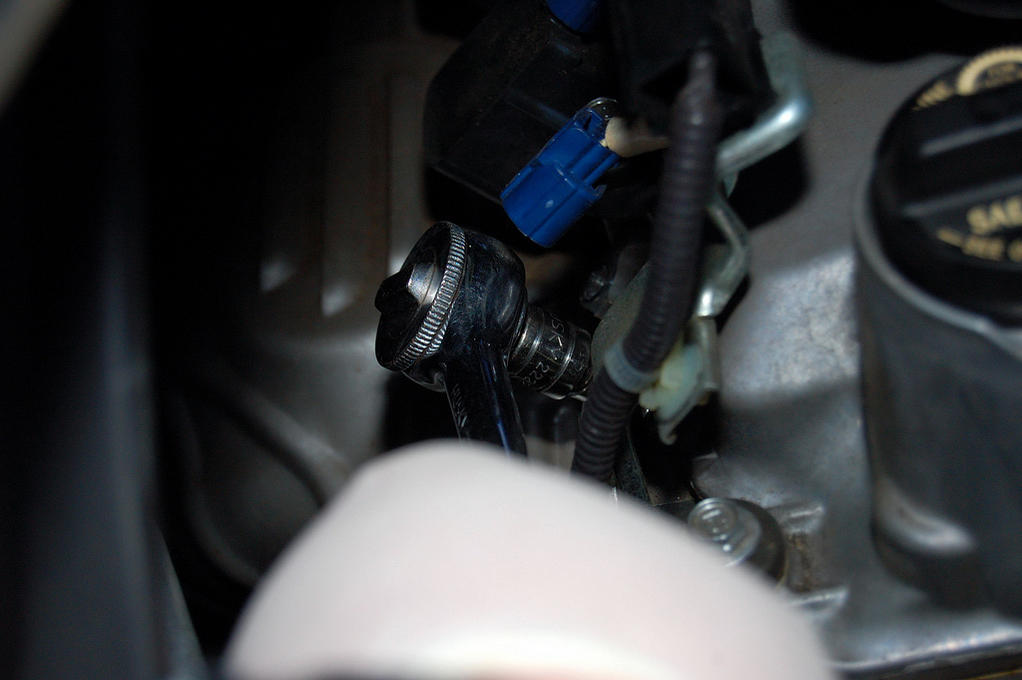
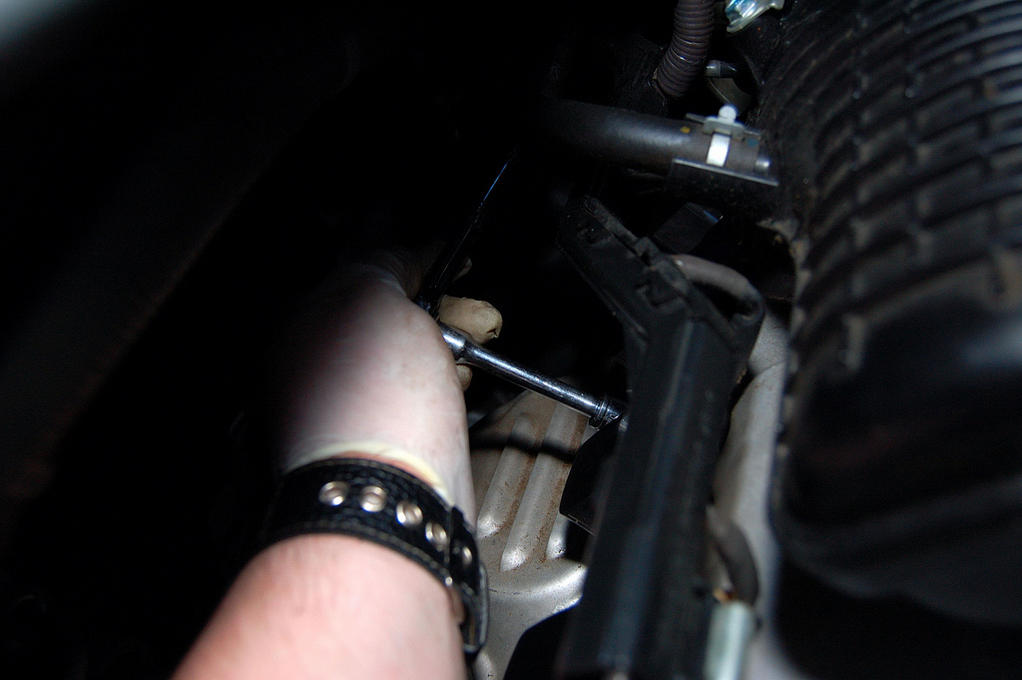
You will now use the 10mm socket and ratchet to remove the 10mm bolt holding the coil pack onto the head.
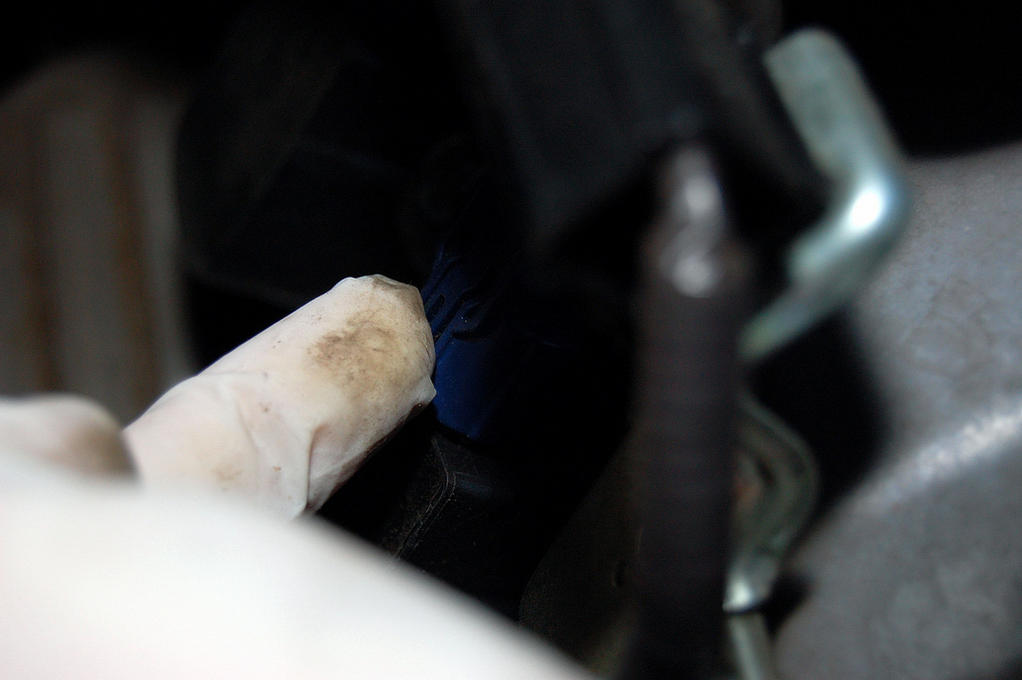
And now you want to unplug the blue wire harness from the coil pack. You can then pull the entire coil pack out of the spark plug well.

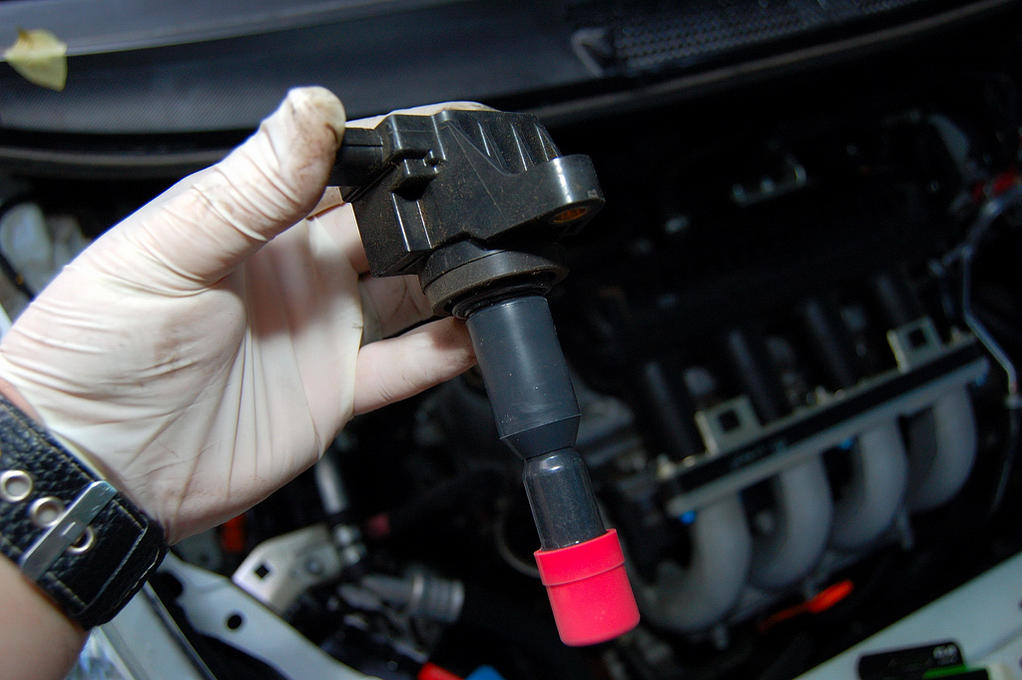
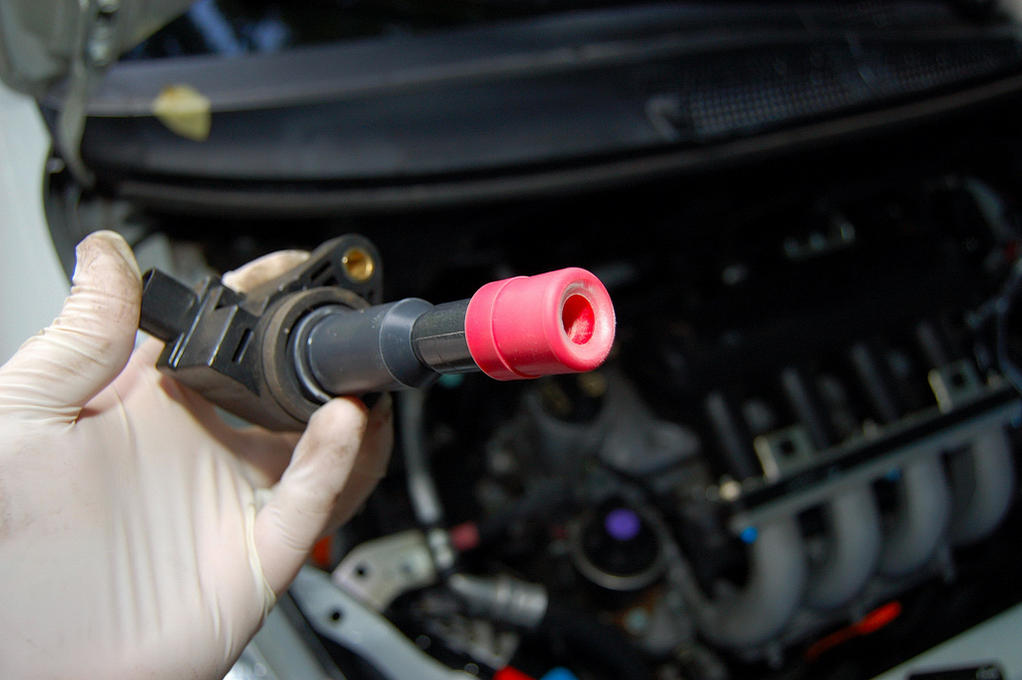
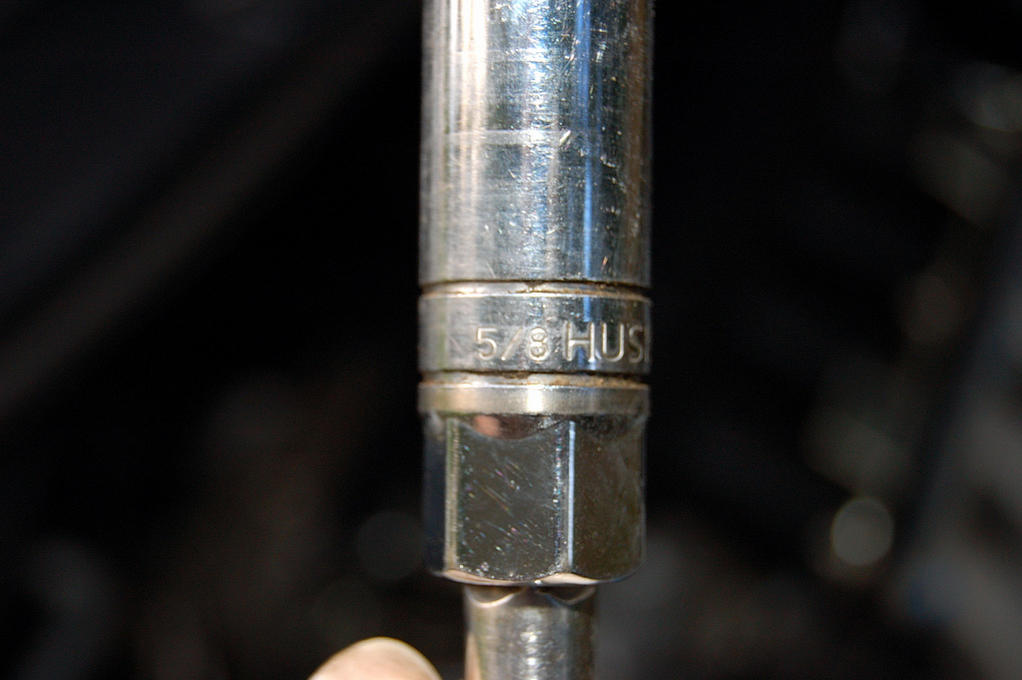
Now you will use the 5/8" spark plug socket with a medium extension in order to reach all the way down into the spark plug well to the spark plug. By using an actual spark plug socket instead of a regular socket, the rubber o-ring inside will grip the plug and allow you to pull it out of the head after loosening.

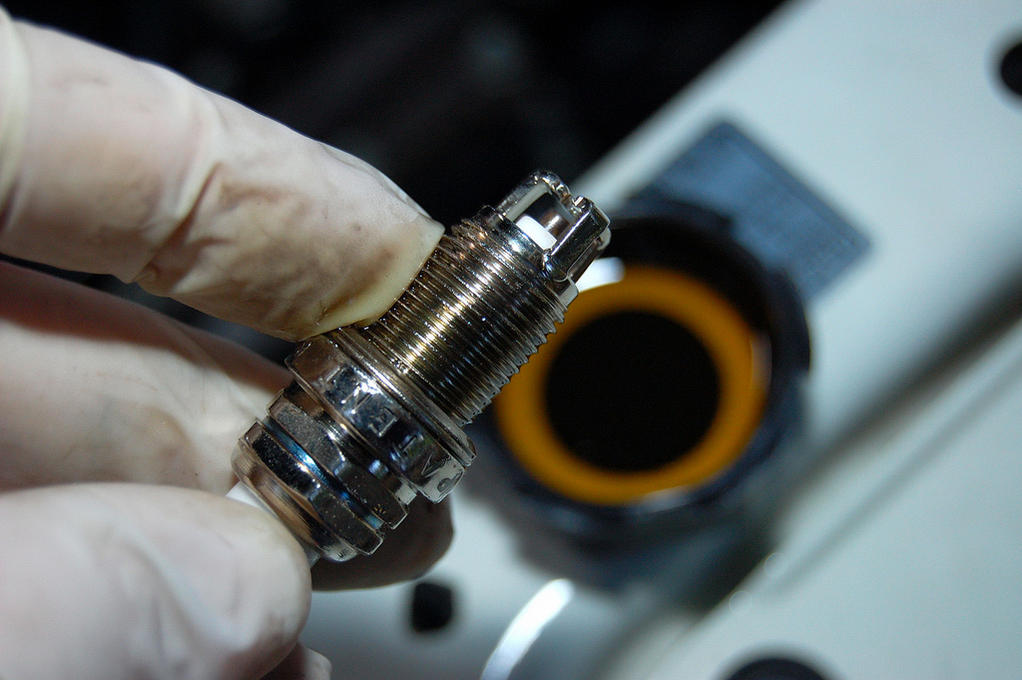
There are many references you can check in order to properly read a plug and it's performance. This plug is functioning great. And the engine is neither running too lean, nor too rich. The light tan coating around this plug, with no oily residue means this engine is running very good. Considering I only have 19,000 miles, and I run Royal Purple Race Oil, and other than my SSR Intake and muffler delete, I have no other performance mods, this is too be expected.

I was a bit surprised to see that the OEM Honda plugs were Denso Iridium. Nice, expensive, high quality plug! No wonder they last 100,000 miles before replacing.

And here we compare the Iridium plug with the E3 DiamondFire plug.

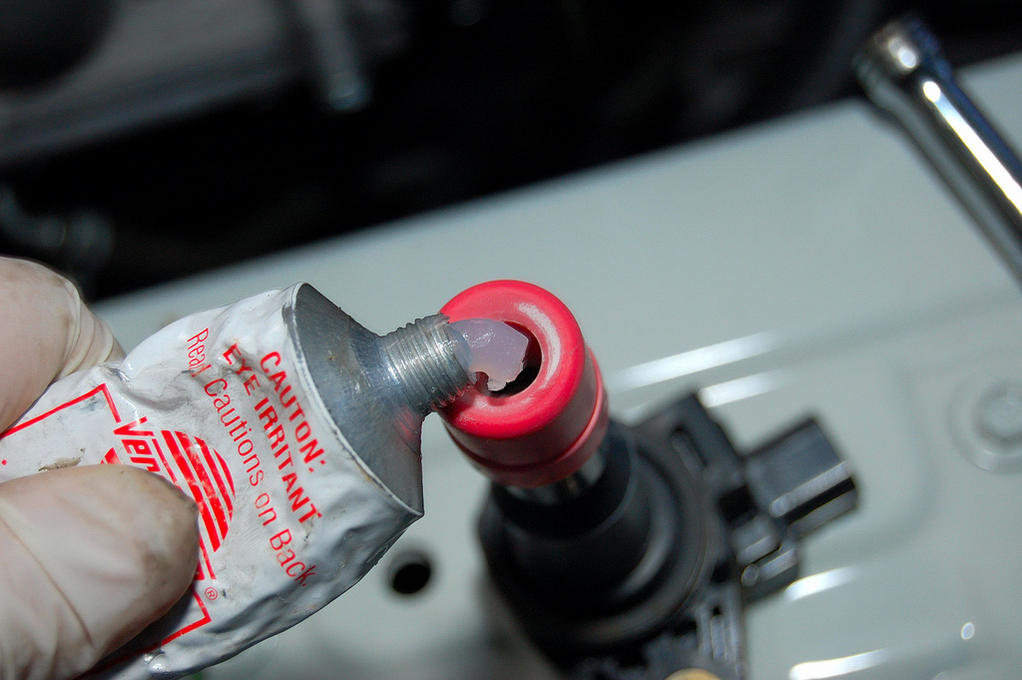
The E3 plugs come pre-gapped. If you have to gap your plugs, then .044" is the recommended gap size. It is at this point you will want to coat the threads with either anti-seize or a quality oil to ensure that you get proper torque when installing the plugs. Also make triple sure the washer is on the plug. Iron heads have a tapered seat plug, and aluminum heads use a washer type plug.
When installing the new plugs, you want to start with just the extension without the ratchet. You will want to be careful to not cross-thread the plug into the head. Remember this Honda head is aluminum and you can very easily tear up the threads of this rather soft metal. So be careful and take your time. Tighten the plug down finger tight. You will want to then finish it up with a torque wrench to around 13ft/lbs. I have tried to locate an exact spec, but I have not been able to yet. I do know that most Honda aluminum heads require a spark plug torque of between 13-18ft/lbs. Be careful to not strip out the threads by putting the nut-buster super-grip tightening wrench of death to it.

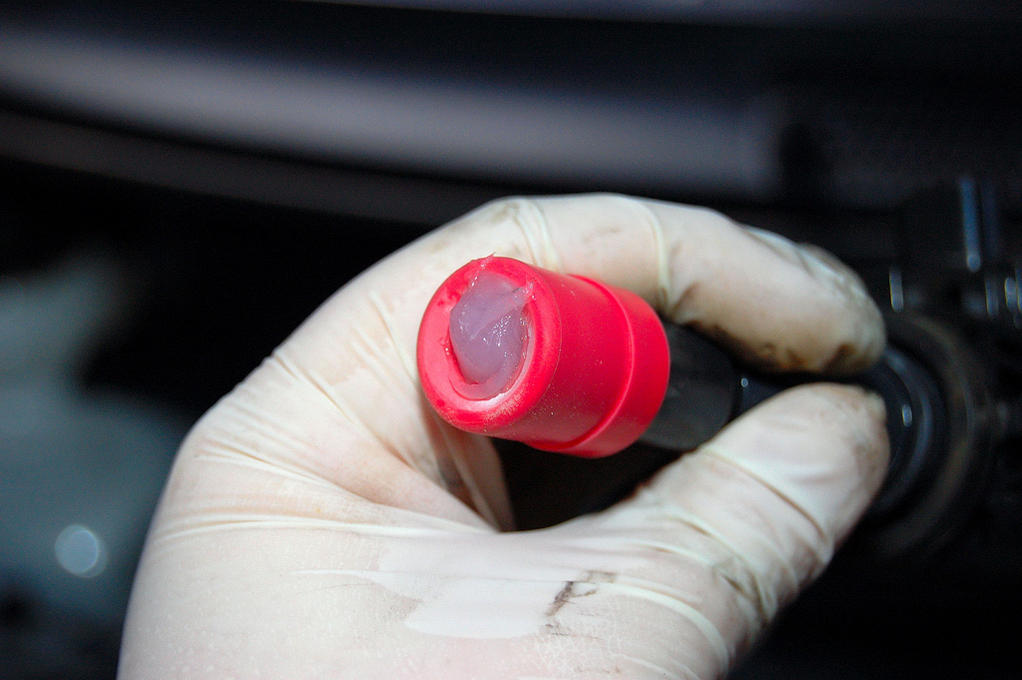
Now you could use dielectric grease to coat the interior of the coil pack. This will ensure good conductivity between the coil and the plug. It will also keep moisture out. Use a small amount on the ceramic portion of the plug.

Now re-install the coil pack onto the spark plug.

You want to be sure and also either use anti-seize on the coil pack retaining bolts or a quality oil, as I did in my situation.


You will need to again be careful to not cross-thread the bolts into the aluminum head. Again torque them down to around 7ft/lbs.

Remember to re-attach the blue wire harness clip to the coil pack.
You will want to repeat these steps for the other three plugs.

Triple check to make sure everything is torqued down correctly and that all coil pack connectors are connected. Then reinstall the cam cover if you removed it like a dummy like me!
Finish off your ice cold beverage and enjoy your new plugs!!
Remember, neither myself nor IB, nor FitFreak.net are to be held liable for any problems that may arise from following this DIY. Please use common sense, and proceed at your own peril!
I did the switch on my 2007 Honda Fit Sport, and I know this DIY will work for most any GD3 with the L15A VTEC engine. I do not know at this time if it will be exactly the same on the GE8 L15A i-VTEC engine. It should be pretty close. The i-DSI L series engines found in JDM vehicles will have a different course of action since they have 8 plugs to worry about.
So first off, here are the tools you will need:
- 10mm socket
- 5/8" Spark Plug Socket
- Regular Ratchet and a Torque Wrench
- Dielectric Grease
- Anti-Seize or other lubrication
- Ice cold beverage of your choice
Here we have tools and parts needed. I forgot to get some anti-seize for the plugs, so I used some Castrol synthetic oil I had in the garage.
I went with some E3 DiamondFire plugs. I have heard so many good things about these new plugs. Every test I have seen, they make real power on both an engine and chasis dyno. sometimes as much as 12-14hp! They are also able to be used in forced induction and nitrous applications, which of course you can't do with platinum plugs. I got mine from Summit Racing High Performance Car and Truck Parts l 800-230-3030 for less than $5 each.
I figured out afterward, that I didn't really need to remove the cam cover, but I had already done it. You can skip that step since it would appear that it really doesn't get in the way much.
Looking on the rear of the engine above the exhaust manifold heat shield, you will see the 4 coil packs with blue wiring harness clips attached.
You will now use the 10mm socket and ratchet to remove the 10mm bolt holding the coil pack onto the head.
And now you want to unplug the blue wire harness from the coil pack. You can then pull the entire coil pack out of the spark plug well.
Now you will use the 5/8" spark plug socket with a medium extension in order to reach all the way down into the spark plug well to the spark plug. By using an actual spark plug socket instead of a regular socket, the rubber o-ring inside will grip the plug and allow you to pull it out of the head after loosening.
There are many references you can check in order to properly read a plug and it's performance. This plug is functioning great. And the engine is neither running too lean, nor too rich. The light tan coating around this plug, with no oily residue means this engine is running very good. Considering I only have 19,000 miles, and I run Royal Purple Race Oil, and other than my SSR Intake and muffler delete, I have no other performance mods, this is too be expected.
I was a bit surprised to see that the OEM Honda plugs were Denso Iridium. Nice, expensive, high quality plug! No wonder they last 100,000 miles before replacing.
And here we compare the Iridium plug with the E3 DiamondFire plug.
The E3 plugs come pre-gapped. If you have to gap your plugs, then .044" is the recommended gap size. It is at this point you will want to coat the threads with either anti-seize or a quality oil to ensure that you get proper torque when installing the plugs. Also make triple sure the washer is on the plug. Iron heads have a tapered seat plug, and aluminum heads use a washer type plug.
When installing the new plugs, you want to start with just the extension without the ratchet. You will want to be careful to not cross-thread the plug into the head. Remember this Honda head is aluminum and you can very easily tear up the threads of this rather soft metal. So be careful and take your time. Tighten the plug down finger tight. You will want to then finish it up with a torque wrench to around 13ft/lbs. I have tried to locate an exact spec, but I have not been able to yet. I do know that most Honda aluminum heads require a spark plug torque of between 13-18ft/lbs. Be careful to not strip out the threads by putting the nut-buster super-grip tightening wrench of death to it.
Now you could use dielectric grease to coat the interior of the coil pack. This will ensure good conductivity between the coil and the plug. It will also keep moisture out. Use a small amount on the ceramic portion of the plug.
Now re-install the coil pack onto the spark plug.
You want to be sure and also either use anti-seize on the coil pack retaining bolts or a quality oil, as I did in my situation.
You will need to again be careful to not cross-thread the bolts into the aluminum head. Again torque them down to around 7ft/lbs.
Remember to re-attach the blue wire harness clip to the coil pack.
You will want to repeat these steps for the other three plugs.
Triple check to make sure everything is torqued down correctly and that all coil pack connectors are connected. Then reinstall the cam cover if you removed it like a dummy like me!
Finish off your ice cold beverage and enjoy your new plugs!!
Last edited by Sid 6.7; 02-12-2013 at 10:54 AM.


#4
07-25-2009, 03:11 PM
There are many references you can check in order to properly read a plug and it's performance. This plug is functioning great. And the engine is neither running too lean, nor too rich. The light tan coating around this plug, with no oily residue means this engine is running very good. Considering I only have 19,000 miles, and I run Royal Purple Race Oil, and other than my SSR Intake and muffler delete, I have no other performance mods, this is too be expected.
I noticed the "other" site has a DIY for changing plugs, but it seemed rather lacking in detail.
And although indexing plugs really can make a difference in high hp engines, and I know people will argue that "every little bit helps", it seriously will make less than a .5hp difference in our dinky little econo L15 4-bangers. On 1,000hp Big Block Chevy engines you honestly would only really see maybe a 10hp difference between indexed and non-indexed plugs. But in certain classes, that 10hp can make the difference between a win and a loss. So at that level you do EVERYTHING you can to squeeze out every last once of power.
And yes, I have indexed plugs many a time before, on both my own race cars and other cars I helped build/tune. So I am fully aware of all of the advantages and reasons to do it.
Funny it was also mentioned on the "other" site that you don't use washers to help index flat seat plugs. Hmmmm..... very interesting considering I've used these Moroso washers to do just that on a set of aluminum Big Chief BBC heads.
Moroso 71910 - Moroso Spark Plug Indexing Washers SummitRacing.com

Last edited by Sid 6.7; 07-25-2009 at 03:23 PM.
#5
07-25-2009, 03:18 PM
awesome DIY! Thanks man now I can buy the plugs that Kraftwerks recommends for an extra 3 or 4whp
#6
07-25-2009, 10:48 PM
Great DIY Sid, thanks.
Apparently the GD L15As have the sparkplugs at the back of the engine, on the side closest to the firewall The smaller L13As have twice the sparkplugs and they're mounted on the front and back of the cylinder head.
You mentioned dielectric grease - where do you get it?
Apparently the GD L15As have the sparkplugs at the back of the engine, on the side closest to the firewall
The smaller L13As have twice the sparkplugs and they're mounted on the front and back of the cylinder head.You mentioned dielectric grease - where do you get it?
#7
07-26-2009, 12:26 AM
Great DIY Sid, thanks.
Apparently the GD L15As have the sparkplugs at the back of the engine, on the side closest to the firewall The smaller L13As have twice the sparkplugs and they're mounted on the front and back of the cylinder head.
You mentioned dielectric grease - where do you get it?
Apparently the GD L15As have the sparkplugs at the back of the engine, on the side closest to the firewall
The smaller L13As have twice the sparkplugs and they're mounted on the front and back of the cylinder head.You mentioned dielectric grease - where do you get it?
You might even find it at an electronics repair parts store where they sell things like resistors and capacitors. Like at Radio Shack.

#13
08-29-2009, 02:01 PM
So if you had to guess, does this make a slight gain of a couple horsepower? also @ trancedsailor, what plugs are you talking about that Kraftswerks recommends for 3-4hp? The Denso IK22 Iridium plugs?
This is the article I'm referring to where I saw that:
KraftWerks: OSCAR JACKSON ON SPARK PLUGS
If that torque increase is accurate I'd be sold.
This is the article I'm referring to where I saw that:
KraftWerks: OSCAR JACKSON ON SPARK PLUGS
If that torque increase is accurate I'd be sold.
#14
08-29-2009, 02:20 PM
More than likely you would need them. Although I have seen a few times that Honda will actually index at the factory on some engines!
The washers you will need are the flat seat type, NOT the tapered seat type. Since we have aluminum heads our plugs are flat seat with a washer already.
Iron heads have tapered seat plugs without washers.
I have always used Moroso indexing plug washer kits in the past.
Moroso 71910 - Moroso Spark Plug Indexing Washers - Overview - SummitRacing.com
And I would hate to guess at a HP/Trq increase amount. But I would assume that if your current ignition setup is in good working order, you may increase a couple horses with these plugs and indexing.
Now if your current plugs were fouled out or damaged, then you could see a pretty substantial increase in power by installing new components.
For example, I have a 1989 Ford Crown Vic with a 5.0 V8 under the hood. It had been a very long time since a tune up had been done on it when I purchased the car. I installed an MSD billet distributor, MSD Blaster 2 coil, MSD 8.5mm race wires and NGK V-power racing plugs. I swear I picked up 50hp from those parts. But that had more to do with the poor condition of the OEM parts, and less about the high performance nature of the new parts.
Sure it was a lot better than stock, but if my OEM parts had been in tip-top shape I might have only gained in the 15-20hp range.
#15
09-08-2009, 01:42 AM
Thanks for the write up. After 39K miles I decided to change my spark plugs today after reading this DIY. I'm glad I did. 2 of my sparkplugs (cylinders 1 and 4) looked liked the ones posted by the OP. The other 2 (cylinders 2 and 3) were not installed as snug. As a result there were burnt oil residue along the threads and caked on the washer and around the nut. For the last 10K miles or so, I've noticed a hit on my MPG and hopefully I will see an improvement. The new plugs installed easily and my car feels better than before.
#16
12-20-2010, 11:11 AM
After almost 18 months and 9,000 miles, I pulled my plugs to read them and they were perfect. I really do recommend these E3 Diamond Fire plugs. They are well worth the price and little effort involved.
#17
12-20-2010, 01:12 PM
Thanks for this DIY for the plug change, I assume this is exactly the same for us GE guys? I'm not mechanically inclined but after seeing this write up, I can do this for sure but I'll wait till the car has around 50k on it though
Now, 3-4 hp changing out to a perf plug, I don't see how that's possible, not trying to flame whomever said that but I just don't see how that's possible
Now, 3-4 hp changing out to a perf plug, I don't see how that's possible, not trying to flame whomever said that but I just don't see how that's possible
#19
10-27-2011, 03:09 PM

I have a Honda Fit 08 Sport, and about 45k miles.
I've got a big list of things I'm ordering online so far since I've never done much of anything with cars beyond replacing the harmonic balancer, alternator, and simple oil/filter changes: a locking extension bar set, a 3/8 inch 10-80 foot/lbs automatic torque wrench, the swivel spark plug socket, the anti-seize, the dielectric, and the 4 spark plugs you have mentioned on this discussion (the plug size is the same for Honda 08), as well as a spark plug gapper (I've heard a lot of people state that pre-gapped plugs usually don't have the gap distance set the same).
My question is in regards to the spark plug wire set and distributor cap, which you didn't talk about in your DIY, but a friend of mine suggests I go ahead and replace those if they have such. I haven't really found anything on Amazon for the wire set nor the distributor cap for my car on the site's parts finder. Is there a reason why this is? Does the Honda Fit even have a distributor cap that can be replaced? Or is it all computer controlled and only way to change it is to replace the entire distributor? Thanks for the help.
#20
10-27-2011, 04:40 PM
I think you'll find that there is no spark plug wire set and distributor cap to replace because they don't have them any more.
Each spark plug has its own coil controlled by the ECU.
No spark plug wires or distributor cap to worry about.
Each spark plug has its own coil controlled by the ECU.
No spark plug wires or distributor cap to worry about.

