The Stembridge Fit (Jazz) Mod Thread - 2015 MSM EX CVT
#1
 12-22-2015, 09:43 AM


The Stembridge Fit (Jazz) Mod Thread - 2015 MSM EX CVT
Finally getting around to making a dedicated thread for the mods I've made to my Jazz (nee Fit).
INDEX of MODS
Wheels & Tires
Rear Garnish
Tailgate Spoiler Removal
Tanabe Medallion Touring Exhaust
Visual Garage Shark Fin Antenna
JDM Upper & Lower Taillights
EX-L Leather Steering Wheel & CVT Shift Knob
LED Bulbs (Interior Cabin)
Ultra Racing Rear Sway Bar
Parking Brake Adjustment
JDM Rear Bumper, RS-R "Down" rear springs
Weapon R Cold Air Intake
RS-R "Down" front springs, Camber Bolts
Rear axle shims
LX Grille, Tow Hook
Mugen-style Front Chin / Lip
Autocrossing the Fit
Sold my Fit/Jazz - 2.5 years / 52,000 miles
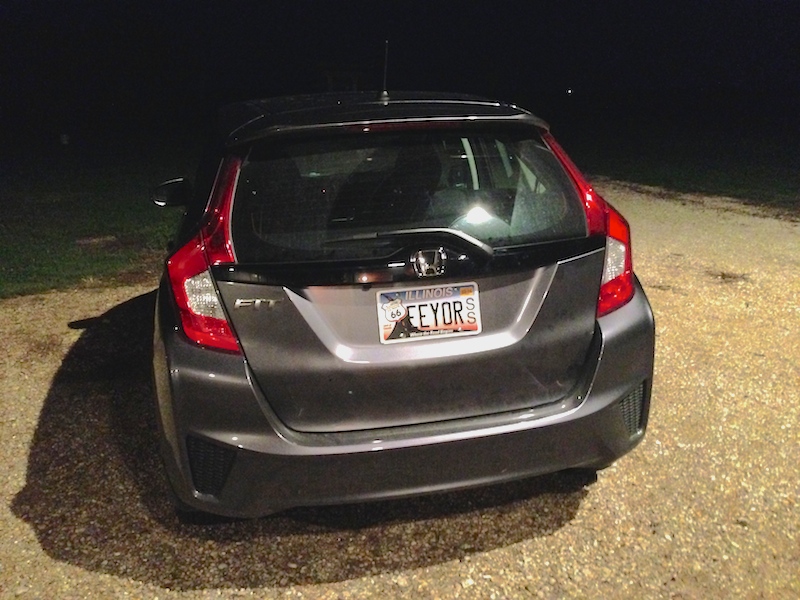
Here's a pic of my car on the day of purchase (it didn't stay like this long!):
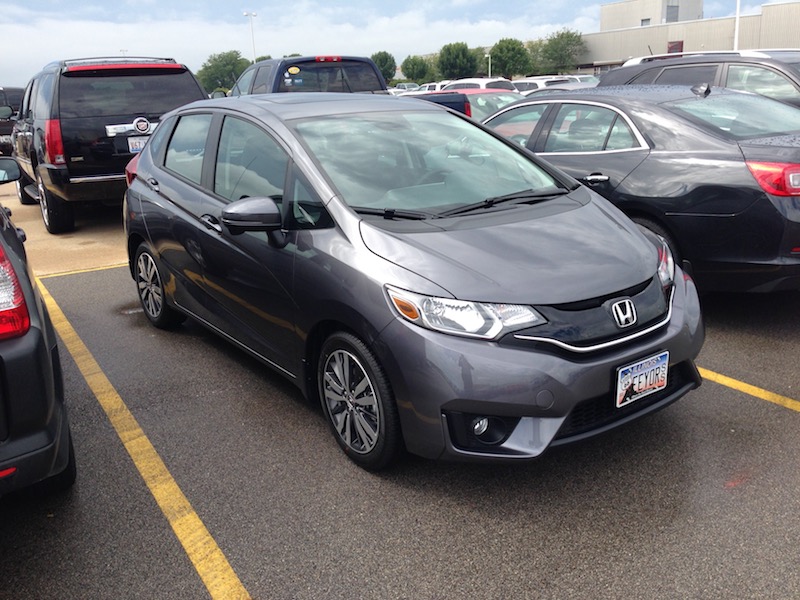
After doing the paperwork, I promptly drove it to work… My dealer experience (Bob Lindsay Honda in Peoria, IL) was probably the best I've ever had purchasing a car (new or otherwise). The only hiccup at signing time was that splash guards were listed on the invoice, which I did not request (the car was a transfer from another dealer, which is probably how this happened). My sales person apologized, checked with his manager, then came back and told the finance person to mark them "no charge." In addition to the splash guards, I also added an OEM cargo cover and "all weather" floor mats.
I checked the car pretty thoroughly for some of the issues that have been reported here with lower-VIN cars, and found none. My build sequence number is in the 196xx range, which places it as a more-recently-built car. Oh, I got the CVT in spite of the fact I normally much prefer a manual. Didn't like the low gearing of the manual (I do a lot of highway driving), and after several test drives, thought the CVT would be okay (wife's happier, too!).
es
INDEX of MODS
Wheels & Tires
Rear Garnish
Tailgate Spoiler Removal
Tanabe Medallion Touring Exhaust
Visual Garage Shark Fin Antenna
JDM Upper & Lower Taillights
EX-L Leather Steering Wheel & CVT Shift Knob
LED Bulbs (Interior Cabin)
Ultra Racing Rear Sway Bar
Parking Brake Adjustment
JDM Rear Bumper, RS-R "Down" rear springs
Weapon R Cold Air Intake
RS-R "Down" front springs, Camber Bolts
Rear axle shims
LX Grille, Tow Hook
Mugen-style Front Chin / Lip
Autocrossing the Fit
Sold my Fit/Jazz - 2.5 years / 52,000 miles
Here's a pic of my car on the day of purchase (it didn't stay like this long!):
After doing the paperwork, I promptly drove it to work… My dealer experience (Bob Lindsay Honda in Peoria, IL) was probably the best I've ever had purchasing a car (new or otherwise). The only hiccup at signing time was that splash guards were listed on the invoice, which I did not request (the car was a transfer from another dealer, which is probably how this happened). My sales person apologized, checked with his manager, then came back and told the finance person to mark them "no charge." In addition to the splash guards, I also added an OEM cargo cover and "all weather" floor mats.
I checked the car pretty thoroughly for some of the issues that have been reported here with lower-VIN cars, and found none. My build sequence number is in the 196xx range, which places it as a more-recently-built car. Oh, I got the CVT in spite of the fact I normally much prefer a manual. Didn't like the low gearing of the manual (I do a lot of highway driving), and after several test drives, thought the CVT would be okay (wife's happier, too!).
es
Last edited by stembridge; 08-05-2017 at 07:51 AM.
#2
12-23-2015, 10:52 AM
Wheels & Tires
This post gathers info I've posted elsewhere on my wheel and tire upgrades into one place.
If you have a (US market) EX or higher trim 2015 Fit (GK), your cast aluminum OEM wheels have the following specs:
16x6 size
4-100 bolt pattern
56.1 hub bore
+53 offset
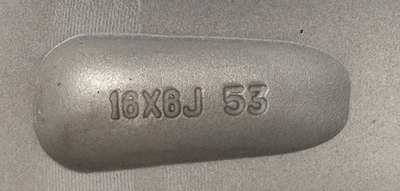
OEM tire size is 185/55R16, and earlier cars seem to have come with Bridgestones (as did mine, with a build sequence in the 196-- range). Later cars seem to be coming with Firestone tires.
Adding a 20-25mm spacer to the rear wheels will bring them out nearly flush with the fender and is an inexpensive way to change the look of the car.
LX Fits have the following specs for their steel wheels:
15x6 size
4x100 bolt pattern
56.1mm hub bore
+53 offset
Here's a pic of my EX with 16x7 +40 wheels (Rota RB) and 205/50R16 tires (Continental ExtremeContact DWS) installed:
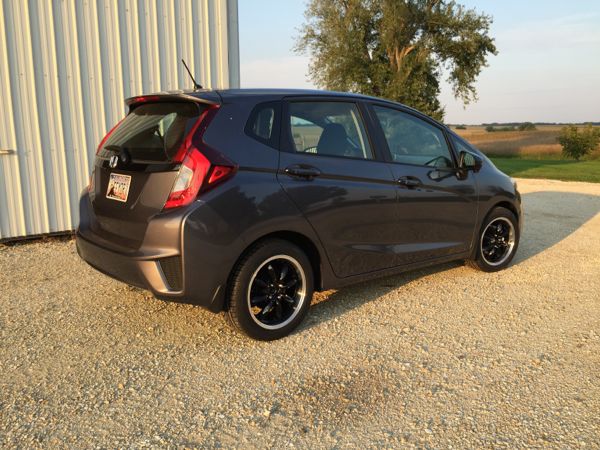
There is no interference when steering lock-to-lock, but if I hit a big bump, the front tires *will* kiss the fender (actually the plastic liner where it meets the fender). With stock alignment, the +40 offset (OEM is +53), and extra 1" wheel width puts the tire about 23mm farther outboard than OEM.
I chose this combination partly because I wanted a Minilite-style wheel and also because I wanted the tire diameter to be identical to stock.
And here's a pic of my car with 15x6 Sport Tuning T9 wheels (+43 offset - required a centering ring) and 185/60R-15 Firestone Winterforce SL tires installed:
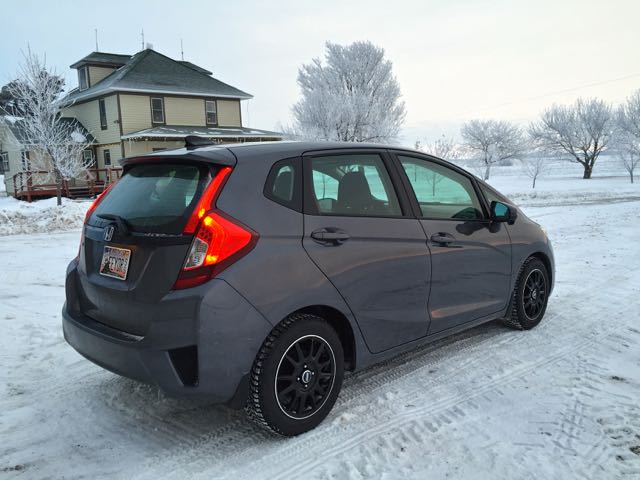
I chose to go -1 on my winter wheels/tires in order to have more rubber between me and our horribly potholed rural Illinois roads (worse in the Winter & Spring). Having grown up in the Southern USA, these were my first snow tires ever, and they seemed to do quite well!
es
If you have a (US market) EX or higher trim 2015 Fit (GK), your cast aluminum OEM wheels have the following specs:
16x6 size
4-100 bolt pattern
56.1 hub bore
+53 offset
OEM tire size is 185/55R16, and earlier cars seem to have come with Bridgestones (as did mine, with a build sequence in the 196-- range). Later cars seem to be coming with Firestone tires.
Adding a 20-25mm spacer to the rear wheels will bring them out nearly flush with the fender and is an inexpensive way to change the look of the car.
LX Fits have the following specs for their steel wheels:
15x6 size
4x100 bolt pattern
56.1mm hub bore
+53 offset
Here's a pic of my EX with 16x7 +40 wheels (Rota RB) and 205/50R16 tires (Continental ExtremeContact DWS) installed:
There is no interference when steering lock-to-lock, but if I hit a big bump, the front tires *will* kiss the fender (actually the plastic liner where it meets the fender). With stock alignment, the +40 offset (OEM is +53), and extra 1" wheel width puts the tire about 23mm farther outboard than OEM.
I chose this combination partly because I wanted a Minilite-style wheel and also because I wanted the tire diameter to be identical to stock.
And here's a pic of my car with 15x6 Sport Tuning T9 wheels (+43 offset - required a centering ring) and 185/60R-15 Firestone Winterforce SL tires installed:
I chose to go -1 on my winter wheels/tires in order to have more rubber between me and our horribly potholed rural Illinois roads (worse in the Winter & Spring). Having grown up in the Southern USA, these were my first snow tires ever, and they seemed to do quite well!
es
#3
12-23-2015, 10:54 AM
Rear Garnish
I was asked if I had photos of when I replaced my chrome EX rear garnish with the black LX garnish, and while I didn't I thought I'd shoot what I could without repeating the install.
A diagram of the parts involved can be viewed here.

First, you'll need to remove the rear wiper. The plastic cover pops off easily and then use a socket to remove the nut holding the wiper arm on. It should come off easily.
Next, remove two bolts, one at each side - these are accessible with the hatch open (you don't have to remove the interior trim panel).
Those bolts screw into the outer portion of the garnish piece � be careful to not overtighten when installing.
Finally, with the bolts out, the garnish piece is held in with plastic clips. Gently pry (with something that won't scratch your paint) and the panel should pop right out.
Take a close look at the clips - if I remember right, two of them are slightly different between the EX and LX trim. I swapped those out before installing my LX garnish piece.
To install, just position the new garnish in place, making sure the plastic clips are lined up with their holes, and press gently to seat them all. Install your two bolts at the outer edges (again, don't overtighten), and reinstall your wiper.
You're done!
es
A diagram of the parts involved can be viewed here.
First, you'll need to remove the rear wiper. The plastic cover pops off easily and then use a socket to remove the nut holding the wiper arm on. It should come off easily.
Next, remove two bolts, one at each side - these are accessible with the hatch open (you don't have to remove the interior trim panel).
Those bolts screw into the outer portion of the garnish piece � be careful to not overtighten when installing.
Finally, with the bolts out, the garnish piece is held in with plastic clips. Gently pry (with something that won't scratch your paint) and the panel should pop right out.
Take a close look at the clips - if I remember right, two of them are slightly different between the EX and LX trim. I swapped those out before installing my LX garnish piece.
To install, just position the new garnish in place, making sure the plastic clips are lined up with their holes, and press gently to seat them all. Install your two bolts at the outer edges (again, don't overtighten), and reinstall your wiper.
You're done!
es
#4
12-23-2015, 10:58 AM
Great Service Experience
I'd been hearing a pinging/creaking noise from the wheel area (notably hard to discern exactly which one, as sound under the car echos around). The noise started from a crawl and went away around 15-20 mph, and was not wheel or engine speed dependent.
I had some time this afternoon, so without making an appointment, drove the car to the Honda dealer in the town where my Dad lives (visiting for the US Thanksgiving holiday), and explained to the scheduler the symptom. He asked me to drive him around the parking lot, and I didn't get 50 feet before he said to pull into the bay � "you've got a rock in your brake rotor."
They had me back on the road in less than 20 minutes (again, no appointment!), with a quiet car. I asked "What do I owe you?" to which they replied "Have a great afternoon."
I made sure to tell them how much better this experience was than any Service engagement I ever had with my previous VW products. Glad I bought the Fit!
es
#5
12-23-2015, 11:01 AM
Tailgate Spoiler Removal
Over in the USDM vs. JDM Spoiler Questions thread, a couple of us expressed interest in the base model JDM/AUDM Fit/Jazz "stubby spoiler:"

I had some time last week (rare!) so I took my USDM rear spoiler wing off to see what was underneath, which turns out to be the 'stubby' spoiler! It's actually the steel door frame� There are caveats, however, as you'll see.
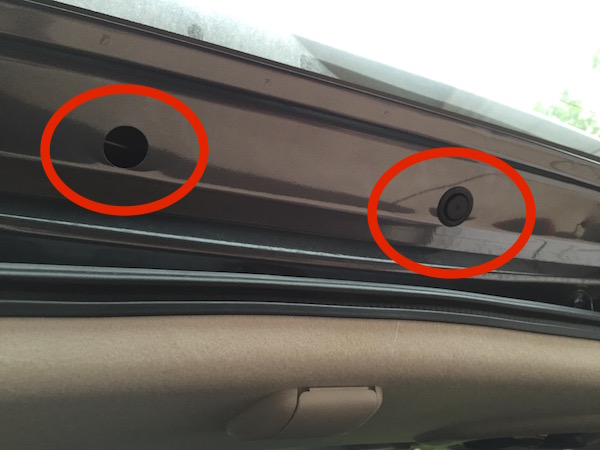
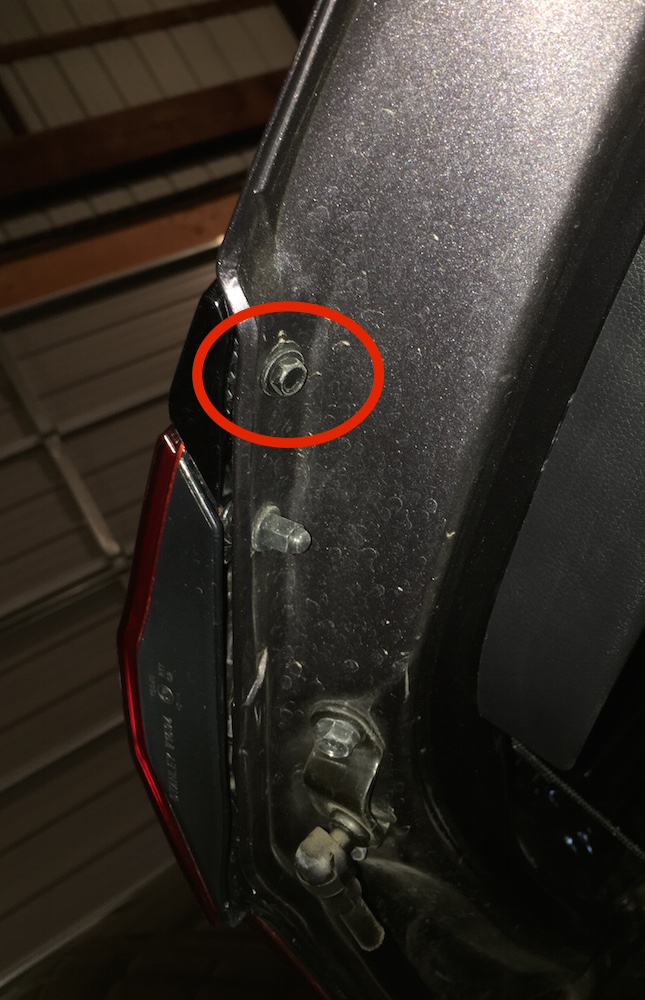
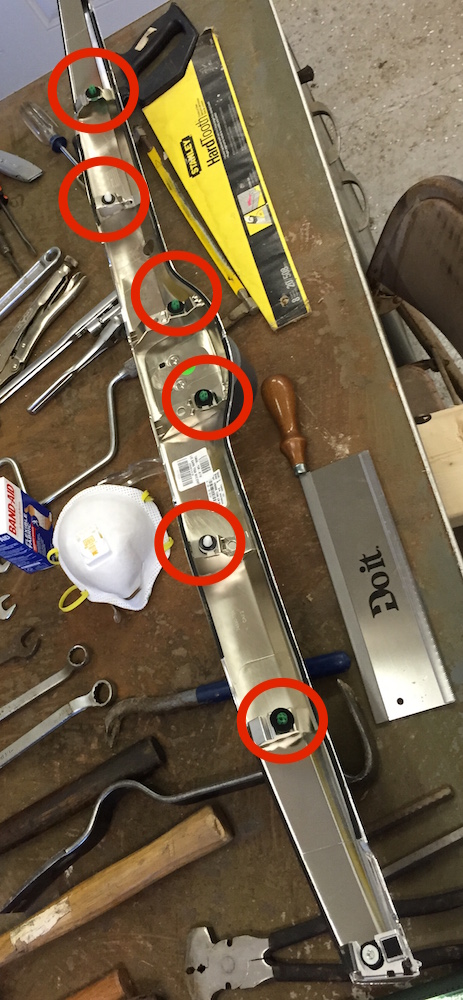
To remove the USDM wing, open the rear hatch and pop out the two rubber seals covering a pair of hex-head screws that also need to be removed.
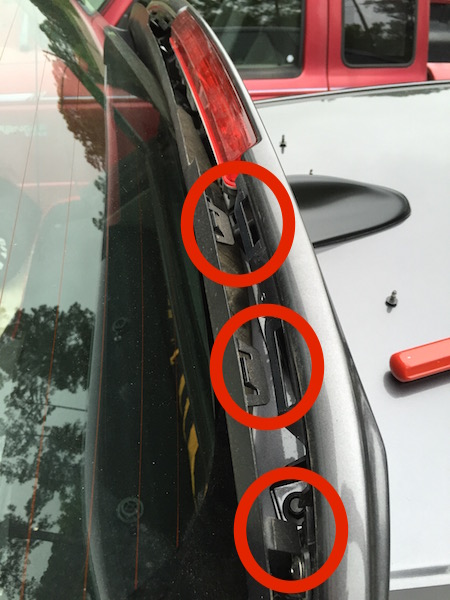
Next, carefully pry the plastic panel away from the underside of the wing (clips circled).
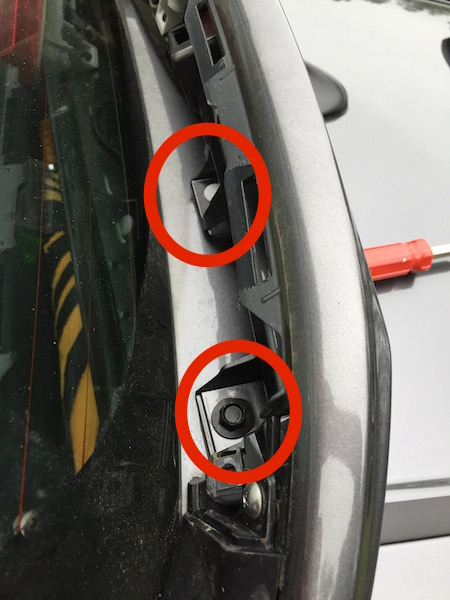
Each side will have a bolt and a plastic "one-way" clip. The bolts come out easy, but I had to destroy one of the clips to remove the wing (the clips go into a slot on the wing, so once one is removed, the wing can slide off the other). With the wing off, I was able to use a thin flat-blade screwdriver to remove both clips, but it wasn't easy.
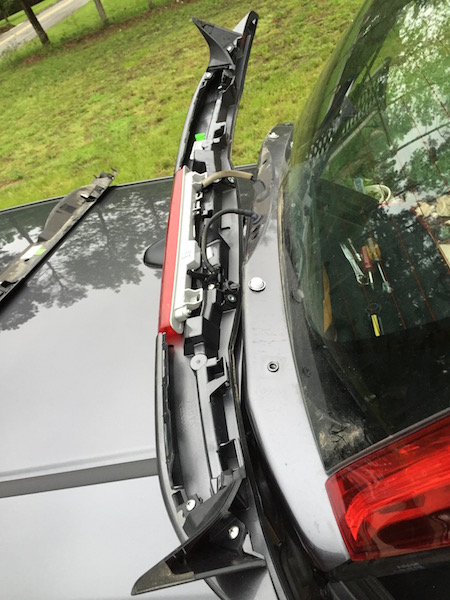
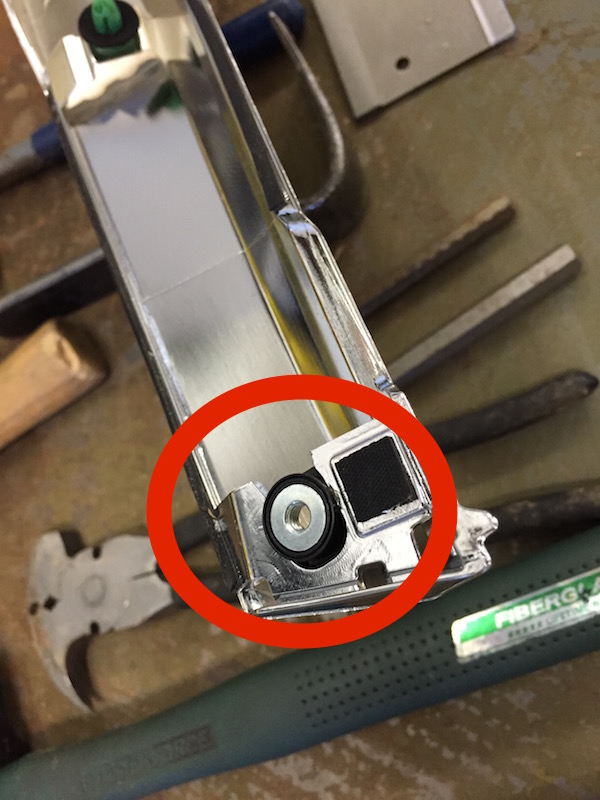
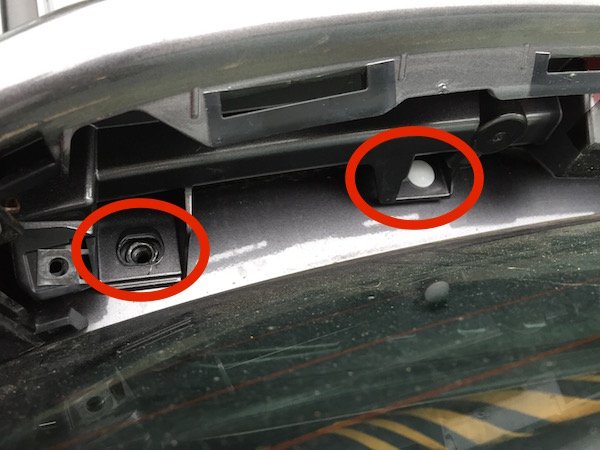
At this point, the wing can be set aside, but cannot be removed without disconnecting the third brake light and windshield washer fluid line.
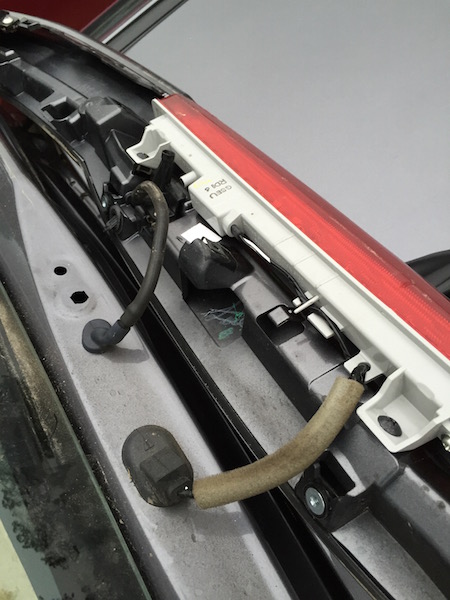
I stopped here, as it became obvious the USDM brake light would not work in the 'stubby' brake light hole � a JDM light will have to be sourced after confirming it has the integral washer fluid nozzle.
Additionally, for one wanting to convert to the stubby spoiler, you'll have four extra holes to cover or seal.
I made contact with a Canadian Honda dealer in late 2015 to order the brakelight, but they were really slow to respond, and I have not heard from them in a couple weeks. Will try to locate another dealer and see if I can get this project underway, and will edit this post if it works out.
es
I had some time last week (rare!) so I took my USDM rear spoiler wing off to see what was underneath, which turns out to be the 'stubby' spoiler! It's actually the steel door frame� There are caveats, however, as you'll see.
To remove the USDM wing, open the rear hatch and pop out the two rubber seals covering a pair of hex-head screws that also need to be removed.
Next, carefully pry the plastic panel away from the underside of the wing (clips circled).
Each side will have a bolt and a plastic "one-way" clip. The bolts come out easy, but I had to destroy one of the clips to remove the wing (the clips go into a slot on the wing, so once one is removed, the wing can slide off the other). With the wing off, I was able to use a thin flat-blade screwdriver to remove both clips, but it wasn't easy.
At this point, the wing can be set aside, but cannot be removed without disconnecting the third brake light and windshield washer fluid line.
I stopped here, as it became obvious the USDM brake light would not work in the 'stubby' brake light hole � a JDM light will have to be sourced after confirming it has the integral washer fluid nozzle.
Additionally, for one wanting to convert to the stubby spoiler, you'll have four extra holes to cover or seal.
I made contact with a Canadian Honda dealer in late 2015 to order the brakelight, but they were really slow to respond, and I have not heard from them in a couple weeks. Will try to locate another dealer and see if I can get this project underway, and will edit this post if it works out.
es
#6
12-23-2015, 11:03 AM
Tanabe Medallion Touring Exhaust
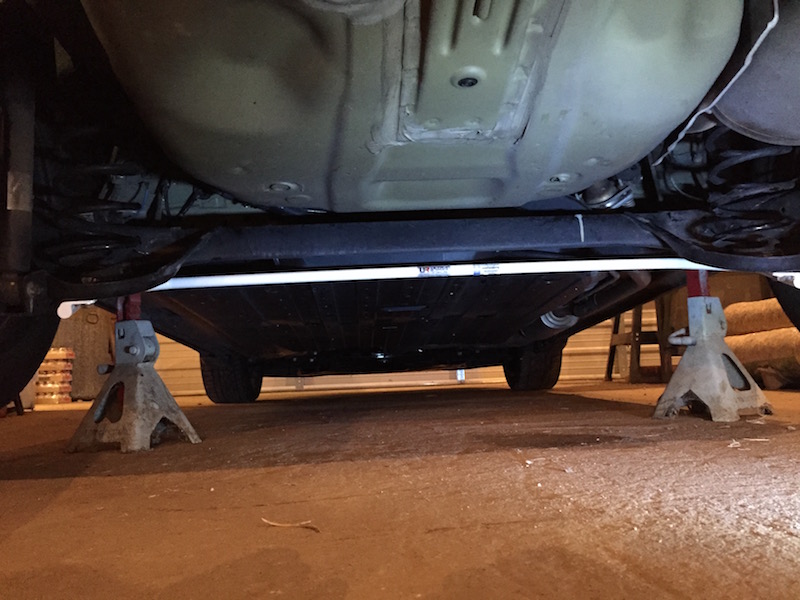
Installed my Tanabe Medallion Touring exhaust - took about an hour including tools out to everything put away (longest task was getting those rubber hangars off the supports!). I've only cranked it to move it out of the shop, so don't really have a "tone" report yet. It does have more tone than stock, and I think I'm going to like it.
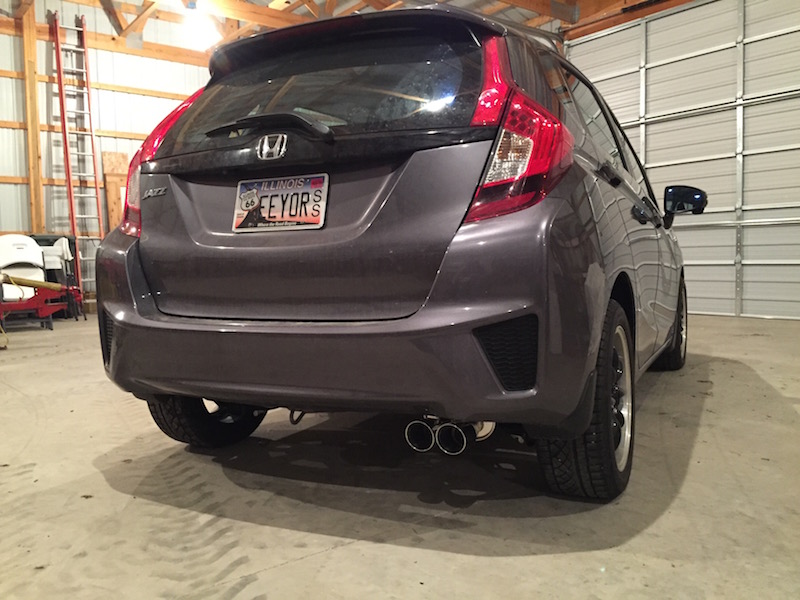
I've had the exhaust on for three months now (as of this writing), and it has developed more of a nice growly tone that's not intrusive at normal throttle settings, but does make itself known under "vigorous" acceleration. I like it!
es
I've had the exhaust on for three months now (as of this writing), and it has developed more of a nice growly tone that's not intrusive at normal throttle settings, but does make itself known under "vigorous" acceleration. I like it!
es
#7
12-23-2015, 11:12 AM
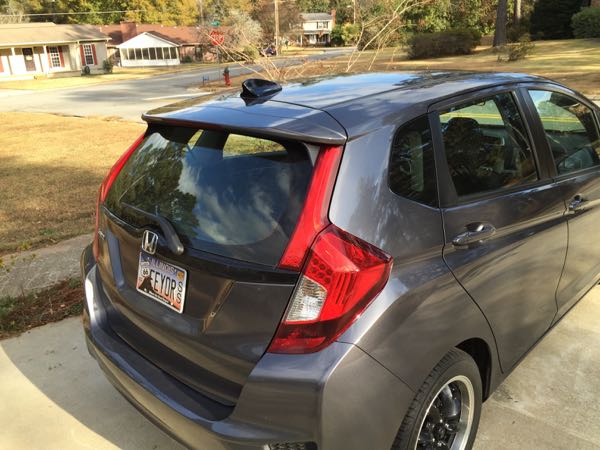
Visual Garage Shark Fin Antenna
Here's a pic after installing a Visual Garage shark fin antenna...
es
es
#8
12-23-2015, 11:16 AM
JDM Upper and Lower Brake Light Swap (plus rebadged as a Jazz)
This post details installation of my JDM taillights.
Sure thing. Here's the link:
http://www.ebay.com/itm/JDM-Honda-Fit-GK3-4-5-6-LED-Taillight-Illumination-Tube-Type-GENUINE-OEM-/261644156660?pt=Motors_Car_Truck_Parts_Accessories&hash=item3ceb34fef4&vxp=mtr
As mentioned, I ended up buying direct, which saved me a bit. I bought the set of lights and the OEM Jazz badge, and they were $820.00 delivered to my door (including shipping). Spendy, like I said, but you only live once, right?
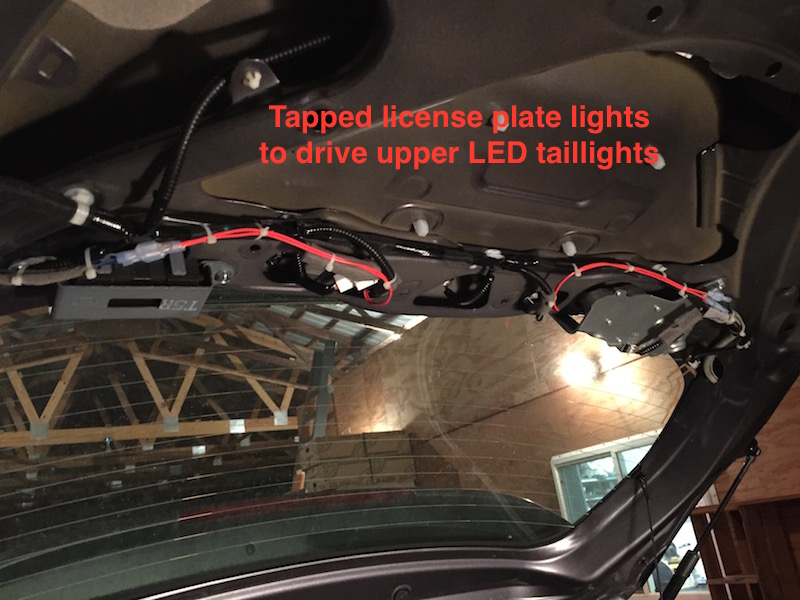
The lights are *not* a plug and play install. If you check out Rottboy's thread on the upper light install, you'll see you have to tap the license plate light circuit to drive the LEDs - not a huge deal, though.
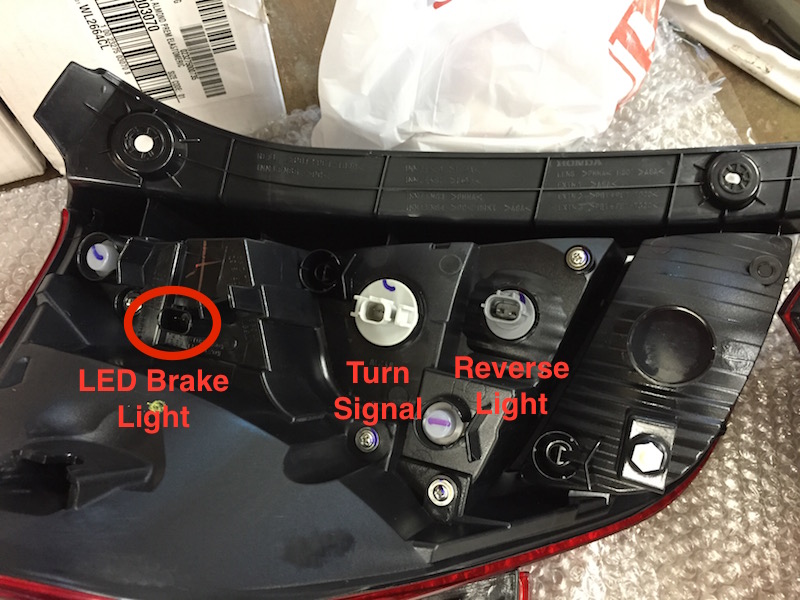
The main brake lights required a bit of hacking (literally and figuratively) as the light bulb sockets are different from USDM to JDM.
Here are the two light housings for comparison (USDM on top):
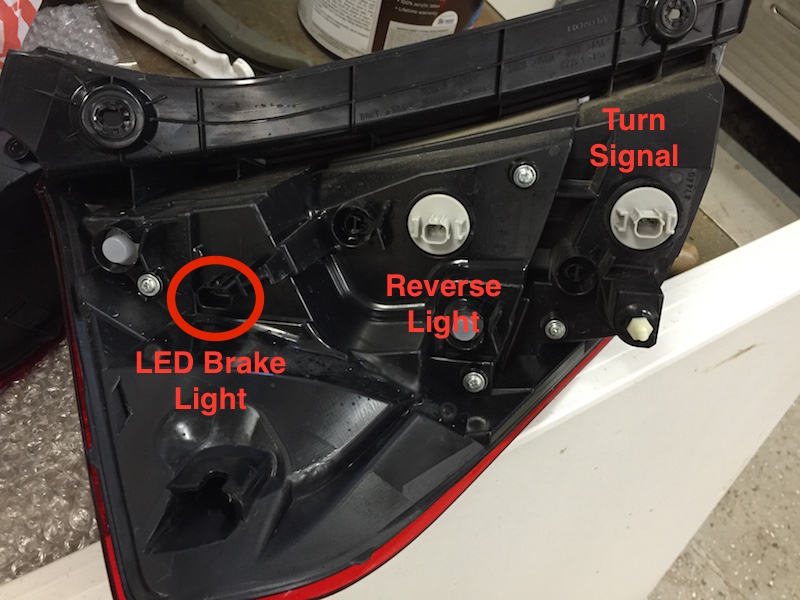
The LED brake light is plug and play, so no worries there.
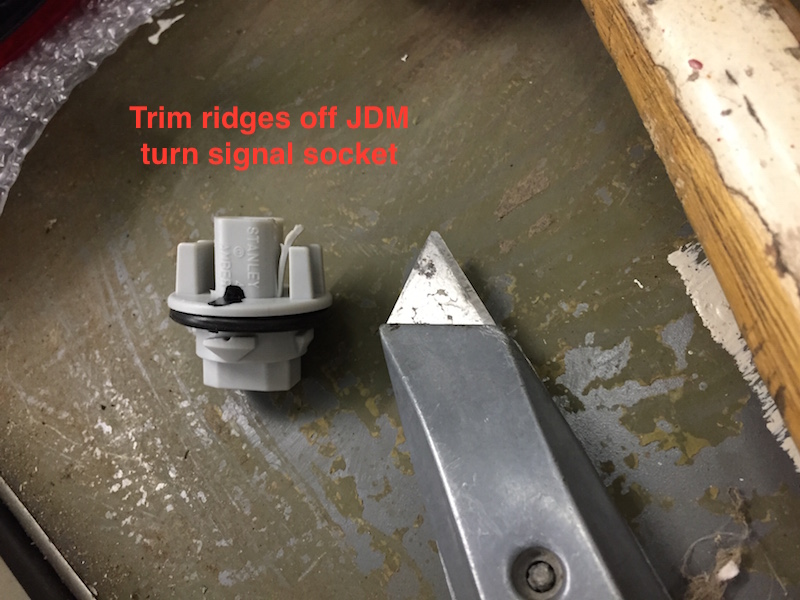
The turn signal plug is slightly different between the two, and by carving the ridges off the JDM light socket, the USDM plug will fit, although the locking tab will not lock (different size). Just push it on - it's a snug fit and shouldn't come off unless you do some Dukes of Hazzard-type jumps.
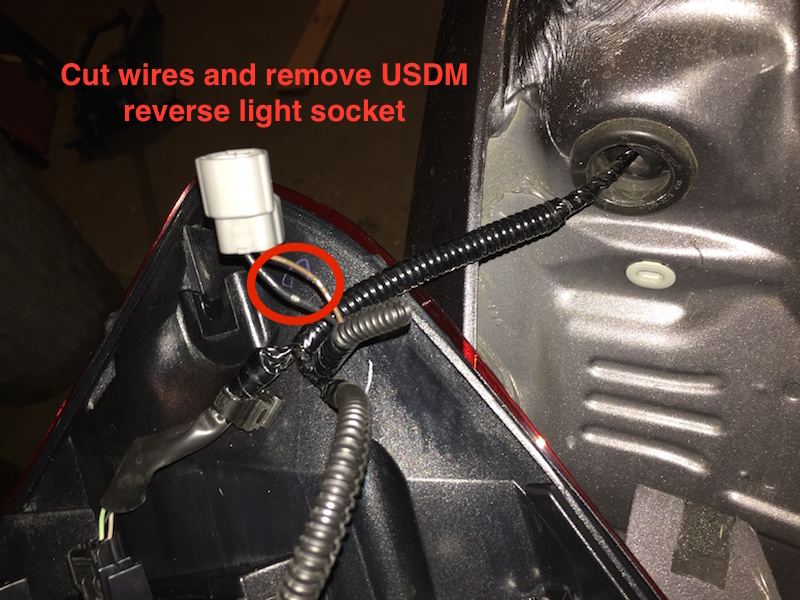
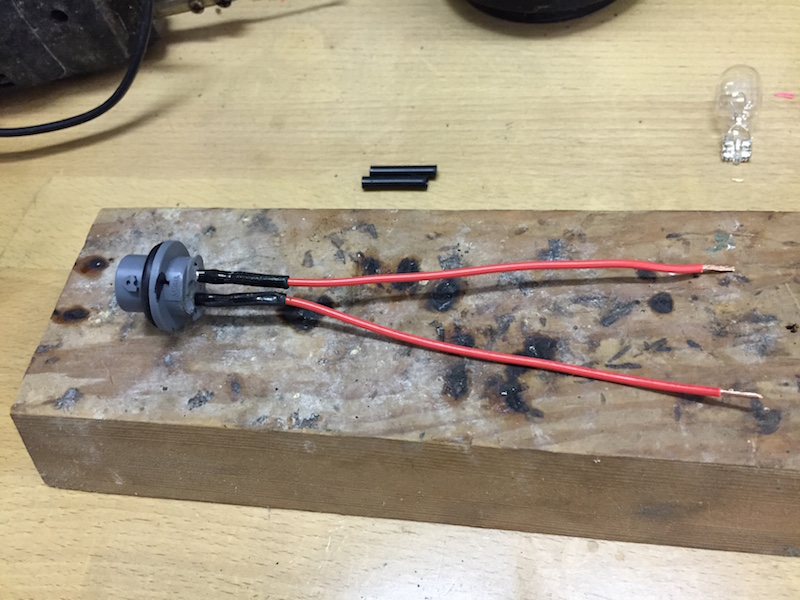
The reverse light uses a smaller socket on the JDM light, and requires some extra wire to reach since the position of the light is different between the two. You'll have to peel back the outer covering and cut the USDM plug off (car side wiring harness), leaving enough wire exposed to later solder your extended JDM plug in place.
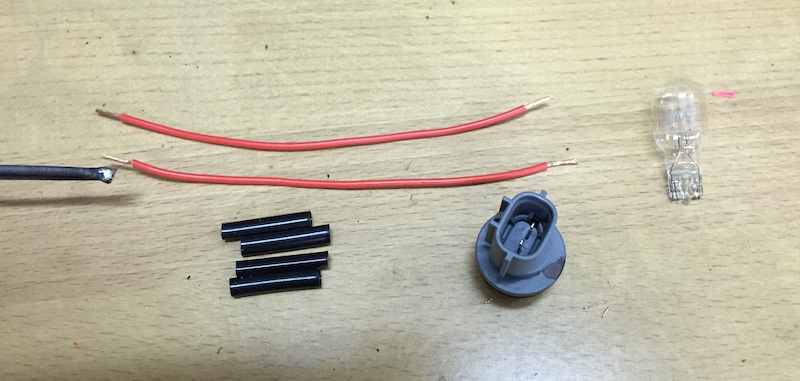
Here are the parts I used to make the new plug with extended wiring:
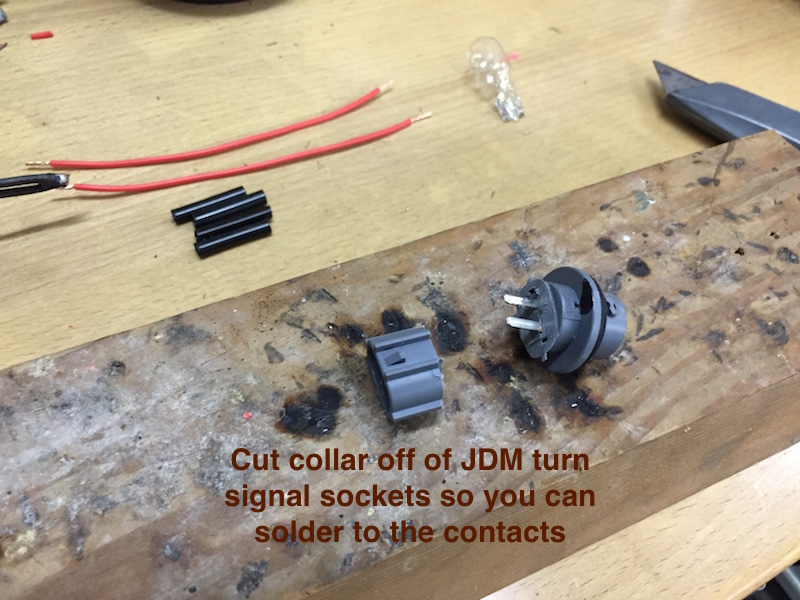
Since I could not figure out a way to solder down inside the JDM plug, I cut the collar off:
Extended wiring soldered in place:
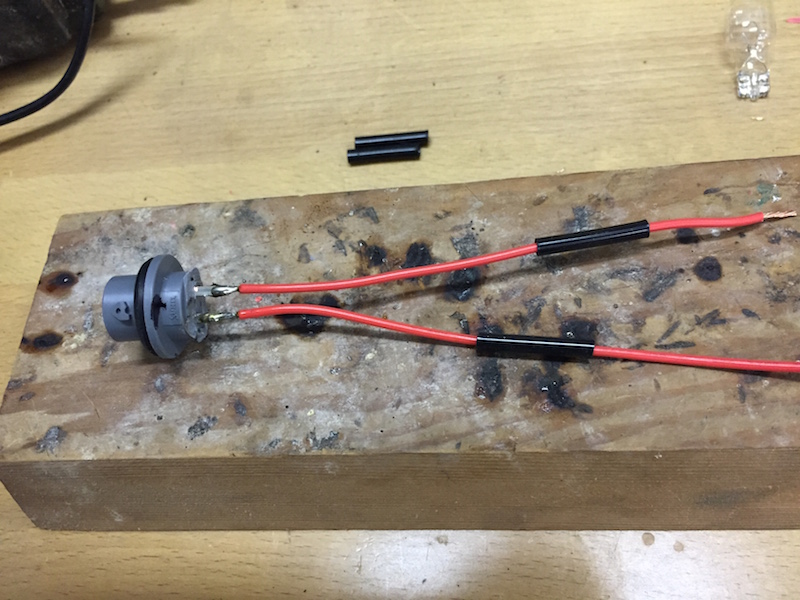
I used heat shrink tubing to tidy it up:
Once that's done, take it out to the car and solder to the wires where you previously cut away the USDM plug. Note that you have to remember to slip your heat shrink tubing on *before* you solder the wires together:
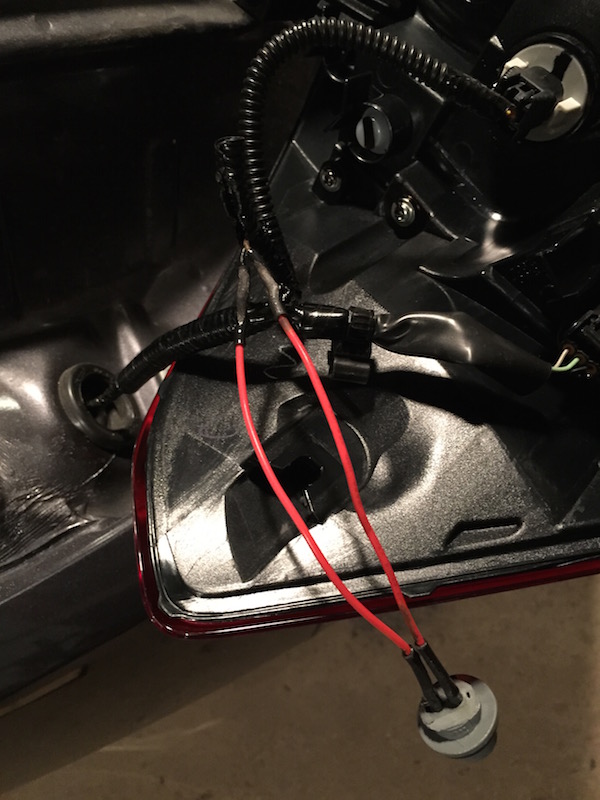
Test everything before you button up the inner beauty panel, and you're good to go!
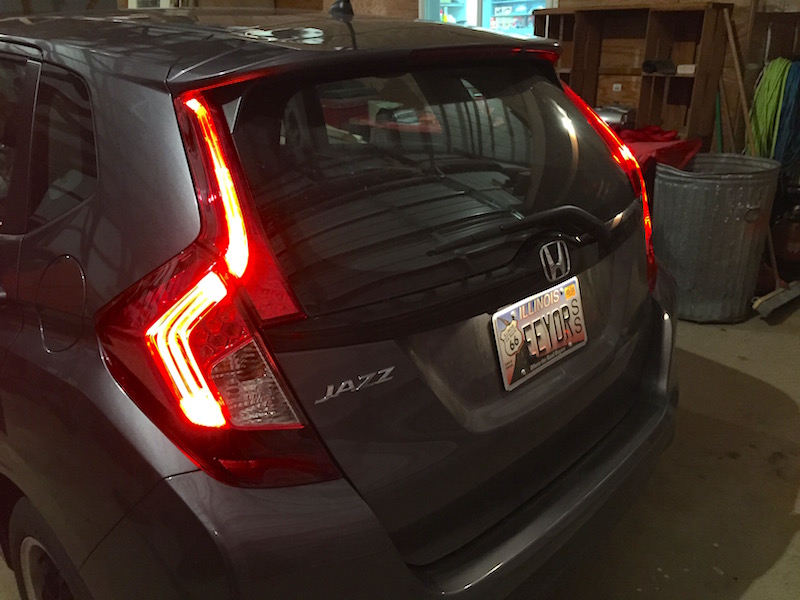
You'll also note I rebadged my Fit as a Jazz!
es
http://www.ebay.com/itm/JDM-Honda-Fit-GK3-4-5-6-LED-Taillight-Illumination-Tube-Type-GENUINE-OEM-/261644156660?pt=Motors_Car_Truck_Parts_Accessories&hash=item3ceb34fef4&vxp=mtr
As mentioned, I ended up buying direct, which saved me a bit. I bought the set of lights and the OEM Jazz badge, and they were $820.00 delivered to my door (including shipping). Spendy, like I said, but you only live once, right?
The lights are *not* a plug and play install. If you check out Rottboy's thread on the upper light install, you'll see you have to tap the license plate light circuit to drive the LEDs - not a huge deal, though.
The main brake lights required a bit of hacking (literally and figuratively) as the light bulb sockets are different from USDM to JDM.
Here are the two light housings for comparison (USDM on top):
The LED brake light is plug and play, so no worries there.
The turn signal plug is slightly different between the two, and by carving the ridges off the JDM light socket, the USDM plug will fit, although the locking tab will not lock (different size). Just push it on - it's a snug fit and shouldn't come off unless you do some Dukes of Hazzard-type jumps.
The reverse light uses a smaller socket on the JDM light, and requires some extra wire to reach since the position of the light is different between the two. You'll have to peel back the outer covering and cut the USDM plug off (car side wiring harness), leaving enough wire exposed to later solder your extended JDM plug in place.
Here are the parts I used to make the new plug with extended wiring:
Since I could not figure out a way to solder down inside the JDM plug, I cut the collar off:
Extended wiring soldered in place:
I used heat shrink tubing to tidy it up:
Once that's done, take it out to the car and solder to the wires where you previously cut away the USDM plug. Note that you have to remember to slip your heat shrink tubing on *before* you solder the wires together:
Test everything before you button up the inner beauty panel, and you're good to go!
You'll also note I rebadged my Fit as a Jazz!
es
Last edited by stembridge; 12-23-2015 at 12:56 PM.
#9
12-23-2015, 12:21 PM
EX-L Leather Steering Wheel & CVT Shift Knob Swap
DISCLAIMER - Do this at your own risk. These are not official instructions or procedures, and if you choose to attempt this mod, your experience may vary. SEVERE INJURY or DEATH can occur if the airbag goes off while you are working near it.
The parts have been sitting in my shop since July (2015), and I finally got the nerve up to do this somewhat ticklish swap. I got the leather steering wheel and CVT shift knob from one of the many OEM Honda parts houses online:
Leather Steering Wheel
Leather CVT Shift Selector Knob
The shift knob was a simple, one-minute swap (no pics) - just carefully pry the front cover under the "trigger" button forward and off (use a plastic putty knife or similar so you don't mar it), then lift the old knob off. Reverse disassembly instructions for your new leather knob. Done!
The steering wheel, on the other hand, was much more complicated, with a hint of danger since you'll be handling the airbag module.
First step is to disconnect the battery - I pulled the ground side and made sure it was tied back so it couldn't accidentally flop back over and make contact with the post while I was working in the cabin. Be sure to wait 15-30 minutes to let any residual electrons settle down (saw this on another mod post, so I presume there are capacitors or backup batteries somewhere in the system that need to bleed off).

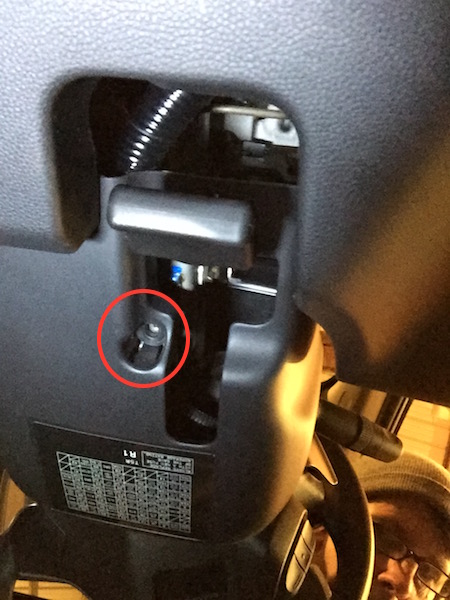
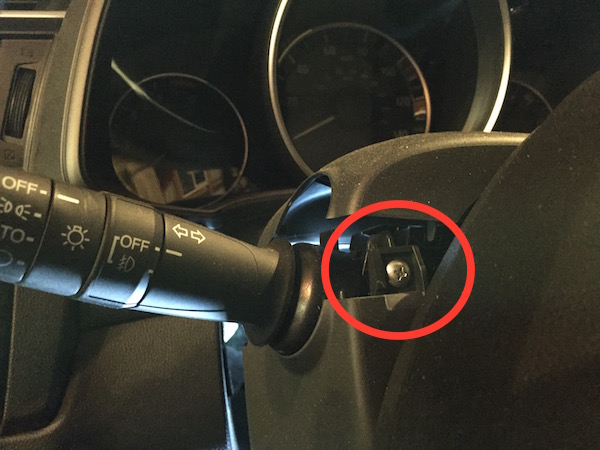
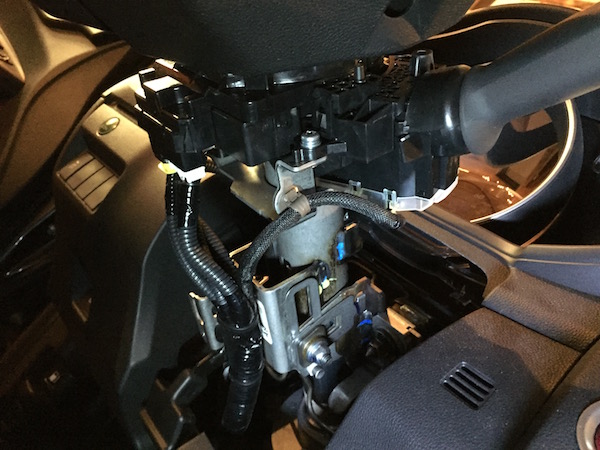
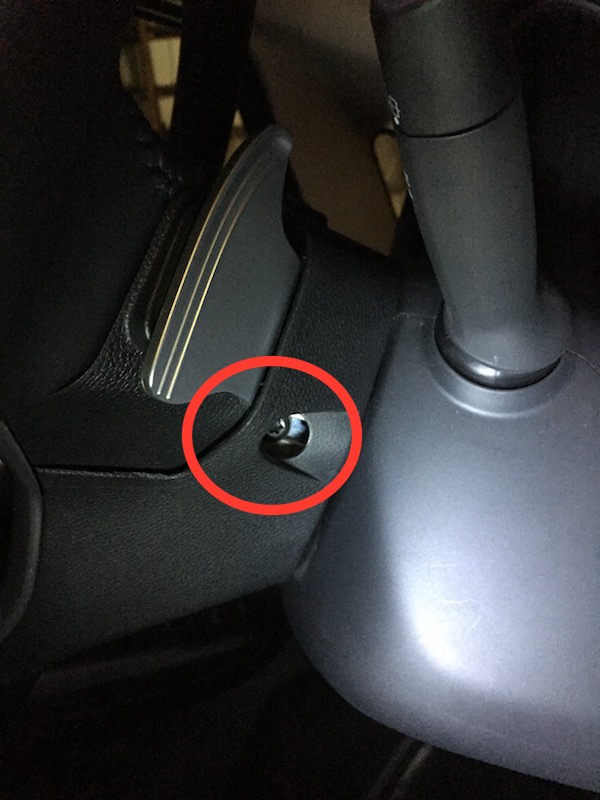
Not having any instructions, I took the top and lower cover off behind the steering wheel itself, but it turns out there's really nothing there you need to disconnect, so you can dispense with that step. I'll include a couple photos just for reference, though. There's one screw underneath near the tilt lock lever, and the top cover just pops off, revealing two more screws that become accessible by rotating the wheel about 15� each side of "straight." Remove those, and the lower cover comes off.
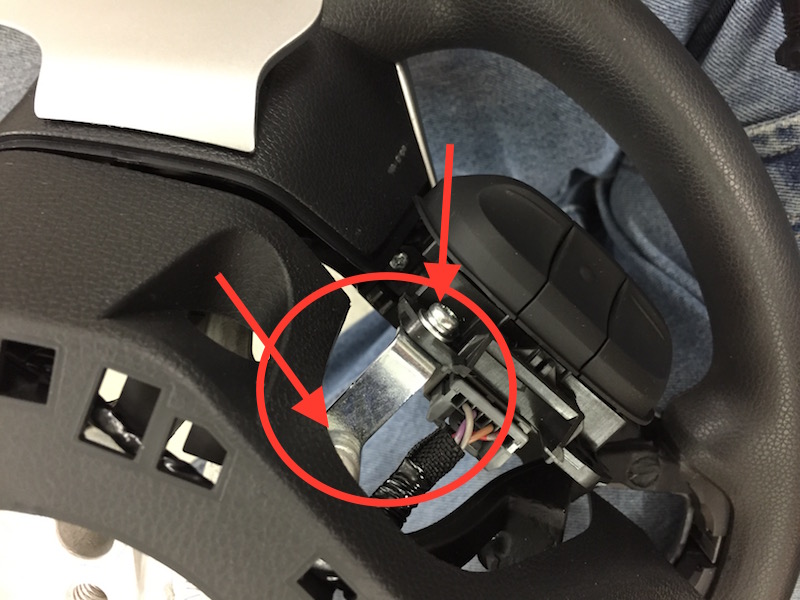
Here's where things get fun. There are two torx screws accessible from either side of the back of the wheel – those hold the airbag module in place. It would not be unreasonable to wear safety glasses while handling the module, and think about where your hands and head are in relation to where the bag might go were it to go off. USE YOUR HEAD - YOU ARE RESPONSIBLE FOR YOUR OWN SAFETY HERE!
With those two screws out, you can easily life the airbag module out, but note that there are several connections that will prevent you removing it right off.

First up is the horn connector:
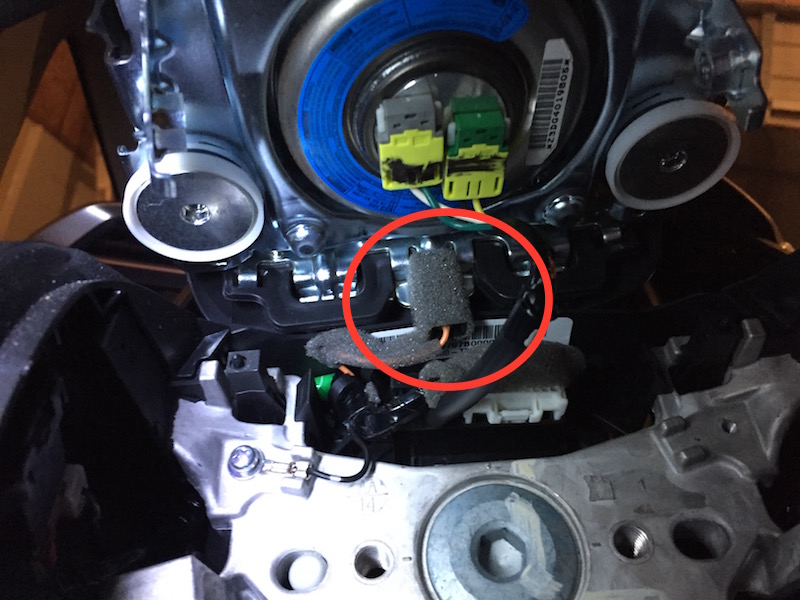
It was actually a bit of a bear to remove. It's wrapped in foam, and was hard to tell if there's a spring clip on there or not. I kept worrying it with a small flat-blade screwdriver and finally got it to pop off.
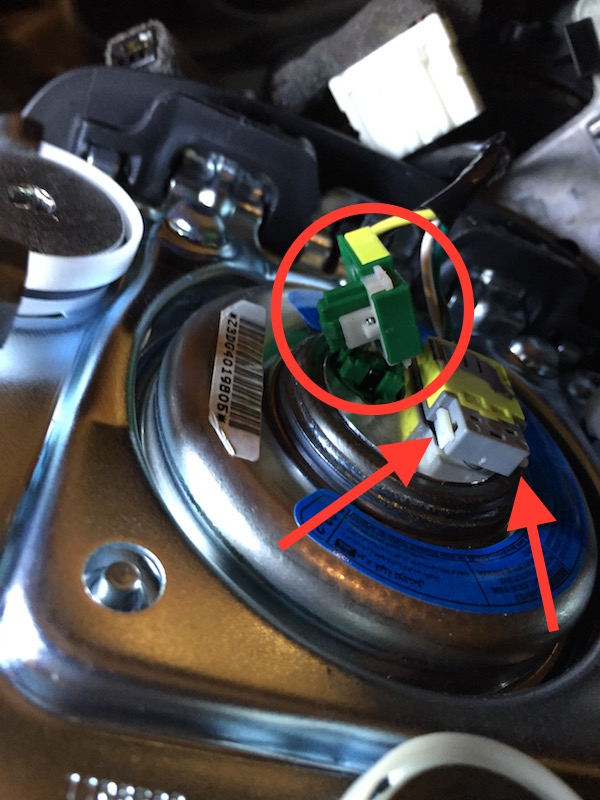
Next up is to disconnect the airbag module. There are two connectors, and each have two white spring-loaded catches that have to be pried up at the same time. I used a pair of small flat-blade screwdrivers and once you get both tabs up, the whole connecter pops right off. The airbag module can be carefully set aside at this point.
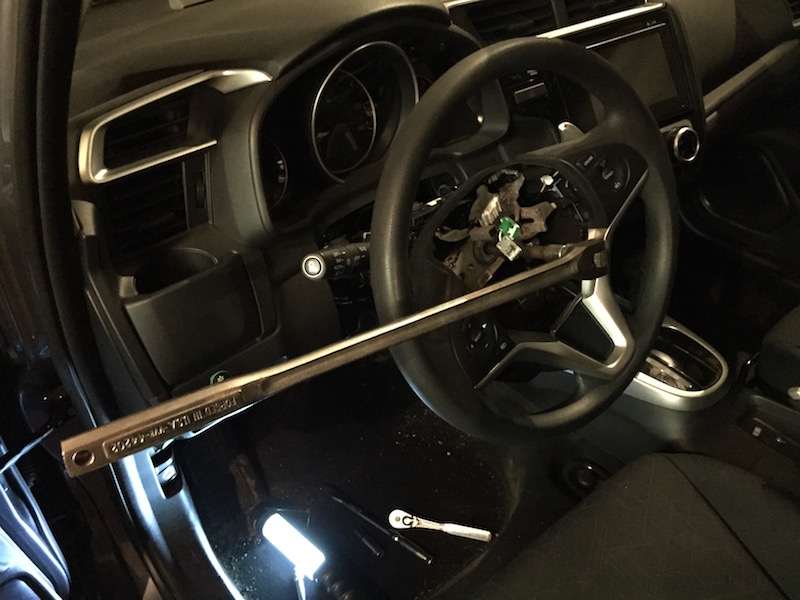
Next up is to remove the steering wheel bolt. It's essentially a big cap screw, with an inset hex hole. I happened to have the right socket end to fit it, but it's not a common tool, so you may have to pick one up at an auto parts store (shouldn't cost more than a few bucks). I quickly realized that substantial leverage was going to be required - that bolt is *in there*. I finally ended up getting out my pneumatic lug wrench, and even it didn't break the bolt loose! It did, however, break the bond enough that I was able to use the long extension to get the bolt moving. I switched over to a long ratchet wrench to finish the extraction - the bolt has something like Loctite on the threads that required effort all the way out.
Once the bolt is out, make sure the airbag and horn wiring is pushed back out of the wheel, and then it would be a Really Good Idea to make a mark on both your old wheel and the steering shaft so you know the proper alignment of the two when you go to put it back together. After that, a good tug should have the wheel in your lap. Note that the floating ring (plastic) you're now looking at will indeed rotate easily. Try to avoid disturbing its location, as it also needs to be properly aligned to the steering wheel when you reinstall.

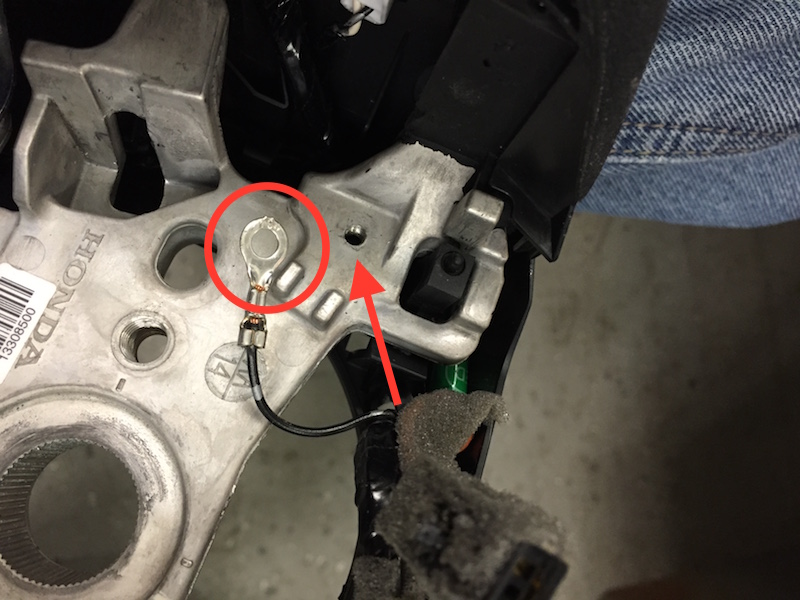
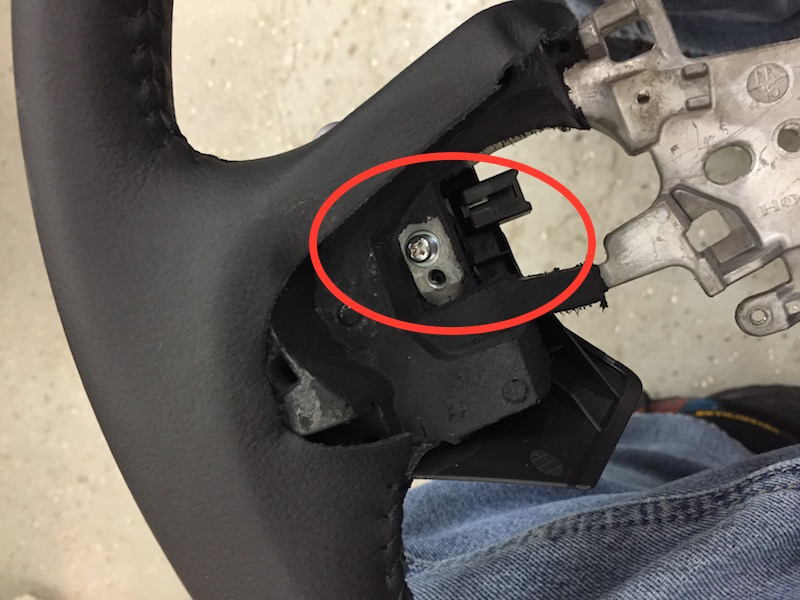
I tool the wheel into my heated shop for the next steps. First, remove the ground wire:
Note that the next steps require removal of various wiring and connectors, etc. Always look for the spring clip that holds each connector in place - some are kind of hard to get to, and you may need to partially or completely remove other components before you can get at them. Study it out and it should become obvious to you.
The rear cover is held in place by a number of clips. Take time to carefully study it before you start yanking on things, lest you break something. Each side uses two clips at the top that must be pressed at the same time (in directions 90� opposite from each other). Go ahead and do both sides, but don't try yanking the cover off just yet, because...
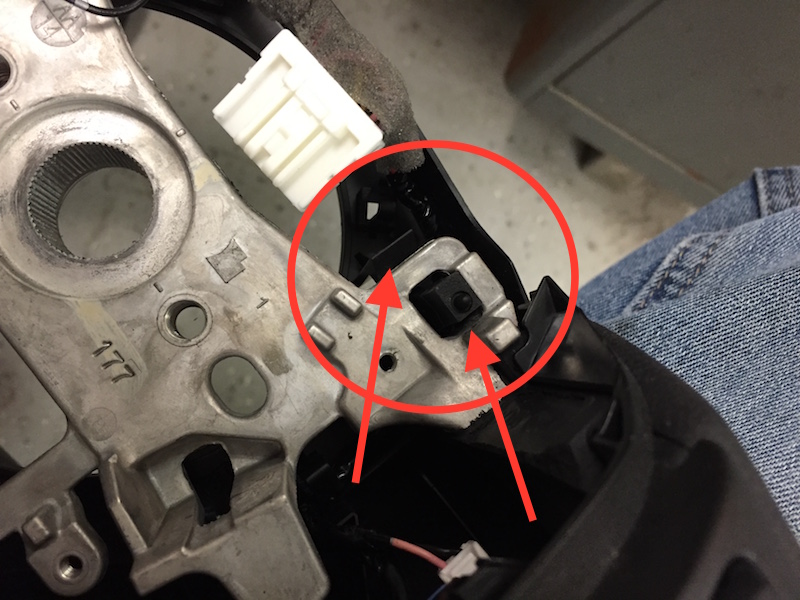
...you also need to unclip these at the bottom of the cover. They are quite firm, so be careful to not overstress them!

Next up is to remove the hands-free button cluster. The cover on the back side of the wheel just pops off, and you'll see two screws that hold it in place. I only removed the one screw (not seen) from the wheel itself.
You can now remove the paddle shifter modules - one screw for each:
I went ahead and transferred the paddles to my new wheel at this point. Note the pin and hole it goes into before you run your screw back in. The hole is rubber and is a "press fit."
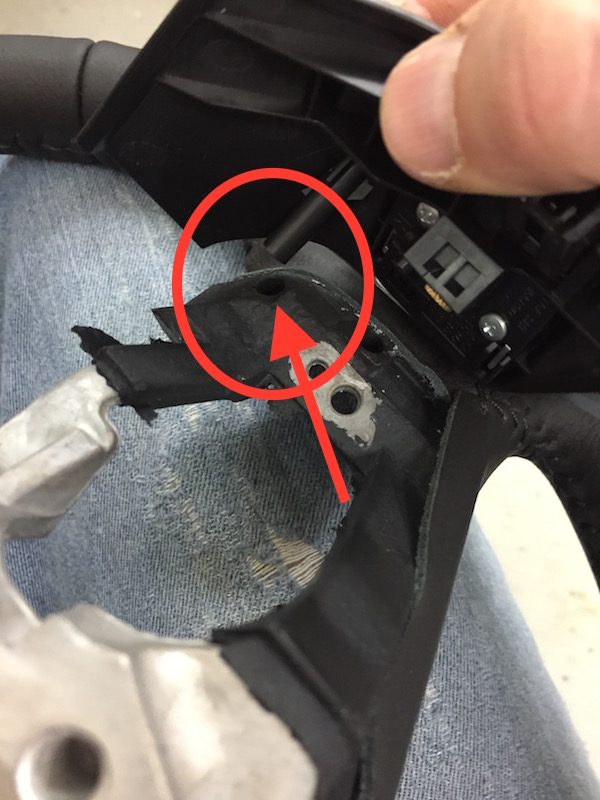
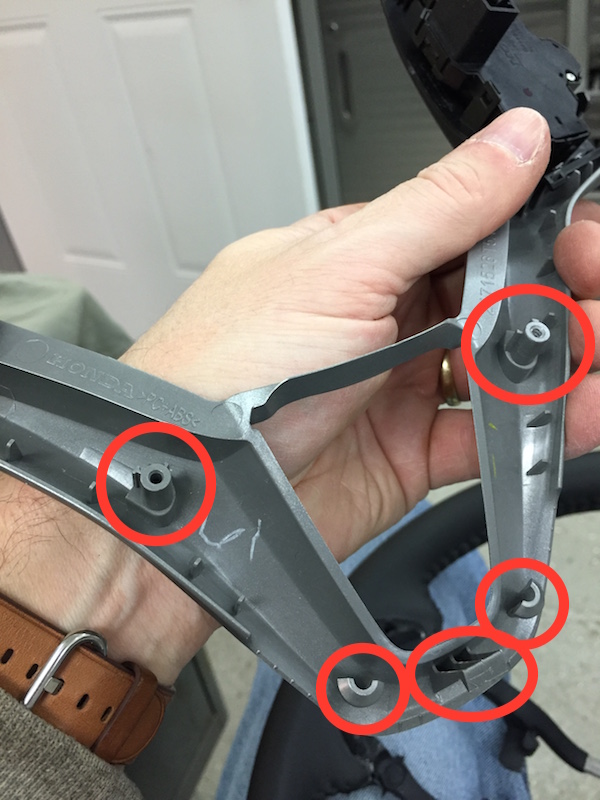
The final piece to transfer is the front garnish. This was the diciest, as it is held in with numerous flared pins that fit into rubberized holes on the steering wheel itself. Go *very* slow and don't force anything here! I just kept carefully prying with a tape-wrapped flat screwdriver, moving things a mm at a time until I could see what was going on.

At this point, you should have everything removed from the old wheel. Installing the front garnish on the new wheel was ticklish. I had to trim a little off the leather wrap where it was slightly interfering with one of the front garnish pins, and otherwise, went slowly, not forcing anything.
Make sure you reconnect all the wiring as you go (now *that* would be a disappointment!), and once you have the wheel back together, reinstall it on the car (I do not have a torque value for the steering wheel bolt - I went as tight as I could with my long bar). Make sure you align the wheel and floating ring behind the wheel correctly as noted earlier! Thread your horn and airbag wiring back in place and reinstall the airbag module.
If you did happen to remove the covers, put those back now.
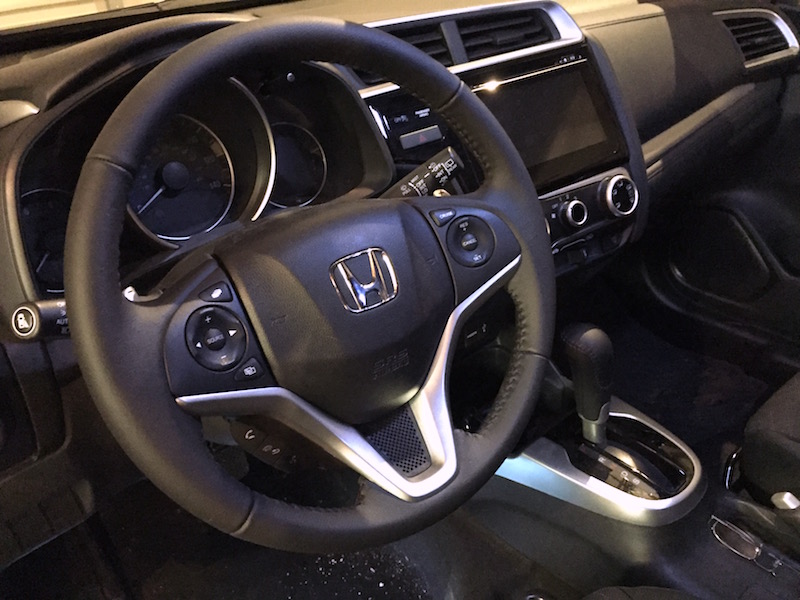
Reconnect the battery and start 'er up! I had to reset my radio, but other than than, had no error codes or anything.
es
DISCLAIMER (AGAIN!) - Do this at your own risk. These are not official instructions or procedures, and if you choose to attempt this mod, your experience may vary. SEVERE INJURY or DEATH can occur if the airbag goes off while you are working near it.
The parts have been sitting in my shop since July (2015), and I finally got the nerve up to do this somewhat ticklish swap. I got the leather steering wheel and CVT shift knob from one of the many OEM Honda parts houses online:
Leather Steering Wheel
Leather CVT Shift Selector Knob
The shift knob was a simple, one-minute swap (no pics) - just carefully pry the front cover under the "trigger" button forward and off (use a plastic putty knife or similar so you don't mar it), then lift the old knob off. Reverse disassembly instructions for your new leather knob. Done!
The steering wheel, on the other hand, was much more complicated, with a hint of danger since you'll be handling the airbag module.
First step is to disconnect the battery - I pulled the ground side and made sure it was tied back so it couldn't accidentally flop back over and make contact with the post while I was working in the cabin. Be sure to wait 15-30 minutes to let any residual electrons settle down (saw this on another mod post, so I presume there are capacitors or backup batteries somewhere in the system that need to bleed off).
Not having any instructions, I took the top and lower cover off behind the steering wheel itself, but it turns out there's really nothing there you need to disconnect, so you can dispense with that step. I'll include a couple photos just for reference, though. There's one screw underneath near the tilt lock lever, and the top cover just pops off, revealing two more screws that become accessible by rotating the wheel about 15� each side of "straight." Remove those, and the lower cover comes off.
Here's where things get fun. There are two torx screws accessible from either side of the back of the wheel – those hold the airbag module in place. It would not be unreasonable to wear safety glasses while handling the module, and think about where your hands and head are in relation to where the bag might go were it to go off. USE YOUR HEAD - YOU ARE RESPONSIBLE FOR YOUR OWN SAFETY HERE!
With those two screws out, you can easily life the airbag module out, but note that there are several connections that will prevent you removing it right off.
First up is the horn connector:
It was actually a bit of a bear to remove. It's wrapped in foam, and was hard to tell if there's a spring clip on there or not. I kept worrying it with a small flat-blade screwdriver and finally got it to pop off.
Next up is to disconnect the airbag module. There are two connectors, and each have two white spring-loaded catches that have to be pried up at the same time. I used a pair of small flat-blade screwdrivers and once you get both tabs up, the whole connecter pops right off. The airbag module can be carefully set aside at this point.
Next up is to remove the steering wheel bolt. It's essentially a big cap screw, with an inset hex hole. I happened to have the right socket end to fit it, but it's not a common tool, so you may have to pick one up at an auto parts store (shouldn't cost more than a few bucks). I quickly realized that substantial leverage was going to be required - that bolt is *in there*. I finally ended up getting out my pneumatic lug wrench, and even it didn't break the bolt loose! It did, however, break the bond enough that I was able to use the long extension to get the bolt moving. I switched over to a long ratchet wrench to finish the extraction - the bolt has something like Loctite on the threads that required effort all the way out.
Once the bolt is out, make sure the airbag and horn wiring is pushed back out of the wheel, and then it would be a Really Good Idea to make a mark on both your old wheel and the steering shaft so you know the proper alignment of the two when you go to put it back together. After that, a good tug should have the wheel in your lap. Note that the floating ring (plastic) you're now looking at will indeed rotate easily. Try to avoid disturbing its location, as it also needs to be properly aligned to the steering wheel when you reinstall.
I tool the wheel into my heated shop for the next steps. First, remove the ground wire:
Note that the next steps require removal of various wiring and connectors, etc. Always look for the spring clip that holds each connector in place - some are kind of hard to get to, and you may need to partially or completely remove other components before you can get at them. Study it out and it should become obvious to you.
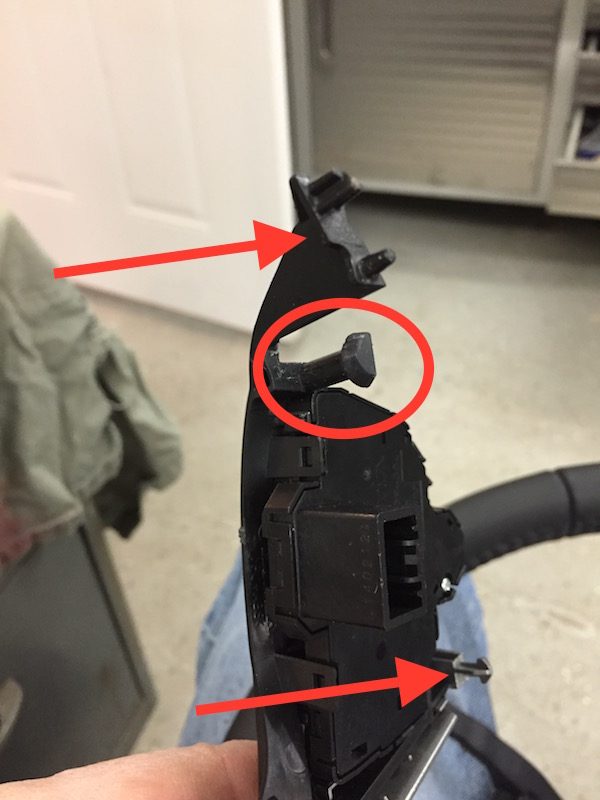
The rear cover is held in place by a number of clips. Take time to carefully study it before you start yanking on things, lest you break something. Each side uses two clips at the top that must be pressed at the same time (in directions 90� opposite from each other). Go ahead and do both sides, but don't try yanking the cover off just yet, because...
...you also need to unclip these at the bottom of the cover. They are quite firm, so be careful to not overstress them!
Next up is to remove the hands-free button cluster. The cover on the back side of the wheel just pops off, and you'll see two screws that hold it in place. I only removed the one screw (not seen) from the wheel itself.
You can now remove the paddle shifter modules - one screw for each:
I went ahead and transferred the paddles to my new wheel at this point. Note the pin and hole it goes into before you run your screw back in. The hole is rubber and is a "press fit."
The final piece to transfer is the front garnish. This was the diciest, as it is held in with numerous flared pins that fit into rubberized holes on the steering wheel itself. Go *very* slow and don't force anything here! I just kept carefully prying with a tape-wrapped flat screwdriver, moving things a mm at a time until I could see what was going on.
At this point, you should have everything removed from the old wheel. Installing the front garnish on the new wheel was ticklish. I had to trim a little off the leather wrap where it was slightly interfering with one of the front garnish pins, and otherwise, went slowly, not forcing anything.
Make sure you reconnect all the wiring as you go (now *that* would be a disappointment!), and once you have the wheel back together, reinstall it on the car (I do not have a torque value for the steering wheel bolt - I went as tight as I could with my long bar). Make sure you align the wheel and floating ring behind the wheel correctly as noted earlier! Thread your horn and airbag wiring back in place and reinstall the airbag module.
If you did happen to remove the covers, put those back now.
Reconnect the battery and start 'er up! I had to reset my radio, but other than than, had no error codes or anything.
es
DISCLAIMER (AGAIN!) - Do this at your own risk. These are not official instructions or procedures, and if you choose to attempt this mod, your experience may vary. SEVERE INJURY or DEATH can occur if the airbag goes off while you are working near it.
Last edited by stembridge; 01-06-2016 at 10:09 AM.

#14
12-23-2015, 10:41 PM
 Winkers and heated mirrors are next on my list, and I have your videos bookmarked. Got a few other honeydoos to take care of first, tho!
es
#15
12-23-2015, 10:50 PM
LED Interior Bulbs Swap
No pics for this mod as it's well documented elsewhere. I bought a pack of LED bulbs and replaced everything inside the cabin. The LEDs give off a cooler (bluer) light than the stock incandescents, which kind of enhances the "high tech" feel of the interior.
es
es
Last edited by stembridge; 01-04-2016 at 01:51 PM.
#16
12-23-2015, 10:52 PM

#19
12-24-2015, 04:04 PM
Well to be fair winkers were done AFTER i installed the heated side mirrors. I felt left out.
Whats the link to the sway bar you got? Thats a mod I wouldn't mind doing in the future.
#20
12-25-2015, 07:04 PM
es