DIY A/T fluid and filter, with pics
#1
 12-04-2010, 05:17 PM


I searched and couldn't find a good A/T 'drain and fill' thread so I thought I'd make one. This is something that everyone with an automatic transmission should be doing on a regular basis! Hope this helps some people out there, if this thread isn't helpful and/or is in the wrong forum, mods please feel free to delete or move as needed.
And now, on with the countdown.
Our '07 Sport had about 84,000 miles on it and was well overdue for new coolant, brake bleed, etc. It definitely needed new transmission fluid and a new filter. For those that think 'there isn't a filter!', we'll get to that in a bit
When talking to the techs at my local dealer, ALL of them stated the best thing to do was a simple drain and fill. They have had a few transmissions go south doing the 'power flush' approach apparently. This thread will show you how to do a simple drain and fill with a change of the inline transmission filter.
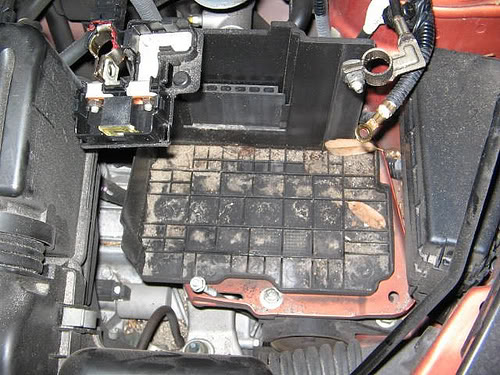
Step one, remove battery and battery tray. Your automatic transmission inline filter is located underneath the battery tray. Battery comes out first, then the plastic base, then the metal battery tray.

Battery and outer battery cover removed, plastic base still in place - this part simply lifts off of the battery tray:
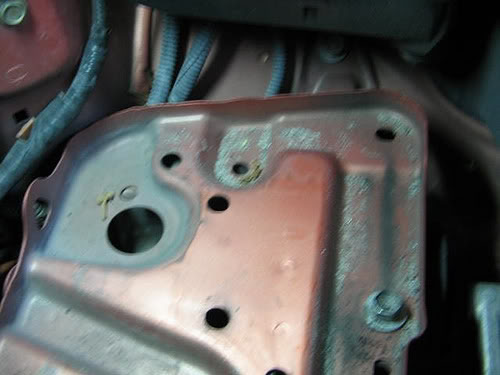
Metal battery tray held in by three bolts. Two are easy to get to, one may make you curse Honda engineers. The very outside bolt is a bit tricky to reach:
Next, I found it MUCH easier to do this with the airbox out of the way. Two bolts and a couple of 'spring' type hose clamps later, airbox is out of the way. This also gives you a chance to check and clean the throttle as needed.
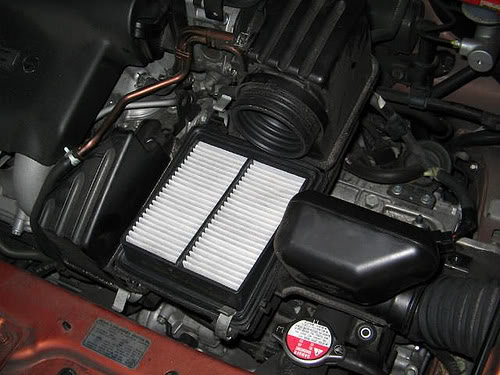
Airbox removed, ahhhh look at all that room to work with:
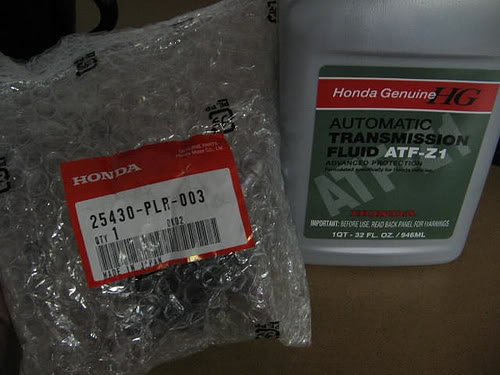
Next I changed out the transmission filter. Here is a picture showing the filter with the part number on the bag. You'll also need three quarts of this Honda ATF. Every tech said to only use the Honda fluid, and it was cheap (about $7 per quart). The filter was $21.
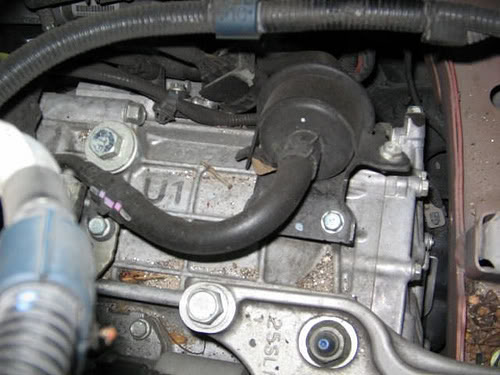
Ladies and gentlemen, allow me to introduce you to your transmission filter. The techs said the car didn't have one, the parts counter said it didn't have one. Guess what - it has one!!!!! It is held in place by a clamshell bracket - undo the 10mm bolt on one side, and the bracket lifts off. Undo the spring loaded hose clamp on either side of the filter and it's ready to be removed. If you pull on the hose it probably won't budge - give it a twist and the hose should disengage from the ends of the filter.
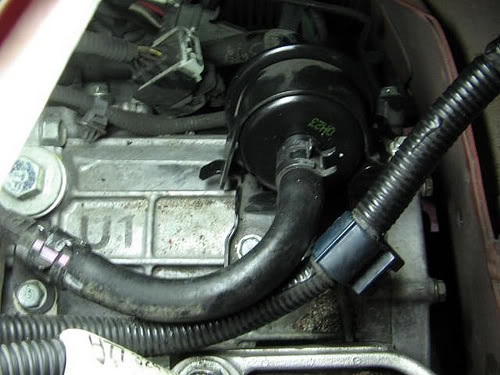
New filter in place:
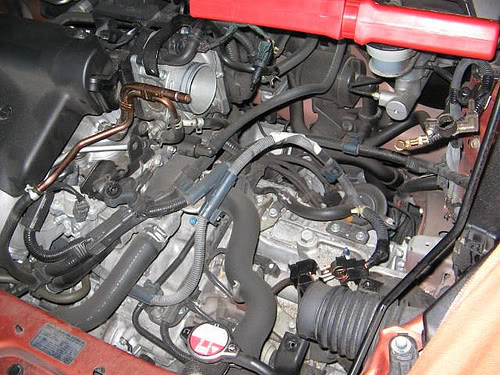
Now time to drain the fluid from the transmission.
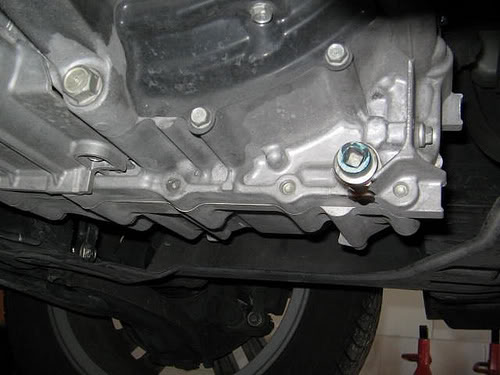
The transmission drain plug is located on the right side of the transmission casing. It is marked with a dab of blue paint, and can be loosened with a ratchet WITHOUT a socket on the end of it. Engage your ratchet directly with the drain bolt, and remove it (with a proper drain pan under the bolt!!)
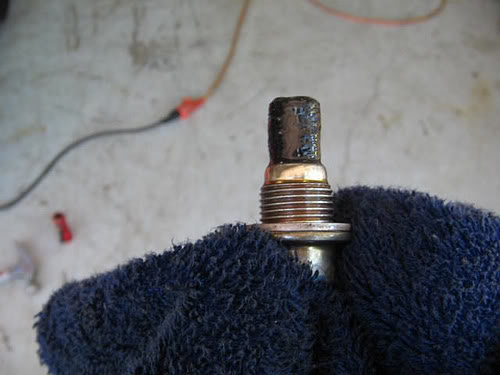
While your transmission is draining, check the magnetic drain plug for debris. Small amounts of debris like this are OK - if you see small chunks of metal, your transmission may be in trouble. Everything looks good here:
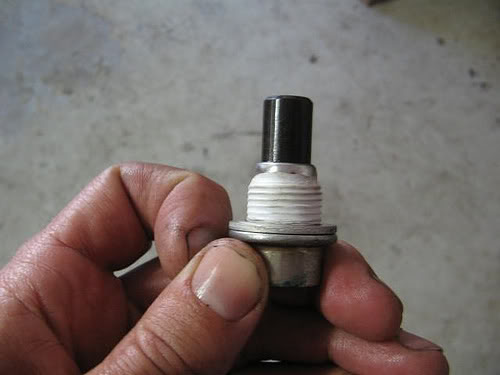
Clean the debris from the drain plug and clean the threads. I always wrap my drain plugs with a piece of teflon tape - you don't have to. Also, install a new crush washer on the drain plug (available at your dealer). This one's ready to go back in:
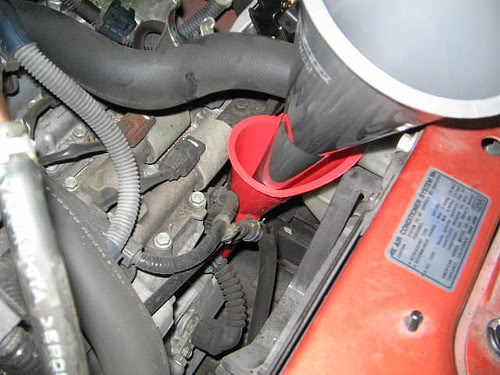
The next step is to fill the transmission. I removed the transmission dipstick, inserted a skinny funnel into the dipstick hole, and then placed a large funnel into the smaller funnel. The dipstick hole is waaaay down there, so this way works well:
I removed 2.5 quarts of fluid, and filled it with nearly the same amount.
Reinstall the airbox, battery tray, and battery and you're nearly done. Start the car on level ground, and let the engine come completely up to temperature (radiator fan comes on at least once). Shut the car off, and within 60 to 90 seconds check your transmission fluid level - it should fall somewhere in the 'HOT' part of the dipstick. If it's a bit low, get out your funnels and top it off.
I hope this helps those out there with an automatic transmission. It's an easy job that I did in conjunction with other things. By itself, this is maybe a one hour job.
And now, on with the countdown.
Our '07 Sport had about 84,000 miles on it and was well overdue for new coolant, brake bleed, etc. It definitely needed new transmission fluid and a new filter. For those that think 'there isn't a filter!', we'll get to that in a bit
When talking to the techs at my local dealer, ALL of them stated the best thing to do was a simple drain and fill. They have had a few transmissions go south doing the 'power flush' approach apparently. This thread will show you how to do a simple drain and fill with a change of the inline transmission filter.
Step one, remove battery and battery tray. Your automatic transmission inline filter is located underneath the battery tray. Battery comes out first, then the plastic base, then the metal battery tray.
Battery and outer battery cover removed, plastic base still in place - this part simply lifts off of the battery tray:
Metal battery tray held in by three bolts. Two are easy to get to, one may make you curse Honda engineers. The very outside bolt is a bit tricky to reach:
Next, I found it MUCH easier to do this with the airbox out of the way. Two bolts and a couple of 'spring' type hose clamps later, airbox is out of the way. This also gives you a chance to check and clean the throttle as needed.
Airbox removed, ahhhh look at all that room to work with:
Next I changed out the transmission filter. Here is a picture showing the filter with the part number on the bag. You'll also need three quarts of this Honda ATF. Every tech said to only use the Honda fluid, and it was cheap (about $7 per quart). The filter was $21.
Ladies and gentlemen, allow me to introduce you to your transmission filter. The techs said the car didn't have one, the parts counter said it didn't have one. Guess what - it has one!!!!! It is held in place by a clamshell bracket - undo the 10mm bolt on one side, and the bracket lifts off. Undo the spring loaded hose clamp on either side of the filter and it's ready to be removed. If you pull on the hose it probably won't budge - give it a twist and the hose should disengage from the ends of the filter.
New filter in place:
Now time to drain the fluid from the transmission.
The transmission drain plug is located on the right side of the transmission casing. It is marked with a dab of blue paint, and can be loosened with a ratchet WITHOUT a socket on the end of it. Engage your ratchet directly with the drain bolt, and remove it (with a proper drain pan under the bolt!!)
While your transmission is draining, check the magnetic drain plug for debris. Small amounts of debris like this are OK - if you see small chunks of metal, your transmission may be in trouble. Everything looks good here:
Clean the debris from the drain plug and clean the threads. I always wrap my drain plugs with a piece of teflon tape - you don't have to. Also, install a new crush washer on the drain plug (available at your dealer). This one's ready to go back in:
The next step is to fill the transmission. I removed the transmission dipstick, inserted a skinny funnel into the dipstick hole, and then placed a large funnel into the smaller funnel. The dipstick hole is waaaay down there, so this way works well:
I removed 2.5 quarts of fluid, and filled it with nearly the same amount.
Reinstall the airbox, battery tray, and battery and you're nearly done. Start the car on level ground, and let the engine come completely up to temperature (radiator fan comes on at least once). Shut the car off, and within 60 to 90 seconds check your transmission fluid level - it should fall somewhere in the 'HOT' part of the dipstick. If it's a bit low, get out your funnels and top it off.
I hope this helps those out there with an automatic transmission. It's an easy job that I did in conjunction with other things. By itself, this is maybe a one hour job.
Last edited by KyleB; 12-04-2010 at 06:35 PM. Reason: Flickr sucks some SERIOUS arse. never again...


#7
12-04-2010, 10:19 PM

Very nice!
Crazy part is I took my car to the new 'Joe Morgan' dealer here north of Cincinnati and was told that my 26k mile '08 had burnt gearbox fluid and was wondering how hard it would be to complete the transmission fluid swap myself. Now the question is... should I still let them do it since the car is still under warranty or would me doing this myself void it?
Reason I took it in was the transmission makes this funny clicking noise when going from Drive to Reverse and vice versa a couple times a week?
Thanks for the write up!
#8
12-10-2010, 06:43 PM
WOW!!! I have almost 100K miles on my car, and I never changed the filter... since I Was told the same exact information. I was told that the magnet on the nut was all that was on the car for catching the metal debris.
JEeeeze... this may explain a LOT about the car's engine problems i've been experiencing the last 40K miles.
JEeeeze... this may explain a LOT about the car's engine problems i've been experiencing the last 40K miles.
#9
12-10-2010, 07:11 PM

A very good write up, wished that you had this posted when I was looking for one (there's one, but with no picture and just illustration - who actually knows what is going on without picture illustrations - duh). Anyway, it's a good writeup and welcome to the Fit club! Oh by the way, regarding the filter, did you change everything (filter + hose + clamps) as they look different.
#10
12-11-2010, 04:49 PM
A very good write up, wished that you had this posted when I was looking for one (there's one, but with no picture and just illustration - who actually knows what is going on without picture illustrations - duh). Anyway, it's a good writeup and welcome to the Fit club! Oh by the way, regarding the filter, did you change everything (filter + hose + clamps) as they look different.

#13
12-22-2010, 03:29 PM
I just called the local dealership and asked for the a/t filter. To my surprise, they told me there was no filter, hahahahaha. I asked them to search the part # and the woman helping me said that wasn't a valid Honda #. She then asked her supervisor who was able to find it, but told her I didn't need to change it. I asked her if it wasn't a filter, what was it? She said it is a filter, but I don't need to change it... oh dealerships.

#17
03-06-2011, 03:33 PM
As for me? No, the filter didn't appear to be dirty at all but I kept it and plan on taking the dremel to it to see what it's like inside. The tranny plug bolt was a little dirty but only grunge, no large metal particles. Similar to the picture above from KyleB. Took it over to store after-wards and noticeably smoother shifts.
#18
03-08-2011, 09:47 PM

Kudos on your write-up. And for that pesky little filter, new to me. I used Amsoil for the new oil but I won't knock using Honda fluid.
But I will add a different way to change ALL the fluid, not just 3 of the 6 quarts. We also use the lower right corner of radiator as a tranny cooler. It will help to have the front of the car up in the air a little bit.
Disconnect either line from the cooler. It really does not matter which one. The right line is the "hot" input into the radiator. I use this one since it is easiest to take the now disconnected hose and stick it into a empty container with a small opening. If you disconnect the "cool" return line you will need to temporarily put on a extra short length of hose back on the radiator nipple with the other end feeding into a empty container. Otherwise you will be spraying tranny fluid all over!
So with the hose end in a empty container, a 1 quart bottle works best, have a helper start the engine. Now you have tranny fluid filling up the bottle. Don't worry, it does not come out with much force. Just prior to the 1 quart bottle being filled, tell the helper to turn off the engine, the flow stops quickly. Empty your bottle into a large waste oil container.
On the top left side of the tranny behind the engine there is a large benign looking bolt head on the top flat tranny case. This is a easy fill port to replenish the tranny fluid with a long funnel neck or a short funnel with a length of hose attached to it. No need to get fancy, the large access hole just gives access to the top of the tranny case and into the tranny "void".
So, one quart old fluid out, one quart new fluid in. Repeat this procedure 6 times. At about the 5th one you will start to see new fluid coming out. I don't need to tell you how to button up the hose that was disconnected. With this method you are changing near 100% of the fluid. Not the approximately 50% with the removing the drain bolt method.
I didn't spill a drop with this method. As a bonus, if you use a 1 quart bottle as the waste oil bottle, and you fill it up with one quart, this does a remarkable job of having the correct amount of fluid back in the tranny when you are finished. Mine was spot on!