Ignition Light Ring DIY
#1
 10-10-2008, 03:12 PM


Ignition Light Ring DIY
okay folks
i'm going to try to make this as easy as possible
also i'm in no way resposible or is fitfreaks if you
mess up your car.
so here goes
pics of product.
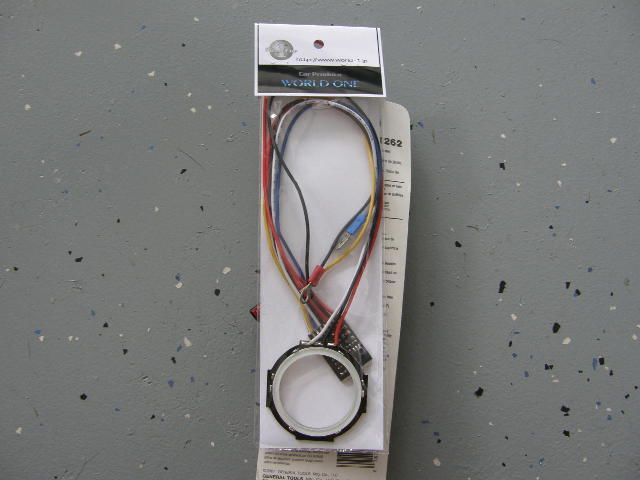

this pic above is the ring opened and preped for install.
if you notice i have an eye-let attached to black.
add a fuse to red
and a connector on blue.
all tools supplies you will need are:
wire crimps/strippers
linesman
to wire connecters (the red ones you will see in pics later)
one eye-let connector
one add a fuse wire
male and female connector (to make a wire longer)
phillips screw driver
flat head screw driver
Also i would like to give credit to JDM_DOHC_SiR
he is the best. we both helped each other through the
whole process to get this done for people to come.
also if it wasn't for JDM i would have a key ring either.
thanks again JDM
more coming soon
i'm going to try to make this as easy as possible
also i'm in no way resposible or is fitfreaks if you
mess up your car.
so here goes
pics of product.
this pic above is the ring opened and preped for install.
if you notice i have an eye-let attached to black.
add a fuse to red
and a connector on blue.
all tools supplies you will need are:
wire crimps/strippers
linesman
to wire connecters (the red ones you will see in pics later)
one eye-let connector
one add a fuse wire
male and female connector (to make a wire longer)
phillips screw driver
flat head screw driver
Also i would like to give credit to JDM_DOHC_SiR
he is the best. we both helped each other through the
whole process to get this done for people to come.
also if it wasn't for JDM i would have a key ring either.
thanks again JDM
more coming soon
Last edited by niko3257; 10-15-2016 at 03:31 PM. Reason: updated data
#2
10-10-2008, 03:48 PM
okay first picture shows all 4 parts you have to remove.
note all parts just pull right off except the steering column
cover. if you look at the pics. you will see two holes on the
bottom of steering column. these two holes have phillips head
screws in them along with another one by the steering wheel
adjuster. is is right above the handle where you adjust the
steering wheel. so total you have 3 phillips head screws.

after you remove all 3 screws move to the fuse box access door open it
via handle under the 3 blank slots.

now that you opened it unhook it. (just pull on it carefully and
it will come right off)
now that the door is off you will see this

now you have to remove the tray on the bottom.
if you look on the bottom of the tray you will see
a twist knob on the far left side (closest to the door)
the other side is just a snap.
look at the pic above and you will see what it looks like from the top.
this knob holds the tray in.
twist it pull it down so the other side unsnaps and its off.
this is a pic twisted ready to come off

now we go back to the steering column.
this is made up of two peices.
top and bottom.
i pulled them apart by getting a small skinny screw driver
and putting a rag over it.
i stuck the screw driver with the rag in the headlight hole and in the
wiper hole. just pull the driver up towards the sky and the top will
unclip from the bottom. like so.

now make sure you release your steering wheel ajuster. (open it so that the steering wheel can go back and forth up and down.
pull it out all the way and down. now remove the top.
now keep the wheel all the way out but lift it this time all the
way up. remove the bottom peice make sure your carefull. you have to guide it through the lever.
now you have everything off.
now we can begin to connect the wireing
but first you have to locate the connectors and color wires that you
need to splice into.
note all parts just pull right off except the steering column
cover. if you look at the pics. you will see two holes on the
bottom of steering column. these two holes have phillips head
screws in them along with another one by the steering wheel
adjuster. is is right above the handle where you adjust the
steering wheel. so total you have 3 phillips head screws.
after you remove all 3 screws move to the fuse box access door open it
via handle under the 3 blank slots.
now that you opened it unhook it. (just pull on it carefully and
it will come right off)
now that the door is off you will see this
now you have to remove the tray on the bottom.
if you look on the bottom of the tray you will see
a twist knob on the far left side (closest to the door)
the other side is just a snap.
look at the pic above and you will see what it looks like from the top.
this knob holds the tray in.
twist it pull it down so the other side unsnaps and its off.
this is a pic twisted ready to come off
now we go back to the steering column.
this is made up of two peices.
top and bottom.
i pulled them apart by getting a small skinny screw driver
and putting a rag over it.
i stuck the screw driver with the rag in the headlight hole and in the
wiper hole. just pull the driver up towards the sky and the top will
unclip from the bottom. like so.
now make sure you release your steering wheel ajuster. (open it so that the steering wheel can go back and forth up and down.
pull it out all the way and down. now remove the top.
now keep the wheel all the way out but lift it this time all the
way up. remove the bottom peice make sure your carefull. you have to guide it through the lever.
now you have everything off.
now we can begin to connect the wireing
but first you have to locate the connectors and color wires that you
need to splice into.
Last edited by niko3257; 10-15-2016 at 03:34 PM.
#3
10-10-2008, 03:54 PM
okay lets get the wires on the key ring
you have red,black,yellow and blue.
well
red is 12v constant
black is ground
yellow is switched by ignition.
we will be hooking this one up to
gray wire.
blue is door lock unlock
we will be hooking this one up to
the brown wire with silver spots.
you have red,black,yellow and blue.
well
red is 12v constant
black is ground
yellow is switched by ignition.
we will be hooking this one up to
gray wire.
blue is door lock unlock
we will be hooking this one up to
the brown wire with silver spots.

#5
10-10-2008, 04:09 PM
okay lets start with the igniton switch.
look at the pics and look for the silver wire.
this is the one to hook up to.

hook it up like so.
yellow to silver.

now that we have the silver hooked. don't worry if you hear the door bell
chime. this means it's working and you have the right wire.
now lets move to the ground.
i put it here.

this picture above also shows a good view of the yellow attched
to the gray.
now we can move onto the red.
once this is attached you door chime will silence.
with the add a fuse your basically in control.
you can put it just about anywhere in your fuse box.
this is why i picked this method.
i hooked it up here.
alright now we are almost done
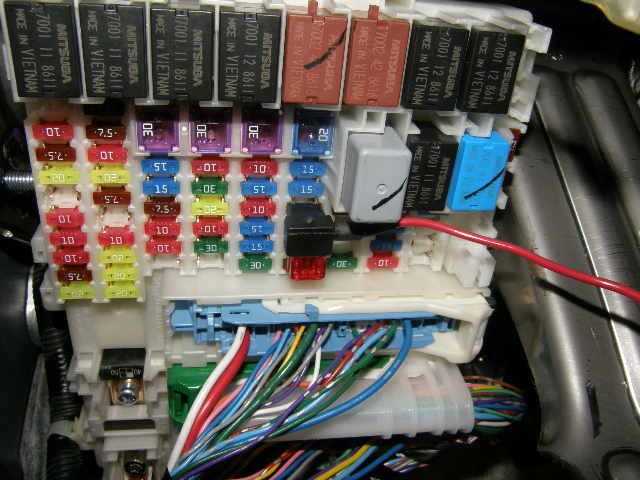
all we have left is the blue wire.
look for a clip on your fuse box. it's green
and on the bottom left hand corner.
look at the pics. i have multiple pics with different
angles so don't get confused.
look at my pics and look for the brown wire with silver
spots.
i have pulled it out a little so you can see.

look at the pics and look for the silver wire.
this is the one to hook up to.
hook it up like so.
yellow to silver.
now that we have the silver hooked. don't worry if you hear the door bell
chime. this means it's working and you have the right wire.
now lets move to the ground.
i put it here.
this picture above also shows a good view of the yellow attched
to the gray.
now we can move onto the red.
once this is attached you door chime will silence.
with the add a fuse your basically in control.
you can put it just about anywhere in your fuse box.
this is why i picked this method.
i hooked it up here.
alright now we are almost done
all we have left is the blue wire.
look for a clip on your fuse box. it's green
and on the bottom left hand corner.
look at the pics. i have multiple pics with different
angles so don't get confused.
look at my pics and look for the brown wire with silver
spots.
i have pulled it out a little so you can see.
Last edited by niko3257; 10-15-2016 at 03:36 PM.


#7
10-10-2008, 04:22 PM
okay now that we have located the brown wire we can attach the blue
wire to it.
now mind you that i extened the blue wire. so it has chaged color to green. so don't get confused.
also a side note the blue wire was the only wire i had to extend.
okay so here are pics connected.


here is a pic also of where the blue changes to green. (the only wire i extended)

well now we are done.
wire to it.
now mind you that i extened the blue wire. so it has chaged color to green. so don't get confused.
also a side note the blue wire was the only wire i had to extend.
okay so here are pics connected.
here is a pic also of where the blue changes to green. (the only wire i extended)
well now we are done.
Last edited by niko3257; 10-15-2016 at 03:38 PM.
#8
10-10-2008, 04:36 PM
don't forget to put a zip tie on the harness.

now you can put everthing back together in the same process but
reverse.
the only thing i have to add is one thing. when putting the steering wheel
peices back on there is a trick to it.
look at the pic

this is a pick with the bottom on and the top off. pic is from the top of the steering column.
look at the right and left side top of steering column opening. do you see
the rectangular holes? i hope you do.
it is very improtant you put the top cover on hooks first or it won't
clip on properly.
so there you have it.
now you can put everthing back together in the same process but
reverse.
the only thing i have to add is one thing. when putting the steering wheel
peices back on there is a trick to it.
look at the pic
this is a pick with the bottom on and the top off. pic is from the top of the steering column.
look at the right and left side top of steering column opening. do you see
the rectangular holes? i hope you do.
it is very improtant you put the top cover on hooks first or it won't
clip on properly.
so there you have it.
Last edited by niko3257; 10-15-2016 at 03:39 PM.
#9
10-10-2008, 04:56 PM
so here are a few pics when it's on.


blue is when door(s) unlocked
red is when car is locked
flashes red also like a security feature.
i can take video but i don't know how to post it.
but i did find this on the web thanks to JDM
http://www.world-1.jp/20071129235128.3gp
also have this info for you guys
Translated version of http://www.world-1.jp/keyring.html
Translated version of http://minkara.carview.co.jp/userid/257175/car/150134/424657/note.aspx
thanks again Dave
DIY done
Last edited by niko3257; 10-15-2016 at 03:42 PM.
#10
10-10-2008, 05:05 PM

Thank you for taking the time out to post a step by step DIY with photos. I know that took a lot of effort. Thanks
So is that the other features that JDM was hinting to? Red locked - Blue unlocked or are there other hidden features? Any other extra benefits?
I'm guessing this is not a Honda part but would work just fine?
So is that the other features that JDM was hinting to? Red locked - Blue unlocked or are there other hidden features? Any other extra benefits?
I'm guessing this is not a Honda part but would work just fine?
#11
10-10-2008, 06:44 PM
Join Date: Jan 2006
Location: San Diego, CA
Posts: 2,804
 Great job with the DIY!!!
 This will make it very clear for those installing this item...
ADMIN PLEASE STICKY THIS THREAD...!!
#12
10-12-2008, 03:26 AM
Nice DIY. Thanks for putting in the effort to document the procedure and not just posting the finished results.

#14
10-12-2008, 10:03 PM
Thank you for taking the time out to post a step by step DIY with photos. I know that took a lot of effort. Thanks
So is that the other features that JDM was hinting to? Red locked - Blue unlocked or are there other hidden features? Any other extra benefits?
I'm guessing this is not a Honda part but would work just fine?
So is that the other features that JDM was hinting to? Red locked - Blue unlocked or are there other hidden features? Any other extra benefits?
I'm guessing this is not a Honda part but would work just fine?
thank you for looking
the only other features it has is it acts like
a security system. blinks red when car is locked.
also no need to worry draw on it is very low.
i hope this makes it easy for everyone to do installs.
#15
10-12-2008, 10:06 PM
Thanks Dave
couldn't have done it without ya.
Sticky would be nice also for future fitfreaks willing
to wire this up.

#18
10-13-2008, 03:50 AM
i wanted to know if all those wireing are the same for the older fits (2007) and anothing thing is where can you get those Ignition Light Ring? PM me for the info, thanks
#20
10-13-2008, 07:52 PM

+1 for that definitely. This seems like a very easy mod that's quite practical as well.