[DIY] Custom Phone Mount for Honda Fit
#1
 03-31-2011, 12:50 PM


[DIY] Custom Phone Mount for Honda Fit
Disclaimer: The following is provided as a GUIDE ONLY, and neither myself, nor FITFREAK.NET endorse, recommend, encourage nor take any responsibility for the outcome of someone else doing the following. You follow these steps at your own risk!
For as long as I've had the car, I�ve been looking for �the� spot for my phone to mount. I have the standard, suction-cup-style, car mount for my droid:

... and up until this past weekend, I had it stuck on the little triangle-window on the driver�s left. It was ok here � off the windshield and within reach � but it the spot wasn't perfect for a phone:
This past weekend, I put in a JVC XR810 head-unit, which obviously required popping of the center console part. Once I had it off, I had an epiphany� a spot that was perfect for a phone!


The mod is only takes about 20-30minutes, does minimal "damage" to the trim (just two little [3/16�] drill-holes), and is less than 2 bucks for the mounting hardware! (figure another 7 bucks if you decide to hard-wire your charger like I did)
Hardware needed:
Install Procedure:
I didn�t take any pictures during the install, but if you can't follow along... well... yeah... you should probably just suction cup your mount to your windshield
Moving on...
1) Get the mounting hardware: I took apart my mount, separating the suction-cup base from the arm piece, and then took the arm-piece to Home Depot. After stealthily pulling a few screws out of their plastic bags, I learned that an 8x32 machine screw was the right diameter to just barely fit through the hole... and that a 1" long screw was just the right length to pass through everything and leave enough threads for the wing-nut to grab.
2) Figure-out roughly where to drill the holes: Before you pop-off any trim, 'dry fit' your mount (with the phone in it) to see roughly where you want the mounting hole. Can you reach the phone there? Does it block anything? Once you find the right spots, mark them lightly with a pencil.
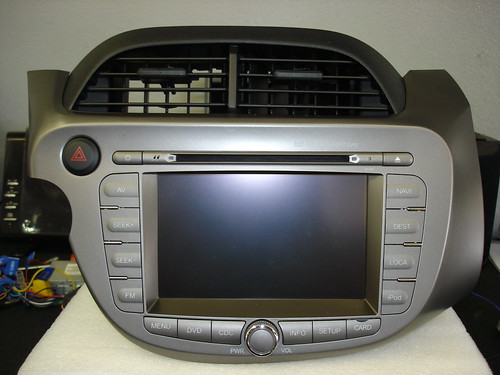
3) Remove the radio/trim completely: This is the hardest part, and it�s actually pretty easy! Just follow kman�s guide [stickied]! Pop the bottom trim, unscrew one Philips-head screw, and then pop-out the radio. After disconnecting the four wire-harnesses [radio, antenna, hazard switch, and airbag light], th radio, trim, and vents all come out together. From kman�s thread:
4) Figure out exactly where to drill the holes: You know roughly where to put the holes since you marked them with a pencil in #1. Now you need to find a spot near that mark where there�s open space behind the trim. (You don't want to drill a hole on the pencil mark and then, after you put the radio back in the dash, discover the hole's blocked underneath by a clip or support piece or something.)
Note: the charger-cable�s hole is really a notch right at the edge. If it was in the middle, you�d need like a �� hole in order to feed through micro-USB plug; on the side, you just slip the cable in:

5) Drill Baby Drill: Flip the thing over and drill from the inside-out. This will ensure you don't accidentally drill through a clip or support piece. For the cable-hole, I drilled through and then just pushed the drill-bit sideways to make the notch - it cuts through that plastic like butter
Note: Since I had the wire-harness harness pulled apart anyway [to install the XR810], I decided to add an additional accessory-outlet behind the radio... for the charger to plug into. If I didn�t have to take apart the wire-harness, I think I probably just would have left the charger plugged-in to the outlet behind the shifter - and then just snaked the cable up behind the radio/dash.
Comments/questions/suggestions welcome
For as long as I've had the car, I�ve been looking for �the� spot for my phone to mount. I have the standard, suction-cup-style, car mount for my droid:
... and up until this past weekend, I had it stuck on the little triangle-window on the driver�s left. It was ok here � off the windshield and within reach � but it the spot wasn't perfect for a phone:
- It interfered w/ the cup-holder a little when there were tall cups/bottles
- It blocked the left defroster vent.
- It required me use my left hand.
- It needed a bit of an ugly, long-run for the charger cord, from the bottom of the center console, up over the steering-column, then in front of the tach.
This past weekend, I put in a JVC XR810 head-unit, which obviously required popping of the center console part. Once I had it off, I had an epiphany� a spot that was perfect for a phone!
- It�s just below the horizon of the windshield, yet still right within the field of view whilst driving.
- It�s a great position ergonomically, easily reachable without leaning forward.
- It doesn't block any of the vents.
- It�s aesthetically pleasing � nicely in-line with the HVAC controls, and in one of the only "empty" spots as you look around the dash area.
The mod is only takes about 20-30minutes, does minimal "damage" to the trim (just two little [3/16�] drill-holes), and is less than 2 bucks for the mounting hardware! (figure another 7 bucks if you decide to hard-wire your charger like I did)
Hardware needed:
- 1� machine screw (8x32)
- wing-nut (8x32)
- 2 inner-toothed lock-washers
- Optional:12v Accessory Socket for hardwiring charger ($7 at RadioShack)
Install Procedure:
I didn�t take any pictures during the install, but if you can't follow along... well... yeah... you should probably just suction cup your mount to your windshield
Moving on...
1) Get the mounting hardware: I took apart my mount, separating the suction-cup base from the arm piece, and then took the arm-piece to Home Depot. After stealthily pulling a few screws out of their plastic bags, I learned that an 8x32 machine screw was the right diameter to just barely fit through the hole... and that a 1" long screw was just the right length to pass through everything and leave enough threads for the wing-nut to grab.
2) Figure-out roughly where to drill the holes: Before you pop-off any trim, 'dry fit' your mount (with the phone in it) to see roughly where you want the mounting hole. Can you reach the phone there? Does it block anything? Once you find the right spots, mark them lightly with a pencil.
3) Remove the radio/trim completely: This is the hardest part, and it�s actually pretty easy! Just follow kman�s guide [stickied]! Pop the bottom trim, unscrew one Philips-head screw, and then pop-out the radio. After disconnecting the four wire-harnesses [radio, antenna, hazard switch, and airbag light], th radio, trim, and vents all come out together. From kman�s thread:
4) Figure out exactly where to drill the holes: You know roughly where to put the holes since you marked them with a pencil in #1. Now you need to find a spot near that mark where there�s open space behind the trim. (You don't want to drill a hole on the pencil mark and then, after you put the radio back in the dash, discover the hole's blocked underneath by a clip or support piece or something.)
Note: the charger-cable�s hole is really a notch right at the edge. If it was in the middle, you�d need like a �� hole in order to feed through micro-USB plug; on the side, you just slip the cable in:
5) Drill Baby Drill: Flip the thing over and drill from the inside-out. This will ensure you don't accidentally drill through a clip or support piece. For the cable-hole, I drilled through and then just pushed the drill-bit sideways to make the notch - it cuts through that plastic like butter
Note: Since I had the wire-harness harness pulled apart anyway [to install the XR810], I decided to add an additional accessory-outlet behind the radio... for the charger to plug into. If I didn�t have to take apart the wire-harness, I think I probably just would have left the charger plugged-in to the outlet behind the shifter - and then just snaked the cable up behind the radio/dash.
Comments/questions/suggestions welcome


Thread
Thread Starter
Forum
Replies
Last Post
fuzzybabybunny
General Fit Talk
7
07-01-2010 05:26 PM