Lyon's free adjustable spoiler mod!
#21
 10-03-2010, 03:37 PM
![Lyon[Nightroad] is offline](https://www.fitfreak.net/forums/skynetimages/statusicon/user_offline.gif)

A bump and a couple more questions Lyon.
Bolt size. Are they 1 1/2 x 3/16ths or 5/16ths?
See if I have this right.
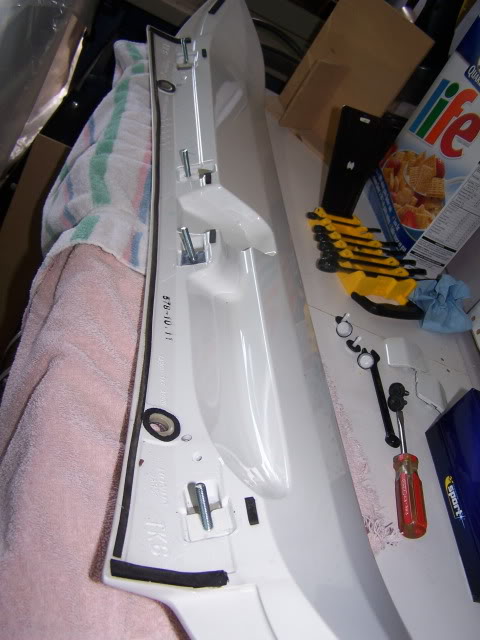
Take two bolts out and the pull up on spoiler to pop the clips. Do not drop spoiler!
I may not paint clip holders as I am TW.
The bolts are slid onto the spoiler and the nuts tightened just enough to hold them in place.
Place spoiler back on car and put in the two original bolts from the top. Tighten just snug and then adjust height by turning the nuts on the stove bolts. This will cause them to loosen the bolts from spoiler clip but they stay in place as the end of the bolts are in hatch clip recesses and the nuts are tight to the spoiler clips right?
Once adjusted to the perfect height tighten the two bolts and put their covers on.
Am I on right track Lyon?
Bolt size. Are they 1 1/2 x 3/16ths or 5/16ths?
See if I have this right.
Take two bolts out and the pull up on spoiler to pop the clips. Do not drop spoiler!
I may not paint clip holders as I am TW.
The bolts are slid onto the spoiler and the nuts tightened just enough to hold them in place.
Place spoiler back on car and put in the two original bolts from the top. Tighten just snug and then adjust height by turning the nuts on the stove bolts. This will cause them to loosen the bolts from spoiler clip but they stay in place as the end of the bolts are in hatch clip recesses and the nuts are tight to the spoiler clips right?
Once adjusted to the perfect height tighten the two bolts and put their covers on.
Am I on right track Lyon?
3/16ths.
You're on track.
The only thing is that the bolts do not screw in to the plastic clips (I think thats what you meant). They slide into the plastic clips. You can push them in or pull them out. They 'click' everytime you move then in or out. When you are about to install the spoiler, the nuts should be around 1/3 of the way from the base of the spoiler. The only thing holding the bolt to spoiler is the head (back) of the bolt. That makes it a bit tricky to keep them from falling out while you are positioning the spoiler. I slide the 4 bolts in (while attached to the spoiler) first then put in and tighten the 2 retaining bolts fairly tight. Then fine adjust the nuts and finally tighten up the spoiler.

Last edited by Lyon[Nightroad]; 10-03-2010 at 03:57 PM.
#22
10-03-2010, 04:09 PM
I gotta agree with your girl and say it looks silly... props to you for doing something different though
#24
10-04-2010, 04:43 AM
The beauty of these things is that they are temporary. I got bored of havng it up and took it completely off for a couple of months. Now, I have it back on but a bit lower, yet still higher than stock.
#25
10-04-2010, 05:23 AM
Thanks Lyon. Got it now. I understood how the bolt head slipped in. I thought maybe the nut was tightened up to hold bolt in place til it was mounted then moved to adjust. I now see the nut is on the roof not the spoiler.
I may do this week. It has turned cool here. Only in the 60s all week but sunny.
bill
I may do this week. It has turned cool here. Only in the 60s all week but sunny.
bill
#26
10-04-2010, 04:07 PM
Well that was rather easy. Especially after the second trip to Home Despot for the correct size bolts. I bought 1/4 vs 3/16th the first time and they do not go into clip holes on the body. I am raised not much more than the width of the nut.
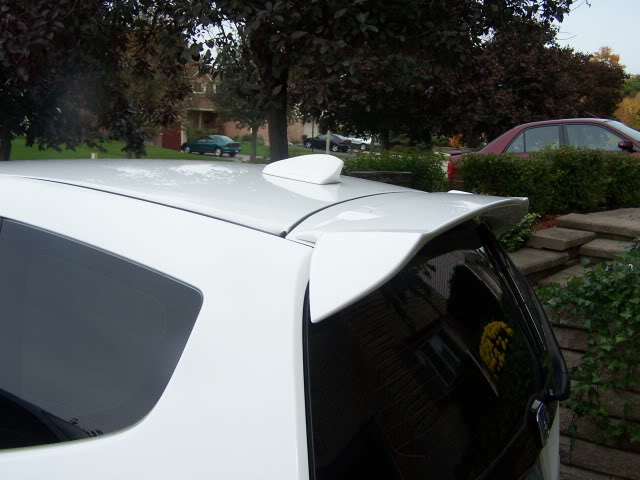
I did not raise it too much. Not crazy about the gap in the middle now between spoiler and roof. I wonder how much crap I will get in there in the winter on slushy roads.
A pic with wrong bolts in place.
Two old fingers

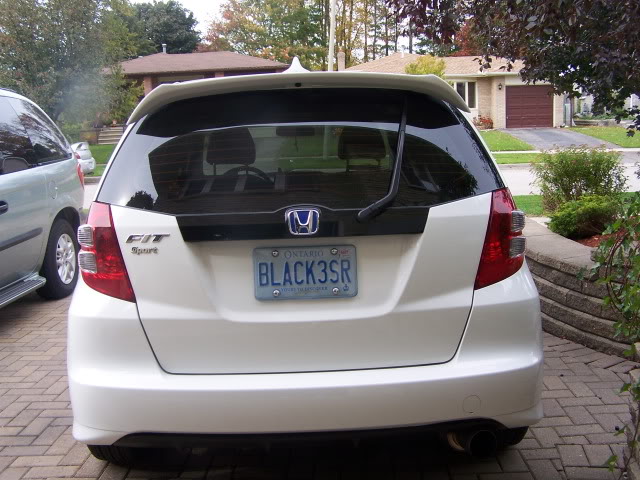
From rear
Side view
Before
I did not raise it too much. Not crazy about the gap in the middle now between spoiler and roof. I wonder how much crap I will get in there in the winter on slushy roads.
A pic with wrong bolts in place.
Two old fingers
From rear
Side view
Before

#28
10-04-2010, 10:23 PM

will this also work on the GD? Has anyone tried it yet? I probably will tomorrow and report back. I would like more tilt if possible.
#31
10-05-2010, 01:05 AM
Thanks for trying it out! looks alright. It's not like it takes more than 10 minutes to go back to stock if you get bored, but now your spoiler is one of a kind. There are black stick on foam strips wider than the ones that come with the spoiler you can use to cover up the gap.
Last edited by Lyon[Nightroad]; 10-05-2010 at 01:07 AM.
#32
10-05-2010, 06:31 AM
Are you talking weather stripping foam Lyon?
It sure is an easy mod to do. Have you been through a no touch car wash with it? I use one in the winter. So maybe this is a summer mod and change it when I switch to winter tires and viceversa.
It sure is an easy mod to do. Have you been through a no touch car wash with it? I use one in the winter. So maybe this is a summer mod and change it when I switch to winter tires and viceversa.
#33
10-05-2010, 05:07 PM
Ok so I checked on this in some depth for the GD. It is a definate no go. I will have to work on fab'ing a bracket or something. The GD's spoiler is different it attaches the same way but the "center" bolts (3) are molded into the spoiler. But on a side note my spoiler got a very nice wax job while it was off.

#35
10-06-2010, 04:10 AM
Yep, weatherstripping foam. I have been through the 120+ mph car wash dryers many times and no damage, even with it very high up.
#37
10-06-2010, 11:56 AM
So after 2 trips to Lowe's I still cannot find/come up with anything that will work on the GD3. I know this has been tried before with limited success. After work today I will make another trip, I have a new idea that may work. The idea will elevate have adjustable tilt, if I can find the right hardware.
#38
10-06-2010, 08:57 PM
Ok I found the hardware I was looking for. Now on to the fab work. I will post pics as it progresses, probably tomorrow. It takes forever to cut this stuff and make it look pretty.
#39
10-07-2010, 08:25 PM
Ok here's V1.0 of the GD tilt. It does allow to fully open the hatch. The spoiler hits the antena but not the base. I made it adjustable too so I can lower the angle to almost stock. I used 1/16" aluminum and lots of measuring, cutting, griding, and sparks. It's still a little on the ugly side but this is just my first version. I may paint it/clean it up some. I did find some of that factory installed rust under the spoiler so I'm glad I did this little project. Comments welcome.
Enjoy!

By alvarospatchez at 2010-10-07

Enjoy!
By alvarospatchez at 2010-10-07


