DIY: Yakima roof rack track install
#1
 04-23-2010, 08:39 PM


DIY: Yakima roof rack track install
Disclaimer!
I nor FitFreak.net or anyone else but you are responsible for messing up your car. Only you can take responsibility for your actions. if you don't feel comfortable get a professional to do the work.
ya-da ya-da ya-da....
READ and READ again the whole post before you start!
You may want help doing this, but I did it by my self.
Note. this is how I installed this rack. it is working fine for me. you may be able to mount it differently and if work just as well, or it could be absolutely horrible.....
ok.
DIY Yakima track system roof rack install.
I"m using the Yakima 54" (inch) track system to mount a control tower roof rack onto my 2009 Fit Sport. there is a video on youtube that covers the general installation. Here are some of the more GE8 specific things.
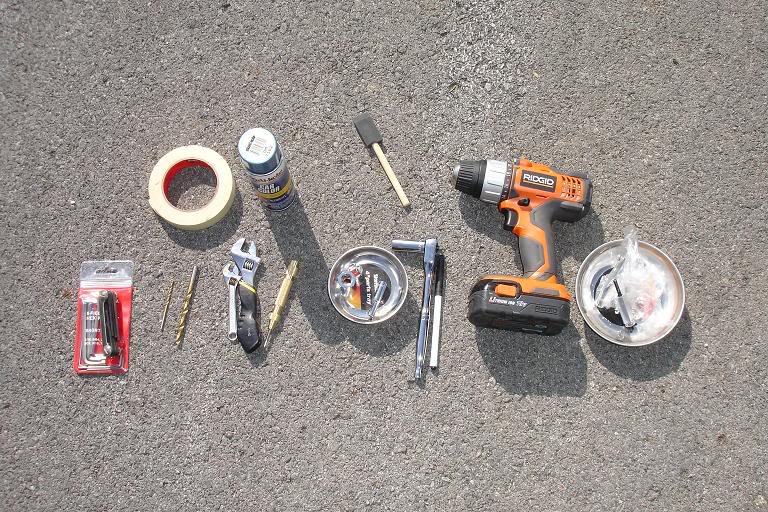
Here are some of the things you will need.
if you don't have this stuff, go get it before you start.
starting at the top left.
first three items.
Masking tape.
Automotive touch-up paint.*
small art brush. ( i used a foam brush, but art brush would have worked better.)
Next row.
SAE Hex key set. (only need 1/8 inch to install track)
1/8i inch drill bit for pilot hole
9/32 inch for plus-nut. (Do Not use a bigger or smaller bit!)
adjustable wrench. ( I only needed one)
metal punch. (this one is spring loaded so i didn't need a hammer.)
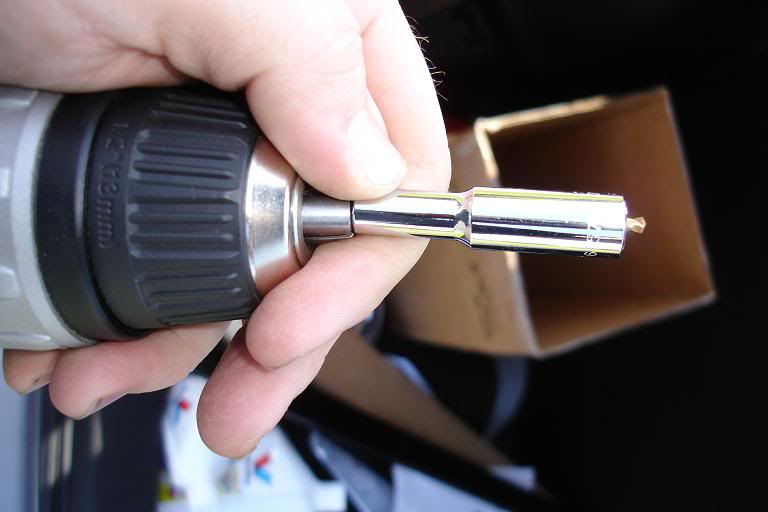
sockets for bit spacers. (I used 7/32, 15mm and 17mm deep well.)
ratchet wrench with 1/2 inch Deep well.
(if you don't have a deep well socket, you will have to use an open end or box wrench.)
Sharpie marker (also get a pencil)
Drill
Magnetic trays and a box to hold all the tools and hardware is a big help.
you will also need a measuring device. tape measurer works well.
* ( this is a spray can. you can spray some into a jar and paint it on with a brush. just do if FAR away from your, or anybody else's car or personal property.)
U should start by marking out the locations of the cross supports for the roof. I google for the image and then I APPROXIMATED these locations. the orange mark is the actual location. Guess how i found out? disregard the tape next to it on the left.
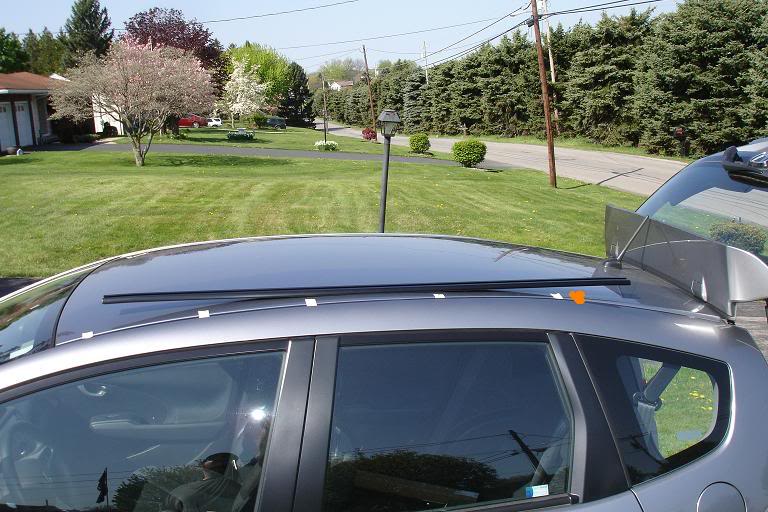
There are ten holes in the 54inch track. The holes in the track that I used was, from the front of the track/car,
1 2 5 7 8 10 Yakima's manuals numbers the holes from the back of the track. just go from the front and you'll be ok.
The tape in this image isn't the same as the pieces of tape on the cross frame picture, but you get the idea.
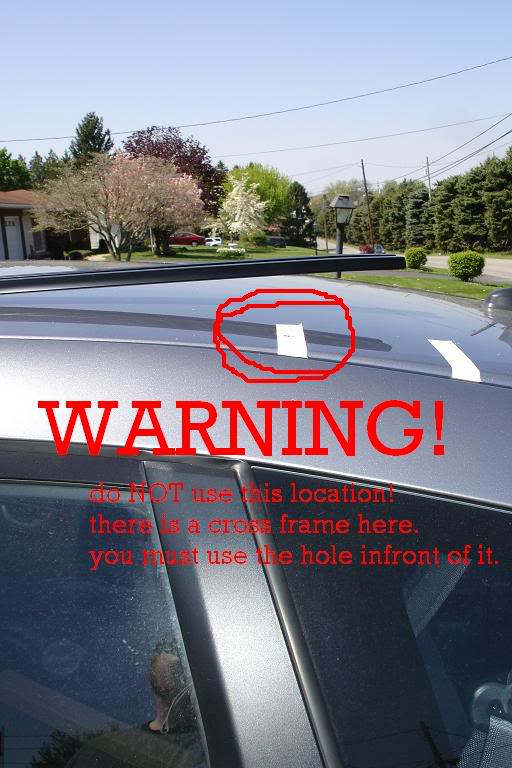
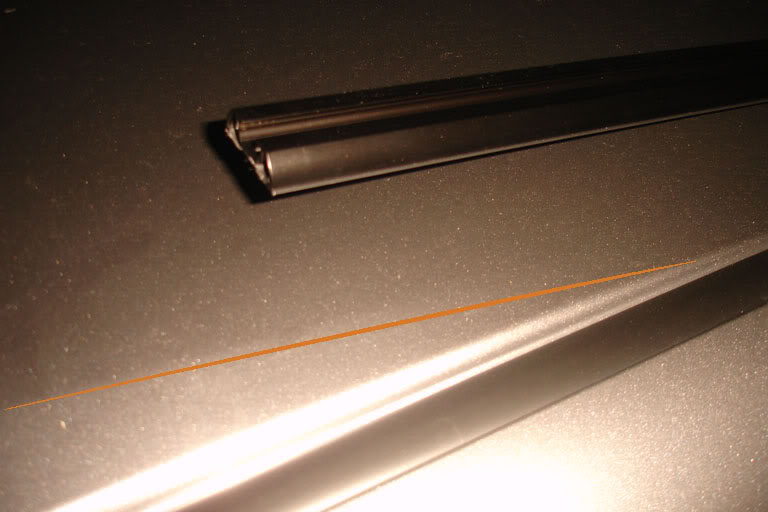
The first hole to drill is at the front of the roof, hole number 1. From the end of the rubber windshield seal i measured in 4 and 7/16 inch. Put down some masking tape in the general area, and measure at several locations inward and outward around 4 and 1/2 inches from the outside edge of the roof/frame. connect the dots and this will give you a general curve that you can measure the distance from the side outside roof/frame. this distance in is 4 and 11/16 from the "frame". See the orange line in the next pic. this picture isnt the first hole, but the middle 5th hole.
(Note: this is where i drilled the first hole. All the other holes to the back of the car are dependent on it. notice that that the back of my rack is almost into the bend at the back of the roof. (see pic under) If you want to give it more space, you will have to start the first hole up farther. I cant say for sure that if you move it up all the holes will miss cross frames, but all my holes seemed to have some clearance to front and back, but i would be scared to go more than an inch forward.)
To start drilling the holes, use the metal punch to create a divot for the drill bit to spin in. if you just try to drill the bit will wander off and scratch your exposed paint. start with the 1/8 inch bit. Use a deep socket, drill bit stop, or lots of tape on the bit to keep it from driving through your headliner. you only need to get through the sheet metal, so 1/8 inch is enough.
Blow, suck or "Pat" up the metal shaving with masking tape. DONT brush the shavings around on your paint! after the 1/8in move up to the 9/32 inch. don't try and use a bigger bit than this just because you don't have the right bit. go buy it. these Plus nuts have to be very close fitting to give the best grip.
after the hole is drilled you may want to clean up and deburr the hole. I used a small jewelry file set. what ever you use,be careful not to change the shape of the hole.
Apply some of the touch-up paint to the holes and allow to dry. Say no to exposed metal!
Now install the first plus-nut. The manual will cover the main details of plus-nut installation, but just FYI.
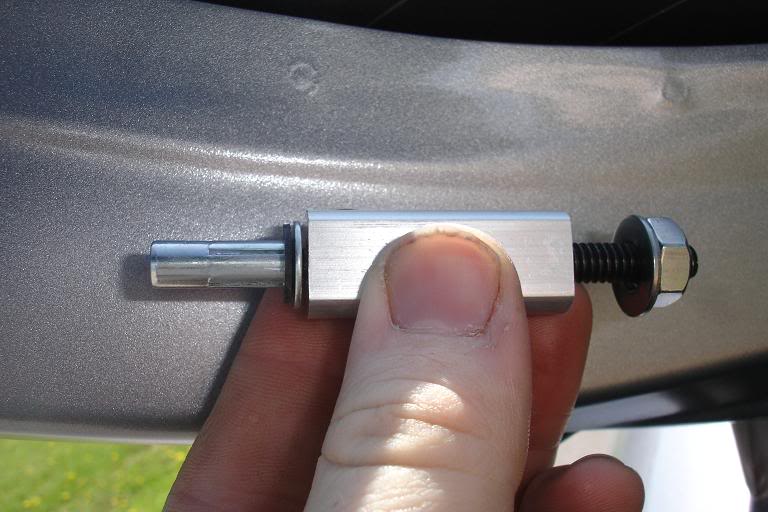
They will fit into the holes, just push firmly. Make SURE you have a rubber washer on it before you start tightening. you wont get them out unless you do some serious work. ie headliner removal and cutting off the bottom of it with a dremel tool. and you only will have two extra! Make sure that they are firm to tighten with the wrench. dont go too tight, but make sure they wont start slipping after you try to tighten down the track with the bolts.
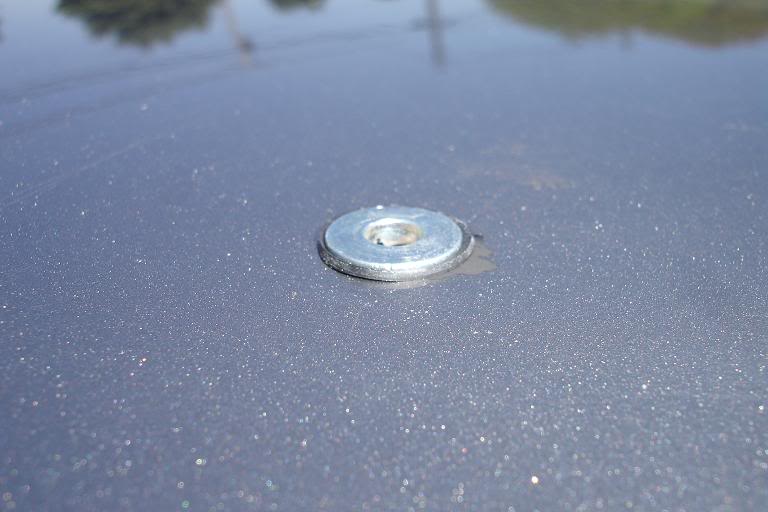
After the first plus-nut is installed, you can LIGHTLY tighten the track into it. leave it lose enough so you can pivot it on your roof without scratching the paint. MAKE SURE THERE ARE NO SHAVINGS!. With the track on you can determine the rough distances for all the other holes. use masking tape under the hole that I mentioned above. The track should bend to the surface of the roof. push down at the front as well, you dont want to pop the plus-nut out of the hole!
Note: I gave a very slight bend to the front and back of my tracks to relieve pressure on the bolts before i installed the track. I dont think it was completely nessisary and you might be able to get away with out it. if i did it over, i wouldn't have bent them.
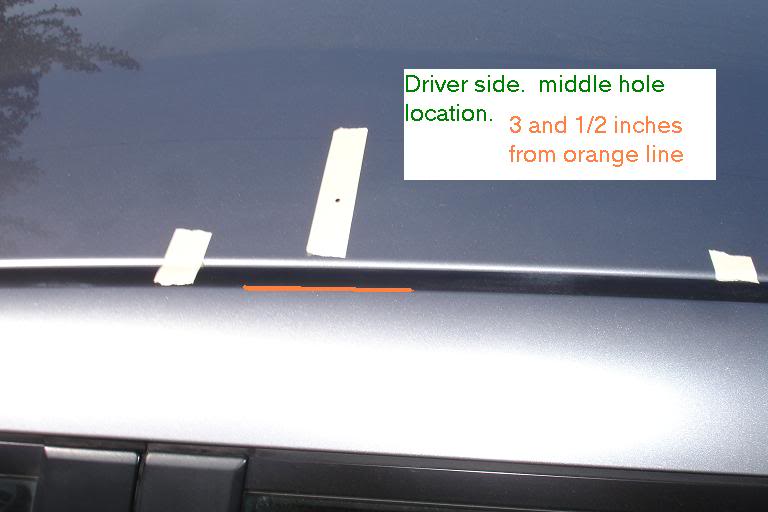
I actually started drilling my holes in the middle of the roof on the driver side. (the picture repeated below) The hole was 3 and 1/2 inches from the outside roof edge, but this is the second hole you should drill. It is the 5th hole in the track. When I put the passenger side track on i did the front hole first and then the middle (5th) hole, essentially the same as if you where doing it.
after the 5th hole is done, you should do the number 10 hole, or the last hole in the track. then you can mark the rest of the holes, drill them all out and install the plus-nuts all at once. You will have to remove the track to drill, you don't want to drill through the track!
after thats done, and all the plus-nuts are installed. you will repeat the process for the other track.
With the track removed, test each of the plus-nuts with the bolts. put them in almost the whole way. IF it seems like you are getting pressure before they are seated, back off the bolt a little, and continue tightening. if you put too much torque on the plus-nuts they will spin when you go to put the track on. THIS IS VERY BAD! This is the last chance you will have to tighten up the plus-nuts before you add the silicone, after you start the silicone, you have to get the track tightened down before the silicone cures in order to get the best seal.
When you are ready for final track installation, put the landing nut plate nuts into the tracks before you tighten them down. the end caps act as washers for the first and last holes in the track. Use a good amount of the supplied silicone in and around the bolt holes to seal your roof good. As you tighten the bolts down with the 1/8 hex key, go slow. Again, IF it seems like you are getting pressure on the plus-nuts before they are seated, back up a little and continue to tighten.
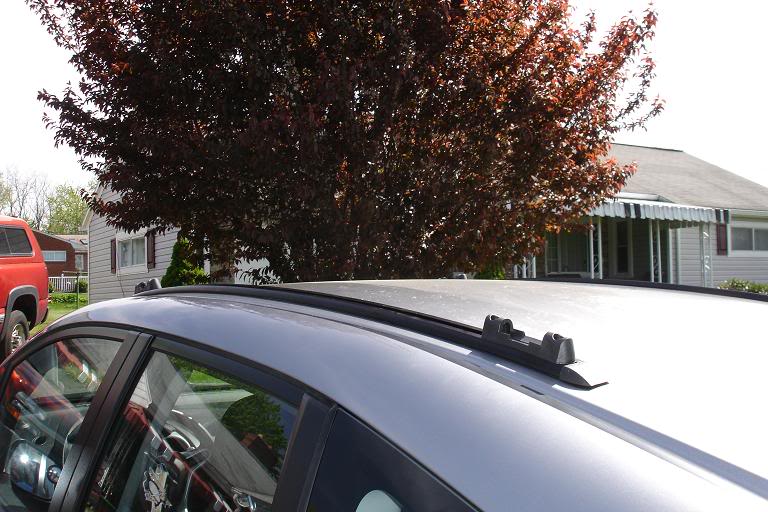
Now you just have to add the control towers and cross bars.
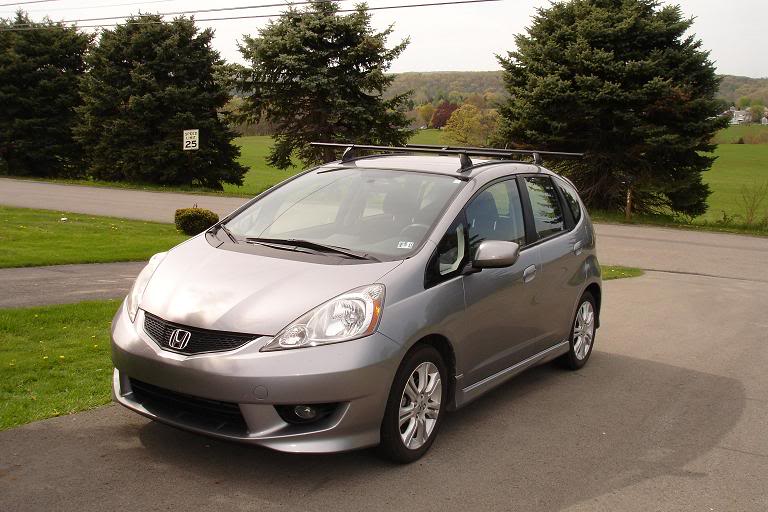
The finished product.
I like them, but it wont be long before I add a flaring to cut down on the road noise. I'll probably shorten them a little, but i want to be able to get sheet goods from the store, so we will see.
I nor FitFreak.net or anyone else but you are responsible for messing up your car. Only you can take responsibility for your actions. if you don't feel comfortable get a professional to do the work.
ya-da ya-da ya-da....
READ and READ again the whole post before you start!
You may want help doing this, but I did it by my self.
Note. this is how I installed this rack. it is working fine for me. you may be able to mount it differently and if work just as well, or it could be absolutely horrible.....
ok.
DIY Yakima track system roof rack install.
I"m using the Yakima 54" (inch) track system to mount a control tower roof rack onto my 2009 Fit Sport. there is a video on youtube that covers the general installation. Here are some of the more GE8 specific things.
Here are some of the things you will need.
if you don't have this stuff, go get it before you start.
starting at the top left.
first three items.
Masking tape.
Automotive touch-up paint.*
small art brush. ( i used a foam brush, but art brush would have worked better.)
Next row.
SAE Hex key set. (only need 1/8 inch to install track)
1/8i inch drill bit for pilot hole
9/32 inch for plus-nut. (Do Not use a bigger or smaller bit!)
adjustable wrench. ( I only needed one)
metal punch. (this one is spring loaded so i didn't need a hammer.)
sockets for bit spacers. (I used 7/32, 15mm and 17mm deep well.)
ratchet wrench with 1/2 inch Deep well.
(if you don't have a deep well socket, you will have to use an open end or box wrench.)
Sharpie marker (also get a pencil)
Drill
Magnetic trays and a box to hold all the tools and hardware is a big help.
you will also need a measuring device. tape measurer works well.
* ( this is a spray can. you can spray some into a jar and paint it on with a brush. just do if FAR away from your, or anybody else's car or personal property.)
U should start by marking out the locations of the cross supports for the roof. I google for the image and then I APPROXIMATED these locations. the orange mark is the actual location. Guess how i found out? disregard the tape next to it on the left.
There are ten holes in the 54inch track. The holes in the track that I used was, from the front of the track/car,
1 2 5 7 8 10 Yakima's manuals numbers the holes from the back of the track. just go from the front and you'll be ok.
The tape in this image isn't the same as the pieces of tape on the cross frame picture, but you get the idea.
The first hole to drill is at the front of the roof, hole number 1. From the end of the rubber windshield seal i measured in 4 and 7/16 inch. Put down some masking tape in the general area, and measure at several locations inward and outward around 4 and 1/2 inches from the outside edge of the roof/frame. connect the dots and this will give you a general curve that you can measure the distance from the side outside roof/frame. this distance in is 4 and 11/16 from the "frame". See the orange line in the next pic. this picture isnt the first hole, but the middle 5th hole.
(Note: this is where i drilled the first hole. All the other holes to the back of the car are dependent on it. notice that that the back of my rack is almost into the bend at the back of the roof. (see pic under) If you want to give it more space, you will have to start the first hole up farther. I cant say for sure that if you move it up all the holes will miss cross frames, but all my holes seemed to have some clearance to front and back, but i would be scared to go more than an inch forward.)
To start drilling the holes, use the metal punch to create a divot for the drill bit to spin in. if you just try to drill the bit will wander off and scratch your exposed paint. start with the 1/8 inch bit. Use a deep socket, drill bit stop, or lots of tape on the bit to keep it from driving through your headliner. you only need to get through the sheet metal, so 1/8 inch is enough.
Blow, suck or "Pat" up the metal shaving with masking tape. DONT brush the shavings around on your paint! after the 1/8in move up to the 9/32 inch. don't try and use a bigger bit than this just because you don't have the right bit. go buy it. these Plus nuts have to be very close fitting to give the best grip.
after the hole is drilled you may want to clean up and deburr the hole. I used a small jewelry file set. what ever you use,be careful not to change the shape of the hole.
Apply some of the touch-up paint to the holes and allow to dry. Say no to exposed metal!
Now install the first plus-nut. The manual will cover the main details of plus-nut installation, but just FYI.
They will fit into the holes, just push firmly. Make SURE you have a rubber washer on it before you start tightening. you wont get them out unless you do some serious work. ie headliner removal and cutting off the bottom of it with a dremel tool. and you only will have two extra! Make sure that they are firm to tighten with the wrench. dont go too tight, but make sure they wont start slipping after you try to tighten down the track with the bolts.
After the first plus-nut is installed, you can LIGHTLY tighten the track into it. leave it lose enough so you can pivot it on your roof without scratching the paint. MAKE SURE THERE ARE NO SHAVINGS!. With the track on you can determine the rough distances for all the other holes. use masking tape under the hole that I mentioned above. The track should bend to the surface of the roof. push down at the front as well, you dont want to pop the plus-nut out of the hole!
Note: I gave a very slight bend to the front and back of my tracks to relieve pressure on the bolts before i installed the track. I dont think it was completely nessisary and you might be able to get away with out it. if i did it over, i wouldn't have bent them.
I actually started drilling my holes in the middle of the roof on the driver side. (the picture repeated below) The hole was 3 and 1/2 inches from the outside roof edge, but this is the second hole you should drill. It is the 5th hole in the track. When I put the passenger side track on i did the front hole first and then the middle (5th) hole, essentially the same as if you where doing it.
after the 5th hole is done, you should do the number 10 hole, or the last hole in the track. then you can mark the rest of the holes, drill them all out and install the plus-nuts all at once. You will have to remove the track to drill, you don't want to drill through the track!
after thats done, and all the plus-nuts are installed. you will repeat the process for the other track.
With the track removed, test each of the plus-nuts with the bolts. put them in almost the whole way. IF it seems like you are getting pressure before they are seated, back off the bolt a little, and continue tightening. if you put too much torque on the plus-nuts they will spin when you go to put the track on. THIS IS VERY BAD! This is the last chance you will have to tighten up the plus-nuts before you add the silicone, after you start the silicone, you have to get the track tightened down before the silicone cures in order to get the best seal.
When you are ready for final track installation, put the landing nut plate nuts into the tracks before you tighten them down. the end caps act as washers for the first and last holes in the track. Use a good amount of the supplied silicone in and around the bolt holes to seal your roof good. As you tighten the bolts down with the 1/8 hex key, go slow. Again, IF it seems like you are getting pressure on the plus-nuts before they are seated, back up a little and continue to tighten.
Now you just have to add the control towers and cross bars.
The finished product.
I like them, but it wont be long before I add a flaring to cut down on the road noise. I'll probably shorten them a little, but i want to be able to get sheet goods from the store, so we will see.


#5
04-24-2010, 10:42 AM
it awful.......... lol. i'm already planning on a DIY fairing. One thing is i have a lot of cross bar exposed at the ends. I got the longer bars because they where the same price as the shorter ones, and i want the maximum capacity. They are only about 3 inchs wider than the car, maybe. if you where to bump into them, then you were too close to my car in the first place.
Got them from rackoutfitters.com.
i think the channels are creating wind noise as well. I'm going to find something to fill them in that i can easily remove for adjustably.
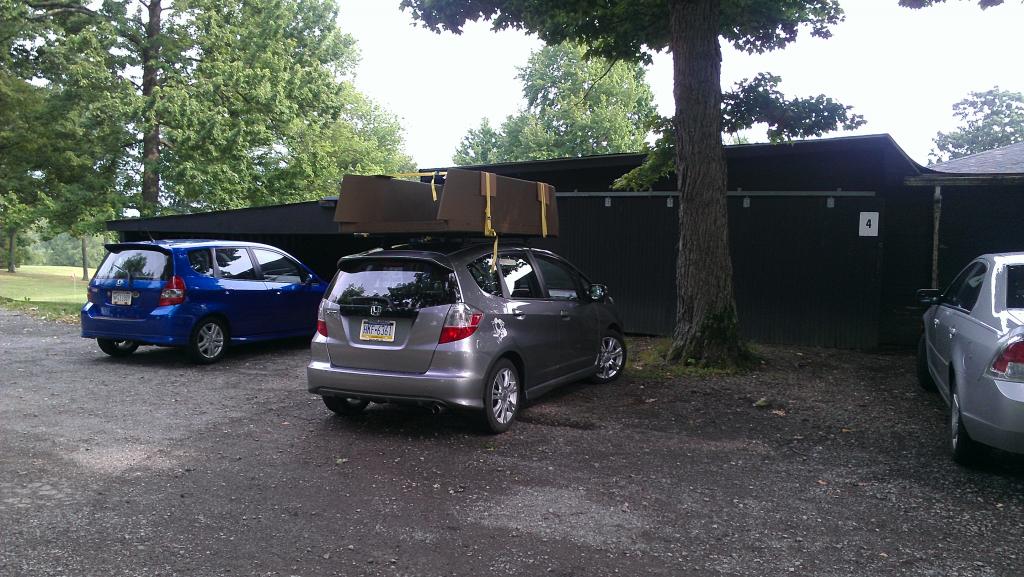
My first consideration when getting the rack was my kayak. Its a fishing kayak, so it a bit on the more heavy side. secondly would be getting lumber and hardwoods, and Maybe even a short trip with plywood or other 4'x8' material.
lol. i'm already planning on a DIY fairing. One thing is i have a lot of cross bar exposed at the ends. I got the longer bars because they where the same price as the shorter ones, and i want the maximum capacity. They are only about 3 inchs wider than the car, maybe. if you where to bump into them, then you were too close to my car in the first place.Got them from rackoutfitters.com.
i think the channels are creating wind noise as well. I'm going to find something to fill them in that i can easily remove for adjustably.
My first consideration when getting the rack was my kayak. Its a fishing kayak, so it a bit on the more heavy side. secondly would be getting lumber and hardwoods, and Maybe even a short trip with plywood or other 4'x8' material.
#6
04-24-2010, 10:52 AM
Oh sorry, i havent tryed with just the tracks yet. ill get back to you on that. here are some more shots of the racks from different angles.
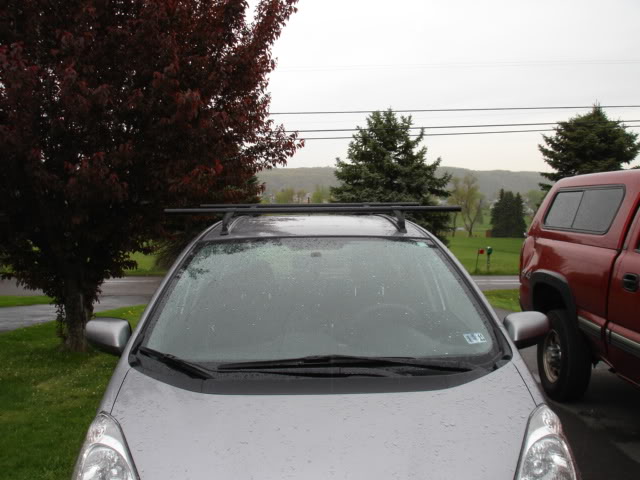
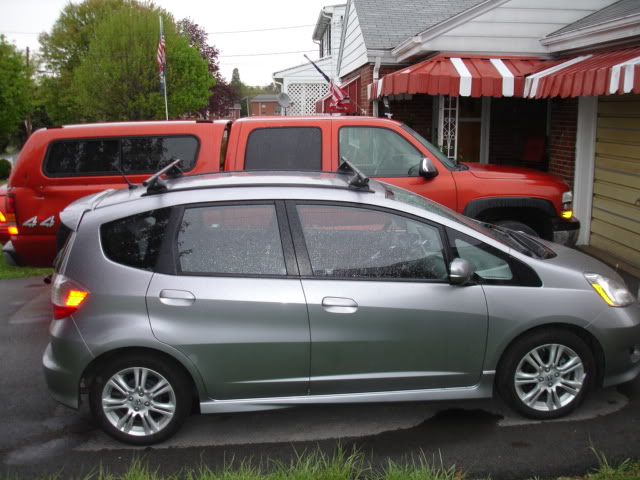
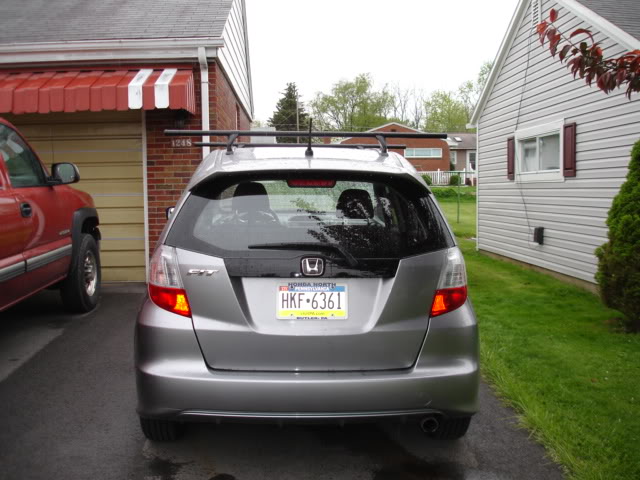
man it looks really wide from the back.
man it looks really wide from the back.
#7
04-24-2010, 06:25 PM

I found the Fairing cut down on noise but also dropped the mpg of both the Integras by about 3-4mpg. I'm guessing on the fit, with less torque than the integra, highway jaunts will drop it 4-6mpg. When I took off the Fairing and added wind-jammers, my economy went right back up and the noise was about the same as with the fairing. With the bars out so far, you might not be able to get a fairing that fits right AND cuts down on the noise as the Fairing will only go out so far. you might want to look into either shorter bars, ones that can be extended, or windjammers for either end of the car.
~SB
~SB
#8
04-25-2010, 12:05 AM
I took the the Fit on the highway without the cross bars, and im plessed to say to didn't hear anything. I didn't even have the landing pad inserts in.
Yeah, i thought about putting the wind jammers on the ends of the racks, but i think it might look like an airplane.
Yeah, i thought about putting the wind jammers on the ends of the racks, but i think it might look like an airplane.
#9
10-31-2012, 07:28 PM

I'm going to do almost the same install either this weekend or the weekend after (using 42" track and 48" bars) - will try and post the process and pictures in a new thread to try and help anyone else as this thread has been really helpful to me.
Decided to with the track and plusnut approach after our Thule bolt-on rack lasted less than a week on the car before being stolen here in center city Philly.
I just finished an after-market JVC double-DIN stereo install, wish I'd documented that a bit better so I could have posted to try and help anyone else.
#10
11-04-2012, 10:47 PM
I haven't been around the forum in a long time, but the roof rack is going strong.
I've put some memorable things on top the rack, including this catamaran I built for an anything floats race and a 60 inch flat screen. I use the rack all the time with my 70 lbs kayak.
I had several sheets of 4' x 8' foam on top to make the catamaran. A nice reason for using the longer cross bars. They go wider than the car so if your not into carrying building goods or multiple kayaks, the shorter bars are better.


Thread
Thread Starter
Forum
Replies
Last Post
violation
1st Generation (GD 01-08)
10
01-15-2009 01:02 PM