DIY headlight painting
#41
 06-02-2009, 10:10 PM

Good point on the paint code. That slipped my mind.
Well the older fits had it paint matched and they looked alright.
I'm leaning more towards the contrasting colors now.
Well the older fits had it paint matched and they looked alright.
I'm leaning more towards the contrasting colors now.
#42
06-06-2009, 07:58 PM

I have some questions about the headlight painting. I saw that there were a few people who ended up with condensation after painting there lights. I had the same thing happen with my G6 headlights and am still dealing with it 1 1/2 later. I wanted to know how common it is and for the people it's not happening to, did you take any special precautions? I really like the look of the storm silver with black headlight bezels, but I am so scared to crack them open and ruin my brand new car. If I could just buy them already done, I would. Oh well. Any info would be great.
#43
06-07-2009, 12:48 AM

Mine now have condensation!!
I have two vehicles, and parked the fit for a few weeks and drove my jeep. Well, while the car was sitting, it was also building up condensation. WTF? Very, very small amount, but will have to re-do them.
It's been more than a month since I painted mine... and I'm guessing that I didn't see the condensation before because I drove it, and with the lights being on, baked them out daily. Once the car sat for awhile it allowed the condensation to build up, so it is now noticeable...
Ah well, knew the risks going in. These headlights are HUGE and of course that means more chance for leakage due to more sealing surface. Guess it's a good excuse to attempt an HID retro-fit!!
#44
06-07-2009, 08:05 AM

i don't have any condensation.
when doing this job you are suppose to get the rubber sealant.
i don't think anyone did. not even me. this is our flaws.
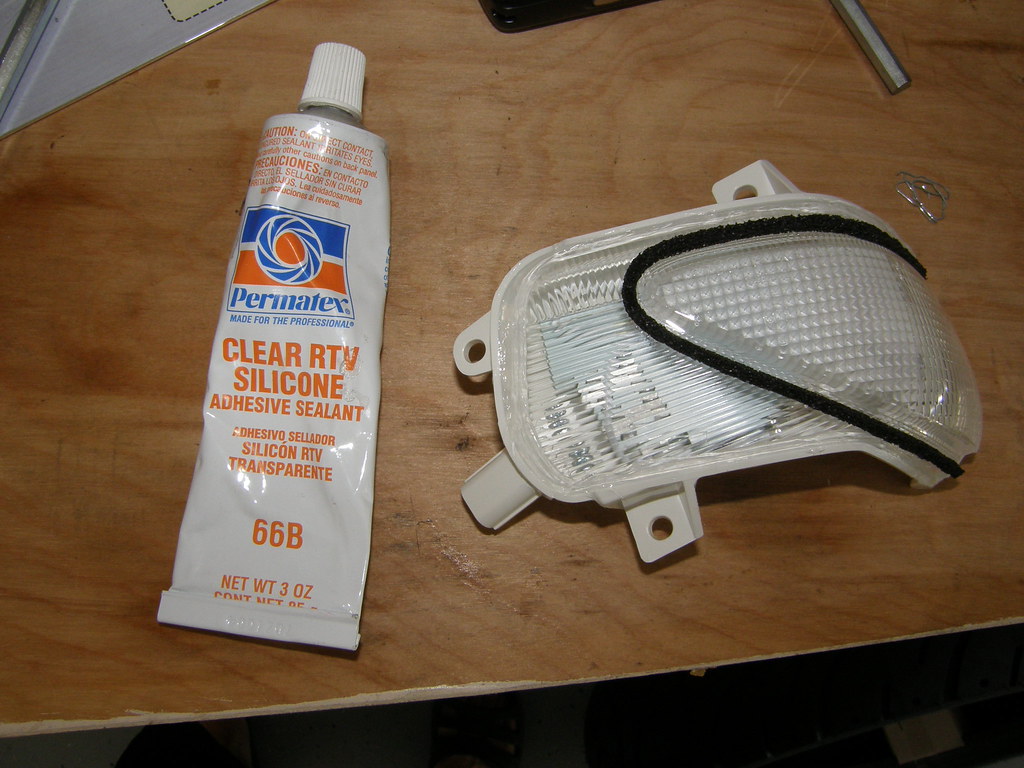
i myself took the extra measure and used silicone. clear RTV. works
great. as of right now i have no leaks and all is well thanks to the
RTV.
here is a pic of the rtv on.
P4100068.jpg?t=1239475460
and here is a pic of the RTV i used.
when doing this job you are suppose to get the rubber sealant.
i don't think anyone did. not even me. this is our flaws.
i myself took the extra measure and used silicone. clear RTV. works
great. as of right now i have no leaks and all is well thanks to the
RTV.
here is a pic of the rtv on.
P4100068.jpg?t=1239475460
and here is a pic of the RTV i used.
#48
07-23-2009, 07:17 PM
nissan tail light sealant. when you have the housing apart. stretch the sealant around the housing then re heat. press the two pieces together. you will have no problems. the light will have a stock like seal.
p/n for the sealant is b6553-89915
p/n for the sealant is b6553-89915
#49
07-24-2009, 03:48 AM

Awesome DIY, Im actually considering going ahead and doing this, as you make it look so easy.
Im itching to black the lights out, but Im a little too scared to cook my lights and not keen on spending money on new ones/second hand ones.
Im itching to black the lights out, but Im a little too scared to cook my lights and not keen on spending money on new ones/second hand ones.


#52
10-09-2009, 12:36 PM

ive got someone to paint my headlights for me
but ive noticed that one of them fogs up whenever i wash the car
wt do you suggest on me doin by myslf?
i mean, is there a way i can find out where the leak is so that i can seal it back up?
and can you post a pic of where i need to seal?
but ive noticed that one of them fogs up whenever i wash the car
wt do you suggest on me doin by myslf?
i mean, is there a way i can find out where the leak is so that i can seal it back up?
and can you post a pic of where i need to seal?
#53
10-09-2009, 05:01 PM
do a search i think someone made a DIY.
but there really is no need to. It's very easy.
Just pull/pry with a screw driver till the tabs break.
Sand it down paint it and your done. let dry and put back
on with scilicone.
this is where you need to seal.
P4100057.jpg?t=1239469572
it will look like this after you seal.
P4100068.jpg?t=1239475460
and the sealant you will need.
just apply the sealant around the whole light where the lens meets
the housing.
but there really is no need to. It's very easy.
Just pull/pry with a screw driver till the tabs break.
Sand it down paint it and your done. let dry and put back
on with scilicone.
ive got someone to paint my headlights for me
but ive noticed that one of them fogs up whenever i wash the car
wt do you suggest on me doin by myslf?
i mean, is there a way i can find out where the leak is so that i can seal it back up?
and can you post a pic of where i need to seal?
but ive noticed that one of them fogs up whenever i wash the car
wt do you suggest on me doin by myslf?
i mean, is there a way i can find out where the leak is so that i can seal it back up?
and can you post a pic of where i need to seal?
P4100057.jpg?t=1239469572
it will look like this after you seal.
P4100068.jpg?t=1239475460
and the sealant you will need.
just apply the sealant around the whole light where the lens meets
the housing.

#55
11-30-2009, 01:39 PM

Amazing! I am truly stunned that anyone would go thru all of that complicated work for such a minor change and effect!
I'm not knocking the results of this mod, as I do think it's better looking when you see the old/new headlight housings side by side on the cars.
But I, for one, would never even notice the difference on a headlight-repainted Fit sitting there all by it's lonesome!
(I guess maybe I'm just not a real affectionado then..?)
Anyway, the obsession some people have for detailing these little cars is truly awe inspiring!
However for myself I think I'll just pass, leave my base GE10 mostly stock, {except for the horn}, and enjoy the show...
#56
12-06-2009, 10:33 PM

I tried your DIY today. I had set the oven to 300degrees for 5 minutes. However the plastic started warping and a part of the plastic started bubbling. I made sure that my headlights did not touch any part of the oven, so I don't understand how that could of happened. I was unable to pry the plastic from the housing as well. the adhesive was simply way too strong. help?
#57
12-16-2009, 06:12 PM
is it necessary to take of the front bumper?
and can this be done without adhesion promoter, but still get the same quality?
mahaloz
and can this be done without adhesion promoter, but still get the same quality?
mahaloz
#58
12-16-2009, 11:48 PM
people have done it without taking the bumper off.
for me it was easier to take it off.
don't cheap out get the promoter. it's a must. unless
you really feel like sanding every inch of it. which by the
way is a pain in the ass. and boy does it have a lot of
small cracks to sand lol. quality wont be the same either.
the promoter is just so worth it. just spray it and your
ready to paint.
#59
01-30-2010, 08:26 PM

sweet job with the headlights! One of my HID burnt in the headlight assembly and so now i have a slight haze on the inside. If anyone from FITFREAK from socal and is out to make some extra $$$ I'll pay to have my headlights cleaned and painted just like the DIY. Willing to pay $200 for a pro job!!!
#60
02-28-2010, 01:20 AM
Make sure you unscrewed all the small silver screws off the back of the housing. I was prying my first one off and realized I missed one. This could lead to damage of the light itself. Other then that Pry with a screwdriver and break the two sides from each other.
My method was pry all tabs up after the 5 mins. Put in for another min. and then start working the corner and then eventually pull each side away from each other. Worked great.
Got some pics to show the blackout I did. Replaced the top orange bulbs with silver ones, and also covered the orange reflector with paint
hah yeah, I go through a 12 pack of dew daily almost. I have it in my blood. I also took the blackouts one step further and went for the headlights. All this blacking out in one day. Car looks great, and completely different now.


My method was pry all tabs up after the 5 mins. Put in for another min. and then start working the corner and then eventually pull each side away from each other. Worked great.
Got some pics to show the blackout I did. Replaced the top orange bulbs with silver ones, and also covered the orange reflector with paint
I tried your DIY today. I had set the oven to 300degrees for 5 minutes. However the plastic started warping and a part of the plastic started bubbling. I made sure that my headlights did not touch any part of the oven, so I don't understand how that could of happened. I was unable to pry the plastic from the housing as well. the adhesive was simply way too strong. help?


