GE8 JDM Rear Wiper Mod
#1
 08-31-2011, 11:07 PM


GE8 JDM Rear Wiper Mod
i don't get why it's JDM if all fits come with the wiper in the "down" position
anyways, moving onto the diy
i am not responsible for any damages you do to your car. do at your own risk
ignore the position of my wiper, i was sure to switch the gear back before i took pics of where to move it.
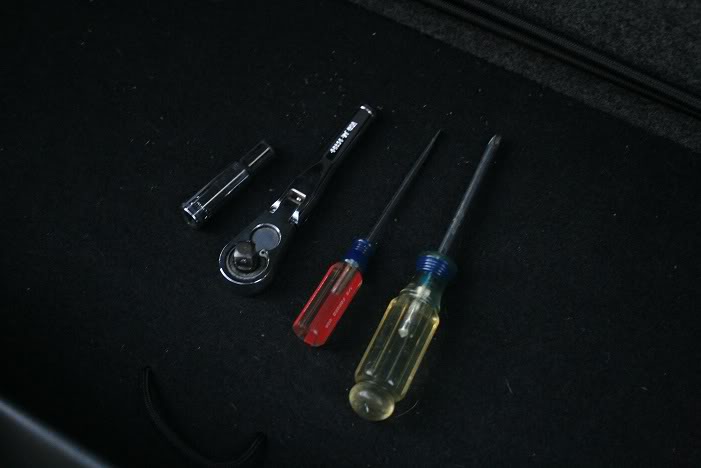
now thats all taken care of, you'll need the following:
1- small flat head screwdriver
1- philip head screwdriver
1- 10mm socket / wrench
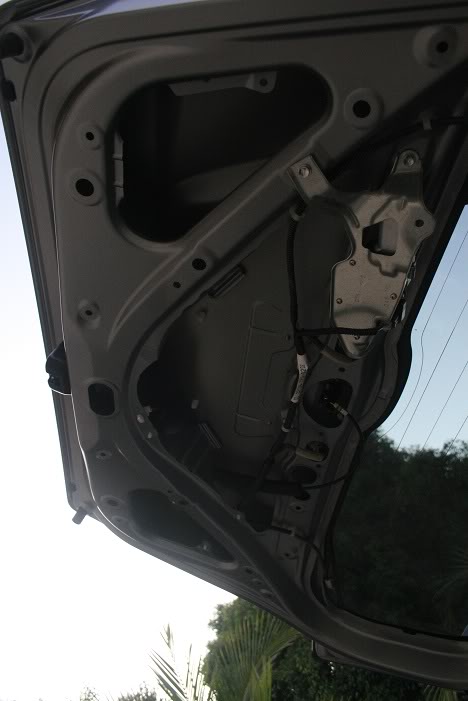
1: remove the interior panel. i'm not sure if there are any screws holding it on (took mine off awhile ago cause of my sub), but you need to pull HARD on it to get the clips to come out.
2: remove the cap covering the bolt on the wiper. pull on the two ends and itll pop right off.
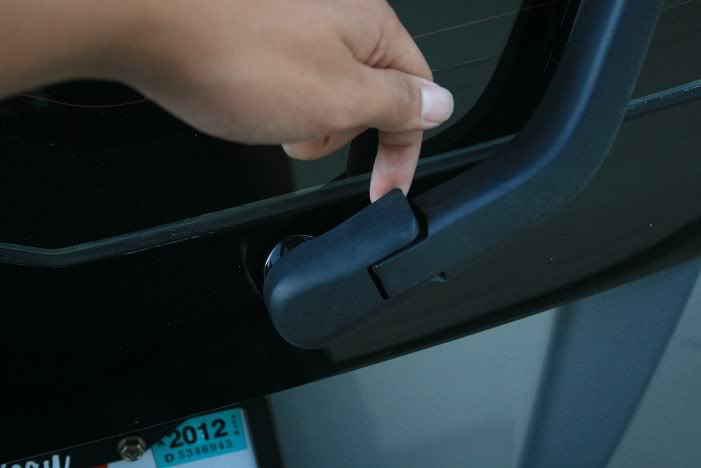
3: remove the 10mm nut holding the wiper on.
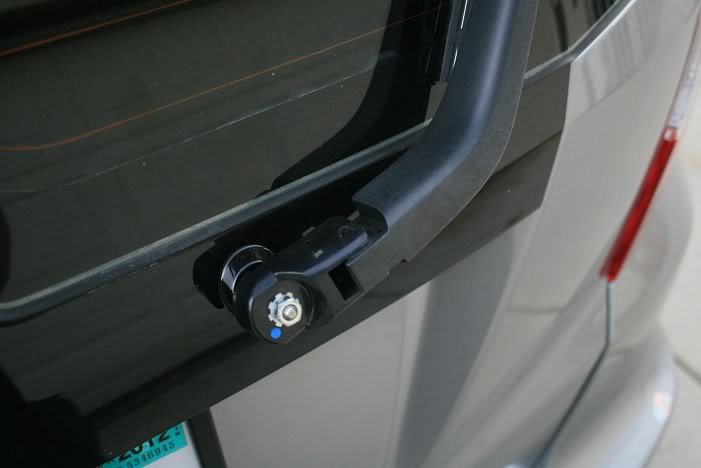
4: remove the wiper. you need to wiggle it and pull upwards to remove it.
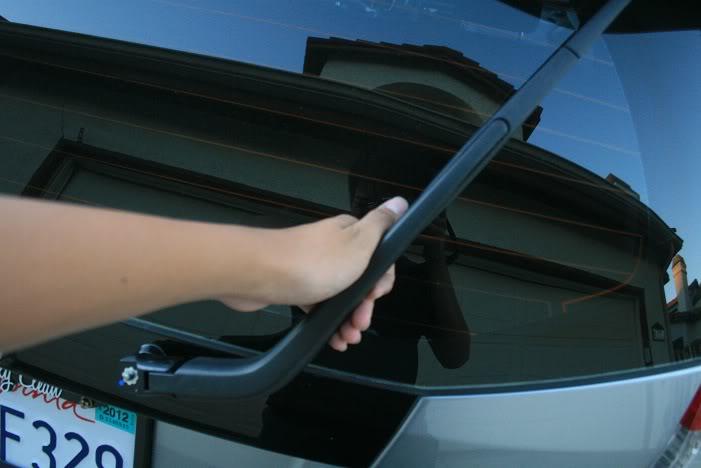
i held it there and by the motor.
5: remove the plug using a flat head screwdriver to lift the black plastic.
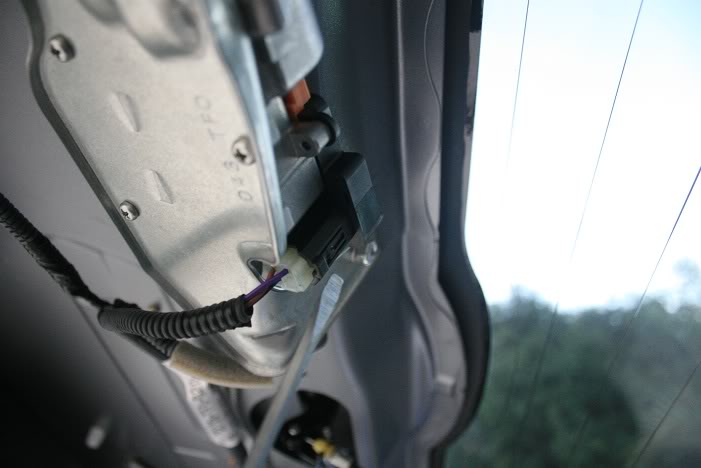
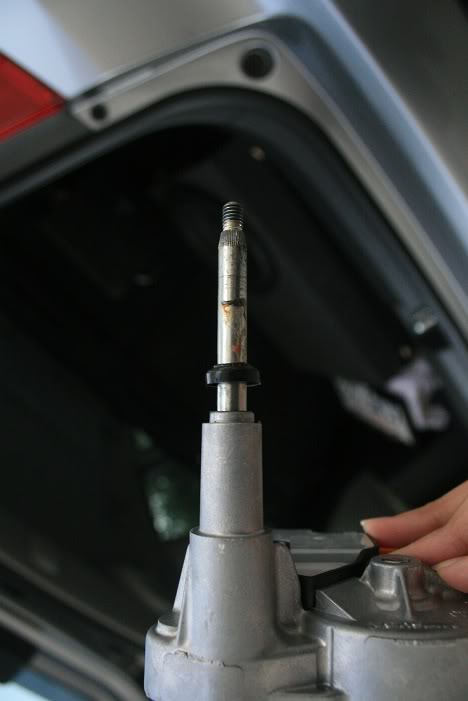
6: remove the three 10mm bolts holding the motor in place.
7: take down the motor assembly and remove these 4 screws.
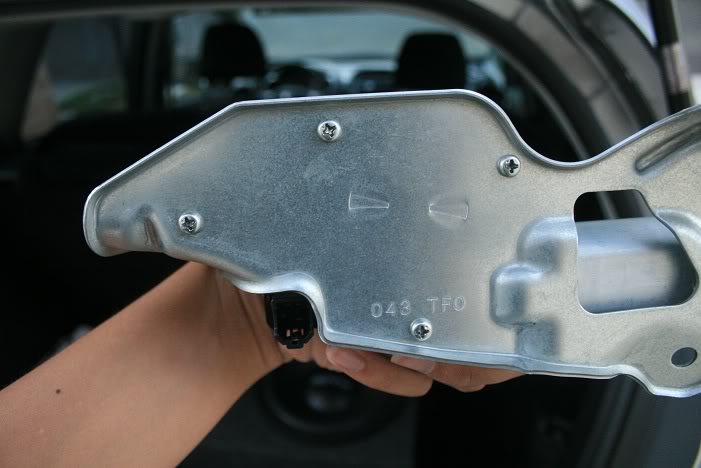
8: when you open it, you'll find this.
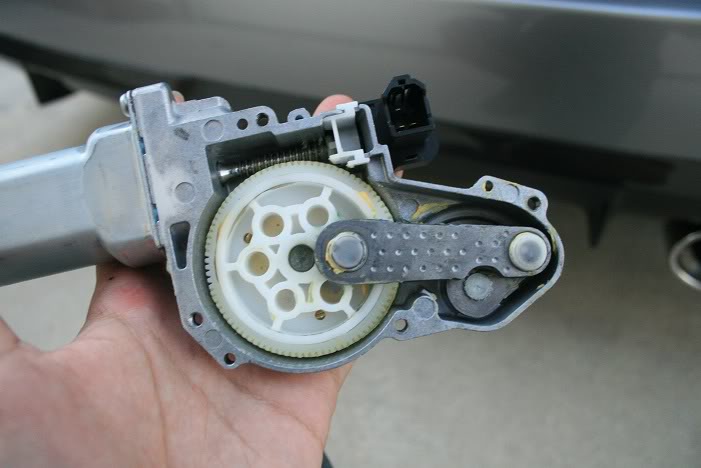
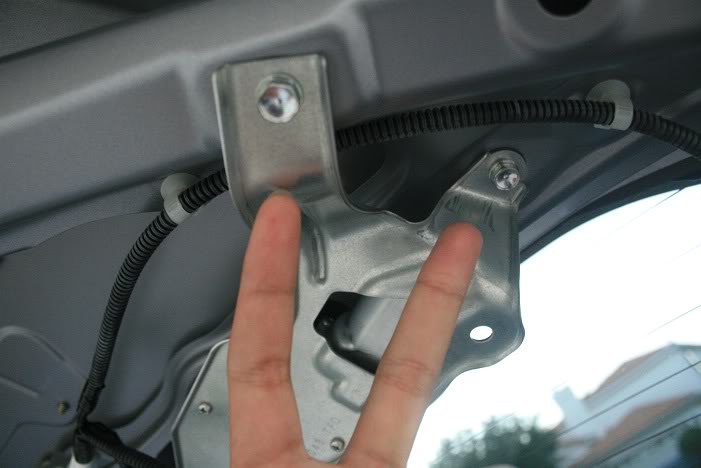
9: remove the arm attached to the white gear and the small metal piece by lifting it straight up.
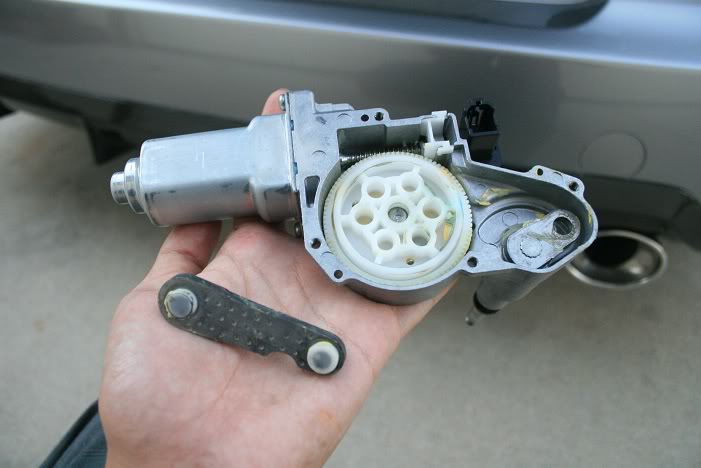
10: swing the small metal piece to the opposite side.

11: reattach the metal arm, inserting the peg into the hole on the opposite side of the white gear. (basically, be sure you didn't turn the white gear and you'll be fine).
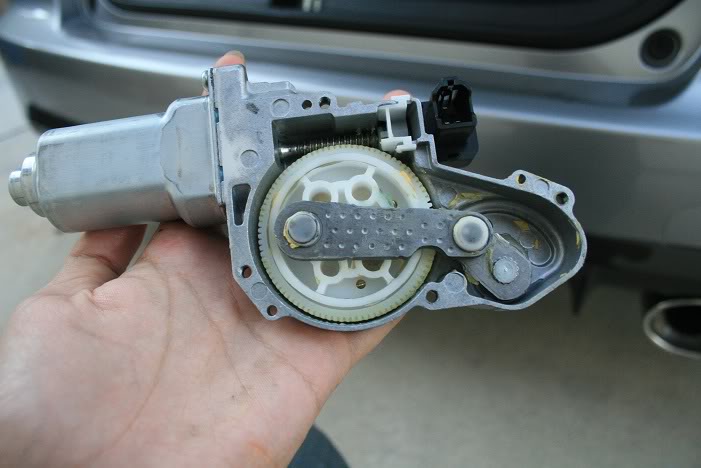
12: be sure this black cap is pushed back in place.
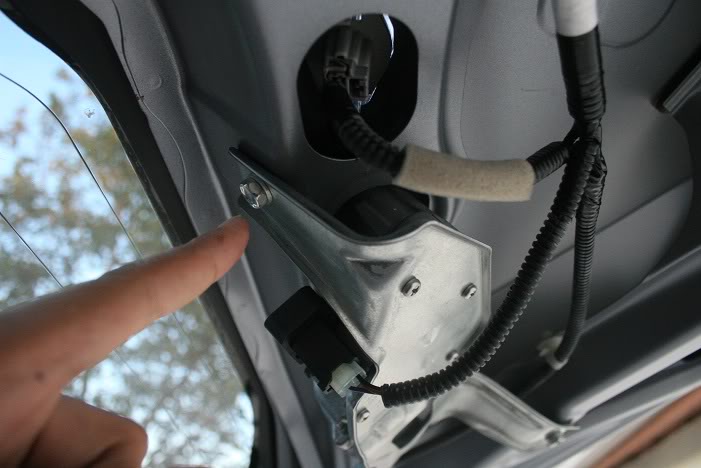
13: line up back plate to the motor and rescrew the 4 phillip head screws
14: put the motor back in the car and tighten the 3 10mm bolts
15: put the wiper back on along with the cover.
16: test be sure everything works
17: if it's all good then reinstall the interior panel (if you have a sub just leave it off, thats where almost all the rattles are coming from).
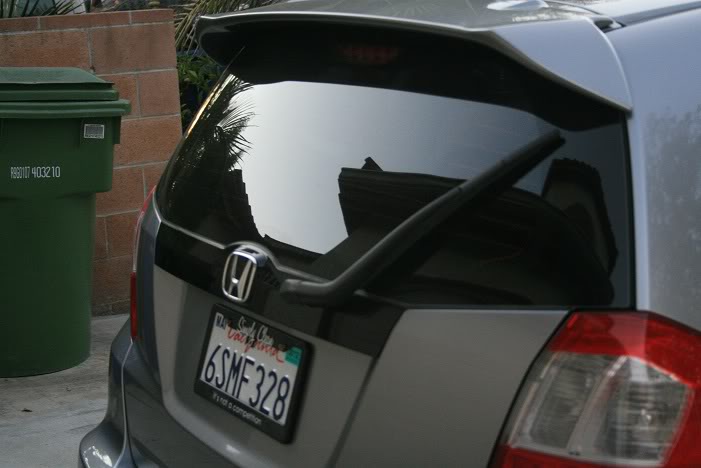
note: you can adjust the angle the wiper sits at to your preference, just be sure to test it so it stays on the glass. i personally have it the furthest back it can go.
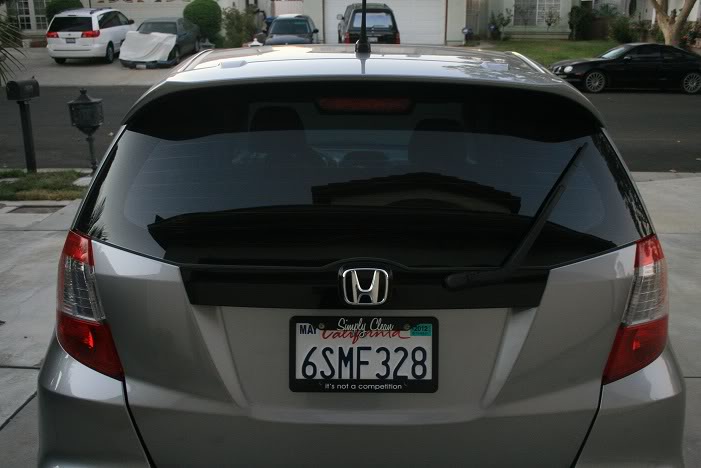
as you can see it's almost identical to the gd's diy. hope this helped some of you out!
anyways, moving onto the diy
i am not responsible for any damages you do to your car. do at your own risk
ignore the position of my wiper, i was sure to switch the gear back before i took pics of where to move it.
now thats all taken care of, you'll need the following:
1- small flat head screwdriver
1- philip head screwdriver
1- 10mm socket / wrench
1: remove the interior panel. i'm not sure if there are any screws holding it on (took mine off awhile ago cause of my sub), but you need to pull HARD on it to get the clips to come out.
2: remove the cap covering the bolt on the wiper. pull on the two ends and itll pop right off.
3: remove the 10mm nut holding the wiper on.
4: remove the wiper. you need to wiggle it and pull upwards to remove it.
i held it there and by the motor.
5: remove the plug using a flat head screwdriver to lift the black plastic.
6: remove the three 10mm bolts holding the motor in place.
7: take down the motor assembly and remove these 4 screws.
8: when you open it, you'll find this.
9: remove the arm attached to the white gear and the small metal piece by lifting it straight up.
10: swing the small metal piece to the opposite side.
11: reattach the metal arm, inserting the peg into the hole on the opposite side of the white gear. (basically, be sure you didn't turn the white gear and you'll be fine).
12: be sure this black cap is pushed back in place.
13: line up back plate to the motor and rescrew the 4 phillip head screws
14: put the motor back in the car and tighten the 3 10mm bolts
15: put the wiper back on along with the cover.
16: test be sure everything works
17: if it's all good then reinstall the interior panel (if you have a sub just leave it off, thats where almost all the rattles are coming from).
note: you can adjust the angle the wiper sits at to your preference, just be sure to test it so it stays on the glass. i personally have it the furthest back it can go.
as you can see it's almost identical to the gd's diy. hope this helped some of you out!
Last edited by FittedOnEm; 09-07-2011 at 12:58 AM.


#4
09-01-2011, 01:39 AM
those and getting the wiper off were the hardest for me. the wiper wouldnt budge first time around.
good luck!
good luck!
#5
09-04-2011, 09:50 AM
I hate the dirt that gets caught on the wiper and this mod would certainly take care of that but I'm still not sure if I'm liking the looks of it.
Has any body put a plug/cap in the hole after they took the motor out? Pics?
Has any body put a plug/cap in the hole after they took the motor out? Pics?
#6
09-04-2011, 11:19 AM
Thanks for the DIY. Just did this on my 2011. I did not have to take the wiper off or unplug the wiring clips to do this. Here's what I did:
1) pull hatch interior cover off.
2) remove the three 10mm bolts on the metal bracket holding the motor in place to expose the motor wheel assembly.
3) pull the two white plastic caps off pins and remove bracket linking pins.
4) rotate pin to position closest to the white wheel. (See Fitted's pic for step 10. The wiper moves as you do this.)
5) put pin in place on far side of wheel and link pins with the plate, putting white caps back on. (See Fitted's step 11 pic for position.)
6) Screw metal bracket back in place and bolt it to the hatch.
7) Test then pop hatch cover back.
Free mod that took a half and hour, should reduce crap build-up on the back glass AND looks better. Nice!
#7
09-04-2011, 02:28 PM

Thanks for the DIY. Just did this on my 2011. I did not have to take the wiper off or unplug the wiring clips to do this. Here's what I did:
1) pull hatch interior cover off.
2) remove the three 10mm bolts on the metal bracket holding the motor in place to expose the motor wheel assembly.
3) pull the two white plastic caps off pins and remove bracket linking pins.
4) rotate pin to position closest to the white wheel. (See Fitted's pic for step 10. The wiper moves as you do this.)
5) put pin in place on far side of wheel and link pins with the plate, putting white caps back on. (See Fitted's step 11 pic for position.)
6) Screw metal bracket back in place and bolt it to the hatch.
7) Test then pop hatch cover back.
Free mod that took a half and hour, should reduce crap build-up on the back glass AND looks better. Nice!
1) pull hatch interior cover off.
2) remove the three 10mm bolts on the metal bracket holding the motor in place to expose the motor wheel assembly.
3) pull the two white plastic caps off pins and remove bracket linking pins.
4) rotate pin to position closest to the white wheel. (See Fitted's pic for step 10. The wiper moves as you do this.)
5) put pin in place on far side of wheel and link pins with the plate, putting white caps back on. (See Fitted's step 11 pic for position.)
6) Screw metal bracket back in place and bolt it to the hatch.
7) Test then pop hatch cover back.
Free mod that took a half and hour, should reduce crap build-up on the back glass AND looks better. Nice!
#8
09-04-2011, 03:46 PM
Good write up. Cant believe people need a diy for this. My gd was alot harder then the ge was. I have done two gds and two ges so far. Easy as cake.
If you have not done this yet, do it super easy. With this thread even easier.
Fyi measure the hole, go to lowes and they sell caps to work as a plug. In the hardware section.
If you have not done this yet, do it super easy. With this thread even easier.
Fyi measure the hole, go to lowes and they sell caps to work as a plug. In the hardware section.

#10
09-04-2011, 07:01 PM
I washed my car last week for my friend's wedding, and managed to collect a lot of dust on the wiper since then.
I turned on my wiper and cut the power when it was at the furthest point on the arc and looked at it. Bothers me when looking out my rear view mirror. I know, the OP moved it even further, and that helps with pulling the wiper off the window. But, it'll still be in view in the mirror.
Form... or function?
#11
09-06-2011, 06:01 AM
whats the best way to remove the panel of the hatch? everything seems easy but i dnt wana break the clips of the panel. anyone know the best way to do this?

#14
09-06-2011, 03:56 PM
gah. i think i'm DIY impaired this was challenging! (the white wheel kept falling off. too hot to do inside the trunk. took me an hour, BUT pulled it off!
btw. i think picture 5 is incorrect, same pic as the one above (pic 4)
thanks for all the help guys! awesome DIY!
btw. i think picture 5 is incorrect, same pic as the one above (pic 4)
thanks for all the help guys! awesome DIY!
#15
09-07-2011, 01:03 AM
Or just tear the thing out. i broke 1 clip and one of the mounting points on the plastic piece but it didn't make any difference.
OEM's with the top/sides redded out with vinyl.
thanks for pointing that out!
#16
09-07-2011, 06:26 AM
just did this last night, instructions were easy and helpful.
took me about 15-20 minutes.
i broke 2 clips
and it looks great, thanks OP
took me about 15-20 minutes.
i broke 2 clips
and it looks great, thanks OP

#20
10-19-2011, 10:42 PM
you have to pull and wiggle it at the same time; it's really hard to get out the first time around.
LOLOLOL EL OH EL
just fyi i had to rewrite this entire diy before i posted it cause all of it sounded dirty
LOLOLOL EL OH EL
just fyi i had to rewrite this entire diy before i posted it cause all of it sounded dirty