Using Rhino Ramp to do oil change
#1
 07-20-2012, 04:34 PM


Using Rhino Ramp to do oil change
I know there's a good step by step DIY oil change at link below for 2007 Fit, but I wanted to show my way using Rhino Ramp.
https://www.fitfreak.net/forums/fit-...-2007-fit.html
Instead of jacking up the car, I use Rhino Ramp for engine oil change. The benefits are:
1) No need to jack up the car. Easy to go up the ramp. No need to jack down the car!
2) Oil drains out more as the front is raised and the oil drain points downward toward the rear wheel.
3) plenty of space under the engine
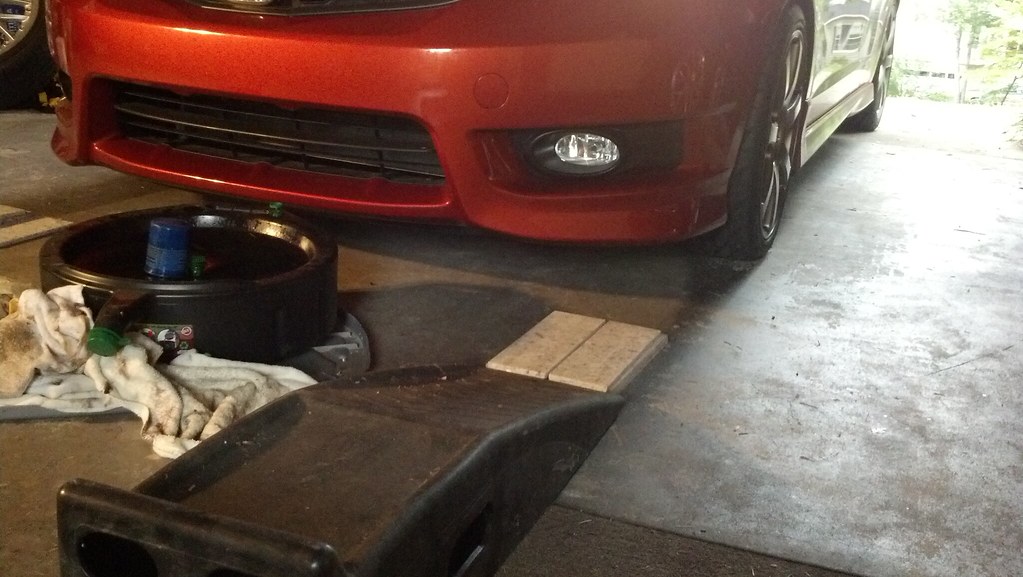
Ramp:

Notice I have a small piece of wood to prevent the front lower bumper from touching the ramp.
Useful oil filter wrench

BTW, the 14mm crush gasket can fit on oil plug for Korean cars. The gaskets can be bought online between 20 cents to 50 cents depending on where you buy... but you pay for shipping, so it's better to buy the gasket with other Honda parts (like filter).
Plug location

You will need 17mm socket to remove. The dealer over torqued it so I used a long rachet (i.e. breaker bar) to break the plug
The steps I follow are:
1) get the car up to operating temperature by doing a short errand/driving. Don't get it to hot thought.
2) bring the car onto level ground (i.e. garage). Put short piece of wood to touch the front wheel and then line up the Rhino Ramp.
3) Drive up the ramp until you are at the top. Put on parking brake, put the car in gear. Get out. Chock the rear wheels. Strangely, I find that I always miss judge the line for passenger side with impact that the passenger front tire touches the edge of the ramp while the driver side, I can get it to sit on the center every time.
4) Open the hood and remove the oil filler cap.
5) bring your oil pan, rag, newspaper to catch old oil.
6) Get under the car. Get the pan lined up with the plug (note. a bit of oil may touch the plastic shield when draining... No biggie... you can wipe it off.
7) Wear a cheap vinyl/nitrile gloves to prevent the old oil from touching you. Loosen the drain plug with 17mm socket and then hand-loosen the bolt until the old oil drains into the pan. The initial gush may splash, so be prepared. If your car is hot, the oil will be HOT too, so be careful.
8) leave it draining... I usually drain for about 30 minutes while I do something else. By the time I come back, I see maybe a drip every 5 seconds or so. With the new 14mm gasket, put back the drain plug. I usually tighten it with a ratchet until it's resisting and then give a small tug to "torque" it. Usually it comes out to about 30 lb.ft when I check with a torque wrench later.
9) Using the Honda oil wrench, break the oil filter and then loosen it by hand. If you have a 1 gallon zipper bag, cover it on the filter and start loosening it. The bag will catch the initial drips and direct extra drips easily down toward the pan. Completely remove and let the filter sit on the pan to drain. Look at the area where the filter was sitting and wipe it clean of dirt, oil, and anything you see until you see a clean metal.
10) open up a new filter. Open up a new oil ( I typically use synthetic 5w20 as I have 2009 Fit). Pour a bit of oil into the filter (1/5 or less. Anything more, it will flow out when you try to put in back on). Use your finger to dip the new oil and spread around the new rubber gasket on the new filter.
11) With the pan lined up to catch any drips, put the filter using your hands until you feel that the filter is seating. The manual says to use the wrench to do 3/4 turn by looking at the number on the filter (i.e. if you see #2, turn it until you see 3,4 and then 1)... For me, I hand tighten until I can't and then use the wrench to tight it a just a little. I never found oil dripping.
12) Clean up. Use a rag to clean up the oil on the engine and the plastics around the engine. I usually spray a bit of Windex around the oil and wipe it clean. I've seen others just spray brake cleaner to remove the oil completely. Clear out the area under the engine.
13) Get a funnel and pour in new oil. Manual says it will take 3.8 quarts including the filter. My method takes about 3.9 to nearly 4 quarts. For now, pour in about 3.5 quarts
14) close the cap. Close the hood. Remove rear chock. Turn the engine on and wait until the oil light goes off. It usually takes anywhere from 1/2 second to 1 second before the light goes off. Come down from the ramp. Turn the engine off. Clear out the ramps. Open the hood and use dipstick to check the oil level. If not at max, pour new oil in small increments while you check the oil level until the desired level is reached. Close the cap. Close the hood. You are done.
You may want to check the oil level 5 minutes after you've reached operating temperature. As long is the oil level is between min/max, you're good.
15) Remember to recycle the used oil. Any auto parts store will accept it. You can also check Earth911.com for recycling other types of hazardous material.
https://www.fitfreak.net/forums/fit-...-2007-fit.html
Instead of jacking up the car, I use Rhino Ramp for engine oil change. The benefits are:
1) No need to jack up the car. Easy to go up the ramp. No need to jack down the car!
2) Oil drains out more as the front is raised and the oil drain points downward toward the rear wheel.
3) plenty of space under the engine
Ramp:
Notice I have a small piece of wood to prevent the front lower bumper from touching the ramp.
Useful oil filter wrench
BTW, the 14mm crush gasket can fit on oil plug for Korean cars. The gaskets can be bought online between 20 cents to 50 cents depending on where you buy... but you pay for shipping, so it's better to buy the gasket with other Honda parts (like filter).
Plug location
You will need 17mm socket to remove. The dealer over torqued it so I used a long rachet (i.e. breaker bar) to break the plug
The steps I follow are:
1) get the car up to operating temperature by doing a short errand/driving. Don't get it to hot thought.
2) bring the car onto level ground (i.e. garage). Put short piece of wood to touch the front wheel and then line up the Rhino Ramp.
3) Drive up the ramp until you are at the top. Put on parking brake, put the car in gear. Get out. Chock the rear wheels. Strangely, I find that I always miss judge the line for passenger side with impact that the passenger front tire touches the edge of the ramp while the driver side, I can get it to sit on the center every time.
4) Open the hood and remove the oil filler cap.
5) bring your oil pan, rag, newspaper to catch old oil.
6) Get under the car. Get the pan lined up with the plug (note. a bit of oil may touch the plastic shield when draining... No biggie... you can wipe it off.
7) Wear a cheap vinyl/nitrile gloves to prevent the old oil from touching you. Loosen the drain plug with 17mm socket and then hand-loosen the bolt until the old oil drains into the pan. The initial gush may splash, so be prepared. If your car is hot, the oil will be HOT too, so be careful.
8) leave it draining... I usually drain for about 30 minutes while I do something else. By the time I come back, I see maybe a drip every 5 seconds or so. With the new 14mm gasket, put back the drain plug. I usually tighten it with a ratchet until it's resisting and then give a small tug to "torque" it. Usually it comes out to about 30 lb.ft when I check with a torque wrench later.
9) Using the Honda oil wrench, break the oil filter and then loosen it by hand. If you have a 1 gallon zipper bag, cover it on the filter and start loosening it. The bag will catch the initial drips and direct extra drips easily down toward the pan. Completely remove and let the filter sit on the pan to drain. Look at the area where the filter was sitting and wipe it clean of dirt, oil, and anything you see until you see a clean metal.
10) open up a new filter. Open up a new oil ( I typically use synthetic 5w20 as I have 2009 Fit). Pour a bit of oil into the filter (1/5 or less. Anything more, it will flow out when you try to put in back on). Use your finger to dip the new oil and spread around the new rubber gasket on the new filter.
11) With the pan lined up to catch any drips, put the filter using your hands until you feel that the filter is seating. The manual says to use the wrench to do 3/4 turn by looking at the number on the filter (i.e. if you see #2, turn it until you see 3,4 and then 1)... For me, I hand tighten until I can't and then use the wrench to tight it a just a little. I never found oil dripping.
12) Clean up. Use a rag to clean up the oil on the engine and the plastics around the engine. I usually spray a bit of Windex around the oil and wipe it clean. I've seen others just spray brake cleaner to remove the oil completely. Clear out the area under the engine.
13) Get a funnel and pour in new oil. Manual says it will take 3.8 quarts including the filter. My method takes about 3.9 to nearly 4 quarts. For now, pour in about 3.5 quarts
14) close the cap. Close the hood. Remove rear chock. Turn the engine on and wait until the oil light goes off. It usually takes anywhere from 1/2 second to 1 second before the light goes off. Come down from the ramp. Turn the engine off. Clear out the ramps. Open the hood and use dipstick to check the oil level. If not at max, pour new oil in small increments while you check the oil level until the desired level is reached. Close the cap. Close the hood. You are done.
You may want to check the oil level 5 minutes after you've reached operating temperature. As long is the oil level is between min/max, you're good.
15) Remember to recycle the used oil. Any auto parts store will accept it. You can also check Earth911.com for recycling other types of hazardous material.
Last edited by CasualFitOwner; 10-09-2012 at 10:49 AM. Reason: changed out broken picture link

#4
07-21-2012, 02:16 PM

Step 7b should include collecting used oil to be sent to an oil lab for testing.
I just use some 2x8s (doubled and nailed/glued together) as my ramps. Garage floor is a bit to slick to drive up them, so i just use the floor jack to raise the car and then put the ramps under the wheels. I'm a bit too big to be comfortable under the car without raising it a few inches. I also found that with the oil filter location on this car, the bag over the filter isn't necessary. It comes off and can go right into the oil catch pan without spilling over everything; unlike the placement on my accord.
I just use some 2x8s (doubled and nailed/glued together) as my ramps. Garage floor is a bit to slick to drive up them, so i just use the floor jack to raise the car and then put the ramps under the wheels. I'm a bit too big to be comfortable under the car without raising it a few inches. I also found that with the oil filter location on this car, the bag over the filter isn't necessary. It comes off and can go right into the oil catch pan without spilling over everything; unlike the placement on my accord.
#5
09-18-2012, 05:43 PM

I'd make sure you can at least loosen the oil filter before you open up the drain bolt. If you can't move it, then it's probably better there's still oil in your pan. I didn't have an oil filter wrench so I had to make a trip to the auto parts shop to get one.
#6
09-18-2012, 05:49 PM
Good suggestion! The only time I found the filter to be very tightly held was when it came off the factory and when dealer changed the oil.
#7
09-18-2012, 05:54 PM
i dont usually remove the oil cap completely until im ready to pour in new oil since i do my oil change out on my driveway and dont want crap to fall inside. just loosen to let air in to allow old oil to drain out freely.
i also loosen the oil filter and let the contents drip, then loosen some more, drip, loosen some more, drip, then at the very end of the thread press filter against the tread and tilt to drip rest of oil out before separating from the thread. i use a second drain pan for the filter as i dont like to get any drips on my driveway.
i also loosen the oil filter and let the contents drip, then loosen some more, drip, loosen some more, drip, then at the very end of the thread press filter against the tread and tilt to drip rest of oil out before separating from the thread. i use a second drain pan for the filter as i dont like to get any drips on my driveway.
#8
09-18-2012, 07:20 PM
Good write-up!
Before I was lowered I would just shove the ramps onto the wheels and drive up... no wooden blocks needed. Now I use a couple extra stacked granite tiles leftover from my kitchen.
Before I was lowered I would just shove the ramps onto the wheels and drive up... no wooden blocks needed. Now I use a couple extra stacked granite tiles leftover from my kitchen.


#11
04-04-2013, 01:00 PM

I always take the oil filter off before draining the oil. Why? Well on many cars I've worked on there is considerably more oil drained back to the pan once oil filter has been removed. You can test that theory, drain the oil and then remove the oil filter,you can see more oil pour out of the pan when old filter gets loosened. Some cars more then others but in my past vehicles I was always able to purge more old oil this way.
#12
04-11-2013, 02:45 PM

nice write up.
I would recommend getting an oil filter claw
Michigan Industrial Tools - Tekton by MIT 12 Filter Claw Oil Filter Pliers
they fit almost any oil filter. much more versatile than those oil filter cap wrenches.
though I guess if you plan on buying the exact same oil filter forever than that filter cap wrench will be just fine.
also i noticed on my last oil change that the metal gasket on the drain plug wouldn't come off so i just reused it. i have in the past gone out and bought the generic copper gaskets and they leaked. not sure if there is a special gasket you can order from honda.
love the placement of the oil filter on the fit. really easy to reach compared to the back of the engine. my fit has enough space underneath so i don't even need to raise it to change the oil
also noticed you are using a genuine honda filter. i heard that they are honeywell which is fram. people have told me to stay away from fram but who knows
Last edited by knm345; 04-11-2013 at 02:54 PM.
#13
04-11-2013, 02:55 PM
Crush washer for oil plug is 99 cents at Honda IIRC, just buy a bunch of them. It is ok if you didn't replace it this time, but get one for next time.
Honeywell Honda A02 filters are not exactly the same as Fram filters, they are a little better quality as far as the components that are used. They are indeed made by the same company, but not identical. There is a lot of info online regarding this.
Honeywell Honda A02 filters are not exactly the same as Fram filters, they are a little better quality as far as the components that are used. They are indeed made by the same company, but not identical. There is a lot of info online regarding this.
#14
04-12-2013, 03:01 AM
oil change
When I changed my o2 sensor I ended up just lifting up the bumper and shuving the ramps right under the tires, did you end up topping fliuds off on other tanks CasualFitOwner?
I would like to do this myself but seem like it costs a lot more than getting it done for 25 bux at a auto shop..
I would like to do this myself but seem like it costs a lot more than getting it done for 25 bux at a auto shop..

#16
04-29-2013, 10:07 AM

Clearance is tight so no need to risk scraping. Here is what I did 5 years ago to my ramps so my SVT would clear.
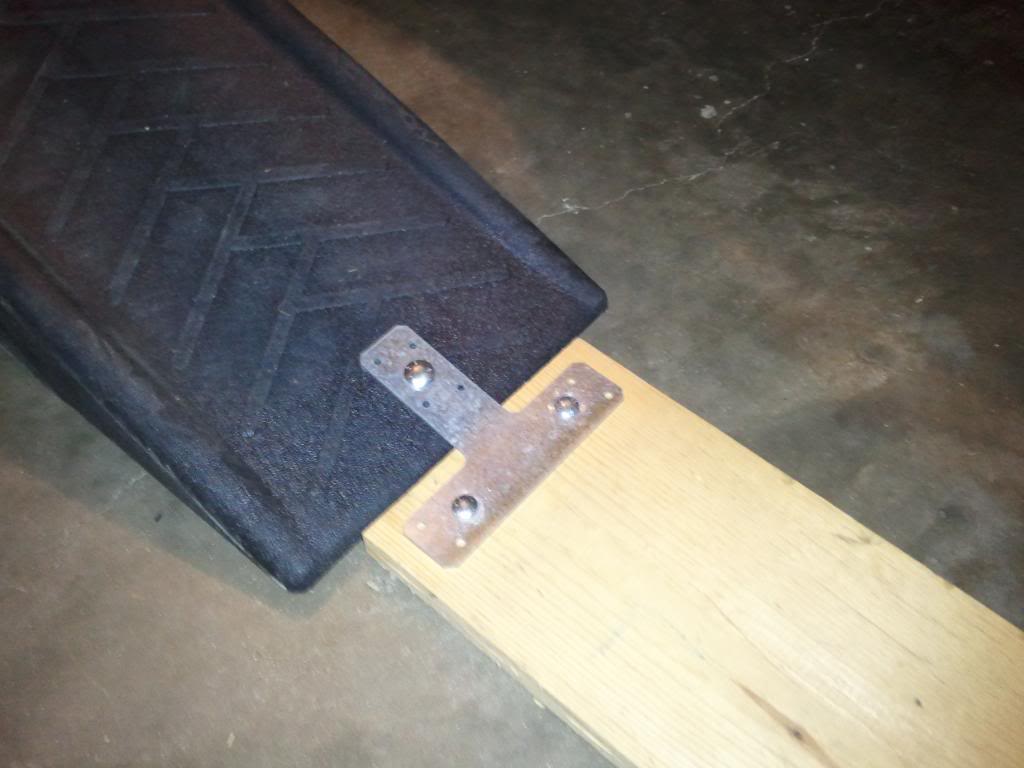
1"x6" attached to ramps with a T strap. Use carriage bolts for a smooth top surface and countersink your nuts underneath so the wood plank lays perfectly flat on the floor.
Serves two purposes, obvious is to clear your front lip but the wood being attached also makes climbing onto the ramp easier and safer. No more slipping/sliding of ramps on a slick/smooth garage floor. Roll onto the wood plank and your front wheels anchor the ramp. Then you slowly climb onto the anchored ramp without any ramp movement.
_

Thread
Thread Starter
Forum
Replies
Last Post