
DIY- Monroe Rear Air Shocks w/Photos


The following is provided as a guide only, and neither myself nor fitfreak.net endorse, recommend, encourage, nor accept any responsibility for the outcome of anyone doing the following modification. You follow these steps at your own risk.
Now that the CYA stuff is out of the way, my opinion is that this is a very good and affordable improvement to your Fit's rear suspension. For an investment of under $80.00 (I bought my shocks on Amazon.com for about $75.00 plus shipping), you increase the payload capacity of the car, have the ability to raise the body back up to stock height and eliminate spring sag in overload conditions, and improve the ride all at the same time.
The thread that led me and others to try this new hardware is this one. Thanks to members radareclipse and mahout for their input on the original thread, and thanks to mrFroge for his valuable advice.
https://www.fitfreak.net/forums/fit-...ew-design.html

Two U.S. shock absorber manufacturers make after-market rear air shocks that will fit '07-08 Fits. The makers are Monroe and Gabriel. The air shocks that fit the Fit are made for mid-90's Chevy Cavallier. I and others used the Monroe Model MA811. MrFroge used the air shocks from Gabriel.
Tools Required:
Floor jack, jack stands, wheel chocks, ratchet wrench (at least 3/8" drive), 5mm hex (Allen) wrench- long style is best, 14 mm socket, 14 mm box wrench, large "Vise-Grip" locking pliers, small blade-type screw driver, and either a good bench vise, or a human helper with strong hands. In addition,you need an electric drill with a 5/16" bit, and a roll of 2" or 3" wide stainless steel tape from the HVAC dept. of Home Depot or you local hardware store. If you do not have any now, also buy some denatured alcohol to use as a car paint-safe cleaning solvent under the car. You will need to remove the stock shock absorbers, and disassemble them to obtain some of the shock absorber parts to be reinstalled on the new air shocks.
1. Loosen the lug nuts. Block one of the front wheels with your wheel chocks. Raise the rear of the car with the floor jack- get it as high as possible because you will need all of the room you can get. Place the jack stands at the lifting points in front of the rear wheels. Remove the lug nuts and wheels.
2. Use the ratchet and 14mm socket to remove the lower shock mounting bolts. Inside the car, use the screwdriver to pop off the plastic covers from the upper mounts of the shock absorbers. Place the 14mm box wrench on the nut, and the 5mm hex wrench in the socket of the mounting stud. Hold the hex wrench while you loosen the hex nut enough to completely remove it with your fingers. Repeat for the other side.
3. Under the car, use the screwdriver to pry the bottom of the shocks out of the axle mounting brackets, and pull the shocks down and out of the upper mounts.
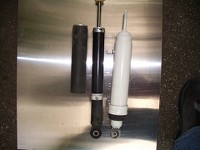
4. Here are some views of the differences in the shock absorber designs of the stock and the air shock
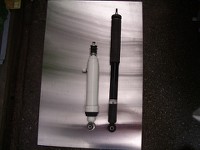
This image shows the similarity in shock sizes with the stock dust boot removed:
5. This photo shows the "bump stop" in the stock shock, which prevents the rear suspension from being able to completely bottom out which could break the springs and/or destroy the internals of the shock absorber.
YOU WILL NEED TO RE-USE THE METAL BUSHINGS THAT ARE SCREWED ONTO THE STOCK STUDS, AS WELL AS BOTH OF THE LARGE FLAT WASHERS, BOTH OF THE LARGE RUBBER UPPER MOUNT "PADS" AND BOTH OF THE LARGE, CUPPED MOUNTING RETAINERS (WASHERS. DO NOT RE-USE THE STOCK UPPER MOUNT HEX NUT. USE ONLY THE HEX NUT SUPPLIED WITH THE NEW SHOCKS. DO NOT USE THE UPPER WASHERS OR RUBBER BUSHINGS SUPPLIED WITH THE NEW SHOCKS.
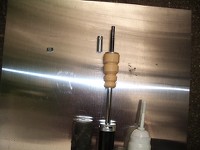
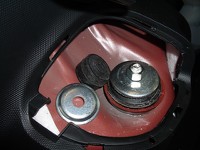
6. Clamp the 5mm Allen wrench in the jaws of the bench vise. Put the long end of the wrench horizontally between the vise jaws with the short end sticking up vertically. On both stock shocks, remove the rubber mounting pad and the lower retainer (washer), save those parts, and pull off the dust boot. Turn the shock upside down and put the stud hex socket onto the Allen wrench in the vise. Adjust your Vise-Grip pliers to get a firm, but not crushing grip on the shiny, smooth sided bushing that is screwed onto the threaded stud. Attach the plier jaws near the upper end of the bushing, away from the crimp that was stamped into the bushing near the bottom end of it. The bushing is high on the stud, just under the plastic bump stop. It looks like this:
The metal bushing that you are trying to salvage has already been removed, and is to the left of the threaded stud.
This metal bushing is soft- probably a zinc alloy. It has been crimped, or stamped, to keep it from unscrewing accidentally. The Vise Grips will allow you to unscrew it by turning it clockwise (the shock is upside down). It will turn with some resistance, but it is fairly easy once you get past the first couple of turns. The last few turns can be done with your fingers. You will see some soft metal smeared into the threads of the stud, but the threads are not harmed. The smeared bushing material can be cleaned off with the correct size of die, or even a wire brush if you ever want to reinstall the stock shocks.
7. Now, put a metal retainer washer from the old shocks onto the studs of the new shocks, screw the metal bushings onto the studs, and push the rubber mounting pads over the studs and onto the bottom of the bushings.
Now you are ready to install the new shocks on the car.
8. Go inside the car and get the upper metal retainer washers and upper rubber pads from the body cavities and put each set on the floor near the mounting hole. Have an assistant standing by. from under the car push each shock stud up through the fender well through the hole, and while you push upward, have your friend install the rubber pads, retainer washers, and screw the new shock hex nuts on only a couple of turns.
The Monroe instructions tell you to install the air shocks with the airline connections pointed toward the center of the car. This is not possible--- install the shocks with the airline connectors pointing to the rear on each side of the car.
9. Monroe supplies two cup-shaped retainer washers along with two rubber bushings per shock for the upper mounts. Throw away the small rubber bushings from Monroe, but keep the four cup-washers from Monroe. Under the car, hold onto each shock body near the mounting eye at the bottom, and pull hard with all your weight. The shocks will start to elongate and pull downward, but it will take a lot of pulling to stretch them down to the axle brackets. They will try to shrink back up due to vacuum in the air sleeves. Once you get them pulled down a little lower than the axle brackets, put a cupped washer on each side of the mounting eye, push the eyes into the mounting brackets, and push the shock bolts into the holes. The cupped washers on the inner sides of the axle brackets act as spacers. The new shocks are narrower than the stock shocks where they fit into the mounting brackets. The Monroe cupped washers are the perfect size to make up the difference in width of the new shocks. There will be tension on the bolts as the shocks try to shrink back up, so you will need to use your 14mm socket and ratchet to get the bolts completely through the holes and engaged in the threads of the mounting bracket.
Next, go back inside and use the 14mm box wrench to slowly tighten the hex nuts on the studs until you have exposed the flats that have been formed on the end of the stud. On the new shocks, there is no hex socket to hold the stud while tightening the mounting nut. The flats on the new studs serve that purpose by holding them with the locking pliers while tightening the nut. Leave the wrench on the hex nut, and use your Vise Grips to lock the end of the jaws onto the flats. Hold the stud from turning while you get the hex nuts tightened snugly.
NOW FOR THE AIR LINES-----
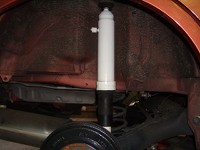
Decide in advance where you want to install the fill nipple. Some people install the filler tee inside the spare tire well. I don't want to un-bury the tire well every time I want to check the system pressure, so I installed my fill tee on the bottom side of the bumper plastic. Whatever location you chose, drill a 5/16" dia. hole and install the tee with the two airline fittings under the car and the nipple either pointing up into the tire well, or downward through the hole in the bumper plastic. Here's my fill tee:
10. Begin the air line installation at one of the shocks. Unscrew the cap on the side of the shock and push about 2" of air line through the small hole in the closed end of the cap. Put one of the supplied small rubber o-rings onto the end of the line and push it about 1/2 " back. Push the end of the line carefully into the threaded connection on the side of the shock until it bottoms out. Then push the cap and o-ring toward the threaded port and screw the cap down, tightly, BY HAND ONLY. DON'T USE TOOLS- FINGER TIGHT ONLY.
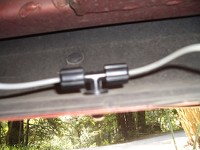
To eliminate any rubbing on the air line by tires, wheels, snagged sticks picked up on the road, etc., I suggest that you pass the bundle of air line once behind the upper, stationary shock body, in one loose turn CLOCKWISE. After going behind the shock, the passenger side air line wil point toward the front of the car. As you pass it underneath, it will clear the exhaust with a lot of room. On the driver's side, the air line going behind the shock will point toward the back of the car. I used both a zip tie AND one wrap of 2" dia. stainless steel tape to hold the air line securely to the shock body. The air line is hard plastic and has a lot of spring to it. If it ever comes loose and rests against a tire or wheel, the system will spring a leak very quickly. Here's an example:


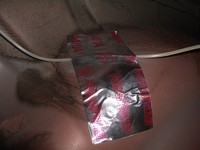
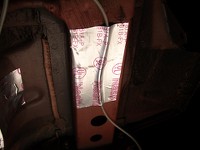
11. On the pass. side, I routed the air line as high as possible, and made the first zip tie around the brake line where it is attached to the underbody sheet metal bracket over the exhaust, and continued running it along the top of the black plastic channel that protects the fuel lines using zip ties long the way. I ran the last foot of driver's side line along a flat channel next to the side of the spare tire well, and after wiping the area with denatured alcohol, I used 3" wide stainless steel tape for a secure hold along the channel. Then I cut the air line with a razor blade as instructed, attached one cap from the fill tee and the o-ring, then attached the line to the tee. For the pass. side line, I used the alcohol and SS tape to hold the line on the curved side of the spare tire well.
12. Now you need an air source, and keep in mind that this system does not need much volume. If you air up at a gas station (if you can find one with air available), treat this like the skinny tires on your old 10-speed bike. To save space and eliminate the hassle of running the electrical cord to the power port in the console, I paid about $10.00 for a 100 psi-capable folding foot pump. It is very small, works just fine, and I pumped the system up to 100 psi to test for air leaks with a spray at each connection with soap and water. No leaks. I then let the pressure down to the recommended 20 psi for unloaded conditions, and will leave it there until I need to compensate for extra weight of passengers or cargo.
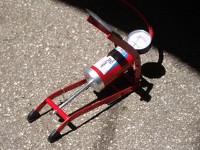

This is the folded pump sitting on the left corner of the rear bumper:

13. One last piece of advice:
Some of our members have installed these air shocks without taking apart the old shocks to re-use the mounting pads and washers. They used the too small mounting supplies from the new shocks. Here is the size comparison. The photo shows the new shocks installed with the old pads and washer retainers. The tiny Monroe bushings and washers are sitting on top for comparison:
This is not meant as criticism of the people who used the Monroe mounting components, but I predict trouble for them in the future. Some of these people have already complained about noise from the shock mounts, with various solutions of adding grease, Teflon tape, loosening the nuts, and so on. The Honda shock mounting components are designed to fill a very large hole in the body, with an even larger cavity molded into the top of the wheel well sheet metal. If you use rubber bushings and steel washers that are much smaller than the hole and the sheet metal well, you will get movement of the rubber bushings, and you will collect road grit in the now vacant space around the lower bushing in the wheel well. The movement and the grit will wear away the paint and expose bare metal, and rust will begin to attack the wheel well where you can't even see it.
If you do not do the job correctly the first time, you will have consequences to pay in the future. Best case, you get to do it over again. Worst case, you get needless damage to your car and a lot of expense to repair it.
Now that the CYA stuff is out of the way, my opinion is that this is a very good and affordable improvement to your Fit's rear suspension. For an investment of under $80.00 (I bought my shocks on Amazon.com for about $75.00 plus shipping), you increase the payload capacity of the car, have the ability to raise the body back up to stock height and eliminate spring sag in overload conditions, and improve the ride all at the same time.
The thread that led me and others to try this new hardware is this one. Thanks to members radareclipse and mahout for their input on the original thread, and thanks to mrFroge for his valuable advice.
https://www.fitfreak.net/forums/fit-...ew-design.html
Two U.S. shock absorber manufacturers make after-market rear air shocks that will fit '07-08 Fits. The makers are Monroe and Gabriel. The air shocks that fit the Fit are made for mid-90's Chevy Cavallier. I and others used the Monroe Model MA811. MrFroge used the air shocks from Gabriel.
Tools Required:
Floor jack, jack stands, wheel chocks, ratchet wrench (at least 3/8" drive), 5mm hex (Allen) wrench- long style is best, 14 mm socket, 14 mm box wrench, large "Vise-Grip" locking pliers, small blade-type screw driver, and either a good bench vise, or a human helper with strong hands. In addition,you need an electric drill with a 5/16" bit, and a roll of 2" or 3" wide stainless steel tape from the HVAC dept. of Home Depot or you local hardware store. If you do not have any now, also buy some denatured alcohol to use as a car paint-safe cleaning solvent under the car. You will need to remove the stock shock absorbers, and disassemble them to obtain some of the shock absorber parts to be reinstalled on the new air shocks.
1. Loosen the lug nuts. Block one of the front wheels with your wheel chocks. Raise the rear of the car with the floor jack- get it as high as possible because you will need all of the room you can get. Place the jack stands at the lifting points in front of the rear wheels. Remove the lug nuts and wheels.
2. Use the ratchet and 14mm socket to remove the lower shock mounting bolts. Inside the car, use the screwdriver to pop off the plastic covers from the upper mounts of the shock absorbers. Place the 14mm box wrench on the nut, and the 5mm hex wrench in the socket of the mounting stud. Hold the hex wrench while you loosen the hex nut enough to completely remove it with your fingers. Repeat for the other side.
3. Under the car, use the screwdriver to pry the bottom of the shocks out of the axle mounting brackets, and pull the shocks down and out of the upper mounts.
4. Here are some views of the differences in the shock absorber designs of the stock and the air shock

This image shows the similarity in shock sizes with the stock dust boot removed:

5. This photo shows the "bump stop" in the stock shock, which prevents the rear suspension from being able to completely bottom out which could break the springs and/or destroy the internals of the shock absorber.

YOU WILL NEED TO RE-USE THE METAL BUSHINGS THAT ARE SCREWED ONTO THE STOCK STUDS, AS WELL AS BOTH OF THE LARGE FLAT WASHERS, BOTH OF THE LARGE RUBBER UPPER MOUNT "PADS" AND BOTH OF THE LARGE, CUPPED MOUNTING RETAINERS (WASHERS. DO NOT RE-USE THE STOCK UPPER MOUNT HEX NUT. USE ONLY THE HEX NUT SUPPLIED WITH THE NEW SHOCKS. DO NOT USE THE UPPER WASHERS OR RUBBER BUSHINGS SUPPLIED WITH THE NEW SHOCKS.
6. Clamp the 5mm Allen wrench in the jaws of the bench vise. Put the long end of the wrench horizontally between the vise jaws with the short end sticking up vertically. On both stock shocks, remove the rubber mounting pad and the lower retainer (washer), save those parts, and pull off the dust boot. Turn the shock upside down and put the stud hex socket onto the Allen wrench in the vise. Adjust your Vise-Grip pliers to get a firm, but not crushing grip on the shiny, smooth sided bushing that is screwed onto the threaded stud. Attach the plier jaws near the upper end of the bushing, away from the crimp that was stamped into the bushing near the bottom end of it. The bushing is high on the stud, just under the plastic bump stop. It looks like this:
The metal bushing that you are trying to salvage has already been removed, and is to the left of the threaded stud.
This metal bushing is soft- probably a zinc alloy. It has been crimped, or stamped, to keep it from unscrewing accidentally. The Vise Grips will allow you to unscrew it by turning it clockwise (the shock is upside down). It will turn with some resistance, but it is fairly easy once you get past the first couple of turns. The last few turns can be done with your fingers. You will see some soft metal smeared into the threads of the stud, but the threads are not harmed. The smeared bushing material can be cleaned off with the correct size of die, or even a wire brush if you ever want to reinstall the stock shocks.
7. Now, put a metal retainer washer from the old shocks onto the studs of the new shocks, screw the metal bushings onto the studs, and push the rubber mounting pads over the studs and onto the bottom of the bushings.
Now you are ready to install the new shocks on the car.
8. Go inside the car and get the upper metal retainer washers and upper rubber pads from the body cavities and put each set on the floor near the mounting hole. Have an assistant standing by. from under the car push each shock stud up through the fender well through the hole, and while you push upward, have your friend install the rubber pads, retainer washers, and screw the new shock hex nuts on only a couple of turns.
The Monroe instructions tell you to install the air shocks with the airline connections pointed toward the center of the car. This is not possible--- install the shocks with the airline connectors pointing to the rear on each side of the car.

9. Monroe supplies two cup-shaped retainer washers along with two rubber bushings per shock for the upper mounts. Throw away the small rubber bushings from Monroe, but keep the four cup-washers from Monroe. Under the car, hold onto each shock body near the mounting eye at the bottom, and pull hard with all your weight. The shocks will start to elongate and pull downward, but it will take a lot of pulling to stretch them down to the axle brackets. They will try to shrink back up due to vacuum in the air sleeves. Once you get them pulled down a little lower than the axle brackets, put a cupped washer on each side of the mounting eye, push the eyes into the mounting brackets, and push the shock bolts into the holes. The cupped washers on the inner sides of the axle brackets act as spacers. The new shocks are narrower than the stock shocks where they fit into the mounting brackets. The Monroe cupped washers are the perfect size to make up the difference in width of the new shocks. There will be tension on the bolts as the shocks try to shrink back up, so you will need to use your 14mm socket and ratchet to get the bolts completely through the holes and engaged in the threads of the mounting bracket.
Next, go back inside and use the 14mm box wrench to slowly tighten the hex nuts on the studs until you have exposed the flats that have been formed on the end of the stud. On the new shocks, there is no hex socket to hold the stud while tightening the mounting nut. The flats on the new studs serve that purpose by holding them with the locking pliers while tightening the nut. Leave the wrench on the hex nut, and use your Vise Grips to lock the end of the jaws onto the flats. Hold the stud from turning while you get the hex nuts tightened snugly.
NOW FOR THE AIR LINES-----
Decide in advance where you want to install the fill nipple. Some people install the filler tee inside the spare tire well. I don't want to un-bury the tire well every time I want to check the system pressure, so I installed my fill tee on the bottom side of the bumper plastic. Whatever location you chose, drill a 5/16" dia. hole and install the tee with the two airline fittings under the car and the nipple either pointing up into the tire well, or downward through the hole in the bumper plastic. Here's my fill tee:

10. Begin the air line installation at one of the shocks. Unscrew the cap on the side of the shock and push about 2" of air line through the small hole in the closed end of the cap. Put one of the supplied small rubber o-rings onto the end of the line and push it about 1/2 " back. Push the end of the line carefully into the threaded connection on the side of the shock until it bottoms out. Then push the cap and o-ring toward the threaded port and screw the cap down, tightly, BY HAND ONLY. DON'T USE TOOLS- FINGER TIGHT ONLY.
To eliminate any rubbing on the air line by tires, wheels, snagged sticks picked up on the road, etc., I suggest that you pass the bundle of air line once behind the upper, stationary shock body, in one loose turn CLOCKWISE. After going behind the shock, the passenger side air line wil point toward the front of the car. As you pass it underneath, it will clear the exhaust with a lot of room. On the driver's side, the air line going behind the shock will point toward the back of the car. I used both a zip tie AND one wrap of 2" dia. stainless steel tape to hold the air line securely to the shock body. The air line is hard plastic and has a lot of spring to it. If it ever comes loose and rests against a tire or wheel, the system will spring a leak very quickly. Here's an example:


11. On the pass. side, I routed the air line as high as possible, and made the first zip tie around the brake line where it is attached to the underbody sheet metal bracket over the exhaust, and continued running it along the top of the black plastic channel that protects the fuel lines using zip ties long the way. I ran the last foot of driver's side line along a flat channel next to the side of the spare tire well, and after wiping the area with denatured alcohol, I used 3" wide stainless steel tape for a secure hold along the channel. Then I cut the air line with a razor blade as instructed, attached one cap from the fill tee and the o-ring, then attached the line to the tee. For the pass. side line, I used the alcohol and SS tape to hold the line on the curved side of the spare tire well.


12. Now you need an air source, and keep in mind that this system does not need much volume. If you air up at a gas station (if you can find one with air available), treat this like the skinny tires on your old 10-speed bike. To save space and eliminate the hassle of running the electrical cord to the power port in the console, I paid about $10.00 for a 100 psi-capable folding foot pump. It is very small, works just fine, and I pumped the system up to 100 psi to test for air leaks with a spray at each connection with soap and water. No leaks. I then let the pressure down to the recommended 20 psi for unloaded conditions, and will leave it there until I need to compensate for extra weight of passengers or cargo.


This is the folded pump sitting on the left corner of the rear bumper:

13. One last piece of advice:
Some of our members have installed these air shocks without taking apart the old shocks to re-use the mounting pads and washers. They used the too small mounting supplies from the new shocks. Here is the size comparison. The photo shows the new shocks installed with the old pads and washer retainers. The tiny Monroe bushings and washers are sitting on top for comparison:

This is not meant as criticism of the people who used the Monroe mounting components, but I predict trouble for them in the future. Some of these people have already complained about noise from the shock mounts, with various solutions of adding grease, Teflon tape, loosening the nuts, and so on. The Honda shock mounting components are designed to fill a very large hole in the body, with an even larger cavity molded into the top of the wheel well sheet metal. If you use rubber bushings and steel washers that are much smaller than the hole and the sheet metal well, you will get movement of the rubber bushings, and you will collect road grit in the now vacant space around the lower bushing in the wheel well. The movement and the grit will wear away the paint and expose bare metal, and rust will begin to attack the wheel well where you can't even see it.
If you do not do the job correctly the first time, you will have consequences to pay in the future. Best case, you get to do it over again. Worst case, you get needless damage to your car and a lot of expense to repair it.
Last edited by manxman; Jun 3, 2008 at 11:25 AM. Reason: add comment
Thanks, and the answer is NO. At the recommended min. air press. of 20 psi, the car is at stock height. They do not recommend that you use high press. air to try to raise the back end either. Too much or too little pressure will cause premature failure of the air system.
Last edited by manxman; May 4, 2008 at 10:14 PM.
Yep- it would be the same height, and that brings up the issue of premature wear on the shocks due to short stroke length. I assume that this would be the same for the air shocks as it is for the stock ones.

Excellent "How-To" Manxman...thanks!
I installed my Monroe's over the weekend and to say the least I'am very happy with the end results.
After a quick run thru the local canyon roads (hwy 9) the rear end now feels much more planted and flat around corners. No more the 'feeling' the rear suspension is lifting around corners with the oem shocks.
And as a added suprise, I actually think the ride quality got smoother and quieter over rough pavement.
.


 jk
jk
Push My Button

Joined: May 2007
Posts: 4,997
From: Calgary, Alberta
Nice writeup!
I had these shocks installed into the rear of my Jeep Cherokee to increase payload and keep the back end from sitting down on my larger tires. I had mine connected to an air hose which ran to a filler cap drilled through the rear bumper as well. I usually kept it around 50-60psi and loaded it upto about 130psi at the gas station air when I had excessive payload.
I found my ride height could be adjusted up to about 2" depending on the amount of pressure, I am curious, when you increase the pressure how is the ride height for the Fit?
Cheers,
Thanks claymore- I forgot to send you the link that I promised- sorry!
Sugarphreak, when I pumped my newly installed system up to 100 psi for the leak test, I did not notice any great increase in ride height, and did not notice any settling back down when I brought the pressure back down to 20 psi. However, the reason may be that I had just lowered the previously lifted back end down to the ground and had not moved the car, so the camber had not returned to normal "level". Since these shocks are made to fit the Cavallier, you would not expect the same stroke length or weight capacity of the air system that would be in the design for trucks and SUV's.
I rarely carry passengers in the back, but will be carrying cinder blocks, concrete pavers, bags of cement, and pulling a lightly loaded occasional trailer. The weight compensating feature of these shocks will keep the car level, and the better ride characteristics will be the main reasons for the purchase.


Push My Button
Joined: May 2007
Posts: 4,997
From: Calgary, Alberta
Excellent, thanks for the responce.
You will enjoy these shocks, they are great quality and can stand up to a lot of abuse. I had mine in for 3 years with trouble free service and I still see the new owner driving it around with no problems.
These shocks are pretty much a must for anybody who considers towing, would also be great for anybody who is having minor rubbing with aftermarket tires when the vehical is loaded.

Excellent DIY. Thanks for helping out the community.
I always very much enjoy reading your stuffs. You're
one of the few intelligent individuals on here that I admire and envy.
Keep up the good work!
I always very much enjoy reading your stuffs. You're
one of the few intelligent individuals on here that I admire and envy.
Keep up the good work!
Member
Joined: Jan 2008
Posts: 4,371
From: NC USA
Very good. Especially like your comments about lower U clamp hardware. I'll have to look at that although I have no descernable noise from the back now.
From Feb 08 post:
If you are speaking of Air Lifts so you can carry heavyweight guys in the rear without dragging Monroe Airlifts MA811 fit nicely with only washers needed fit make up for the narrower bottom yoke. Handling remains great. Expect 40 psi preload empty and about 60 psi with heavyweights in the rear.
Last edited by mahout; Jul 19, 2009 at 03:29 PM.
Fitiful,
I write for people like you, and just like the Canadians "who are too polite", you are too nice. Thanks for the appreciation, but like hatred, envy is a waste. You probably didn't take classes to learn to use your computer- you probably learned by using your computer. You can learn to do the work on your own car the same way, and by reading some of the DIY articles on these forums. The money saved by doing your own work will more than pay for the tools required, that will last the rest of your life.
I write for people like you, and just like the Canadians "who are too polite", you are too nice. Thanks for the appreciation, but like hatred, envy is a waste. You probably didn't take classes to learn to use your computer- you probably learned by using your computer. You can learn to do the work on your own car the same way, and by reading some of the DIY articles on these forums. The money saved by doing your own work will more than pay for the tools required, that will last the rest of your life.

Air pressure does not change the damping. Air pressure only changes the ride height to prevent spring sag from overload conditions. These are not "adjustable shocks" regarding compression or rebound. The ride quality is slightly more stiff than stock, with much better compression and rebound damping compared to stock shocks.
Last edited by manxman; May 11, 2008 at 07:02 PM.