Replacing the GK rear garnish
#1
 04-03-2015, 10:58 PM


Replacing the GK rear garnish
I was asked if I had photos of when I replaced my chrome EX rear garnish with the black LX garnish, and while I didn't I thought I'd shoot what I could without repeating the install.
A diagram of the parts involved can be viewed here.

First, you'll need to remove the rear wiper. The plastic cover pops off easily and then use a socket to remove the nut holding the wiper arm on. It should come off easily.
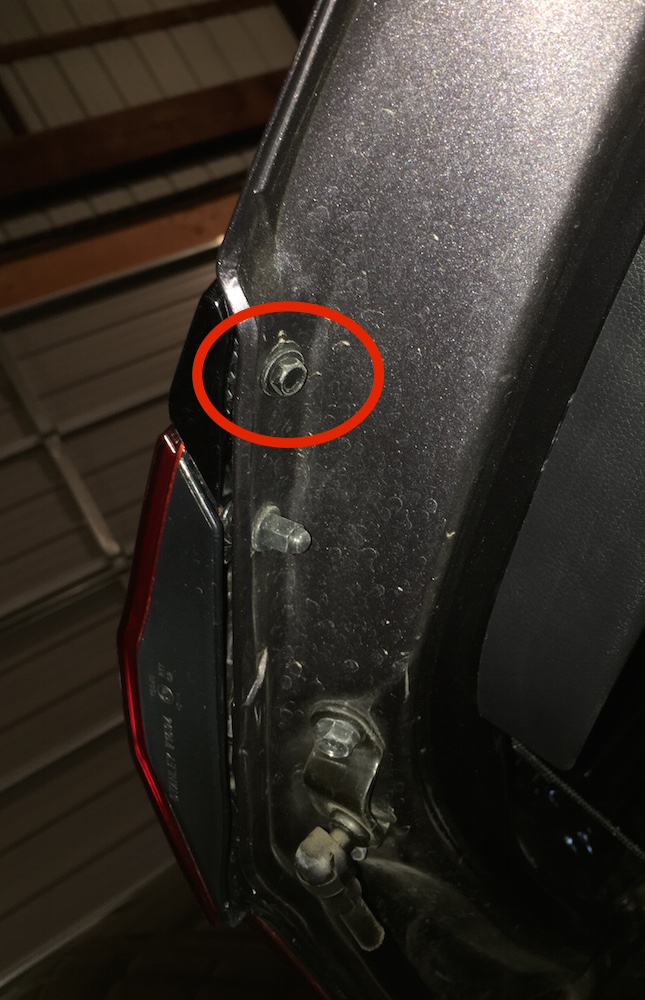
Next, remove two bolts, one at each side - these are accessible with the hatch open (you don't have to remove the interior trim panel).
Those bolts screw into the outer portion of the garnish piece � be careful to not overtighten when installing.
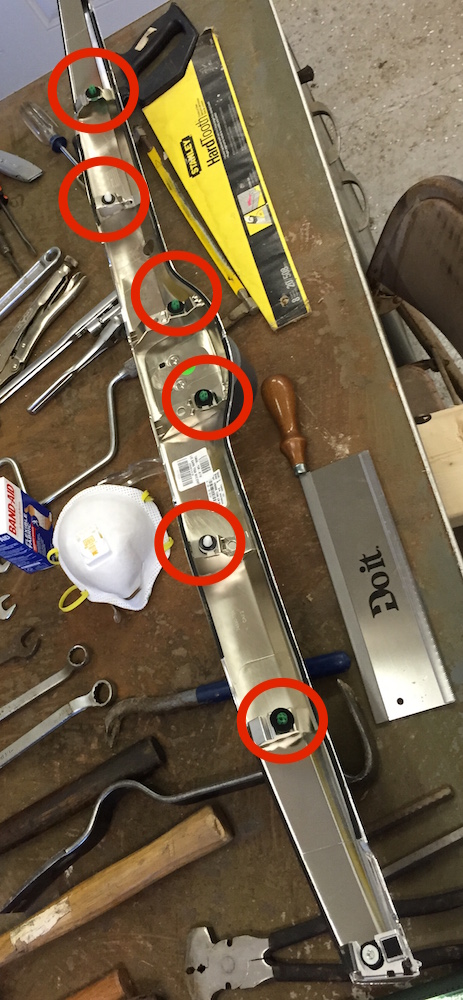
Finally, with the bolts out, the garnish piece is held in with plastic clips. Gently pry (with something that won't scratch your paint) and the panel should pop right out.
Take a close look at the clips - if I remember right, two of them are slightly different between the EX and LX trim. I swapped those out before installing my LX garnish piece.
To install, just position the new garnish in place, making sure the plastic clips are lined up with their holes, and press gently to seat them all. Install your two bolts at the outer edges (again, don't overtighten), and reinstall your wiper.
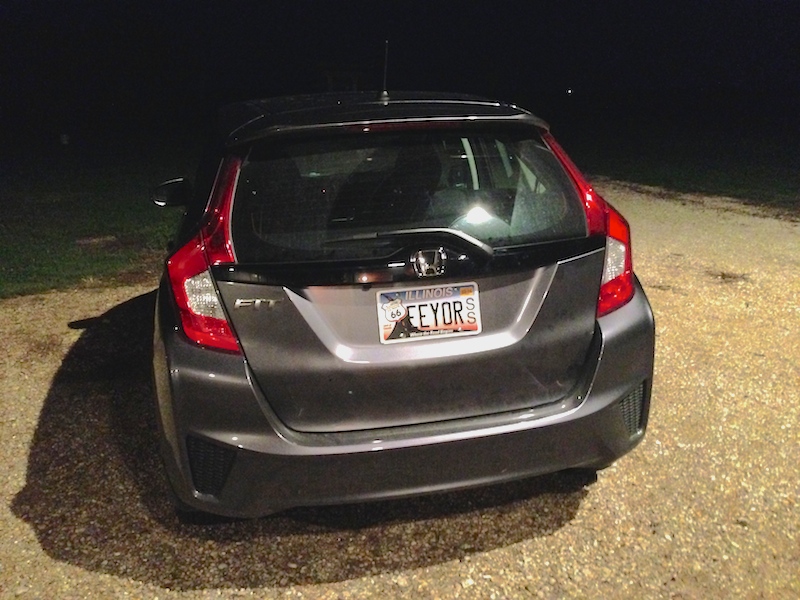
You're done!
es
A diagram of the parts involved can be viewed here.
First, you'll need to remove the rear wiper. The plastic cover pops off easily and then use a socket to remove the nut holding the wiper arm on. It should come off easily.
Next, remove two bolts, one at each side - these are accessible with the hatch open (you don't have to remove the interior trim panel).
Those bolts screw into the outer portion of the garnish piece � be careful to not overtighten when installing.
Finally, with the bolts out, the garnish piece is held in with plastic clips. Gently pry (with something that won't scratch your paint) and the panel should pop right out.
Take a close look at the clips - if I remember right, two of them are slightly different between the EX and LX trim. I swapped those out before installing my LX garnish piece.
To install, just position the new garnish in place, making sure the plastic clips are lined up with their holes, and press gently to seat them all. Install your two bolts at the outer edges (again, don't overtighten), and reinstall your wiper.
You're done!
es
#4
04-06-2015, 01:25 PM
Yeah Tofu
The Honda Fit LX rear garnish is
74890-T5A-J12
OEM Honda Part 74890-T5A-J12 | Rear License Garnish Assembly
I did the LX rear garnish swap on my black EX. It looks so much better than the "chrome"
The Honda Fit LX rear garnish is
74890-T5A-J12
OEM Honda Part 74890-T5A-J12 | Rear License Garnish Assembly
I did the LX rear garnish swap on my black EX. It looks so much better than the "chrome"
#5
04-10-2015, 07:43 PM

removing emblem/badge
http://imgur.com/a/saGr5
I plan on plastidipping the garnish black for the time being. Was fairly simple and easy removing it, took maybe 4 minutes. Is there a way for me to remove the Honda emblem/badge?
I plan on plastidipping the garnish black for the time being. Was fairly simple and easy removing it, took maybe 4 minutes. Is there a way for me to remove the Honda emblem/badge?
#6
04-11-2015, 08:53 AM
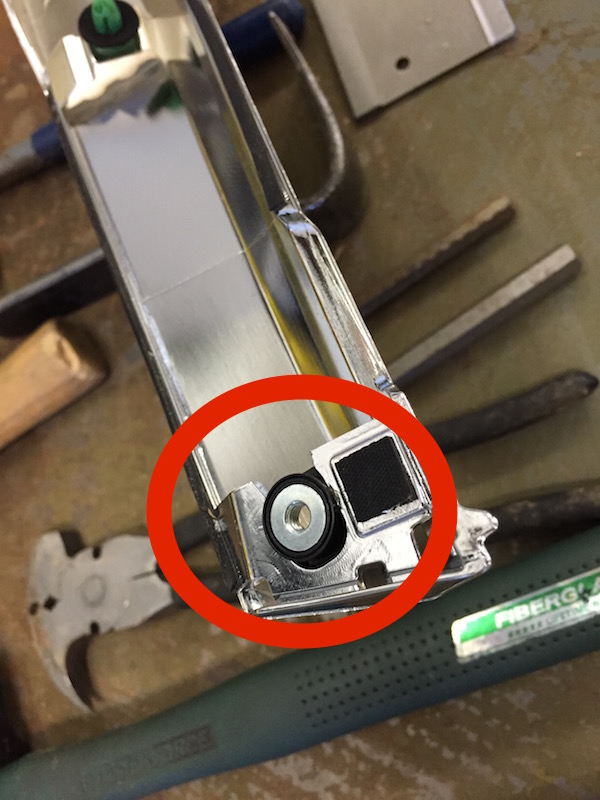
You can clip or crush the two little circular tabs on the back (the metal washers hold it in place) and it will come off. There might be a way to gently lift the tabs on the washers so you arent basically breaking the piece. I wasnt going to re use my emblem so I went the fast and careless route. You would probably need to epoxy or use some high grade plastics glue to keep it in place if you plan to use it after plastidip.
#7
04-27-2015, 12:00 PM
This probably a stupid question, but I could not find and answer anywhere online. Why do the bars on the back of the honda fit vary from car to car?
Why is mine shiny chrome but others I see on the roads are black? Its driving me nuts > <'
Why is mine shiny chrome but others I see on the roads are black? Its driving me nuts > <'

#9
04-27-2015, 12:30 PM
Thanks, I didn't realize it was something so simple. Somewhat disappointed, I thought it was a sports model thing or something. The black looks way nicer than the chrome.
#10
04-27-2015, 01:12 PM

I didn't like the chrome either, I thought they were all chrome until I saw an LX on the road, I was as baffled as you, I didn't know they were different. I took the bar off this weekend and PlastiDipped it, it looks great!
#11
10-14-2016, 01:16 AM
Strangely, I bought a different part number, and it still fit. I was just speaking with a parts rep over email, and they said it depends whether your car was manufactured in Mexico or Japan for the LX, but for EX and up trim, it doesn't matter.
Part number: 74890-T5A-A11
HondaPartscheap.com has this piece now for $50.40 and no tax unless you live in California. Shipping is cheap too, they don't gouge you like the other sites. My final sale price was $64 shipped+ tax. Legit!!
Part number: 74890-T5A-A11
HondaPartscheap.com has this piece now for $50.40 and no tax unless you live in California. Shipping is cheap too, they don't gouge you like the other sites. My final sale price was $64 shipped+ tax. Legit!!

#13
11-09-2016, 09:33 AM
I still have mine, and would be happy to sell it. PM me if you're interested.
es
es
#14
11-20-2016, 11:01 PM

hello everyone,
I'm new here..i just bought a black rear garnish. But IDK how to install it. Haha..
Planning to install it myself.
May I know what tools do you used throughout the removal and installation process? Thanks.
I'm new here..i just bought a black rear garnish. But IDK how to install it. Haha..
Planning to install it myself.
May I know what tools do you used throughout the removal and installation process? Thanks.
#15
11-21-2016, 09:47 PM
Um, start at the top and read the whole thread? This is one of the simplest mods you can do to the car.
es
es
#16
11-23-2016, 10:51 PM
i don't really understand pic no. 2. where is it located?
this is gonna be the 1st time i mod car myself..haha
#17
11-28-2016, 09:21 AM
Make sure all screws, nuts and bolts are removed before you attempt to pry the garnish off, otherwise you *will* break something. Those plastic clips do require some effort to pry loose, and you'll have to "feel" your way there.
Good luck!
es
#18
11-28-2016, 02:37 PM
NP, we all have to start somewhere! Pic number two is of the tailgate. Open yours and look where the gas strut connects to the tailgate, then look farther up (again, the tailgate is open at this point, so "up" is closer to the bottom of the tailgate, since it's way up in the air now). You should be seeing the same view as in my pic.
Make sure all screws, nuts and bolts are removed before you attempt to pry the garnish off, otherwise you *will* break something. Those plastic clips do require some effort to pry loose, and you'll have to "feel" your way there.
Good luck!
es
Make sure all screws, nuts and bolts are removed before you attempt to pry the garnish off, otherwise you *will* break something. Those plastic clips do require some effort to pry loose, and you'll have to "feel" your way there.
Good luck!
es

Yeah!!! I manage to replace the chrome with black rear garnish!!! Thanks a lot for the great help! It was not difficult as I thought..I'm so happy that I change it myself. Indeed this post is the best guide to follow.
 thanks again