Instructions: Switch for toggling interior LEDs between dome light mode and always on
#1
 01-17-2016, 08:51 PM


Instructions: Switch for toggling interior LEDs between dome light mode and always on
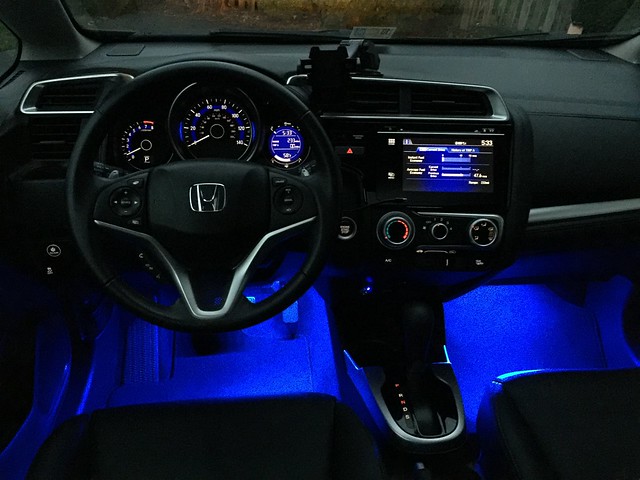
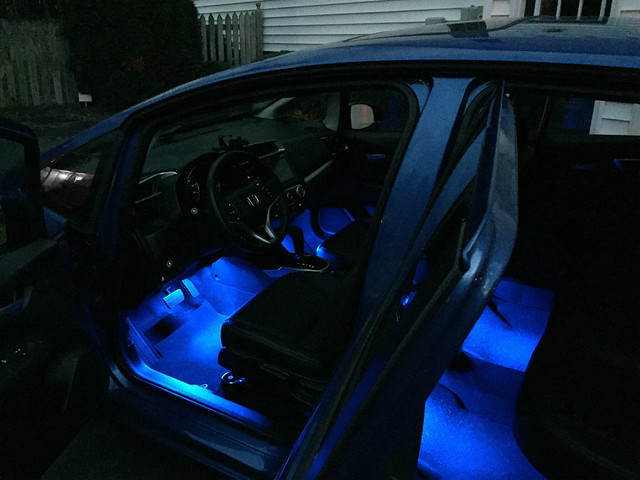
I just installed a switch in my car that allows me to control my footwell LED lights. The switch fits into one of the blank slots next to the left of the steering wheel and toggles between three modes:
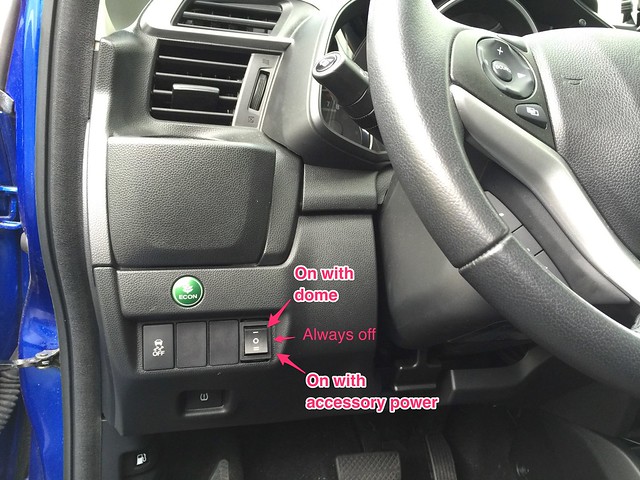
What I really wanted was footwell lights that would always come on with the dome lights, and a switch could turn them on while driving. My switch does one or the other, if I leave the lights on while driving then forget to switch it back to dome light mode, then the next time I go out to my car the lights don't come on with the dome. Combining the dome light circuit with a switched power source turned out to be too complicated because the dome light circuit uses constant power with switched ground, while the car accessory power is switched power with constant ground. Instead of combining those two circuits I have a dual pole dual throw switch that allows me to toggle between these two separate circuits.
- On with dome light (open or unlock door)
- Always off
- On with accessory power (for driving)
What I really wanted was footwell lights that would always come on with the dome lights, and a switch could turn them on while driving. My switch does one or the other, if I leave the lights on while driving then forget to switch it back to dome light mode, then the next time I go out to my car the lights don't come on with the dome. Combining the dome light circuit with a switched power source turned out to be too complicated because the dome light circuit uses constant power with switched ground, while the car accessory power is switched power with constant ground. Instead of combining those two circuits I have a dual pole dual throw switch that allows me to toggle between these two separate circuits.
Last edited by simonx314; 01-17-2016 at 09:31 PM.
#2
01-17-2016, 09:08 PM
Thanks to JupiterJoe for posting instructions about tapping into the dome light switch in this thread.
https://www.fitfreak.net/forums/3rd-...ht-wiring.html
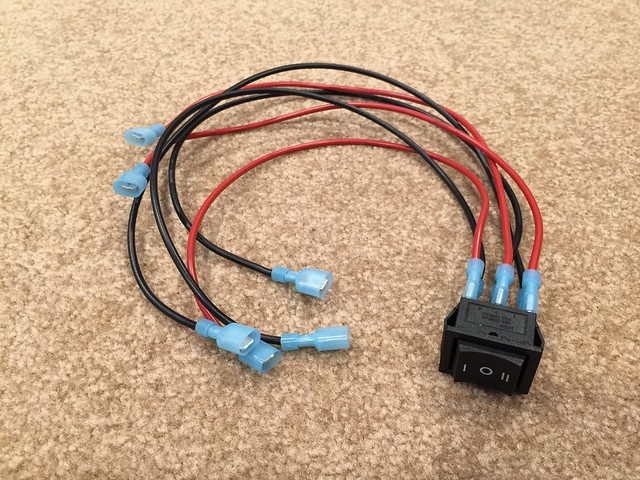
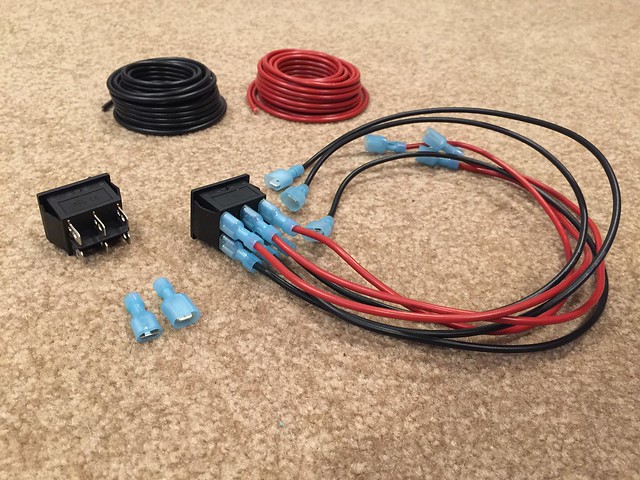
Parts
The wire crimp terminals were crucial for this project. They crimp on to automotive wire and then you can just plug in all your wires with no soldering or electrical tape. They hold tight but can be unplugged if needed. Here is an Amazon link to the terminal connectors I purchased.
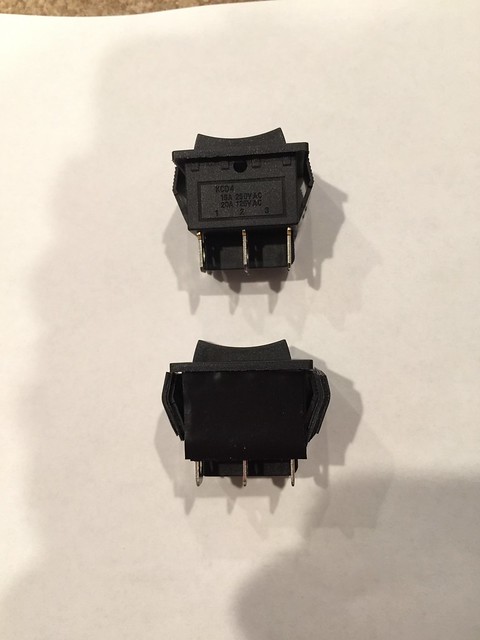
Those terminal connectors are a perfect fit for the six spades on this DPDT switch that fits into the Honda blank switch plate. The switch is a little bit too small so I had to fatten it up by wrapping it in electrical tape.
Amazon link for switch:
Amazon link for fuse tap add-a-circuit
Amazon link for molex power connector
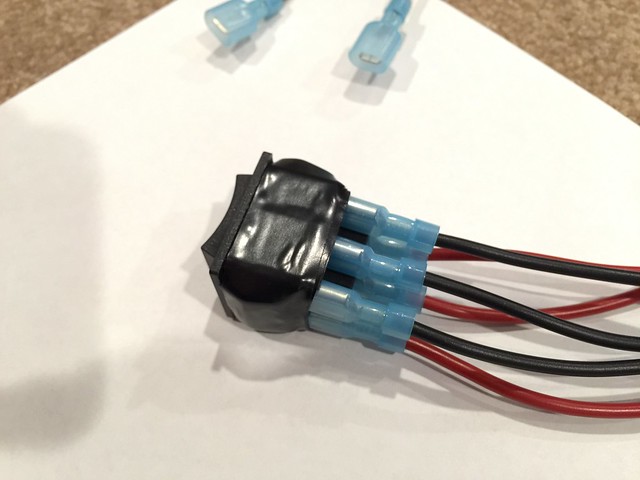
Here is my switch crimped to the connectors. The switch is a 2-pack so I have an extra switch.
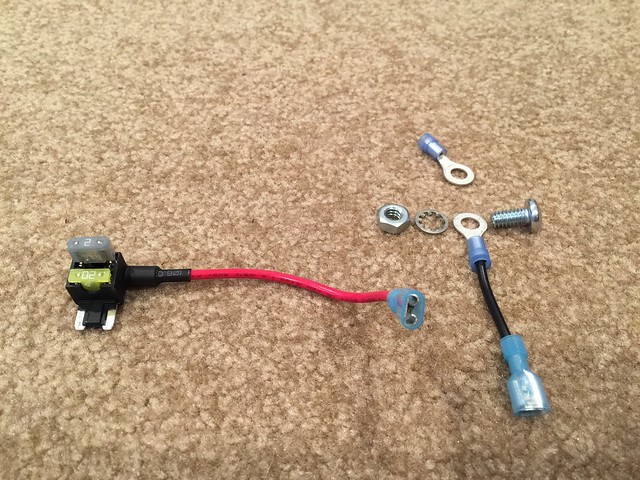
Here is a fuse tap next to the ground connection I made using a ring connector bolted to the frame of the car. My footwell LED lights draw less than 2 amps so I use a 2 amp fuse when I add a circuit to the fuse box to power the lights.
https://www.fitfreak.net/forums/3rd-...ht-wiring.html
Parts
- 14 guage automotive wire
- Wire crimp terminal connector spades (male and female)
- Switch (Dual pole dual throw)
- Ring terminal connectors 14 guage
- Fuse tap add-a-circuit (2)
- 2 amp low-profile fuse
- molex power connector
The wire crimp terminals were crucial for this project. They crimp on to automotive wire and then you can just plug in all your wires with no soldering or electrical tape. They hold tight but can be unplugged if needed. Here is an Amazon link to the terminal connectors I purchased.
Those terminal connectors are a perfect fit for the six spades on this DPDT switch that fits into the Honda blank switch plate. The switch is a little bit too small so I had to fatten it up by wrapping it in electrical tape.
Amazon link for switch:
Amazon link for fuse tap add-a-circuit
Amazon link for molex power connector
Here is my switch crimped to the connectors. The switch is a 2-pack so I have an extra switch.
Here is a fuse tap next to the ground connection I made using a ring connector bolted to the frame of the car. My footwell LED lights draw less than 2 amps so I use a 2 amp fuse when I add a circuit to the fuse box to power the lights.
Last edited by simonx314; 01-17-2016 at 09:27 PM.
#3
01-17-2016, 09:25 PM
Step 1
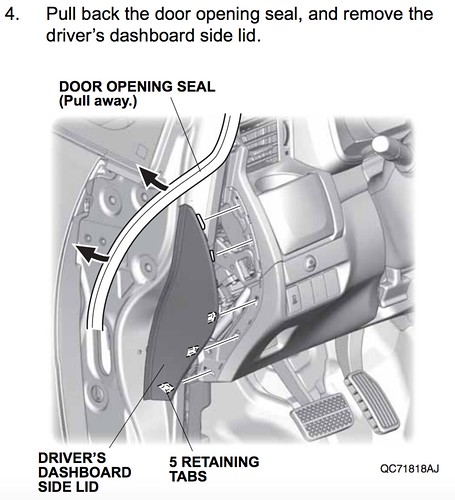
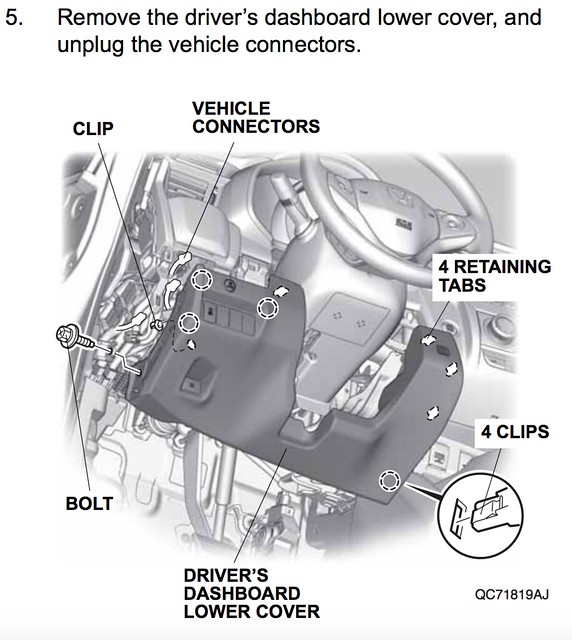
Remove the lower dashboard cover.
This is really easy it is just removing one bolt and pulling away the plastic cover below the steering wheel. First peel back the weather stripping on the left just enough to pry out the plastic side lid, then you will see the bolt to remove. Once this is done the fuse box is easily accessible which makes the whole project much easier. Here are the relevant instructions from Honda's official interior illumination kit.
Step 2
Use a bolt and ring connectors to add a grounding point.
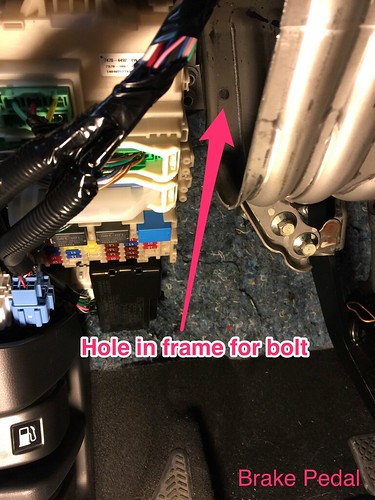
I added a second ground point wire for hardwiring a dash cam. This picture also shows the fuse tap inserted into the fuse box.
Remove the lower dashboard cover.
This is really easy it is just removing one bolt and pulling away the plastic cover below the steering wheel. First peel back the weather stripping on the left just enough to pry out the plastic side lid, then you will see the bolt to remove. Once this is done the fuse box is easily accessible which makes the whole project much easier. Here are the relevant instructions from Honda's official interior illumination kit.
Step 2
Use a bolt and ring connectors to add a grounding point.
I added a second ground point wire for hardwiring a dash cam. This picture also shows the fuse tap inserted into the fuse box.
#4
01-17-2016, 09:53 PM
Step 3 - Setup switch
Here is the schematic for the switch.
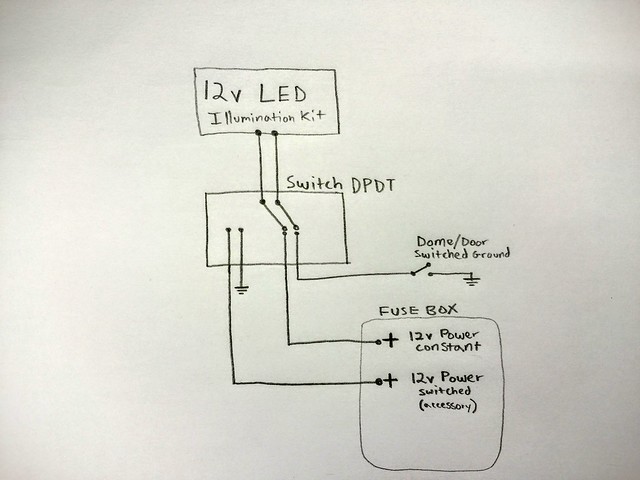
Attach about a foot of wire to each of the terminals on the switch. One side is for power, the other side is ground. The middle terminals connect to the LEDs. The other pairs of switch terminals are for the dome light circuit and the accessory power circuit.
The back of the switch has 6 terminals arranged like so:
1 2
3 4
5 6
1 = vehicle ground
2 = accessory power
3 = LED ground
4 = LED power
5 = dome light switched ground
6 = constant power
The switch is a slightly too narrow and noticeably too short for the blank switch slots to the left of the steering wheel, so I fattened it up by wrapping it in electrical tape.
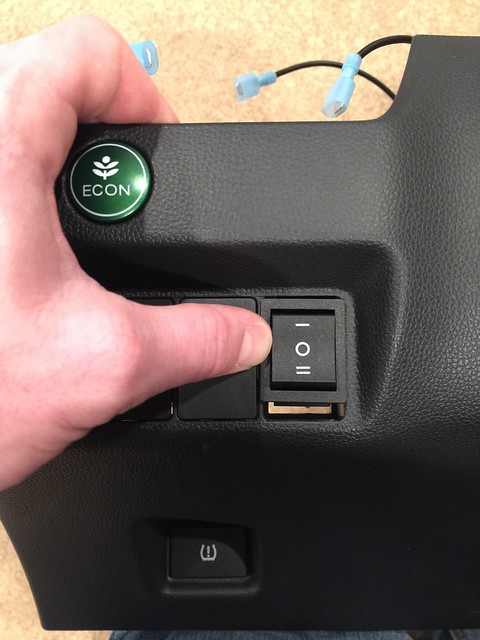
Fattened with tape compared to extra switch
Here is the schematic for the switch.
Attach about a foot of wire to each of the terminals on the switch. One side is for power, the other side is ground. The middle terminals connect to the LEDs. The other pairs of switch terminals are for the dome light circuit and the accessory power circuit.
The back of the switch has 6 terminals arranged like so:
1 2
3 4
5 6
1 = vehicle ground
2 = accessory power
3 = LED ground
4 = LED power
5 = dome light switched ground
6 = constant power
The switch is a slightly too narrow and noticeably too short for the blank switch slots to the left of the steering wheel, so I fattened it up by wrapping it in electrical tape.
Fattened with tape compared to extra switch
#5
01-17-2016, 10:22 PM
Step 4
Dome light circuit
Just above the fuse box is a connector for the official Honda door sill accessory which contains a pin that is grounded when the dome light is activated. Combine this switched ground with a constant power source to have the LEDs go on with the dome light. Thanks to JupiterJoe for finding the location of this pin, here is his thread:
https://www.fitfreak.net/forums/3rd-...ht-wiring.html
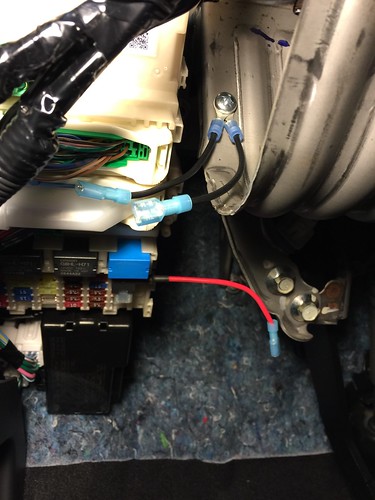
That dome light connector has another pin for constant power, but I just used another fuse tap because the connection is much more secure.
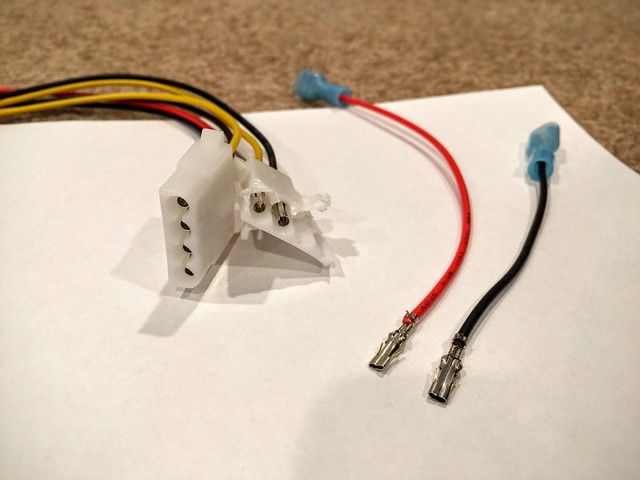
To attach a wire to the switched ground pin, I flattened a molex power connector as mentioned by TinyPlaces on the thread linked above.
Flattened molex connector. Although I created a red wire for power I ended up not using it because I just used a fuse tap, more on that later.
Dome light circuit
Just above the fuse box is a connector for the official Honda door sill accessory which contains a pin that is grounded when the dome light is activated. Combine this switched ground with a constant power source to have the LEDs go on with the dome light. Thanks to JupiterJoe for finding the location of this pin, here is his thread:
https://www.fitfreak.net/forums/3rd-...ht-wiring.html
That dome light connector has another pin for constant power, but I just used another fuse tap because the connection is much more secure.
To attach a wire to the switched ground pin, I flattened a molex power connector as mentioned by TinyPlaces on the thread linked above.
Flattened molex connector. Although I created a red wire for power I ended up not using it because I just used a fuse tap, more on that later.
#6
01-17-2016, 10:39 PM
Step 5
Fuse taps
I use two fuse taps, one for constant power (dome light mode) and one for switched power (accessory mode) so I can leave the lights on while driving (but not have to worry about them staying on while the car is off which could happen if I used constant power).
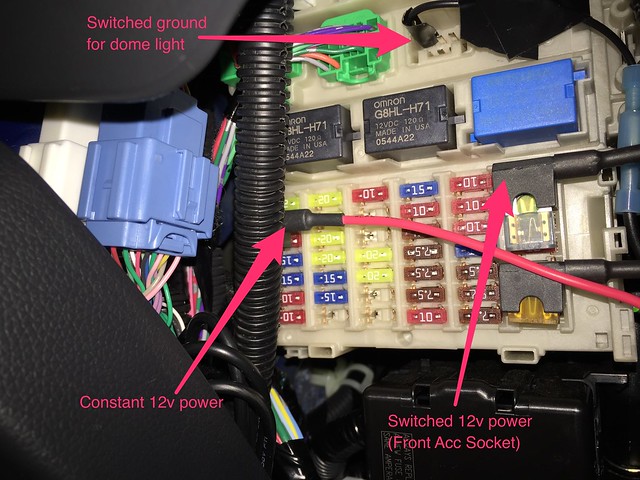
Here is the fuse box diagram printed under the steering wheel. I found an empty fuse slot that is constant power which I used for the dome light mode circuit. For accessory power I used the "front acc socket" fuse. My unrelated dash cam is powered by the "rear wiper" circuit.

I use 2 amp fuses in the fuse taps because the LEDs use less than 2 amps. The switched ground for dome light mode is the top left pin in that connector.
Step 6
Plug everything in, put everything back together, and tidy up with zip ties.
This is my first automotive electrical project so let me know if I could have made any improvements. I would also be interested to find a similar switch which is the perfect size for our Hondas.
Fuse taps
I use two fuse taps, one for constant power (dome light mode) and one for switched power (accessory mode) so I can leave the lights on while driving (but not have to worry about them staying on while the car is off which could happen if I used constant power).
Here is the fuse box diagram printed under the steering wheel. I found an empty fuse slot that is constant power which I used for the dome light mode circuit. For accessory power I used the "front acc socket" fuse. My unrelated dash cam is powered by the "rear wiper" circuit.
I use 2 amp fuses in the fuse taps because the LEDs use less than 2 amps. The switched ground for dome light mode is the top left pin in that connector.
Step 6
Plug everything in, put everything back together, and tidy up with zip ties.
This is my first automotive electrical project so let me know if I could have made any improvements. I would also be interested to find a similar switch which is the perfect size for our Hondas.
Last edited by simonx314; 01-17-2016 at 10:44 PM.
#7
04-09-2016, 10:34 AM


Thank you for the awesome tutorial! I'll definitely be doing this when my Fit comes in (which will be a few months, but it will be the car I want, so it's okay.)
I do have a question, though. Would it be possible to daisy chain two of these switches from one power source? I'm contemplating adding footwell lights and underglow and I would want the two switches to be independent, but have both run off the same power hookups (ie reduce the number of fuse taps). Do you think that would work? Would it even be advisable?
I do have a question, though. Would it be possible to daisy chain two of these switches from one power source? I'm contemplating adding footwell lights and underglow and I would want the two switches to be independent, but have both run off the same power hookups (ie reduce the number of fuse taps). Do you think that would work? Would it even be advisable?
#8
04-09-2016, 11:02 AM
Thanks for reading.
Yes you could power multiple circuits with one fuse tap as long as both circuits total amperage draw is less than the amperage of the fuse slot. Adding a fuse tap is as easy as plugging in a cable so you wouldn't be saving yourself much effort, just a few bucks. The other disadvantage of using only one fuse tap is if the fuse tap or fuse fails both your lights would stop working, instead of just the one.
Yes you could power multiple circuits with one fuse tap as long as both circuits total amperage draw is less than the amperage of the fuse slot. Adding a fuse tap is as easy as plugging in a cable so you wouldn't be saving yourself much effort, just a few bucks. The other disadvantage of using only one fuse tap is if the fuse tap or fuse fails both your lights would stop working, instead of just the one.
#9
02-19-2017, 08:54 AM

fuse tap
hi
fantastic read on this. learnt lots from it. but i have a question, if i were to use the fuse location 2 which is empty and use the fuse tap like the one you provided with the link, is it required for me to use up both fuse slots on the fuse tap in order to complete the circuit or i can just use one of it? or i will actually need to get a different kind of fuse holder?
fantastic read on this. learnt lots from it. but i have a question, if i were to use the fuse location 2 which is empty and use the fuse tap like the one you provided with the link, is it required for me to use up both fuse slots on the fuse tap in order to complete the circuit or i can just use one of it? or i will actually need to get a different kind of fuse holder?
#10
02-19-2017, 09:19 AM
hi
fantastic read on this. learnt lots from it. but i have a question, if i were to use the fuse location 2 which is empty and use the fuse tap like the one you provided with the link, is it required for me to use up both fuse slots on the fuse tap in order to complete the circuit or i can just use one of it? or i will actually need to get a different kind of fuse holder?
fantastic read on this. learnt lots from it. but i have a question, if i were to use the fuse location 2 which is empty and use the fuse tap like the one you provided with the link, is it required for me to use up both fuse slots on the fuse tap in order to complete the circuit or i can just use one of it? or i will actually need to get a different kind of fuse holder?
#11
02-19-2017, 10:07 AM
fuse tap
hi simon
did you leave yours one empty for the fuse port no.2? or you used up both fuse ports on the fuse tap

#13
03-21-2017, 08:46 AM

Starting on this project.
Going off of tbfit's thread for LED's: https://www.fitfreak.net/forums/3rd-...t-ambient.html
I have ordered about the same LEDs from a china ebayer. $2 for a 2pc of 3led strips. Got 6x total.
In the process of finding the perfect 3 position switch I like.
I am going to wire mine a bit different, but still go off of simonx314's scheme.
What I am going to do, is get aftermarket sill's. One that has the connector just like OEM sill's. Then just splice the ACC/Dome light part off of that.
First one I found cheap and with a connector is this (thanks to another thread):
https://www.aliexpress.com/store/pro...369599564.html
But then I found this on ebay, which seems way to cool to be true or have quality...
New Honda Fit Jazz 14-16 GK LED Door Scuff Sill Plate Running Moving BLUE Lights | eBay
^ This is what they do:
Last edited by fizzy99; 03-21-2017 at 08:48 AM. Reason: Append

Thread
Thread Starter
Forum
Replies
Last Post
Macswfc
Fit Interior & Exterior Illumination
7
12-31-2015 08:00 AM
kitkit201
Fit Interior & Exterior Illumination
4
11-26-2012 11:32 AM
Sam Misled
Fit Interior & Exterior Illumination
3
04-17-2010 05:44 AM

