When you click on links to various merchants on this site and make a purchase, this can result in this site earning a commission. Affiliate programs and affiliations include, but are not limited to, the eBay Partner Network.
Posting this thread as a documentation of the ongoing items I have been adding my Fit. Everything done is primarily to make the car go faster. I just figure I may as well try to put it all in one place.
The car's name is MISFIT. This is no beauty/car-show queen. Just a regular Fit.
Will copy/paste what I have up in threads and try to put it all together in this one.
See 'Myxal Great Intake Test' thread. This was the final intake I decided to keep on the Fit. It netted the fastest 1/4 mile time of all the intakes I made. It gained up to 3mph over the stock intake and 4/10-5/10ths of a second.
The inlet on my setup is 3.5" from ram air/PRM Air Filter inlet. PRM air filter outlet is 3", going into a 3" 180 degree silicone bend. Then it reduces to 2.5", to a 2.5" 90 degree pipe that reduces down to 2" before going through the maf sensor. The filter itself is HUGE though. Barely fits under the maf sensor. Hehe! This setup was made this way to reduce any restriction from having a long length of same diameter pipe. Also, the reducing bends heading towards the maf speeds up air intake velocity as it gets closer. I read that any bend in the intake piping causes air to slow down but a funnel affect (reducing diameter) causes air velocity to speed up. So I try to speed the velocity as it goes around a bend towards the maf sensor or just have the bend so large (3") that it doesn't cause the motor to have to try to suck in the air harder. This is EXACTLY what I wanted.
I uploaded a short video so you care hear how it sounds at idle. Nothing much to hear since our 'Earth Dreams' engine sounds like diesels. I'm no video expert so no sure why it's not a full screen. Either way...
I purchased a 2014 1.8ltr Honda Civic LX CVT air cleaner housing to do this mod here --> 2014 Civic Air Box Housing
I used a hacksaw to cut out the maf sensor housing and took measurements of it vs the stock 2015 Honda Fit maf sensor housing. Here is what I came up with.
Here are a couple of pictures of the maf sensor housings side-by-side.
I don't even need to tell you which is which because the difference in size is The 1.8ltr Civic maf housing is on the right side and the top of the pictures.
I removed the maf sensor from my stock housing and inserted it into the 1.8ltr Civic maf sensor housing. The I started the car up. No check engine light and it revs just fine. No engine stutter!
I found a bullshit generic filter I could use for testing thankfully so I'll be driving around tonight to see if everything is ok. I'll toss this filter out for an S&B filter tomorrow if all goes well.
Had to cut it short since the Misses was calling me for dinner. :-)
The Spectre maf airflow sensor kit came in. Had a nice cool Spectre bag with it, with all the reducer pieces inside as well as maf sensor connectors for a 3" pipe they provided. The kit is very nice and I'm sure if could be really useful for someone using a 3" intake. However, this is where I made my mistake.
The maf adapters are all for a 3" pipe. They are supposed to reduce the piping size as follows:
3" to 2.75"
3" to 2.5"
3" to 2.25"
What I needed to do is reduce my maf sensor inlet from 2.25" to 2". Specter doesn't sell a 2.25" adapter reducer (Or even a 2.5" one that I could find). So I was stuck in a dilemma.
So out came the knife and hacksaw. I cut up the 2.5" and 2.25" several ways. I took a fair amount of pics but I'm too tired (lazy) to put them up now. Very ghetto looking.
What I ended up doing is sliding the cut up 2.25" into the 2.5". Then sliding both of those into the Civic Maf sensor to reduce the inside diameter down. Both pieces were slid into the inlet side of the maf sensor, with both pieces allowing the maf sensor to be inserted through the top. Here is what is looks like inside.
I need to work on making the inlet air transition into the maf sensor smooth. Right now, it's an abrupt/harsh transition. Any suggestion on what I can apply to make this transition from the silicone hose to maf smooth? Some type of liquid/paste that hardens that wont' get sucked into the intake. I'll be stopping by Home Depot tomorrow to find something to smooth this out inside.
The stock maf sensor Inlet diameter is 2.04" (51.82mm).
Now the Civic maf sensor with the two Specter pieces inside has an inlet diameter of 2.07" (52.99mm). Close enough!
The piece is all ready for me to swap out with the stock piece while testing at the track. Don't worry, I won't be installing them the way you see them. The stock maf is on the left side and the Civic maf housing is on the right (It's upside down though but you get the point).
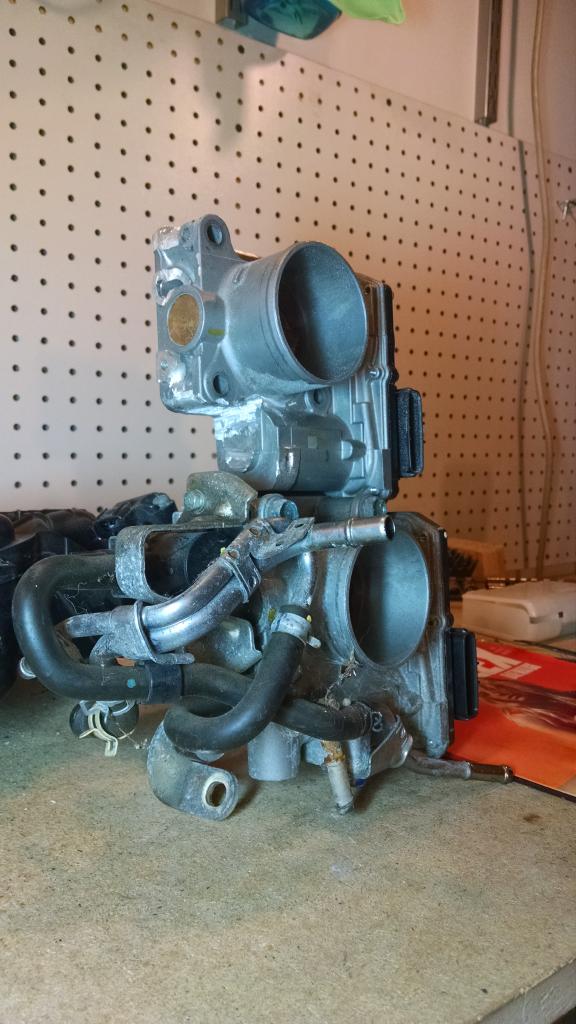
I removed the throttle body. I'm not a mechanic. Just a regular guy like most of you. After removing the intake itself, it's as only a matter of four bolts and unplugging some sensor that was attached to it. You'd also have to remove two coolant hoses from it but I have already done a coolant by-pass modification so it was not needed.
Here is what the intake manifold opening looks like. I measured its diameter at 2.155" (54.74mm) from top to bottom. Measures about 2" across.. It is not perfectly round though. Top to bottom is widest. Weird!
I then measured the throttle body inlet diameter. It measured at 2.172" (55.18mm)
Measuring the throttle body outlet diameter, I came up with 1.966" (49.94mm)
I put the stock throttle body on a scale and weighed it. This way we can gauge how much metal/weight has been removed. It weighed in at 2 lbs 1.6oz (953g)
It is all packaged up and will be overnighted to Maxbore tomorrow. George of Maxbore has been notified.
The throttle body has just arrived at my house. Kudos to Maxbore Jorge for doing what he said he was going to do. I sent this out overnight on Monday, Maxbore received it Tuesday. The bore took place Tues/Wed and he stated he would ship it out on Wed and here it is. Excellent!
The package arrived in the same box I sent it out in. It was wrapped up neatly inside this plastic.
So I weighed the Maxbore throttle body. It came out to 2.05lbs (930g).
.05lbs (23g) weight reduction from metal removal.
Measured the Maxbore throttle body inlet diameter. It came out to be 2.33" (59.24mm)
Inlet diameter was increased by .16" (4.06mm)
Measured the Maxbore throttle body outlet diameter.It came out to be 2.095" (53.21mm)
Outlet diameter was increased by 0.13" (3.27mm)
Went about by-passing the throttle body coolant passage due to seeing high intake air temperatures that I believe is attributed to the hot coolant going through the throttle body. This isn't a how too or D.I.Y. post. Just showing you where the hoses are and what simple part you can use to get this done.
Here is a pic of the stock setup:
See those two hoses directly in the center of the pic? I believe both of those are coolant in and coolant out hoses. I simply disconnected them and used a brass fitting to connect them. I already had a plastic vacuum connector that was the correct size to do this (5/16" X 5/16" or 7.93mm X 7.93mm). I took it to a hardware store and matched the size I needed to a brass fitting. The fitting was $1.99.
I went about disconnecting those two hoses and connecting them together using this brass fitting.
Both hoses fit pretty snug but I still used the stock hose clamps on both of them. By-pass complete! Hopefully my air intake temperature is no more than +4F higher than ambient. It was reaching as high as 50-60F+ at times, pulling in air from the top of the hood. Unacceptable!
Not suggesting you do this at all, especially if you are in a colder climate. Just showing you that yes, it can be done and how easy it is to get it done.
I'm probably gonna catch some flack for this (Maybe a lot) but here it goes. Want to share an idea I have since I keep reading over and Over and OVER again that high revving Hondas make the most power with a 3" exhaust.
No...I am not going with 3". However, I do plan on going with 2.5"....sorta. I want to apply the same concept that I found works on the intake side with the exhaust side. I want to reduce the exhaust diameter by .25 every time it hits a 90 degree turn. This is to keep exhaust velocity high but avoid being restrictive from being to small. So this is what I want to do -->
I start with 2.5" 2nd cat (or just after it). Once it hits the 1st 90 degree turn, 2.25" piping. Hit 2nd 90 degree turn, 2" piping. Then through 2" resonator, then through muffler. I want to come to a compromise between top and and low end.
Any thoughts/feedback?
**Update** I'm already done with Stage 1 of this project. I couldn't get it out of my head so. Here is what I ended up with for the moment. I started with the 2nd cat, then opened the exhaust up to 2.5". It's 2.5" through both 90 degree bends then it goes to a 2.25" Resonator and a 2.25" Hi Pro Flow muffler.
And some pics of the setup. It's all 'crushed bend'. I know, I know....mandrel bends are the best. There are no mandrel benders out here and no aftermarket exhausts for this Fit yet so. Lets get her done!
The muffler used is a 2.25" Hi Pro Flow Max muffler. I had a 2" High Pro Flow Max on that I posted pics of. The car sounded now different than stock and it was a straight through muffler so I stuck with what worked. It's not pretty I know. Wasn't meant to be. When things get ugly, it's gonna look the part. This ain't a show car.
The resonator I purchased was solely to keep exhaust gas velocity up but keep noise down. So I purchased a 2.25" Vibrant Ultra Quiet Resonator. It was $91.50 from Verocious Motorsports. I drove down the street to pick it up to be installed.
Link to Resonator --> Vibrant Ultra Quiet Resonator
I can't feel any loss of torque anywhere and it feels like the car can BREATHE. I'm doubting all my feelings on it and opinions. I need to record some runs and take it to the track to gather data. It's no longer quiet but a slight hum way in the background. Very low, deep! My wife didn't really notice it at all. No raspiness but the video I took of it makes it sound louder than what I thought it was. Doesn't sound like that from inside car. Will post up in a bit. It feels REALLY good though. Like it's faster but I call B.S. until I get real data.
This stage one. I have some testing to do than the 2nd cat may be replaced with a 2.5" unit or removed altogether.....NEXT WEEK. Stay tuned!
Gawd...the muffler sounds LOUD on here to me. Hahaha! I wonder who will win between it and the PRM intake you can hear in my other videos.
Added a J'S RACING GK5 FIT3 SUS Circuit Converter AKA J's Racing Cat Delete. It came with a 'cap' to cap off the EGR pipe outlet to the sensor..
The J's Racing cat delete pipe is 2" in diameter. ***INSTALL WAS A SUCCESS. NO ISSUES WITH INSTALL*** It weighed 5.2lbs
Stock cats and pipe weigh 16lbs.
10.8lbs in weight reduction.
The J's Racing cat delete outlet flares up to about 2.25". This is important to know because if you bolt it up to the stock piping, the exhaust gases will come into contact wiyh the stock 'B' pipe inlet at the flange. This can cause some raspiness my mechanic told me. It'll definitely cause some turbulence and interrupt the exhaust flow somewhat. I'm not mechanic or expert but I'd recommend at least having a 2.25" B pipe (Mid-pipe) to connect to the J's racing cat delete. I had the flange widened up to 2.5". Please look at my pic above at the 2nd cat converter flange that mates up to the 'B' pipe. Look at the 'B' pipe's inlet and you'll notice how small it is before it opens up to 2.5". Then look at this.
Eliminating the cat converters brings out a LOT of exhaust noise. I already have a decent sized 2.25" Hi Pro Flo Max Muffler and 2.25" Ultra quiet Vibrant resonator and they both could not contain the beast. Loud is subjective and different with different people. My definition of loud exhaust is if you drive around for a while (Hours, Days, Weeks) and you still notice your exhaust, all the time, it's too loud. The whole 24hrs after J's racing cat pipe, I noticed the exhaust noise every moment of driving. I should've forgotten about it an hour or two after driving to think about other things and THEN notice the exhaust when my mind went back to it. Anyways.....I decided I needed another resonator added. So I picked up another Vibrant resonator BUT the exhaust shop suggested I go with a longer, slightly bigger muffler instead. So I compared the two.
Both are 2.25" in/out center. The top and left is a Xlerator muffler (Part# XS0425). The bottom and right is another 2.25" Vibrant Resonator. I chose to go with the muffler. It felt a little bit heavier so I was hesitant to get it but I reminded myself that I wanted to get rid of the high exhaust note. Both the resonator and muffler are straight through designs.
And before anyone says anything about adding restriction to the exhaust, just like Vibrant resonator that is already installed, the Xlerator muffler is a straight through design. It's not restrictive.
A close up look with the Ultra quiet Vibrant Resonator going into the Xlerator muffler.
A further out look of the whole exhaust, including the Hi Pro Flow Muffler.
Here is the whole exhaust breakdown!
1) 2" J's Racing Cat Delete Pipe,
2) 2.5" B-Pipe (Midpipe),
3) 2.25" Vibrant Ultra Quiet Resonator,
4) 2.25" Xlerator Muffler,
5) 2.25" Hi Pro Flow Max Muffler
Short video revving it a little in the shop. Exhaust is now 2" J's Racing Cat Delete Piping, 2.5" piping to 2.25" piping, 2.25" Vibrant Ultra Quiet Resonator, 2.25" Hi Flow Pro Max Muffler.
I am totally and utterly happy. This is EXACTLY how I wanted my exhaust. I have no idea on how it performs. If I can test it at a track, I will as soon as I can (This weekend is last weekend track opens). I will be testing on my Android Torque software but I don't report those number. I'll know it works though by testing the 0-60, 1/4 mile time and hp/tq info as the software has been very consistent. So, I'm done with the exhaust. I still have a check engine code --> Check engine code read --> P0135 - Powertrain, O2 Sensor Heater Circuit (Bank 1, Sensor 1). I will work on that in due time.
Non Stop Tuning has agreed to take measurements of a stock pulley I'll be sending them and make a custom 2015 crank pulley. Perhaps with this, they'll be able to duplicate what they make and have pulleys available for the 2015 Honda Fit. Just putting this out there for documentation purposes.
I've already ordered a crankshaft pulley to be sent out to them to measure. Here's what it looks.
The front of the pulley -->
The back of the pulley -->
Here is the weight of the stock crank pulley --> 3.4125lbs (1547g)
I have no expectations performance wise either way. Just doing it because.......I can. Quicker revs would be nice. I know I'd get better results with it being underdriven but that is a little much for my ride at this moment. Will update with new custom crank pulley weight and pics when I receive it (30-40 days estimated). I'll be sending the stock pulley out to them tomorrow. Until then.....
**Update 11/2/15**
The NST Pulley has Arrived!!
Front of stock pulley on the left, Front of NST pulley on the right.
Back of stock pulley on the left, Back of NST pulley on the right.
Weight of NST pulley is 1.14lbs (519g)
Total weight savings with the NST Pulley = 2.27lbs (1028g)
I just did my first datalog. It was non-eventful. Just your regular day to day driving with a wide open throttle here and there. I saved the file and sent one to Ktuner (Just to be sure I'm doing this right) and one to VitViper for Tuning. VitViper is **Closed** for the holidays until 1-5-15 (1.5 weeks). So no news until I receive a reflash.
Some words of advice for ya'll!
1) If you have anti-virus software, it could interfere with installation. My McAfee wreaked havoc on my installation and cause me hours of delay because I didn't know it was stopping me from installing the software. I was installing Ktuner on my job's laptop so McAfee was particularly aggressive (which is good actually) with interfering. I have not read about anyone else having this issue as they probably have been using their personal laptop (recommended).
2) Make sure you read the .pdf/help files Ktuner provides. They are very helpful. I'll be doing some tinkering between now and the reflash to get accustomed to the layouts and other items the software has to offer. Look at the videos Ktuner provided on their website --> Overview of KTuner Software
I can tell you guys that I know nothing about tuning ecu softwares and such. I can tell you now that I'm a little familiar with setting up 2d/3d graph options of air/fuel ratios, cam angles, ignition tables, etc now. I'm only looking and reading. There's a ton to learn. Following the video's guidance on this helps me get familiar with the software quickly. For me, it'll take time but it's fun. I'm currently looking through my 25 minute or so datalog and trying to make sense of things. I won't be changing zilch.
Stock wheel and tire weighed 34lbs on bathroom scale.
Kosei T1 TS wheel and General tire weighed 25lbs on my bathroom scale. Total weight lost--> -9lbs a wheel, -36lbs total
**Update 10/29/14**
Weighed car on ISO certified scale. Gas tank range says 34 miles left. Weight is 2360lbs. AWESOME!! Better than I expected...
Edit: Adding this for personal reference.
"The US EPA states that for every 10 percent of static mass eliminated from a vehicle, fuel economy improves by seven percent. Hotrodders will tell you that cutting 100 pounds from the average car will increase its quarter-mile times by one tenth of a second. " Import Tuner
"According to EPA estimates, a 14-percent savings in fuel efficiency can be seen per ten percent of rotational mass removed from a vehicle's driveline." Import Tuner
14" Kosei K1 TS Wheels & General AltiMAX RT43 tires
Stock wheel --> DISK, WHEEL (15X6J) (MAXION WHEELS)(BLACK) per Bernardiparts.com. According to Hondapartsnetwork, this wheel weighs 17.99lbs (18lbs).
Stock tire-- > TIRE (P185/60R15) (84T) (BS) (ECOPIA EP422 GRAND TOUR A/S) per Bernardiparts.com. Tire weight is 16lbs per Tirerack. Total weight = 33.99lbs
Tirerack states the 14" Kosei's K1 TS are9.3lbs a piece.
185/60R14 General AltiMAX RT43 tires = 15lbs a piece. Total weight = 24.3lbs
interesting work!! love seeing you experimenting around with what works with the exhaust and creative experimenting with the intake. And you are doing yourself right with the weight reduction.
I know you saw my thread on messing around with the GE TB, I'm really curious to see the changes they did with the GK TB. They definitely look compatible with a few modifications but there certainly are some differences. I was mainly surprised to see the elimination of the evap valve on the front (where did that move to??). I'm pretty perplexed with the black plastic housing, looks like they moved some circuitry from the lower back to its own housing on the lower side of the TB, it seems inefficient from a manufacturing standpoint (and I've never even cracked it open to see the circuit below that cover) but it's definitely an added cost that I don't understand the design decision behind it.
That is interesting! Maybe the material of construction is lighter and doesn't retain as much heat as the previous throttle body. Not sure! It is an interesting observation though.
Ordered a set of stock intake and exhaust camshafts and sent them out to be regrinded by DeltaCams. Hoping the regrind makes a good amount of horsepower increase on the topend (6500rpm) with little to no loss on the low to midrange.
Stock intake camshaft is on top. Stock exhaust camshaft is on the bottom.
Both were already sent out to Deltacams.
**Update 10/4/15**
Pic of cam weights and cam specs. Deltacam T-shirt
Cams have arrived on 9-30-15. Posted specs below in post #20 but am putting here on first post below for easy find.
All Duration Specs are @ .050
Lift is with 1.5 Ratio
OEM Specs
Int Vtec Ex
170 206 173 Dur
.300 .360 .318 Lift
Performance Grind
Int Vtec Ex
176 218 176 Dur
.317 .386 .330 Lift
Contacted DeltaCams earlier to see if they could do a regrind on this engine. The gentleman I spoke too needs to know a few things about this engine before considering doing a regrind (if it is at all possible).
1) Is it a Rocker Arm or 'Bucket'? style lifter,
2) If the cams lobes are Hollow (If they are, they can't be reground).
He also was wondering if it was DOHC (Double OverHead Cam) and I stated that yes it is.
I have no idea on either of these things. I'm thinking it is rocker arms because I see this term being tossed up with Honda engine but I need some expert advice. I know where I want the horsepower focus to be at and what I'm willing to compromise but that's about it. Thanks on any help with the info I need.
**UPDATED 2-19-15**
Stock intake/exhaust camshafts arrived. Shipping out to Deltacams for Regrind. Intake camshaft is on top. Exhaust camshaft is on bottom.
Intake cam weight is 1213grams (2.67lbs)**Sorry...forgot to weigh stock weight** Hondapartsnetwork show stock intake came weight at 1288grams (2.84lbs).
Exhaust cam weight is 1109grams (2.44lbs) **Sorry...forgot to weigh stock weight* Hondapartsnetwork show stock exhaust cam weight at 1134grams (2.5lbs).
Back of Deltcam T-Shirt
This video is with a full J's Racing exhaust: J's Circuit Converter, J's B-Pipe with Resonator, J's 50R muffler and Deltacams at idle.
That grille looks so good!! Now if there is a cowl behind that opening so that you can have a functioning ram air grille.
See the little black piece just above the grille?
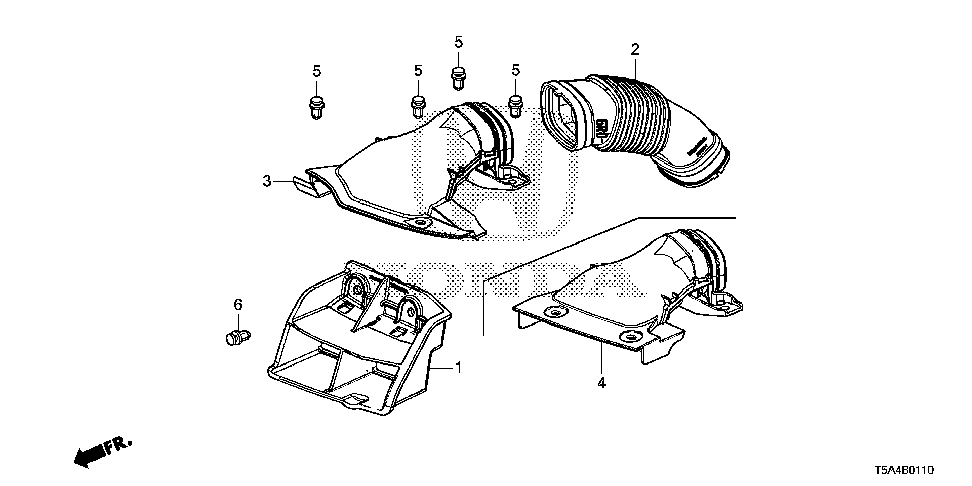
That is what guides the air straight up into the stock cold air piping piece. If you look at how I have the PRM intake setup above, it is already ready to pull the air directly from that hole. The stock setup has a water protection (Rain Guard) piece in there that needs to be removed (I have already removed mine). Look at the diagram below. The rainguard is piece #1
The little black piece above the J's grille is what will be in place of where the rain guard is. The hole will be directly in front of the black piece so you can get an idea how it'll be. The stock setup has that rain guard in place and the air it's pulling from is way down low on the car, at the bottom part of the radiator. It's the only opening on the stock front bumper. The J's grille changes the location of the air entry and forces it up through into the stock cold air intake ducting.
Yeah, I didn't get this for looks. Purely for function. I'll be measuring the difference in air flow (Maf G/S) at 65, 70, 75...etc mphs and compare before and after. 1/4 mile times before & after will follow as well. No...I'm not expecting anything (I never do). I just merely change stuff, observe and report (with a lot of hope and luck in between). I let the experts explain why the results are what they are. My days of forum explaining is over. I'm getting old! A 92mph trap speed would be really, Really nice though! Of course that won't happen though.
The J's Racing B pipe arrived today (Only two weeks after ordering it on 3/23/15). It is the exhaust piping on the left while the stock is on the right. It was packaged really nicely and there did not appear to be any damage to it. Welds look fine, it was shiny (I don't care about this either way). Nothing else to add!
I laid the J's racing B pipe on top of the stock pipe to see if it looks like it would or would not fit on the car. It looks like it is a go.
I took measurements of the J's piping at different sections since I took measurements of the stock B pipe sections earlier today. Here's a pic of the differences. O.D. means 'Outside Diameter'. I.D. means 'Inside Diameter'.
In the case that the picture do not load up in the future, here is the piping diameter info of the J's Racing B Pipe from measuring with a digital caliper.
Feel free to take your own measurements. The stock piping measurements are in this thread --> 2015 Stock B-Pipe Diameter & Weight. Results may vary.
Outer Diameters Inlet Piping diameter -- 46.6mm I.D. (1.83")
Pipe after 2nd cat -- 49.5mm (1.95")
90 degree bend
Pipe leading towards the resonator -- 49.86mm (1.96")
Bend towards resonator
Inlet piping to resonator -- 49mm (1.93")
Resonator
Resonator outlet pipe that has slight bend -- 50.66mm (1.99")
Piping after slight bend that goes to muffler -- 50.4mm (1.98") Piping outlet to muffler -- 41.9mm I.D. (1.65")
The J's Racing B-Pipe weighed in at 12.2lbs.
I will be re-installing a 2" Hi Flo-Pro Max muffler I had on the Fit previously. More information on it here -- 2" Hi Pro Flo Max Muffler.
This muffler has the stock piping attached to the inlet side of it. The exhaust side of the muffler tapers down. Here is what I measured today. O.D. = Outer Diameter, I.D. = Inner Diameter
Piping to inlet of muffler -- 41.82mm (1.65") O.D. **Too Small**
Muffler Outlet pipe - 40.93mm (1.61") O.D., 39.82mm (1.57") I.D., May pick up a Dynomax Ultraflo SS Muffler (My favorite kind since it's quiet), if this setup doesn't prove quiet enough. 2" Dynomax Ultraflo SS Welded
The muffler ain't pretty. This ain't a fashion show. This is for testing for results. I can always 'upgrade' to a muffler that's {prettier} with cool welding later. This thread ain't about the muffler though. Hi Flo-Pro Max Muffler and stock pipe weight is 12.4lbs. I purposely purchased the biggest straight through muffler I could find knowing it'd have to do the work of the previous cats a resonator on quieting down the exhaust.
I'm happy with the purchase thusfar. Will have the B pipe installed tomorrow and remove the 2" to 2.5" monstrousity I have on it now. I may update with a pic or two as well.
I apologize for any wrong numbers I may have typed in and will correct it if necessary.
 12-18-2014, 11:06 PM


 This ain't a show car.


 A 92mph trap speed would be really, Really nice though! Of course that won't happen though.


