Recaro SRD seats + Bride RO-type seat rails: DIY seat removal and install
#1
 07-22-2009, 09:20 PM


Join Date: Jan 2009
Location: Para�aque City, Philippines
Posts: 1,888
Recaro SRD seats + Bride RO-type seat rails: DIY seat removal and install
I made this DIY thread for another forum (Philippine Jazz and City United) two months ago. Decided to repost it here to help DIYers install their seats or just remove the stock ones for any reason.
The obligatory disclaimer:
Remember, neither myself nor IB, nor FitFreak.net are to be held liable for any problems that may arise from following this DIY. Please use common sense, and proceed at your own peril!
(Thanks Sid 6.7 for the disclaimer )
)
================================================== ==========================================
The Recaro SRD semi-bucket seats are arguably best known as the items that came stock with the DC2 Honda Integra Type R and the EK9 Honda Civic Type R. Not many people know, however, that they will mate perfectly with Bride's classic RO-type seat rails. While people have told me that I could have had seat rails fabricated from my stock GD1 Honda Jazz seats, I opted to perform the install myself and with more purpose-made equipment.
You will need the following for this seat swap and install job.
1. 6x25mm bolts x12 (available at motorcycle parts stores) or M8x25mm button-cap bolts if available
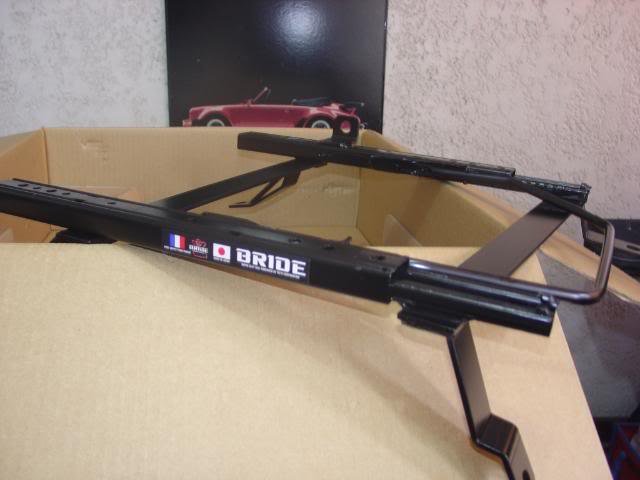
2. Bride RO-type seat rails
3. Bride seat anchor bolt (this, and all its washers and nuts comes with the seat rails)
4. Recaro SR-series or L-series seats
5. ratchet wrench handle
6. sockets: 10, 14, 18 and 22mm
7. long-nose pliers
8. claw hammer
9. screwdriver
10. Allen wrench set
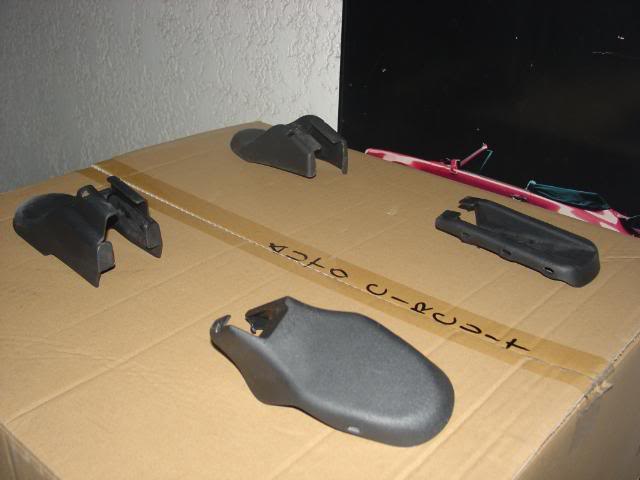
The first thing you want to do is to remove the tough polypropylene "foot covers" that cover the mounting bolts of the stock Jazz seats. All you need to do is pry them off, starting with the inner side.
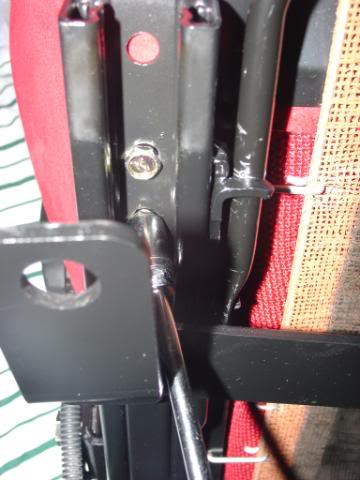
Due to the fuel tank located under the front seats, each of the Jazz's front seats has three normal feet and one flat foot located in the forward inboard side. Most of the foot covers are easy to remove, but the ones on the flat foot are quite tough to pry off. I've taken a photo of the passenger-side foot covers removed, with their approximate location with regard to the seat itself.
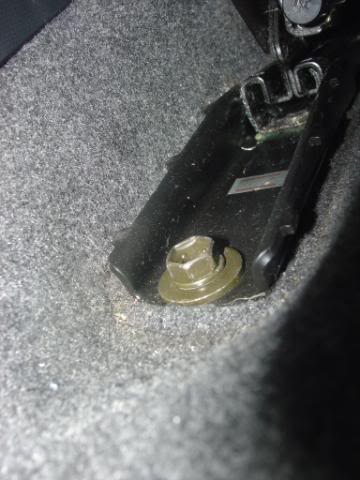
With the foot covers removed, snap on your 14mm socket to your ratchet wrench. Loosen the four heavy bolts that secure the stock seats to the Jazz's floorpan. Keep these bolts; you'll need them when the Recaros go on.
Driver's seat, left-front

Driver's seat, right-front
Driver's seat, rear
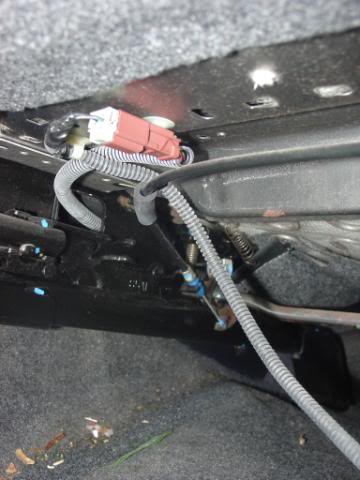
The driver's seat has a seat belt sensor you'll have to take care of. (The passenger seat doesn't.) When all the bolts are off, lift up the seat and disconnect its plug from underneath.
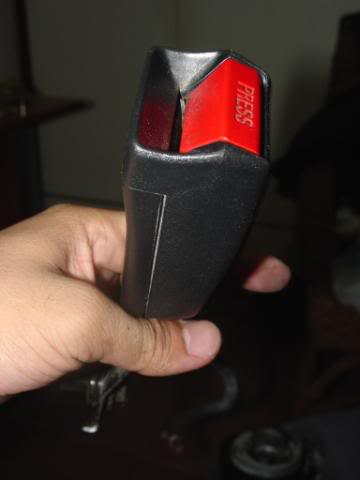
You'll want to use the claw hammer to pry off the socket and wire from the seat's underside, too. It's secured by a sturdy clip. You'll be taking out the seat belt buckle later on.
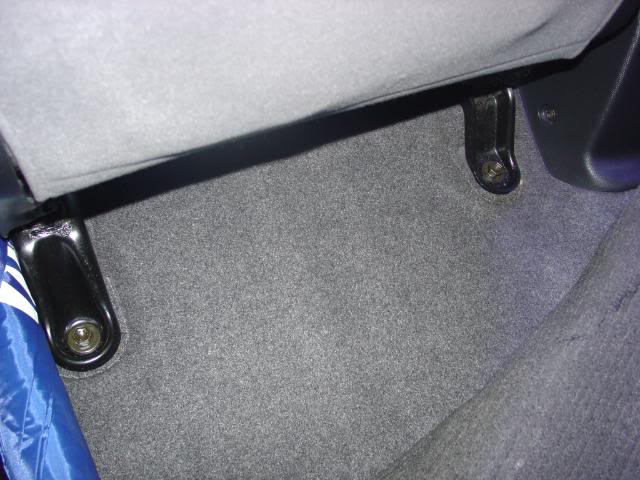
The seat is now ready for removal. You'll need some muscle to move the seats (I suggest getting a friend to help you). When the seat is removed, have it lie on its side so that the "inboard side" (i.e. the one closest to the handbrake) is exposed.
The next few steps will deal with the seat belt buckle removal.
To remove the seat belt buckle, you'll have to remove the inboard side cover. Look within the upderside of the seat and inboard side cover. You'll see this round clip that keeps the inboard side cover in place and prevents its removal. Use your prying tools (pliers, screwdriver, claw hammer) to get it out.
The wire for the seat belt sensor has another clip on the side of the seat. Remove this with your prying tools - again, the claw hammer works wonders here.

With the clips removed, you can pop off the inboard side cover to get to the seat belt buckle. It's connected to the seat via another clip, this time made of metal, but it's just there to snap the cover in place.
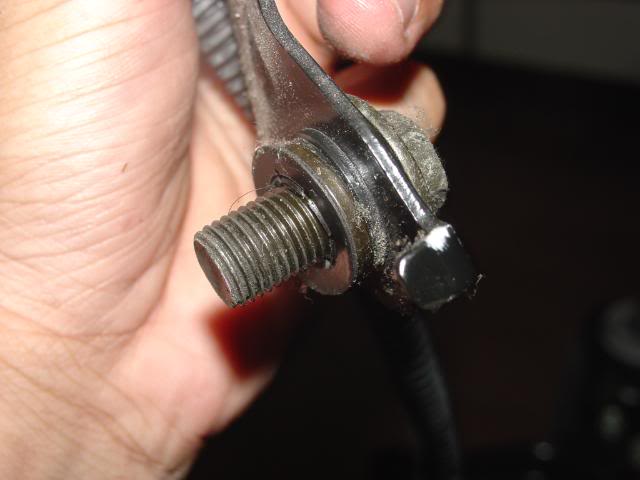
Ready your trusty 14mm socket wrench again. You'll need it to remove the seat belt buckle's anchor bolt. Note that it has a number of washers, some of them spring while the others flat and/or locking. Make sure not to lose any of them. Fasten them back to the seat for safekeeping.
The Bride seat rails come with their own seat belt anchor bolts and washers, too. Again, don't lose any of them.
Seat belt buckle
Seat belt buckle with anchor bolt and washers
Bride seat anchor bolt and washers

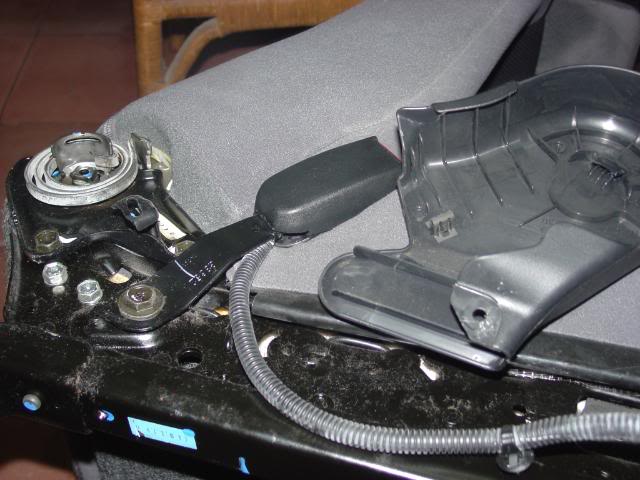
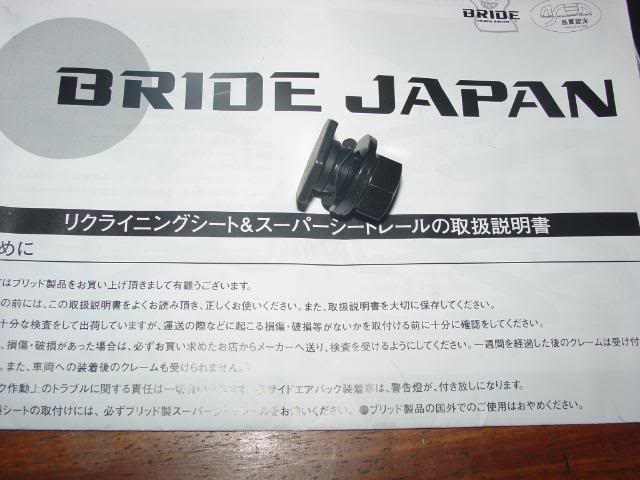
Take the Bride seat belt anchor bolt and the seat belt buckle. Swap out the 14mm socket for a larger 18mm one for the Bride anchor bolt's nut. Then fasten the seat belt buckle to the little flange on the side of the seat rails. The rails should have an instruction manual - they'll tell you which washers go in what sequence between the bolt and the nut. No knowledge of Japanese required.
The anchor bolt itself can be tightened with a 22mm socket.
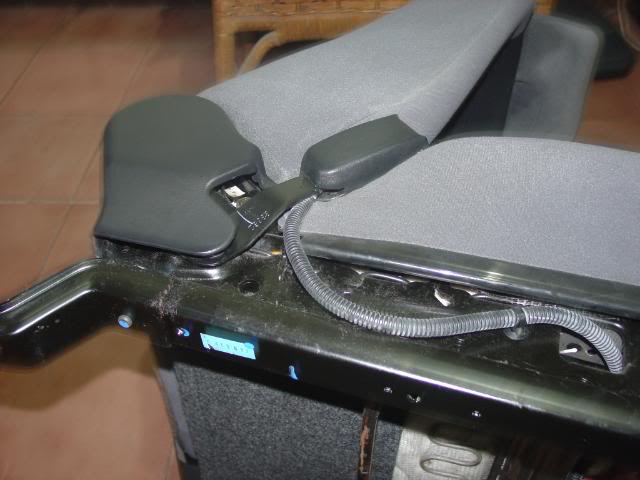
Now that the seat belt buckle has been mounted to the seat rails, we need to mate the seat to its new feet. Take your 10mm socket wrench. I used a slim one with a T-bar end. You will use this to torque the 6x25mm bolts and mount the seat to the rails. (If you used M8x25mm button-cap bolts, you'll need a hex key or Allen wrench to torque those.)
Unlike Sparco and Bride which use four bolts to secure the seat to the rails, Recaro uses six. The front of the seat uses four of them already. You will need to slide the rails themselves backward to expose the holes for the bolts to fasten the seat to. Likewise, to fasten the rear end, slide the rails forward.
The instructions on the Bride rails would recommend you even use a spring washer and a flat washer per bolt. I couldn't get a hold of these at the size, so I went with just the bolts and torqued them down.
Once the rails have been mated to the seat, it's just a matter of bolting them to the Jazz's floorpan again using the 14mm seat mounting bolts from earlier. For the driver's seat, make sure you remember to plug in the seat belt sensor wire too.
When installing the seats to the floorpan, you might run into trouble lining up all the holes for the bolts. They may not line up perfectly. They may not look like they'll fit, but they will. Take your time and line up the holes one corner at a time, then use the mounting bolts as placeholders. Then torque them down.
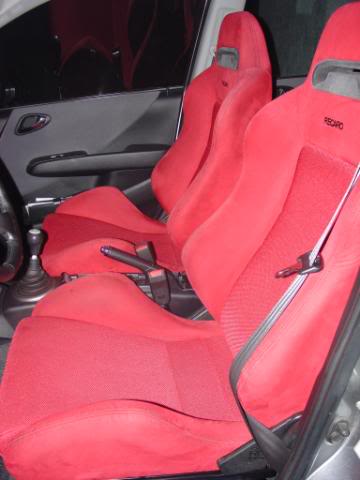
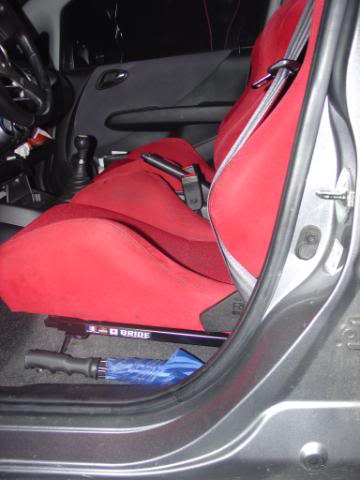
Voila! Here's the result.
The obligatory disclaimer:
Remember, neither myself nor IB, nor FitFreak.net are to be held liable for any problems that may arise from following this DIY. Please use common sense, and proceed at your own peril!
(Thanks Sid 6.7 for the disclaimer
)================================================== ==========================================
The Recaro SRD semi-bucket seats are arguably best known as the items that came stock with the DC2 Honda Integra Type R and the EK9 Honda Civic Type R. Not many people know, however, that they will mate perfectly with Bride's classic RO-type seat rails. While people have told me that I could have had seat rails fabricated from my stock GD1 Honda Jazz seats, I opted to perform the install myself and with more purpose-made equipment.
You will need the following for this seat swap and install job.
1. 6x25mm bolts x12 (available at motorcycle parts stores) or M8x25mm button-cap bolts if available
2. Bride RO-type seat rails
3. Bride seat anchor bolt (this, and all its washers and nuts comes with the seat rails)
4. Recaro SR-series or L-series seats
5. ratchet wrench handle
6. sockets: 10, 14, 18 and 22mm
7. long-nose pliers
8. claw hammer
9. screwdriver
10. Allen wrench set
The first thing you want to do is to remove the tough polypropylene "foot covers" that cover the mounting bolts of the stock Jazz seats. All you need to do is pry them off, starting with the inner side.
Due to the fuel tank located under the front seats, each of the Jazz's front seats has three normal feet and one flat foot located in the forward inboard side. Most of the foot covers are easy to remove, but the ones on the flat foot are quite tough to pry off. I've taken a photo of the passenger-side foot covers removed, with their approximate location with regard to the seat itself.
With the foot covers removed, snap on your 14mm socket to your ratchet wrench. Loosen the four heavy bolts that secure the stock seats to the Jazz's floorpan. Keep these bolts; you'll need them when the Recaros go on.
Driver's seat, left-front
Driver's seat, right-front
Driver's seat, rear
The driver's seat has a seat belt sensor you'll have to take care of. (The passenger seat doesn't.) When all the bolts are off, lift up the seat and disconnect its plug from underneath.
You'll want to use the claw hammer to pry off the socket and wire from the seat's underside, too. It's secured by a sturdy clip. You'll be taking out the seat belt buckle later on.
The seat is now ready for removal. You'll need some muscle to move the seats (I suggest getting a friend to help you). When the seat is removed, have it lie on its side so that the "inboard side" (i.e. the one closest to the handbrake) is exposed.
The next few steps will deal with the seat belt buckle removal.
To remove the seat belt buckle, you'll have to remove the inboard side cover. Look within the upderside of the seat and inboard side cover. You'll see this round clip that keeps the inboard side cover in place and prevents its removal. Use your prying tools (pliers, screwdriver, claw hammer) to get it out.
The wire for the seat belt sensor has another clip on the side of the seat. Remove this with your prying tools - again, the claw hammer works wonders here.
With the clips removed, you can pop off the inboard side cover to get to the seat belt buckle. It's connected to the seat via another clip, this time made of metal, but it's just there to snap the cover in place.
Ready your trusty 14mm socket wrench again. You'll need it to remove the seat belt buckle's anchor bolt. Note that it has a number of washers, some of them spring while the others flat and/or locking. Make sure not to lose any of them. Fasten them back to the seat for safekeeping.
The Bride seat rails come with their own seat belt anchor bolts and washers, too. Again, don't lose any of them.
Seat belt buckle
Seat belt buckle with anchor bolt and washers
Bride seat anchor bolt and washers
Take the Bride seat belt anchor bolt and the seat belt buckle. Swap out the 14mm socket for a larger 18mm one for the Bride anchor bolt's nut. Then fasten the seat belt buckle to the little flange on the side of the seat rails. The rails should have an instruction manual - they'll tell you which washers go in what sequence between the bolt and the nut. No knowledge of Japanese required.
The anchor bolt itself can be tightened with a 22mm socket.
Now that the seat belt buckle has been mounted to the seat rails, we need to mate the seat to its new feet. Take your 10mm socket wrench. I used a slim one with a T-bar end. You will use this to torque the 6x25mm bolts and mount the seat to the rails. (If you used M8x25mm button-cap bolts, you'll need a hex key or Allen wrench to torque those.)
Unlike Sparco and Bride which use four bolts to secure the seat to the rails, Recaro uses six. The front of the seat uses four of them already. You will need to slide the rails themselves backward to expose the holes for the bolts to fasten the seat to. Likewise, to fasten the rear end, slide the rails forward.
The instructions on the Bride rails would recommend you even use a spring washer and a flat washer per bolt. I couldn't get a hold of these at the size, so I went with just the bolts and torqued them down.
Once the rails have been mated to the seat, it's just a matter of bolting them to the Jazz's floorpan again using the 14mm seat mounting bolts from earlier. For the driver's seat, make sure you remember to plug in the seat belt sensor wire too.
When installing the seats to the floorpan, you might run into trouble lining up all the holes for the bolts. They may not line up perfectly. They may not look like they'll fit, but they will. Take your time and line up the holes one corner at a time, then use the mounting bolts as placeholders. Then torque them down.
Voila! Here's the result.
Last edited by Type 100; 07-29-2009 at 08:38 PM. Reason: added the obligatory disclaimer
#2
07-22-2009, 09:21 PM
Join Date: Jan 2009
Location: Para�aque City, Philippines
Posts: 1,888
For the North American people:
I understand that seat removal will be a little different because you have to disable the circuit for the passenger-side airbags. We don't get them here in Manila.
If anyone can post the procedure on disabling the passenger-side airbags, kindly let me know. I'll update the first post and give due credit.
Anyhow I hope this helps, even a little bit.
Last edited by Type 100; 07-22-2009 at 09:28 PM.
#3
07-29-2009, 04:57 PM
Where did you get the seat rails from? And how much should one expect to pay for them? A set of those looks like exactly what i need to kick start my RSX seat project!

#6
07-29-2009, 08:33 PM
Join Date: Jan 2009
Location: Para�aque City, Philippines
Posts: 1,888
Wow, I thought this thread would be buried in obscurity because no one replied
I ordered them from a local parts importer here, in Quezon City, Philippines (remember I'm not based in the US). The rails are PhP10,000 apiece - roughly US$208 each, then multiply by 2. I placed an order and two months later they arrived at the shop. (Shipping and processing got delayed; normally it should have taken just one month.)
Tee's USA could help you with the rails I guess. Just specify the application. It looks like the RO-type rails are the same wherever you go, it's just the feet that bolt down to the floor that will differ for each car.
HTHs. Good luck on the RSX seat project
Tee's USA could help you with the rails I guess. Just specify the application. It looks like the RO-type rails are the same wherever you go, it's just the feet that bolt down to the floor that will differ for each car.
HTHs. Good luck on the RSX seat project
#7
07-29-2009, 08:42 PM
Join Date: Jan 2009
Location: Para�aque City, Philippines
Posts: 1,888
By the way I got a suggestion:
If you're going to proceed with the seat swap, I suggest you mount the seats with the adjusting knob INBOARD (closer to the handbrake or center console) instead of OUTBOARD (closer to the doors).
The seats are mounted like this on the Type R Hondas and I realize why:
If the adjusting knob is outboard, it's a bitch trying to wedge your hand in between the seat and the B-pillar, and trying to turn it at the same time. Fine if you're the only one in the car, but if you got non-regular passengers (like my dad) they'll have a cow.
Since this initial swap, I've swapped the left and right Recaros so that their adjust knobs are inboard. Now adjusting the seat back angle is as easy as pie.
#9
12-10-2009, 03:22 AM
Join Date: Jan 2009
Location: Para�aque City, Philippines
Posts: 1,888
http://bride-jp.com/r-pdf/honda_090805.pdf
For the GDs it's H201 (left) and H202 (right)
For the GEs it's H203 (left) and H204 (right)
Then match with the rails you need. I used RO-type rails for the Recaros. For other Bride seats you'll need something else - usually the YO-type or MO-type
In case the PDF goes out of date here's the alternate link.
http://bride-jp.com/products_m_t.html
Last edited by Type 100; 12-10-2009 at 03:25 AM.
#12
01-26-2010, 10:51 PM
Join Date: Jan 2009
Location: Para�aque City, Philippines
Posts: 1,888
Wow didn't see this reply until today
Yeah they're plenty comfortable. They've given me support in all the places the GD stock seats lacked - thighs, knees and lumbar region of the back - so I no longer dread drives longer than 4 hours.
That they fit me like a glove for trackdays is a huge bonus. Honestly though, I really got them for the thigh and knee support. Having a sore left knee hanging off the clutch pedal in a long, bad traffic jam got old pretty quickly.

#14
03-02-2010, 08:54 PM
Join Date: Jan 2009
Location: Para�aque City, Philippines
Posts: 1,888
Oh I still can I do have to take out the headrests before I fold them though. Otherwise it's just the same.
I do have to take out the headrests before I fold them though. Otherwise it's just the same.
#15
03-03-2010, 08:19 AM
lol... what you would need is the short headrests like the one in the middle... idk if there is a way to get a set, the GE's have 3 and they don't need to move the front seats...
btw, are you much lower with these seats? and they must also be much lighter...
btw, are you much lower with these seats? and they must also be much lighter...
#16
03-03-2010, 09:30 PM
Join Date: Jan 2009
Location: Para�aque City, Philippines
Posts: 1,888
Hip point is about 1" lower on the BRIDE rails - pretty noticeable actually vs. stock. I'm not sure if the Recaros are lighter than stock though. They're actually heavier than they look - I didn't get to weigh them sadly but I spent a lot of gruntwork lifting them and moving them around in my room and during installation. No carbon-fiber, aramid or anything fancy in the construction, just a good old OEM Integra Type R seat.
Comfy too. I take lunchtime naps in these.
Last edited by Type 100; 03-03-2010 at 09:32 PM.
#17
03-19-2010, 12:37 PM

Nice guide 
I've ordered a set of Bride RO seat rails from Japan for the GE6- they should arrive in the UK by mid May.
I'm still uncertain how to tackle the airbag light/ plug and reading on the forum, most US members use a resistor
Mentioned my seat mod to the mechanics at my local honda dealer who i know quite well and they said its an easy solution and mentioned the resistor trick so I might just pop down and see them when I install my seats.
Type 100> I think you mentioned you're in Asia but am I right in saying that you dont have a passenger seat sensor plug like we do in the UK? You just have the seat belt plug?
Thanks
Gary
#18
03-20-2010, 01:48 AM
Join Date: Jan 2009
Location: Para�aque City, Philippines
Posts: 1,888
You're correct. Over here in the Philippines, we just got the seat belt plug - and only on the driver's side.
We don't get the side airbags either. If you manage to pull off the resistor trick, do try to post it up. You're planning to DIY this?


