DIY: Mini D2S Projector Retrofit
#1
 01-27-2011, 11:24 PM


DIY: Mini D2S Projector Retrofit
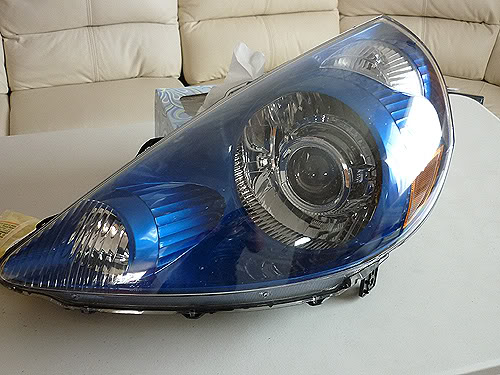
I finally bit the bullet this week and decided to start to finish this project. I bought the Mini D2S projectors and shroud more than 6 months ago. What held me back was because I drive my car every day and knowing how I do things I will not be able to drive my car for a few days. So I was lucky enough to find a set of headlights on this forum (they are SSM which will be on sale soon).
Once I got the replacement headlights I swapped them out and started to work on the retrofit. As a disclosure I do not claim to be a pro at this, even though I have been in the HID seen for quite some time. I will try my best to give tips what I did wrong and what could be improved. Do this at your own cost. But overall its quite easy. Just time consuming.
So what you will need.....
Honda Fit headlight (duh)
Silicone sealant (bought the clear type from Kragen, Hi temp stuff)
Flat head screwdriver (fairly wide head for better results)
Mini D2S Projector (bought at TRS)
Apollo shrouds (bought at TRS)
Dremel (cutting disc bit)
So lets start out once you have the headlights removed. You will need to remove the headlight bracket which is under the signal bulb. There are also 3 small screws behind the headlight which will need to be removed as well.
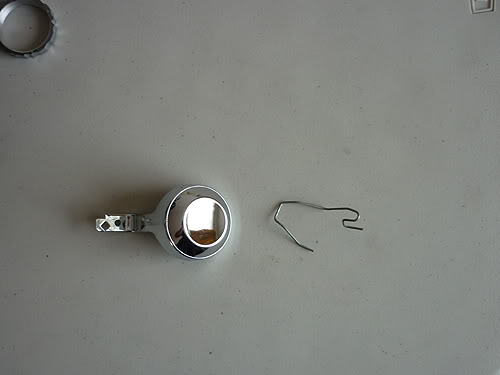
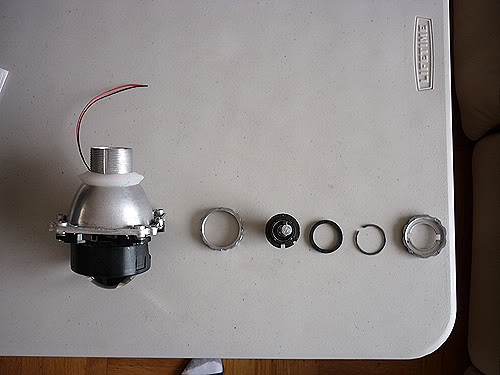
Next you will need to remove the H4 bulb (if you haven't done so) and the bulb clip. Don't worry about the piece on the left it will be later.
Now that you have everything removed. Preheat the oven to 250 - 275 degrees. I did mines at 350 and that was a mistake even though I only put it in the oven for 2 minutes. 250 - 275 is a safe bet. Once it is preheated get a pan and wax paper. Something to protect the plastic from the pan so that it won't melt the plastic. Make sure to not touch any of the ovens sides when you put the headlight in. I had to angle my pan a bit to make it fit. Once it is in roughly 2-3minutes is enough to melt the OEM glue.
Take out the pan with oven mitts and use the flat head screw driver. Start at the signal bulb end. Because it is much easier. The other end is hard cause it is kinda shoved into the black piece. You might have to put the headlight back into the oven to reheat the glue to loosen the glue again. Trust me the glue is SUPER sticky. *CAREFUL NOT TO TOUCH THE CLEAR PLASTIC HEADLIGHT* (If you did, no biggy you just have to use Googone to get it off). It will take some muscle to split it apart, but take your time when you pry it apart. Try not to distort the black plastic too much. Once you make your way to prying the headlight apart unclip the plastic taps as well.
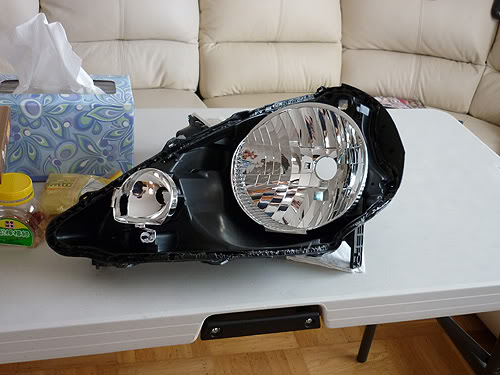
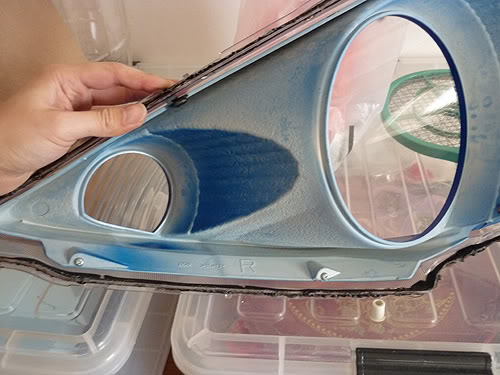
Once its done you have this.
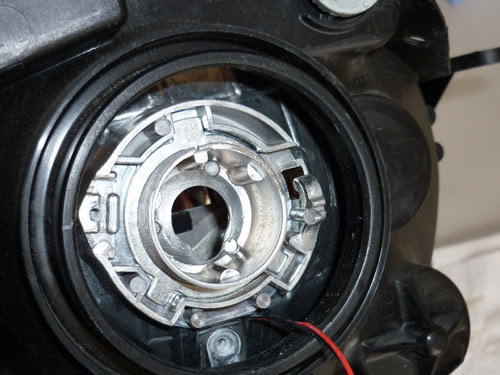
You will now need to unscrew H4 bulb reflector behind the headlight. Left piece.
I cut the hi beam plug because I will be rewiring my way. I fed the two wires through the little slot.

Insert the H4 ring behind the headlight. This piece centers the projector. So you don't have to worry about it being crooked.
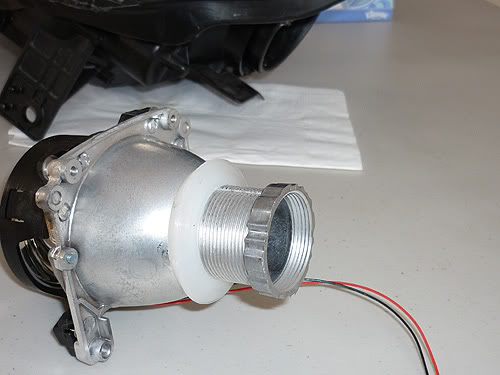
Now you feed the projector with the white rubber on it through the headlight. Slide a black rubber ring then lock it with the nut. Make sure when you screw the nut in the curvy side goes in first while the edgy end faces the back of the headlight. Because if you do it the other way there is no way the the nut will fit tightly. Personally only one side of my headlight used the black rubber ring before the nut. So it really depends if you need it or not. When you lock the projector in try to only do it hand tighten with a nice set of grippy gloves. I did use a set of pliers just to give me that extra umph not not too much. You only want enough so that the projector is not moving around in the reflector. If you put too much pressure on the nut it will crack but you can still use it if its not too bad.
Here is how the order should go.
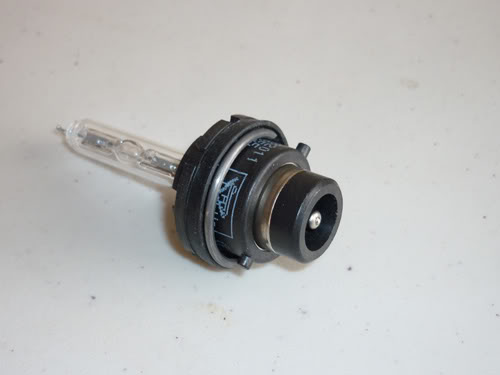
Here is how you would assemble the D2s bulb. You have to put the rubber first than the c rin after it. The C ring fits inside the rubber. You won't need to put in the bulb yet but its good to know before hand.
You should have something like this now.
Next we need to cover up the projector with our apollo shroud. I bought the apollo shroud thanks to the guys at TRS (Matt) who suggested it would look good and its the biggest thing out on the market. I've seen other shrouds, but with our big O reflector the bigger the shroud the better to blend in. When I put the shroud up to the projector it did not fit flush to the projector. I had to trim 1/4" from the shroud. I taped up what I need to cut and pulled out my dremel and went to work. Take your time when you do this you don't want to rush anything. Once you cut both clean off the edges with your hand since its just melted plastic from the shroud. Test fit again and if the shroud sits fluch against the projector you did good.

Now how do we attach the shroud? I took off the prjector and ran a bead of silicone around the tip of the projector (black part) enough that when I put the shroud on it will touch the silicone and give it some grip.
I used two painters tape or what ever you choose to hold the shroud and projector in place. I put the projector and shroud face down on top of the painters tape over night to dry. The next day check to make sure it is held tightly.
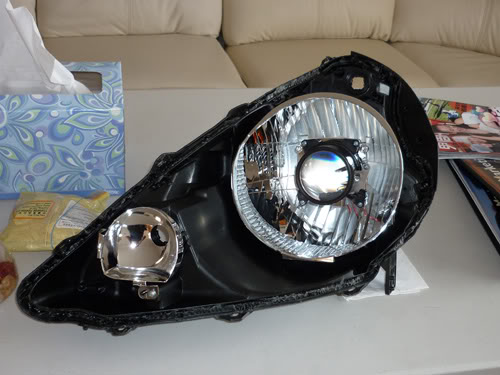
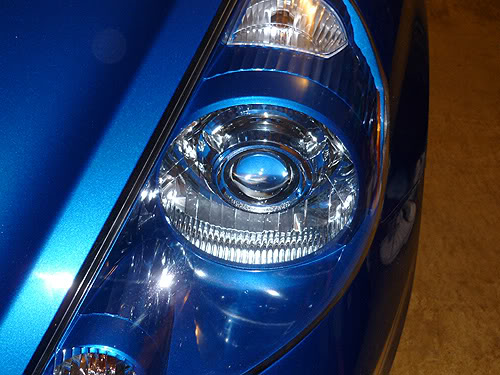
Remount the projector in the headlight with your new shroud on. Remember to run the hi beam wires through the slot. For fun I put the headlight piece on to see how it looks.
If you want to paint the headlight black this is the time to do it. You have to remove two screws and unlip the corner reflector. Once done reassemble.
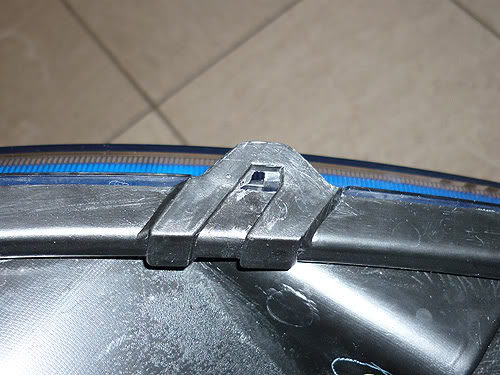
Now to reassemble the headlight. Do the reverse order how we took the headlight apart. But first you want to run a bead of silicone on the front plastic piece. This is insurance if you don't have a good contact with the front of the headlight. Once done you will put the back headlight piece in first once the oven has been preheated. This softens the glue and makes your job much easier.....well just a tad easier. This time start with the rear first which would be where the DRL bulb is. Use muscle and shove it in there and at the same time try to align the tabs if possible. Work your way to the front. You might have to reheat the whole housing to give you that extra umph to close it up.
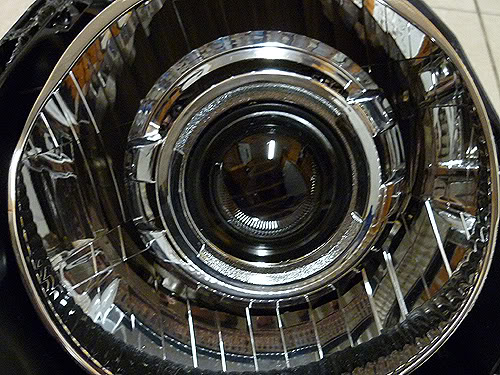
You should be able to get very close to lining up everything. But nothings perfect. I was off a few cms.
Your projector might get condensation inside but thats okay it will dry up. What I did next you might not need to but I am overly cautious. I was worried that the silicone that holds the shroud might have gotten soft so I placed the headlights facing the ceiling so that the if the silicone was soft it would dry correctly.
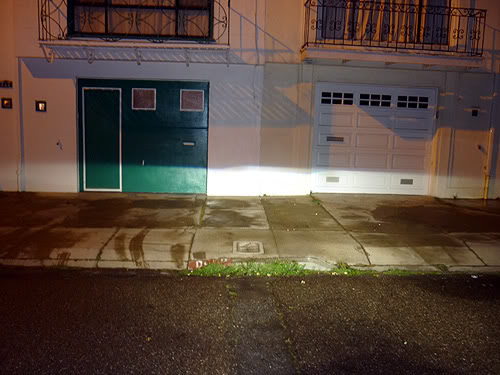
Next day you can reassemble everything. Don't forget to screw in the 3 screws in the back and remount the headlight bracket. Once your done insert your D2S bulb and lock it in place. Test before bolting anything down. If all is good, mount everything back up and you will have to reaim the headlights. Whats great about the Fit is you can only adjust the vertical position.
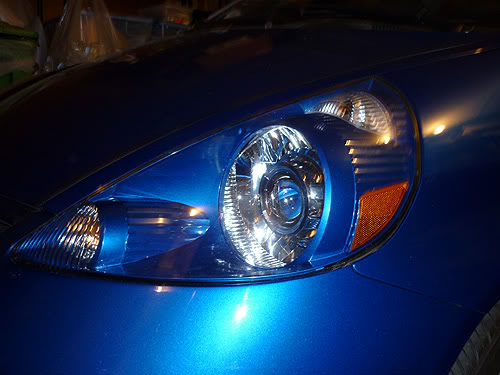
You should have this on your car.
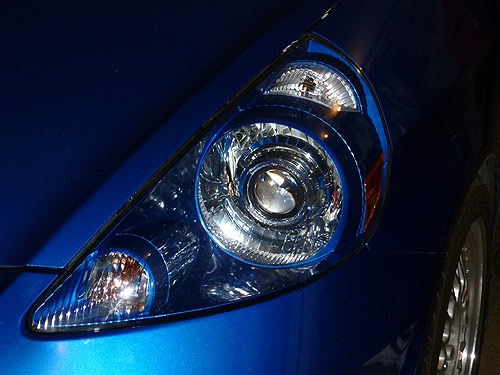

Now I did not rewire the hi beams yet cause it was late and because I made my own custom HID harness. But if you bought the premade one you can just wire it up and your good to go. Rep if this helps you.
MODs if you find this helpful please sticky.
Once I got the replacement headlights I swapped them out and started to work on the retrofit. As a disclosure I do not claim to be a pro at this, even though I have been in the HID seen for quite some time. I will try my best to give tips what I did wrong and what could be improved. Do this at your own cost. But overall its quite easy. Just time consuming.
So what you will need.....
Honda Fit headlight (duh)
Silicone sealant (bought the clear type from Kragen, Hi temp stuff)
Flat head screwdriver (fairly wide head for better results)
Mini D2S Projector (bought at TRS)
Apollo shrouds (bought at TRS)
Dremel (cutting disc bit)
So lets start out once you have the headlights removed. You will need to remove the headlight bracket which is under the signal bulb. There are also 3 small screws behind the headlight which will need to be removed as well.
Next you will need to remove the H4 bulb (if you haven't done so) and the bulb clip. Don't worry about the piece on the left it will be later.
Now that you have everything removed. Preheat the oven to 250 - 275 degrees. I did mines at 350 and that was a mistake even though I only put it in the oven for 2 minutes. 250 - 275 is a safe bet. Once it is preheated get a pan and wax paper. Something to protect the plastic from the pan so that it won't melt the plastic. Make sure to not touch any of the ovens sides when you put the headlight in. I had to angle my pan a bit to make it fit. Once it is in roughly 2-3minutes is enough to melt the OEM glue.
Take out the pan with oven mitts and use the flat head screw driver. Start at the signal bulb end. Because it is much easier. The other end is hard cause it is kinda shoved into the black piece. You might have to put the headlight back into the oven to reheat the glue to loosen the glue again. Trust me the glue is SUPER sticky. *CAREFUL NOT TO TOUCH THE CLEAR PLASTIC HEADLIGHT* (If you did, no biggy you just have to use Googone to get it off). It will take some muscle to split it apart, but take your time when you pry it apart. Try not to distort the black plastic too much. Once you make your way to prying the headlight apart unclip the plastic taps as well.
Once its done you have this.
You will now need to unscrew H4 bulb reflector behind the headlight. Left piece.
I cut the hi beam plug because I will be rewiring my way. I fed the two wires through the little slot.
Insert the H4 ring behind the headlight. This piece centers the projector. So you don't have to worry about it being crooked.
Now you feed the projector with the white rubber on it through the headlight. Slide a black rubber ring then lock it with the nut. Make sure when you screw the nut in the curvy side goes in first while the edgy end faces the back of the headlight. Because if you do it the other way there is no way the the nut will fit tightly. Personally only one side of my headlight used the black rubber ring before the nut. So it really depends if you need it or not. When you lock the projector in try to only do it hand tighten with a nice set of grippy gloves. I did use a set of pliers just to give me that extra umph not not too much. You only want enough so that the projector is not moving around in the reflector. If you put too much pressure on the nut it will crack but you can still use it if its not too bad.
Here is how the order should go.
Here is how you would assemble the D2s bulb. You have to put the rubber first than the c rin after it. The C ring fits inside the rubber. You won't need to put in the bulb yet but its good to know before hand.
You should have something like this now.
Next we need to cover up the projector with our apollo shroud. I bought the apollo shroud thanks to the guys at TRS (Matt) who suggested it would look good and its the biggest thing out on the market. I've seen other shrouds, but with our big O reflector the bigger the shroud the better to blend in. When I put the shroud up to the projector it did not fit flush to the projector. I had to trim 1/4" from the shroud. I taped up what I need to cut and pulled out my dremel and went to work. Take your time when you do this you don't want to rush anything. Once you cut both clean off the edges with your hand since its just melted plastic from the shroud. Test fit again and if the shroud sits fluch against the projector you did good.
Now how do we attach the shroud? I took off the prjector and ran a bead of silicone around the tip of the projector (black part) enough that when I put the shroud on it will touch the silicone and give it some grip.
I used two painters tape or what ever you choose to hold the shroud and projector in place. I put the projector and shroud face down on top of the painters tape over night to dry. The next day check to make sure it is held tightly.
Remount the projector in the headlight with your new shroud on. Remember to run the hi beam wires through the slot. For fun I put the headlight piece on to see how it looks.
If you want to paint the headlight black this is the time to do it. You have to remove two screws and unlip the corner reflector. Once done reassemble.
Now to reassemble the headlight. Do the reverse order how we took the headlight apart. But first you want to run a bead of silicone on the front plastic piece. This is insurance if you don't have a good contact with the front of the headlight. Once done you will put the back headlight piece in first once the oven has been preheated. This softens the glue and makes your job much easier.....well just a tad easier. This time start with the rear first which would be where the DRL bulb is. Use muscle and shove it in there and at the same time try to align the tabs if possible. Work your way to the front. You might have to reheat the whole housing to give you that extra umph to close it up.
You should be able to get very close to lining up everything. But nothings perfect. I was off a few cms.
Your projector might get condensation inside but thats okay it will dry up. What I did next you might not need to but I am overly cautious. I was worried that the silicone that holds the shroud might have gotten soft so I placed the headlights facing the ceiling so that the if the silicone was soft it would dry correctly.
Next day you can reassemble everything. Don't forget to screw in the 3 screws in the back and remount the headlight bracket. Once your done insert your D2S bulb and lock it in place. Test before bolting anything down. If all is good, mount everything back up and you will have to reaim the headlights. Whats great about the Fit is you can only adjust the vertical position.
You should have this on your car.
Now I did not rewire the hi beams yet cause it was late and because I made my own custom HID harness. But if you bought the premade one you can just wire it up and your good to go. Rep if this helps you.
MODs if you find this helpful please sticky.
Last edited by danger69; 02-01-2011 at 10:16 PM.


#5
01-28-2011, 05:08 AM
Nice DIY w/ pics. They're always helpful. It's all preference but I think the setup would look better if you pained the housing black.
#6
01-28-2011, 10:58 AM
I was thinking about painting black, but then it would make the projector tiny in a big housing. I've seen someone on this forum do it and it wasn't or me.
I didn't know they have revisions for the MH1. As for touching front plastic, its not like its going to melt. It just happened when I was prying off the two pieces together the black glue that seals them together got on my fingers and I touched the front plastic which made it stick to it. But goo gone got rid of it fast.
I didn't know they have revisions for the MH1. As for touching front plastic, its not like its going to melt. It just happened when I was prying off the two pieces together the black glue that seals them together got on my fingers and I touched the front plastic which made it stick to it. But goo gone got rid of it fast.
#11
02-11-2011, 03:27 PM
Kenmei, check out this link: Complete Retrofit Kits from The Retrofit Source Inc
I think I'm leaning towards the Mini D2S Kit (w/ Morimoto Ballasts) or the FX-R Kit. I have 35w DDM HID's in my regular halogen housing right now, but don't think they're gonna look as nice in the projectors as the D2S's.
I think I'm leaning towards the Mini D2S Kit (w/ Morimoto Ballasts) or the FX-R Kit. I have 35w DDM HID's in my regular halogen housing right now, but don't think they're gonna look as nice in the projectors as the D2S's.
#12
02-11-2011, 04:11 PM
I had most of the hardware already, but the Mini D2s & shroud cost me $150. I'd personally go with the D2s since you can run the OEM bulbs or even OEM ballast. I have my hella ballast for 6yrs already and no problems at all.
#13
02-11-2011, 07:00 PM
I was reading the first post of this thread: Morimoto Mini H1 vs Mini D2S? and a member wrote:
"Yes, the threaded mounting shaft on the backside of the MH1 is only about 22mm in diameter, whereas the MD2S is about 32mm. A 9006 reflector has a hole that is only big enough to fit the MH1 through without dremeling it to widen the diameter. If you dont mind making the opening about 10mm or so bigger, the D2S version would fit. You've got plenty of room inside the highlander headlights"
Our bulb size is 9006 right? Can you shine some light on this? Since you had the D2S, it doesn't look like you had to modify the reflector hole any to get the threads of the projector through, or did you?
#14
02-12-2011, 12:50 AM
I was reading the first post of this thread: Morimoto Mini H1 vs Mini D2S? and a member wrote:
"Yes, the threaded mounting shaft on the backside of the MH1 is only about 22mm in diameter, whereas the MD2S is about 32mm. A 9006 reflector has a hole that is only big enough to fit the MH1 through without dremeling it to widen the diameter. If you dont mind making the opening about 10mm or so bigger, the D2S version would fit. You've got plenty of room inside the highlander headlights"
Our bulb size is 9006 right? Can you shine some light on this? Since you had the D2S, it doesn't look like you had to modify the reflector hole any to get the threads of the projector through, or did you?
"Yes, the threaded mounting shaft on the backside of the MH1 is only about 22mm in diameter, whereas the MD2S is about 32mm. A 9006 reflector has a hole that is only big enough to fit the MH1 through without dremeling it to widen the diameter. If you dont mind making the opening about 10mm or so bigger, the D2S version would fit. You've got plenty of room inside the highlander headlights"
Our bulb size is 9006 right? Can you shine some light on this? Since you had the D2S, it doesn't look like you had to modify the reflector hole any to get the threads of the projector through, or did you?
#15
02-12-2011, 03:45 AM
Oh you're right. Thanks for clarifying. I should know, I just bought and setup my DDM kit a few weeks ago... So the D2S's should fit find without any cutting.
#18
03-02-2011, 03:25 PM

Thanks for the write up. I will be doing the exact same as soon as my D2S bulbs come in, the difference being it is in a GE8. I have a PNP kit now and it has a horribly uneven pattern.
PS - The Retrofit Source has great service and great shipping. I regret not getting my bulbs (burners) from there.
PS - The Retrofit Source has great service and great shipping. I regret not getting my bulbs (burners) from there.
#20
03-02-2011, 07:32 PM
projectors
hey that looks like a sweet kit. question looks like you got the mini d2s lens kit which come with the projectors only correct? did you have to buy the shrouds separate? how much did did run u complete? also does this company sell this projectors in a h4 bulb housing? cause that's the HID kit i have right now..
thx
thx