How to change 1st-gen serpentine belt?
#1
 05-17-2011, 10:55 AM


DIY - Change 1st gen serpentine belt
I am getting belt squeal sometimes when cold. I haven’t figured out yet, whether it’s when AC is on.
I cannot find a DIY online about changing the serpentine belt.
Has anyone done this? Does the engine mount have to come off?
I cannot find a DIY online about changing the serpentine belt.
Has anyone done this? Does the engine mount have to come off?
Last edited by bryanska; 06-04-2011 at 10:10 PM. Reason: Added DIY
#2
06-04-2011, 10:08 PM
OK, so I did this today.
1 - Put the car on ramps or stands. The front of the car is all you need up.
2 - Remove the underbody fairing (black plastic tray) that covers the bottom of the motor. You need access to the underside of the belts/pulleys. No way to do this from the top. The plastic plugs are very difficult to remove. The center portion of the plug pulls completely out of the outer portion of the plug. Some silicone spray helps to loosen the connectors.
3 - Remove the ABS data connector. This is a 1" by 4"vertical black plastic plug that connects to the right side of the ABS module. Lift up on the orange handle to disengage the connector. You will move this connector around in order to access the bolts that need to be loosened.
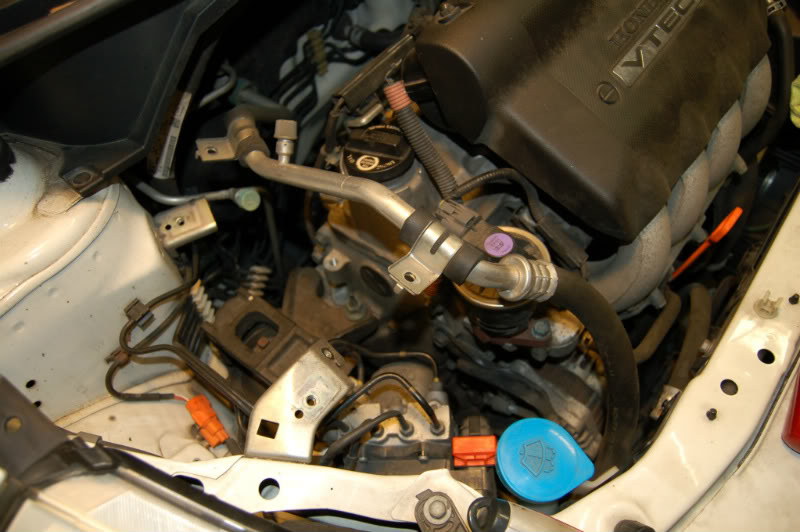
4 - Loosen 3 bolts. See the diagram below (bolts A, B, and C). Bolt A is upper left arrow, Bolt B is upper right arrow, Bolt C is lower middle arrow.

5. Loosen the 12mm bolt A first: back it almost entirely out. This will allow the alternator to slide for and aft in the bracket. The alternator is the only pulley that moves, and we'll adjust the position of the alternator to adjust belt tension.
6. Loosen the 12mm bolt B next. You may need a breaker bar, and I was only able to loosen it from below. No need to back this one out past loose.
7. Finally, bolt C will pull/push the alternator fore and aft. Mark the position of this bolt with a Sharpie. You may OR may not return to this position. Loosening bolt C will push the alternator all the way aft, which is where you need it for belt changing.
8. Remove the belt. I found this much easier from below.
9. Install the new belt per the diagram below. Note that belts are always tricky to put on. Be patient. With the alternator all the way aft, you've done everything right and the belt will eventually go on.
The arrow is pointing to where you eventually use the tension tool.

NOTE: at this point I installed a new idler pulley. It was about $25 through Bernardi Honda. If you are handy, you can press the old bearing out of the pulley, and press a new one in. When you unbolt the idler pulley (12mm) bolt, a few little parts will topple out. If you lose the order of these pieces, you can use the parts diagrams at Bernardi Parts under AC COMPRESSOR for the 2007 Honda Fit.
10. Once the new belt is installed, it's time to adjust the tension. Turn bolt C to move the alternator forward, and tighten bolts A and C.
Torque: Bolt A 17 ft lbs
Bolt B 33 ft lbs
Bolt C has no torque
11. Check tension by pushing in on the belt between the bottom two pulleys. There are special tools for this, and I tried to find one, but no auto parts stores carried them. You can order one online for about 10 bucks. The "old school" method, which I reluctantly used, was: Hold a straightedge against the two pulleys and see how far you can push the belt with a force of 22 pounds. Here are the specs:
Deflection: With A/C compressor: Used Belt: 5.5-8.5 mm (0.22-0.33 in.) New Belt: 3.5-5.0 mm (0.14-0.20 in.) Without A/C compressor: Used Belt: 7.5-10.5 mm (0.30-0.41 in.) New Belt: 4.5-6.0 mm (0.18-0.24 in.)
12. After you acheive this deflection (you may need to loosen & retighten some bolts), it's time to seat the belt. Run the car for five minutes and re-check tension. It's very common to have to set the tension again after the belt is seated.
13. Put everything back together!
1 - Put the car on ramps or stands. The front of the car is all you need up.
2 - Remove the underbody fairing (black plastic tray) that covers the bottom of the motor. You need access to the underside of the belts/pulleys. No way to do this from the top. The plastic plugs are very difficult to remove. The center portion of the plug pulls completely out of the outer portion of the plug. Some silicone spray helps to loosen the connectors.
3 - Remove the ABS data connector. This is a 1" by 4"vertical black plastic plug that connects to the right side of the ABS module. Lift up on the orange handle to disengage the connector. You will move this connector around in order to access the bolts that need to be loosened.
4 - Loosen 3 bolts. See the diagram below (bolts A, B, and C). Bolt A is upper left arrow, Bolt B is upper right arrow, Bolt C is lower middle arrow.
5. Loosen the 12mm bolt A first: back it almost entirely out. This will allow the alternator to slide for and aft in the bracket. The alternator is the only pulley that moves, and we'll adjust the position of the alternator to adjust belt tension.
6. Loosen the 12mm bolt B next. You may need a breaker bar, and I was only able to loosen it from below. No need to back this one out past loose.
7. Finally, bolt C will pull/push the alternator fore and aft. Mark the position of this bolt with a Sharpie. You may OR may not return to this position. Loosening bolt C will push the alternator all the way aft, which is where you need it for belt changing.
8. Remove the belt. I found this much easier from below.
9. Install the new belt per the diagram below. Note that belts are always tricky to put on. Be patient. With the alternator all the way aft, you've done everything right and the belt will eventually go on.
The arrow is pointing to where you eventually use the tension tool.
NOTE: at this point I installed a new idler pulley. It was about $25 through Bernardi Honda. If you are handy, you can press the old bearing out of the pulley, and press a new one in. When you unbolt the idler pulley (12mm) bolt, a few little parts will topple out. If you lose the order of these pieces, you can use the parts diagrams at Bernardi Parts under AC COMPRESSOR for the 2007 Honda Fit.
10. Once the new belt is installed, it's time to adjust the tension. Turn bolt C to move the alternator forward, and tighten bolts A and C.
Torque: Bolt A 17 ft lbs
Bolt B 33 ft lbs
Bolt C has no torque
11. Check tension by pushing in on the belt between the bottom two pulleys. There are special tools for this, and I tried to find one, but no auto parts stores carried them. You can order one online for about 10 bucks. The "old school" method, which I reluctantly used, was: Hold a straightedge against the two pulleys and see how far you can push the belt with a force of 22 pounds. Here are the specs:
Deflection: With A/C compressor: Used Belt: 5.5-8.5 mm (0.22-0.33 in.) New Belt: 3.5-5.0 mm (0.14-0.20 in.) Without A/C compressor: Used Belt: 7.5-10.5 mm (0.30-0.41 in.) New Belt: 4.5-6.0 mm (0.18-0.24 in.)
12. After you acheive this deflection (you may need to loosen & retighten some bolts), it's time to seat the belt. Run the car for five minutes and re-check tension. It's very common to have to set the tension again after the belt is seated.
13. Put everything back together!
Last edited by bryanska; 06-24-2014 at 10:35 AM.


#5
07-25-2011, 06:05 PM
When I have changed belts I have almost always had to re tighten them after doing some driving and they start squealing a little.... It's better they do this than it is to over tighten the belt when it is installed and put too much load on the belt driven components.
 ,
,
#7
11-23-2011, 03:02 AM

I did this tonight and did not touch bolt B. I also moved the bolts holding the a/c lines and the ground and moved it all out of the way.
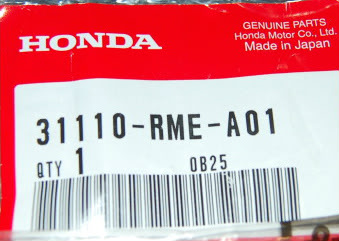
Part Number for 07 Fit Sport.
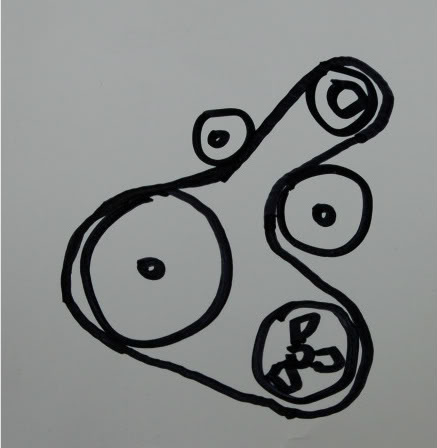
Fun little drawing I did to help remember where the belt goes.
Part Number for 07 Fit Sport.
Fun little drawing I did to help remember where the belt goes.
#8
11-23-2011, 03:16 AM
What is a lot of fun to do when you have had a few beers is mounting a supercharger and a longer belt along with all of the other pulleys...

#10
08-20-2012, 11:09 AM
Team, the images came from the Honda Jazz online service manual.
I can't link directly to the images in the service manual. And PIcasa Web doesn't seem to offer me the option to link to images I've saved there. So unless I can figure out PIcasa, I can't put the images up this week. Too much to do (day job and such).
If you haven't seen the Jazz manual, it's requried reading! You can find the images there, search for "drive belt replacement"
http://www.hondafitjazz.com/manual.htm
Last edited by bryanska; 08-20-2012 at 11:19 AM.
#12
08-26-2013, 01:07 PM

The bolt from hell
Some things i learned yesterday while doing the change:
1) the clips for the plastic diaper are prone to snapping and breaking with removal if you go at them like a gorilla ( i was able to remove half the clips and bend the plastic diaper out of the way...it's enough space to get access).
2) Removing / unconnecting the A/C tubing / ground wire / ABS plug does free up space, recommended
3) Bolt "B" is a bear to loosen (absolutely no space). Its kinda hard to see it too, its on the bottom on the other side. After messing with bolt A / C it did not give me enough play to remove the belt. Bolt B allows the altenator to pivot a little more and give you enough clearance. You will probably need an extension with a swivel of some sort. I used a 24 inch 3/8 drive extension with a swivel and the 12 socket on the end. The swivel was duct taped to hold the angle i wanted. You may have the tools to create a different setup which is fine by me.
Spray WD40 on that bolt b as well. Lastly, went at the bolt from the side, with the rachet head near the radiator cap. When tightening, I put the belt on, used a bar to gently give the belt some tension then tightened bolt B. Then proceeded to do the actual tensioning with bolt A/C.
4) Belt was installed easier from the bottom, have someone grab it up top and loop over alternator last.
5) Give yourself enough time...do it on a saturday, not sunday afternoon. Just in case. My wife almost had no car to drive to work today.
6) Truly an oversight of honda to not have a spring loaded tensioner. It would have much easier.

#15
06-24-2014, 10:30 AM
Last edited by bryanska; 06-24-2014 at 10:34 AM.
#16
05-06-2015, 11:50 AM

08 fit Idler pulley too?
Going to replace my belt now too. Question how many also replaced the idler pulley too. Rock auto has a kit with idler pulley. In original post Op says something about small parts falling out when changing idler pulley. What parts fall out? How is idler pulley removed?. One bolt through center of idler pulley? Enough room to remove idler pulley?
#17
05-06-2015, 01:36 PM
We did not replace the idler @ 105K when we replaced the belt on our '07.
My thought process was that because the tension is fixed (rather than spring-loaded as in many modern cars) there would not be as much strain on the idler.
I DID give it a really good listen with a mechanic's stethoscope before hand... And I injected some oil into the bearing while the belt was off.
#18
05-08-2015, 06:53 AM
Going to replace my belt now too. Question how many also replaced the idler pulley too. Rock auto has a kit with idler pulley. In original post Op says something about small parts falling out when changing idler pulley. What parts fall out? How is idler pulley removed?. One bolt through center of idler pulley? Enough room to remove idler pulley?
The idler pulley is two parts: a widely-available bearing pressed into a simple metal cup. Nothing falls out when this assembly comes off the car. The bearing part is cheap; less than 10 bucks on Rock Auto. The steel cup can be reused; there's no reason to get a new one except hassle factor.
I changed it because it was so cheap. If the pulley began to squeak before the belt was replaced again then I'd feel silly for not having done it.
#19
05-08-2015, 01:50 PM
Thanks
Thanks for the info. I figured it was only one bilt but the OP of this thread made it sound like parts would fall out, at least thats how I took it. Iam just going to order the kit from Rock Auto that has a new pulley with bearing. I dont want to screw around with trying to find someone to press the old bearing out and new bearing in. Not worth the hassle to me.
The pulley was removed with that one single bolt. It's one of the easier parts of the job actually.
The idler pulley is two parts: a widely-available bearing pressed into a simple metal cup. Nothing falls out when this assembly comes off the car. The bearing part is cheap; less than 10 bucks on Rock Auto. The steel cup can be reused; there's no reason to get a new one except hassle factor.
I changed it because it was so cheap. If the pulley began to squeak before the belt was replaced again then I'd feel silly for not having done it.
#20
07-19-2015, 04:52 PM
I just did this on my 08 Fit Base. My experience was that I was able to do it without loosening bolt B BUT, when I tightened the tensioning bolt, it bent. Since I was able to get the belt tight and the tensioning bolt doesn't carry the tension - that's done by bolt A - I just let it be for now.
The rest of the procedure was much like described above. I only took out two of the plastic fasteners to get access to the bottom of the pulleys and it took some patience (and assistance from my lovely wife) to get the new belt on but I was glad I did it. The old belt was discolored and cracking on the back. Probably not signs of imminent failure but the belt had 102K miles on it so it served us well.
I didn't do the idler pulley - if it ain't broke, don't fix it.
I did order replacements for the bent parts from Bernardi ($5 before shipping for the bolt and the small tensioning eyelet) so I can get to it at next time I'm in there for something else.