DIY: GD3 clutch hard line (to remove the in-line CDV)
#1
 01-15-2012, 03:13 PM


DIY: GD3 clutch hard line (to remove the in-line CDV)
Aftering looking over the 'apexanimal' DIY post and asking a few questions... I decided to remove my CDV. 
https://www.fitfreak.net/forums/fit-...ml#post1017395
(YMMV / take your own risks / not my fault if you do something silly / etc.)
Info:
'08 Sport
purchased with 19,900 miles
currently has 51,000 miles
the clutch release sucks and has progressively gotten worse
Here is the parts list from my original post in the link above:
There are several different lengths available (would need to measure it off to make sure it is long enough) (24" = $15.95)
http://www.summitracing.com/search/Brand/Aeroquip/Product-Line/Aeroquip-Teflon-Racing-Hose-Hydraulic-Brake-and-Clutch-Couplings/Hose-Size/minus-3-AN/Hose-End-2-Angle/90-degree/?Ns=Rank%7cAsc&autoview=SKU
(straight end for the connection at the bracket and a 90 degree end at the master)
(For the connection to the hard line on top of the tranny vs. running the whole way up to the salve cylinder)
http://www.summitracing.com/parts/RUS-R41411/ ($17.06)
Female 10mm x 1.0, Male -3 AN, Steel, Chrome, Each (Designed to fit Japanese style inverted flare)
(For the connection to the master cylinder)
http://www.anplumbing.com/search/index?search_text=305-03M121 (click the goodridge tab)
12 MM X 1.0 male bubble flare to -3 male steel (305-03M121) $14.99
I ordered the fittings/SS 3-AN line a few weeks ago... and installed the parts last weekend.
-Remove air cleaner
-Remove battery and tray (3 bolts)
-Remove the CDV (the bracket has 2 bolts to the frame rail)
-Use towels to catch the fluid
-A 10mm and 12mm flare nut wrench help with the line fittings
-Install the new parts and make sure all connections are snug
-Bleed the clutch system (I held the new line up in the air to help get the bubbles out. Once the new line was full of fluid I bolted it up.)
-Enjoy
The fitting for the clutch master cylinder was incorrect so I am working on a clarification (shipped the wrong one/inverted bubble flare?/ordered the wrong one/?).
The 24" SS braided was a little bit too long. I think that a 18" version would be just fine.
Aeroquip FBPA0039-18 - Aeroquip Teflon� Racing Hose Hydraulic Brake and Clutch Couplings - Overview - SummitRacing.com
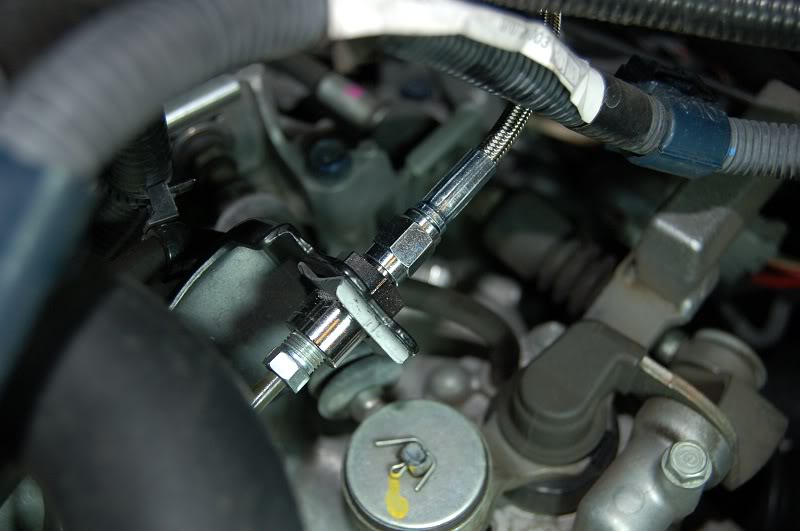
Photos: (I will add more once I get the other fitting figured out)
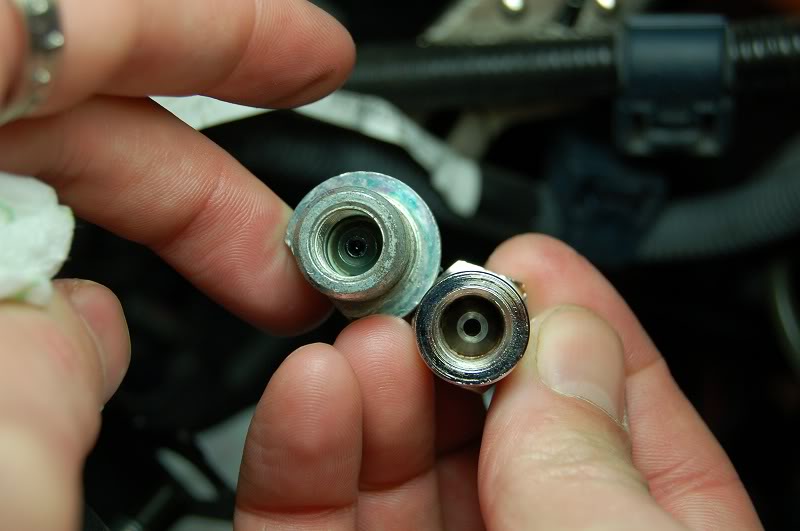
Here is the 41411 fitting (shown on the right/there were 2 in the package)
(on sale now for $14.40! Russell Performance R41411 - Russell Brake Adapter Fittings - Overview - SummitRacing.com)
Test fit in the OEM Fit bracket.
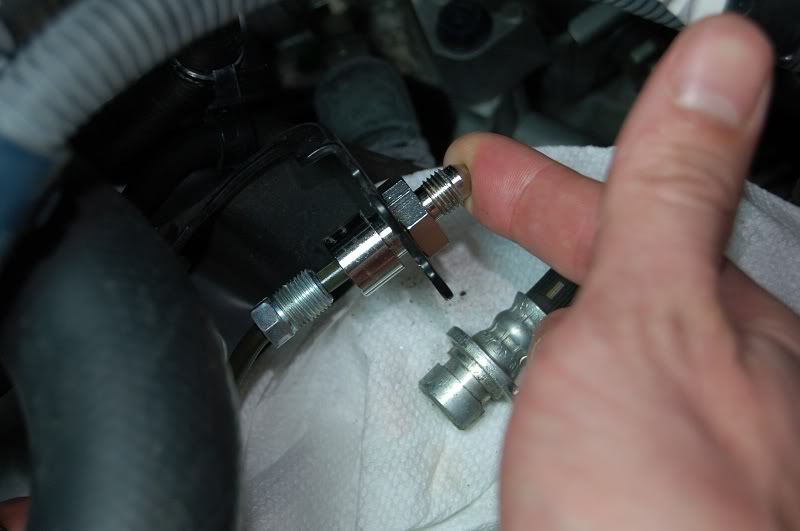
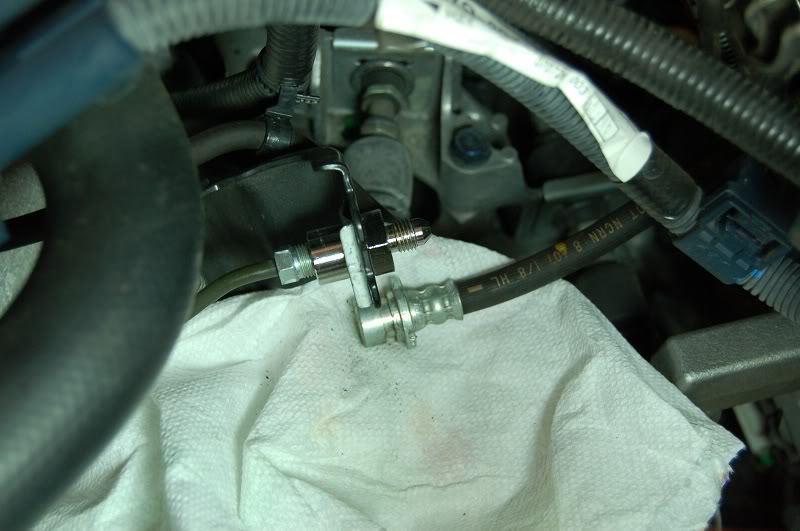
The factory metal lock tab was a little snug... but worked just fine.
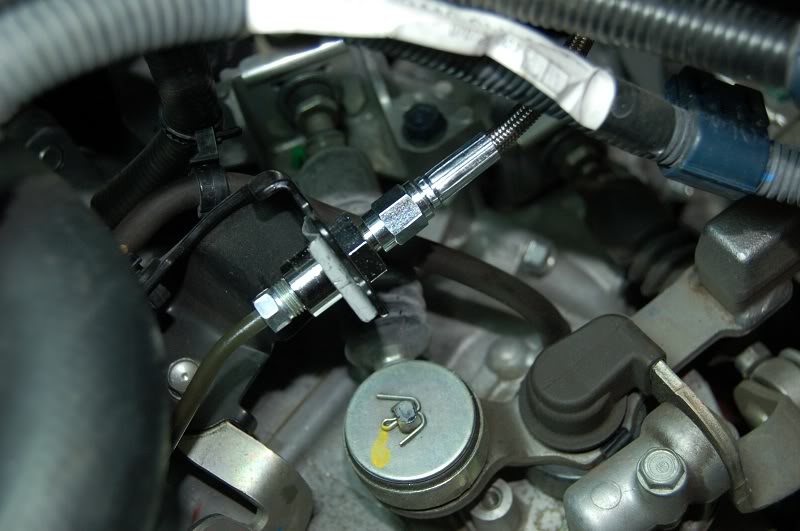
I wish the car was this way from the factory... SO much better.
Removal of the CDV is highly recommended.
Enjoy!
https://www.fitfreak.net/forums/fit-...ml#post1017395
(YMMV / take your own risks / not my fault if you do something silly / etc.)
Info:
'08 Sport
purchased with 19,900 miles
currently has 51,000 miles
the clutch release sucks and has progressively gotten worse
Here is the parts list from my original post in the link above:
There are several different lengths available (would need to measure it off to make sure it is long enough) (24" = $15.95)
http://www.summitracing.com/search/Brand/Aeroquip/Product-Line/Aeroquip-Teflon-Racing-Hose-Hydraulic-Brake-and-Clutch-Couplings/Hose-Size/minus-3-AN/Hose-End-2-Angle/90-degree/?Ns=Rank%7cAsc&autoview=SKU
(straight end for the connection at the bracket and a 90 degree end at the master)
(For the connection to the hard line on top of the tranny vs. running the whole way up to the salve cylinder)
http://www.summitracing.com/parts/RUS-R41411/ ($17.06)
Female 10mm x 1.0, Male -3 AN, Steel, Chrome, Each (Designed to fit Japanese style inverted flare)
(For the connection to the master cylinder)
http://www.anplumbing.com/search/index?search_text=305-03M121 (click the goodridge tab)
12 MM X 1.0 male bubble flare to -3 male steel (305-03M121) $14.99
I ordered the fittings/SS 3-AN line a few weeks ago... and installed the parts last weekend.
-Remove air cleaner
-Remove battery and tray (3 bolts)
-Remove the CDV (the bracket has 2 bolts to the frame rail)
-Use towels to catch the fluid
-A 10mm and 12mm flare nut wrench help with the line fittings
-Install the new parts and make sure all connections are snug
-Bleed the clutch system (I held the new line up in the air to help get the bubbles out. Once the new line was full of fluid I bolted it up.)
-Enjoy
The fitting for the clutch master cylinder was incorrect so I am working on a clarification (shipped the wrong one/inverted bubble flare?/ordered the wrong one/?).
The 24" SS braided was a little bit too long. I think that a 18" version would be just fine.
Aeroquip FBPA0039-18 - Aeroquip Teflon� Racing Hose Hydraulic Brake and Clutch Couplings - Overview - SummitRacing.com
Photos: (I will add more once I get the other fitting figured out)
Here is the 41411 fitting (shown on the right/there were 2 in the package)
(on sale now for $14.40! Russell Performance R41411 - Russell Brake Adapter Fittings - Overview - SummitRacing.com)
Test fit in the OEM Fit bracket.
The factory metal lock tab was a little snug... but worked just fine.
I wish the car was this way from the factory... SO much better.
Removal of the CDV is highly recommended.
Enjoy!
#2
04-03-2012, 01:21 AM

Thank you, Willand, this worked out perfectly.
I went off willard's parts list and had success with this just yesterday. Very satisfied and well worth the investment. It is hard to quantify exactly how much "feel" you gain from the mod, but immediately you notice how much easier it is to drive. I even lost a lot of the cold car clutch studders just by simply being able to drive around it with the cdv gone.
Notes on the install: Even with flare nut wrench the 10mm nut on the hardline stripped out. I've had experience working with brakes on dozens of cars, and the only cars I've stripped out brake line fasteners was on my 85 corolla gts...and now a 2007 fit sport, lol. Vice grip worked immediately right after this, go figure. The flare nut on the master cylinder side was a breeze coming out of the composite fitting adapter. It came off with a simple open end, no fuss. 24" is a little excessive in length, but don't overthink it. A little too much is better than not enough. Thanks again Willard.

#4
04-04-2012, 05:52 AM

Looking forward to doing this the minute my warranty expires, thanks for all of the great info.

#6
04-04-2012, 08:09 PM
actually I can't even find it on the GE8, it looks to be on the back firewall maybe. This is the one thing that I can't understand, it does nothing but hurt a proficient driver. I would like to see some sort of reasoning or workaround for this from Honda. It would really be nice if there was some readily available ninja workout around like the BMWs have.
Fml found it: https://www.fitfreak.net/forums/2nd-generation-ge-08-13/65723-ge8-cdv-gone.html
Fml found it: https://www.fitfreak.net/forums/2nd-generation-ge-08-13/65723-ge8-cdv-gone.html
Last edited by SardonicMedic; 04-04-2012 at 08:23 PM.
#7
04-05-2012, 09:32 AM
")
Honda just wants to clutch discs/transmissions/motor mounts to last past the warranty period and this is one way of doing that.
I think that the use of a CDV has hurt/harmed either the disc, pp, or flywheel in some fashion as my shudder is still there (slightly better with the CDV removed).
Once I save up a few dollars I will purchase (I bet it is earlier than "needed") new OEM parts (pressure plate/clutch disc/release bearing/pilot bearing) and replace those wear items and see if that fixes the shudder. :sigh:
As mentioned above... I should have ordered the 18" version of the SS line.
Once I figure out the correct AN3 fitting for master cylinder... I will add more photos/information.
Hope the info helps.

#8
04-05-2012, 09:39 AM
actually I can't even find it on the GE8, it looks to be on the back firewall maybe. This is the one thing that I can't understand, it does nothing but hurt a proficient driver. I would like to see some sort of reasoning or workaround for this from Honda. It would really be nice if there was some readily available ninja workout around like the BMWs have.
Fml found it: ge8 cdv.... gone - Unofficial Honda FIT Forums
Fml found it: ge8 cdv.... gone - Unofficial Honda FIT Forums
I would like to see the reasoning for this as well - CDV's seemed to have popped up out of no where in the last few years...
#10
04-05-2012, 09:59 AM
The clutch delay valve is easy to remove. Just unbolt, remove it, and bolt the line back up. No parts needed.
e36 m3 clutch delay valve - Google Search
e36 m3 clutch delay valve - Google Search
#11
04-05-2012, 11:01 AM
subaru's have had cdv's in them for years as well... and most have TWO - one in the slave AND one in the master... simple enough to fix but still a pain...
does anyone have an exploded view of the ge master? there has to be a way to disengage it without replacing the entire thing...
does anyone have an exploded view of the ge master? there has to be a way to disengage it without replacing the entire thing...
#12
12-23-2014, 02:30 AM
I did this version of the delete about a month ago - thanks for the breakdowns, Apex and Willard.
Just wanted to clarify a few things for those who may be doing this later, and to add a few notes of my own.
Parts:
The 18" line indeed was long enough. http://www.summitracing.com/parts/AER-FBPA0039-18/
The Russel part junctions the hardline to the new 18" braided line. You get two - pass one on. http://www.summitracing.com/parts/RUS-R41411/
The Goodridge part, for the master cylinder. (-3 AN) Search Results | 305-03M121
12mm flare nut wrench - needed one of these for getting the hardline connecter loose - I was just crushing it with a normal box wrench. I think it's 12mm - just get the 3 pack set since it's only a few bucks more. Got one at my local Pep Boys.
Dot 3 brake fluid. This is a good opportunity to flush the old fluid out, and you'll need some anyway.
Nitrile/latex gloves. Always handy when working, especially if fluids are involved.
Notes:
A second person holding a catch bottle for the old fluid flushing process makes it much easier, cleaner and faster.
Don't remove the lid from the master cylinder reservoir until everything is hooked up; the vacuum created from leaving the lid on will stop most of the old fluid from leaking out when you're removing the stock fitting from the master cylinder.
The little metal tab that traps the stock fitting at the hardline just slides out, but you'll need something to grip it well to get it out. Finger strength probably won't be enough.
Before putting the airbox back in, wipe down the new connections until they are dry/clean and let it sit for 15 minutes or so; re-check the fittings to see if they are weeping any brake fluid. Tighten if so. A very thin wrapping of PTFE tape to the threads may be a good idea (I forgot to do this, but have done this for the braking systems of my motorcycle to good effect).
#13
04-20-2015, 07:05 PM

Hello everybody, I'm new at the forum. I have a 1st gen 2008 MT Honda Fit and I have a really serious clutch problem since a few monts. I bought it one year ago and it was not working fine. I decided to change the clutch kit because it was slipping a little bit so I bought a new LUK clutch kit and I bring it to the Honda licensee. Few days later, the clutch start to slipping again so I assumed Honda licensee did a bad Work. When the car is cold, the clutch is fine but when I drive it for a while, the clutch become a f*cking problem! It slip too much, like if the pressure plate has no pressure. I changed again the kit clutch and the same thing happened again few days later. I'm very worried because I've no idea what to do. Does the CDV is at fault? I've read too much about it and I doubt. HELP!!! Sorry for my english, I'm from Venezuela and nobody here helped me.
#14
12-08-2015, 09:21 PM

Hey guys,
Can you confirm the part I got:
305-03M121P -3 12mmX1.0 12 MM X 1.0 Male Bubble Flare To -3 Male. Steel 14.99
Is the right fitting for the MC? I was looking in the MC adapter and see that the inside is a convex so I thought the the -3AN to 12mm x1.0 Male fitting would need to be concave to be able to seal with the adapter.
#15
12-09-2015, 11:40 AM
This is what my mechanic says. The connection from the original hard line to the MC adapter is an inverted flare. The part that's listed from ANPlumbing is a bubble flare so it's the wrong connection. 305-03M121P -3 12mmX1.0 12 MM X 1.0 Male Bubble Flare To -3 Male. Steel 14.99. I don't know if ANPlumbing shipped the wrong part or if you guys got a different part from them because I'd need -3 12mmX1.0 12 MM X 1.0 Male with inverted flare. The guys at ANPlumbing says they've only sold the Goodridge 305-03M121P -3 12mmX1.0 12 MM X 1.0 Male Bubble Flare To -3 Male. Steel 14.99. So I'm not sure where you guys got the right part from?!?
#16
01-07-2016, 01:28 AM
so if I understand what is the CDV actually is... so on a stock car when you press the clutch pedal down to shift from 1st to 2nd are you talking about the time it takes for the revs to dropping down? So basically with this mod the revs just drop faster? Cuz I got to granny shift this car just to get it to drive smooth.
#17
01-07-2016, 12:06 PM
Hey Vap,
For me it was mainly the feel of the catch point and how vague that felt compared to other MT cars I've driven in the past (Miata, MR2). After the removal of the CDV, it's alittle better, you can feel the catch point better. I find that I'm able to modulate the clutch action from a stop and go better. You'll also feel the clutch vibration abit more, I guess this is because the dampning effect of the CDV has been removed. For me I don't mind it given that the clutch has more feel now. Hope this helps.
For me it was mainly the feel of the catch point and how vague that felt compared to other MT cars I've driven in the past (Miata, MR2). After the removal of the CDV, it's alittle better, you can feel the catch point better. I find that I'm able to modulate the clutch action from a stop and go better. You'll also feel the clutch vibration abit more, I guess this is because the dampning effect of the CDV has been removed. For me I don't mind it given that the clutch has more feel now. Hope this helps.
#18
01-08-2016, 01:17 AM
Hi Jimmyjoejak that was a good description! I really appreciate the time you took to give me that description as the "Aha" moment is starting to kick in :P
I noticed you were in Canada so curious where did you go to get all the parts for the CDV delete? How long did it take you to do?
I noticed you were in Canada so curious where did you go to get all the parts for the CDV delete? How long did it take you to do?
#19
01-08-2016, 01:11 PM
Hey Vap,
I used the parts that was listed in this thread:
The 18" line indeed was long enough. http://www.summitracing.com/parts/AER-FBPA0039-18/
The Russel part junctions the hardline to the new 18" braided line. You get two - pass one on. http://www.summitracing.com/parts/RUS-R41411/
The Goodridge part, for the master cylinder. (-3 AN) Search Results | 305-03M121
The Goodridge adapter to the MC isn't 100% fit but does work. As listed in my previous message, you're mating a male to male connection. but it does work and there's no leaks so far.
I had my mechanic do the swap as I don't like bleeding clutches. It's probably a 1 hour job if you have the tools and know what you're doing. Probably a 2 hour job if the mechanic isn't as intuitive.
I'm in Van and I wasn't able to source any of the parts locally. The Canadian car parts market sux and is super over priced!!
Besides the CDV removal I found the following bolt-ons really helped the feel of the car and they were pretty cheap:
1. Progress rear bar - $180 US but I did have to remove the rear springs to install
2. Spoon replica front strut bar - $20 US (from ebay seller) this was a steal at that price - Install was ok, you have to get your own bolts and nuts
3. Strup headers - $60US (ebay seller). I havent' installed this yet but have heard that's good upgrade from stock and at $60US this is pretty good deal.
Last edited by Jimmyjoejak; 01-08-2016 at 01:14 PM.
