Coil Packs & Misfires - Some Answers
#1
 01-05-2013, 11:10 AM


A lot of people seem to be having problems with misfires and I've seen a lot of questions regarding coil packs floating around.
This was written with the USDM L15 GD3 Fits in mind, but can generally be applied to all vehicles.
1) What do coil packs do?
- Coil packs boost the low (12V) voltage of the car's electrical system into voltage high enough (~20,000V) to jump the gap of your spark plugs.
2) How many coil packs are there?
- Our Fits, like most modern vehicles, use a "Coil-On-Plug" setup, with one coil pack per plug.
3) Where are the coil packs located?
- They are located on the rear side of the engine, just below the wiring harness that runs behind the plastic top engine cover.
4) Are coil packs all the same?
- All the coil packs on the engine are the same.
- If you remove them it doesn't matter where you put them back.
5) Are coil packs dangerous?
- Not when the ignition is off, when they are unplugged from the wiring harness, or when they are installed in the engine.
- They can be dangerous when they not installed in the engine but are plugged into the harness with the ignition on. You could receive a dangerous spark from the spark plug end.
6) How do coil packs work?
- There are three wires on the harness side. Two are used to power the coil (+V, -V) - they continuously charge the coil. The third is used by the ECU to trigger the coil - when it goes hot the coil sends the high voltage down the body which fires the plug.
7) What is a misfire?
- A misfire is when the fuel/air mixture in one of the cylinders fails to burn.
- In order for combustion to take place you need three things: fuel, oxygen, and heat.
- Fuel is injected into the intake via fuel injectors.
- Oxygen is found in air, and is sucked in via the throttle body.
- Heat is provided by the spark plugs firing.
- In a gasoline engine the air and fuel must be mixed in a particular ratio. If there is too much fuel (not enough air) it is said to be burning rich. Too little fuel (too much air) and it is said to be burning lean.
8) What causes a misfire?
- Bad air/fuel ratio
- Spark plug not firing
Last edited by JCLW; 01-05-2013 at 01:18 PM. Reason: updating information
#2
01-05-2013, 11:11 AM
Troubleshooting Coil Packs & Misfires
1) Regarding anti-seize & dielectric grease:
- I use anti-seize on all bolts (and nuts), especially when dissimilar metals are involved (steel bolts in aluminium head). Honda does not.
- Don't use anti-seize that contains copper on aluminium parts because the aluminium will get eaten away due to galvanic corrosion. I use Permatex Nickel anti-seize.
- I generally do not use dielectric grease on the ends of the coil pack boots. Neither does Honda. Some people do.
2) Is your CEL (Check Engine Light) on?
- Read the code(s). They might provide clues.
- A sensor error may be causing the misfire.
3) Do you have a fairly regular misfire at idle?
- Undo the coil pack harness connectors one at a time (plug one back in before unplugging the next).
- If the misfire evens out with one particular coil pack unplugged then it has something to do with that cylinder.
4) Are you using the correct grade of fuel?
- Octane is a measurement of the fuel's resistance to burning - the higher the number, the harder it is to ignite it.
- Using the recommended grade of fuel (87) may reduce or eliminate your misfires, even though the engine should be able to burn higher grades.
5) Do you have a lot of valvetrain noise, or "ticking"?
- Check and adjust your valve lash (this should be done even if your engine is not misfiring).
- If a valve is staying open late or closing early it can affect the air/fuel ratio to the point of causing a misfire.
*** There is a thread by FitCrazy80 about adjusting valve lash here: https://www.fitfreak.net/forums/fit-...clearance.html ***
6) Remove and check the coil packs:
- Unplug the harness connectors and use a 10mm socket with an extension to remove the retaining bolts.
- Check for signs of moisture and/or corrosion
- Check for signs of arcing and/or dis-colouration
- Check for signs of physical damage (cracks, loose boots, etc)
- Hold the bottom of the boot in one hand and the top in the other. Spin the top three times counter-clockwise (looking down at the top) to break loose any internal corrosion.
- *** DO NOT OVER-TIGHTEN THE BOLTS WHEN RE-INSTALLING - THE HEAD IS ALUMINIUM ***
*** There is a thread by Sid 6.7 showing coil pack and spark plug removal & installation here: https://www.fitfreak.net/forums/fit-...l15a-vtec.html ***
7) Remove and check the spark plugs:
- Remove the coil packs first.
- Use a 5/8" spark plug socket (with the rubber inside) with an extension to remove the spark plugs.
- Check for signs of moisture and/or corrosion
- Check for signs of arcing and/or dis-colouration
- Check for signs of physical damage (cracks, etc)
- Check for signs of fouling (a light brown coating is normal)
- Normally the Iridium plugs should last at least 160k kms (100k miles)
- Use a very light coating of high-heat (non-copper) anti-seize on the threads of the spark plugs when you re-install them.
- The spark plugs use crush washers. They should be easy to tighten (by hand) until you get to the crush washer. At this point tighten them using your socket - you'll feel a bit of resistance as the washer crushes and then it will snug up tight. Do not tighten any more then this. If you have a torque wrench this should be around 15ft/lbs.
- *** DO NOT OVER-TIGHTEN THE SPARK PLUGS WHEN RE-INSTALLING - THE HEAD IS ALUMINIUM AND WILL STRIP ***
8) Disassemble the coil pack(s):
- Clean them first (with rags and rubbing alcohol - wear gloves). Don't get the silicone end part (that goes on the plugs) dirty or greasy - wipe away from it.
- There are two main parts to the coil packs. The coil part at the top (with the harness connector) and the boot at the bottom (which goes into the engine and connects to the spark plug). This is so they can make a standard coil and attach different boots to fit different engines.
- Grab the boot in one hand (at the indented part halfway up) and the coil in the other. Twist counter-clockwise (when looking down at the top of the coil) and pull - they will separate.
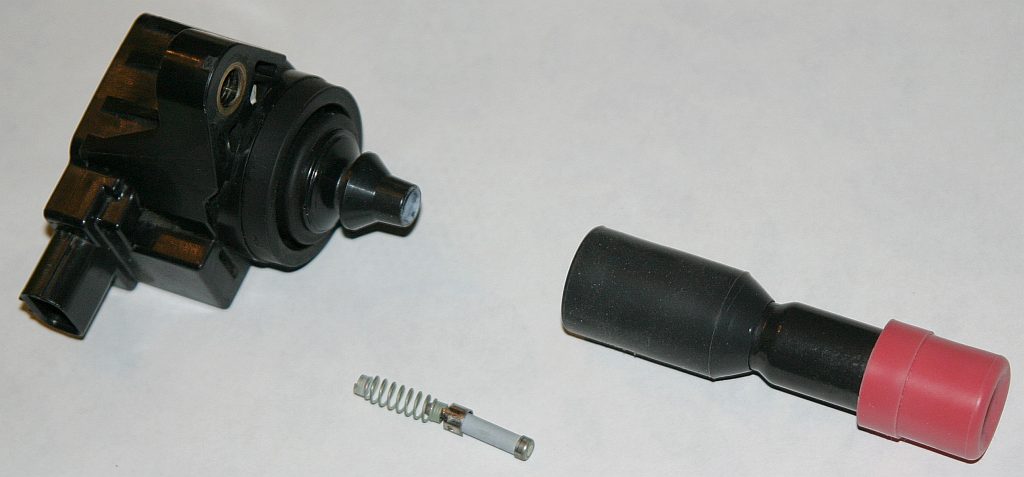
8a) The coil:
- Check the rubber seal for damage.
- Clean the high voltage contact (under where the boot connects) with a Q-tip and rubbing alcohol.
8b) The boot:
- Pull on the end of the little spring. It will pull out with a fuse on the end.
- Check the spring and the fuse for physical damage and signs of arcing.
- Remaining inside the boot is the other end of the fuse holder and a spring end that mates with the spark plug. Use a flashlight to check them both for physical damage and signs of arcing.
- Clean everything with a Q-tip and rubbing alcohol.
- If a coil pack doesn't work at all (constant misfire in one cylinder) then check the fuse for continuity.
8c) Reassemble the coil pack(s):
- Opposite of dis-assembly.
- Fit the fuse and spring into the boot. Use a small jeweler's screwdriver (or bent open paper clip, toothpick, etc..) to push down through the middle of the spring to make sure the fuse is seated correctly. Make sure the spring is centered in the hole and not caught under the lip of the boot.
- Push the boot back on the coil while turning the coil counter-clockwise (as seen from the top). Spin it around a few times to make sure everything is correctly seated.
- I use anti-seize on all bolts (and nuts), especially when dissimilar metals are involved (steel bolts in aluminium head). Honda does not.
- Don't use anti-seize that contains copper on aluminium parts because the aluminium will get eaten away due to galvanic corrosion. I use Permatex Nickel anti-seize.
- I generally do not use dielectric grease on the ends of the coil pack boots. Neither does Honda. Some people do.
2) Is your CEL (Check Engine Light) on?
- Read the code(s). They might provide clues.
- A sensor error may be causing the misfire.
3) Do you have a fairly regular misfire at idle?
- Undo the coil pack harness connectors one at a time (plug one back in before unplugging the next).
- If the misfire evens out with one particular coil pack unplugged then it has something to do with that cylinder.
4) Are you using the correct grade of fuel?
- Octane is a measurement of the fuel's resistance to burning - the higher the number, the harder it is to ignite it.
- Using the recommended grade of fuel (87) may reduce or eliminate your misfires, even though the engine should be able to burn higher grades.
5) Do you have a lot of valvetrain noise, or "ticking"?
- Check and adjust your valve lash (this should be done even if your engine is not misfiring).
- If a valve is staying open late or closing early it can affect the air/fuel ratio to the point of causing a misfire.
*** There is a thread by FitCrazy80 about adjusting valve lash here: https://www.fitfreak.net/forums/fit-...clearance.html ***
6) Remove and check the coil packs:
- Unplug the harness connectors and use a 10mm socket with an extension to remove the retaining bolts.
- Check for signs of moisture and/or corrosion
- Check for signs of arcing and/or dis-colouration
- Check for signs of physical damage (cracks, loose boots, etc)
- Hold the bottom of the boot in one hand and the top in the other. Spin the top three times counter-clockwise (looking down at the top) to break loose any internal corrosion.
- *** DO NOT OVER-TIGHTEN THE BOLTS WHEN RE-INSTALLING - THE HEAD IS ALUMINIUM ***
*** There is a thread by Sid 6.7 showing coil pack and spark plug removal & installation here: https://www.fitfreak.net/forums/fit-...l15a-vtec.html ***
7) Remove and check the spark plugs:
- Remove the coil packs first.
- Use a 5/8" spark plug socket (with the rubber inside) with an extension to remove the spark plugs.
- Check for signs of moisture and/or corrosion
- Check for signs of arcing and/or dis-colouration
- Check for signs of physical damage (cracks, etc)
- Check for signs of fouling (a light brown coating is normal)
- Normally the Iridium plugs should last at least 160k kms (100k miles)
- Use a very light coating of high-heat (non-copper) anti-seize on the threads of the spark plugs when you re-install them.
- The spark plugs use crush washers. They should be easy to tighten (by hand) until you get to the crush washer. At this point tighten them using your socket - you'll feel a bit of resistance as the washer crushes and then it will snug up tight. Do not tighten any more then this. If you have a torque wrench this should be around 15ft/lbs.
- *** DO NOT OVER-TIGHTEN THE SPARK PLUGS WHEN RE-INSTALLING - THE HEAD IS ALUMINIUM AND WILL STRIP ***
8) Disassemble the coil pack(s):
- Clean them first (with rags and rubbing alcohol - wear gloves). Don't get the silicone end part (that goes on the plugs) dirty or greasy - wipe away from it.
- There are two main parts to the coil packs. The coil part at the top (with the harness connector) and the boot at the bottom (which goes into the engine and connects to the spark plug). This is so they can make a standard coil and attach different boots to fit different engines.
- Grab the boot in one hand (at the indented part halfway up) and the coil in the other. Twist counter-clockwise (when looking down at the top of the coil) and pull - they will separate.
8a) The coil:
- Check the rubber seal for damage.
- Clean the high voltage contact (under where the boot connects) with a Q-tip and rubbing alcohol.
8b) The boot:
- Pull on the end of the little spring. It will pull out with a fuse on the end.
- Check the spring and the fuse for physical damage and signs of arcing.
- Remaining inside the boot is the other end of the fuse holder and a spring end that mates with the spark plug. Use a flashlight to check them both for physical damage and signs of arcing.
- Clean everything with a Q-tip and rubbing alcohol.
- If a coil pack doesn't work at all (constant misfire in one cylinder) then check the fuse for continuity.
8c) Reassemble the coil pack(s):
- Opposite of dis-assembly.
- Fit the fuse and spring into the boot. Use a small jeweler's screwdriver (or bent open paper clip, toothpick, etc..) to push down through the middle of the spring to make sure the fuse is seated correctly. Make sure the spring is centered in the hole and not caught under the lip of the boot.
- Push the boot back on the coil while turning the coil counter-clockwise (as seen from the top). Spin it around a few times to make sure everything is correctly seated.
Last edited by JCLW; 01-05-2013 at 04:23 PM. Reason: updating information
#3
01-05-2013, 02:02 PM
Part Numbers
Double check part numbers when you order!
GD3:
Coil Packs (complete):
OEM - Honda 30520-PWC-003 (old)
OEM - Honda 30520-PWC-S01 (new)
OEM - Hitachi IGC0053
Aftermarket - Delphi GN10249
Aftermarket - Beck/Arnley 1788374
Aftermarket - Standard Motor UF581
Aftermarket - Airtex/Wells 5C1635
Coils (top part only)
OEM - Hitachi CM11-110 (double check - often used to describe complete coil pack)
Boots (bottom part only)
OEM - Denso 671-4301 (double check)
Aftermarket - Prestolite 164018
Aftermarket - Beck/Arnley 1751058
Aftermarket - Standard Motor 19261
Spark Plugs:
OEM - Denso SKJ20DR-M13
OEM - NGK IZFR6K-13
GE8:
Coil Packs (complete):
OEM - Honda RB0-003
OEM - Hitachi IGC0073
Aftermarket - Beck/Arnley 1788367
Aftermarket - Standard Motor UF626
Aftermarket - Airtex/Wells 5C1721
Spark Plugs:
OEM - Denso SKJ20DR-M13
OEM - NGK IZFR6K-13
Last edited by JCLW; 04-17-2013 at 10:30 PM. Reason: updating information
#4
01-27-2013, 02:25 PM

1) Regarding anti-seize & dielectric grease:
- I use anti-seize on all bolts (and nuts), especially when dissimilar metals are involved (steel bolts in aluminium head). Honda does not.
- Don't use anti-seize that contains copper on aluminium parts because the aluminium will get eaten away due to galvanic corrosion. I use Permatex Nickel anti-seize.
- I generally do not use dielectric grease on the ends of the coil pack boots. Neither does Honda. Some people do.
No manufacturers manual I've ever used with the part of the engine I was working on ever mentioned anti-seize. Neither do any aircraft or aerospace products manufacturers.
Secondly, you are upsetting the torque specs when you goop something with anti-seize. Bolts typically are spec'd for "dry" and "wet" torque values, the "wet" being a lubricated value. All engine manufacturer torque specs are "dry", at least with most things, maybe some headbolt specs are wet. If you torque a lubricated bolt to a dry spec you will over-stretch the bolt beyond it's designed preload.
#5
06-05-2014, 04:23 PM

Thanks for the write-up and part numbers all in one place! At 106000miles/170590kms I'm running into needing to change spark plugs, check valve clearance, and possibly replace coil packs to stop rough idling.
#6
09-18-2014, 03:54 PM


Double check part numbers when you order!
GD3:
Coil Packs (complete):
OEM - Honda 30520-PWC-003 (old)
OEM - Honda 30520-PWC-S01 (new)
OEM - Hitachi IGC0053
Aftermarket - Delphi GN10249
Aftermarket - Beck/Arnley 1788374
Aftermarket - Standard Motor UF581
Aftermarket - Airtex/Wells 5C1635
Coils (top part only)
OEM - Hitachi CM11-110 (double check - often used to describe complete coil pack)
But for some reason I got Delphi GN10249 boxes and inside each box, I got a coil with a blue rubber end and is labeled (silver sticker on top): IGC0053 Made in Japan. Also etched is CM11-110 13611-M.
Can anyone tell me if the OEM Hitachi are labeled/etched "Hitachi" or labeled/etched like mine? Do I have the Hitachi? Or Did I actually get the aftermarket versions?
Thanks,
-d
#7
10-02-2014, 05:53 PM
[QUOTE=dlong;1264619]I ordered and received some coil packs from Amazon:
But for some reason I got Delphi GN10249 boxes and inside each box, I got a coil with a blue rubber end and is labeled (silver sticker on top): IGC0053 Made in Japan. Also etched is CM11-110 13611-M.
Can anyone tell me if the OEM Hitachi are labeled/etched "Hitachi" or labeled/etched like mine? Do I have the Hitachi? Or Did I actually get the aftermarket versions?
Thanks,
The Hatachi have the letter C on the top side of the coil pack
#9
12-29-2014, 10:15 AM

My daughter was starting to experience the same "stutter" problem in her 75k mile '07 Fit that's been described here numerous times. In my case, I had no codes show to point me in the right direction, so diagnosis was all guesswork. Thanks to JCLW's detailed coil pack post, I disassembled mine, cleaned everything with CRC contact cleaner, scrubbed all contact points with a soft wire brush in a Dremel, then reassembled everything with dielectric grease inside the boots. Since it was all apart, I also installed a set of Denso 1K20TT plugs. Measured gap was about .035, so I left them there. It's only been two weeks, but I'm happy to report that it now runs great, with no sign of any hesitation. Thanks to JCLW and other members who have chimed in with their experiences, I've saved the $300+ it would have cost to replace all the coils. I'm a somewhat competent GM mechanic, but the Fit is my first non-GM vehicle I care for, so the information gathered here is invaluable when I have a question.
Thanks again and have a Happy New Year!
Bill
Thanks again and have a Happy New Year!
Bill
#11
10-18-2015, 11:03 AM

Thanks to JCLW for the instructions! I only want me clarify this
- just twist and pull - there is no tread.
Misfire at idle when A/C is on and sometimes at 60mi/h. Removed coils one by one, 10mm socket to �” ratchet wrench. Removed the rubber boot from the coil by twisting and puling. Cleaned electrical parts with CRC electrical components cleaner – fuse with spring - and Q-tips terminal to the coil and the terminal to the spark plug. Wait to dry and put dielectric grease on the terminal to coil.
In my opinion cleaning is enough (like BillyJack did) but didn’t have time for experiments and put grease also.
Checked the spark plugs at the same time for wear. Torque tighten – spark plugs -150 lb.in, Gap-1.2-1.3mm, and bolt to coil - 80 lb.in
Now the car is running without issues.
- Hold the bottom of the boot in one hand and the top in the other. Spin the top three times counter-clockwise
Misfire at idle when A/C is on and sometimes at 60mi/h. Removed coils one by one, 10mm socket to �” ratchet wrench. Removed the rubber boot from the coil by twisting and puling. Cleaned electrical parts with CRC electrical components cleaner – fuse with spring - and Q-tips terminal to the coil and the terminal to the spark plug. Wait to dry and put dielectric grease on the terminal to coil.
In my opinion cleaning is enough (like BillyJack did) but didn’t have time for experiments and put grease also.
Checked the spark plugs at the same time for wear. Torque tighten – spark plugs -150 lb.in, Gap-1.2-1.3mm, and bolt to coil - 80 lb.in
Now the car is running without issues.
Last edited by georgi6; 10-18-2015 at 11:05 AM.
#12
10-18-2015, 01:12 PM
Glad to hear it worked for you also. It's been 10 months now since I did my boot/coil cleaning and there's been no hint of trouble. As I said in my post, I'll trade an extra hour or two of labor to save $300 in parts anytime!
Bill
Bill

#14
12-21-2015, 08:15 PM

I just wanted to thank the members who contributed to this thread and the other one on replacing coil packs. I replaced mine within an hour and tried it out, only to have my 07 Fit miss at 2800-2900 rpm and refuse to go any faster than 50 km. It turns out that rats had chewed some of the wiring harnesss!(unrelated to the coil packs)I went to the local dealer with the plug and the remnants of the wire hanging from it. They told me that they don't sell the individual plug, only the whole engine harness but one of their mechanics cut a plug from a used harness and gave it to me for nothing, along with a chunk of heat shrink tubing. That fixed the problem-- I just don't want anymore rats in my motor!
Thanks again for the advice.
T2
Thanks again for the advice.
T2
#15
12-22-2015, 07:02 PM

it provides a very small amount of resistance in case something shorts before the plug to prevent a direct short of the coil output to ground which will often fry the coil pack or the ECU circuit driving it..
Most commonly happens when people are pulling the coil packs on a running engine looking for the bad one..
IMHO, the packs are a 80K maintenance item. at 80K just DO IT adjust the valves new plugs and coil packs your engine will thank you..
Cheers.
#16
12-27-2015, 07:09 PM

A lot of people seem to be having problems with misfires and I've seen a lot of questions regarding coil packs floating around.
This was written with the USDM L15 GD3 Fits in mind, but can generally be applied to all vehicles.
1) What do coil packs do?
- Coil packs boost the low (12V) voltage of the car's electrical system into voltage high enough (~20,000V) to jump the gap of your spark plugs.
2) How many coil packs are there?
- Our Fits, like most modern vehicles, use a "Coil-On-Plug" setup, with one coil pack per plug.
3) Where are the coil packs located?
- They are located on the rear side of the engine, just below the wiring harness that runs behind the plastic top engine cover.
4) Are coil packs all the same?
- All the coil packs on the engine are the same.
- If you remove them it doesn't matter where you put them back.
5) Are coil packs dangerous?
- Not when the ignition is off, when they are unplugged from the wiring harness, or when they are installed in the engine.
- They can be dangerous when they not installed in the engine but are plugged into the harness with the ignition on. You could receive a dangerous spark from the spark plug end.
6) How do coil packs work?
- There are three wires on the harness side. Two are used to power the coil (+V, -V) - they continuously charge the coil. The third is used by the ECU to trigger the coil - when it goes hot the coil sends the high voltage down the body which fires the plug.
7) What is a misfire?
- A misfire is when the fuel/air mixture in one of the cylinders fails to burn.
- In order for combustion to take place you need three things: fuel, oxygen, and heat.
- Fuel is injected into the intake via fuel injectors.
- Oxygen is found in air, and is sucked in via the throttle body.
- Heat is provided by the spark plugs firing.
- In a gasoline engine the air and fuel must be mixed in a particular ratio. If there is too much fuel (not enough air) it is said to be burning rich. Too little fuel (too much air) and it is said to be burning lean.
8) What causes a misfire?
- Bad air/fuel ratio
- Spark plug not firing
This was written with the USDM L15 GD3 Fits in mind, but can generally be applied to all vehicles.
1) What do coil packs do?
- Coil packs boost the low (12V) voltage of the car's electrical system into voltage high enough (~20,000V) to jump the gap of your spark plugs.
2) How many coil packs are there?
- Our Fits, like most modern vehicles, use a "Coil-On-Plug" setup, with one coil pack per plug.
3) Where are the coil packs located?
- They are located on the rear side of the engine, just below the wiring harness that runs behind the plastic top engine cover.
4) Are coil packs all the same?
- All the coil packs on the engine are the same.
- If you remove them it doesn't matter where you put them back.
5) Are coil packs dangerous?
- Not when the ignition is off, when they are unplugged from the wiring harness, or when they are installed in the engine.
- They can be dangerous when they not installed in the engine but are plugged into the harness with the ignition on. You could receive a dangerous spark from the spark plug end.
6) How do coil packs work?
- There are three wires on the harness side. Two are used to power the coil (+V, -V) - they continuously charge the coil. The third is used by the ECU to trigger the coil - when it goes hot the coil sends the high voltage down the body which fires the plug.
7) What is a misfire?
- A misfire is when the fuel/air mixture in one of the cylinders fails to burn.
- In order for combustion to take place you need three things: fuel, oxygen, and heat.
- Fuel is injected into the intake via fuel injectors.
- Oxygen is found in air, and is sucked in via the throttle body.
- Heat is provided by the spark plugs firing.
- In a gasoline engine the air and fuel must be mixed in a particular ratio. If there is too much fuel (not enough air) it is said to be burning rich. Too little fuel (too much air) and it is said to be burning lean.
8) What causes a misfire?
- Bad air/fuel ratio
- Spark plug not firing
I wish I had read this before attempting to do what this guy does at 4:48:
I scared the bejesus out of myself when sparks started arcing all over the place.
Would it be a safer alternative to unplug the wiring harness while the engine is running?
#17
12-31-2015, 03:27 PM

A big 'ol +1 to the OP and contributors to this thread.
I'd been having problems with missing/stuttering somewhere around 2,500rpm, and after reading through other threads, decided to buy (1) new ignition coil pack to attempt to repair the problem as cheaply as possible (a big thanks to student loan payments for this one). I attempted to figure out which coil(s) was giving me problems by looking for fouling on the ignition end of the spark plugs, but each one of them looked normal.
Just went through the process of cleaning the ignition coils and boots as described above, as well as replacing the spark plugs with new OE NGK plugs. When cleaning the coil above cylinder 4 (I labeled the coils before proceeding with the repair, as I had also considered resorting to replacing each coil pack in procession to find the troublesome coil), I tried to use my fingernail to clean the leading edge of the tapered part of the coil (the edge where the spring/fuse assembly in the boot mates) and either found or created a small gouge in the plastic. I also attempted to lightly scratch the area for the cylinder 3 coil, and any more pressure would've caused the same resulting gouge. Be warned: The plastic in that tapered portion tends to be very malleable and easy to deform with fingernails or moderate pressure. My '08 Standard Fit has 184k miles on it, up from the 168k miles when I purchased it Used from a dealer. It is possible that the pliability of that part of the coil is due to age, but not probable.
Therefore, don't use anything other than that Q-tip to clean that area. Stupid me for trying to use my fingernail - and maybe, just maybe, that gouge was there before - but don't try to be a hero. The Q-tip and rubbing alcohol alone got the job done.
The end result for me was that I replaced the coil for cylinder 4 with the new coil that I purchased. I am happy to report that I tested my Fit in 5th gear in the 2-to-3,000rpm range under load WITHOUT stuttering... but I might've saved myself a cool $50 if I had kept myself from damaging that one coil.
#18
01-15-2016, 06:26 PM

Can anyone tell me how to take out the had of the coil pack that connects to the spark plug? I went to remove the whole coil pack but half is stuck inside