JDM style 3rd brake light DIY!
#61
 01-19-2009, 04:17 AM

Got my 4-chip Super Flux LEDs a while ago, but have been too lazy to get the resistors 'til Friday, and told myself I'd do it this weekend.
I decided to do it today, and just as I finished designing my circuit and was ready to test, the power in my neighborhood went out.")
Anyways, power came back, and I got it done. Tested it with friends driving behind and it is all good.
My friend's playing with CREE LEDs right now for his LED Daylight project, and I was tempted to try those. But couldn't be bothered with power supply and heat sinking for a 3rd brake light. But since it's not always on, maybe you don't need much heat sinking. Man, those would be bright!!
My How-To and photos can be found on my blog.
I decided to do it today, and just as I finished designing my circuit and was ready to test, the power in my neighborhood went out.
Anyways, power came back, and I got it done. Tested it with friends driving behind and it is all good.
My friend's playing with CREE LEDs right now for his LED Daylight project, and I was tempted to try those. But couldn't be bothered with power supply and heat sinking for a 3rd brake light. But since it's not always on, maybe you don't need much heat sinking. Man, those would be bright!!
My How-To and photos can be found on my blog.

#63
02-13-2010, 01:42 PM
Welcome! koolkev is back w/ another DIY mod. This time it's the JDM 3rd brake light. As you can tell i love working w/ led's so i had 2 conquer the jdm 3rd brake light b/c i was not about to blow $90 for something that can cost me >$5. Newazy here u go!
Disclaimer: The following is provided as a GUIDE ONLY, and neither myself, nor FITFREAK.NET take any responsibility for the outcome of someone else doing the following. You follow these steps at your own risk!
Ur gonna start out by removing your third brake light. Open up ur hatch and use a flat head screwdriver to remove the cover n take off the 2 10mm bolts that hold it onto the hatch and the plug for the bulb harness. Next go 2 ur work station. use a flat tipped screwdriver and look for the 4 clips holding the red lens on. remove that. then push down the metal bracket @ the clip points to remove that as well. You should end up with this:

Next, you can chose the led's u want to work with. I chose the 5mm led's at 8000mcd b/c those are the specs of the oem jdm 3rd brake light. I bought em off my dope ass friend that bought 100 of em and i only needed 6 of em. Super cheap btw.
Now you are going to go 2 radioshack and purchase their led circuit board. basically its just a board w/ holes in it to mount ur led's to. Well go n get that ($4.00) n cut it in 1/2 cuz thats how much ur gonna need. Next take the red lens and trace it onto this surface.

Now cut it. I used a pair of scissors but it does get difficult when u want to trim. Be careful cuz this stuff will break if you bend too much. Now for trimming. take this rough piece and test fit it into the oem housing. Check out the pic below of where you NEED the board 2 rest or else it won't allow you to put the red lens back on.


Here is where you can be creative. I decided 2 make it look just like the OEM jdm version which has 6 led's but you can do however you want and in whatever pattern you want. Find the center of ur piece n mark the 2 vertical sets that it lies in between. Now you can just guestimate and put where you want the led's but as a reference i made my led's 8 holes apart so it housed 6 perfectly. Check out my trial and error below. The green dots are where i mounted my led's:

Now go and get ur hot glue gun and turn it on. Take your led's and push them through the led board holes. Use ur judgement here b/c if it looks like the leds are too spaced apart, then fix it. Now with the led's through the board, bend the positives toward the top (or bottom) and same w/ the negatives but in the opposite direction so you don't forget which are positive n negative. Then glue the back of the led "legs" and wait for em 2 dry. check out my artwork:

Now, the way i did it was i wired the led's up so each of them has its own resistor.
NOTE: FOR THE LED'S ON THE ENDS YOU MUST BEND THE LEGS FLAT TOWARDS THE CENTER SO THEY CAN CLEAR THE BACK OF THE PLASTIC HOUSING.
You just take the resistor and solder it to the positive end of the led. Then take some wire ( i used speaker wire b/c its not much current going through) and wire them all up. check out my spider web thing below. Take the resistor end of 2 led's and solder them together (same w/ the negatives) and attach a small piece of wire to those ends and meet all the pairs together to the center to end up as only one pair of wires. If i confused you look at the pic below.

I decided not to use heat shrink this time b/c the led legs aren't going anywhere they are pretty solid.
Nest just use a 9 volt battery and test it to see if all of em light up. If you did everythign correctly they will light

From there, i put back that metal holder thing back onto the plastic housing like i removed it. I then took my board and shoved the wires through the existing hole for the wiring socket. It should hold snug by itself once you put it in the holder b/c that metal bracket added thickness to the top and bottom.


Now take the wire ends and push it into the corners of the bulb harness. It should hold snug (sorry for the bad pic)

Now here is a tricky part. YOu can do one of 2 things: the first is that you can put the red lens back on BUT WAIT! the led's are about .5mm too long for the red lens to fit w/o effort. YOu can just let it rest on top of the led's and just tape (or glue) the red lens in front of the board OR you can just use a little elbow grease and force the red lens back into its clips. I forced it (took a risk of breaking my board but it held up nicely) and it looks and clipped in like oem, its just a little snug. If you did force it on, test the light once more to make sure none of the connections came loose.

Now go back to your car and remount it onto the hatch and plug in the harness BUT BEFORE YOU LEAVE W/ A JOYOUS SMILE get someone 2 press the brake and check to make sure they light because remember led's only light one way. If your little sis or bro hit it and it doesnt light, reverse the wire's on the back of the bulb socket housing. Then test it once mo:


Below is the actual jdm third brake light. Pole position has em in stock so if u dont wanna make ur own order from him!

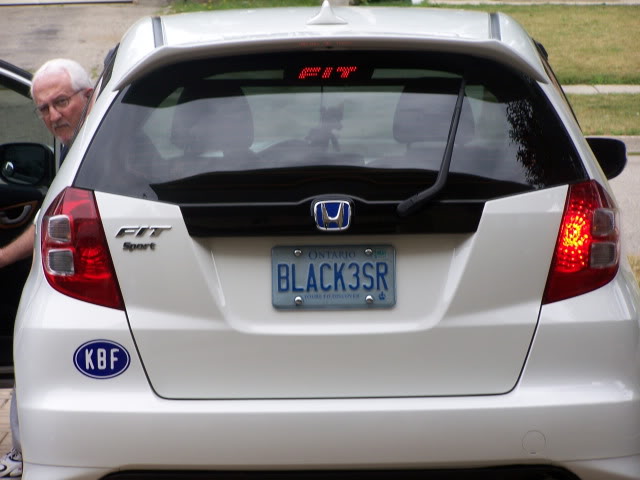
DAMN THATS ILL SON!! I bet ur asking "damn they don't light that bright" well its b/c i have 15% tint on my car so the led's are battling against my tint. Also, my digi camera didn't pick it up too well but if you do get the jdm LED taillights u will notice they are about the same brightness as my DIY 3rd brake light.
I hope i educated many ppl with this DIY and keep a look out for more DIY mod's i will post on here. So far this is #3!
Oh btw if u want you can sticky it so you will always have it on your fingertips in case you get bored n u wanna accomplish it.
Disclaimer: The following is provided as a GUIDE ONLY, and neither myself, nor FITFREAK.NET take any responsibility for the outcome of someone else doing the following. You follow these steps at your own risk!
Ur gonna start out by removing your third brake light. Open up ur hatch and use a flat head screwdriver to remove the cover n take off the 2 10mm bolts that hold it onto the hatch and the plug for the bulb harness. Next go 2 ur work station. use a flat tipped screwdriver and look for the 4 clips holding the red lens on. remove that. then push down the metal bracket @ the clip points to remove that as well. You should end up with this:
Next, you can chose the led's u want to work with. I chose the 5mm led's at 8000mcd b/c those are the specs of the oem jdm 3rd brake light. I bought em off my dope ass friend that bought 100 of em and i only needed 6 of em. Super cheap btw.
Now you are going to go 2 radioshack and purchase their led circuit board. basically its just a board w/ holes in it to mount ur led's to. Well go n get that ($4.00) n cut it in 1/2 cuz thats how much ur gonna need. Next take the red lens and trace it onto this surface.
Now cut it. I used a pair of scissors but it does get difficult when u want to trim. Be careful cuz this stuff will break if you bend too much. Now for trimming. take this rough piece and test fit it into the oem housing. Check out the pic below of where you NEED the board 2 rest or else it won't allow you to put the red lens back on.
Here is where you can be creative. I decided 2 make it look just like the OEM jdm version which has 6 led's but you can do however you want and in whatever pattern you want. Find the center of ur piece n mark the 2 vertical sets that it lies in between. Now you can just guestimate and put where you want the led's but as a reference i made my led's 8 holes apart so it housed 6 perfectly. Check out my trial and error below. The green dots are where i mounted my led's:
Now go and get ur hot glue gun and turn it on. Take your led's and push them through the led board holes. Use ur judgement here b/c if it looks like the leds are too spaced apart, then fix it. Now with the led's through the board, bend the positives toward the top (or bottom) and same w/ the negatives but in the opposite direction so you don't forget which are positive n negative. Then glue the back of the led "legs" and wait for em 2 dry. check out my artwork:
Now, the way i did it was i wired the led's up so each of them has its own resistor.
NOTE: FOR THE LED'S ON THE ENDS YOU MUST BEND THE LEGS FLAT TOWARDS THE CENTER SO THEY CAN CLEAR THE BACK OF THE PLASTIC HOUSING.
You just take the resistor and solder it to the positive end of the led. Then take some wire ( i used speaker wire b/c its not much current going through) and wire them all up. check out my spider web thing below. Take the resistor end of 2 led's and solder them together (same w/ the negatives) and attach a small piece of wire to those ends and meet all the pairs together to the center to end up as only one pair of wires. If i confused you look at the pic below.
I decided not to use heat shrink this time b/c the led legs aren't going anywhere they are pretty solid.
Nest just use a 9 volt battery and test it to see if all of em light up. If you did everythign correctly they will light
From there, i put back that metal holder thing back onto the plastic housing like i removed it. I then took my board and shoved the wires through the existing hole for the wiring socket. It should hold snug by itself once you put it in the holder b/c that metal bracket added thickness to the top and bottom.
Now take the wire ends and push it into the corners of the bulb harness. It should hold snug (sorry for the bad pic)
Now here is a tricky part. YOu can do one of 2 things: the first is that you can put the red lens back on BUT WAIT! the led's are about .5mm too long for the red lens to fit w/o effort. YOu can just let it rest on top of the led's and just tape (or glue) the red lens in front of the board OR you can just use a little elbow grease and force the red lens back into its clips. I forced it (took a risk of breaking my board but it held up nicely) and it looks and clipped in like oem, its just a little snug. If you did force it on, test the light once more to make sure none of the connections came loose.
Now go back to your car and remount it onto the hatch and plug in the harness BUT BEFORE YOU LEAVE W/ A JOYOUS SMILE get someone 2 press the brake and check to make sure they light because remember led's only light one way. If your little sis or bro hit it and it doesnt light, reverse the wire's on the back of the bulb socket housing. Then test it once mo:
Below is the actual jdm third brake light. Pole position has em in stock so if u dont wanna make ur own order from him!
DAMN THATS ILL SON!! I bet ur asking "damn they don't light that bright" well its b/c i have 15% tint on my car so the led's are battling against my tint.
Also, my digi camera didn't pick it up too well but if you do get the jdm LED taillights u will notice they are about the same brightness as my DIY 3rd brake light. I hope i educated many ppl with this DIY and keep a look out for more DIY mod's i will post on here. So far this is #3!
Oh btw if u want you can sticky it so you will always have it on your fingertips in case you get bored n u wanna accomplish it.
#64
11-07-2010, 09:51 PM


Not to TC here but LED replacement boards for Fit are available on Fleabay for around $20. Search for: honda fit brake led. There are choices of full rows LED replacement or some meaningful words  .
.
However, I do have a question of how warm/hot these LEDs get. Also, I wonder how will they look if we words will be unlit(reverse the lights to light up the background)
.However, I do have a question of how warm/hot these LEDs get. Also, I wonder how will they look if we words will be unlit(reverse the lights to light up the background)


#71
06-11-2014, 02:51 PM

Original pics do not work. I would like to create my own.
Little confused on where to hook up the resistors and how to hook them up. Also slightly confused on what wire to use, where to put the wires in order to plug into harness for car. Or must I cut off the plug and re solder it to my new wires and then plug in?
What strength of resistor is everyone using? 180ohm?
Last edited by GinoLicious; 06-11-2014 at 04:00 PM.
#72
05-04-2016, 09:27 AM
Original pics do not work. I would like to create my own.
Little confused on where to hook up the resistors and how to hook them up. Also slightly confused on what wire to use, where to put the wires in order to plug into harness for car. Or must I cut off the plug and re solder it to my new wires and then plug in?
What strength of resistor is everyone using? 180ohm?
Little confused on where to hook up the resistors and how to hook them up. Also slightly confused on what wire to use, where to put the wires in order to plug into harness for car. Or must I cut off the plug and re solder it to my new wires and then plug in?
What strength of resistor is everyone using? 180ohm?
The pics dont work in this thread, but was able to find this thread that does have working pics.. https://www.fitfreak.net/forums/2nd-...t-install.html
OH yea heres mine too!


Thread
Thread Starter
Forum
Replies
Last Post