Re-painting interior dash panels
#1
 08-06-2014, 04:09 PM

Re-painting interior dash panels
Hey everybody! I'm looking for some help about interior painting. I own a 2009 Fit, and while I friggin' love this car, one thing that I've always felt was missing was some interior color coordination with the paint outside. I've got the milano red, and am looking to re-paint the lighter silver interior panels to red.
My problem is, I'm not sure how to safely remove these panels without breaking them. The only one that seems remotely easy is the main center one around the audio display, which seems to have a little hole for prying to the right by the upper glove box. I've highlighted the panels I want to remove and paint in the following picture, color-coded by how difficult I'm guessing it is to remove them:
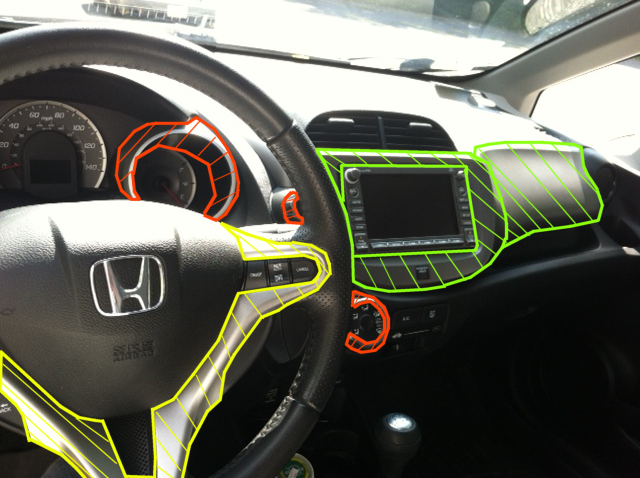
Does anybody have any suggestions or directions on getting those gray panels off without breaking something? Also, recommendations for types of paint best for interior alterations are appreciated, too. I hope this hasn't been asked a billion times before, I looked a bit and didn't see any threads about it.
My problem is, I'm not sure how to safely remove these panels without breaking them. The only one that seems remotely easy is the main center one around the audio display, which seems to have a little hole for prying to the right by the upper glove box. I've highlighted the panels I want to remove and paint in the following picture, color-coded by how difficult I'm guessing it is to remove them:
Does anybody have any suggestions or directions on getting those gray panels off without breaking something? Also, recommendations for types of paint best for interior alterations are appreciated, too. I hope this hasn't been asked a billion times before, I looked a bit and didn't see any threads about it.
#2
08-06-2014, 08:50 PM

If you search around here enough, I think you'll come across discussions of most if not all of these bits. For the instrument panel ones, look for threads on scratches on the clear plastic lenses/covers. Generally speaking, though, the interior comes apart fairly easily, with mostly friction clips holding it together (along with the occasional screw and push-rivet-thingy.)
The steering wheel is probably the hardest one to manage, actually; I believe you have to remove the airbag unit and maybe even the whole wheel to get the trim piece off. Diddling with the airbag unit requires some specific precautions to ensure it doesn't explode in your face, such as disconnecting the power for a period of time before starting to muck about.
The steering wheel is probably the hardest one to manage, actually; I believe you have to remove the airbag unit and maybe even the whole wheel to get the trim piece off. Diddling with the airbag unit requires some specific precautions to ensure it doesn't explode in your face, such as disconnecting the power for a period of time before starting to muck about.
#3
08-06-2014, 09:52 PM
If you search around here enough, I think you'll come across discussions of most if not all of these bits. For the instrument panel ones, look for threads on scratches on the clear plastic lenses/covers. Generally speaking, though, the interior comes apart fairly easily, with mostly friction clips holding it together (along with the occasional screw and push-rivet-thingy.)
The steering wheel is probably the hardest one to manage, actually; I believe you have to remove the airbag unit and maybe even the whole wheel to get the trim piece off. Diddling with the airbag unit requires some specific precautions to ensure it doesn't explode in your face, such as disconnecting the power for a period of time before starting to muck about.
The steering wheel is probably the hardest one to manage, actually; I believe you have to remove the airbag unit and maybe even the whole wheel to get the trim piece off. Diddling with the airbag unit requires some specific precautions to ensure it doesn't explode in your face, such as disconnecting the power for a period of time before starting to muck about.
What do you mean by scratches in the lenses? Like, looking for clips along the edge of the clear plastic where it meets the rest of the dash?
#4
08-06-2014, 09:58 PM
We want pictures when you're done.
I would suggest shop colors before you take things apart. Not all spay paints can be used on plastic, be sure that you can get what you want.
Make a couple of trial pieces so that you can get a feel for how the paint works and how it looks inside your car. Maybe you can get some scrapped pieces from a car that are the same plastic and similar shapes. When you get the parts out clean them very carefully - I would use some mineral spirits, but no harsh solvents. Give the surfaces a bit of 'tooth' by lightly sanding with #600 grit. If they are vastly different colors you may want to give them all a coat of, say, flat grey first. (you do not need to 'prime' with plastic) Light thin coats, easy does it, Don't try to build up the whole body of the color in one go, paint the pieces from several different angles to get coverage. You may want to mask off locking tabs or friction fit areas.
#5
08-06-2014, 11:16 PM
I meant that there's a thread or two on these forums about replacing the clear plastic in front of the gauges due to the plastic getting scratched somehow (it seems to be a fairly soft plastic). It's necessary to remove the bezel before the plastic panel, so IIRC there was some information there about how to get it all apart and back together.
#6
08-07-2014, 12:16 PM
We want pictures when you're done.
I would suggest shop colors before you take things apart. Not all spay paints can be used on plastic, be sure that you can get what you want.
Make a couple of trial pieces so that you can get a feel for how the paint works and how it looks inside your car. Maybe you can get some scrapped pieces from a car that are the same plastic and similar shapes. When you get the parts out clean them very carefully - I would use some mineral spirits, but no harsh solvents. Give the surfaces a bit of 'tooth' by lightly sanding with #600 grit. If they are vastly different colors you may want to give them all a coat of, say, flat grey first. (you do not need to 'prime' with plastic) Light thin coats, easy does it, Don't try to build up the whole body of the color in one go, paint the pieces from several different angles to get coverage. You may want to mask off locking tabs or friction fit areas.
I would suggest shop colors before you take things apart. Not all spay paints can be used on plastic, be sure that you can get what you want.
Make a couple of trial pieces so that you can get a feel for how the paint works and how it looks inside your car. Maybe you can get some scrapped pieces from a car that are the same plastic and similar shapes. When you get the parts out clean them very carefully - I would use some mineral spirits, but no harsh solvents. Give the surfaces a bit of 'tooth' by lightly sanding with #600 grit. If they are vastly different colors you may want to give them all a coat of, say, flat grey first. (you do not need to 'prime' with plastic) Light thin coats, easy does it, Don't try to build up the whole body of the color in one go, paint the pieces from several different angles to get coverage. You may want to mask off locking tabs or friction fit areas.
Also, don't worry there will definitely be pictures when it's done.
I meant that there's a thread or two on these forums about replacing the clear plastic in front of the gauges due to the plastic getting scratched somehow (it seems to be a fairly soft plastic). It's necessary to remove the bezel before the plastic panel, so IIRC there was some information there about how to get it all apart and back together.
I'll give all these suggestions a try when I come back from vacation in a few days.
#7
08-22-2014, 09:31 PM
UPDATE TIME! I would have posted something sooner, but I've been out of commission with strep these last few days.
Project is mostly complete, as you can see here:

However, I messed up the glove box lid, and have to re-do the paint. That's actually the test dummy lid in the photo, since it already got the matte protector coat. The actual one got smeared, so its overall glossy appearance would look more out of place while I'm working on fixing things.
Strangely enough, I only broke a few things! All of them were little clips the navigation unit rested against in the center console piece. Turns out the plastic doesn't slide forward off the nav. system, it slides back after you remove a part of the metal scaffolding. Nothing a little superglue couldn't fix, and they were sort of redundant after other parts that were metal and supported by screws.
There's a few other minor cosmetic defects one would expect from an amateur, as well as a couple tiny scratches, but hey, no pain no gain. Life gets bumpy when you drive off the easy streets.
THINGS FOR THE FUTURE SOME DAY: Finishing the upper glove box (TIP: the gray plastic CANNOT be separated from the hinge components!). I also wanna try painting the lower glove box, the knobs can definitely be removed, maybe the steering wheel gray plastic, and maybe some door trimming.
Thanks again for your help! Couldn't have done this without you guys!
Project is mostly complete, as you can see here:
However, I messed up the glove box lid, and have to re-do the paint. That's actually the test dummy lid in the photo, since it already got the matte protector coat. The actual one got smeared, so its overall glossy appearance would look more out of place while I'm working on fixing things.
Strangely enough, I only broke a few things! All of them were little clips the navigation unit rested against in the center console piece. Turns out the plastic doesn't slide forward off the nav. system, it slides back after you remove a part of the metal scaffolding. Nothing a little superglue couldn't fix, and they were sort of redundant after other parts that were metal and supported by screws.
There's a few other minor cosmetic defects one would expect from an amateur, as well as a couple tiny scratches, but hey, no pain no gain. Life gets bumpy when you drive off the easy streets.
THINGS FOR THE FUTURE SOME DAY: Finishing the upper glove box (TIP: the gray plastic CANNOT be separated from the hinge components!). I also wanna try painting the lower glove box, the knobs can definitely be removed, maybe the steering wheel gray plastic, and maybe some door trimming.
Thanks again for your help! Couldn't have done this without you guys!
#8
08-23-2014, 02:02 AM
Wow... this was too much. If I had done this. it would have been very limited to the gauge rings and door handles. Just my .02
#9
08-23-2014, 10:53 AM

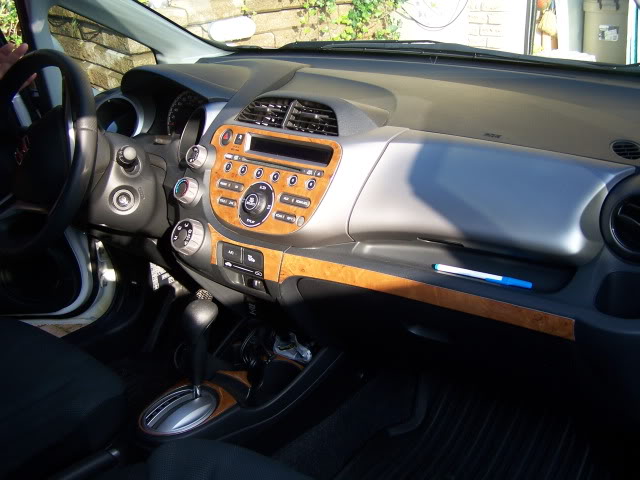
wish I had seen this thread sooner- I would have suggested a red carbon fiber dash trim kit. I put a blue one in mine to match both the fabric inside and my tidewater blue fit
Unofficial Honda FIT Forums - sooznd's Album: Interior Carbon Fiber Trim
http://www.carid.com/images/remin-da...materials.html
Unofficial Honda FIT Forums - sooznd's Album: Interior Carbon Fiber Trim
http://www.carid.com/images/remin-da...materials.html
Last edited by sooznd; 08-23-2014 at 12:50 PM.
#11
08-23-2014, 04:50 PM
wish I had seen this thread sooner- I would have suggested a red carbon fiber dash trim kit. I put a blue one in mine to match both the fabric inside and my tidewater blue fit
Unofficial Honda FIT Forums - sooznd's Album: Interior Carbon Fiber Trim
Remin Materials
Unofficial Honda FIT Forums - sooznd's Album: Interior Carbon Fiber Trim
Remin Materials
Eh, that's fine by me. I'm a pretty over-the-top kind of person, especially when it comes to my favorite color. So if this car gives the same impression, then I've accomplished my task of expressing my personality through the car!

#14
08-24-2014, 10:18 AM

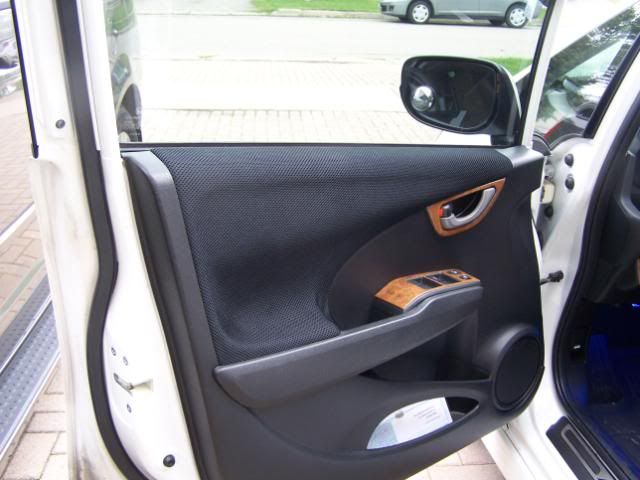
EDIT: How easy was it to get those panels off the door? Those were other parts I want to paint.
Last edited by Fnoigy; 08-24-2014 at 12:28 PM.
#15
08-24-2014, 05:13 PM
I got the Remin Kit for my car- it came in several levels of trim- I got the basic one which cost about $85. It looks as though both Sherwood and B & I kits also offer Carbon Fiber & they might have options for the Navi model. I remember calling CARID several times to make sure I was getting the color I wanted since ordering by their colors online was confusing. I just checked the B & I does offer trim for the Navi as well.
Last edited by sooznd; 08-24-2014 at 05:16 PM.
#16
09-02-2014, 08:56 PM
I got the Remin Kit for my car- it came in several levels of trim- I got the basic one which cost about $85. It looks as though both Sherwood and B & I kits also offer Carbon Fiber & they might have options for the Navi model. I remember calling CARID several times to make sure I was getting the color I wanted since ordering by their colors online was confusing. I just checked the B & I does offer trim for the Navi as well.
#17
12-30-2016, 11:52 PM

UPDATE TIME! I would have posted something sooner, but I've been out of commission with strep these last few days.
Project is mostly complete, as you can see here:

However, I messed up the glove box lid, and have to re-do the paint. That's actually the test dummy lid in the photo, since it already got the matte protector coat. The actual one got smeared, so its overall glossy appearance would look more out of place while I'm working on fixing things.
Strangely enough, I only broke a few things! All of them were little clips the navigation unit rested against in the center console piece. Turns out the plastic doesn't slide forward off the nav. system, it slides back after you remove a part of the metal scaffolding. Nothing a little superglue couldn't fix, and they were sort of redundant after other parts that were metal and supported by screws.
There's a few other minor cosmetic defects one would expect from an amateur, as well as a couple tiny scratches, but hey, no pain no gain. Life gets bumpy when you drive off the easy streets.
THINGS FOR THE FUTURE SOME DAY: Finishing the upper glove box (TIP: the gray plastic CANNOT be separated from the hinge components!). I also wanna try painting the lower glove box, the knobs can definitely be removed, maybe the steering wheel gray plastic, and maybe some door trimming.
Thanks again for your help! Couldn't have done this without you guys!
Project is mostly complete, as you can see here:
However, I messed up the glove box lid, and have to re-do the paint. That's actually the test dummy lid in the photo, since it already got the matte protector coat. The actual one got smeared, so its overall glossy appearance would look more out of place while I'm working on fixing things.
Strangely enough, I only broke a few things! All of them were little clips the navigation unit rested against in the center console piece. Turns out the plastic doesn't slide forward off the nav. system, it slides back after you remove a part of the metal scaffolding. Nothing a little superglue couldn't fix, and they were sort of redundant after other parts that were metal and supported by screws.
There's a few other minor cosmetic defects one would expect from an amateur, as well as a couple tiny scratches, but hey, no pain no gain. Life gets bumpy when you drive off the easy streets.
THINGS FOR THE FUTURE SOME DAY: Finishing the upper glove box (TIP: the gray plastic CANNOT be separated from the hinge components!). I also wanna try painting the lower glove box, the knobs can definitely be removed, maybe the steering wheel gray plastic, and maybe some door trimming.
Thanks again for your help! Couldn't have done this without you guys!

#19
12-31-2016, 05:54 PM

@lokomaika'i
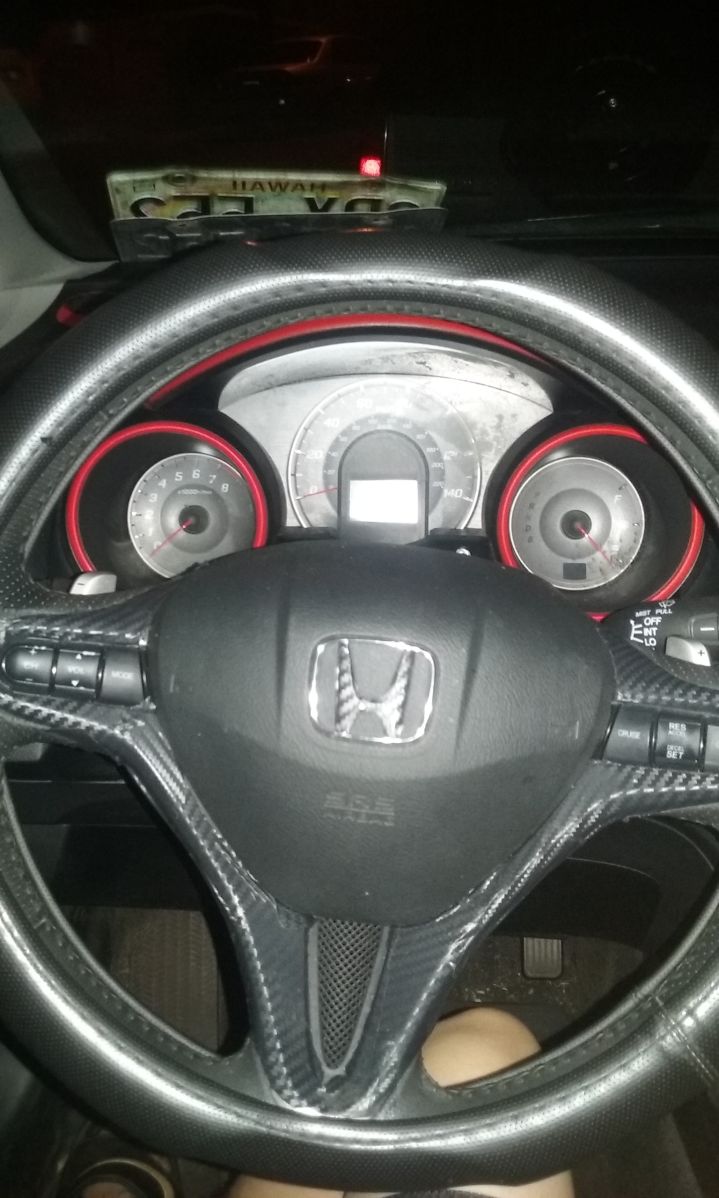
I'm looking to do something similar, how do you remove the two big dial cowls? do they just pull out?
I'm looking to do something similar, how do you remove the two big dial cowls? do they just pull out?
#20
12-31-2016, 07:39 PM
First pull the knob out from the odometer and mpg thing by the gauges. Then on the left side of the steering wheel by the side mirror controlls there's a notch where you can fit a screw driver put a cloth over your screw driver so you don't scratch anything. Put it in the knotch and pry up you should loosen a few clips. Pull in front of the gauges to release 2 clips. Then slide your hand in from the left and work your way all the way around to the wind shield area then back to the right side of the steering wheel. Once you get the whole panel loose don't pull it off there's two screws holding the controls to the side mirror once the controls are out the panel should be free. There are 2 screws on each side holding the two round pieces with chrome rings. And the cover over the gauges has 1 screw in the middle. Once you pull those scews out everything should come apart and the chrome rings are just clipped in so you can just push them out with your fingers except for one which needs to be pried with a flat head.then you just put everything back in reverse when your done with what you do. Hope this helped you