Daddy's New Toy :D 1990 EF Hatch
#261
 09-01-2014, 07:17 PM


Join Date: Dec 2008
Location: Chesapeake, VA. -USA
Posts: 4,429
Labor Day
Yep Labored on the hood today wet sanded 1500 to 2500 and buffed with lo cut compound, machine polish, glazed, waxed.
#262
09-07-2014, 03:13 PM
Join Date: Dec 2008
Location: Chesapeake, VA. -USA
Posts: 4,429
New Lighting Twists
Ordered a new 7 color under car lighting system to replace the old tubes that came with the car. Also ordered a sound relay control and some 6000k LED snap lights. They are like lighting strikes in the headliner and other nooks and crannies when the bass hits, this will be crazy for the night time get togethers.
Last edited by Perrenoud Fit; 09-11-2014 at 10:48 PM.
#263
09-11-2014, 10:58 PM
Join Date: Dec 2008
Location: Chesapeake, VA. -USA
Posts: 4,429
Under Car Lighting
LED kit came in and there's not enough lights man! :(
So I started look'n and decided a 16' real of 300, 5050 RGB lights with 8 dif. color combos and the 44 function remote should do the trick. :)

Specifications for 5050 LED Strips
Color: RGB
LED Type: 5050 SMD LED
LED Quantity: 300leds/ 5M
View angle:120�
Working Voltage: 12VDC
Output power: 72W
Working Temperature: -20~+50�C
Dimension: 500cm*1.0cm*0.2cm (L x W x H)
Protection Degree: IP20
Long life: Above 50,000 hours
Certification: CE & RoHS
So I started look'n and decided a 16' real of 300, 5050 RGB lights with 8 dif. color combos and the 44 function remote should do the trick. :)
Specifications for 5050 LED Strips
Color: RGB
LED Type: 5050 SMD LED
LED Quantity: 300leds/ 5M
View angle:120�
Working Voltage: 12VDC
Output power: 72W
Working Temperature: -20~+50�C
Dimension: 500cm*1.0cm*0.2cm (L x W x H)
Protection Degree: IP20
Long life: Above 50,000 hours
Certification: CE & RoHS
Last edited by Perrenoud Fit; 09-11-2014 at 11:12 PM.
#265
09-12-2014, 03:01 PM
Join Date: Dec 2008
Location: Chesapeake, VA. -USA
Posts: 4,429
Haha never!
Hey Bill,
Yep we are. And I don't think I'll run out but if I do ... time for a new project!! :D
Yep we are. And I don't think I'll run out but if I do ... time for a new project!! :D
Last edited by Perrenoud Fit; 09-12-2014 at 03:07 PM.
#266
09-12-2014, 03:15 PM
Join Date: Dec 2008
Location: Chesapeake, VA. -USA
Posts: 4,429
CAPACITANCE AND THE BIG 3 information
5 farad capacitor for stereo system so the bass hits Harder! And the amps/batteries & alternator work more efficiently.

Capacitors
 Capacitance is typified by a parallel plate arrangement and is defined in terms of charge storage:
 where
where
Car Audio Capacitor Installation
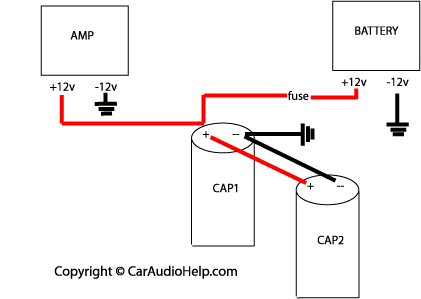
There is often a lot of confusion on how to wire a car audio capacitor (a.k.a. power capacitor or Stiffening™ capacitor). There are two terminals on a car audio capacitor. A positive and a negative. The negative terminal is connected to ground. The positive terminal is connected "in-line" with the car audio amplifier +12 volts terminal. See the diagram below. NOTE: If you have a third smaller terminal it is probably the remote turn on for a digital display.

Note that the two terminals do not both connect to the +12 volt power wire. This will cause your amplifier's power supply to be cut off. The power capacitor acts like a small battery (power storage) so it is connected as shown in the diagram. The downside of this type of connection is you don't know if the power capacitor fails since the amplifier will continue to work with or without a working power capacitor.
Ideally the power capacitor should be as close as possible to the amplifier. Within a couple of feet is acceptable. This keeps any cable losses to a minimum. To learn more about how car audio capacitors work click here.
Here's how to wire two capacitors in a system. In the diagram both capacitors have their ground terminals wired together but you could also ground them independently. You can even fabricate or purchase "buss bars" which are solid pieces of metal that connect the capacitors both physically and electrically. These "buss bars" are generally bare metal so they can be dangerous if not installed properly. Use caution if you take this route.
NOTE OF CAUTION: Power capacitors store a large amount of energy and they charge very quickly. You must first "charge" your power capacitor before connecting it directly to +12 volts. This is done with a resistor and a voltmeter. The exact value of the resistor is not critical but I would keep it in the 500-1k ohm range. This will increase the charging time and you can use values 1/10th that if you prefer (50-100 ohms). I would recommend getting a 1 watt resistor if possible (your capacitor may have come with a resistor for charging). A lower wattage resistor will heat up too quickly. Also, do not hold the resistor with your bare hand. The current flowing through the resistor will cause the resistor to heat up and you could be burned. A good place to put the resistor is in the main power wire fuse holder (the one installed near the battery). Simply substitute the resistor for the fuse. A diagram for the capacitor charging setup is shown below. You will need to place a voltmeter across the capacitor to monitor the voltage. Once the voltmeter reads 12 volts (or close to it) you can remove the voltmeter and replace the resistor with the power fuse. Alternatively you can measure the voltage across the charging resistor. It should start around 12 volts and slowly work its way down to 0 volts. When the voltage stops changing you have charged the capacitor completely.
Another method for charging involves using an old style test light instead of a resistor. The connection is similar (alligator clip on one side, probe on the other) but you don't need a voltmeter to monitor voltage. When the bulb goes out the capacitor is charged (because the voltage across the bulb went from 12volts to 0volts).
Car Audio Power Capacitors
A car audio power capacitor is a secondary, passive (non-powered) storage device for electrical power. Sometimes simply called a cap, power cap or Stiffening Cap™. They typically come in cylindrical shapes that are three inches in diameter and about a foot long though rectangular shapes are also available for different technologies. There will be a positive and negative terminal and possibly a third remote turn on terminal that turns an LCD display on or off. Regardless of the shape or extras they come with they are designed for one thing, to store electrical power.
Why Does a Car Audio Power Capacitor Work?
A car audio power cap works by storing large amounts of electrical power which it can then deliver to power hungry components when called upon to do so. They have an advantage over typical lead acid storage batteries because they have very low internal resistance. This allows them to deliver large amounts of power (current) very quickly. Much faster than a car's charging system can deliver that same amount of current.
Car audio power amplifiers can have very large current demands. This is dependent on the music being played through the amplifier. Typically these currents are only needed in short bursts during transient peaks (bass drum note, etc.). If the amplifier tries to pull this current from the electrical system directly it may cause a drop in voltage called a sag. This sag is equivalent to a voltage drop in the system and the size of the drop depends on the resistance of the wire from the source (battery) to the amplifier.
As an example, let's say you have twenty feet of 8 gauge wire and your amplifier suddenly needs 100 amps for a bass hit. Using Ohm's Law where voltage, or in this case voltage drop, is equal to the current (100 amps) times the resistance. Using a power wire resistance table we can see that 8 gauge wire has a resistance of 0.000739 ohms per foot. Multiple that by the twenty foot length of wire we have to get a total resistance of .01478 ohms. That doesn't seem like much but relative to the voltage of a vehicle's electrical system it is. Here's the math using Ohm's Law:
E = I x R or voltage = current multiplied by resistance
E = 100 amps x .01478 ohms
E = 1.478 volts
So 100 amps running through a twenty foot long run of 8 gauge wire causes the voltage at the amplifier to drop about 1.5 volts. And if your vehicle's system is charging at 14 volts (13.5-14.5 is the average range) the voltage at your amplifier will be 12.5 volts. This also shows why you need to know the current draw and wire length in your system. If your amplifier(s) are capable of large current draws on a continuous basis you need to have large power wire to keep this voltage drop minimized.
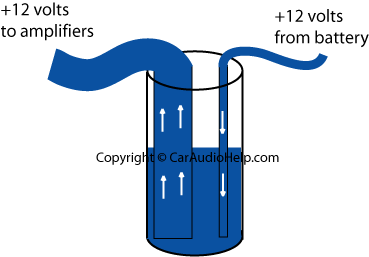
So what does that have to do with a car audio power capacitor? Two things. First, a power capacitor is placed much closer to the amplifiers than the battery is so that voltage drop is going to be much less all other things being equal. But second, your charging system probably isn't designed to provide current draws that large at any time. So your amplifiers are going to have to get the power from the vehicle's battery as well as the alternator. And the battery has its own internal resistance which, as stated before, is much higher than that of a car audio power capacitor. Because of this extra internal resistance it is not an effective means of delivering large amounts of instantaneous current. The capacitor acts like a small tank with a large hose while a battery acts like a large tank with a small hose. So with a capacitor installed you can deliver a large current burst during a music transient and then the capacitor can recharge during the non-peak portions of the music.
See the diagram below which illustrates the capacitor as a water tank. The water represents the electrical energy that a capacitor stores. The tank has a slow moving input line which comes from the battery. The tank also has a large output line which goes to the amplifiers. This large output line let's the tank drain quickly. But if the amplifiers try to pull too much out the tank will empty and you will have to wait until the slow input line from the battery refills it. To avoid this you need to make sure your tank is big enough for your amplifiers. This capacity or "tank size" is measured in Farads.
Will a Power Capacitor Help You?
I don't know, it depends. How's that for an answer? The degree of help a power capacitor will give you depends on your specific vehicle, car audio amplifier(s) current draw, music type and listening habits.
The first way most people know if their system is in trouble is headlights dimming. To most car audio enthusiasts with a passing knowledge of electrical systems this means a capacitor is needed. Headlights dimming? Get a cap. And that's a pretty good guess but not always true and certainly not a guaranteed cure. A power capacitor can only do so much. If your electrical system only has a scrape it's a good band-aid but if it's really bleeding you need stitches. And stitches come in the form of an upgraded alternator and battery. If the headlight dimming only occurs at idle then it probably isn't much to worry about and a power capacitor may help. An idling vehicle puts out much less current from the alternator while the current draw from the audio system remains the same.
What Size Car Audio Power Capacitor Do You Need?
Since the beginning of car audio power capacitor time (late 1980's) the accepted rule has been one Farad of capacitance per 1,000 watts of power with a minimum of one Farad (that last part is often forgotten). This value was determined experimentally by Richard Clark (of Autosound 2000 and Buick Grand National fame). More isn't necessarily better but it doesn't hurt either.
So Do You Need One or Not?
If your system doesn't exhibit any problems such as dimming headlights then it probably isn't worth the added expense. I've done vehicles that benefited tremendously from caps and others that appeared to have not benefit at all. As always the only way to find out is to try it. Though every car audio shop is different it's unlikely that they will let you test drive a power capacitor. An easier way may be to borrow one from a friend that may already have one installed. Just remember to observe the same safety rules for uninstalling and installing a capacitor as you would for a battery (disconnect the negative terminal of the battery, remove the main power wire fuse, etc.). If installing the power capacitor doesn't help with dimming headlights then you either have a faulty charging system or an inadequate charging system. A qualified mechanic can tell you if the electrical system is not charging correctly. Be sure they check the grounds for the battery, engine block and the power wire from the alternator to the battery (the "Big Three").
In some cases you can determine for yourself if the factory charging system is adequate even under ideal conditions. Find the output rating (amps) of your alternator and figure about 30% of that may be available for your audio system. Remember that an alternator's output is not constant and the rated output will not be available when idling. The faster the alternator spins the more current it puts out. If you use an underdrive pulley on your engine then the alternator will put out less than its rated current. Now determine the current draw of your audio system under the conditions you will use it. The amplifier(s) manufacturer should provide this in the owner's manual or by request through telephone or email. If you crank it to the max then use the maximum current draw. Otherwise you'll probably want to use the "typical" or "with music" rating. If your alternator is rated at 80 amps then you probably have 24 amps available under ideal conditions. More when current drawing devices like lights and fans are off. This means your typical current draw needs to be less than 24 amps. Anything more than that are you'll be pulling the additional current from a storage device (battery and/or capacitor). Depending on the degree of additional current you need this can cause the dimming headlights syndrome. Small overages can often be helped with a capacitor while large overages need the upgraded alternator and battery.
Car Audio Electrical Basics
Car Electrical System
A vehicle's electrical consists of many parts but the ones we're interested in are the battery, the alternator, and the power wiring. A vehicle electrical system is a 12 volt DC system. The primary source of power when the vehicle is NOT running is the battery. The primary source of power when the vehicle IS running is the alternator. This is a very important point to remember. The primary functions of the battery are to start the vehicle and provide power when the vehicle is not running. Because the battery's stored power is so great it is important to treat it with respect. It's the automotive equivalent of a loaded gun. It has the power to stop your heart and can burn your vehicle up if an unfused power wire is shorted to ground. Always remember to disconnect the negative battery cable before doing any work on a stereo system. NOTE: If your radio has a security feature that requires a secret code to be input after power has been disconnected make sure you know this code before you begin (ie Delco-Loc, Eclipse ESN).
Depending on your vehicle's factory electrical system, you may not have enough power to run your aftermarket stereo system. You probably do unless you have a multi-megawatt system or an extremely tiny alternator. If your battery goes dead often after the installation of your new stereo you may have an electrical system problem. Have your battery and electrical system tested by a qualified technician. If everything checks out then you probably are in need of an upgrade. Here are some of the common problems and their likely cures.
Adding a Second Battery
Many people are under the impression that adding a second battery will cure their electrical problems. If one battery is good then two must be better. Wrong. Remember that the function of a battery is to start the vehicle and to provide power when the vehicle is not running. The only thing a second battery will help you with is "parking lot" listening time. Basically it will provide you the additional capacity to run your stereo longer without starting the vehicle. After the vehicle is started the second battery becomes another load on an already overworked alternator. If you do replace your battery I would recommend getting one from Optima ("Red Top" or "Yellow Top").
Upgrading Your Alternator
Frequent dead batteries are a good indication that your electrical system isn't keeping up and you may need to upgrade your alternator. Doing so will give you more juice to run all of your electrical components, including your stereo system, without looking to the battery for help. The problem is your alternator is undersized for your new electrical requirements and has to look to the battery to provide the extra power, resulting in shortened battery life. Have a qualified technician verify this before investing in a larger alternator. Hopefully you can find a larger alternator from your vehicle's manufacturer that will interface with your existing system. Consult the manufacturer or the local dealer to find out about this. If not then you can look to the aftermarket manufacturers to see what is available. Check with Ohio Generator, Stinger or one of the many other manufacturers for high output models.
Factory Ground Straps and the "Big Three"
One of the most overlooked components of the vehicle's electrical system is the factory ground strap. This is the wire that connects the negative terminal of the battery to the chassis of the vehicle. All of the power in the vehicle will flow through this wire so it is a very important connection. Check the connection for corrosion and breakage near the factory ground bolt. You should even consider replacing this wire with an aftermarket wire (at least 4 gauge). Ask your installer or mechanic about making this change. You should also consider replacing/upgrading your engine ground strap and the power wire that runs from your alternator to your battery. The combination of these upgrades is often called the "Big Three".
ELECTRICAL SYSTEM'S CAPACITY FOR YOUR STEREO
How to estimate your electrical system's reserve current capacity:
Take your alternator's amp rating and multiply it by 40%. This rough figure will give you a baseline for about how much reserve capacity your car's electrical system has.
If, for instance, your alternator is rated for 90 amps, 90 amps x 40% = 36 amps left to power your sound system. A hypothetical sound system drawing 33 amps would just work with this car's electrical system (system draw = 33 amps, car's reserve = 36 amps). The car's battery would supply the reserve current necessary for the program peaks that are capable of drawing 60-70 amps.
Andy
Crutchfield Advisor
1-800-388-2911-ext 3161
Capacitors
Capacitance is typified by a parallel plate arrangement and is defined in terms of charge storage: whereCar Audio Capacitor Installation
There is often a lot of confusion on how to wire a car audio capacitor (a.k.a. power capacitor or Stiffening™ capacitor). There are two terminals on a car audio capacitor. A positive and a negative. The negative terminal is connected to ground. The positive terminal is connected "in-line" with the car audio amplifier +12 volts terminal. See the diagram below. NOTE: If you have a third smaller terminal it is probably the remote turn on for a digital display.
Note that the two terminals do not both connect to the +12 volt power wire. This will cause your amplifier's power supply to be cut off. The power capacitor acts like a small battery (power storage) so it is connected as shown in the diagram. The downside of this type of connection is you don't know if the power capacitor fails since the amplifier will continue to work with or without a working power capacitor.
Ideally the power capacitor should be as close as possible to the amplifier. Within a couple of feet is acceptable. This keeps any cable losses to a minimum. To learn more about how car audio capacitors work click here.
Here's how to wire two capacitors in a system. In the diagram both capacitors have their ground terminals wired together but you could also ground them independently. You can even fabricate or purchase "buss bars" which are solid pieces of metal that connect the capacitors both physically and electrically. These "buss bars" are generally bare metal so they can be dangerous if not installed properly. Use caution if you take this route.
NOTE OF CAUTION: Power capacitors store a large amount of energy and they charge very quickly. You must first "charge" your power capacitor before connecting it directly to +12 volts. This is done with a resistor and a voltmeter. The exact value of the resistor is not critical but I would keep it in the 500-1k ohm range. This will increase the charging time and you can use values 1/10th that if you prefer (50-100 ohms). I would recommend getting a 1 watt resistor if possible (your capacitor may have come with a resistor for charging). A lower wattage resistor will heat up too quickly. Also, do not hold the resistor with your bare hand. The current flowing through the resistor will cause the resistor to heat up and you could be burned. A good place to put the resistor is in the main power wire fuse holder (the one installed near the battery). Simply substitute the resistor for the fuse. A diagram for the capacitor charging setup is shown below. You will need to place a voltmeter across the capacitor to monitor the voltage. Once the voltmeter reads 12 volts (or close to it) you can remove the voltmeter and replace the resistor with the power fuse. Alternatively you can measure the voltage across the charging resistor. It should start around 12 volts and slowly work its way down to 0 volts. When the voltage stops changing you have charged the capacitor completely.
Another method for charging involves using an old style test light instead of a resistor. The connection is similar (alligator clip on one side, probe on the other) but you don't need a voltmeter to monitor voltage. When the bulb goes out the capacitor is charged (because the voltage across the bulb went from 12volts to 0volts).
Car Audio Power Capacitors
A car audio power capacitor is a secondary, passive (non-powered) storage device for electrical power. Sometimes simply called a cap, power cap or Stiffening Cap™. They typically come in cylindrical shapes that are three inches in diameter and about a foot long though rectangular shapes are also available for different technologies. There will be a positive and negative terminal and possibly a third remote turn on terminal that turns an LCD display on or off. Regardless of the shape or extras they come with they are designed for one thing, to store electrical power.
Why Does a Car Audio Power Capacitor Work?
A car audio power cap works by storing large amounts of electrical power which it can then deliver to power hungry components when called upon to do so. They have an advantage over typical lead acid storage batteries because they have very low internal resistance. This allows them to deliver large amounts of power (current) very quickly. Much faster than a car's charging system can deliver that same amount of current.
Car audio power amplifiers can have very large current demands. This is dependent on the music being played through the amplifier. Typically these currents are only needed in short bursts during transient peaks (bass drum note, etc.). If the amplifier tries to pull this current from the electrical system directly it may cause a drop in voltage called a sag. This sag is equivalent to a voltage drop in the system and the size of the drop depends on the resistance of the wire from the source (battery) to the amplifier.
As an example, let's say you have twenty feet of 8 gauge wire and your amplifier suddenly needs 100 amps for a bass hit. Using Ohm's Law where voltage, or in this case voltage drop, is equal to the current (100 amps) times the resistance. Using a power wire resistance table we can see that 8 gauge wire has a resistance of 0.000739 ohms per foot. Multiple that by the twenty foot length of wire we have to get a total resistance of .01478 ohms. That doesn't seem like much but relative to the voltage of a vehicle's electrical system it is. Here's the math using Ohm's Law:
E = I x R or voltage = current multiplied by resistance
E = 100 amps x .01478 ohms
E = 1.478 volts
So 100 amps running through a twenty foot long run of 8 gauge wire causes the voltage at the amplifier to drop about 1.5 volts. And if your vehicle's system is charging at 14 volts (13.5-14.5 is the average range) the voltage at your amplifier will be 12.5 volts. This also shows why you need to know the current draw and wire length in your system. If your amplifier(s) are capable of large current draws on a continuous basis you need to have large power wire to keep this voltage drop minimized.
So what does that have to do with a car audio power capacitor? Two things. First, a power capacitor is placed much closer to the amplifiers than the battery is so that voltage drop is going to be much less all other things being equal. But second, your charging system probably isn't designed to provide current draws that large at any time. So your amplifiers are going to have to get the power from the vehicle's battery as well as the alternator. And the battery has its own internal resistance which, as stated before, is much higher than that of a car audio power capacitor. Because of this extra internal resistance it is not an effective means of delivering large amounts of instantaneous current. The capacitor acts like a small tank with a large hose while a battery acts like a large tank with a small hose. So with a capacitor installed you can deliver a large current burst during a music transient and then the capacitor can recharge during the non-peak portions of the music.
See the diagram below which illustrates the capacitor as a water tank. The water represents the electrical energy that a capacitor stores. The tank has a slow moving input line which comes from the battery. The tank also has a large output line which goes to the amplifiers. This large output line let's the tank drain quickly. But if the amplifiers try to pull too much out the tank will empty and you will have to wait until the slow input line from the battery refills it. To avoid this you need to make sure your tank is big enough for your amplifiers. This capacity or "tank size" is measured in Farads.
Will a Power Capacitor Help You?
I don't know, it depends. How's that for an answer? The degree of help a power capacitor will give you depends on your specific vehicle, car audio amplifier(s) current draw, music type and listening habits.
- If the electrical system has a lot of additional reserve capacity (large alternator and battery) then you will benefit less then one that has a marginally acceptable charging system.
- If you have large amplifiers with large current draw capability then you are more likely to need a car audio power capacitor. Smaller systems may not benefit at all or at least not enough to justify the cost.
- If you listen to AM talk radio then you probably aren't going to have large transient peaks in your program material. But if you listen to bass heavy music then you are more likely to benefit from a power cap. This is especially true of classical music which has very large peaks and dynamic range.
- You can have the biggest amps in the world but if you don't crank it up then you're not going to ever reach the large current draws those amps can require. Of course I don't really know anyone who buys big amps to let them idle. So if your system is being asked to reach loud volume levels a power capacitor can be a good supplement.
The first way most people know if their system is in trouble is headlights dimming. To most car audio enthusiasts with a passing knowledge of electrical systems this means a capacitor is needed. Headlights dimming? Get a cap. And that's a pretty good guess but not always true and certainly not a guaranteed cure. A power capacitor can only do so much. If your electrical system only has a scrape it's a good band-aid but if it's really bleeding you need stitches. And stitches come in the form of an upgraded alternator and battery. If the headlight dimming only occurs at idle then it probably isn't much to worry about and a power capacitor may help. An idling vehicle puts out much less current from the alternator while the current draw from the audio system remains the same.
What Size Car Audio Power Capacitor Do You Need?
Since the beginning of car audio power capacitor time (late 1980's) the accepted rule has been one Farad of capacitance per 1,000 watts of power with a minimum of one Farad (that last part is often forgotten). This value was determined experimentally by Richard Clark (of Autosound 2000 and Buick Grand National fame). More isn't necessarily better but it doesn't hurt either.
So Do You Need One or Not?
If your system doesn't exhibit any problems such as dimming headlights then it probably isn't worth the added expense. I've done vehicles that benefited tremendously from caps and others that appeared to have not benefit at all. As always the only way to find out is to try it. Though every car audio shop is different it's unlikely that they will let you test drive a power capacitor. An easier way may be to borrow one from a friend that may already have one installed. Just remember to observe the same safety rules for uninstalling and installing a capacitor as you would for a battery (disconnect the negative terminal of the battery, remove the main power wire fuse, etc.). If installing the power capacitor doesn't help with dimming headlights then you either have a faulty charging system or an inadequate charging system. A qualified mechanic can tell you if the electrical system is not charging correctly. Be sure they check the grounds for the battery, engine block and the power wire from the alternator to the battery (the "Big Three").
In some cases you can determine for yourself if the factory charging system is adequate even under ideal conditions. Find the output rating (amps) of your alternator and figure about 30% of that may be available for your audio system. Remember that an alternator's output is not constant and the rated output will not be available when idling. The faster the alternator spins the more current it puts out. If you use an underdrive pulley on your engine then the alternator will put out less than its rated current. Now determine the current draw of your audio system under the conditions you will use it. The amplifier(s) manufacturer should provide this in the owner's manual or by request through telephone or email. If you crank it to the max then use the maximum current draw. Otherwise you'll probably want to use the "typical" or "with music" rating. If your alternator is rated at 80 amps then you probably have 24 amps available under ideal conditions. More when current drawing devices like lights and fans are off. This means your typical current draw needs to be less than 24 amps. Anything more than that are you'll be pulling the additional current from a storage device (battery and/or capacitor). Depending on the degree of additional current you need this can cause the dimming headlights syndrome. Small overages can often be helped with a capacitor while large overages need the upgraded alternator and battery.
Car Audio Electrical Basics
Car Electrical System
A vehicle's electrical consists of many parts but the ones we're interested in are the battery, the alternator, and the power wiring. A vehicle electrical system is a 12 volt DC system. The primary source of power when the vehicle is NOT running is the battery. The primary source of power when the vehicle IS running is the alternator. This is a very important point to remember. The primary functions of the battery are to start the vehicle and provide power when the vehicle is not running. Because the battery's stored power is so great it is important to treat it with respect. It's the automotive equivalent of a loaded gun. It has the power to stop your heart and can burn your vehicle up if an unfused power wire is shorted to ground. Always remember to disconnect the negative battery cable before doing any work on a stereo system. NOTE: If your radio has a security feature that requires a secret code to be input after power has been disconnected make sure you know this code before you begin (ie Delco-Loc, Eclipse ESN).
Depending on your vehicle's factory electrical system, you may not have enough power to run your aftermarket stereo system. You probably do unless you have a multi-megawatt system or an extremely tiny alternator. If your battery goes dead often after the installation of your new stereo you may have an electrical system problem. Have your battery and electrical system tested by a qualified technician. If everything checks out then you probably are in need of an upgrade. Here are some of the common problems and their likely cures.
Adding a Second Battery
Many people are under the impression that adding a second battery will cure their electrical problems. If one battery is good then two must be better. Wrong. Remember that the function of a battery is to start the vehicle and to provide power when the vehicle is not running. The only thing a second battery will help you with is "parking lot" listening time. Basically it will provide you the additional capacity to run your stereo longer without starting the vehicle. After the vehicle is started the second battery becomes another load on an already overworked alternator. If you do replace your battery I would recommend getting one from Optima ("Red Top" or "Yellow Top").
Upgrading Your Alternator
Frequent dead batteries are a good indication that your electrical system isn't keeping up and you may need to upgrade your alternator. Doing so will give you more juice to run all of your electrical components, including your stereo system, without looking to the battery for help. The problem is your alternator is undersized for your new electrical requirements and has to look to the battery to provide the extra power, resulting in shortened battery life. Have a qualified technician verify this before investing in a larger alternator. Hopefully you can find a larger alternator from your vehicle's manufacturer that will interface with your existing system. Consult the manufacturer or the local dealer to find out about this. If not then you can look to the aftermarket manufacturers to see what is available. Check with Ohio Generator, Stinger or one of the many other manufacturers for high output models.
Factory Ground Straps and the "Big Three"
One of the most overlooked components of the vehicle's electrical system is the factory ground strap. This is the wire that connects the negative terminal of the battery to the chassis of the vehicle. All of the power in the vehicle will flow through this wire so it is a very important connection. Check the connection for corrosion and breakage near the factory ground bolt. You should even consider replacing this wire with an aftermarket wire (at least 4 gauge). Ask your installer or mechanic about making this change. You should also consider replacing/upgrading your engine ground strap and the power wire that runs from your alternator to your battery. The combination of these upgrades is often called the "Big Three".
ELECTRICAL SYSTEM'S CAPACITY FOR YOUR STEREO
How to estimate your electrical system's reserve current capacity:
Take your alternator's amp rating and multiply it by 40%. This rough figure will give you a baseline for about how much reserve capacity your car's electrical system has.
If, for instance, your alternator is rated for 90 amps, 90 amps x 40% = 36 amps left to power your sound system. A hypothetical sound system drawing 33 amps would just work with this car's electrical system (system draw = 33 amps, car's reserve = 36 amps). The car's battery would supply the reserve current necessary for the program peaks that are capable of drawing 60-70 amps.
Andy
Crutchfield Advisor
1-800-388-2911-ext 3161
Last edited by Perrenoud Fit; 09-14-2014 at 08:20 PM.
#267
09-12-2014, 07:04 PM
Join Date: Dec 2008
Location: Chesapeake, VA. -USA
Posts: 4,429
We need more power! Scotty
If your needing more storage power here is a good read:
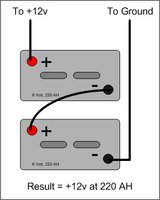
You need to hook those batteries correctly or you will end up with 24 volt on a 12 volt system and that's not good for 12 volt wiring and you will be sorry. The following is how you will need to do it, If you are going to buy new 12 Volt or 6 Volt batteries for your car as your probably trying to power a monster stereo and this is how you'd want to do it for a RV also, it is important to know how to wire them properly so that you do not damage your cars electrical system. Although this is an easy concept to understand, many people tend to get this wrong. Basically, there are two ways to wire your batteries: in series or in parallel. In RVs where 6 Volt batteries are used, you may need to use a combination of both these methods to get 12 Volt output and increase the amount of total Amp Hours simultaneously. And as usual I don't do one liners so you might just want to cut and paste this and save it, so I'll provide some examples also, ok With batteries wired in series, the Voltage increases but the Amperage remains the same. Example: If you[ take two 6 Volt batteries] that have a capacity rating of 220 Amp Hours each and you wire them in series, you will get a total of [12 Volts] of power; however, the total Amp Hours will remain the same at a total of 220 Amp Hours. Now, here is what you need to pay special attention to, With batteries wired in series, [the positive (+) from one battery is connected to the negative (-) terminal of the other]. The remaining free positive (+) terminal and negative (-) terminal are used to connect to your RV. This is how you create 12 Volts from two 6 Volt batteries. Following is a graphic that represents two 6 Volt batteries wired in series.
9 out of 9 people think this is helpful.
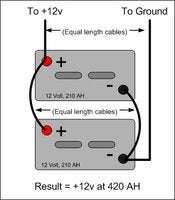
OK, so that was two 6 volt batteries at 220 amp hours, now if you did the same with two 12 volt batteries you would have 24 volt in your car, and believe me, that's not good!! With batteries wired in parallel, the Voltage remains the same but the amperage increases. Example: If you take [ two 12 Volt batteries that have a capacity of 210 Amp Hours each] and you wire them in parallel, the Voltage will remain the same at 12 Volts; however, [ the total Amp Hours will increase to 420 Amp Hours]. And assuming and I'll bet your thinking stereo since it's a Dodge Neon, right??? OK, booming and you'll want it to last awhile while parked with your girl or well maybe other...LOL Need to be politically correct these days.With batteries wired in parallel, the positive terminal connects to the positive terminal of the next battery and the negative terminal connects to the negative terminal of the next battery. This is how you increase the total amount of Amp Hours you can get out of your battery bank, the following is a graphic that represents two 12 Volt batteries wired in parallel. So here's a pic of it,
8 out of 8 people think this is helpful.
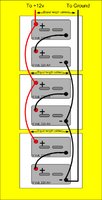
This is about as big as you would want to go in your Saturn, any bigger which is possible and I have done it using just 6 volt batteries and placed like in the trunk, under rear seat, really not a good idea and just about every where I could find a space, wanted POWER. But with more power over the 12 volt parallel, like running 24 volt now you have to remember the wire from the batteries and size and what's there now is for 12 volt and if you try to run 24 volt, well just don't. So, what the heck, what if, suppose you do want to go crazy and have mass amp hours, Now if I want to ensure that I have more total Amp Hours for all my toys, all I have to do is take several of these 6 Volt battery combinations (that are wired in series to give me 12 Volts) and wire them in parallel. In this scenario we can take six � 6 Volt batteries and wired them in series and parallel to give us [12 Volts and 660 Amp Hours of battery capacity]. How did we end up with 660 Amp hours? Remember that each 6 Volt pair of batteries wired in series gives us 220 Amp hours. We have now wired the three pairs of batteries in parallel and when batteries are wired in parallel, the amperage increases. So since each pair produces 220 Amp Hours x 3 pairs = 660 Amp Hours total. Take a look at the diagram below and look closely as you don't want to screw up, but you probably won't be doing this but if someone else is reading this and has like an RV or 5th wheel, well this is what you want, for sure.
6 out of 6 people think this is helpful. You think this is helpful.
You need to hook those batteries correctly or you will end up with 24 volt on a 12 volt system and that's not good for 12 volt wiring and you will be sorry. The following is how you will need to do it, If you are going to buy new 12 Volt or 6 Volt batteries for your car as your probably trying to power a monster stereo and this is how you'd want to do it for a RV also, it is important to know how to wire them properly so that you do not damage your cars electrical system. Although this is an easy concept to understand, many people tend to get this wrong. Basically, there are two ways to wire your batteries: in series or in parallel. In RVs where 6 Volt batteries are used, you may need to use a combination of both these methods to get 12 Volt output and increase the amount of total Amp Hours simultaneously. And as usual I don't do one liners so you might just want to cut and paste this and save it, so I'll provide some examples also, ok With batteries wired in series, the Voltage increases but the Amperage remains the same. Example: If you[ take two 6 Volt batteries] that have a capacity rating of 220 Amp Hours each and you wire them in series, you will get a total of [12 Volts] of power; however, the total Amp Hours will remain the same at a total of 220 Amp Hours. Now, here is what you need to pay special attention to, With batteries wired in series, [the positive (+) from one battery is connected to the negative (-) terminal of the other]. The remaining free positive (+) terminal and negative (-) terminal are used to connect to your RV. This is how you create 12 Volts from two 6 Volt batteries. Following is a graphic that represents two 6 Volt batteries wired in series.

9 out of 9 people think this is helpful.
OK, so that was two 6 volt batteries at 220 amp hours, now if you did the same with two 12 volt batteries you would have 24 volt in your car, and believe me, that's not good!! With batteries wired in parallel, the Voltage remains the same but the amperage increases. Example: If you take [ two 12 Volt batteries that have a capacity of 210 Amp Hours each] and you wire them in parallel, the Voltage will remain the same at 12 Volts; however, [ the total Amp Hours will increase to 420 Amp Hours]. And assuming and I'll bet your thinking stereo since it's a Dodge Neon, right??? OK, booming and you'll want it to last awhile while parked with your girl or well maybe other...LOL Need to be politically correct these days.With batteries wired in parallel, the positive terminal connects to the positive terminal of the next battery and the negative terminal connects to the negative terminal of the next battery. This is how you increase the total amount of Amp Hours you can get out of your battery bank, the following is a graphic that represents two 12 Volt batteries wired in parallel. So here's a pic of it,

8 out of 8 people think this is helpful.
This is about as big as you would want to go in your Saturn, any bigger which is possible and I have done it using just 6 volt batteries and placed like in the trunk, under rear seat, really not a good idea and just about every where I could find a space, wanted POWER. But with more power over the 12 volt parallel, like running 24 volt now you have to remember the wire from the batteries and size and what's there now is for 12 volt and if you try to run 24 volt, well just don't. So, what the heck, what if, suppose you do want to go crazy and have mass amp hours, Now if I want to ensure that I have more total Amp Hours for all my toys, all I have to do is take several of these 6 Volt battery combinations (that are wired in series to give me 12 Volts) and wire them in parallel. In this scenario we can take six � 6 Volt batteries and wired them in series and parallel to give us [12 Volts and 660 Amp Hours of battery capacity]. How did we end up with 660 Amp hours? Remember that each 6 Volt pair of batteries wired in series gives us 220 Amp hours. We have now wired the three pairs of batteries in parallel and when batteries are wired in parallel, the amperage increases. So since each pair produces 220 Amp Hours x 3 pairs = 660 Amp Hours total. Take a look at the diagram below and look closely as you don't want to screw up, but you probably won't be doing this but if someone else is reading this and has like an RV or 5th wheel, well this is what you want, for sure.
6 out of 6 people think this is helpful. You think this is helpful.
Last edited by Perrenoud Fit; 09-12-2014 at 07:13 PM.
#268
09-14-2014, 08:22 PM
Join Date: Dec 2008
Location: Chesapeake, VA. -USA
Posts: 4,429
Another thing to not on this topic is that you can’t really add too much capacitance to your system, so it’s safe to overshoot the guidelines. If you wanted to add three 1 farad capacitors to a 1000 watt system, it wouldn’t be a problem. I definitely recommend installing a capacitor with your mono amplifier.
For your multi-amp setup, you'll need to determine the current demand of your system. Then you'll need to match it against your alternator's reserve capacity. Here's how:
To do that, you must determine the approximate current draw (in amperes) of your amplifier (or amplifiers). First, calculate the total power of each amp (multiply the number of channels by the number of RMS watts per channel). If you have multiple amps, add up the total power figures to arrive at a grand total. Second, double your grand total power figure. And, finally, divide by 13.8 - the result is your system's approximate current draw in amperes.
Some cars' systems are designed for additional current loads (trailer towing packages, for example), but most of them are not. Luckily, most manufacturers design their cars' electrical systems with a reserve capacity that is well-suited to supplying power for a sound system. Look at the tag that is riveted or screwed to the side of the alternator. This tag tells you how much current (expressed in amperes or amps, for short) the alternator is capable of producing.
Most alternators are capable of producing 55-65 amps. This is adequate for sound systems packing up to 350 watts RMS. Most German automobiles have charging systems rated up to about 90 amps. This will be sufficient for systems of up to about 500 watts. Some Hondas, on the other hand, have alternators only rated for 35 amps. This will only support about 125 watts in amplifier power.
If you want more power than your alternator can service, you will have to consider having your alternator rebuilt for higher output. Or you can invest in a high-output aftermarket alternator. Sorry, we can't help you with this. Installing a second battery won't help. The only reason to do that is to play your stereo for long periods with the engine off. How you use your system can make a big difference in current draw.
(Seems the 2008 Fit has an 80 amp alt. so a 400-450 amp RMS is about all the 1st Generation Fits will handle. The 1999 B16 has a 70-75 amp alt. and Lil Red has Zenon Carbon 1300.1 x2 and 460.4 x2 and the alt has been upgraded)
.
Last edited by Perrenoud Fit; 09-18-2014 at 10:47 PM.
#269
09-18-2014, 10:54 PM
Join Date: Dec 2008
Location: Chesapeake, VA. -USA
Posts: 4,429
Getting the Millennium 6 farad capacitor by Pyle. With this the electrical system should be good to go.
https://www.fitfreak.net/forums/pict...pictureid=9350
Good golly this thing is huge! and weighs 10#s. Taking it to work tomorrow to Mr. Haney, and I'll watch him charge and dis-charge this lil monster ( I'll give a step by step ). He even asked what I had in a car that would use 6 farads!! (He he he) :) This is the kinda stuff that just makes me happy.
Well the bass should really rock the car with this installed. The 2 wet cell battery system is okay for now but I will change over to dry cell or even super capacitors in series>

Here check this guy out
https://www.fitfreak.net/forums/pict...pictureid=9350
Good golly this thing is huge! and weighs 10#s. Taking it to work tomorrow to Mr. Haney, and I'll watch him charge and dis-charge this lil monster ( I'll give a step by step ). He even asked what I had in a car that would use 6 farads!! (He he he) :) This is the kinda stuff that just makes me happy.
Well the bass should really rock the car with this installed. The 2 wet cell battery system is okay for now but I will change over to dry cell or even super capacitors in series>
Here check this guy out
Last edited by Perrenoud Fit; 09-25-2014 at 11:28 PM.
#270
09-25-2014, 11:24 PM
Join Date: Dec 2008
Location: Chesapeake, VA. -USA
Posts: 4,429
#271
09-26-2014, 09:51 PM
Join Date: Dec 2008
Location: Chesapeake, VA. -USA
Posts: 4,429
Big Bang Theory
The cap. tested good! and now I'm creating an anchoring system for the heavy rascal to keep it bolted firmly to the floor under the amps. This will make it the shortest length for the power loss.
The last bits came in for the under car light show. Now it's just make the 22' of metal brackets, wire 'em up, and power; and down the road we go!
The last bits came in for the under car light show. Now it's just make the 22' of metal brackets, wire 'em up, and power; and down the road we go!
Last edited by Perrenoud Fit; 09-26-2014 at 09:59 PM.
#272
09-28-2014, 12:03 AM
Join Date: Dec 2008
Location: Chesapeake, VA. -USA
Posts: 4,429
https://www.fitfreak.net/forums/pict...pictureid=9350
Well under the amps and hidden away didn't happen exactly. It's behind the PS front seat which it'll be outa sight when the seat is pushed back & I now have a volt meter inside the car. But holy cow it's great, yah the bass is harder hitting and No clipping at all. When I pushed it just wavered .1 amp! and it was too loud even for a ol' deaf man. ;)

The bright COB lights I installed for interior lights, forget ubout it, too hot! This was the first time they stayed on for 30 min continuously and they're really bright and really hot. Driving lights only keep them outside with out anything close to the yellow center. FYI
Well under the amps and hidden away didn't happen exactly. It's behind the PS front seat which it'll be outa sight when the seat is pushed back & I now have a volt meter inside the car. But holy cow it's great, yah the bass is harder hitting and No clipping at all. When I pushed it just wavered .1 amp! and it was too loud even for a ol' deaf man. ;)
The bright COB lights I installed for interior lights, forget ubout it, too hot! This was the first time they stayed on for 30 min continuously and they're really bright and really hot. Driving lights only keep them outside with out anything close to the yellow center. FYI
Last edited by Perrenoud Fit; 09-28-2014 at 12:15 AM.
#273
09-28-2014, 05:07 PM
Join Date: Dec 2008
Location: Chesapeake, VA. -USA
Posts: 4,429
Leah my daughter's friend helped with laying out the under car lighting brackets. All of this is bits off eBay or just home spun ingenuity. But there is no way I'm spending the $ the kits cost. And this will do more patterns and colors. I'll post a video on you tube when it's done.

Last edited by Perrenoud Fit; 09-30-2014 at 06:10 PM.
#274
09-30-2014, 06:19 PM
Join Date: Dec 2008
Location: Chesapeake, VA. -USA
Posts: 4,429
started painting the L brackets tonight flat black so they are unnoticeable under the car. another project with little steps.


#276
10-26-2014, 10:08 AM
Join Date: Dec 2008
Location: Chesapeake, VA. -USA
Posts: 4,429

#277
11-01-2014, 09:44 PM
Join Date: Dec 2008
Location: Chesapeake, VA. -USA
Posts: 4,429
under car lighting
Me and Hailie worked on installing and wiring up the under car lighting in the rear, and they are so SICK! I highly recommend the eBay lighting they are bright and have lots of functions. Strobe, smooth, hi, low speeds, 8 colors.....
11/8/14
Hailie and I were back at it again tonight. The passenger's side is done :)
11/8/14
Hailie and I were back at it again tonight. The passenger's side is done :)
Last edited by Perrenoud Fit; 11-08-2014 at 10:08 PM.
#279
11-08-2014, 10:14 PM
Join Date: Dec 2008
Location: Chesapeake, VA. -USA
Posts: 4,429
Stated low miles and original paint. The civic was kept in garage and was his fun ride. But....
The min. was too hi for the age of the car for me to pay LOL.
The min. was too hi for the age of the car for me to pay LOL.
#280
11-08-2014, 10:18 PM
Join Date: Dec 2008
Location: Chesapeake, VA. -USA
Posts: 4,429
Me and Hailie where picking up groceries and just for giggles I stopped by a house in the neighborhood that has a Black NSX in the drive and has not been driven for some time. Talked the owner's wife and found out I may be able to swing it by spring if I sell my Charger.

Last edited by Perrenoud Fit; 11-08-2014 at 10:23 PM.