DIY A/T fluid and filter, with pics
#41
 07-09-2011, 12:39 PM


Thanks for the reply, rocksnap ...
I found the fill bolt easily as described. On our car it has a blue tint and the letters ATF embossed! Socket size is 17mm.
It would be great if you could post an image of the back of the radiator showing the hoses, the hose to detach, and where to detach.
Thanks again.
I found the fill bolt easily as described. On our car it has a blue tint and the letters ATF embossed! Socket size is 17mm.
It would be great if you could post an image of the back of the radiator showing the hoses, the hose to detach, and where to detach.
Thanks again.
#42
07-23-2011, 09:25 PM


Ha,...guess I should've fully read through the thread before today. I had my front tires up on rhino ramps and the stuff rushed out the moment that bolt was off.
Had to be at least 3 quarts when I add the mess that spilled on my arms and the ground with the 2.7 quarts I had measured in the container.
I am unsure so I'll carry a 4th quart and check with the dipstick while hot like people here mention.
#43
07-23-2011, 09:29 PM
p.s.,...I did not remove the intake, nor the battery. I bought a slim 97 cent funnel from Walmart and extended the funnel 4 more inches with a bank pen I cut up. It was curvy and could not fall through,...otherwise you'd probably want to superglue it or use something else.

It gave me solid access to the dipstick hole and the rest is history.
It gave me solid access to the dipstick hole and the rest is history.
Last edited by RomeoJunior; 07-23-2011 at 10:39 PM.
#44
04-29-2012, 12:00 AM

I just flushed my transmission with 50K miles, drained the pan, and hooked up a transparent 3/8 tube to coolant return line to flush it. Bolt looked very clean with no slime or gunk. Mine is a GE8 2009 so I believe it already have DW-1 synthetic from factory, fluid still have light pink color and very runny, could have lasted another 50K. I bought the filter but did not change it after saw the fluid condidtions and wait until 100K when flush it again.
I must say flushing is a waste of time since there were very little amount came out from torque converter and cooler. Next time I will drain and replace filter per Honda suggestion.
I must say flushing is a waste of time since there were very little amount came out from torque converter and cooler. Next time I will drain and replace filter per Honda suggestion.
Last edited by PhitAzz; 04-29-2012 at 12:05 AM.
#45
03-25-2013, 04:31 PM

Thanks!
Thanks so much kyleb and rocksnap! I changed the filter and "flushed" the tranny in about an hour and a half. 
#46
03-25-2013, 11:26 PM

tranny
So I did it my way. I ran 2 1/2 CASES of tranny fluid thru it, 3 quarts at a time... It was pretty good looking after 2 cases. I drove it about 30 miles then did my fluid swap procedure running ANOTHER 9 quarts thru it. That was 13,000 miles ago... Beats $4000 for a new tranny plus labor!

#48
10-07-2013, 10:25 AM

lordco lists a different filter, i was checking there to see what it looked like and make sure this matched my car and they show a different looking filter for my vehicle
http://images.wrenchead.com/smartpag...A0440343-1.jpg
thats the filter it lists
http://images.wrenchead.com/smartpag...A0440343-1.jpg
thats the filter it lists
Last edited by Kasek; 10-07-2013 at 11:55 AM.
#49
10-08-2013, 01:17 AM
lordco lists a different filter, i was checking there to see what it looked like and make sure this matched my car and they show a different looking filter for my vehicle
http://images.wrenchead.com/smartpag...A0440343-1.jpg
thats the filter it lists
http://images.wrenchead.com/smartpag...A0440343-1.jpg
thats the filter it lists
That looks like the internal filter in the pan.
#50
10-08-2013, 03:04 AM

Why is everyone for replacing a part, the filter, that isn't a regular service part? Maybe they engineered it for specific purpose and engineered it to not need service.
Also, why are you putting something on threads that wasn't engineered to have it? The teflon tape. It will get into the fluid. The threads are not tapered pipe threads that have a sealing affect. The seal is at the washer. The zinc plated male threads rub nicely on the aluminum female threads. There's no need for any disco here.
Also, why are you putting something on threads that wasn't engineered to have it? The teflon tape. It will get into the fluid. The threads are not tapered pipe threads that have a sealing affect. The seal is at the washer. The zinc plated male threads rub nicely on the aluminum female threads. There's no need for any disco here.
#51
10-02-2015, 09:17 PM

2008 Fit Sport Auto
I searched and couldn't find a good A/T 'drain and fill' thread so I thought I'd make one. This is something that everyone with an automatic transmission should be doing on a regular basis! Hope this helps some people out there, if this thread isn't helpful and/or is in the wrong forum, mods please feel free to delete or move as needed.
And now, on with the countdown.
Our '07 Sport had about 84,000 miles on it and was well overdue for new coolant, brake bleed, etc. It definitely needed new transmission fluid and a new filter. For those that think 'there isn't a filter!', we'll get to that in a bit
When talking to the techs at my local dealer, ALL of them stated the best thing to do was a simple drain and fill. They have had a few transmissions go south doing the 'power flush' approach apparently. This thread will show you how to do a simple drain and fill with a change of the inline transmission filter.
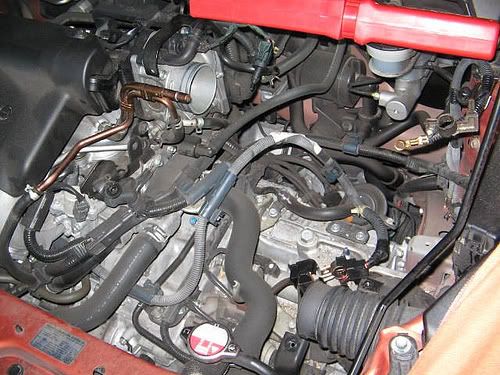
Step one, remove battery and battery tray. Your automatic transmission inline filter is located underneath the battery tray. Battery comes out first, then the plastic base, then the metal battery tray.

Battery and outer battery cover removed, plastic base still in place - this part simply lifts off of the battery tray:

Metal battery tray held in by three bolts. Two are easy to get to, one may make you curse Honda engineers. The very outside bolt is a bit tricky to reach:
Next, I found it MUCH easier to do this with the airbox out of the way. Two bolts and a couple of 'spring' type hose clamps later, airbox is out of the way. This also gives you a chance to check and clean the throttle as needed.
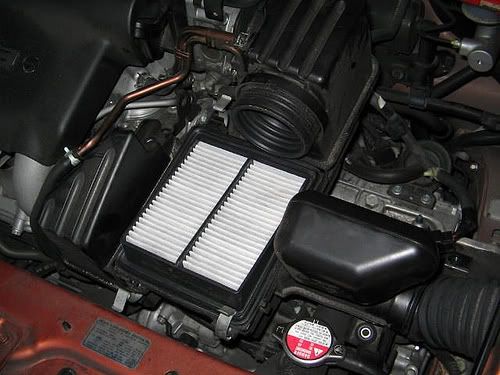
Airbox removed, ahhhh look at all that room to work with:
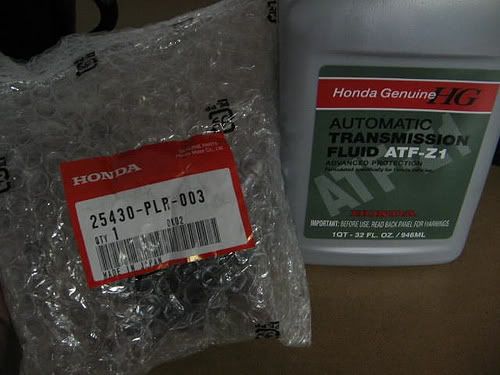
Next I changed out the transmission filter. Here is a picture showing the filter with the part number on the bag. You'll also need three quarts of this Honda ATF. Every tech said to only use the Honda fluid, and it was cheap (about $7 per quart). The filter was $21.
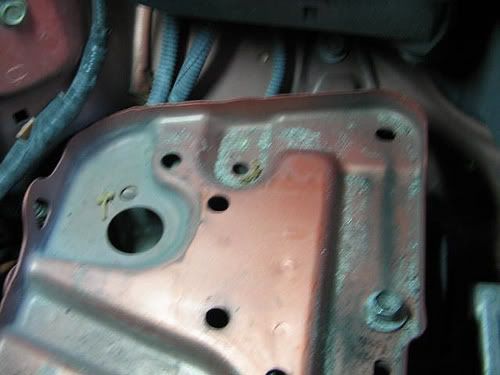
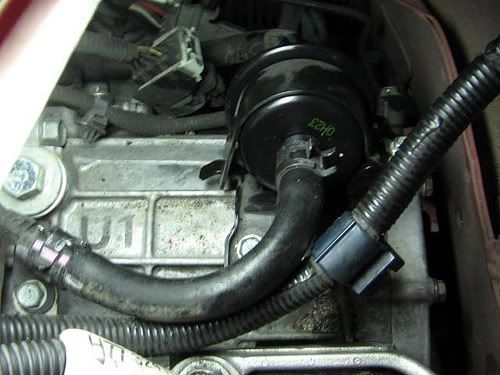
Ladies and gentlemen, allow me to introduce you to your transmission filter. The techs said the car didn't have one, the parts counter said it didn't have one. Guess what - it has one!!!!! It is held in place by a clamshell bracket - undo the 10mm bolt on one side, and the bracket lifts off. Undo the spring loaded hose clamp on either side of the filter and it's ready to be removed. If you pull on the hose it probably won't budge - give it a twist and the hose should disengage from the ends of the filter.
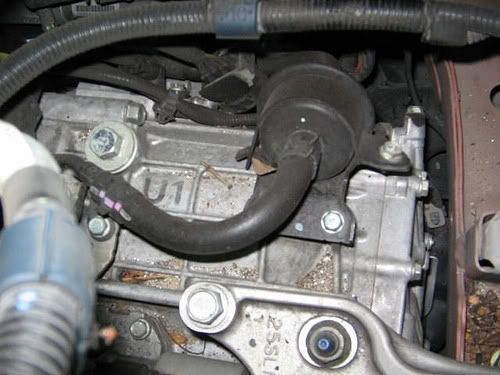
New filter in place:
Now time to drain the fluid from the transmission.
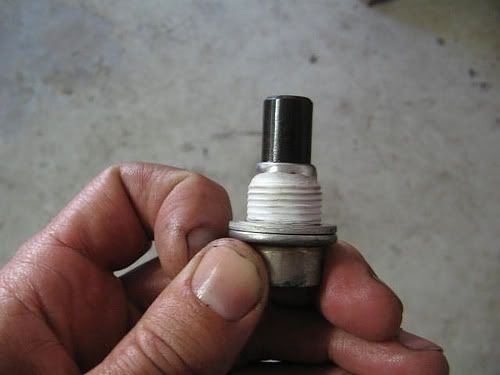
The transmission drain plug is located on the right side of the transmission casing. It is marked with a dab of blue paint, and can be loosened with a ratchet WITHOUT a socket on the end of it. Engage your ratchet directly with the drain bolt, and remove it (with a proper drain pan under the bolt!!)

While your transmission is draining, check the magnetic drain plug for debris. Small amounts of debris like this are OK - if you see small chunks of metal, your transmission may be in trouble. Everything looks good here:
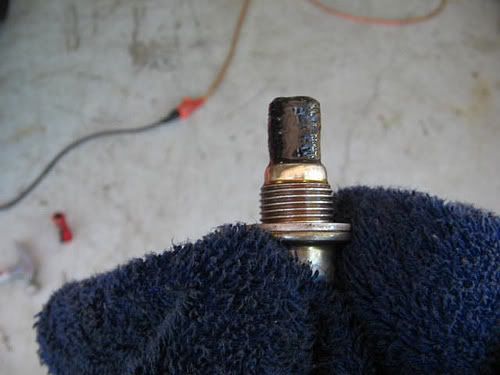
Clean the debris from the drain plug and clean the threads. I always wrap my drain plugs with a piece of teflon tape - you don't have to. Also, install a new crush washer on the drain plug (available at your dealer). This one's ready to go back in:
The next step is to fill the transmission. I removed the transmission dipstick, inserted a skinny funnel into the dipstick hole, and then placed a large funnel into the smaller funnel. The dipstick hole is waaaay down there, so this way works well:
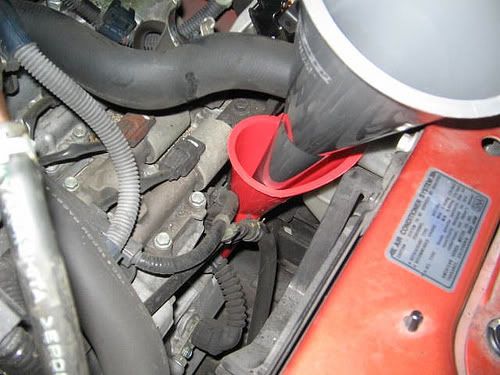
I removed 2.5 quarts of fluid, and filled it with nearly the same amount.
Reinstall the airbox, battery tray, and battery and you're nearly done. Start the car on level ground, and let the engine come completely up to temperature (radiator fan comes on at least once). Shut the car off, and within 60 to 90 seconds check your transmission fluid level - it should fall somewhere in the 'HOT' part of the dipstick. If it's a bit low, get out your funnels and top it off.
I hope this helps those out there with an automatic transmission. It's an easy job that I did in conjunction with other things. By itself, this is maybe a one hour job.
And now, on with the countdown.
Our '07 Sport had about 84,000 miles on it and was well overdue for new coolant, brake bleed, etc. It definitely needed new transmission fluid and a new filter. For those that think 'there isn't a filter!', we'll get to that in a bit
When talking to the techs at my local dealer, ALL of them stated the best thing to do was a simple drain and fill. They have had a few transmissions go south doing the 'power flush' approach apparently. This thread will show you how to do a simple drain and fill with a change of the inline transmission filter.
Step one, remove battery and battery tray. Your automatic transmission inline filter is located underneath the battery tray. Battery comes out first, then the plastic base, then the metal battery tray.
Battery and outer battery cover removed, plastic base still in place - this part simply lifts off of the battery tray:
Metal battery tray held in by three bolts. Two are easy to get to, one may make you curse Honda engineers. The very outside bolt is a bit tricky to reach:
Next, I found it MUCH easier to do this with the airbox out of the way. Two bolts and a couple of 'spring' type hose clamps later, airbox is out of the way. This also gives you a chance to check and clean the throttle as needed.
Airbox removed, ahhhh look at all that room to work with:
Next I changed out the transmission filter. Here is a picture showing the filter with the part number on the bag. You'll also need three quarts of this Honda ATF. Every tech said to only use the Honda fluid, and it was cheap (about $7 per quart). The filter was $21.
Ladies and gentlemen, allow me to introduce you to your transmission filter. The techs said the car didn't have one, the parts counter said it didn't have one. Guess what - it has one!!!!! It is held in place by a clamshell bracket - undo the 10mm bolt on one side, and the bracket lifts off. Undo the spring loaded hose clamp on either side of the filter and it's ready to be removed. If you pull on the hose it probably won't budge - give it a twist and the hose should disengage from the ends of the filter.
New filter in place:
Now time to drain the fluid from the transmission.
The transmission drain plug is located on the right side of the transmission casing. It is marked with a dab of blue paint, and can be loosened with a ratchet WITHOUT a socket on the end of it. Engage your ratchet directly with the drain bolt, and remove it (with a proper drain pan under the bolt!!)
While your transmission is draining, check the magnetic drain plug for debris. Small amounts of debris like this are OK - if you see small chunks of metal, your transmission may be in trouble. Everything looks good here:
Clean the debris from the drain plug and clean the threads. I always wrap my drain plugs with a piece of teflon tape - you don't have to. Also, install a new crush washer on the drain plug (available at your dealer). This one's ready to go back in:
The next step is to fill the transmission. I removed the transmission dipstick, inserted a skinny funnel into the dipstick hole, and then placed a large funnel into the smaller funnel. The dipstick hole is waaaay down there, so this way works well:
I removed 2.5 quarts of fluid, and filled it with nearly the same amount.
Reinstall the airbox, battery tray, and battery and you're nearly done. Start the car on level ground, and let the engine come completely up to temperature (radiator fan comes on at least once). Shut the car off, and within 60 to 90 seconds check your transmission fluid level - it should fall somewhere in the 'HOT' part of the dipstick. If it's a bit low, get out your funnels and top it off.
I hope this helps those out there with an automatic transmission. It's an easy job that I did in conjunction with other things. By itself, this is maybe a one hour job.

#55
01-08-2016, 12:11 PM

If your using teflon tape it should never reach the internal end of the threads.
it should start at the washer and cover about 1/2 the threads if your going to use it.
I've torn down too many race engines destroyed by improper use of silicone and teflon tape to ever use it on my cars any more.. Also you need to use hydrocarbon rated teflon which is yellow not white if the tape has any chance of touching oil,fuel,grease etc. The white WILL break down. Hydrocarbon rated is also listed as "gas-line" as its most common use is on natural gas fittings.
#57
11-01-2019, 11:07 AM

Started to change out the ATF filter on my 2008 Fit using the Haynes manual. It only mentioned the airbox removal. When I got it out I saw that the filter was really under the battery.
Your outline of the job and pictures was so helpful.
Thanks so much.
Your outline of the job and pictures was so helpful.
Thanks so much.

Thread
Thread Starter
Forum
Replies
Last Post