
DIY-Complete TSX Homelink install on a GE8 Sport w/ Nav

Thread Starter
|
Member

Joined: Apr 2009
Posts: 132
From: Portland, OR
DIY-Complete TSX Homelink install on a GE8 Sport w/ Nav
This is a how-to on installing the 2004-08 Acura TSX Homelink on a USDM/NA GE8 Sport w/ Navigation. Other similar units are also available from the 2005-08 Honda Odyssey EX(L), 2003-07 Honda Accord EX w/ optional Nav & Homelink as well as the less common 2006-08 Pilot EXL and 2006-08 Ridgeline RTL.
However some models and trims won�t have certain features such as door light switch, navigation�s mic or will be equipped with a different colored ambient LED (although the LED can be changed to match your interior�s lighting). To match the interior of the GE8 Fit, make sure you buy a �Grey� or �Clear Grey� colored piece since there are many different interior colors available on the donor vehicles.
Before I begin, credits must be given to dela (Base GE maplight install), mscott (GE Sport Homelink install) and indirectly Choro-Q_Fit & Orient Express (Civic Hybrid homelink install). Their threads and info have been of great help to me for my install.
Overview:
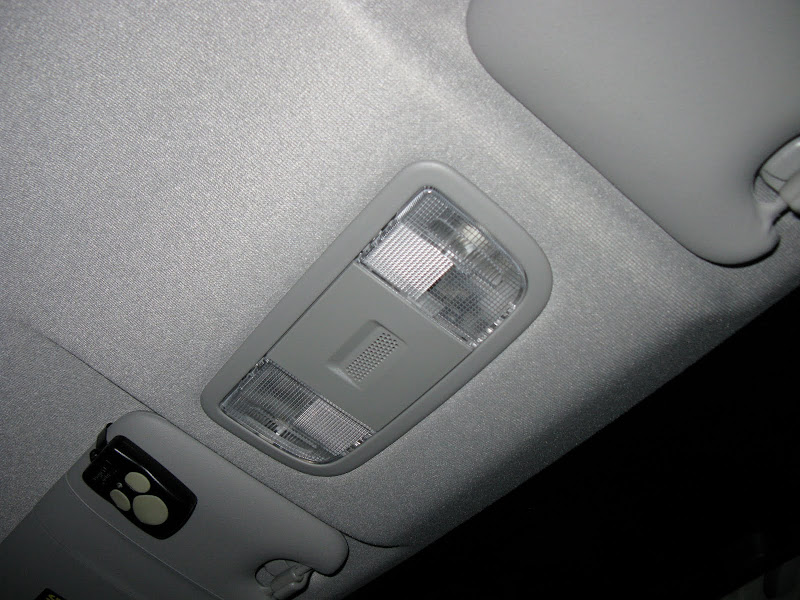
So the idea is to go from the OEM maplight,
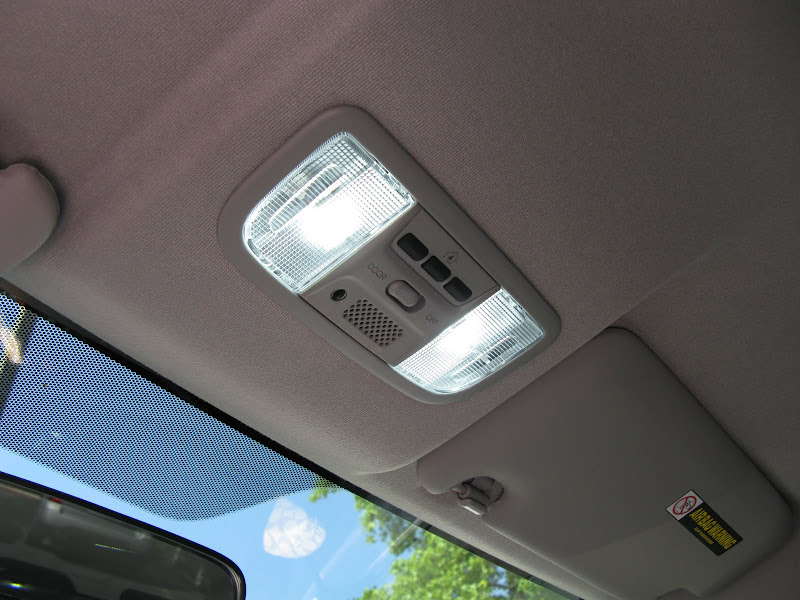
And add 1) Homelink, 2) a door-open enabled maplight, 3) and an Ambient LED while retaining the Nav�s Voice Control capability.
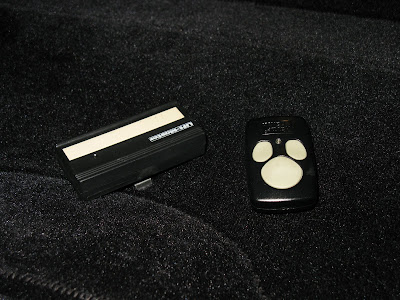
Then be able to dispose of these ugly garage door opener(s) from the vicinity of the visors.
Parts & Materials Needed:
However some models and trims won�t have certain features such as door light switch, navigation�s mic or will be equipped with a different colored ambient LED (although the LED can be changed to match your interior�s lighting). To match the interior of the GE8 Fit, make sure you buy a �Grey� or �Clear Grey� colored piece since there are many different interior colors available on the donor vehicles.
Before I begin, credits must be given to dela (Base GE maplight install), mscott (GE Sport Homelink install) and indirectly Choro-Q_Fit & Orient Express (Civic Hybrid homelink install). Their threads and info have been of great help to me for my install.
Overview:
So the idea is to go from the OEM maplight,
And add 1) Homelink, 2) a door-open enabled maplight, 3) and an Ambient LED while retaining the Nav�s Voice Control capability.
Then be able to dispose of these ugly garage door opener(s) from the vicinity of the visors.
Parts & Materials Needed:
Homelink Unit w/ connectors � buy used off of ebay (I got mine from alsautotrevose)
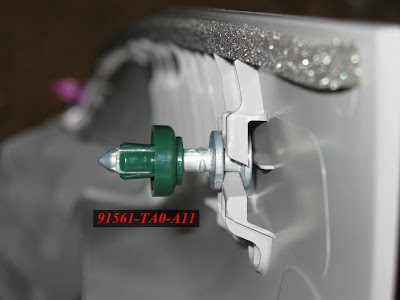
91561-TA0-A11 � Honda A-pillar clip
Wire (70� pair for ambient LED, 26� single for domelight tap, 5� for maplight power extension)
Heatshrink/Electrical tape
Tools Needed:91561-TA0-A11 � Honda A-pillar clip
Wire (70� pair for ambient LED, 26� single for domelight tap, 5� for maplight power extension)
Heatshrink/Electrical tape
Soldering Gun ~35W+
Solder
Wire stripper/cutter
Scissors
Heatgun/blowdryer for heatshrink
Trim removal tools
Ratchet
8mm
Rubber Mallet
Solder
Wire stripper/cutter
Scissors
Heatgun/blowdryer for heatshrink
Trim removal tools
Ratchet
8mm
Rubber Mallet
Thread Starter
|
Member
Joined: Apr 2009
Posts: 132
From: Portland, OR
Install & Wiring
When buying the homelink console off of ebay, it comes as a complete unit with pigtails(hopefully) & sunglass holder
, pop the sunglass holder off and discard.
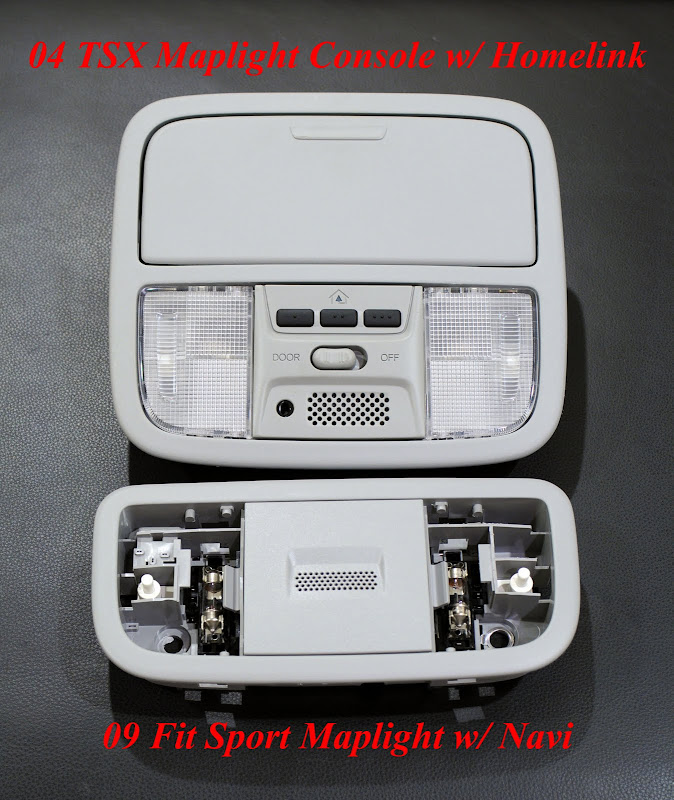
What you need out of the console is this unit on the left.
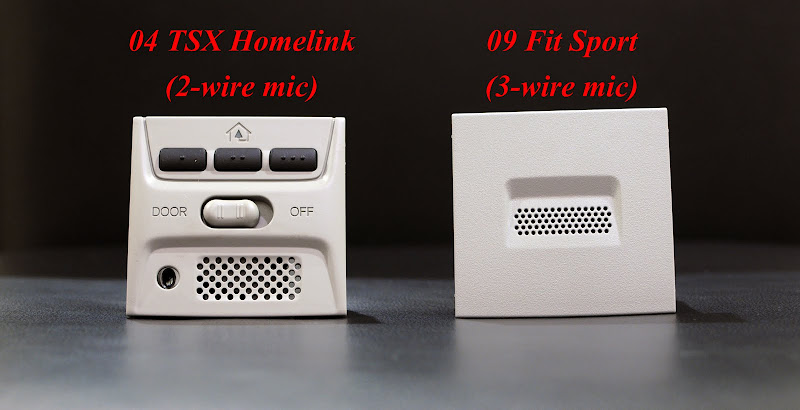
Replacing the stock Mic unit
Pop off the lens covers on the maplight in your Fit, then remove the two 8mm bolts from the maplight. Disconnect the two harnesses.

Remove the mic unit and replace with the TSX unit. This portion is the same as mscott�s thread so check there if you have problems replacing the stock Mic.
Harness Wiring
Connections that need to be made, two of which are pin transfers from the TSX maplight:

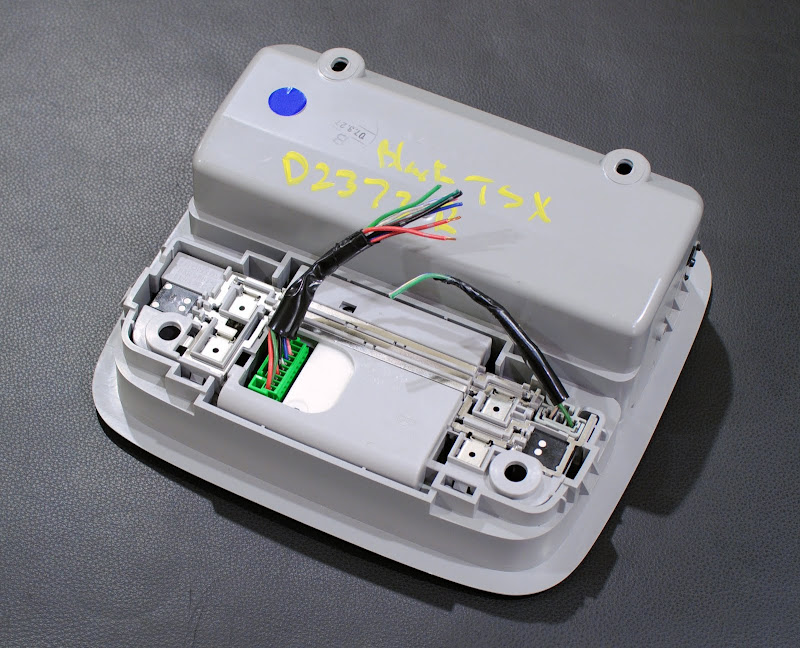
First we�ll start with the wiring connections that will be made between the Homelink and Maplight units themselves (Chassis GND & Intermediate GND). Flip over the maplight you just removed from your Fit.
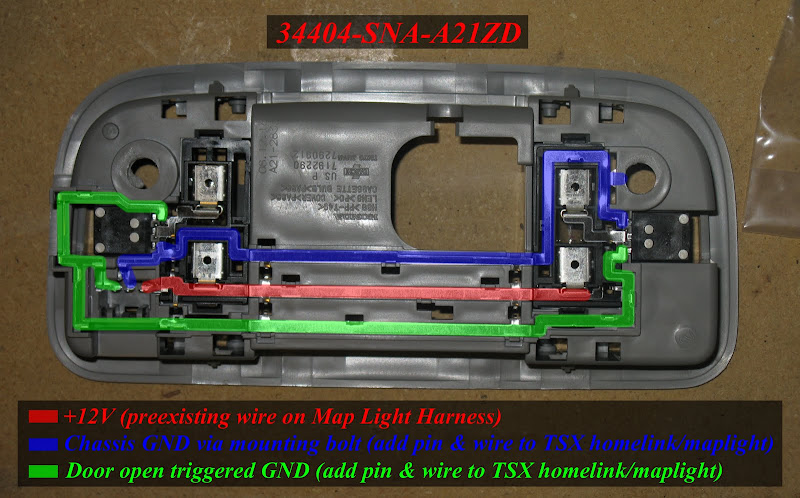
Take the Maplight connector from the TSX unit and extract the pins. We�ll be reusing these for two of the Homelink�s connections.
Plug those two pins directly on the maplight housing so that you can accurately gauge the length of wire needed to solder them together with pins 2 & 6 on the Homelink connector.
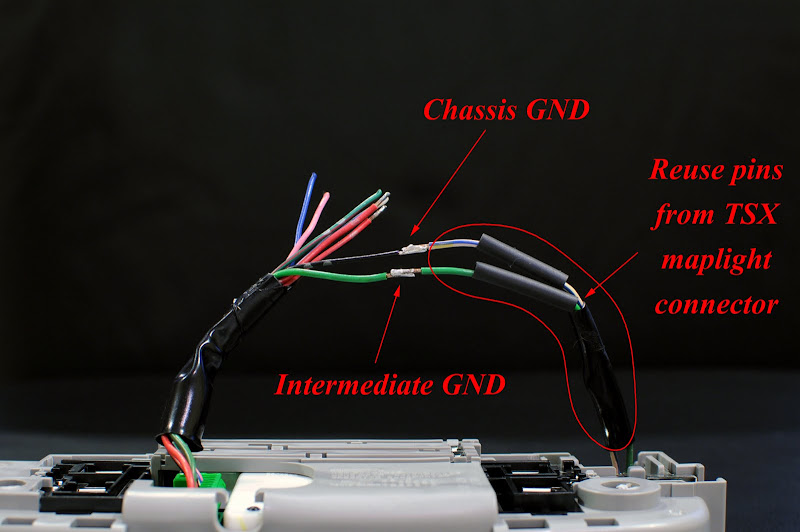
Next, solder the Ambient LED (70� pair), domelight�s Door-switched GND (26�) and 12V (5�) taps.
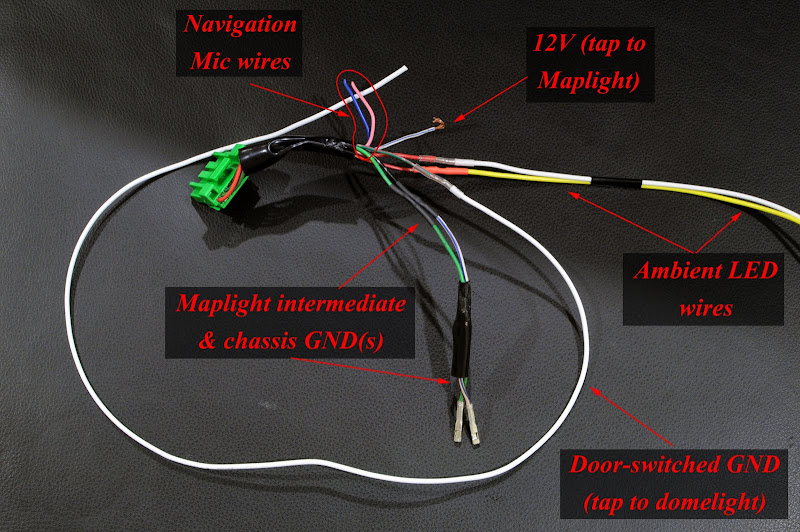
5� not shown
Now the harness is ready for wiring into the car.
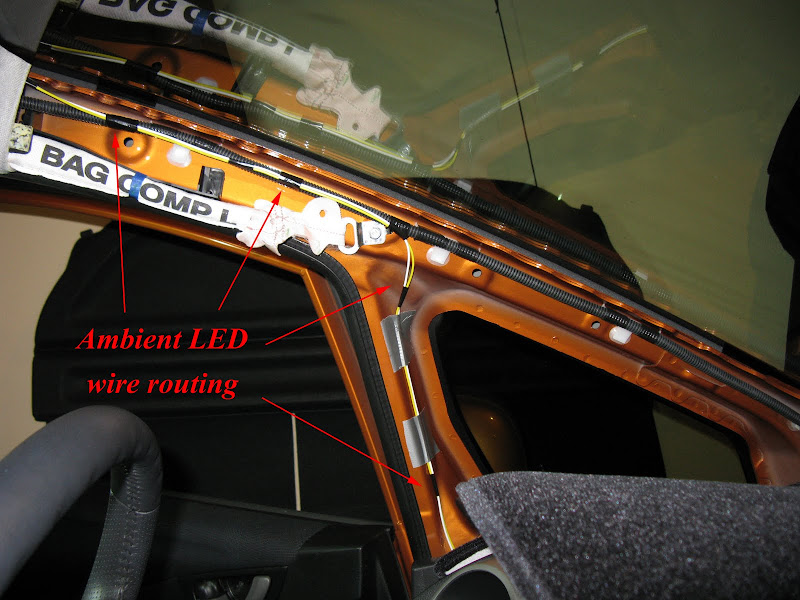
Ambient Wire Routing
Remove the driver�s side sun visor, clip and the A-pillar trim.

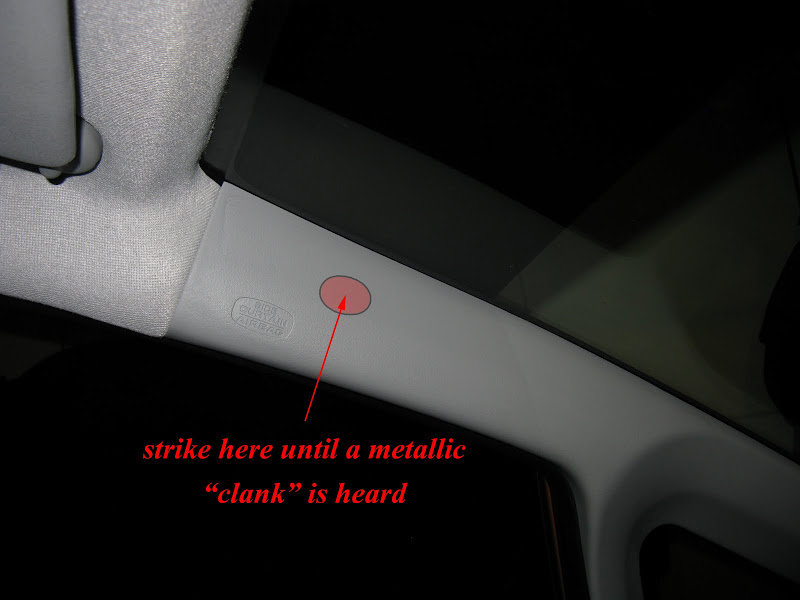

This clip will need to be replaced when reinstalling the A-pillar (it is possible to reset, but it�s quite troublesome just to save $2.50):
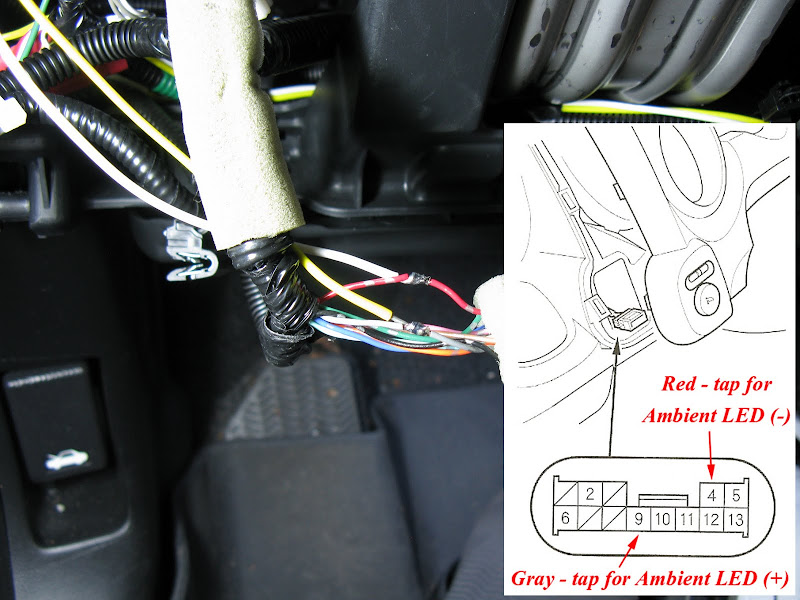
Route the Ambient LED wires through the headliner and down the A�-pillar and tap into the power mirror switch.
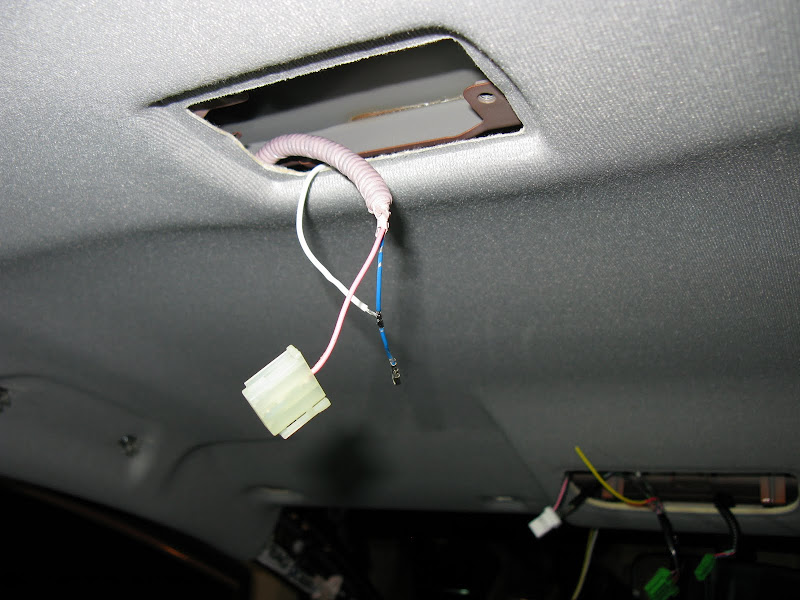
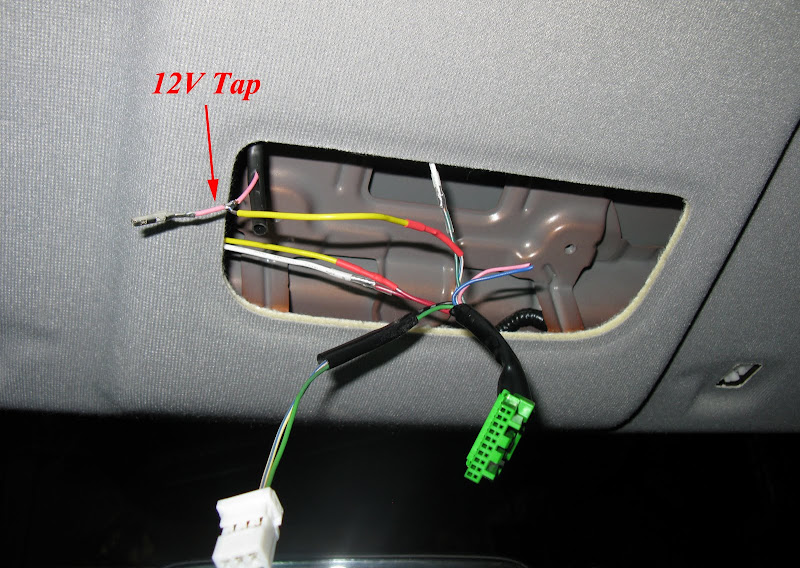
Domelight Wiring Tap
Run the 26� wire through the headliner and tap it to the domelight harness blue wire for a door open controlled GND. If you�re attempting this on a non-Sport GE8 you�ll need to tap the pink for 12V too.
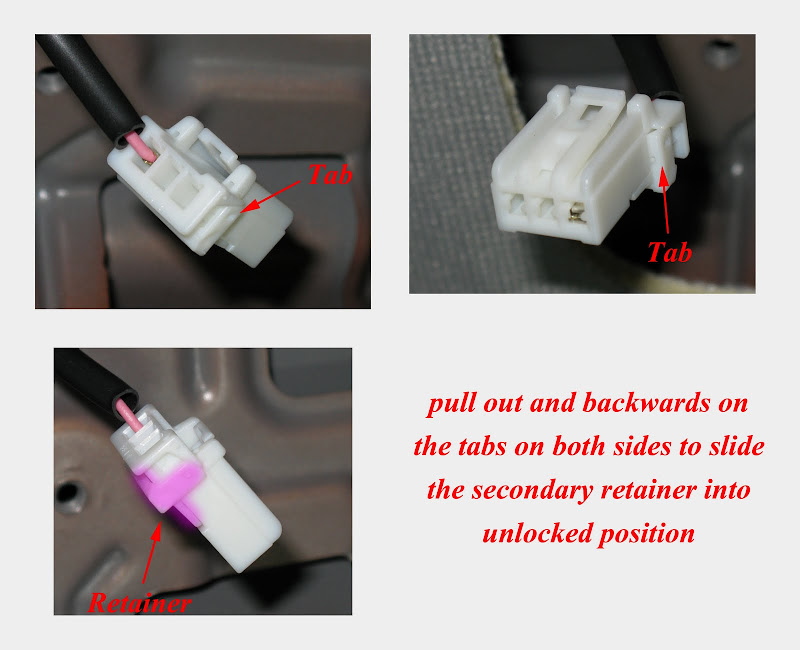
12V Wiring Tap & Maplight Connector
***WARNING - 12V pin is a live 12V, try to not blow a fuse***
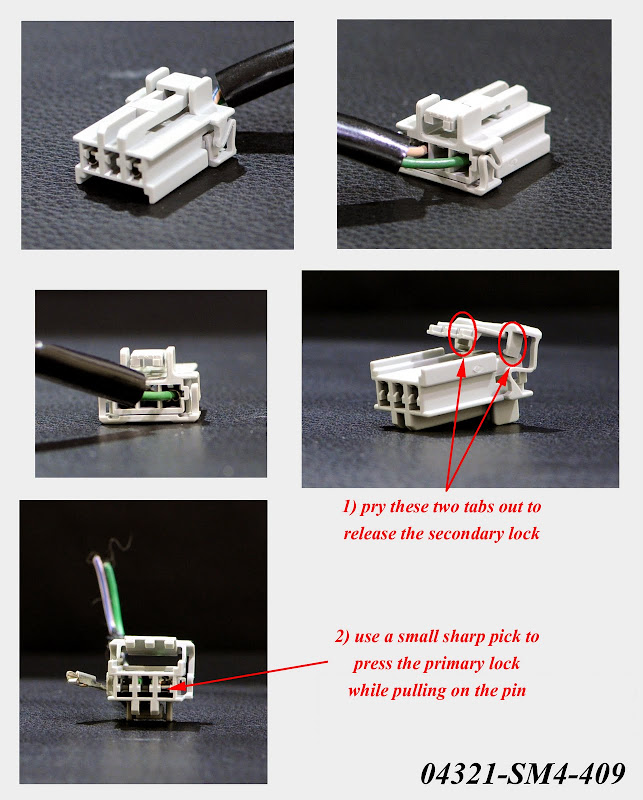
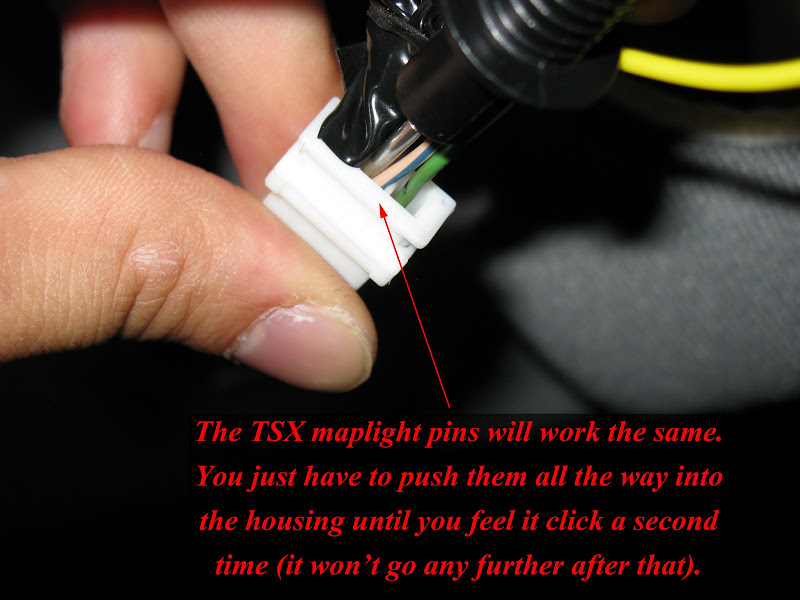
Open the pin retainer on the Maplight Connector for insertion of the two TSX pins.
If you remove the pre-existing 12V pin, you�ll notice that although the tab sizes are the same, the connector housing is different and the 12V pin is 4mm longer.
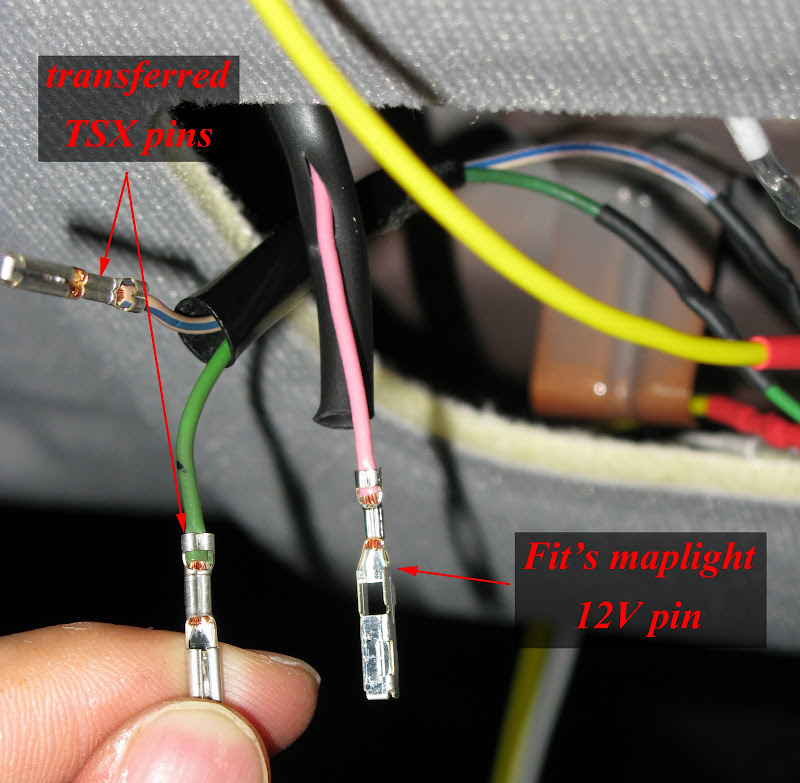
***IMPORTANT � the TSX pins need to be shoved all the way to the front of the connector for the pin transfer to work reliably***
Tap the Fit�s 12V Maplight wire for the Homelink unit�s power.
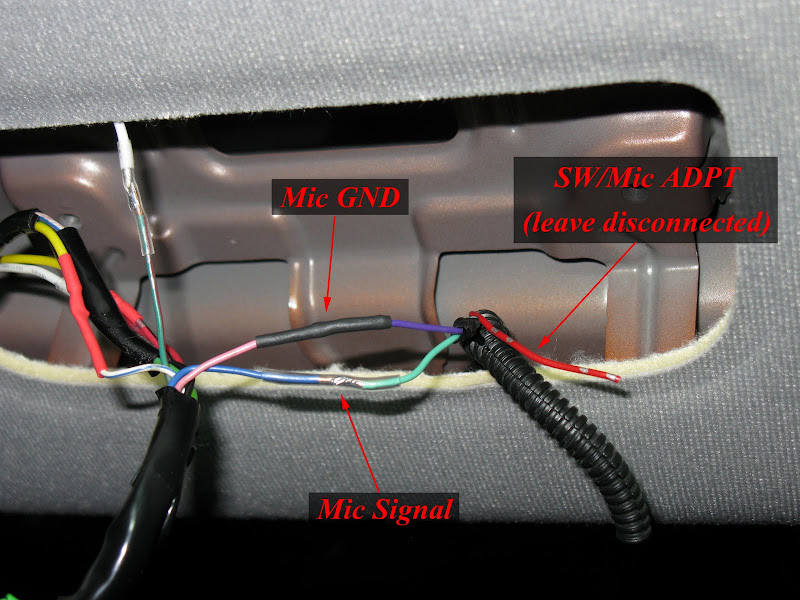
Microphone Wiring
Snip off the 3-pin microphone connector, and solder the Fit�s purple and green to the TSX�s pink and blue wires. Leave the Fit�s red wire disconnected.
Now put everything back together.
***IMPORTANT - Remember that the Homelink�s GND is through the mounting bolt, so test after the base is bolted back into the ceiling***
, pop the sunglass holder off and discard.
What you need out of the console is this unit on the left.
Replacing the stock Mic unit
Pop off the lens covers on the maplight in your Fit, then remove the two 8mm bolts from the maplight. Disconnect the two harnesses.
Remove the mic unit and replace with the TSX unit. This portion is the same as mscott�s thread so check there if you have problems replacing the stock Mic.
Harness Wiring
Connections that need to be made, two of which are pin transfers from the TSX maplight:
First we�ll start with the wiring connections that will be made between the Homelink and Maplight units themselves (Chassis GND & Intermediate GND). Flip over the maplight you just removed from your Fit.
Take the Maplight connector from the TSX unit and extract the pins. We�ll be reusing these for two of the Homelink�s connections.
Plug those two pins directly on the maplight housing so that you can accurately gauge the length of wire needed to solder them together with pins 2 & 6 on the Homelink connector.
Next, solder the Ambient LED (70� pair), domelight�s Door-switched GND (26�) and 12V (5�) taps.
5� not shown
Now the harness is ready for wiring into the car.
Ambient Wire Routing
Remove the driver�s side sun visor, clip and the A-pillar trim.
This clip will need to be replaced when reinstalling the A-pillar (it is possible to reset, but it�s quite troublesome just to save $2.50):
Route the Ambient LED wires through the headliner and down the A�-pillar and tap into the power mirror switch.
Domelight Wiring Tap
Run the 26� wire through the headliner and tap it to the domelight harness blue wire for a door open controlled GND. If you�re attempting this on a non-Sport GE8 you�ll need to tap the pink for 12V too.
12V Wiring Tap & Maplight Connector
***WARNING - 12V pin is a live 12V, try to not blow a fuse***
Open the pin retainer on the Maplight Connector for insertion of the two TSX pins.
If you remove the pre-existing 12V pin, you�ll notice that although the tab sizes are the same, the connector housing is different and the 12V pin is 4mm longer.
***IMPORTANT � the TSX pins need to be shoved all the way to the front of the connector for the pin transfer to work reliably***
Tap the Fit�s 12V Maplight wire for the Homelink unit�s power.
Microphone Wiring
Snip off the 3-pin microphone connector, and solder the Fit�s purple and green to the TSX�s pink and blue wires. Leave the Fit�s red wire disconnected.
Now put everything back together.
***IMPORTANT - Remember that the Homelink�s GND is through the mounting bolt, so test after the base is bolted back into the ceiling***
Thread Starter
|
Member
Joined: Apr 2009
Posts: 132
From: Portland, OR
Testing
Once everything is back together, test that the maplight turns on by A) manually pressing on the lens covers, as well as B) set the toggle switch to “Door” and see if they turn on when you open a door.

The Ambient LED should turn on with the parking lights. The Homelink’s red LED should light when you press any of the three buttons. To program the homelink, check this post.

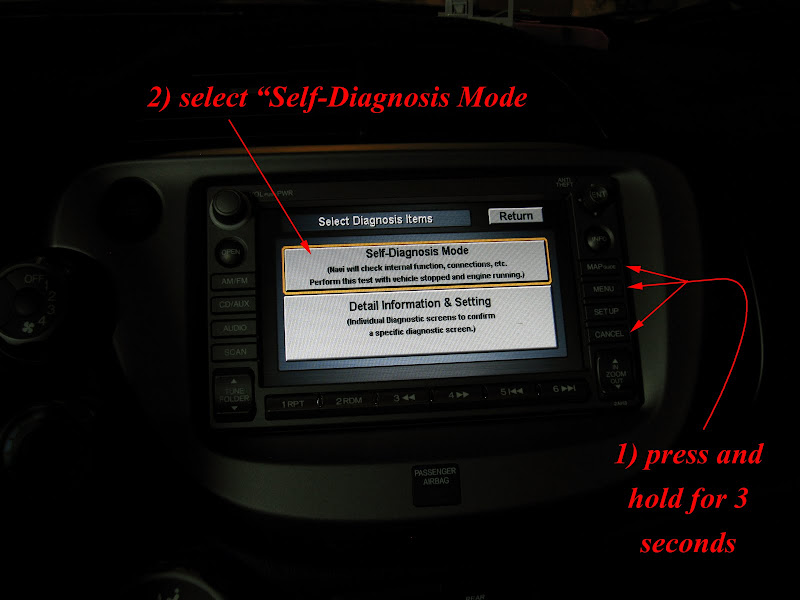
To test the navigation’s microphone, turn the car on (don’t have to start). Press and hold these 3 buttons for ~3 seconds until this menu screen comes up (you’ll hear a bi-bi-bom). Then select “Self-Diagnosis Mode”.
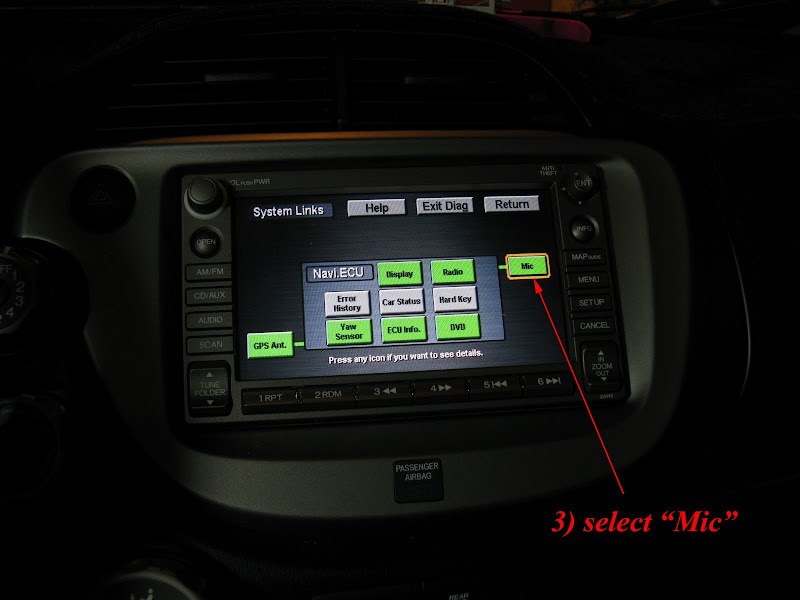
Select “Mic”.
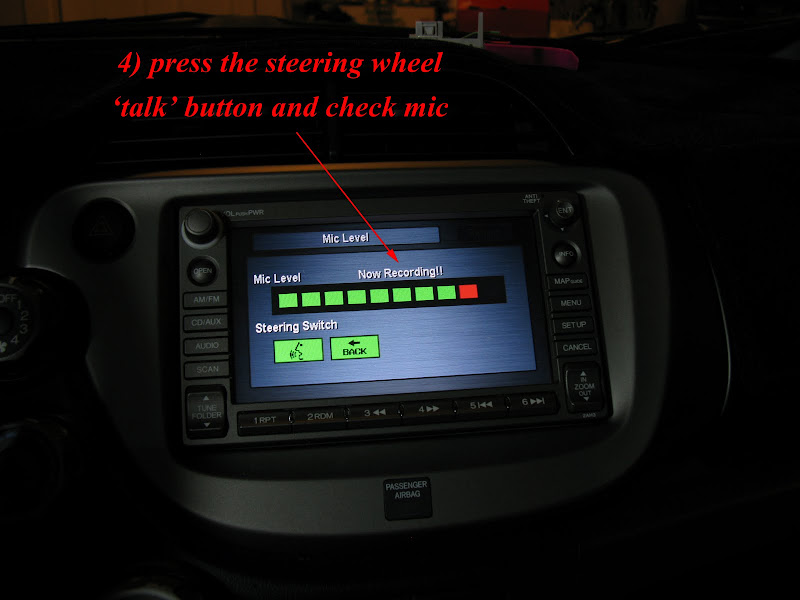
Press the “Talk” button on the steering wheel and make some noise while watching the Mic Level meter. It should fluctuate up and down with sound levels. Press “Back” button to finish the diagnosis, then Exit.
If you entered the test mode while the mic was disconnected, the system will log an error, so you might want to clear it in the “Error History” menu.
Sources of parts:
Ebay for TSX Homelink Console
Larry Miller Honda of Hillsboro for the A-pillar Clip
Superbrightleds.com for 30mm Festoon LED bulbs
Norvac for electrical supplies
The Ambient LED should turn on with the parking lights. The Homelink’s red LED should light when you press any of the three buttons. To program the homelink, check this post.
To test the navigation’s microphone, turn the car on (don’t have to start). Press and hold these 3 buttons for ~3 seconds until this menu screen comes up (you’ll hear a bi-bi-bom). Then select “Self-Diagnosis Mode”.
Select “Mic”.
Press the “Talk” button on the steering wheel and make some noise while watching the Mic Level meter. It should fluctuate up and down with sound levels. Press “Back” button to finish the diagnosis, then Exit.
If you entered the test mode while the mic was disconnected, the system will log an error, so you might want to clear it in the “Error History” menu.
Sources of parts:
Ebay for TSX Homelink Console
Larry Miller Honda of Hillsboro for the A-pillar Clip
Superbrightleds.com for 30mm Festoon LED bulbs
Norvac for electrical supplies
Other notes: the Ambient LED is pointing too far back on the Fit so, modification of the LED housing will be necessary to set it right.
Last edited by Zalthras; Jul 29, 2010 at 07:22 PM.

Member
Joined: Feb 2010
Posts: 176
From: Richmond, VA
Just wanted to say great job on the write-up. Did this a few months back and absolutely love it. I also really like the blue LED. Its just enough to find things in the optional center-console or count change w/o turning on the overhead when its pitch black outside.
On a side note to those using an aftermarket navi with voice; I wasn't able to get the stock mic working by splicing into my pioneers mic cable. I ended up just placing the pioneers mic right behind the grill in the homelink module.
On a side note to those using an aftermarket navi with voice; I wasn't able to get the stock mic working by splicing into my pioneers mic cable. I ended up just placing the pioneers mic right behind the grill in the homelink module.


It actually does fit, but you have to do some modification of the roof liner to make it flush. Besides cutting for the holder, you need to pull the roof liner down slightly, and wedge some spacers between the roof liner, and the roof. I used 2 pieces of 1x3's cut at 2" length, that brings down the headliner enough to make it flush. The only thing is you have to get longer bolts about 1/2" longer cause the existing ones are too short after the spacing. I was expecting the spacers cause it was mentioned in a different thread, but I was unaware of the longer bolts.
I just did this DIY yesterday, I installed it with the sunglass holder. Soldered all the extentions and some connections before bringing it to the car, but made all the connections to the car's wiring using taps. I wasn't trusting my soldering gun to be neat inside the car. The only connection I didn't finish was the ambient light, I routed the wires to the location, I just got to tap them, shouldn't take me more than 5 minutes. Everything else (Navi mic, homelink, maplights on w/door, etc) works just as it's supposed to.
All in all it took me about 4 hrs to cut, solder, make connections, and program the Homelink. A lot quicker than I expected, the scariest part was cutting the roof liner, but once that's done there's no turning back.
I will post pics this weekend.
Thanks again Zalthras for another wonderful DIY!!!!! Thanks.
Last edited by FitStir; Nov 21, 2011 at 11:10 AM.
It actually does fit, but you have to do some modification of the roof liner to make it flush. Besides cutting for the holder, you need to pull the roof liner down slightly, and wedge some spacers between the roof liner, and the roof. I used 2 pieces of 1x3's cut at 2" length, that brings down the headliner enough to make it flush. The only thing is you have to get longer bolts about 1/2" longer cause the existing ones are too short after the spacing. I was expecting the spacers cause it was mentioned in a different thread, but I was unaware of the longer bolts.
I just did this DIY yesterday, I installed it with the sunglass holder. Soldered all the extentions and some connections before bringing it to the car, but made all the connections to the car's wiring using taps. I wasn't trusting my soldering gun to be neat inside the car. The only connection I didn't finish was the ambient light, I routed the wires to the location, I just got to tap them, shouldn't take me more than 5 minutes. Everything else (Navi mic, homelink, maplights on w/door, etc) works just as it's supposed to.
All in all it took me about 4 hrs to cut, solder, make connections, and program the Homelink. A lot quicker than I expected, the scariest part was cutting the roof liner, but once that's done there's no turning back.
I will post pics this weekend.
Thanks again Zalthras for another wonderful DIY!!!!! Thanks.
I just did this DIY yesterday, I installed it with the sunglass holder. Soldered all the extentions and some connections before bringing it to the car, but made all the connections to the car's wiring using taps. I wasn't trusting my soldering gun to be neat inside the car. The only connection I didn't finish was the ambient light, I routed the wires to the location, I just got to tap them, shouldn't take me more than 5 minutes. Everything else (Navi mic, homelink, maplights on w/door, etc) works just as it's supposed to.
All in all it took me about 4 hrs to cut, solder, make connections, and program the Homelink. A lot quicker than I expected, the scariest part was cutting the roof liner, but once that's done there's no turning back.
I will post pics this weekend.
Thanks again Zalthras for another wonderful DIY!!!!! Thanks.

Here's the pics:
You can see the pieces of wood I cut. I decided the 2" height was a little too much, so I recut them at 1 3/4".

I also gave them a slight taper from 1 3/4" to 1 5/8" to form to the angle between the roof and the headliner. It really wasn't necessary, but I wanted it as flush as possible.

In order to minimize the "drop" in height of the roof liner I had to snap off the 2 tabs that helped secure the original map light (seen bent out on previous pics). I tried to fit them between the map light & console (similiar location to where they were on the existing map light), but they're too long and push the console further down. Here they are on top of the piece of roof liner that was cut out.

Here's the finished install.

and a wider shot.

As I mentioned in my previous post the mounting/grounding bolts are slightly short. I still haven't got the longer ones, but I will soon to correct the slight crease toward the front by the maplight, might add a spacer depending on the fit.

As it is now it's extremely secure even though I didn't secure the sunglass section to the roof, and it's still flush. After I get the longer bolts, I will attach some velcro or double stick tape to the back of the sunglass holder part to be more secure to the roof. I don't want anything permanent cause they will have to move the console forward whenever I get the sunroof installed.
You can see the pieces of wood I cut. I decided the 2" height was a little too much, so I recut them at 1 3/4".
I also gave them a slight taper from 1 3/4" to 1 5/8" to form to the angle between the roof and the headliner. It really wasn't necessary, but I wanted it as flush as possible.
In order to minimize the "drop" in height of the roof liner I had to snap off the 2 tabs that helped secure the original map light (seen bent out on previous pics). I tried to fit them between the map light & console (similiar location to where they were on the existing map light), but they're too long and push the console further down. Here they are on top of the piece of roof liner that was cut out.
Here's the finished install.
and a wider shot.
As I mentioned in my previous post the mounting/grounding bolts are slightly short. I still haven't got the longer ones, but I will soon to correct the slight crease toward the front by the maplight, might add a spacer depending on the fit.
As it is now it's extremely secure even though I didn't secure the sunglass section to the roof, and it's still flush. After I get the longer bolts, I will attach some velcro or double stick tape to the back of the sunglass holder part to be more secure to the roof. I don't want anything permanent cause they will have to move the console forward whenever I get the sunroof installed.
Last edited by FitStir; Nov 24, 2011 at 10:54 PM. Reason: corrected typo
You're welcome. I actually have an extra one if you want it. I was going to try and do this mod with the original maplight & sunglass holder, but decided to get the full homelink console instead.
Harness Wiring
Connections that need to be made, two of which are pin transfers from the TSX maplight:
First we�ll start with the wiring connections that will be made between the Homelink and Maplight units themselves (Chassis GND & Intermediate GND). Flip over the maplight you just removed from your Fit.
Now put everything back together.
***IMPORTANT - Remember that the Homelink�s GND is through the mounting bolt, so test after the base is bolted back into the ceiling***

Thread Starter
|
Member
Joined: Apr 2009
Posts: 132
From: Portland, OR
A) TSX Green w/ Red stripe to Fit's dome Blue.
B) TSX Green solid to Fit's maplight connector pin #3 (using a transfered pin from the TSX unit)
? TSX Green solid to Fit's maplight connector pin #3 is that pink wire?
Thread Starter
|
Member
Joined: Apr 2009
Posts: 132
From: Portland, OR
OOORRRRR
If you're using the TSX maplight entirely without swapping homelink blocks with the Fit's navi mic, then just connect them there. No need to repin.