
eternal_fantasy's TWDM GE8

Thread Starter
|
Member
Joined: May 2015
Posts: 78
From: Taipei
eternal_fantasy's TWDM GE8 (Picture Heavy!!)
Since purchasing my GE8 around July 2012, I've been an unregistered FitFreak stalker, but finally decided to register and contribute a little back to the community that has inspired me so much.
In this thread I will consolidate all my mods with any picture I can find from the past 3 years.
I will start off with what it looks like as of July 2015;
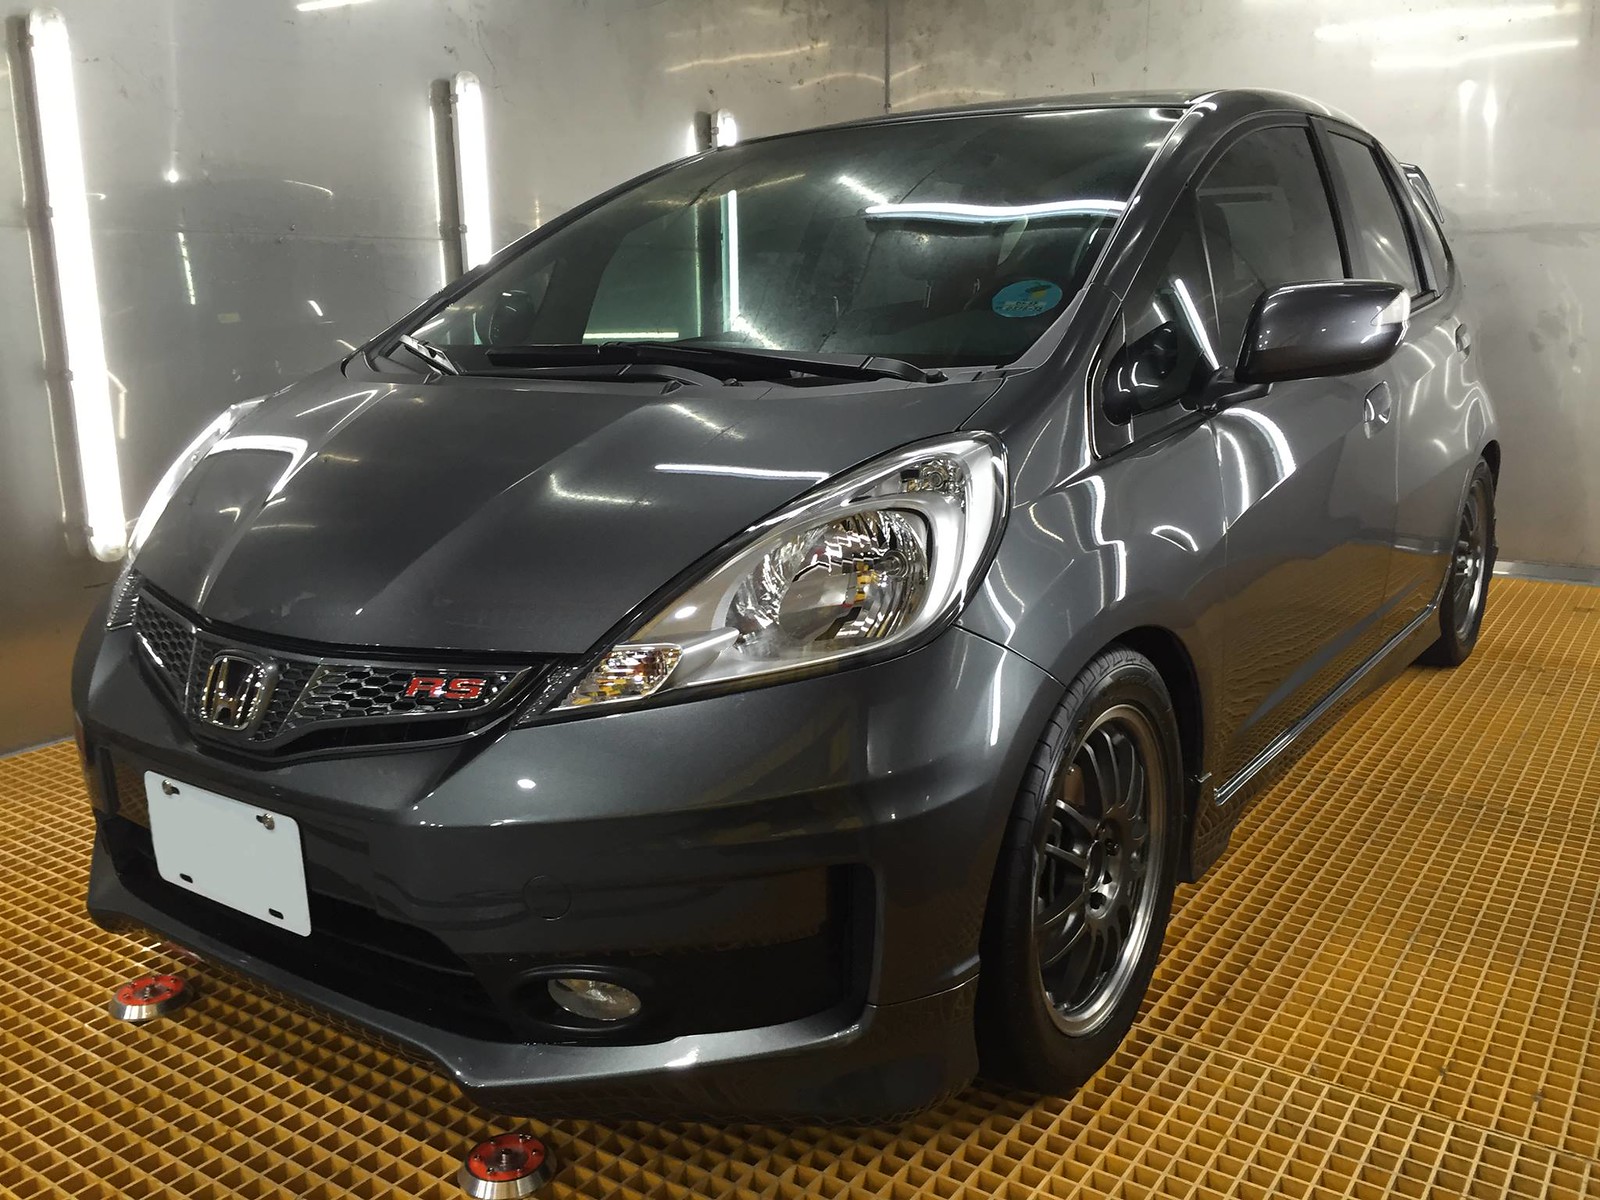

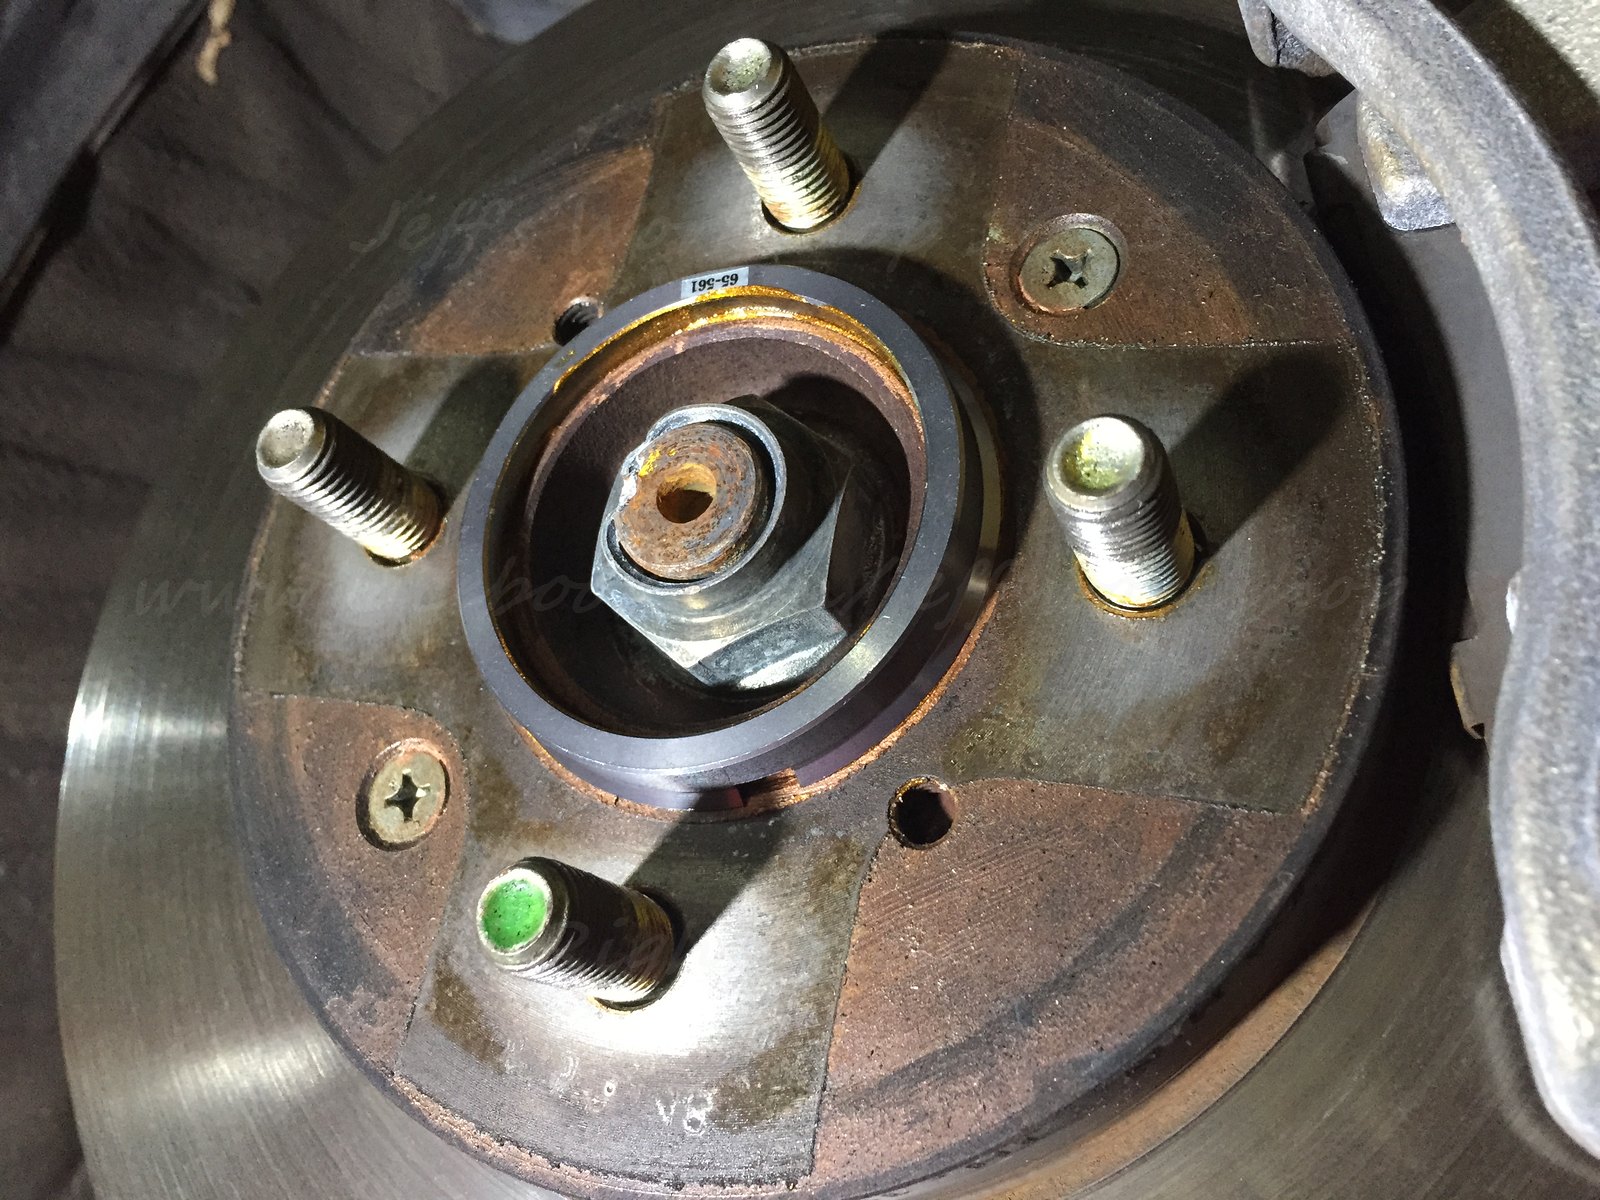
(Hey look, rear disk~!! )
)
Mod list:
Exterior:
JDM Fit RS Front Bumper/Grill
Modulo side skirts
Mugen rear bumper with 4th break light
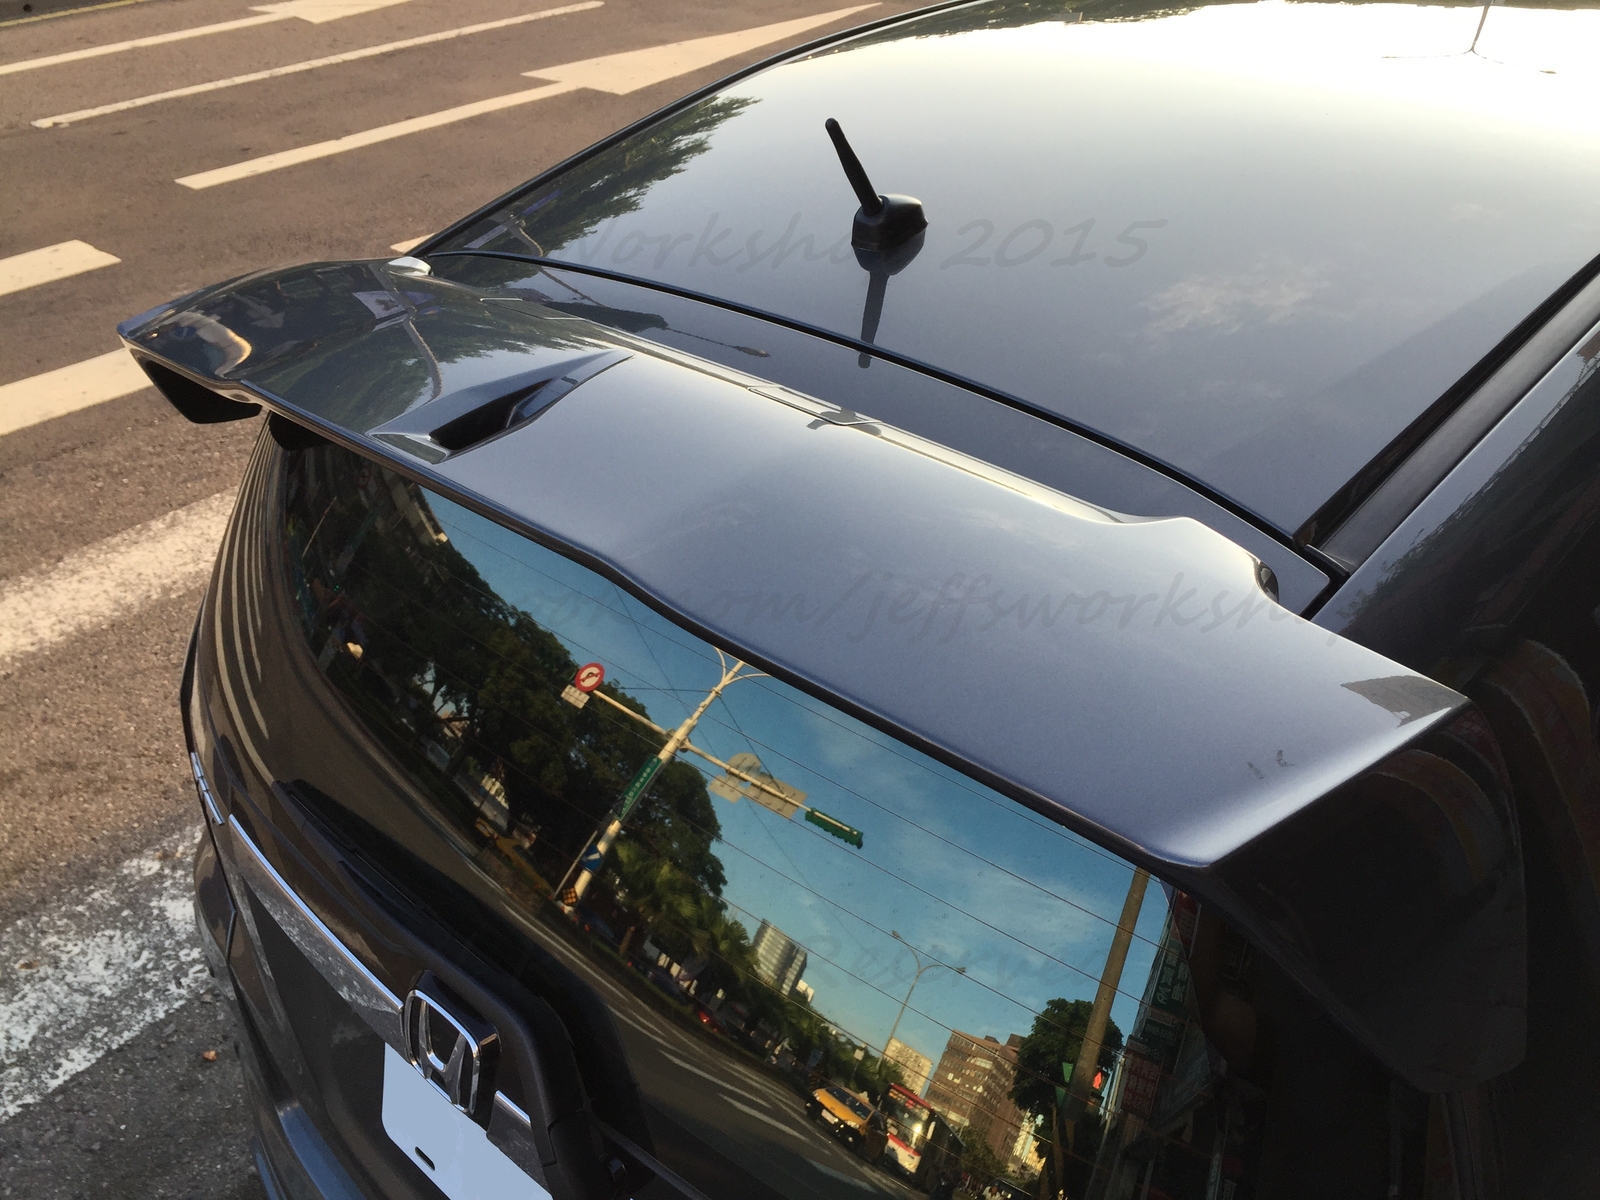
Modulo rear wing
JDM Fit RS Rear Badge + Emission stickers
Axis Styling LED Tail Lights
JDM stubby antenna
V-Kool Window Tint (Eastman Chemical Company) 55% wind shield 30% other windows
Interior:
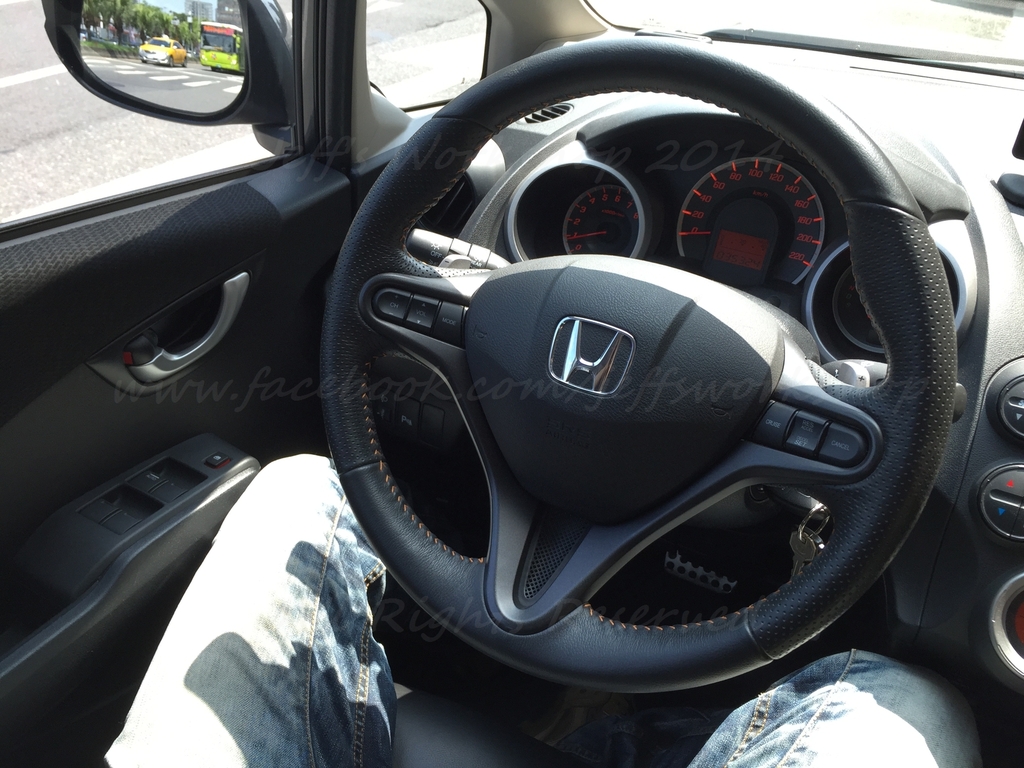
JDM Fit RS Leather steering wheel
JDM Fit RS Gunmetal Steering Wheel Trim
JDM Fit RS Leather shift knob
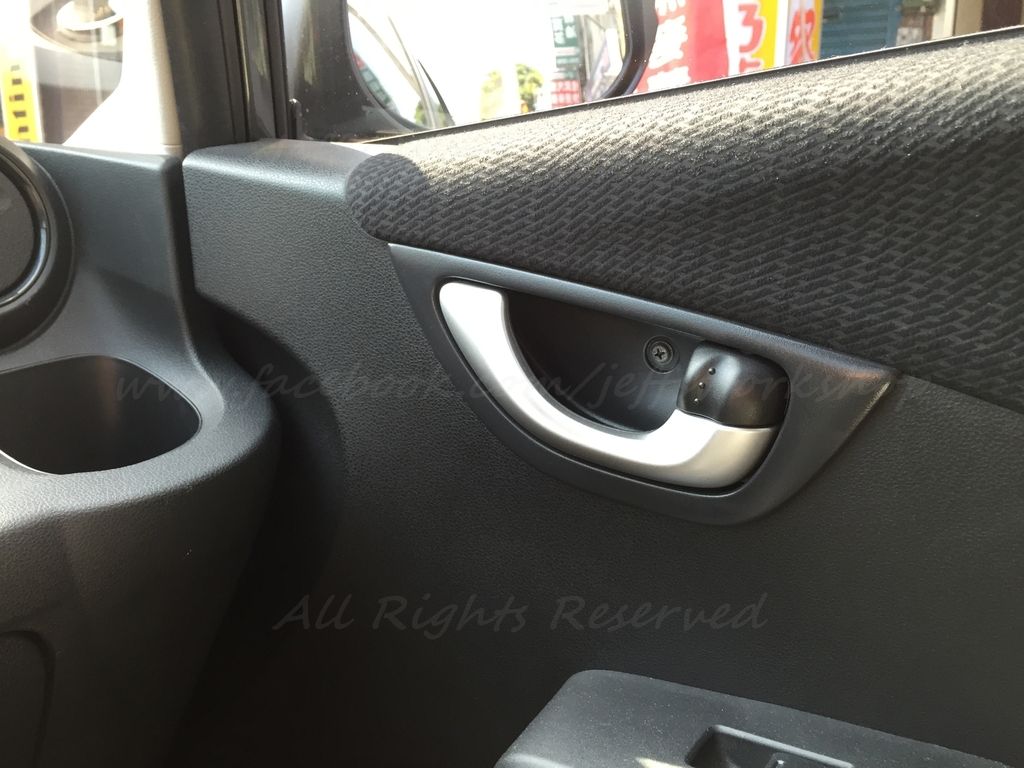
JDM Fit RS Silver interior door latch
Factory Cruse control/Head Unit control
Leather seats
HUD Digital Speedometer
Pioneer DEX-P99RS Head Unit
Carrozzeria DEH-P01 6CH Amplifier
Focal 165 KRXS Tweeter/Front door panel speaker
Focal PS 165 Rear door panel speaker
Pioneer Sub-woofer
Dynamat dampened door panels
Slight rear panel sound insulation added
Chassis/Handling: Except for the tires, all Chassis/Handling mods are DIY.
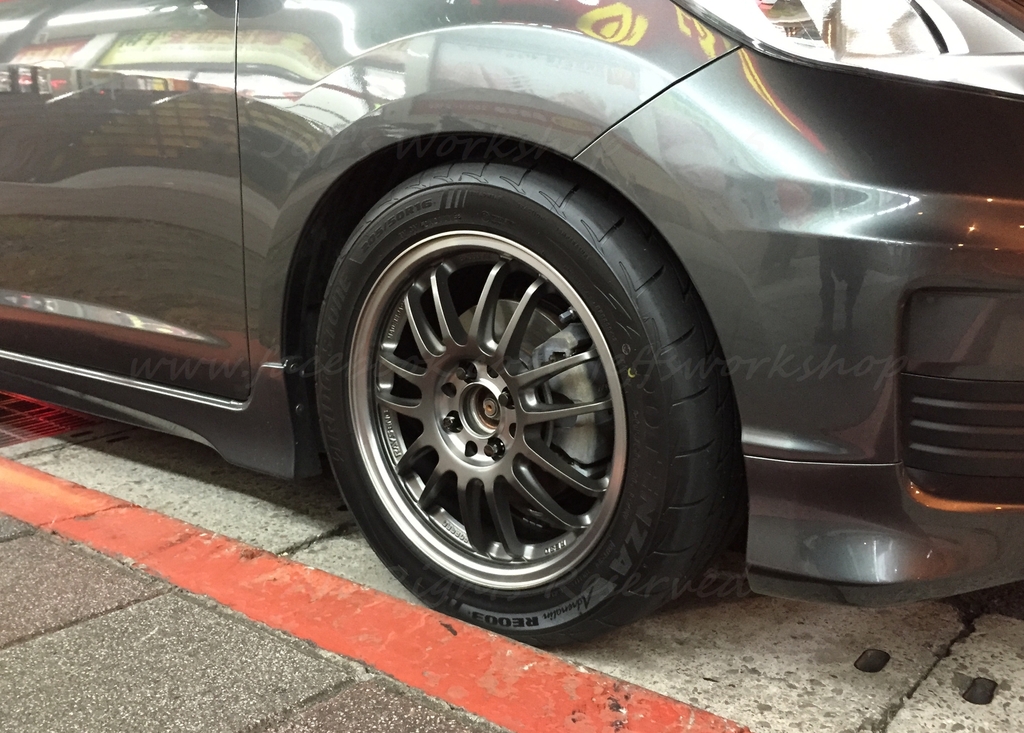
Bridgestone Potenza RE003 205/50 R16 Tires
Rays Volk Racing RE30 Club Sport, 16 x 6 1/2 JJ ET48 4H100
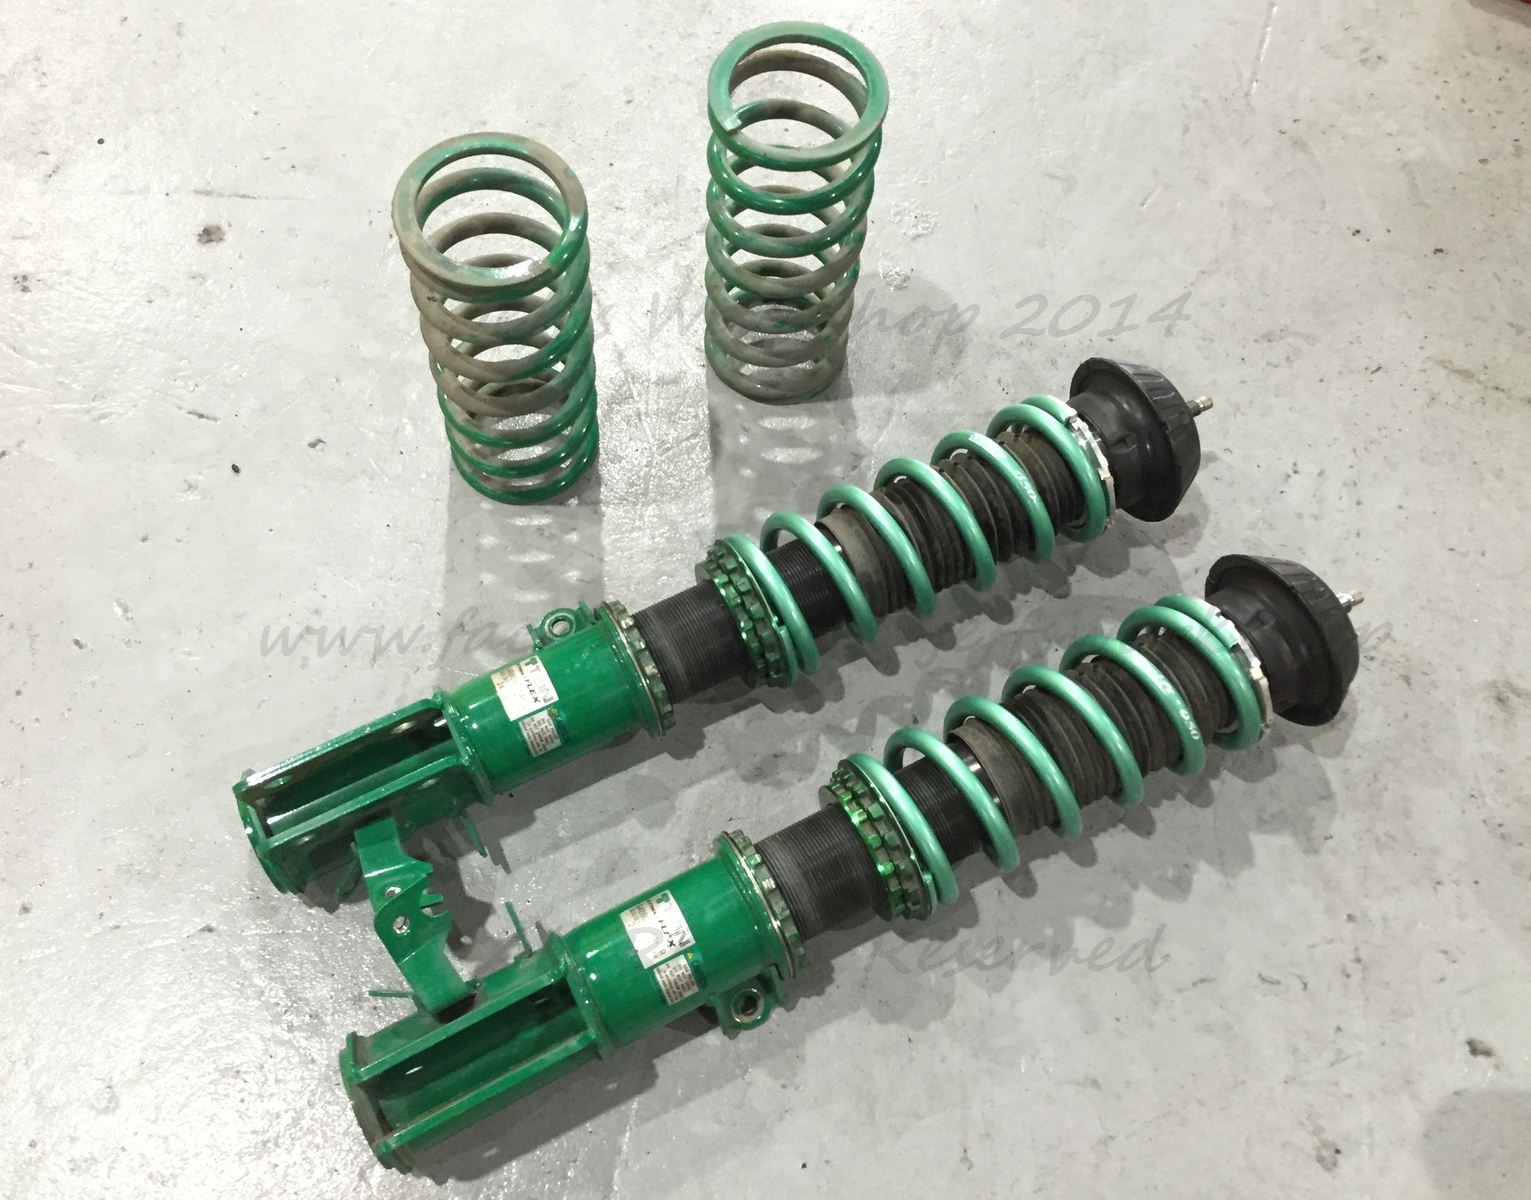
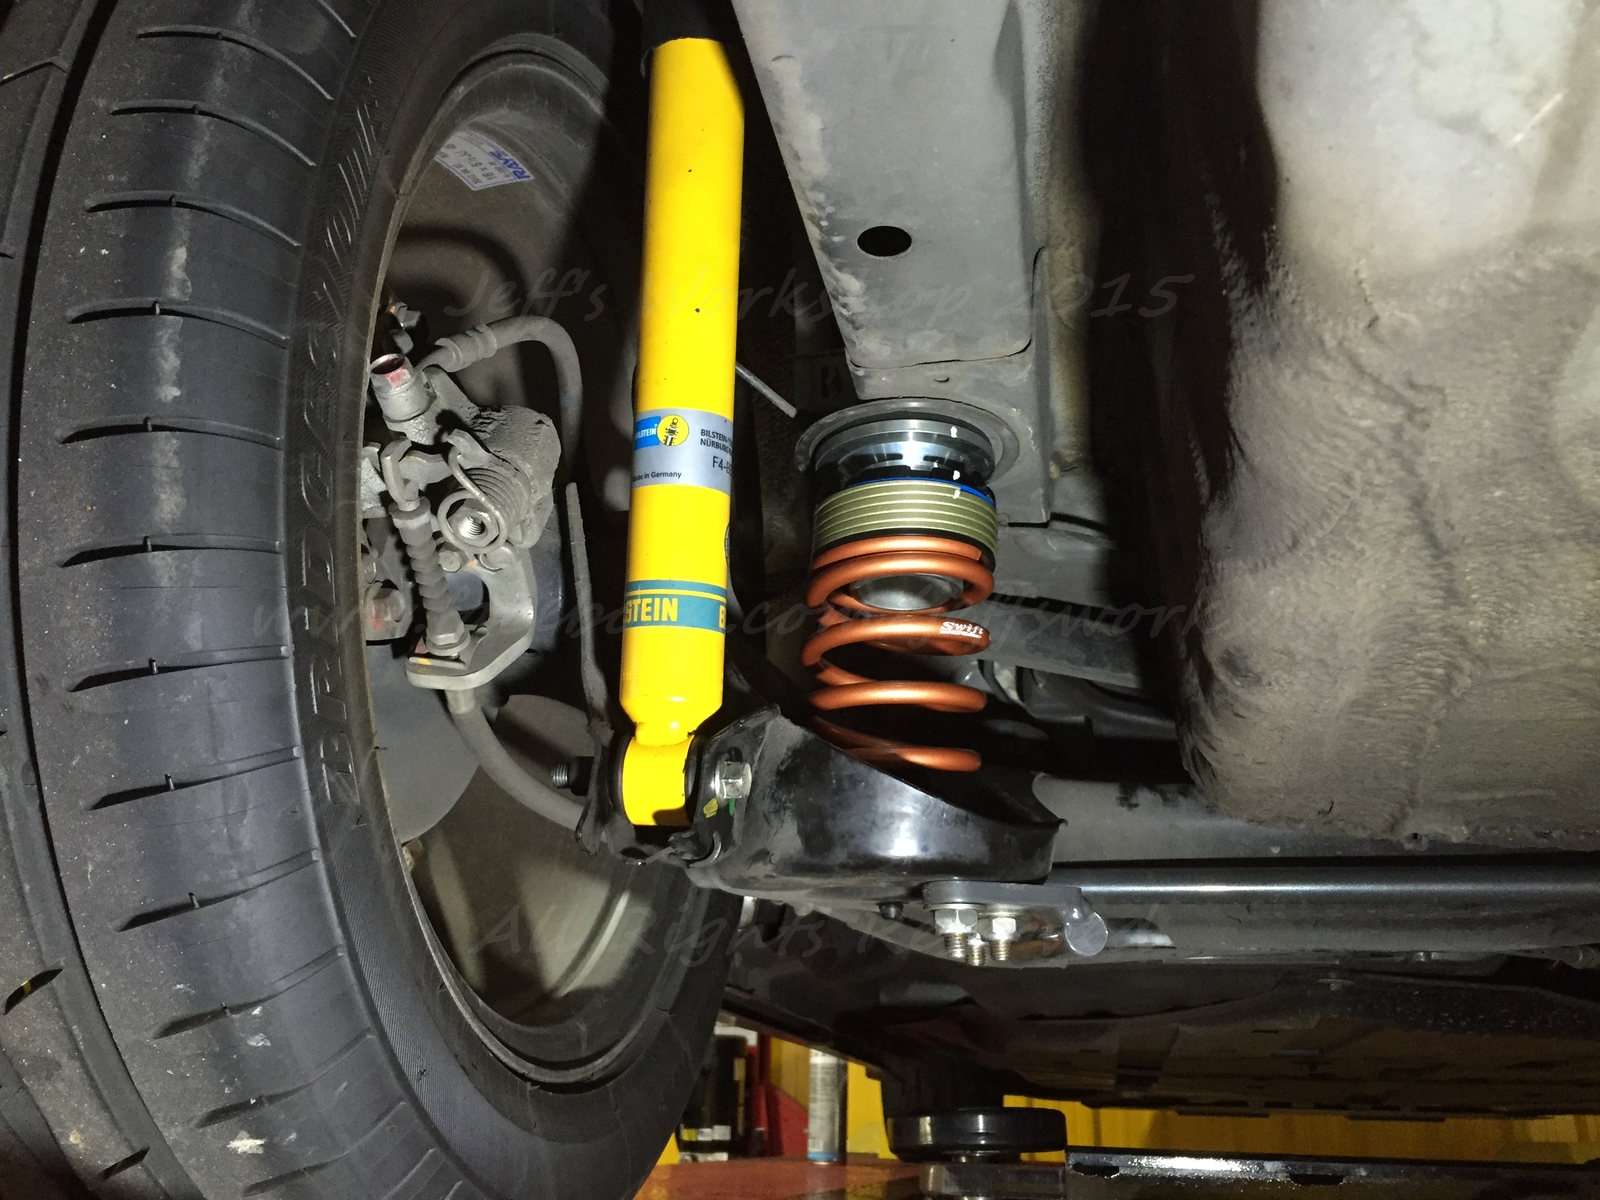
SWIFT Front linear rate 5kgf/mm spring
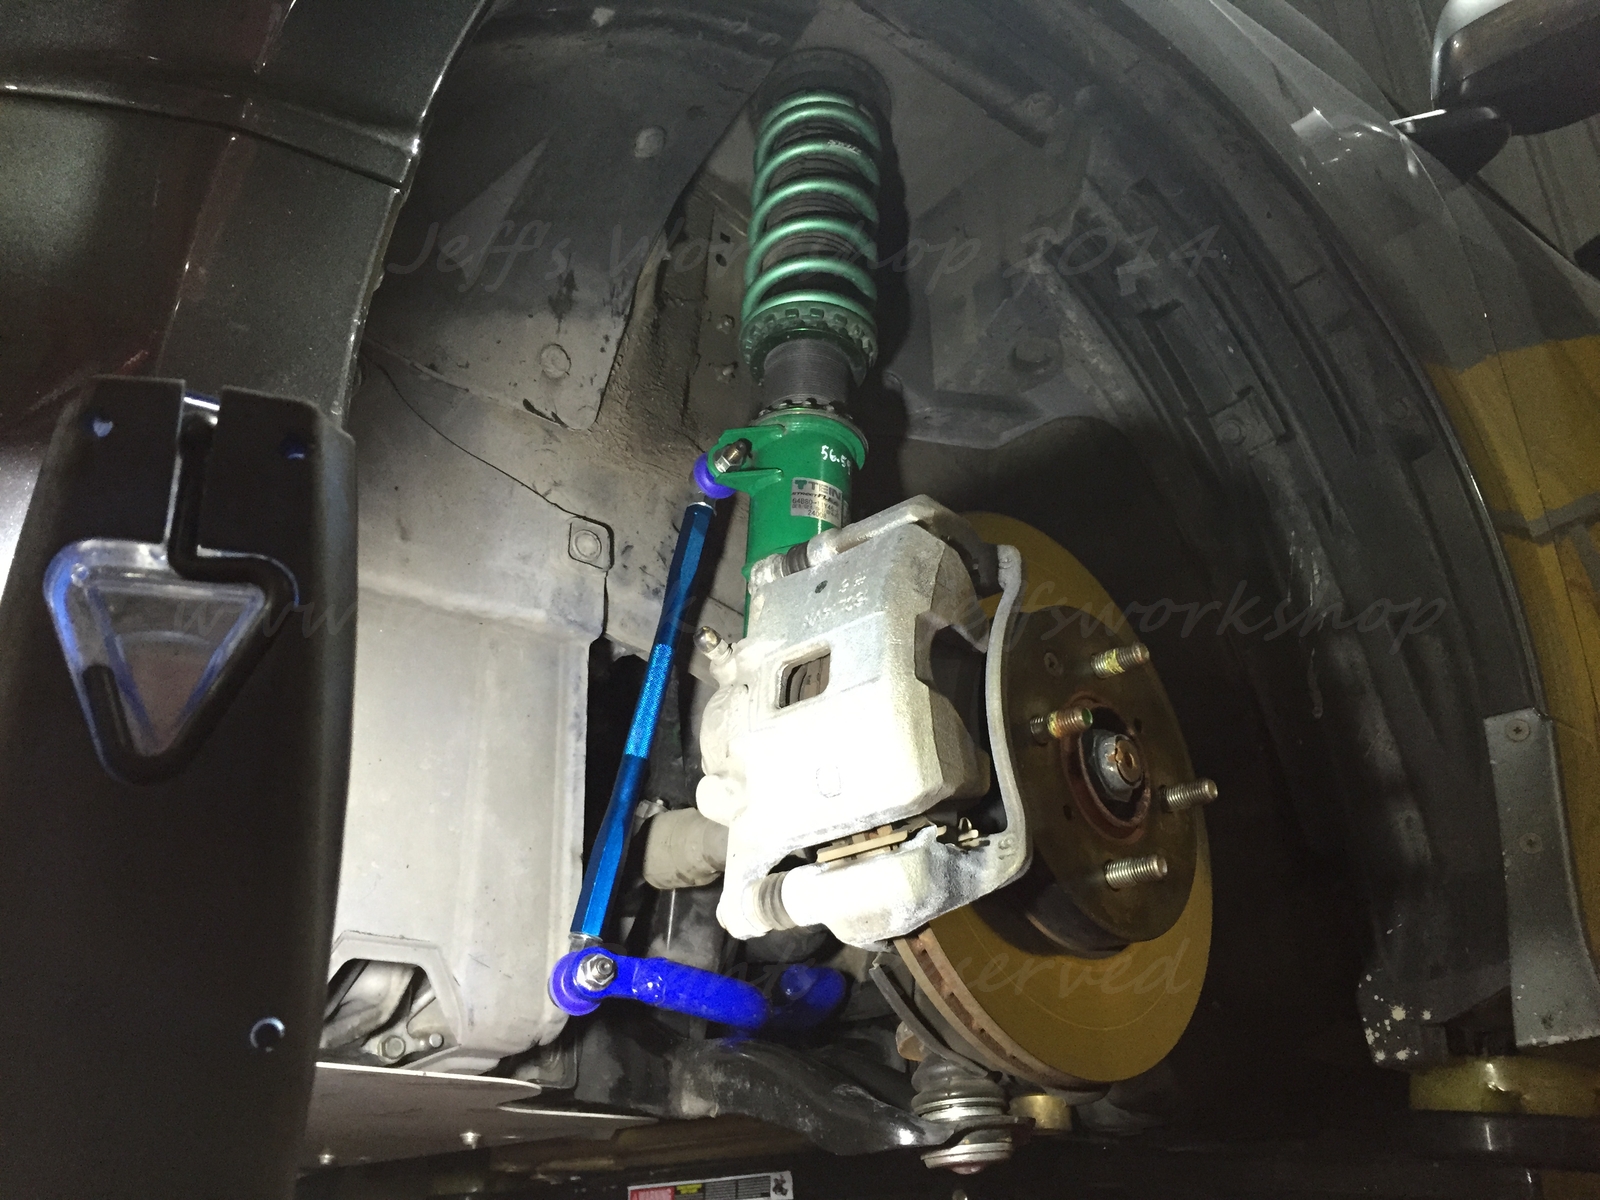
Teins Street Flex Twintube Front strut
SWIFT Rear linear rate 4kgf/mm spring
Bilstein PSS Monotube Rear Damper
Hardrace Hardened Front Strut mounting rubber
JDM Fit RS Front Strut strengthened nut
JDM Fit RS Rear Damper strengthened nut + mounting rubber
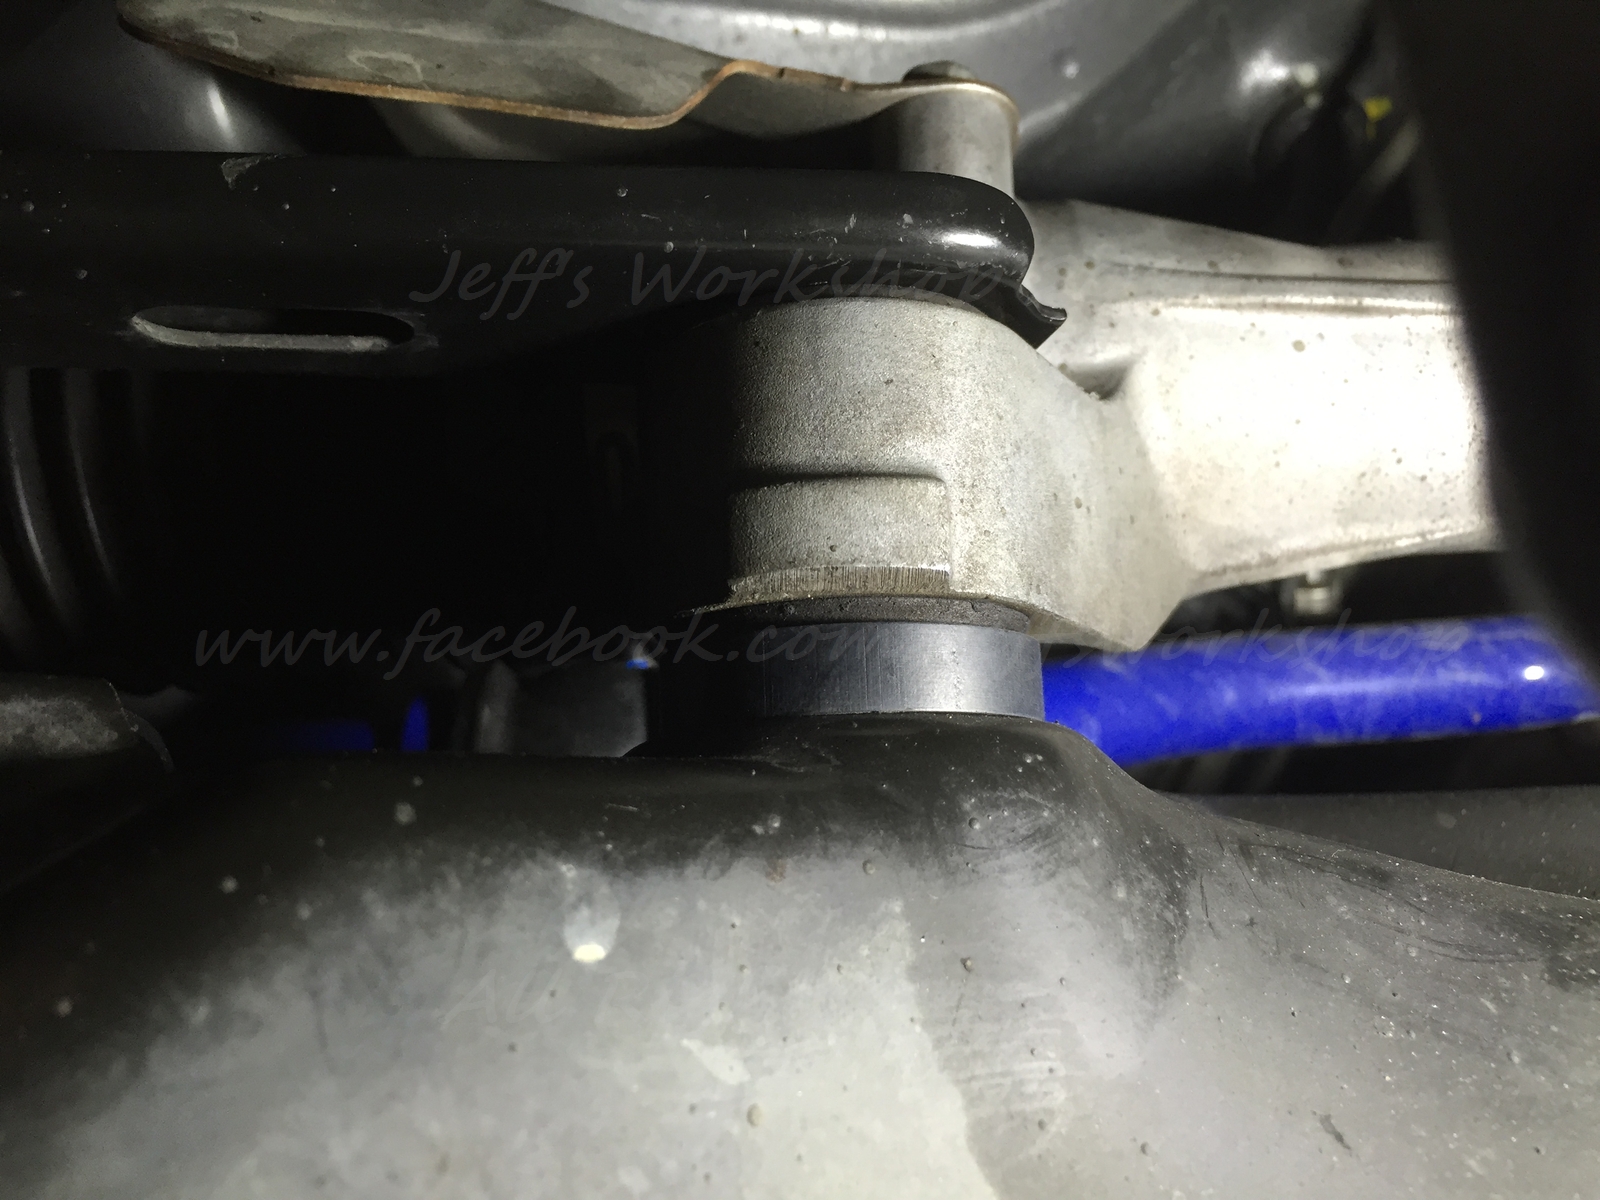
Hardrace Roll Center Adjuster (10mm extension)
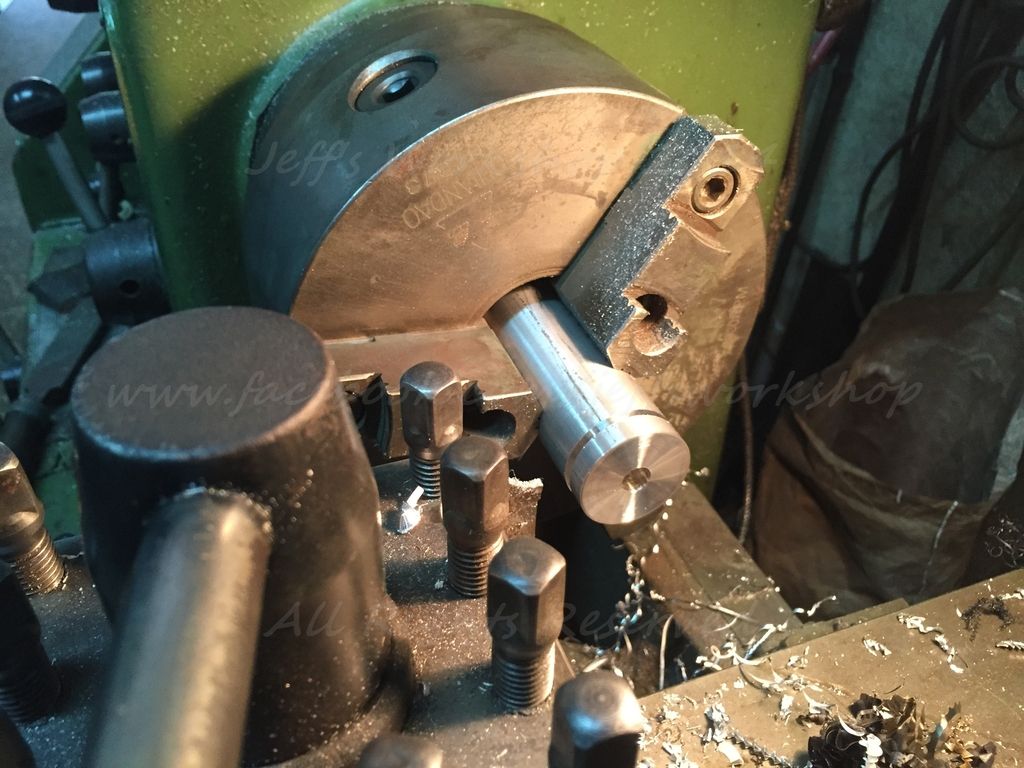
Custom 7075 T6 Aluminium 8mm Steering Rack Shim/Bump Steer Kit
Cusco Front Anti-Roll Bar 24mm
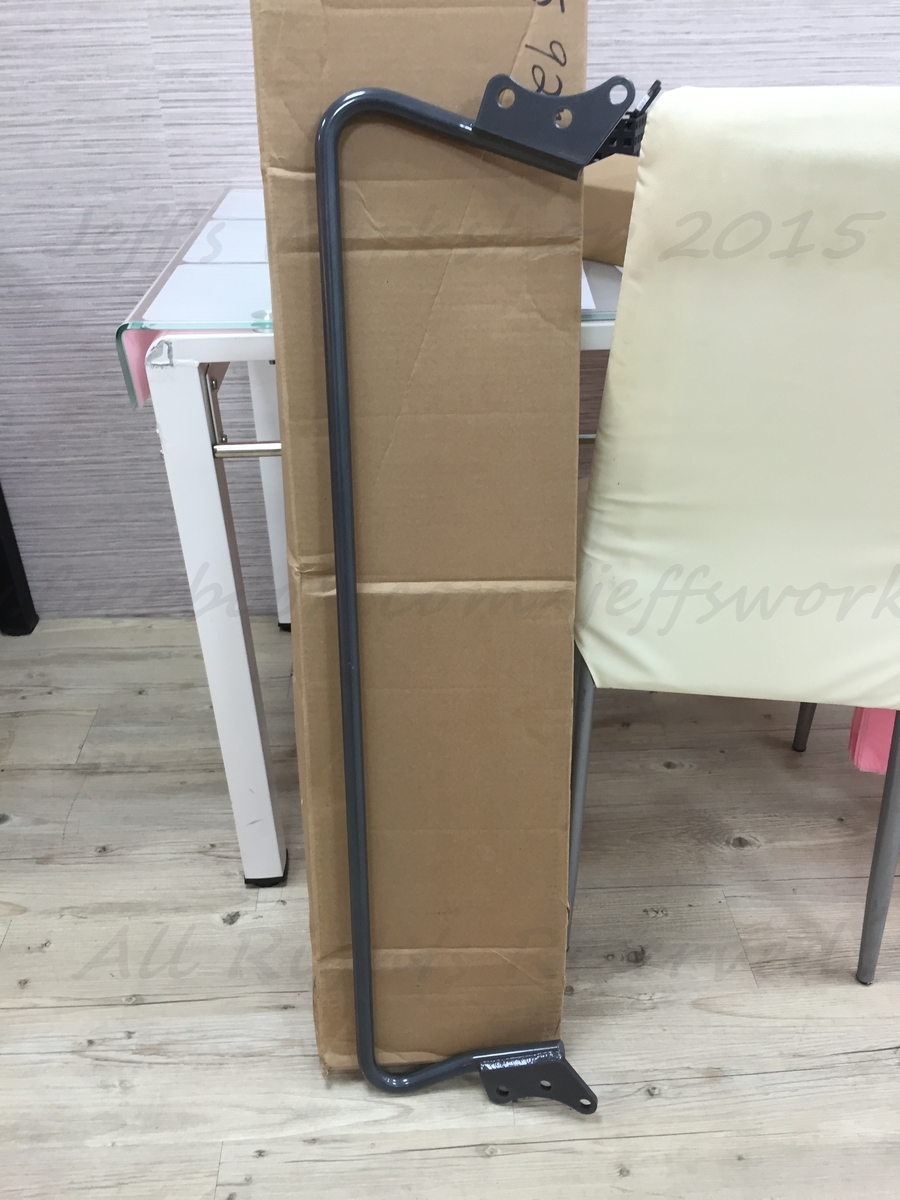
Progress Rear Anti-Roll Bar 19mm
Hardrace Adjustable endlink
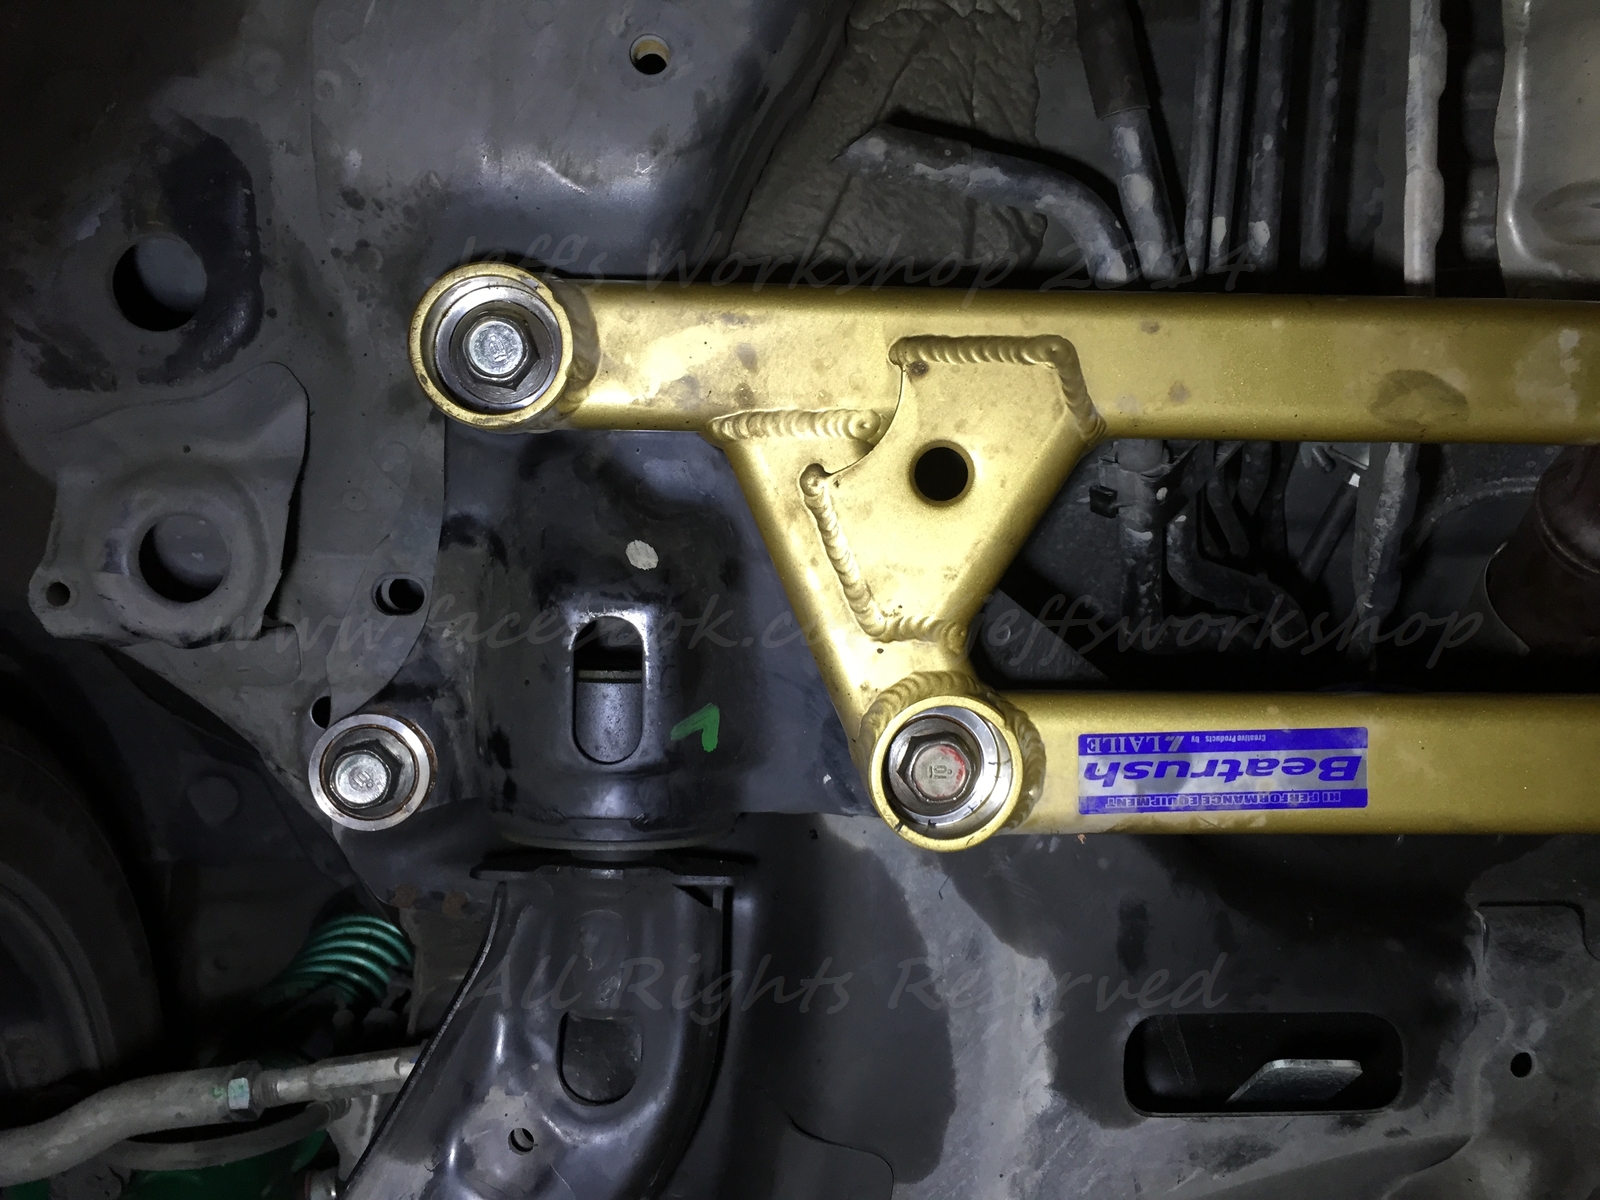
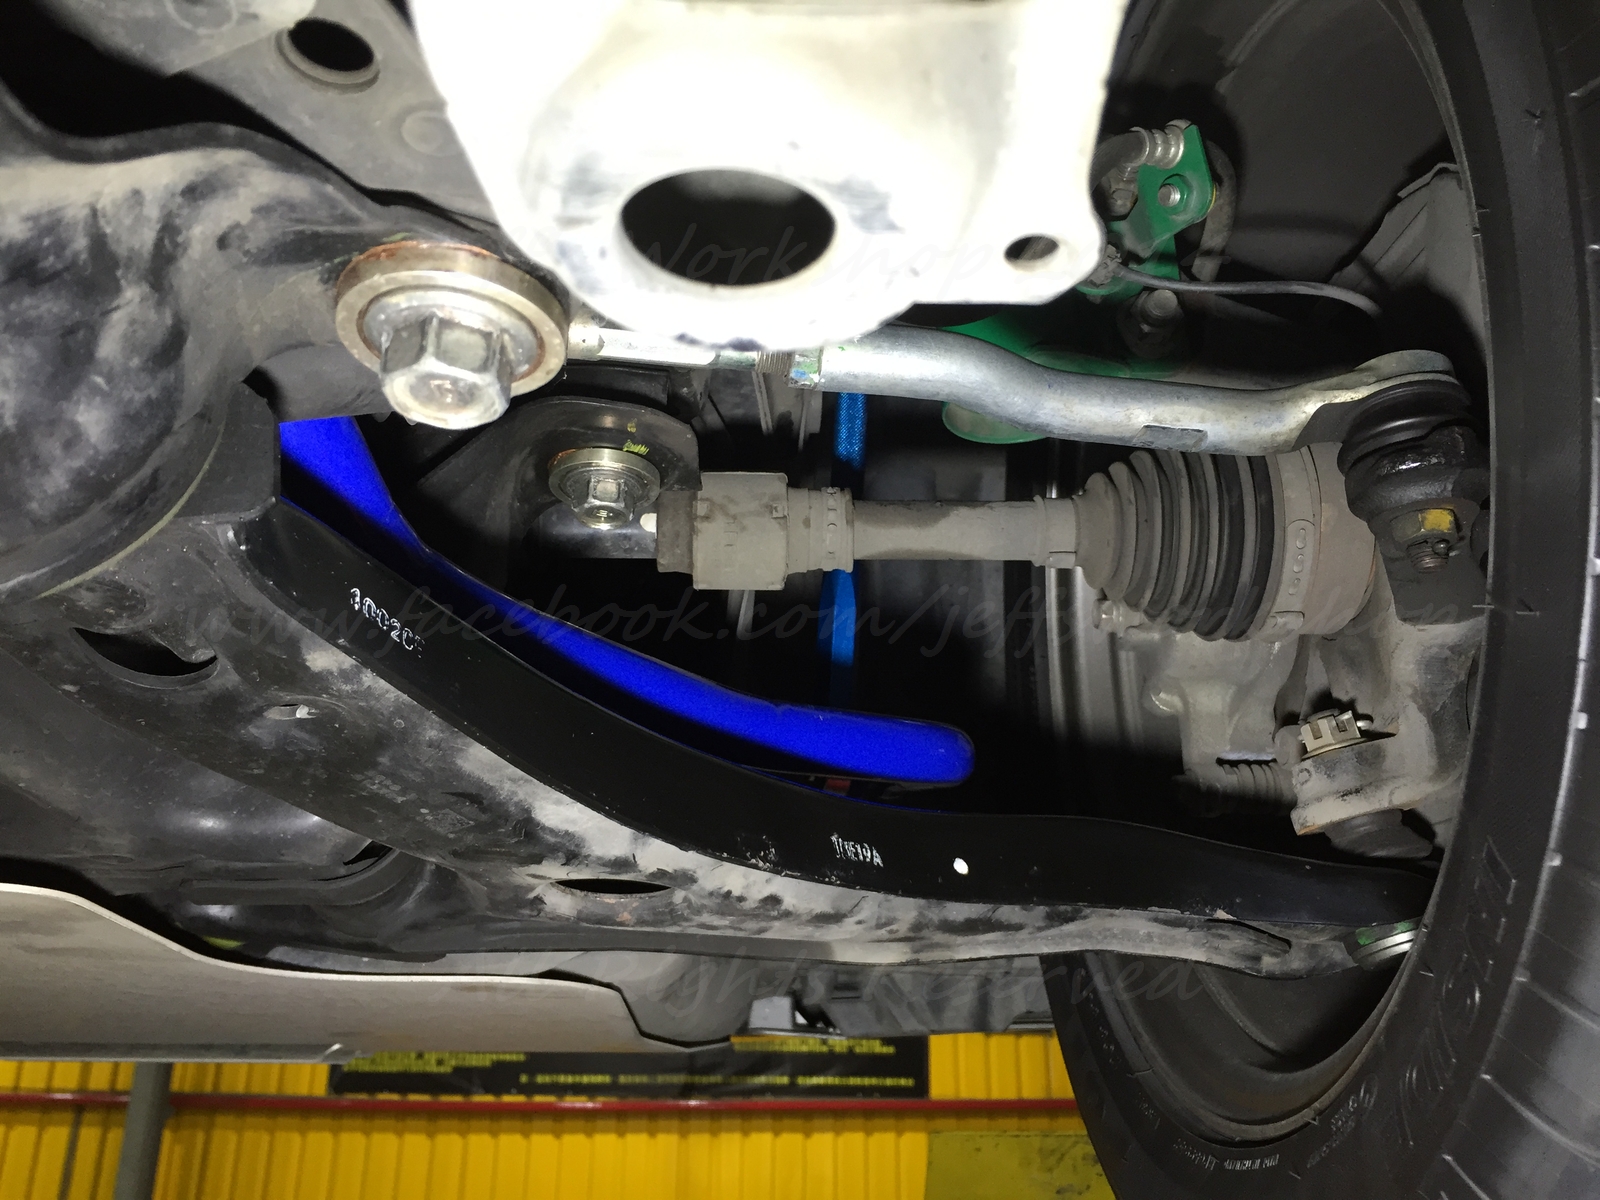
Spoon Rigid Collar for Front Subframe/Rear Trailing Arm
Laile Beatrush 4 point chassis under-brace
Custom 7075 T6 Aluminium under-brace structural/screw centering shim with extended bolts
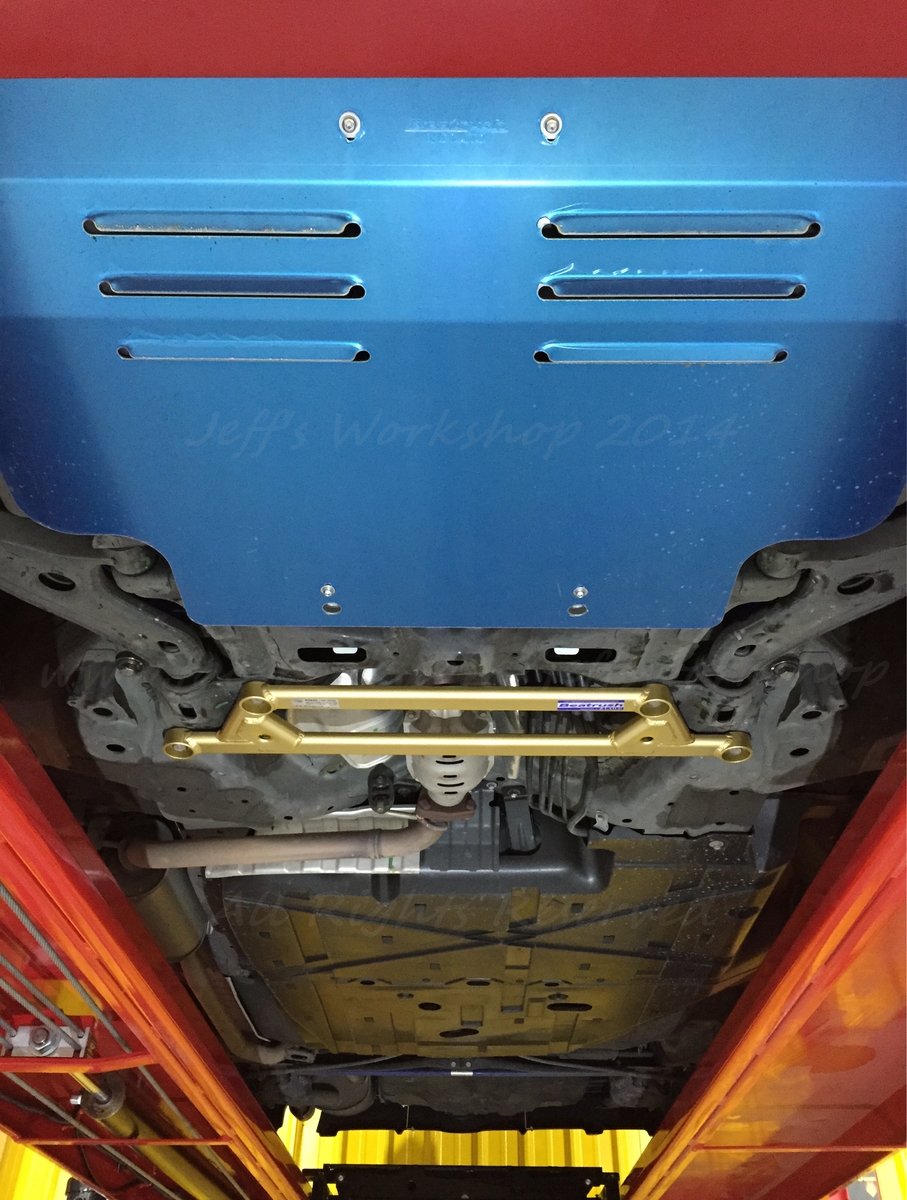
Laile Beatrush Aluminium under-panel
JDM Fit PU mid-section under-panel
JDM Fit RS Exhaust
Spare tire removed
Rear seats/seatbelt removed
Corner balanced
Camber bolts installed, set at -1.5� Front
Lowered to 330mm Hub center to wheel well F/R
Planned/Wishlist:
Front/Rear Bushing Fill
Racing/Bucket seat
Rear X chassis brace
...Sprintex Supercharger??
Retired Parts:
Bilstein PSS B14 coilovers (Over dampened rear, the front strut started to "knock" from wear of slider bushings)(will try and rebuild)
Spoon 25mm Front Sway Bar (Too stiff)
Cusco 16mm Rear Sway Bar (Too soft)
Tein Street Flex stock springs (Way too soft/lots of break-in sag)
17inch Buddy Club Rims/ 205/40 R17 tires (not so great for street use(bad road conditions/potholes/curb rash))
My goal for this car:
Good low speed street ride quality
Good high speed stability
Good roll stiffness
Good responsive handling
Good bump control
Somewhat neutral cornering
Lowered good looks
Sounds like I want it all, but I'm happy to say that I have achieved pretty much 80-90% in all of the above with my current setup. Each of the retired parts was very good at one respect, but compromised too much in another, so they were replaced. All current parts were selected and works together to produce the final driving dynamics I was looking for.
Along the way I have learned that not the biggest rims I can fit or the lowest profile tires, the thickest sway bar or the lowest ride height will be the best modification if it does not work with the rest of your car. No amount of research will prepare you for actually installing and trying out the actual part for your self.
My front lower sub-frame
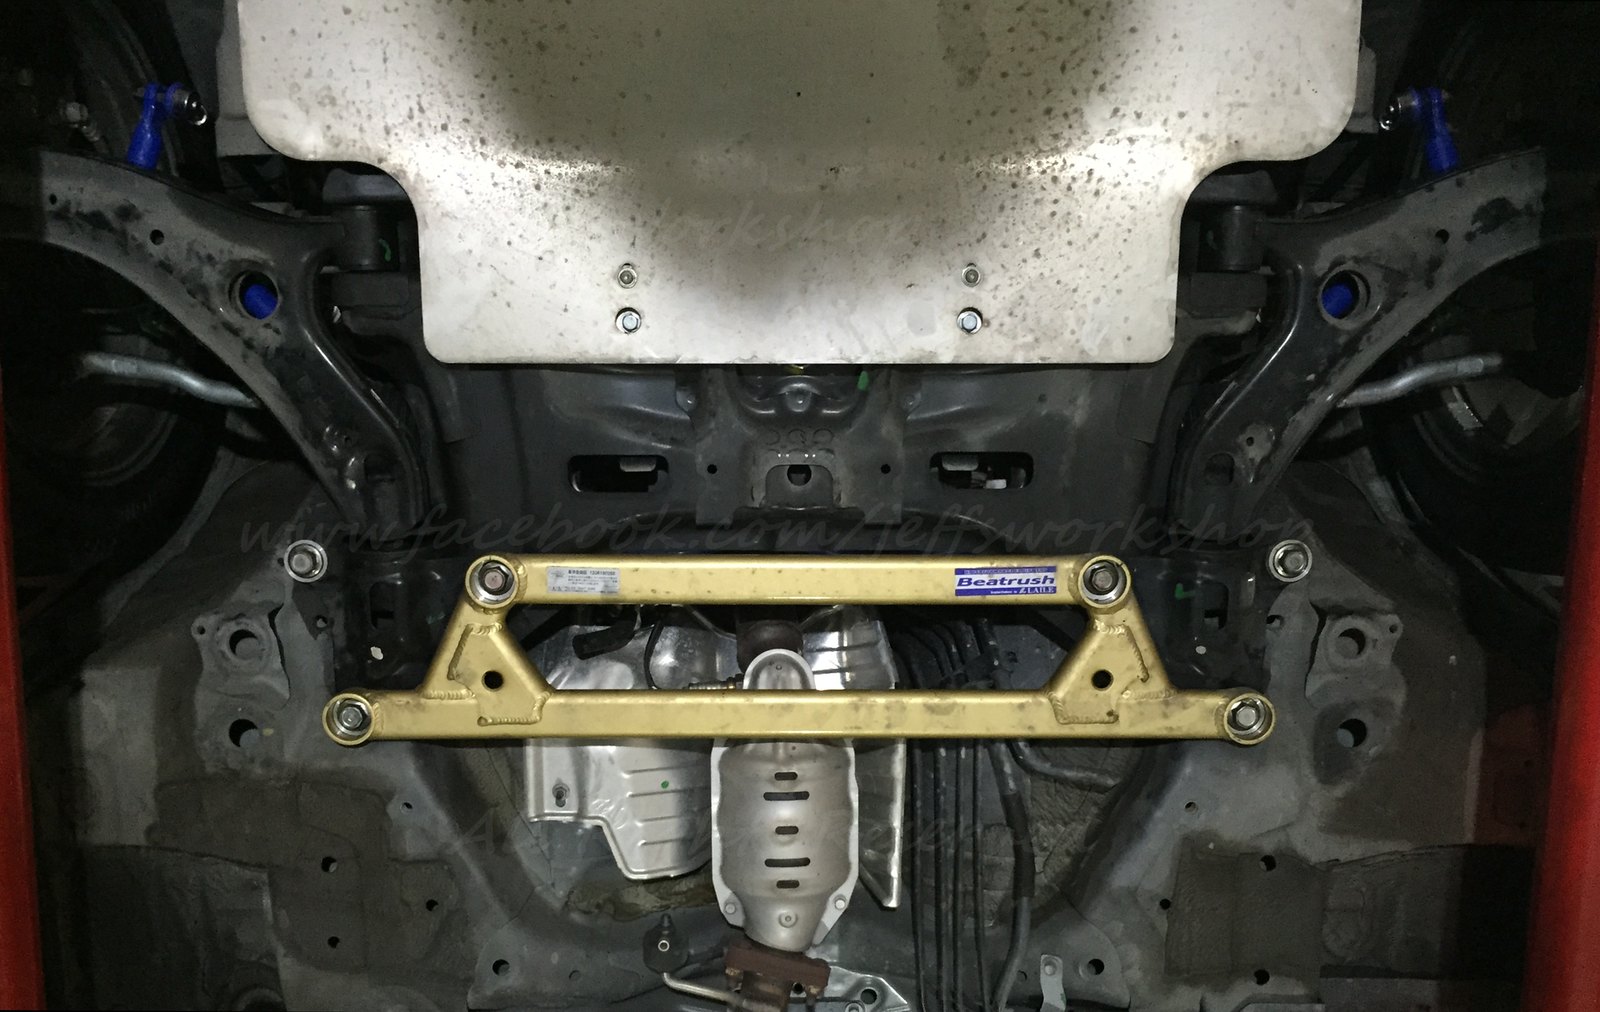
(The Beatrush bracing is for directly connecting the left and the right side of the chassis with solid inserts to reduce chassis flex. This is the only chassis brace I have on my Fit because most commercial bracing are cosmetic, either by their attachment point, attachment method or the bracings' actual structural design. For example, any 2 point subframe brace attaching to the front LCA bolt points are pretty much useless, no matter how stiff the brace is. The deflection of the LCA at the point of the rubber bushings will far far outweigh any structural support the bracing has on the front subframe, unless you run solid spherical bearings. In which case a bent piece of hollow aluminium tubing will not provide much stiffness. That's why J's racing sells reinforced subframes and solid bearing LCAs.)
Some of my other more in depth threads:
Screw collars for Fit's front under chassis brace
Effects of reducing rear weight on an already front heavy car
Bump steer correction steering gearbox Shims for Extended Ball Joint installed Fit
This is what treads looks like after 30000km with 38psi Front and 26psi rear
In the following post I will try and post up all the pictures of mods I could find... Please let me know if you have any questions and I'd be happy to answer!
In this thread I will consolidate all my mods with any picture I can find from the past 3 years.
I will start off with what it looks like as of July 2015;
(Hey look, rear disk~!!
)Mod list:
Exterior:
JDM Fit RS Front Bumper/Grill
Modulo side skirts
Mugen rear bumper with 4th break light
Modulo rear wing
JDM Fit RS Rear Badge + Emission stickers
Axis Styling LED Tail Lights
JDM stubby antenna
V-Kool Window Tint (Eastman Chemical Company) 55% wind shield 30% other windows
Interior:
JDM Fit RS Leather steering wheel
JDM Fit RS Gunmetal Steering Wheel Trim
JDM Fit RS Leather shift knob
JDM Fit RS Silver interior door latch
Factory Cruse control/Head Unit control
Leather seats
HUD Digital Speedometer
Pioneer DEX-P99RS Head Unit
Carrozzeria DEH-P01 6CH Amplifier
Focal 165 KRXS Tweeter/Front door panel speaker
Focal PS 165 Rear door panel speaker
Pioneer Sub-woofer
Dynamat dampened door panels
Slight rear panel sound insulation added
Chassis/Handling: Except for the tires, all Chassis/Handling mods are DIY.
Bridgestone Potenza RE003 205/50 R16 Tires
Rays Volk Racing RE30 Club Sport, 16 x 6 1/2 JJ ET48 4H100
SWIFT Front linear rate 5kgf/mm spring
Teins Street Flex Twintube Front strut
SWIFT Rear linear rate 4kgf/mm spring
Bilstein PSS Monotube Rear Damper
Hardrace Hardened Front Strut mounting rubber
JDM Fit RS Front Strut strengthened nut
JDM Fit RS Rear Damper strengthened nut + mounting rubber
Hardrace Roll Center Adjuster (10mm extension)
Custom 7075 T6 Aluminium 8mm Steering Rack Shim/Bump Steer Kit
Cusco Front Anti-Roll Bar 24mm
Progress Rear Anti-Roll Bar 19mm
Hardrace Adjustable endlink
Spoon Rigid Collar for Front Subframe/Rear Trailing Arm
Laile Beatrush 4 point chassis under-brace
Custom 7075 T6 Aluminium under-brace structural/screw centering shim with extended bolts
Laile Beatrush Aluminium under-panel
JDM Fit PU mid-section under-panel
JDM Fit RS Exhaust
Spare tire removed
Rear seats/seatbelt removed
Corner balanced
Camber bolts installed, set at -1.5� Front
Lowered to 330mm Hub center to wheel well F/R
Planned/Wishlist:
Front/Rear Bushing Fill
Racing/Bucket seat
Rear X chassis brace
...Sprintex Supercharger??
Retired Parts:
Bilstein PSS B14 coilovers (Over dampened rear, the front strut started to "knock" from wear of slider bushings)(will try and rebuild)
Spoon 25mm Front Sway Bar (Too stiff)
Cusco 16mm Rear Sway Bar (Too soft)
Tein Street Flex stock springs (Way too soft/lots of break-in sag)
17inch Buddy Club Rims/ 205/40 R17 tires (not so great for street use(bad road conditions/potholes/curb rash))
My goal for this car:
Good low speed street ride quality
Good high speed stability
Good roll stiffness
Good responsive handling
Good bump control
Somewhat neutral cornering
Lowered good looks
Sounds like I want it all, but I'm happy to say that I have achieved pretty much 80-90% in all of the above with my current setup. Each of the retired parts was very good at one respect, but compromised too much in another, so they were replaced. All current parts were selected and works together to produce the final driving dynamics I was looking for.
Along the way I have learned that not the biggest rims I can fit or the lowest profile tires, the thickest sway bar or the lowest ride height will be the best modification if it does not work with the rest of your car. No amount of research will prepare you for actually installing and trying out the actual part for your self.
My front lower sub-frame
(The Beatrush bracing is for directly connecting the left and the right side of the chassis with solid inserts to reduce chassis flex. This is the only chassis brace I have on my Fit because most commercial bracing are cosmetic, either by their attachment point, attachment method or the bracings' actual structural design. For example, any 2 point subframe brace attaching to the front LCA bolt points are pretty much useless, no matter how stiff the brace is. The deflection of the LCA at the point of the rubber bushings will far far outweigh any structural support the bracing has on the front subframe, unless you run solid spherical bearings. In which case a bent piece of hollow aluminium tubing will not provide much stiffness. That's why J's racing sells reinforced subframes and solid bearing LCAs.)
Some of my other more in depth threads:
Screw collars for Fit's front under chassis brace
Effects of reducing rear weight on an already front heavy car
Bump steer correction steering gearbox Shims for Extended Ball Joint installed Fit
This is what treads looks like after 30000km with 38psi Front and 26psi rear
In the following post I will try and post up all the pictures of mods I could find... Please let me know if you have any questions and I'd be happy to answer!
Last edited by eternal_fantasy; Sep 22, 2015 at 03:41 AM.
Thread Starter
|
Member
Joined: May 2015
Posts: 78
From: Taipei
My DIY Location...
Apartment parking space: for light modding...
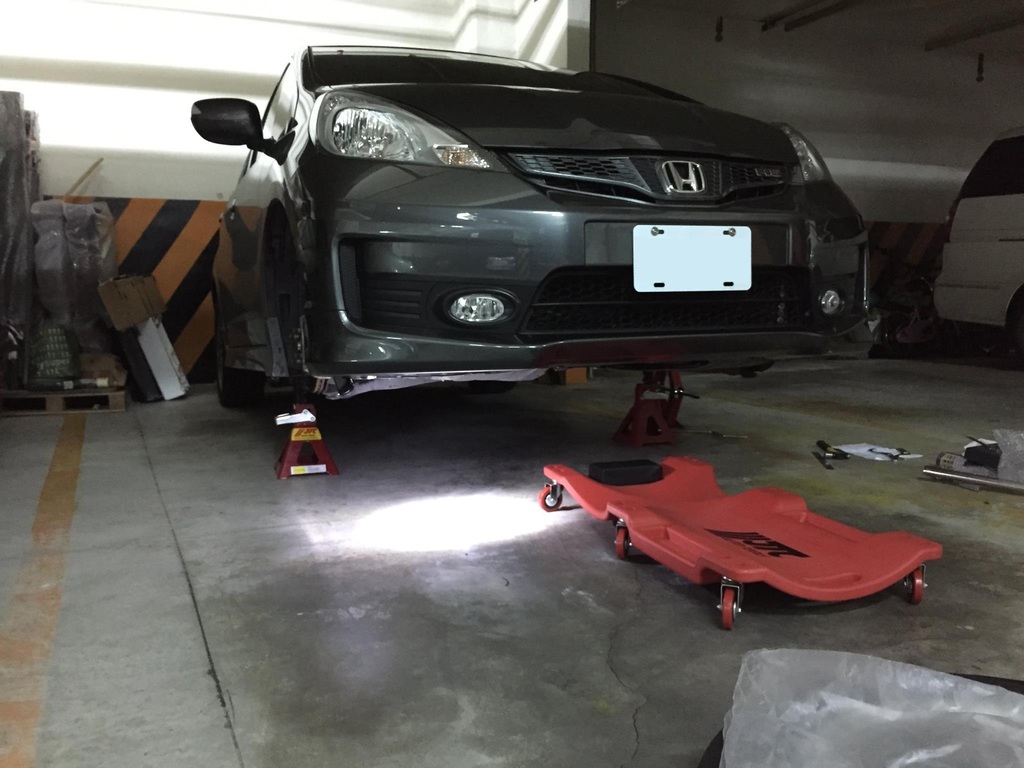
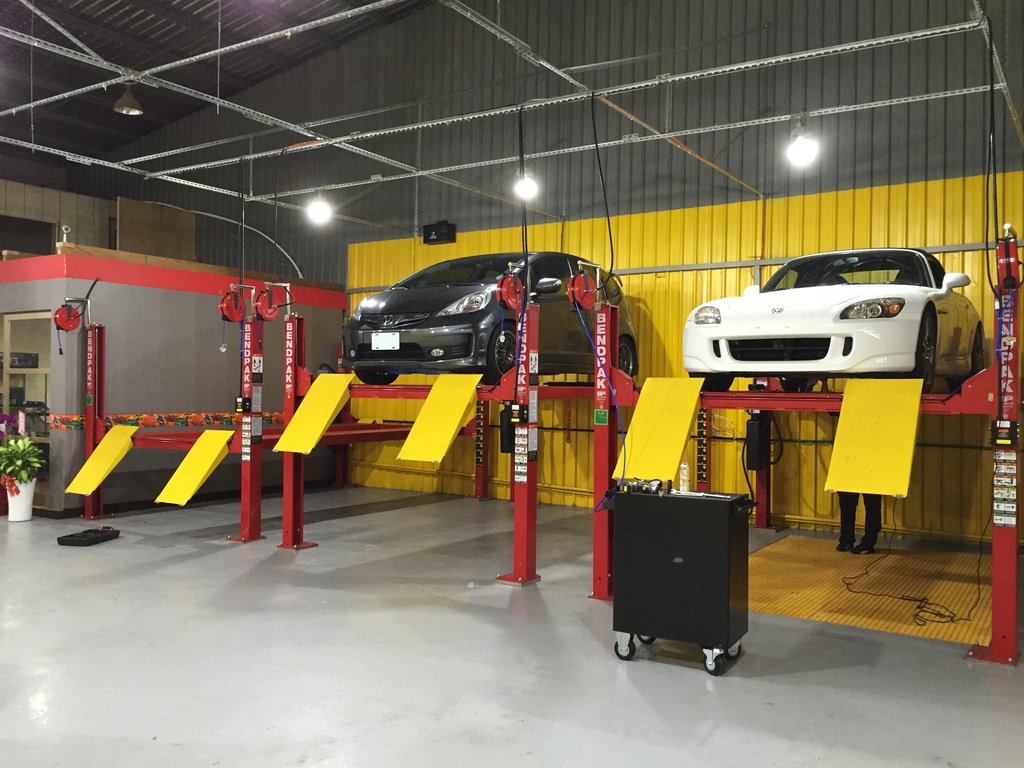
DIY car lift rental Garage: for heavy lifting!
Mods:
Swift springs in box

Tein Street Flex front strut with Swift Springs and Hardrace Hardened Front Strut mounting rubber
Hardrace Adjustable end-links, Cusco Front Sway Bar
Custom Steering rack shim/Bumpsteer kit (Front Right mounting point)
Custom Steering rack shim/Bumpsteer kit (Rear Center mounting point), Cusco Front sway bar
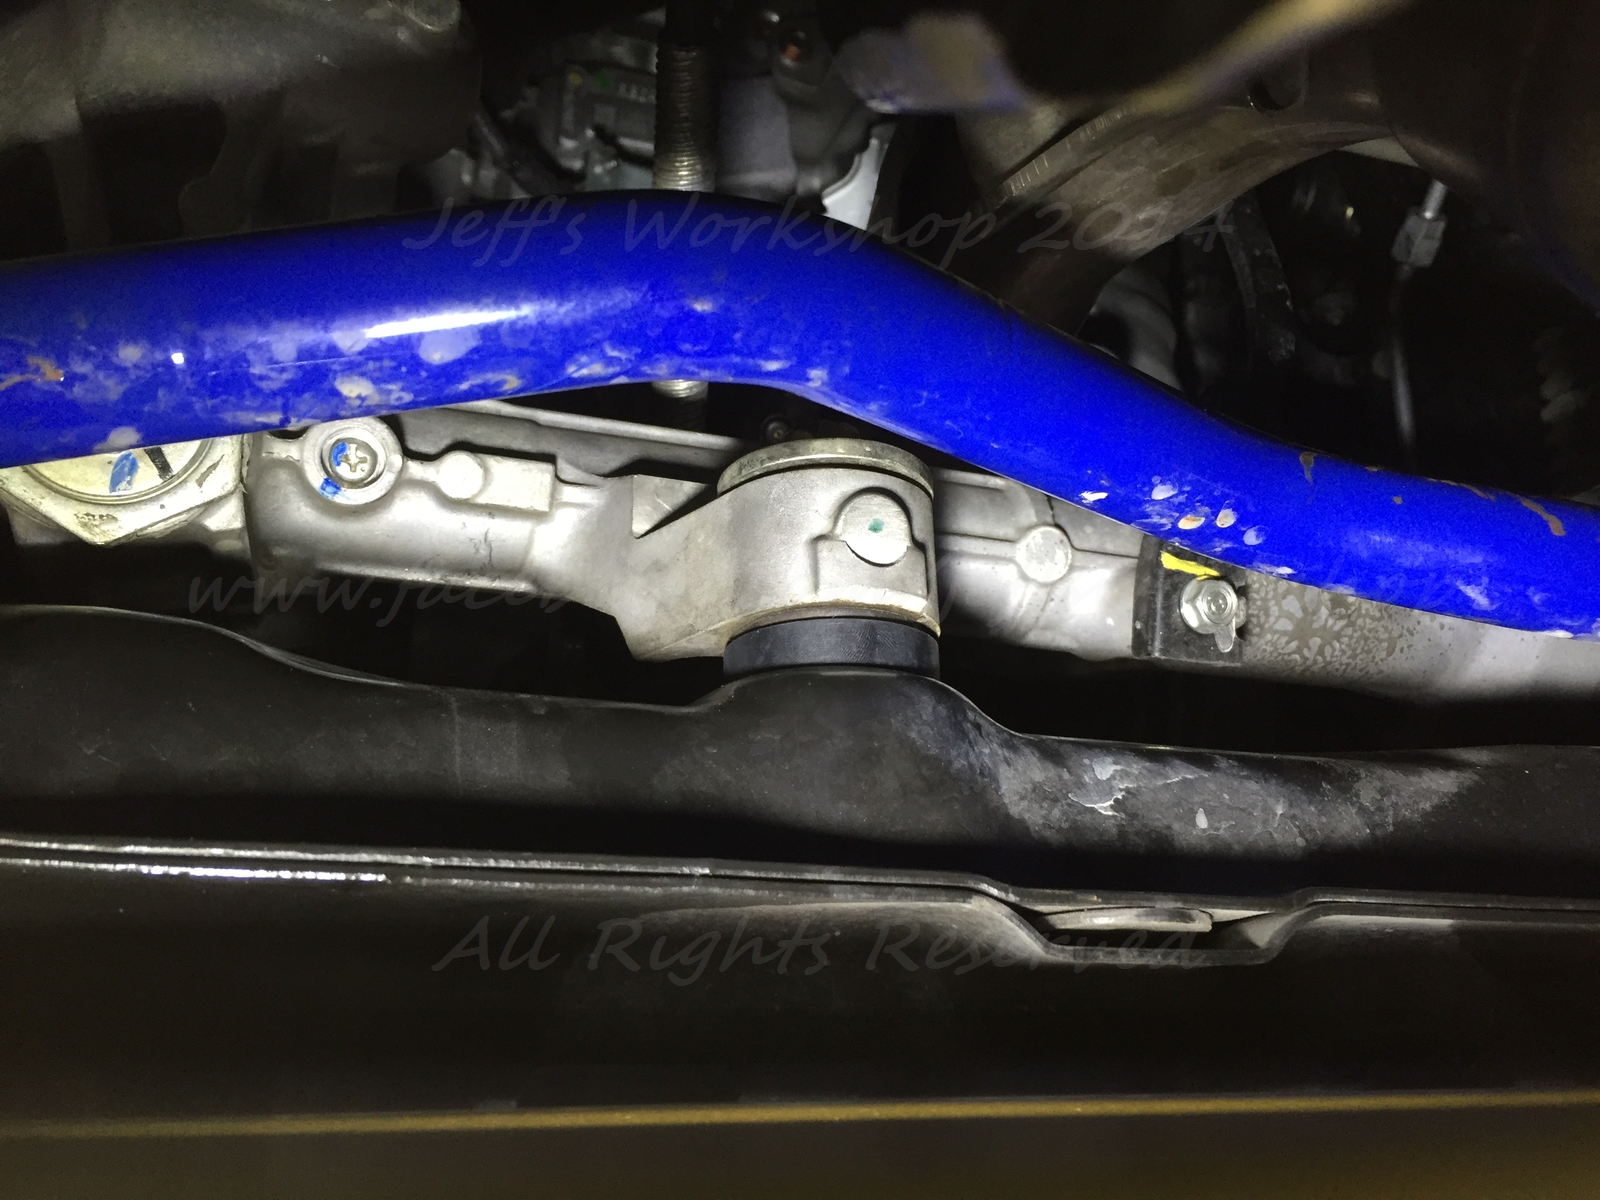
Steering Rack Shim/Bracing Shim Fabrication
Extended Bolt/Underbrace Shim

Beatrush 4 point underbrace with custom alloy shims, Spoon Rigid Collar
Beatrush aluminium underpanel, 4 point underbrace, Mid chassis PU cover
JDM RS interior door handle
JDM RS Leather Steering Wheel, JDM Fit RS Gunmetal Steering Wheel Trim
Rays RE30 16s with Bridgestone Potenza RE003
Hardrace RCA Set

Top: Factory Bottom: Hardrace

Pressed into the LCA

Installed

Lower Control Arm angle with RCA installed
Old set of Bilstein PSS cleaned and set aside

Routed Garmin, Pioneer DEX-P99RS Head Unit, Factory Auto Climate Control

Let me know if there's any specific mod you'd like a picture of, and I'll see what I can do.
Apartment parking space: for light modding...
DIY car lift rental Garage: for heavy lifting!
Mods:
Swift springs in box
Tein Street Flex front strut with Swift Springs and Hardrace Hardened Front Strut mounting rubber
Hardrace Adjustable end-links, Cusco Front Sway Bar
Custom Steering rack shim/Bumpsteer kit (Front Right mounting point)
Custom Steering rack shim/Bumpsteer kit (Rear Center mounting point), Cusco Front sway bar
Steering Rack Shim/Bracing Shim Fabrication
Extended Bolt/Underbrace Shim
Beatrush 4 point underbrace with custom alloy shims, Spoon Rigid Collar
Beatrush aluminium underpanel, 4 point underbrace, Mid chassis PU cover
JDM RS interior door handle
JDM RS Leather Steering Wheel, JDM Fit RS Gunmetal Steering Wheel Trim
Rays RE30 16s with Bridgestone Potenza RE003
Hardrace RCA Set
Top: Factory Bottom: Hardrace
Pressed into the LCA
Installed
Lower Control Arm angle with RCA installed
Old set of Bilstein PSS cleaned and set aside
Routed Garmin, Pioneer DEX-P99RS Head Unit, Factory Auto Climate Control
Let me know if there's any specific mod you'd like a picture of, and I'll see what I can do.
Last edited by eternal_fantasy; Aug 9, 2015 at 10:33 PM.

Thread Starter
|
Member
Joined: May 2015
Posts: 78
From: Taipei

Thread Starter
|
Member
Joined: May 2015
Posts: 78
From: Taipei
Thanks for your comment!
Here's pics of the Modulo Spoiler as requested:
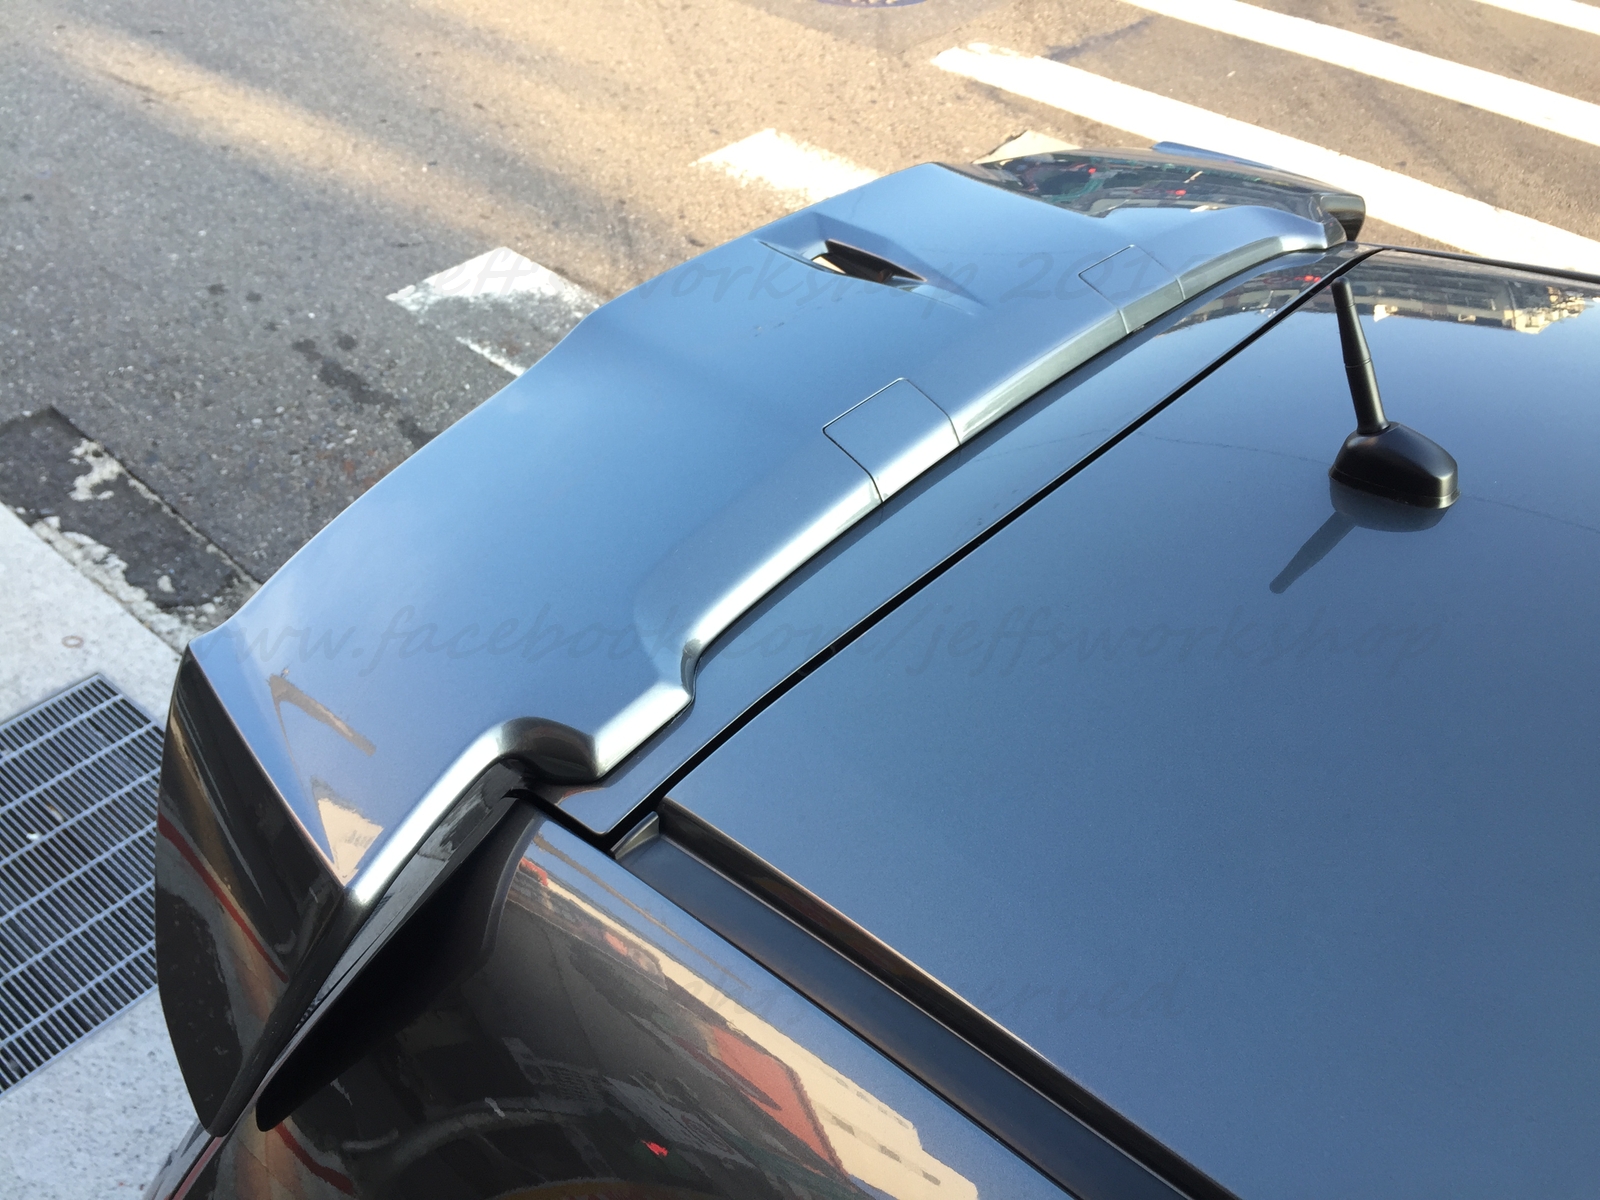
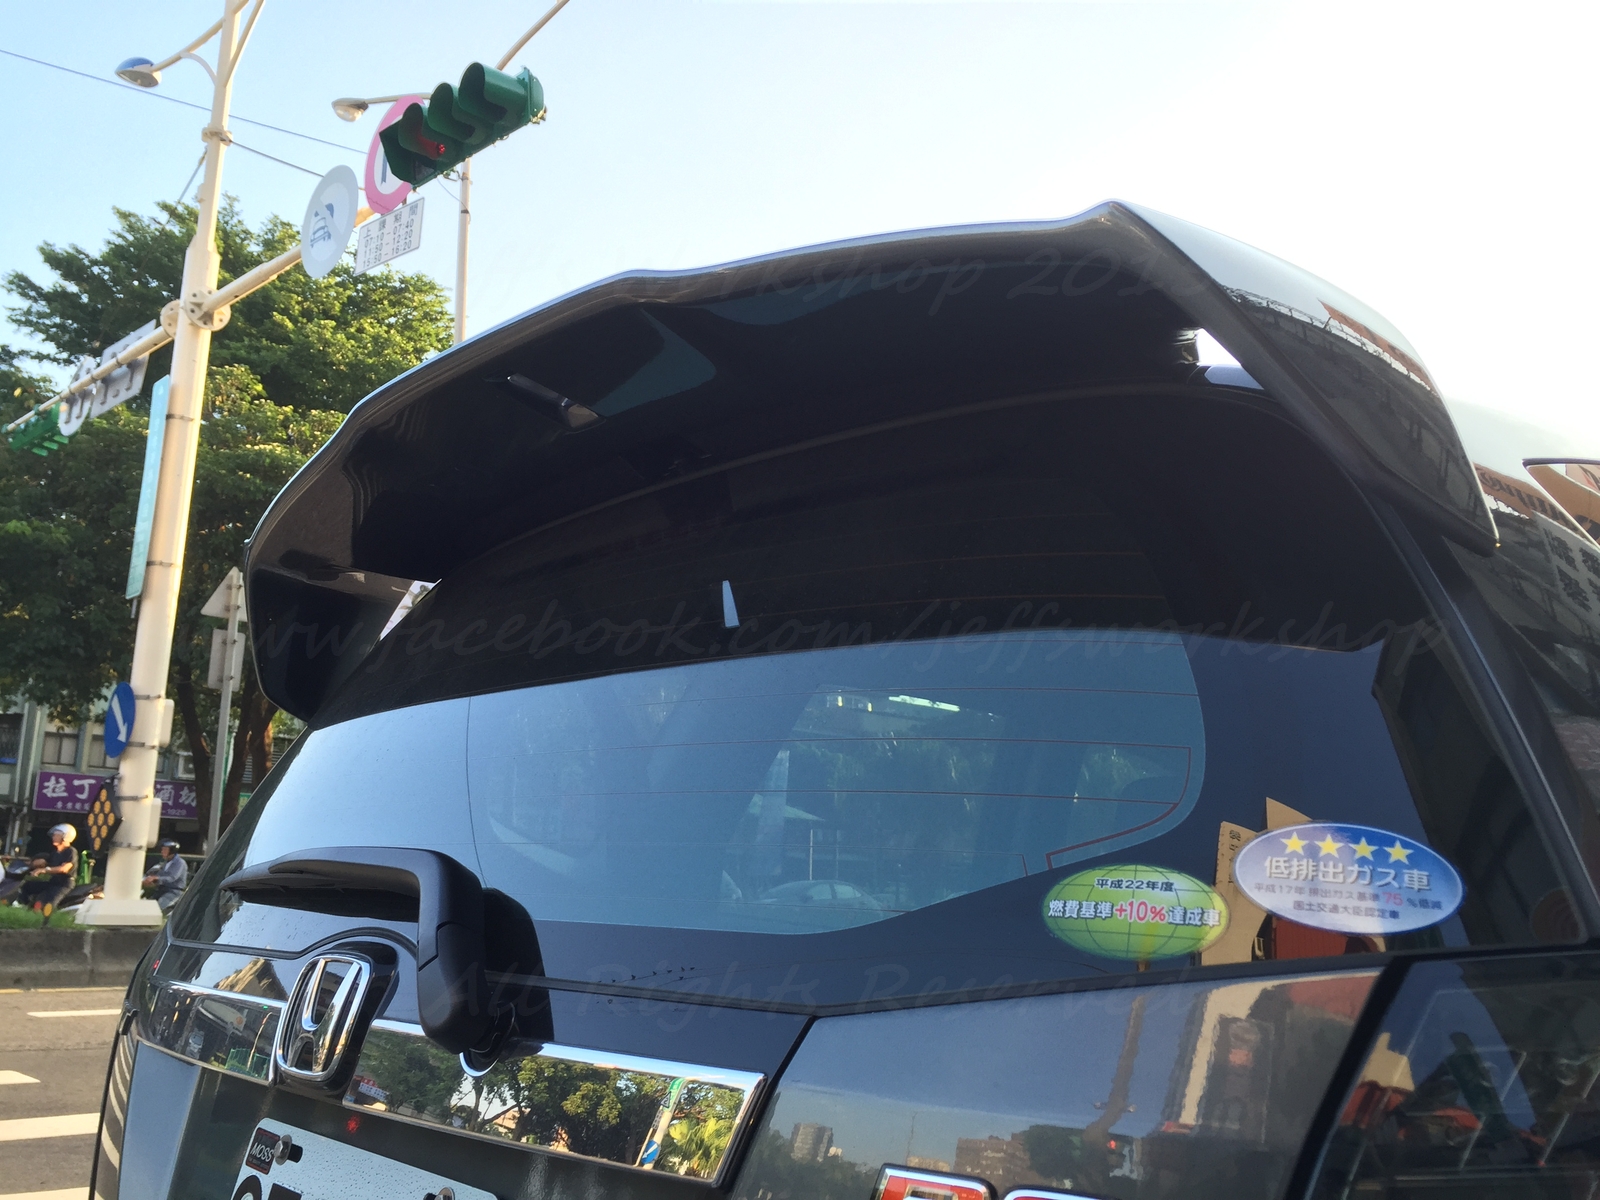
Hole in the middle allows the stock antenna to not interfere with tail gate opening where it would otherwise poke the spoiler.
Here's pics of the Modulo Spoiler as requested:
Hole in the middle allows the stock antenna to not interfere with tail gate opening where it would otherwise poke the spoiler.
Thread Starter
|
Member
Joined: May 2015
Posts: 78
From: Taipei
Nope I'm afraid... It was a factory option from Honda that I selected when I ordered the car. I believe it is manufactured by Modulo Thailand branch for the genuine spoiler, while there are cheaper copies by Taiwanese fabricators.

Thread Starter
|
Member
Joined: May 2015
Posts: 78
From: Taipei
Thanks for the comment! The Tails are one of my favourite exterior mods!
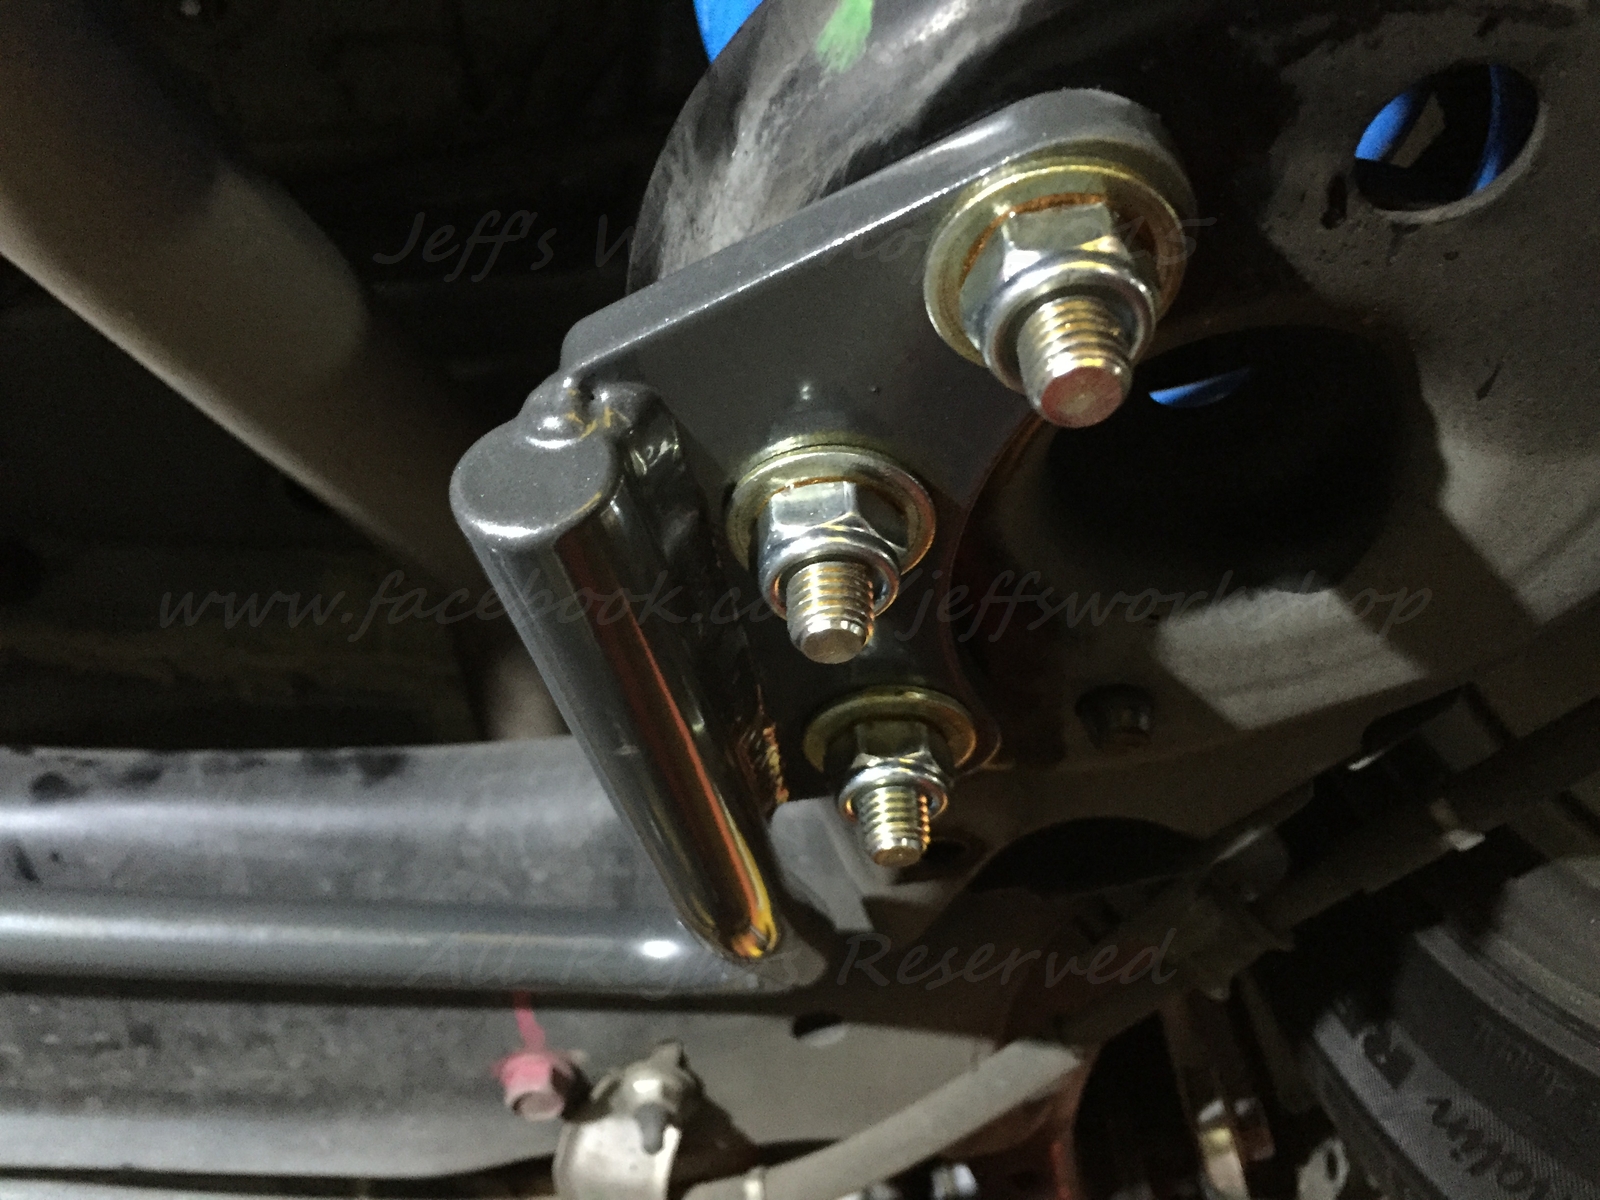
Progress Group makes one mean RSB... It has finally arrived after 3 weeks, travelling across the US by ground, then flown to Taiwan.
The quality of the bends and welds are superb, and the metallic gray powdercoat puts Cusco's flakey paint job to shame.
Picking up the RSB from the importer
Some pictures comparing the 16mm Cusco RSB with the 19mm Progress
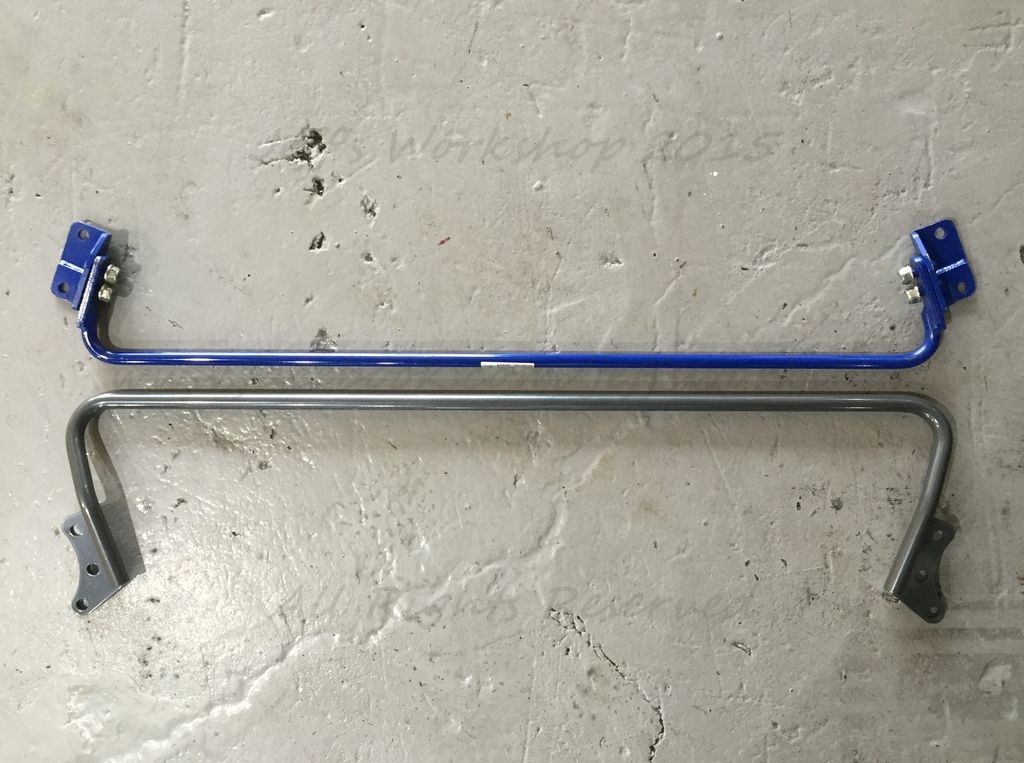
The increase in thickness is apparent. The jump from 16mm to 19mm converts to an increase in stiffness of 99%
Progress mounts to the lower spring perch via 3 screws and nuts. Cusco mounts 2 adaptor plates to the spring perch, then the RSB is attached to the adaptor plate. Easy to tell which product mounts with superior rigidity. Also with the Cusco you get noise from the sway bar/adapter plate interface if the nut is not torqued on super tight, as it is experiencing sheer forces.

And finally with the Progress RSB installed (Click to enlarge)
Super rigid mounting
I also purchased 2 sets of RAYS Hub Centric Spacers for my Volks RE30
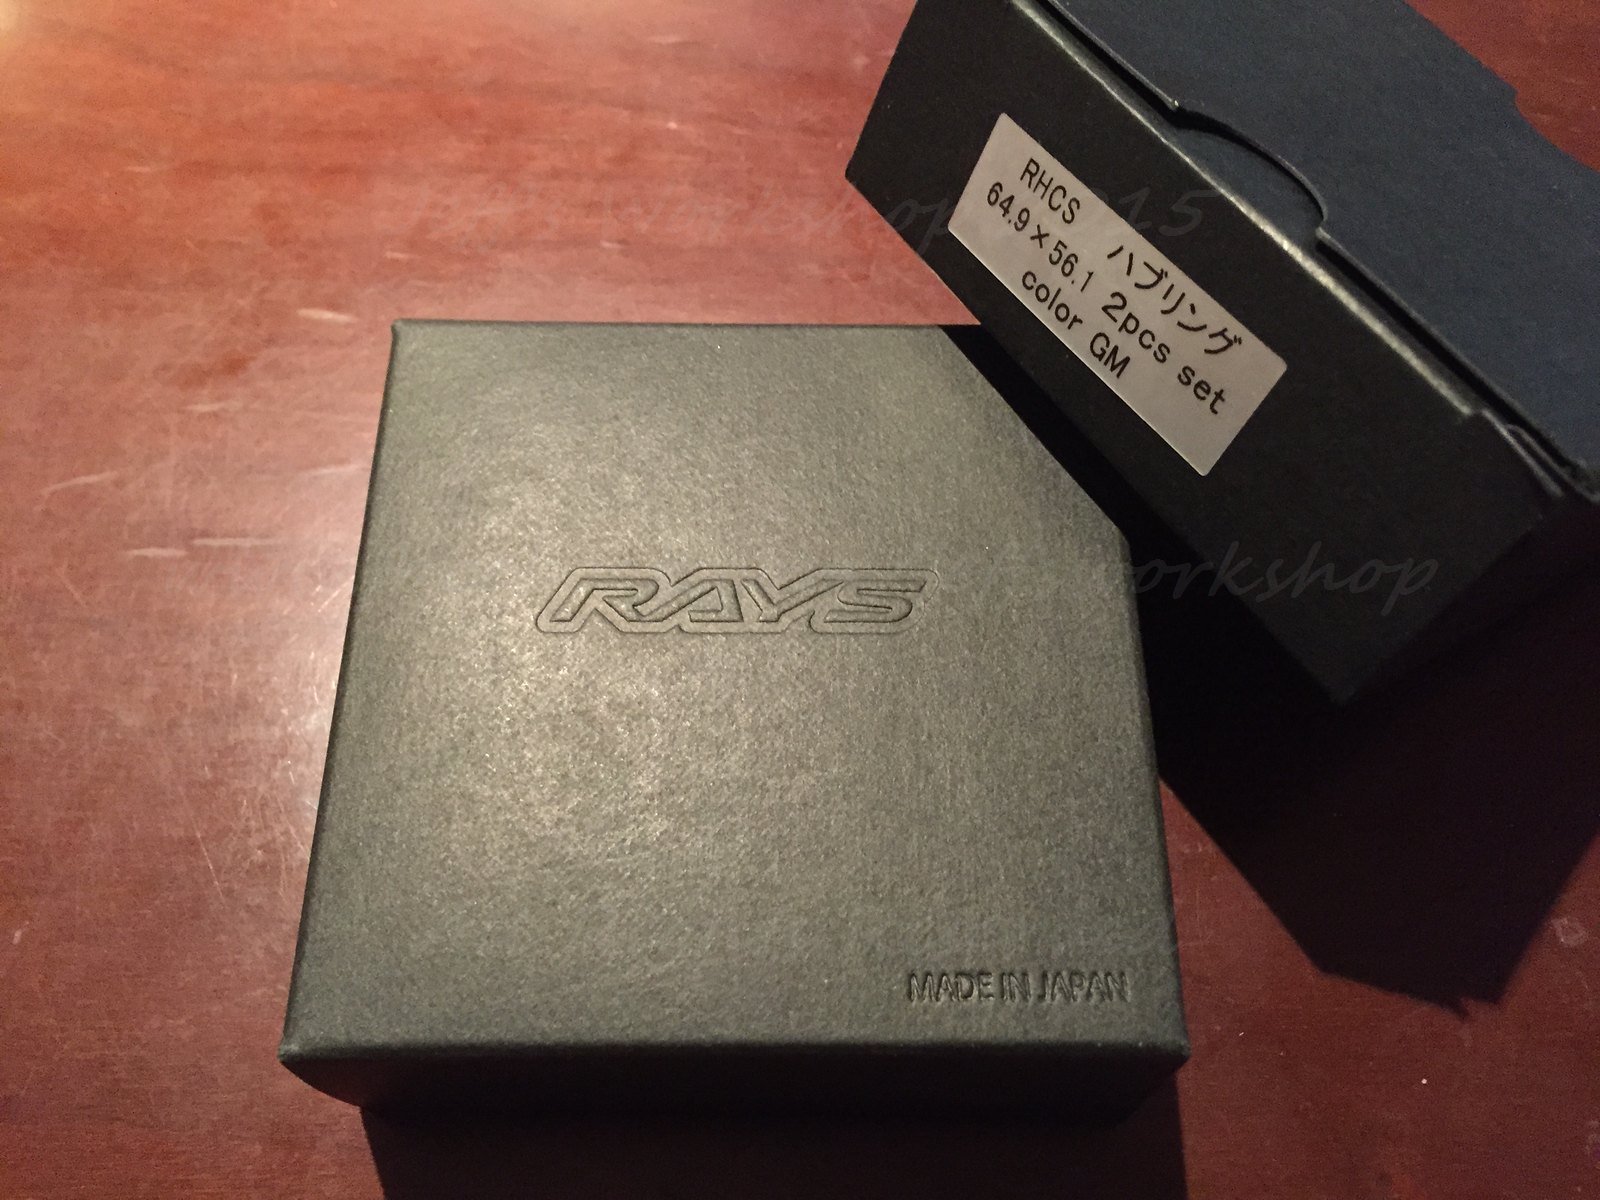
(The copper colour on some bolt/nut/wheel hub are Wurth CU800 Copper anti-seize and corrosion protection paste.)
In the next few days I will attempt to upgrade my rear springs to SWIFT linear rate, 4kgf/mm springs. Just need some measurements taken before determining the spring specs to order.
Thanks for viewing!
Progress Group makes one mean RSB... It has finally arrived after 3 weeks, travelling across the US by ground, then flown to Taiwan.
The quality of the bends and welds are superb, and the metallic gray powdercoat puts Cusco's flakey paint job to shame.
Picking up the RSB from the importer
Some pictures comparing the 16mm Cusco RSB with the 19mm Progress
The increase in thickness is apparent. The jump from 16mm to 19mm converts to an increase in stiffness of 99%
Progress mounts to the lower spring perch via 3 screws and nuts. Cusco mounts 2 adaptor plates to the spring perch, then the RSB is attached to the adaptor plate. Easy to tell which product mounts with superior rigidity. Also with the Cusco you get noise from the sway bar/adapter plate interface if the nut is not torqued on super tight, as it is experiencing sheer forces.
And finally with the Progress RSB installed (Click to enlarge)
Super rigid mounting
I also purchased 2 sets of RAYS Hub Centric Spacers for my Volks RE30
(The copper colour on some bolt/nut/wheel hub are Wurth CU800 Copper anti-seize and corrosion protection paste.)
In the next few days I will attempt to upgrade my rear springs to SWIFT linear rate, 4kgf/mm springs. Just need some measurements taken before determining the spring specs to order.
Thanks for viewing!
Member
Joined: Jul 2014
Posts: 1,083
From: CA


But perhaps all is not lost. Maybe one day I'll be able to track down a Modulo spoiler
Thread Starter
|
Member
Joined: May 2015
Posts: 78
From: Taipei
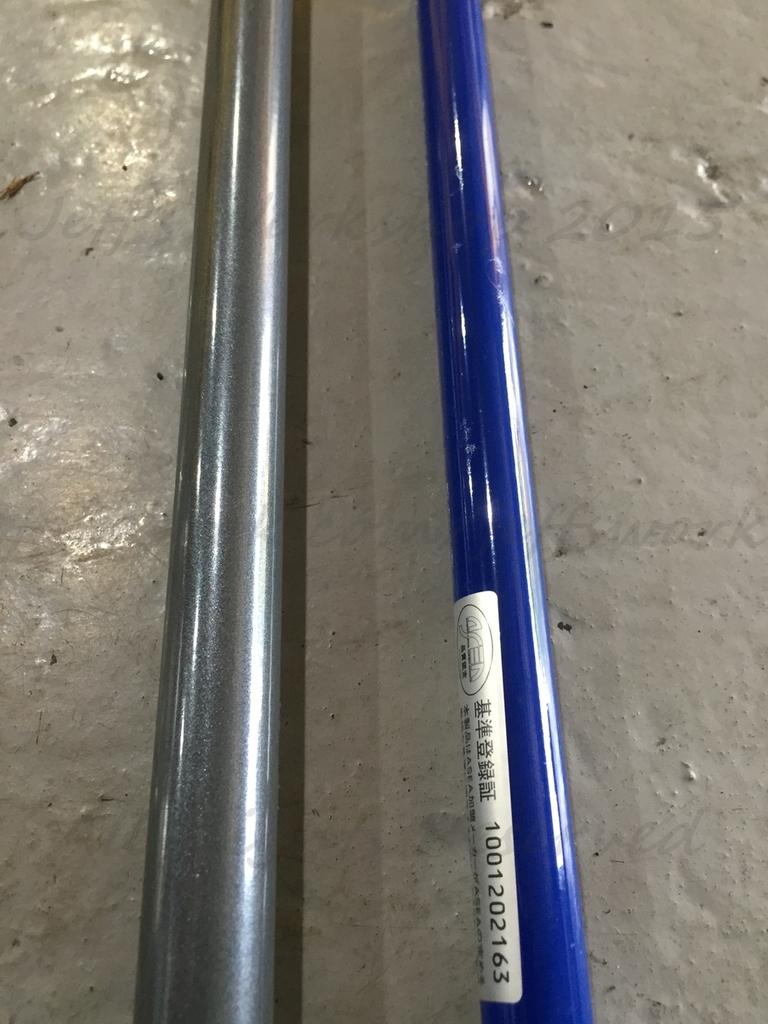
My Rear Swifts arrived from the factory with some free stickers! Everything lining up perfectly, can't wait to install them next week!

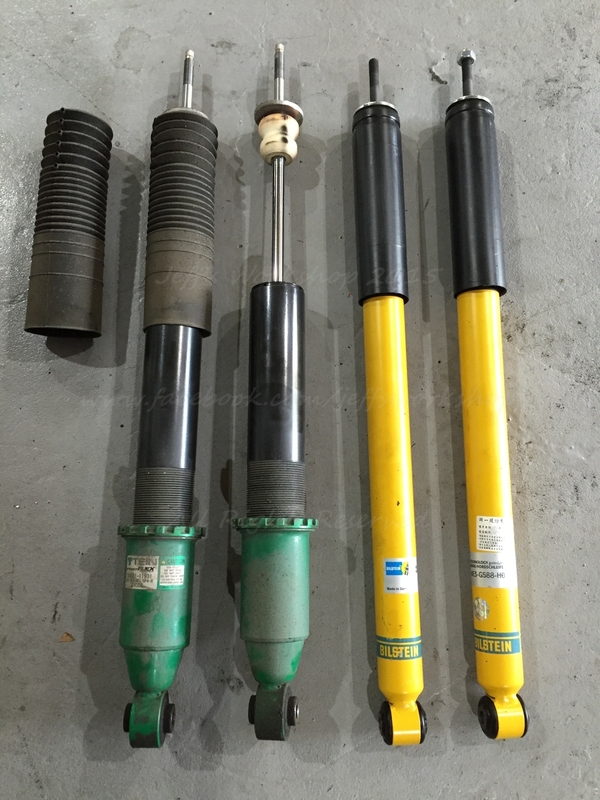
Did a quick wire diameter check, Bilstein 12.6mm, Tein 11.0mm, Swift 9.5mm.
Did a quick wire diameter check, Bilstein 12.6mm, Tein 11.0mm, Swift 9.5mm.
Thread Starter
|
Member
Joined: May 2015
Posts: 78
From: Taipei
Installed Swift Springs, and thanks to the prep work, everything went on smoothly.
Took the opportunity to weight my previous shock and spring and compare them to the Swifts and Bilstein damper
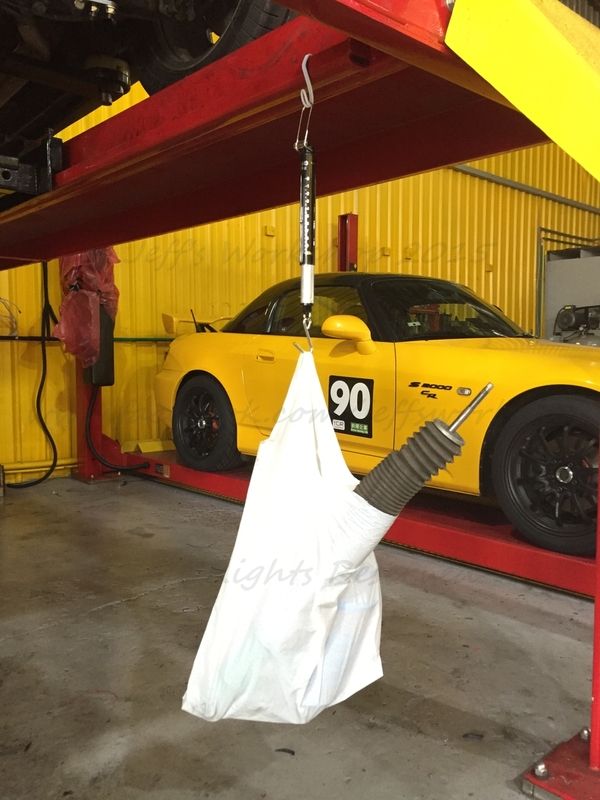
Bilstein PSS progressive springs + TEIN Street Flex Twintube Damper 9.84kg
SWIFT Springs + Bilstein PSS Monotube Damper 4.76kg
Total unsprung weight reduction: 5.08kg
German Damper, Japanese Springs, American Sway Bar. Its like the United Nation of rear suspension setup...
Took the opportunity to weight my previous shock and spring and compare them to the Swifts and Bilstein damper
Bilstein PSS progressive springs + TEIN Street Flex Twintube Damper 9.84kg
SWIFT Springs + Bilstein PSS Monotube Damper 4.76kg
Total unsprung weight reduction: 5.08kg
German Damper, Japanese Springs, American Sway Bar. Its like the United Nation of rear suspension setup...
Last edited by eternal_fantasy; Aug 11, 2015 at 01:46 PM.


Very nice.
A couple questions.
What insulation did you use on the hatch?
Could we see a pic of mounting for GPS. I have mine in same area but glued the disc to dash. Also where did you connect the power supply? To the Aux circuit?
Thanks
A couple questions.
What insulation did you use on the hatch?
Could we see a pic of mounting for GPS. I have mine in same area but glued the disc to dash. Also where did you connect the power supply? To the Aux circuit?
Thanks
Thread Starter
|
Member
Joined: May 2015
Posts: 78
From: Taipei
My GPS mount is the Garmin rubber mount, but with its rubbery base removed, and stuck onto the dash with some 3M double sided acrylic tape. I'll get a picture of it from the side for you. Power is just rerouted through the dash, coming out near the center console cup holders, and plugged in the 12V.
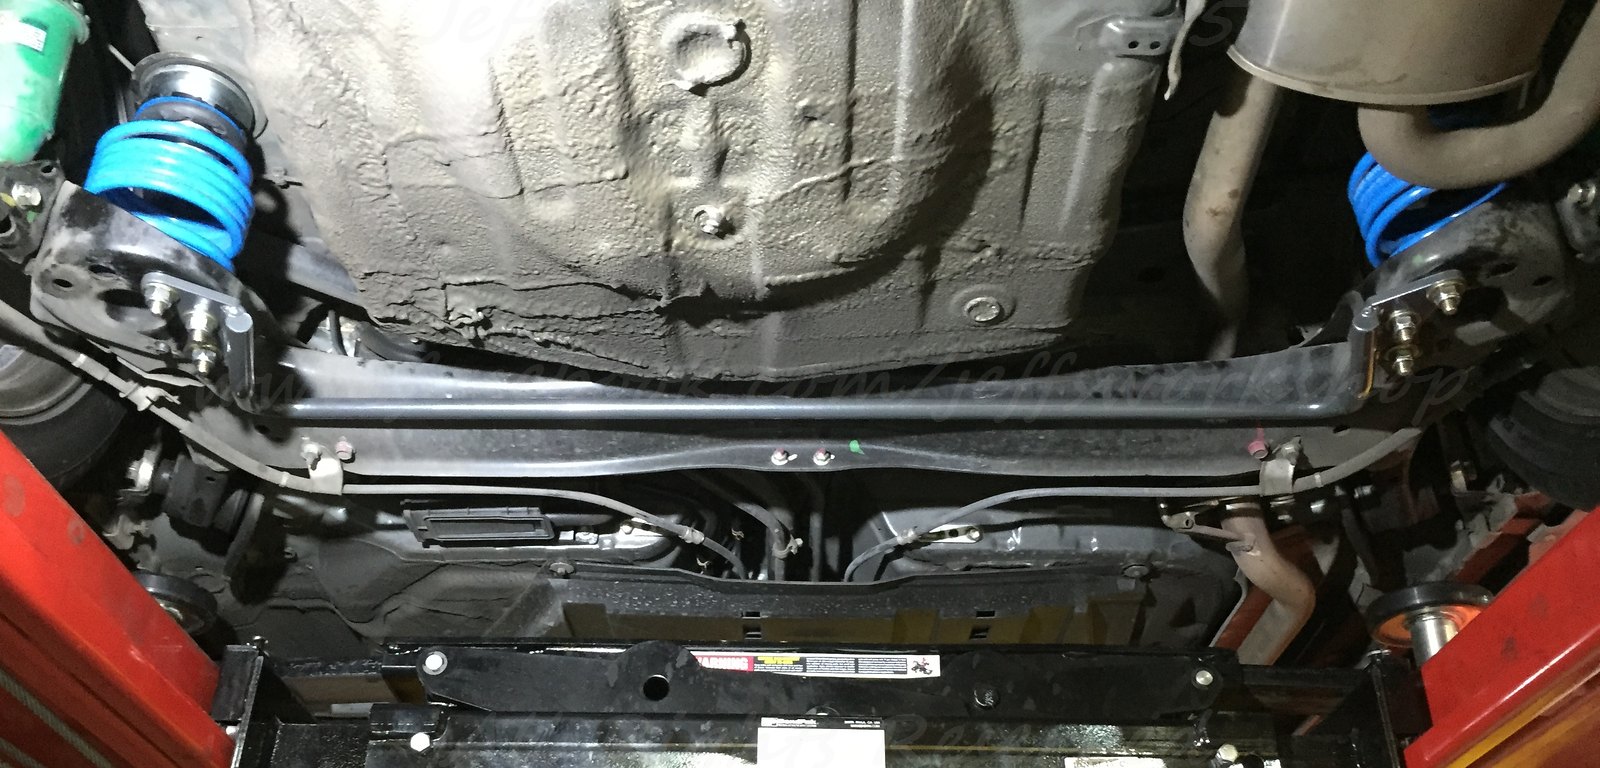
Some update on the rear suspension setup.
Using Stainless Steel wire ropes and some swaging I was able create a device to limit rear trailing arm travel without modifying the damper, thus eliminate the need for helper springs, which was causing some weird behaviour from trailing arm deflection during turns and bumps.
The rubber isolator for the Bilstein rear adjustable spring perch was modified from Honda factory part, which provided much more surface area compared to the Bilstein part.


The ropes have a 290lbs working strength and 1450lbs breaking strength per side, so should be plenty strong for the application.
Last edited by eternal_fantasy; Sep 21, 2015 at 02:12 AM.
