DIY - LED Tails w/ Rear Foglight on a GE8 Sport
#1
 10-31-2009, 03:44 PM


DIY - LED Tails w/ Rear Foglight on a GE8 Sport
This is a how-to on installing LED tails (aka JDM RS taillights) and wiring up the rear fog on a USDM/NA GE8 Sport. As far as I'm aware, LED tails with LHD rear fog are available from Taiwan, China and Germany...probably others but I didn't look. These instructions are for the USDM Sport model because they already come with front fogs and have a foglight switch on the combination light switch; so I can use the Base model accessory foglight harness+switch for a rear fog hookup. The countries that package the Fit with LED tails + rear fog use the foglight dial on combination switch as the rear fog and sell front fogs as accessories instead, refer to pic below.
2-way switch for Fits equipped with rear fog stock.

4-way switch for Fits equipped with both front and rear fogs stock.

A) Parts & Tools
Honda Parts Needed:
The following are some pictures of the Honda parts mentioned above for buying reference:
33500-TF0-J01 Right LED taillight


33550-TF0-G01 Left LED taillight w/ LHD rear foglight (LED on the left, USDM/NA on the right)


33550-TF0-G51 Left LED taillight w/ LHD rear foglight (2012 non-RS or Hybrid)

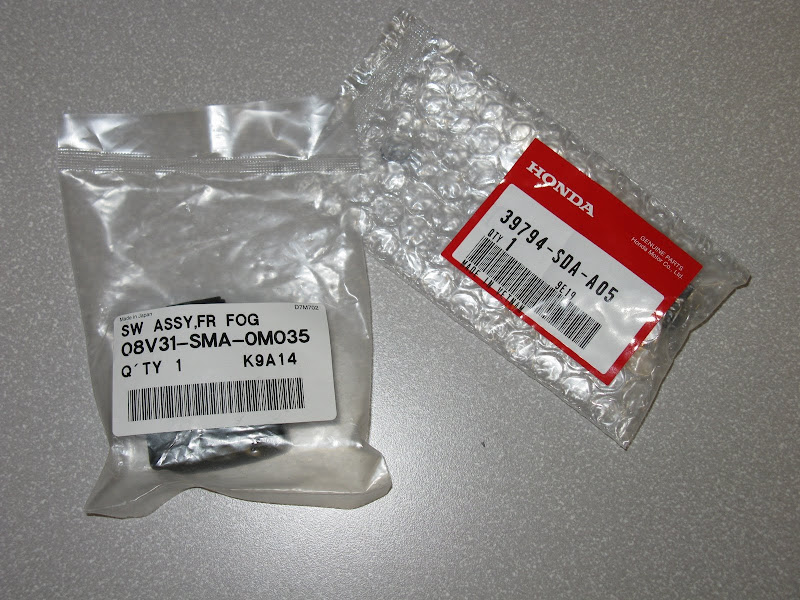
08V31-SMA-0M035 Foglight switch

08V31-TK6-10030 Foglight switch harness for base model

39794-SDA-A05 Relay (package on the right)
04321-SH2-307 Connector (2P .090 F) & 04320-SP0-A00 Pigtail (0.5)

If anyone (in the U.S.) wants a 04321-SH2-307 Connector & 2x 04320-SP0-A00 Pigtails, I have 4 extra sets I can ship @ $5+postage so that you don't have to buy a whole pack. These are the same connectors used for many Honda taillights, and interior lights for Hondas 1990+ (such as our Fit's reverse and cargo area lights).

2-way switch for Fits equipped with rear fog stock.
4-way switch for Fits equipped with both front and rear fogs stock.
A) Parts & Tools
Honda Parts Needed:
33500-TF0-J01 Right LED taillight
33550-TF0-G01 Left LED taillight w/ LHD rear foglight
33500-TF0-J51 (2012 non-RS or Hybrid) Right LED taillight
33550-TF0-G51 (2012 non-RS or Hybrid) Left LED taillight w/ LHD rear foglight
08V31-SMA-0M035 Foglight switch
08V31-TK6-10030 Foglight switch harness for base model
39794-SDA-A05 Relay
38221-SNA-A31 7.5A Fuse - I reused the fuse pulled from DRL disabling or you can use 38221-SNA-A41 10A Fuse
04321-SH2-307 Connector (2P .090 F) - these come in a bag of 5, only 1 needed
04320-SP0-A00 Pigtail (0.5) - these come in a bag of 10, only 2 needed
Other Parts Needed:33550-TF0-G01 Left LED taillight w/ LHD rear foglight
33500-TF0-J51 (2012 non-RS or Hybrid) Right LED taillight
33550-TF0-G51 (2012 non-RS or Hybrid) Left LED taillight w/ LHD rear foglight
08V31-SMA-0M035 Foglight switch
08V31-TK6-10030 Foglight switch harness for base model
39794-SDA-A05 Relay
38221-SNA-A31 7.5A Fuse - I reused the fuse pulled from DRL disabling or you can use 38221-SNA-A41 10A Fuse
04321-SH2-307 Connector (2P .090 F) - these come in a bag of 5, only 1 needed
04320-SP0-A00 Pigtail (0.5) - these come in a bag of 10, only 2 needed
Wire
Heatshrink/Electrical tape
Connectors (I used a 2-pin .062 Molex)
Zip Ties
Tools Needed:Heatshrink/Electrical tape
Connectors (I used a 2-pin .062 Molex)
Zip Ties
Soldering Gun ~35W+
Solder
Wire stripper/cutter
Scissors
Heatgun/blowdryer for heatshrink
Trim removal tools
Ratchet
8mm, 14mm sockets
Crimper (I used a D-Sub crimper for molex pins)
Solder
Wire stripper/cutter
Scissors
Heatgun/blowdryer for heatshrink
Trim removal tools
Ratchet
8mm, 14mm sockets
Crimper (I used a D-Sub crimper for molex pins)
The following are some pictures of the Honda parts mentioned above for buying reference:
33500-TF0-J01 Right LED taillight
33550-TF0-G01 Left LED taillight w/ LHD rear foglight (LED on the left, USDM/NA on the right)
33550-TF0-G51 Left LED taillight w/ LHD rear foglight (2012 non-RS or Hybrid)
08V31-SMA-0M035 Foglight switch
08V31-TK6-10030 Foglight switch harness for base model
39794-SDA-A05 Relay (package on the right)
04321-SH2-307 Connector (2P .090 F) & 04320-SP0-A00 Pigtail (0.5)
If anyone (in the U.S.) wants a 04321-SH2-307 Connector & 2x 04320-SP0-A00 Pigtails, I have 4 extra sets I can ship @ $5+postage so that you don't have to buy a whole pack. These are the same connectors used for many Honda taillights, and interior lights for Hondas 1990+ (such as our Fit's reverse and cargo area lights).
Last edited by Zalthras; 10-21-2011 at 03:48 PM. Reason: updated with 2012 taillight part#s
#2
10-31-2009, 03:45 PM
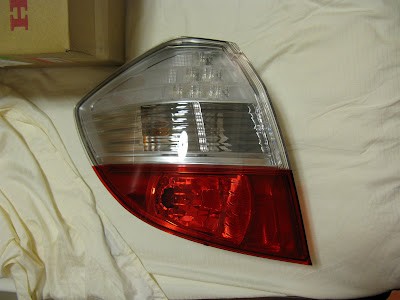
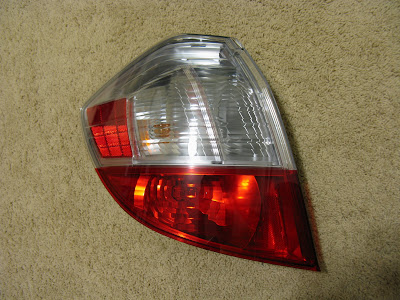
B) Swapping Taillights
I'm going to skip describing this since there are a bunch of DIYs on the forum covering the process.
If you get the part #'s I listed, they come with bulbs and sockets so it's plug-n-play. The LED taillights have bulbs in similar locations as the USDM/NA taillights so all the wires fit perfectly without the need to stretch like when using non-LED taillights.
C) Trim removal & wire routing
This section covers the steps on how to remove the interior trim pieces in order to run a single wire from the fuse box area to the rear fog. We only need to run one wire since the accessory fog harness supplies a switched positive while the ground for the rear fog can be tapped to the body. I'll cover this stuff in a bit more detail to help you guys prevent from damaging the trim pieces.
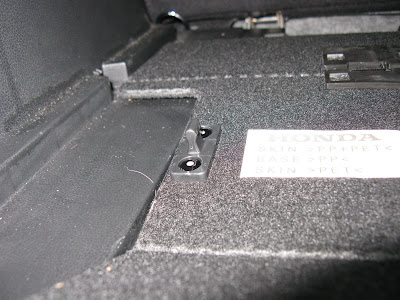
Cargo Floor
Rear Trim Panel (trunk hatch sill cover under where the spare tire tools sit)
Cargo Area Light
Cargo Area Side Trim Panel (Left)
Driver's Dashboard Undercover
Driver's Kick Panel
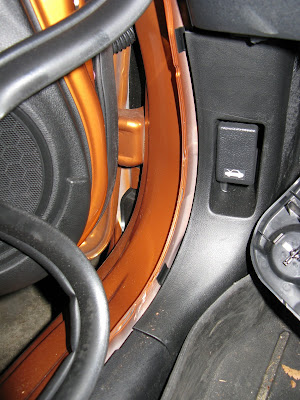
Front Door Sill Trim
Rear Door Sill Trim
B-pillar Lower Trim
Wires
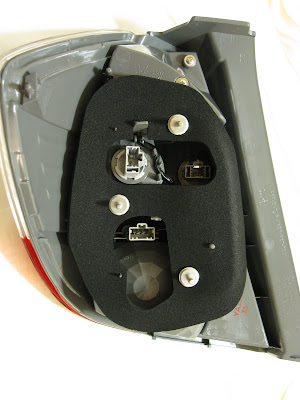
Wire & Connect the Rear Foglight
When reinstalling panels, make sure the tabs on the panels sit flush along the body seam before pressing the inner seals back into place.
I'm going to skip describing this since there are a bunch of DIYs on the forum covering the process.
If you get the part #'s I listed, they come with bulbs and sockets so it's plug-n-play. The LED taillights have bulbs in similar locations as the USDM/NA taillights so all the wires fit perfectly without the need to stretch like when using non-LED taillights.
C) Trim removal & wire routing
This section covers the steps on how to remove the interior trim pieces in order to run a single wire from the fuse box area to the rear fog. We only need to run one wire since the accessory fog harness supplies a switched positive while the ground for the rear fog can be tapped to the body. I'll cover this stuff in a bit more detail to help you guys prevent from damaging the trim pieces.
Cargo Floor
1) the floor is attached by two clips, just open up the spare tire cover and pry it upwards.

2) Becareful when removing the Floor cover, the middle portion of the hinge is supported by two dense foam blocks that are held on by glue.
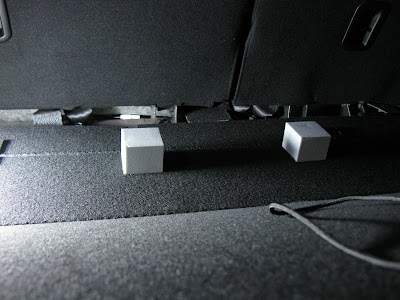
2) Becareful when removing the Floor cover, the middle portion of the hinge is supported by two dense foam blocks that are held on by glue.
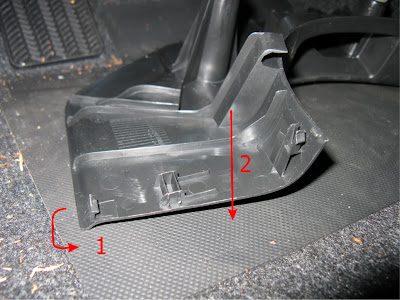
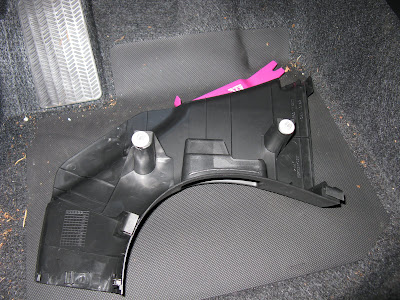
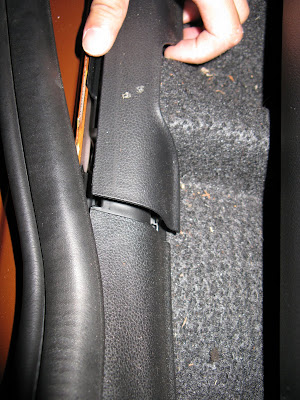
Rear Trim Panel (trunk hatch sill cover under where the spare tire tools sit)
1) Pry the bottom edge of corners to release the hooks #1 from the Cargo Area Side Trim Panels
2) Then pull upwards to release the remaining two hooks #2 (one on either edge) and 4 clips holding the panel to the body.
2) Then pull upwards to release the remaining two hooks #2 (one on either edge) and 4 clips holding the panel to the body.
Cargo Area Light
1) Pry at the front edge of the lens and pop out the lens assembly.

2) Disconnect the connector.
2) Disconnect the connector.
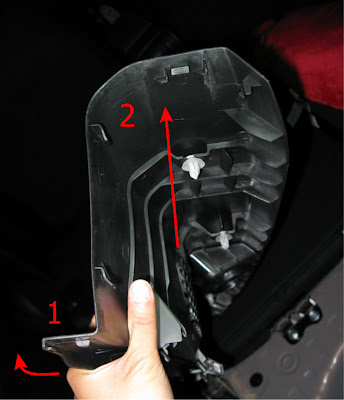
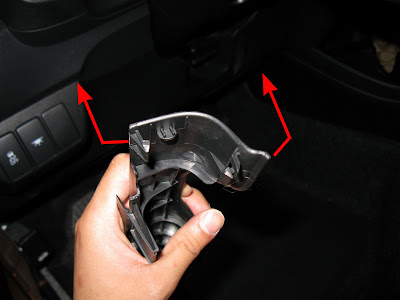
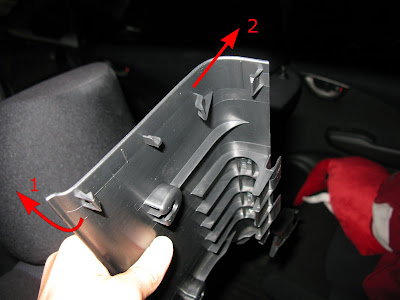
Cargo Area Side Trim Panel (Left)
1) Fold down the rear left seat.
2) Yank out the rear door inner seal as much as needed.

3) Fold down the Cargo Hold Down D-Ring (if equipped).
4) Pop out this clip.
5) Then pop out these two clips.

6) Begin pulling out the upper edge of the panel starting from the door.
7) Unhook the seatbelt.
8) Finally, remove the Side Trim Panel.
2) Yank out the rear door inner seal as much as needed.
3) Fold down the Cargo Hold Down D-Ring (if equipped).
4) Pop out this clip.
5) Then pop out these two clips.
6) Begin pulling out the upper edge of the panel starting from the door.
7) Unhook the seatbelt.
8) Finally, remove the Side Trim Panel.
Driver's Dashboard Undercover
Turn the plastic screw knob 90� and pop out the panel by pushing downwards on the right edge.
Driver's Kick Panel
1) Yank out the front door inner seal as much as needed.
2) Unhook the joining edge by first unhooking the bottom hook #1, then pulling the trim in the direction of #2.
3) Pop the remaining two clips out in the same direction as #2 above, and slide the panel out while holding the hood release open.
2) Unhook the joining edge by first unhooking the bottom hook #1, then pulling the trim in the direction of #2.
3) Pop the remaining two clips out in the same direction as #2 above, and slide the panel out while holding the hood release open.
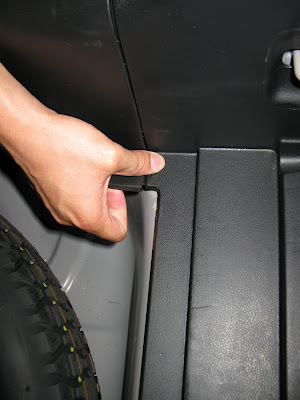
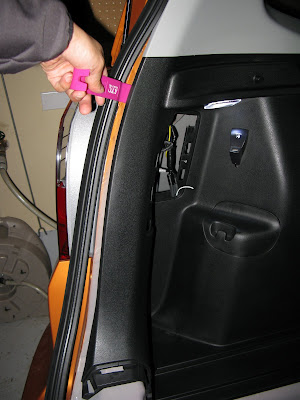
Front Door Sill Trim
1) Continue yanking out the front door inner seal as much as needed.
2) Then lightly tilt the front side of this panel upwards to release the clips from the panel (you can popout the clips from the body later). **Don't overdo this since it doesn't take a whole lot of force.**
3) Unhook the joining edge by spreading out the sides and pulling up on the trim.
2) Then lightly tilt the front side of this panel upwards to release the clips from the panel (you can popout the clips from the body later). **Don't overdo this since it doesn't take a whole lot of force.**
3) Unhook the joining edge by spreading out the sides and pulling up on the trim.
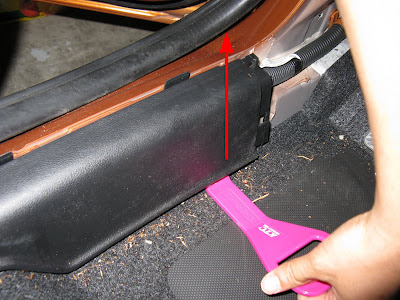
Rear Door Sill Trim
1) Continue pulling out the rear door inner seal as much as needed.
2) Then either pop out the clip or slide the panel inward to release the trim from the clip.
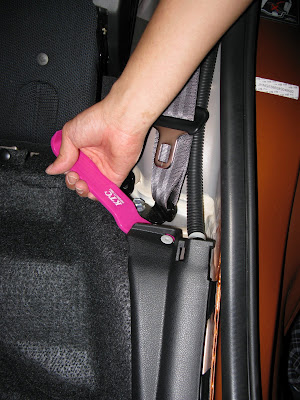
3) Unhook the joining edge by pulling out the bottom hook #1, then pulling the trim in the direction of #2.
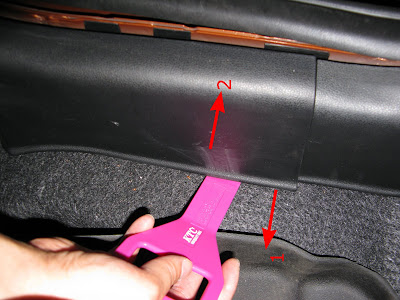
2) Then either pop out the clip or slide the panel inward to release the trim from the clip.
3) Unhook the joining edge by pulling out the bottom hook #1, then pulling the trim in the direction of #2.
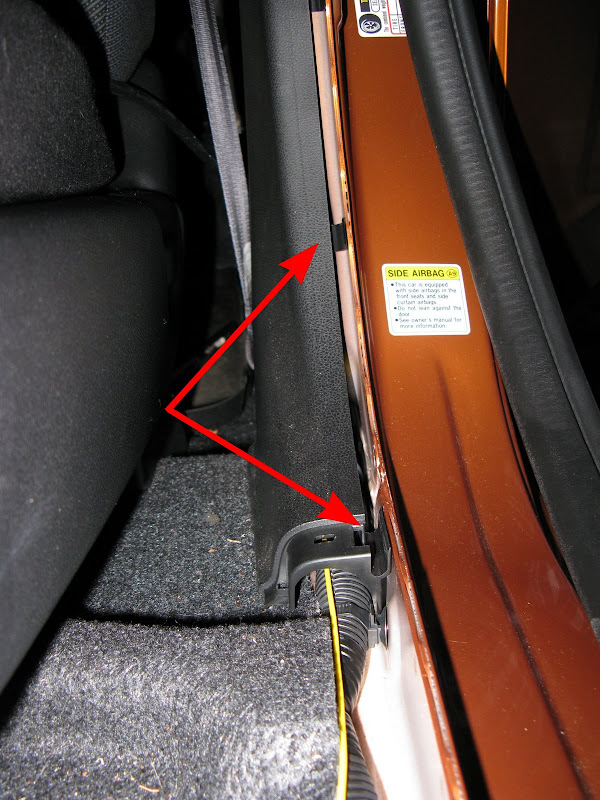
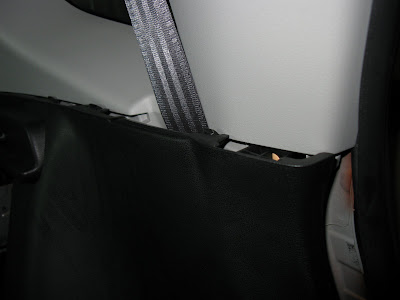
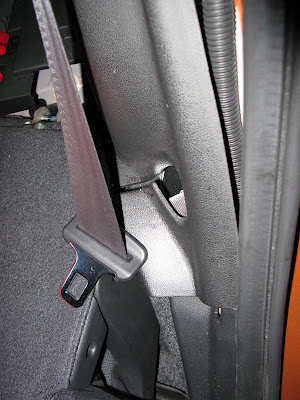
B-pillar Lower Trim
1) Continue pulling out both front and rear door inner seals as much as needed.
2) Remove the seatbelt lower anchor bolt with a 14mm. When reinstalling, torque to 32 N-m (3.3 kgf-m, 24 lbf-ft).
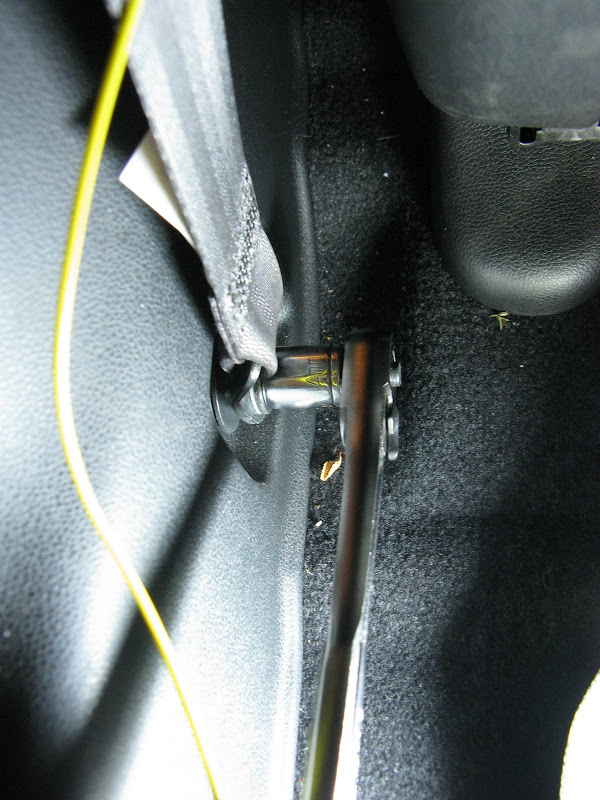
3) Pull out from the bottom just enough for you to run wires through. No need to remove this trim since we're only passing a wire through the bottom.
***Note: there are side impact and seatbelt sensors with yellow harnesses, DO NOT PULL ON OR DISCONNECT THESE***

2) Remove the seatbelt lower anchor bolt with a 14mm. When reinstalling, torque to 32 N-m (3.3 kgf-m, 24 lbf-ft).
3) Pull out from the bottom just enough for you to run wires through. No need to remove this trim since we're only passing a wire through the bottom.
***Note: there are side impact and seatbelt sensors with yellow harnesses, DO NOT PULL ON OR DISCONNECT THESE***
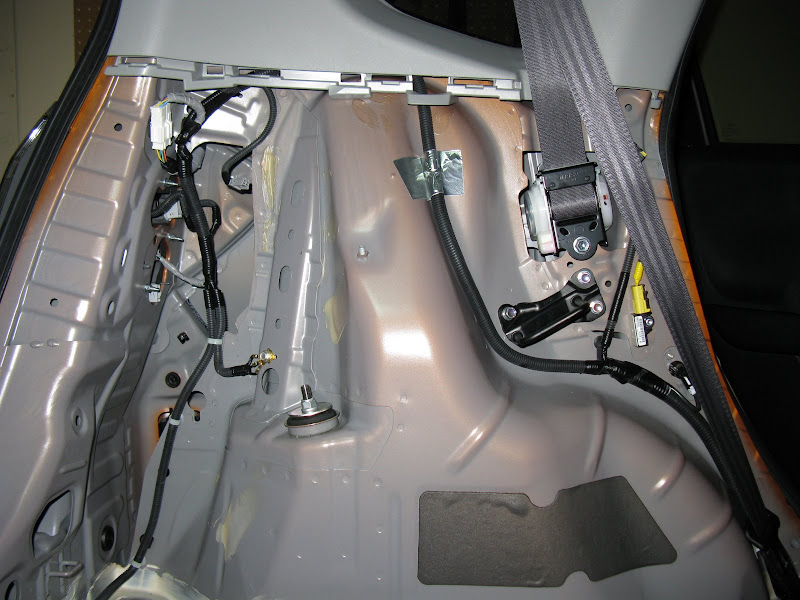
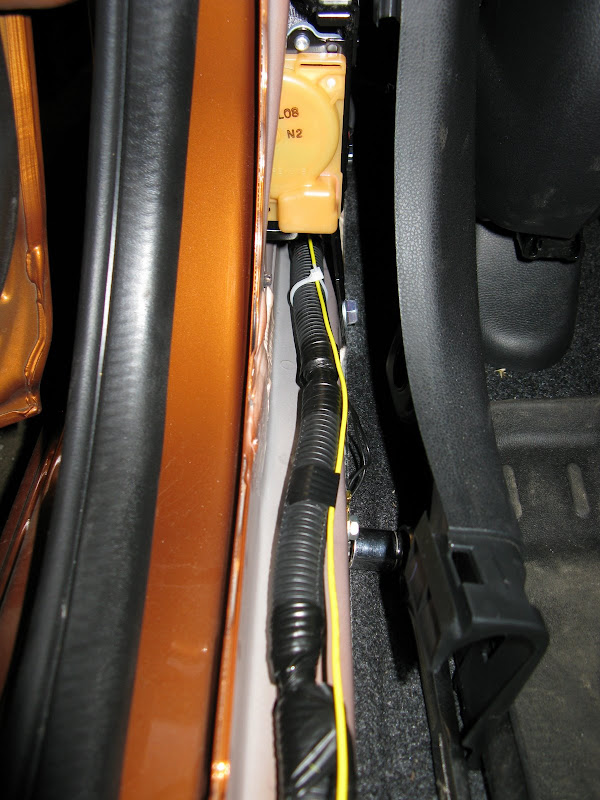
Wires
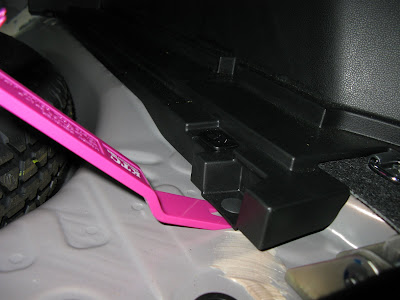
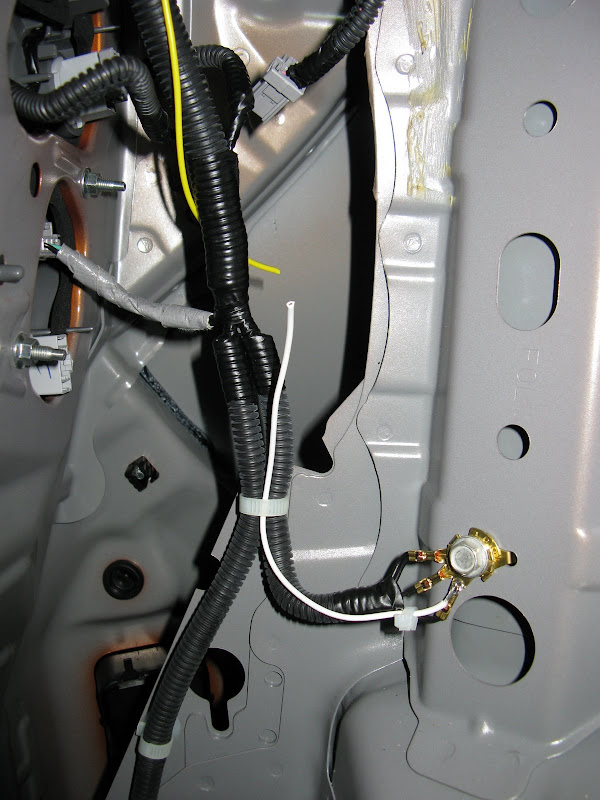
1) Run a wire from the fuse box area to the rear taillight (mine can be seen as the single 18AWG yellow wire in the pictures. Use zipties to attach to existing harnesses.
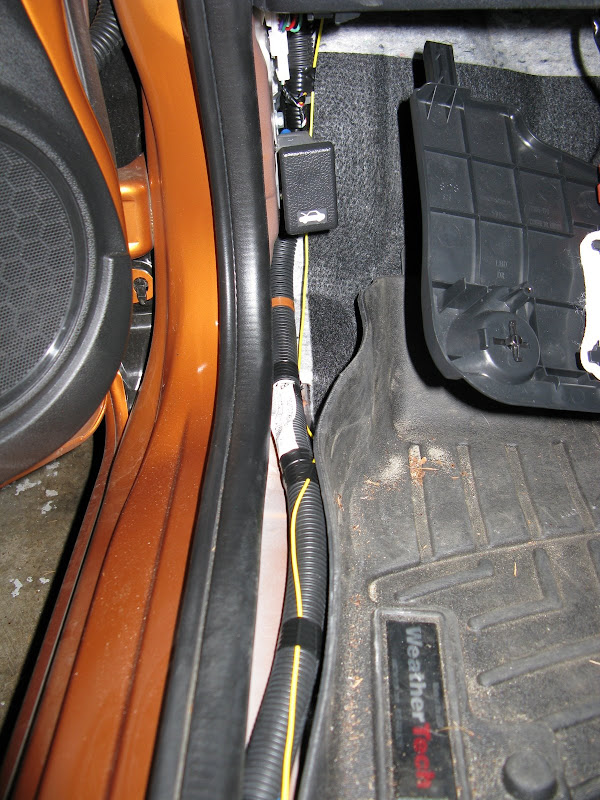
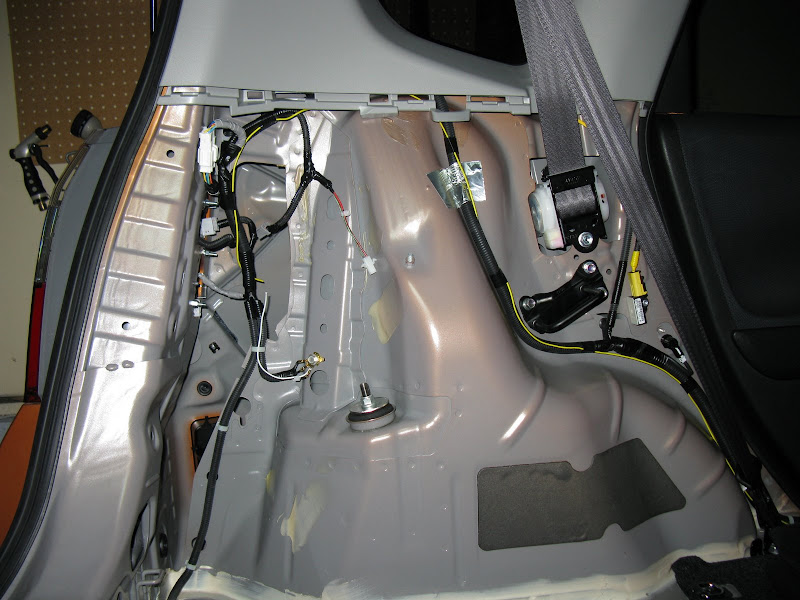
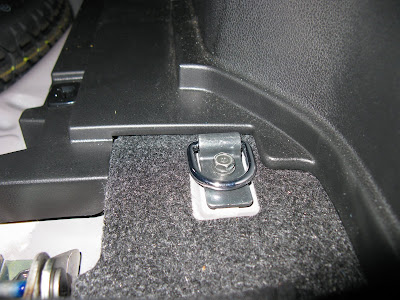
2) For the ground side of the bulb, solder or crimp a wire onto the grounding point bolted to the body. Also ziptie into place.
2) For the ground side of the bulb, solder or crimp a wire onto the grounding point bolted to the body. Also ziptie into place.
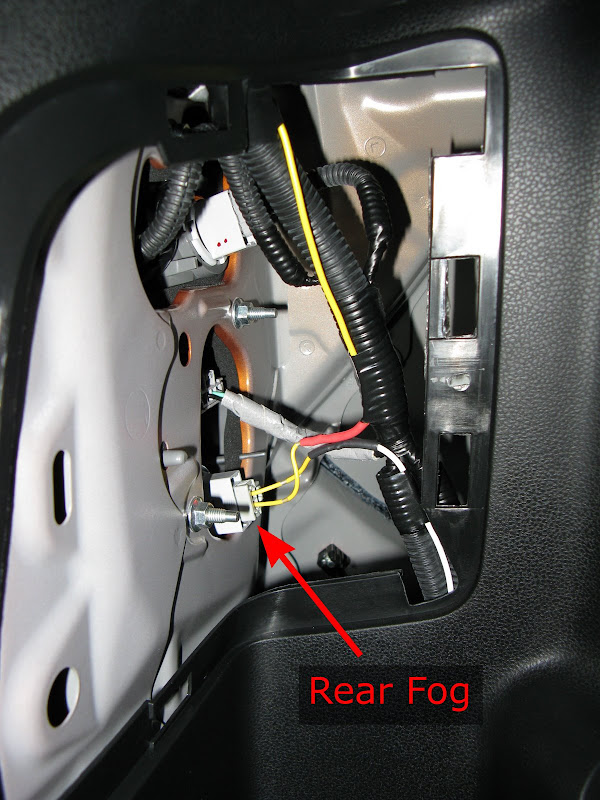
Wire & Connect the Rear Foglight
1) Put the pins into the 2-pin connector. Then solder the leads to the wires you just put in place and plug the connector into the Rear Foglight socket.
When reinstalling panels, make sure the tabs on the panels sit flush along the body seam before pressing the inner seals back into place.
Last edited by Zalthras; 10-31-2009 at 04:20 PM.
#3
10-31-2009, 03:46 PM
D) Foglight switch harness install & wire tapping
This section covers how to install the foglight switch harness and where to tap the switch/relay control(+) signal from.
***Warning - It is recommended that you disconnect the battery before working on wiring. /Warning***
For the most part you can refer to these online instructions @http://www.handa-accessories.com/fit/09fog.pdf for steps #33-62 on pages 8-13. The deviations from these instructions are detailed below:
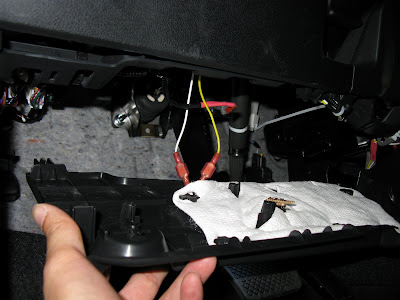
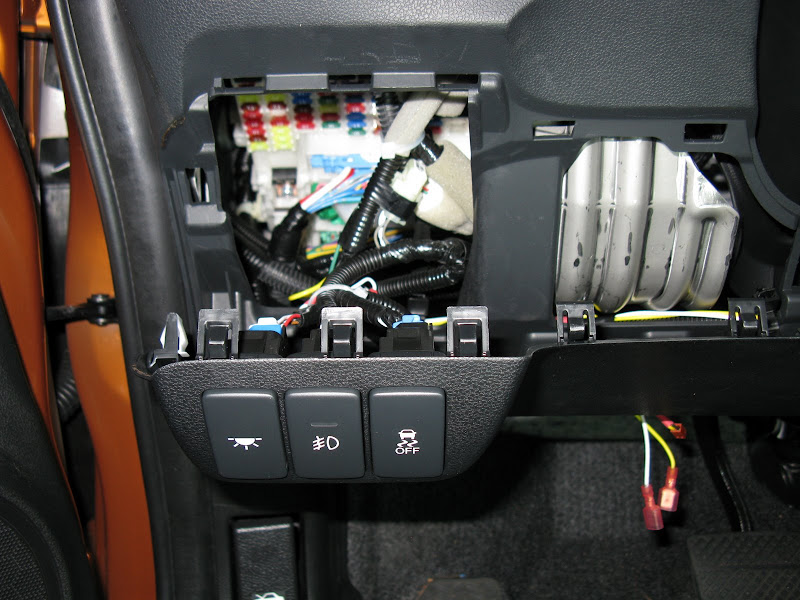
Once you're done, the bottom half of the MICU should look something like this.

Pop in the Switch, plug in everything, zip tie loose cables in place and test it out.
This section covers how to install the foglight switch harness and where to tap the switch/relay control(+) signal from.
***Warning - It is recommended that you disconnect the battery before working on wiring. /Warning***
For the most part you can refer to these online instructions @http://www.handa-accessories.com/fit/09fog.pdf for steps #33-62 on pages 8-13. The deviations from these instructions are detailed below:
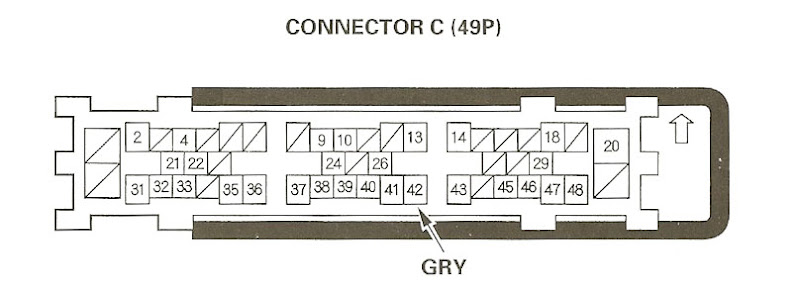
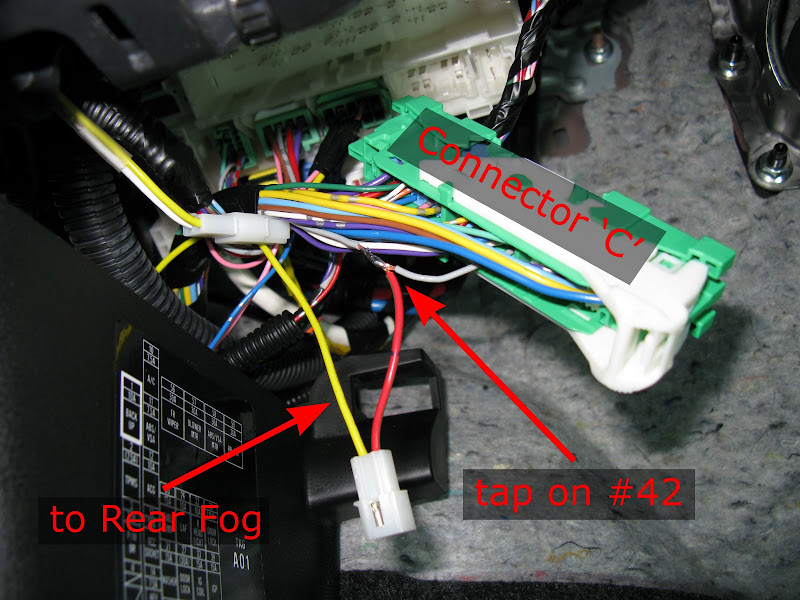
step #36 - instead of looking for a 2-pin connector (it's non-existant on Sport models), you'll need to connect it to a tap on pin #42 of the 'C' connector & the line you just ran from the rear of the car in Part C. This is to limit the use of the Rear Fog to function only when your parking/headlights are on.
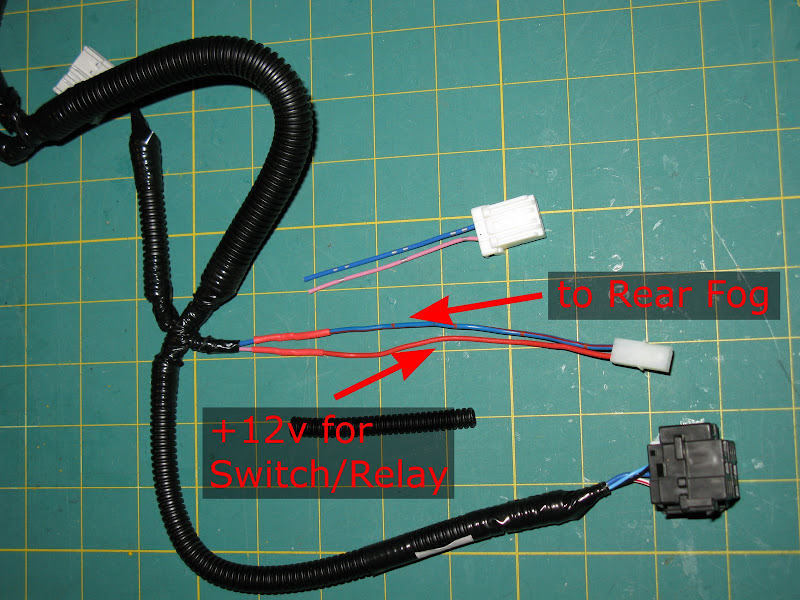
I chose to cut off the 2-pin connector and switch to molex connectors.
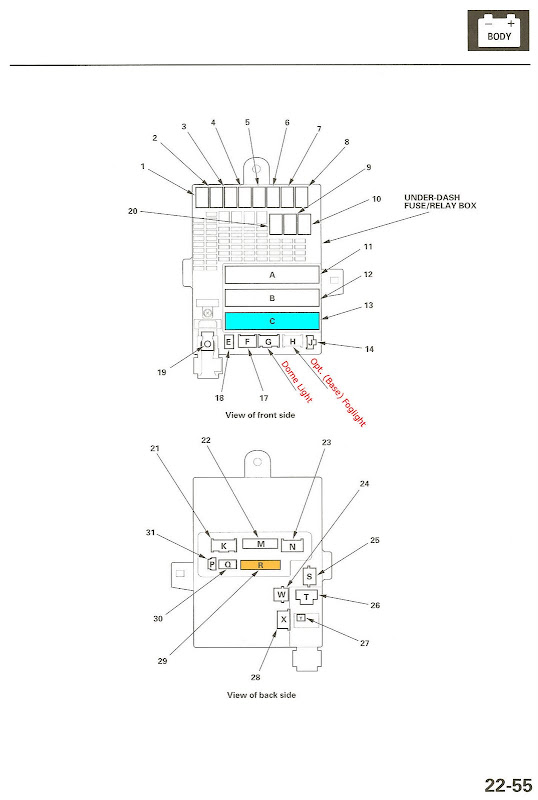
step #38-40 - ignore these and just mount the relay holder directly onto the MICU, it slides in front-to-back and snaps in place.
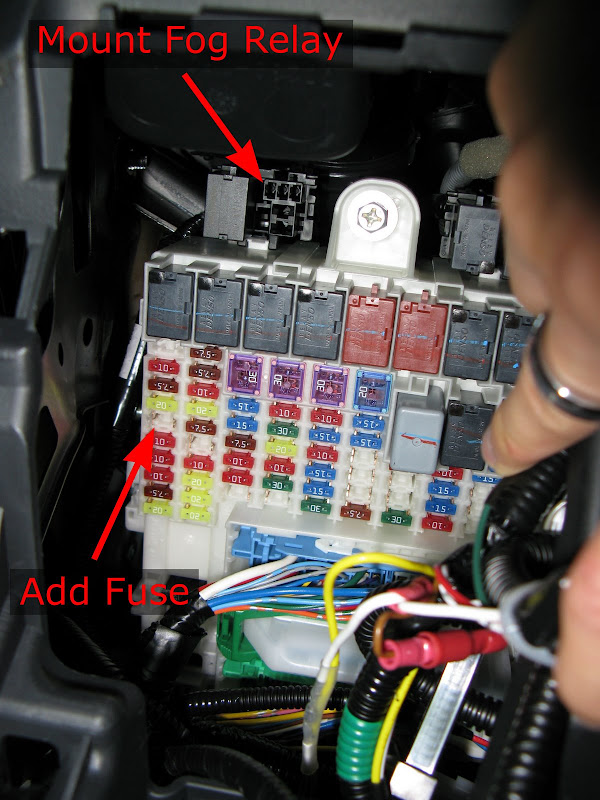
step #42 - instead of a 20A, a single foglamp burns rougly 2A so I just reused the DRL fuse from position #15 (7.5A not shown in the picture above) and moved it to position #4 indicated by the arrow.
I chose to cut off the 2-pin connector and switch to molex connectors.
step #38-40 - ignore these and just mount the relay holder directly onto the MICU, it slides in front-to-back and snaps in place.
step #42 - instead of a 20A, a single foglamp burns rougly 2A so I just reused the DRL fuse from position #15 (7.5A not shown in the picture above) and moved it to position #4 indicated by the arrow.
Once you're done, the bottom half of the MICU should look something like this.
Pop in the Switch, plug in everything, zip tie loose cables in place and test it out.
Last edited by Zalthras; 10-31-2009 at 04:02 PM. Reason: fixed clarity
#4
10-31-2009, 03:47 PM
E) Completed pictures
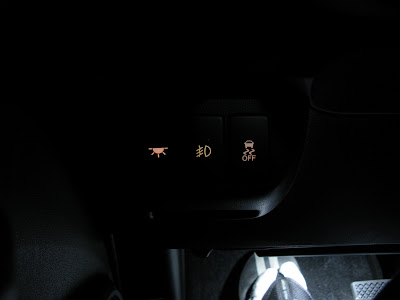
Fog Switched Off
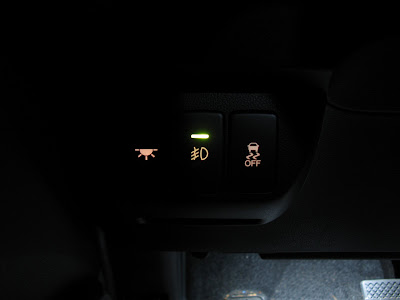
Fog Switched On
Parking Lights

Parking Lights with Rear Fog on
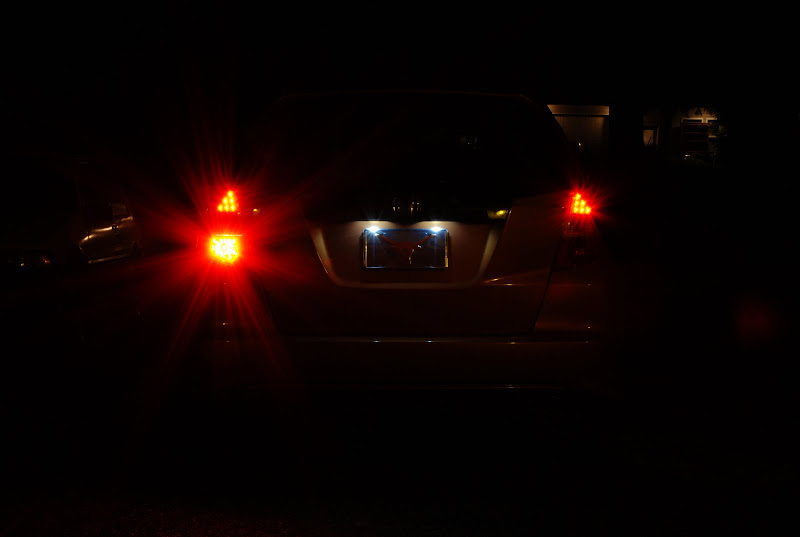
Brake Lights
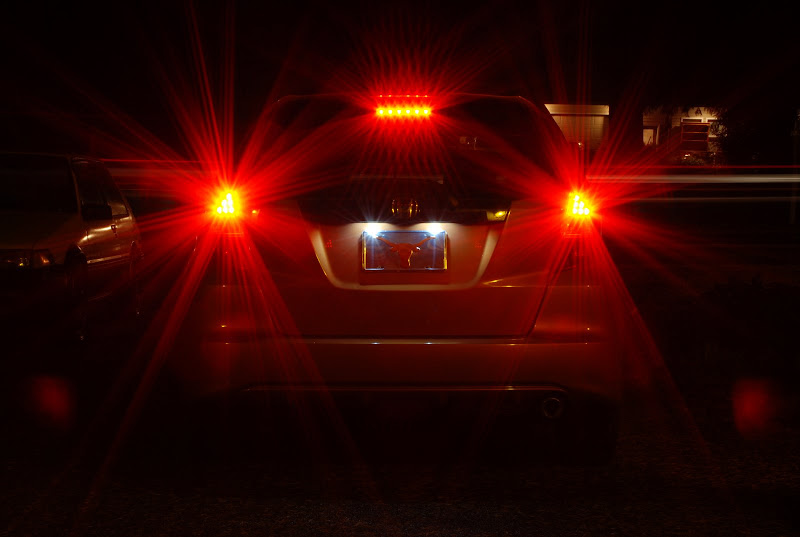
Brake Lights with Rear Fog on

Sources of parts:
Honda of Taiwan (新竹縣竹北市中華路636號) for Taillights
Larry Miller Honda of Hillsboro for the rest of the Honda parts
Norvac for electrical supplies
Fog Switched Off
Fog Switched On
Parking Lights
Parking Lights with Rear Fog on
Brake Lights
Brake Lights with Rear Fog on
Sources of parts:
Honda of Taiwan (新竹縣竹北市中華路636號) for Taillights
Larry Miller Honda of Hillsboro for the rest of the Honda parts
Norvac for electrical supplies
Last edited by Zalthras; 10-31-2009 at 04:27 PM.


#8
11-01-2009, 08:38 PM
Would this work the same on my GD3, does anybody know? For sure the part #s are gonna be different...
I'm taking my Fit to Germany next year and a rear fog light is a must. So I'm trying to get as much information on this as possible.
Great job doing the write-up with all the pictures, this is very helpful!
I'm taking my Fit to Germany next year and a rear fog light is a must. So I'm trying to get as much information on this as possible.
Great job doing the write-up with all the pictures, this is very helpful!
#9
11-01-2009, 11:00 PM

Excellent write-up.
Does anyone know the part number for a Right LED tail light assembly with a fog light?
Would be nice to install one of those with the Left LED w/ fog. I'd just wire them as an extra brake lights.
Does anyone know the part number for a Right LED tail light assembly with a fog light?
Would be nice to install one of those with the Left LED w/ fog. I'd just wire them as an extra brake lights.
#10
11-02-2009, 12:51 AM
I don't have the part#, but I know you can get them in UK because LED tails with foglights on the right taillight come standard on the Jazz in UK. Extra brakelights would be a cool idea too. Do it!
#14
11-05-2009, 03:39 AM
Excellent work! 
On the first pic (column switches behind paddle shifter) I noticed two foglamp indicators. One for front foglamp and the other for the rear foglamp. I don't know where the pic came from. Is it from your car?
If it is, how come you didn't use the switch on the column mounted switch? Or I could be mistaken and it is actually a switch for something else?
The reason I asked is because I recently installed those lamps on my car. I've searched the net but couldn't find exactly where the original rear foglamp switch is located. That 1st pic you posted is my only real clue! Thanks man.
On the first pic (column switches behind paddle shifter) I noticed two foglamp indicators. One for front foglamp and the other for the rear foglamp. I don't know where the pic came from. Is it from your car?
If it is, how come you didn't use the switch on the column mounted switch? Or I could be mistaken and it is actually a switch for something else?
The reason I asked is because I recently installed those lamps on my car. I've searched the net but couldn't find exactly where the original rear foglamp switch is located. That 1st pic you posted is my only real clue!
Thanks man.
#15
11-05-2009, 03:08 PM
Fit/Jazz combo switch w/ foglight dials
Excellent work!
On the first pic (column switches behind paddle shifter) I noticed two foglamp indicators. One for front foglamp and the other for the rear foglamp. I don't know where the pic came from. Is it from your car?
If it is, how come you didn't use the switch on the column mounted switch? Or I could be mistaken and it is actually a switch for something else?
The reason I asked is because I recently installed those lamps on my car. I've searched the net but couldn't find exactly where the original rear foglamp switch is located. That 1st pic you posted is my only real clue! Thanks man.
On the first pic (column switches behind paddle shifter) I noticed two foglamp indicators. One for front foglamp and the other for the rear foglamp. I don't know where the pic came from. Is it from your car?
If it is, how come you didn't use the switch on the column mounted switch? Or I could be mistaken and it is actually a switch for something else?
The reason I asked is because I recently installed those lamps on my car. I've searched the net but couldn't find exactly where the original rear foglamp switch is located. That 1st pic you posted is my only real clue!
Thanks man.The Chinese Fit has a trim level that is packaged with both front and rear fogs, it uses this switch that has a 4 position dial for front and rear fog combinations:

(auto.msn.com.cn album)
Taiwan Fit/Jazz (possibly UK and Germany) use this switch with a rear fog dial:

(from a thread in UK jazz club)
USDM/NA Fit Sport uses this one with a front fog dial:

(my pic from this thread)
What does the combo switch in the Phillipines look like?
#16
11-07-2009, 08:57 AM
Thanks for the info man I really appreciate it.
The combo light in the Philippine Jazz looks the same as the Taiwanese switch you posted but without the rear foglight switch. It's pretty simple. The US version with the front foglamp switch is available here from the dealership but it is sold with the original front foglamps. What I have is the Taiwanese front foglamps with a push button switch included.
The combo light in the Philippine Jazz looks the same as the Taiwanese switch you posted but without the rear foglight switch. It's pretty simple. The US version with the front foglamp switch is available here from the dealership but it is sold with the original front foglamps. What I have is the Taiwanese front foglamps with a push button switch included.
#17
12-05-2009, 12:39 AM
do they make that rear fog for gd3? I really need something like that because fog gets crazy in Central CA
#18
03-03-2010, 10:18 AM

Man... another awesome DIY! With the install, the pics you took, the editing and posting, you must have the patience of a brain surgeon! 
Question... what is the switch to the left of the rear fog switch? (the far left switch) I may just wanna' fill those two empty voids next to the VSA on/off switch on my Fit too!
Thanks for the answer... and the incredibly thorough installs.
Question... what is the switch to the left of the rear fog switch? (the far left switch) I may just wanna' fill those two empty voids next to the VSA on/off switch on my Fit too!
Thanks for the answer... and the incredibly thorough installs.
#19
03-03-2010, 01:59 PM


