
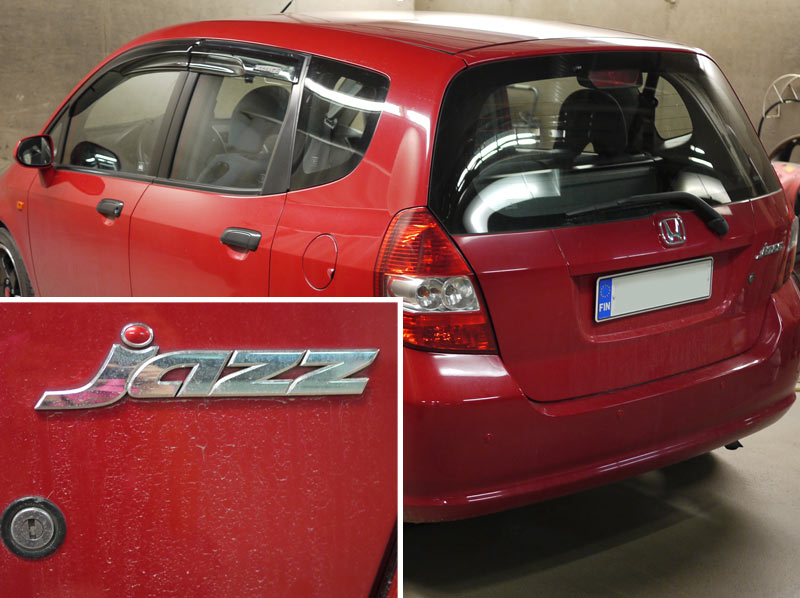
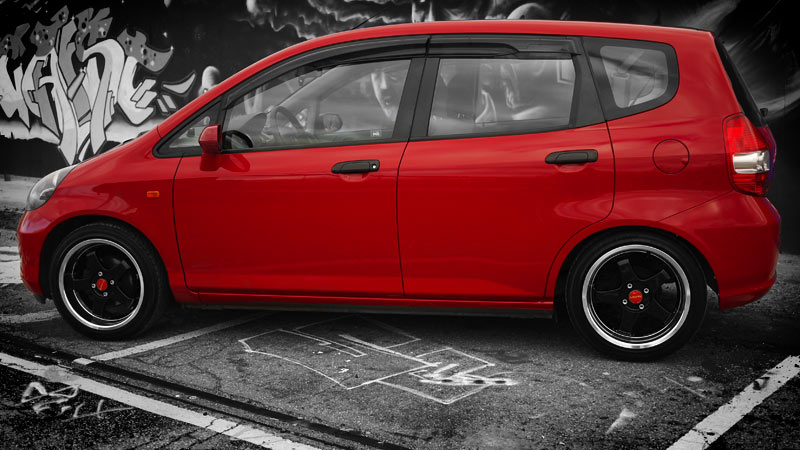
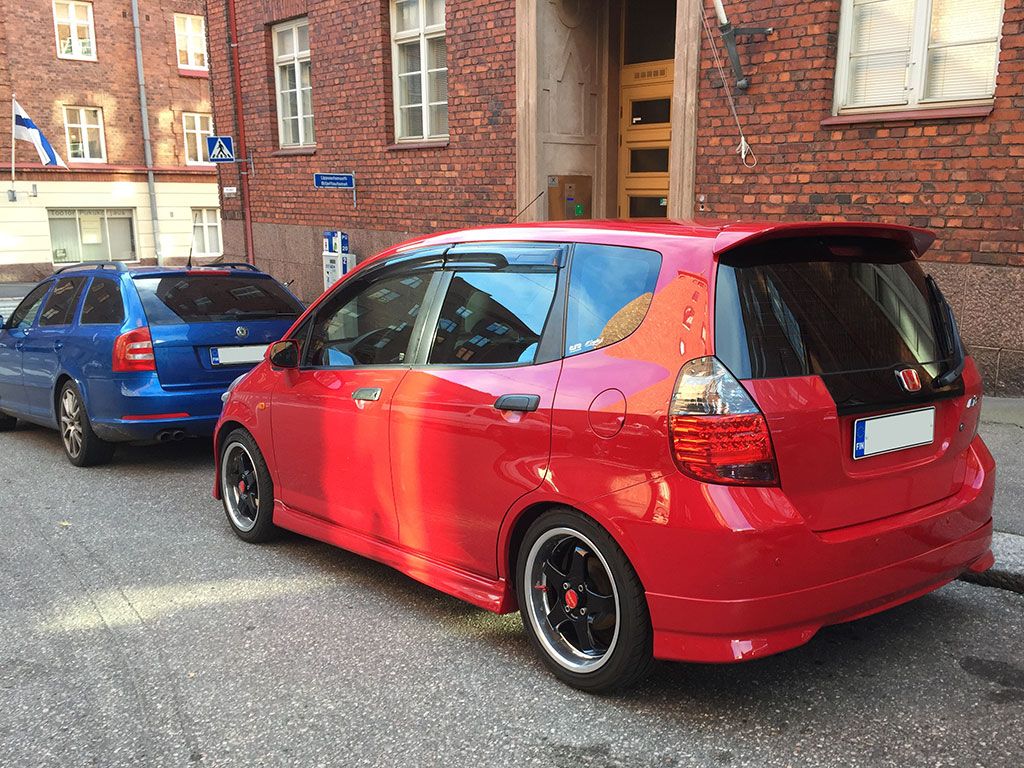
Domo-kun's GD1 Fit-Jazz from Finland

Winter wash & wax job
Winter is here really soon. It snowed on the north of Finland already; so it was time to get the winter coat on to protect the paint from salt etc.
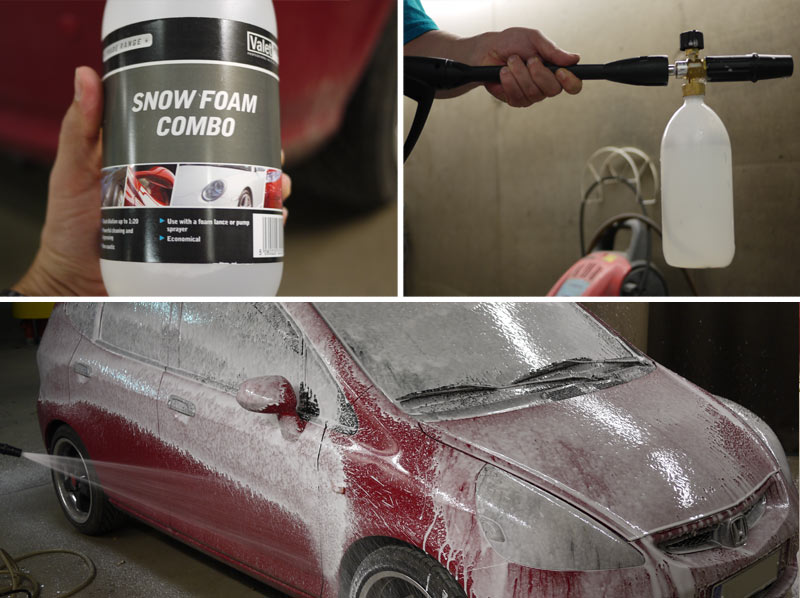
I started of by deep cleaning the car by Valet Pro's Snow Foam Combo. This stuff bites deep into the dirt and raises it to the top of the foam. Let it drip for a good 10 min.
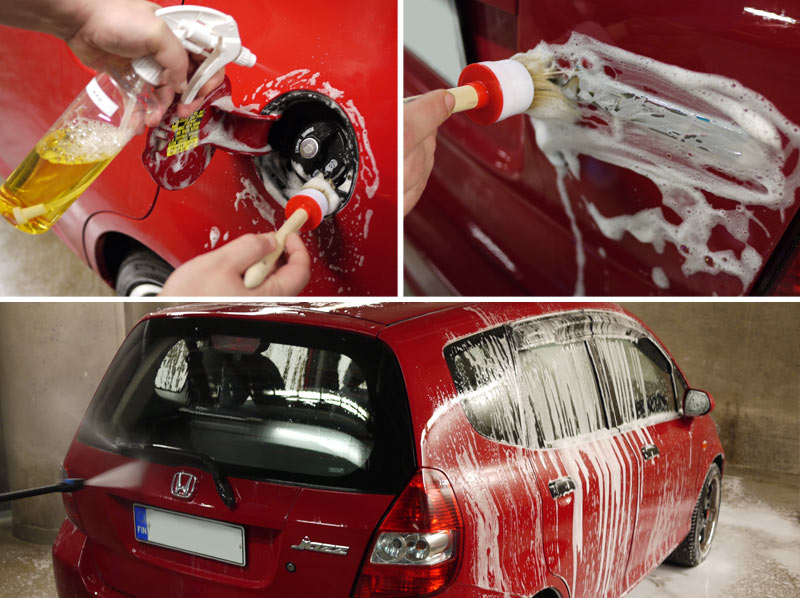
Next go through those places that you think this stuff doesn't drip into. Use soft a brush like this. Some APC (All Purpose Cleaner) was used as well. After this rinse the car off by pressure washer.
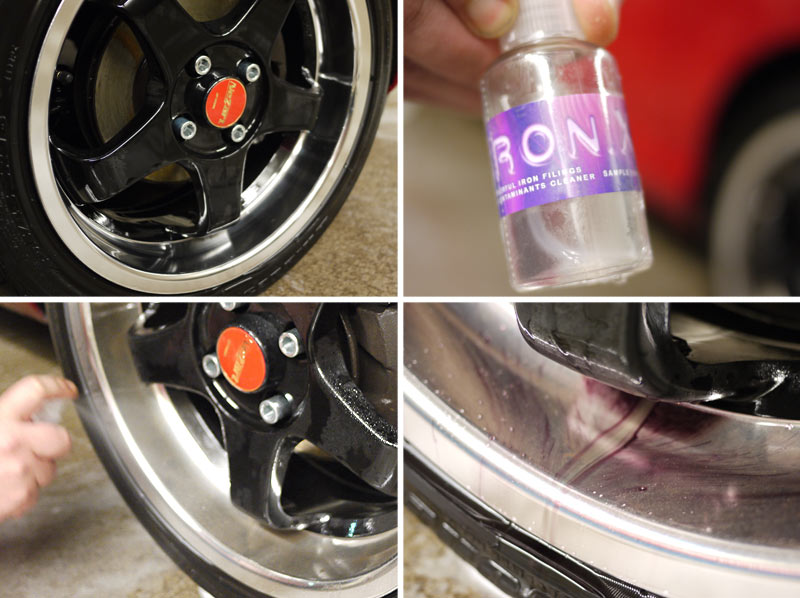
Now everything seems clean, but the wheels need same attention. They look clean, but they have these little particles of brake dust on them that you won't see by bare eye. It's actually small iron-particles that are on the lips & spokes of the wheels.
I used CarPro Iron.X's to remove all the contaminants. First spray a light mist on the wheels lips & spokes, wait for few mins, and you'll see this stuff starting to work. It turns purple from the iron particles as they activate with air. Make's the wheels bleed. This stuff is safe for automotive use (pH neutral). This stuff is excellent for rail dust.
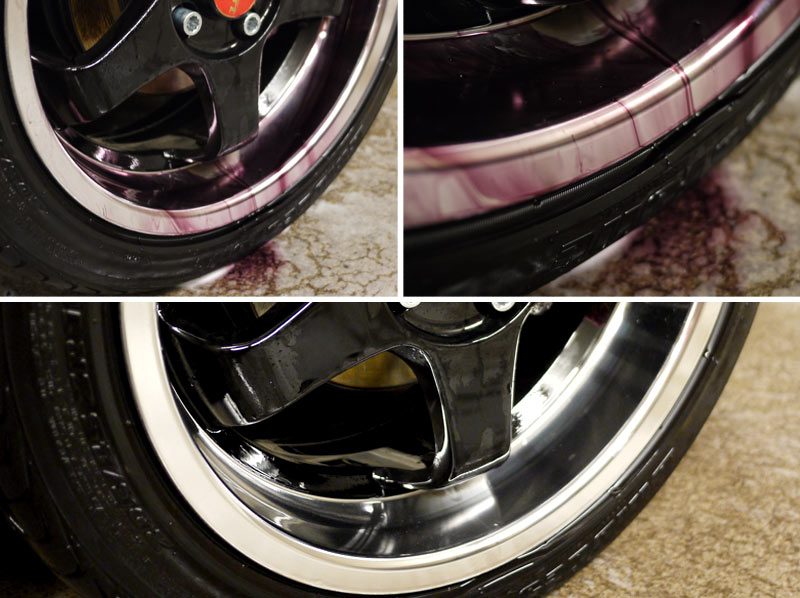
After 10 min rinse wheels with plenty of water. Ok, now the wheels are done.
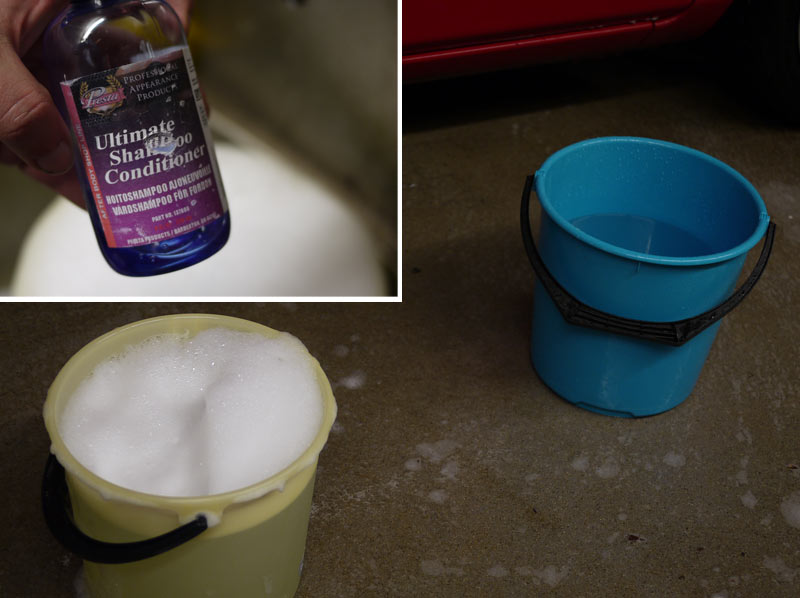
After this go through the normal car wash procedure. Start from the top of the vehicle and move to the bottom. One bucket for the shampoo and the other bucket to rinse your dirty washing sponge.
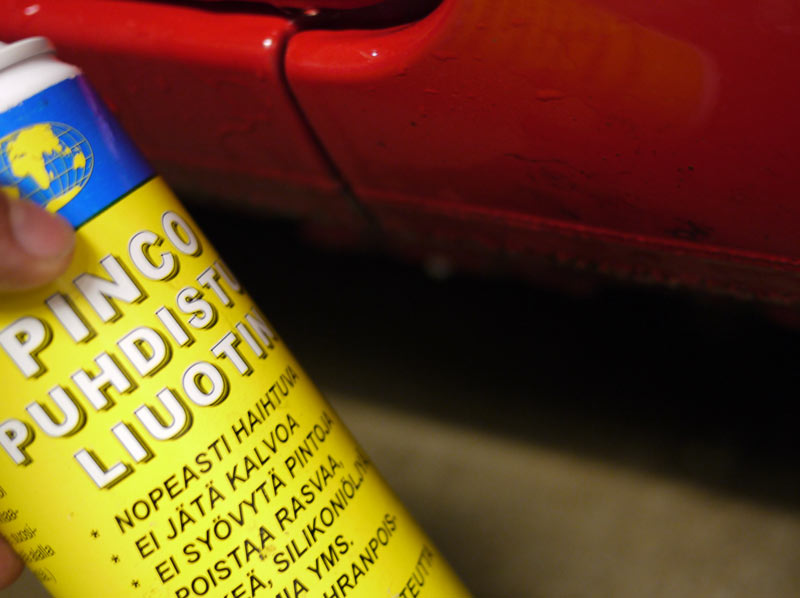
I used some heavy-duty solvent to remove tar stains. Rinse these areas well. At this point you can use Clay bar if you have any tar or hard dirt spots on the car. Take care of those before Waxing part.
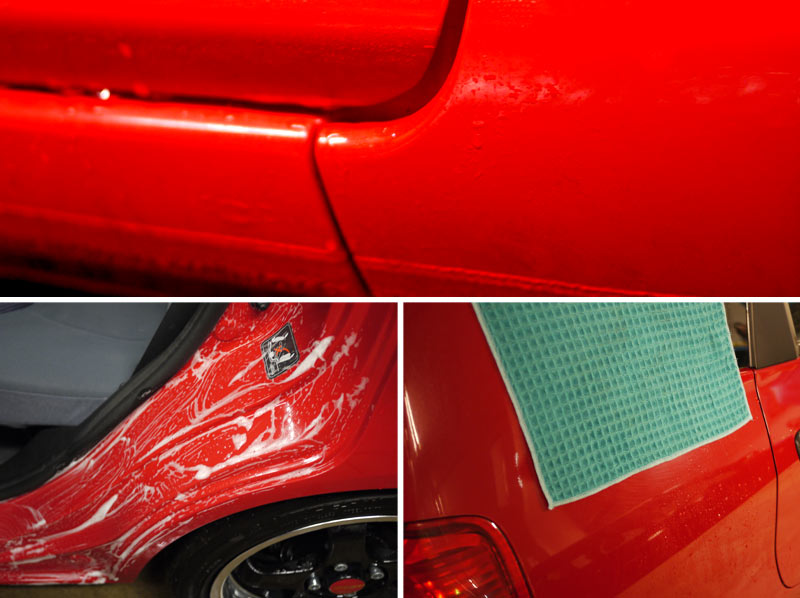
I cleaned very firmly the whole car. Then one last rinse with pressure washer and dried the car with these micro fiber max-pad towel/cloth. They suck ton of water and leave dry surface instantly.
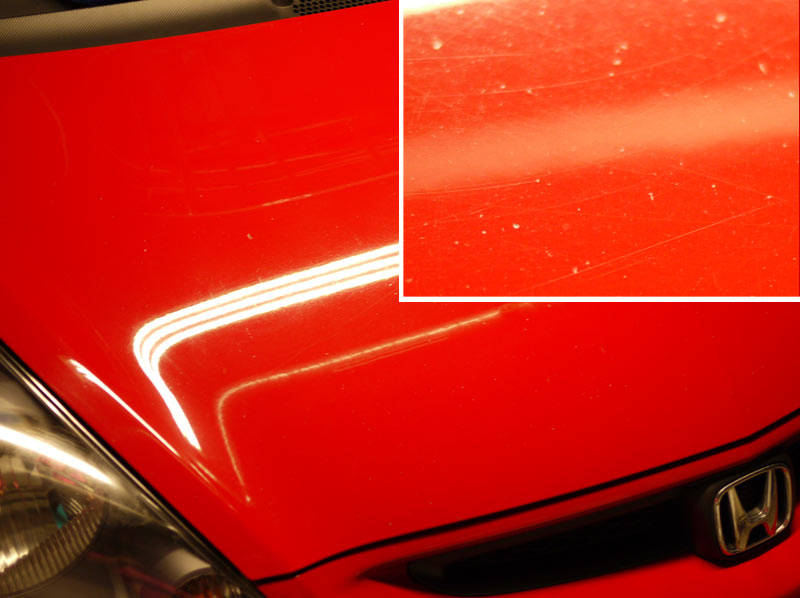
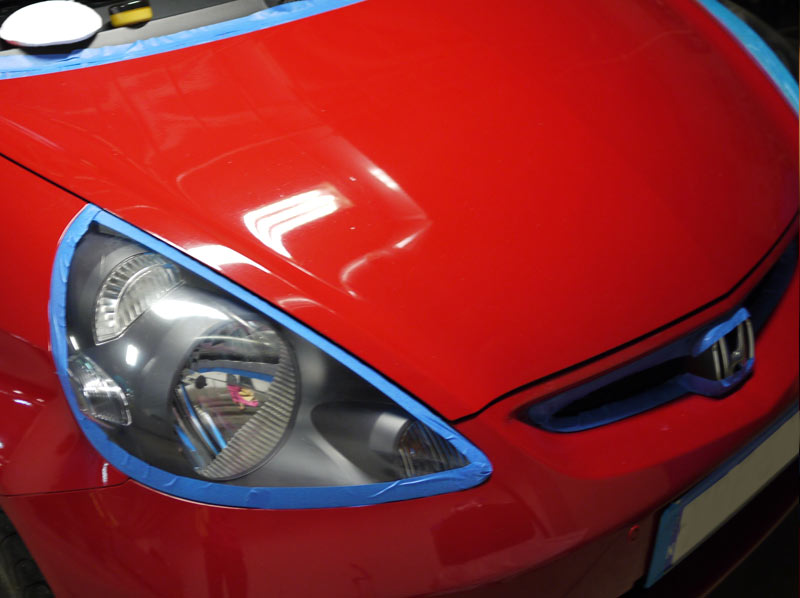
Looks horrible... I know. Little stone chips and light scratches on the hood. Mask all the plastic & rubber parts with blue painters tape. This prevents discoloration and damage of the trim.
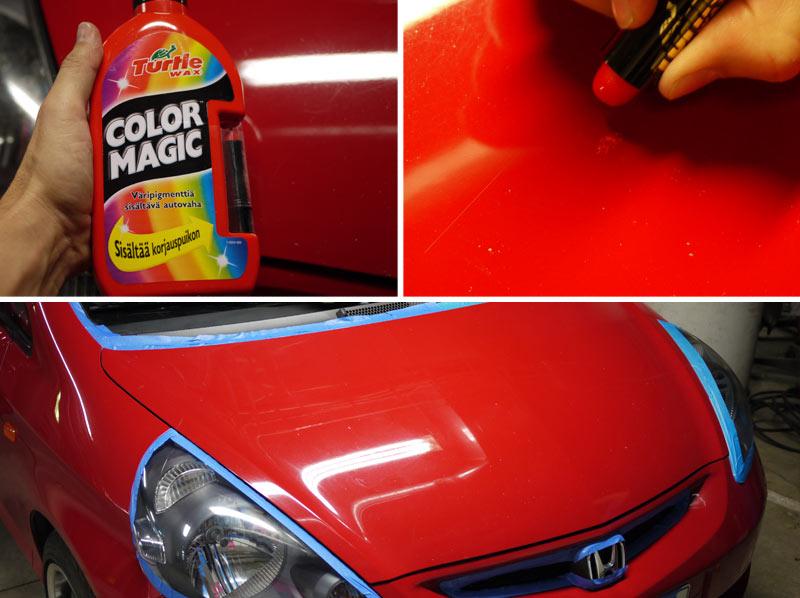
I tried to mask some of the stone chip marks by this color-based wax. It's easy to use, but doesn't really cover the marks that well. So this stuff was only used on the worst panel of the car – the hood.
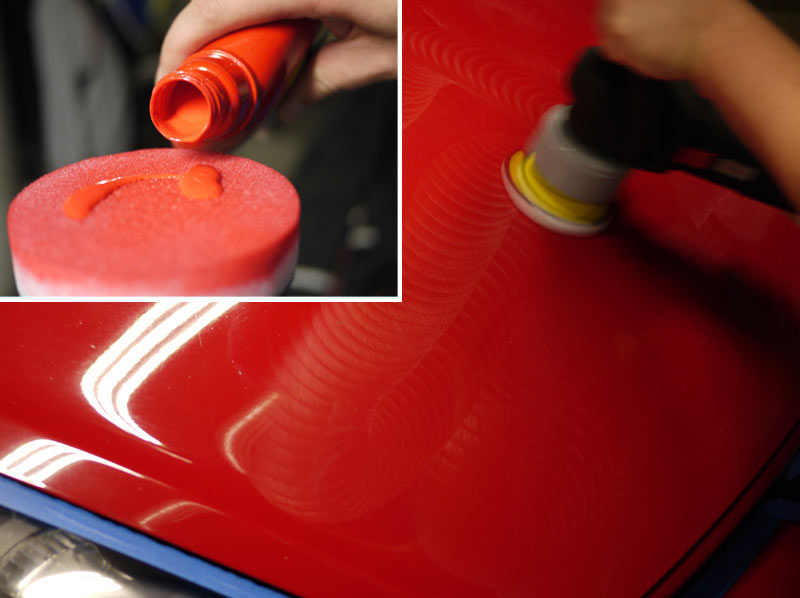
We also gave some TLC with the eccentric circular motion polisher. This machine doesn't create heat or unwanted marks.
Note! All polishes will go through stages as they breakdown, each product is different, but basically their look goes from wet, hazing, translucent to dry or oily.
Without going through these stages you won't get the full effect of the polish and will most likely leave a hazed finish.
Remember with polishing BE PATIENT, take your time, learn how the polish works and breaks down and always start with the least aggressive pad/polish to get the job done. Know what you're doing.
That helped a bit of the rough surface.
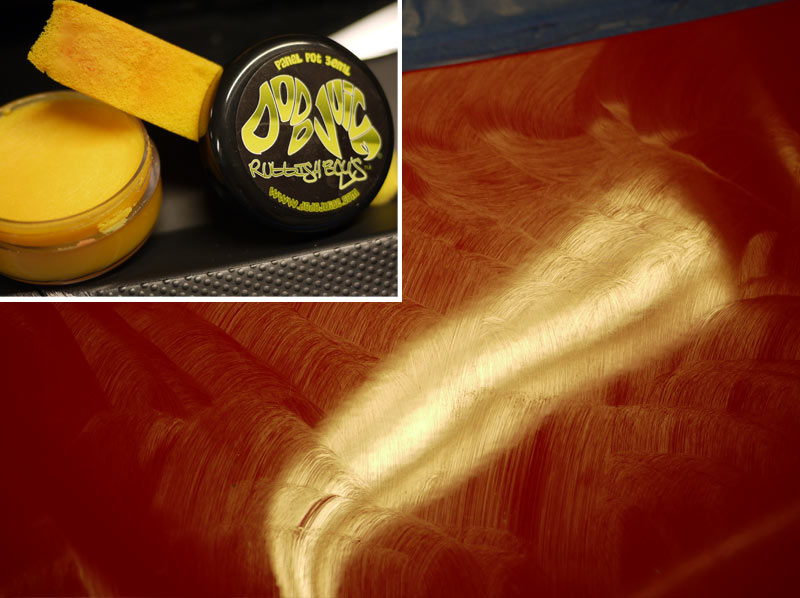
Next was the 4-5 hour "Karate Kid -session". You know, Wax on – Wax off, all done by hand, panel by panel. LOL...
I used some special limited edition Dodo Juice "Rubbish Boys" -natural solvent based wax. It's easy work on, really light to wipe off the haze. (It's actually a handmade, high carnauba wax content car wax. It's made in really small batches and every pot is inspected and tested before being sent out)... Special stuff
Looks alright
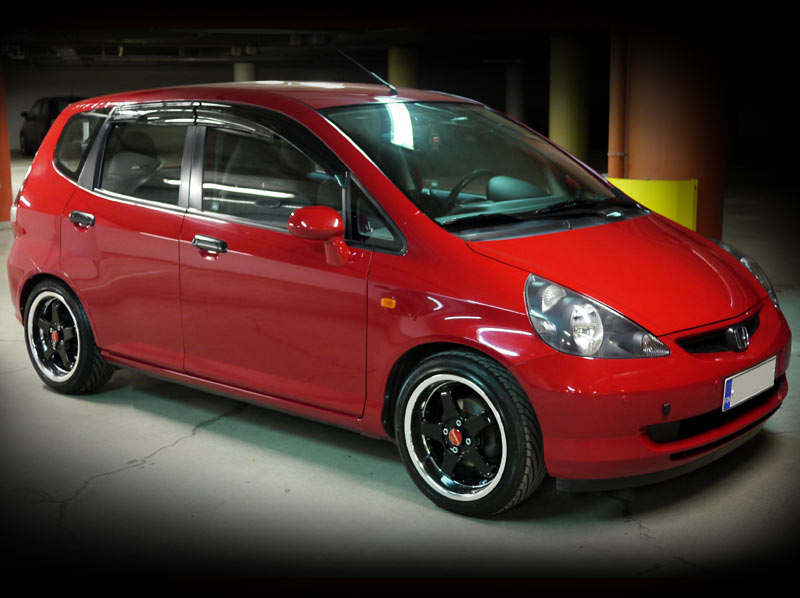
This is how it looks now. Job bone! Took approx 7 hours in total - ouch!
I started of by deep cleaning the car by Valet Pro's Snow Foam Combo. This stuff bites deep into the dirt and raises it to the top of the foam. Let it drip for a good 10 min.
Next go through those places that you think this stuff doesn't drip into. Use soft a brush like this. Some APC (All Purpose Cleaner) was used as well. After this rinse the car off by pressure washer.
Now everything seems clean, but the wheels need same attention. They look clean, but they have these little particles of brake dust on them that you won't see by bare eye. It's actually small iron-particles that are on the lips & spokes of the wheels.
I used CarPro Iron.X's to remove all the contaminants. First spray a light mist on the wheels lips & spokes, wait for few mins, and you'll see this stuff starting to work. It turns purple from the iron particles as they activate with air. Make's the wheels bleed. This stuff is safe for automotive use (pH neutral). This stuff is excellent for rail dust.
After 10 min rinse wheels with plenty of water. Ok, now the wheels are done.
After this go through the normal car wash procedure. Start from the top of the vehicle and move to the bottom. One bucket for the shampoo and the other bucket to rinse your dirty washing sponge.
I used some heavy-duty solvent to remove tar stains. Rinse these areas well. At this point you can use Clay bar if you have any tar or hard dirt spots on the car. Take care of those before Waxing part.
I cleaned very firmly the whole car. Then one last rinse with pressure washer and dried the car with these micro fiber max-pad towel/cloth. They suck ton of water and leave dry surface instantly.
Looks horrible... I know. Little stone chips and light scratches on the hood. Mask all the plastic & rubber parts with blue painters tape. This prevents discoloration and damage of the trim.
I tried to mask some of the stone chip marks by this color-based wax. It's easy to use, but doesn't really cover the marks that well. So this stuff was only used on the worst panel of the car – the hood.
We also gave some TLC with the eccentric circular motion polisher. This machine doesn't create heat or unwanted marks.
Note! All polishes will go through stages as they breakdown, each product is different, but basically their look goes from wet, hazing, translucent to dry or oily.
Without going through these stages you won't get the full effect of the polish and will most likely leave a hazed finish.
Remember with polishing BE PATIENT, take your time, learn how the polish works and breaks down and always start with the least aggressive pad/polish to get the job done. Know what you're doing.
That helped a bit of the rough surface.
Next was the 4-5 hour "Karate Kid -session". You know, Wax on – Wax off, all done by hand, panel by panel. LOL...
I used some special limited edition Dodo Juice "Rubbish Boys" -natural solvent based wax. It's easy work on, really light to wipe off the haze. (It's actually a handmade, high carnauba wax content car wax. It's made in really small batches and every pot is inspected and tested before being sent out)... Special stuff
Looks alright
This is how it looks now. Job bone! Took approx 7 hours in total - ouch!
Last edited by Domo-kun; Oct 18, 2011 at 03:15 PM.


Jazz vs. Fit - badge removal & rebadging
Thanks vinnymac & FELIXY69 for your compliments...
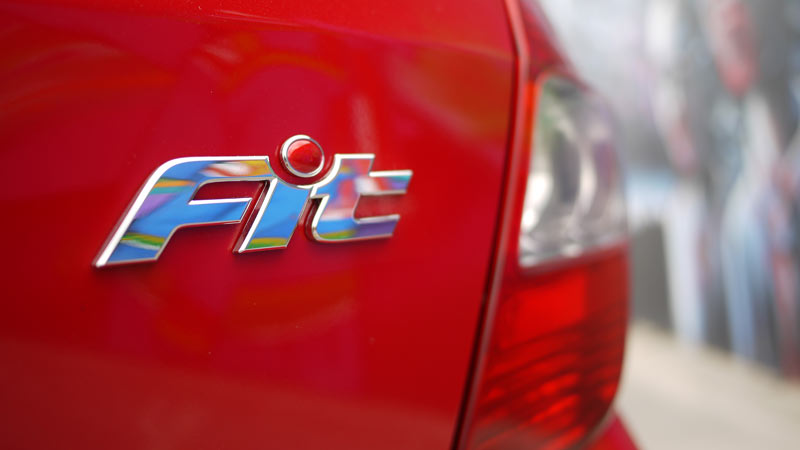
Time to get rid of the "European" look. Some of you might think "ooh no -why do you change those Jazz badges over to the 'common' Fit badge".
Well, in Europe they're all branded Jazz, which to me is boring. I see Jazz's all the time. Haven't seen a single Fit in Europe. (Seen a lots of them in my trips to US & Japan, etc).
Also the car is JDM model/built in Japan, so it should have the original badging.
The reason it's not named Fit on the European market is Sweden. Yes, Fit is a curse word in Sweden/swedish. It's short for slang word 'Fitta' which means... Vulva or cunt - LOL
So the strategy for Honda was to rebrand and rename it for our European markets. In the Scandinavian/Nordic countries, like Finland, Sweden, Norway we pretty much understand each others languages, and like Finland we speak two different languages, Finnish & Sweden. That's the reason for the Jazzy model name.
OK, lession over kids. Time to de-badge.
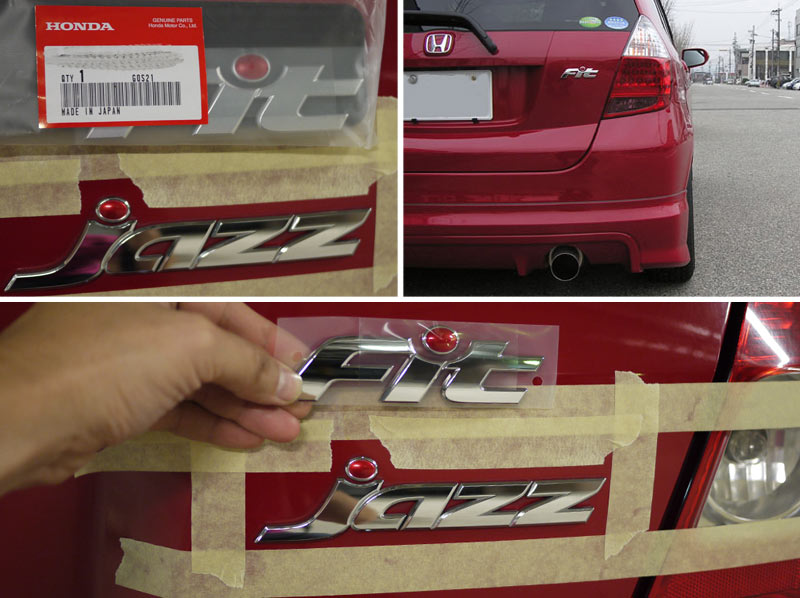
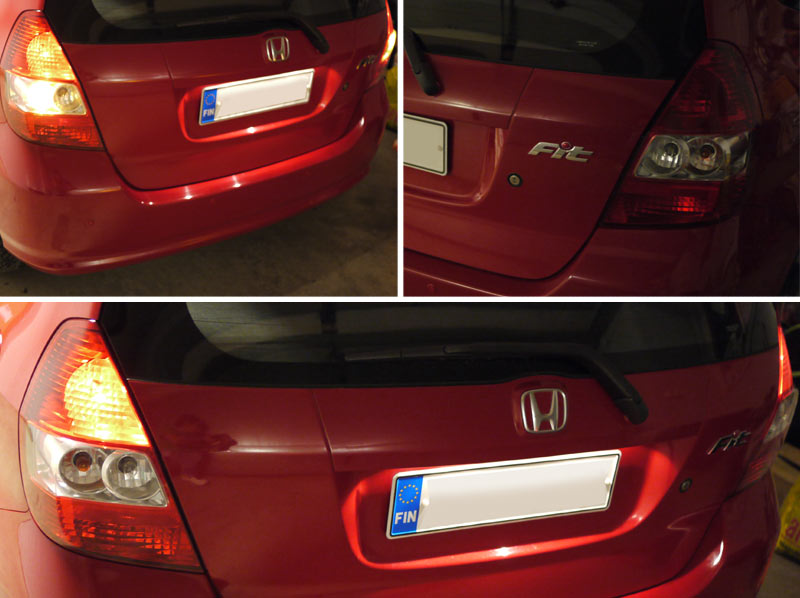
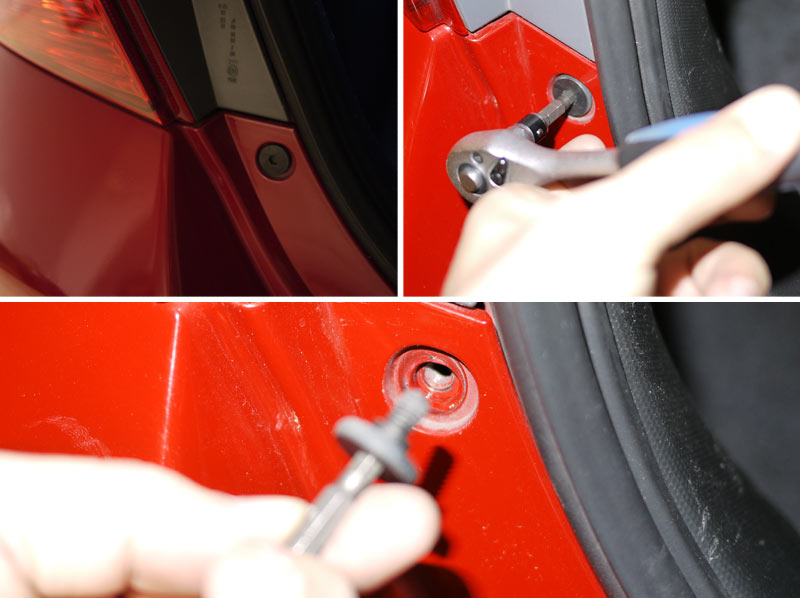
I used the OEM Japanese version of the badge, which has a red dot. JDM badge's are also mounted on the right side of the boot. I wanted to make sure it sits in the right place compared the Japanese model. So there's a pic of JDM spec GD Fit. I measured & marked the spot with Painters Tape.
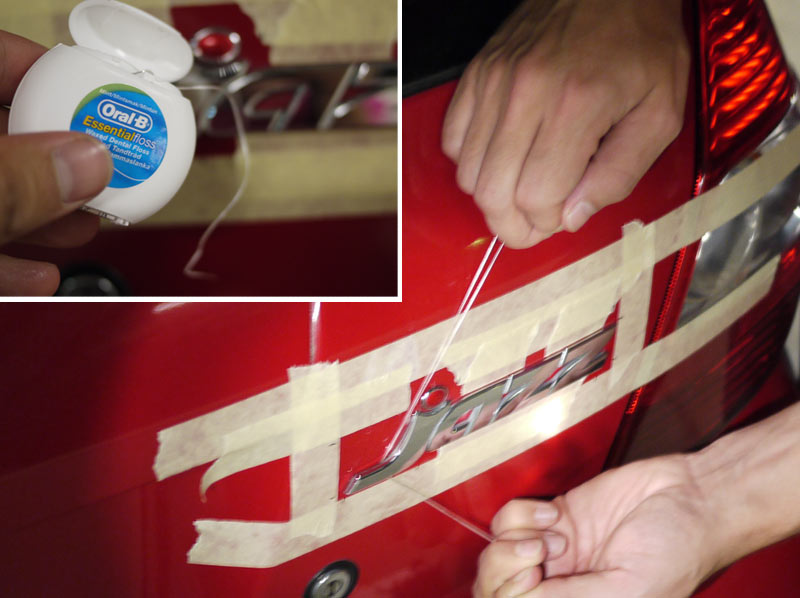
To debadge & remove the old Jazz logo I used Waxed Dental Floss - this stuff is strong but it doesen't harm the paint. Just zig-zag back and forth.
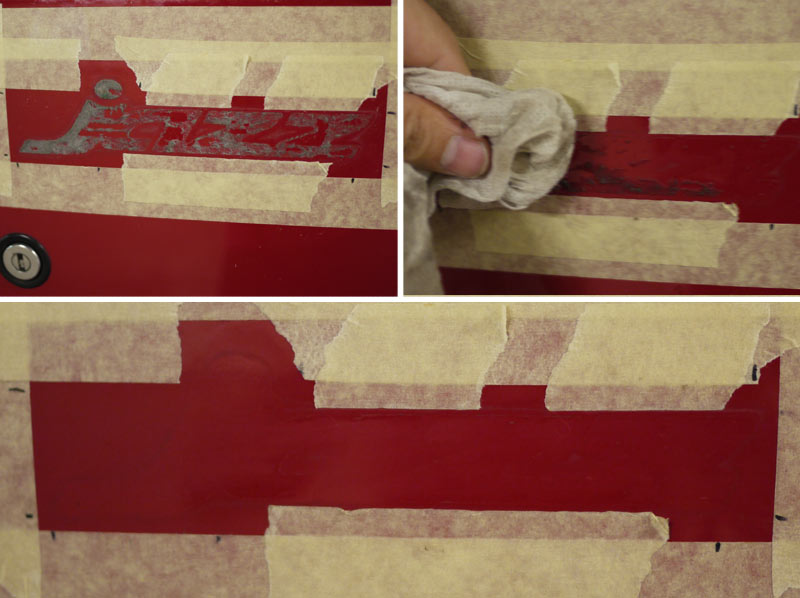
I removed the old tape by sticker glue remover. You might see the light spots under the Jazz text...
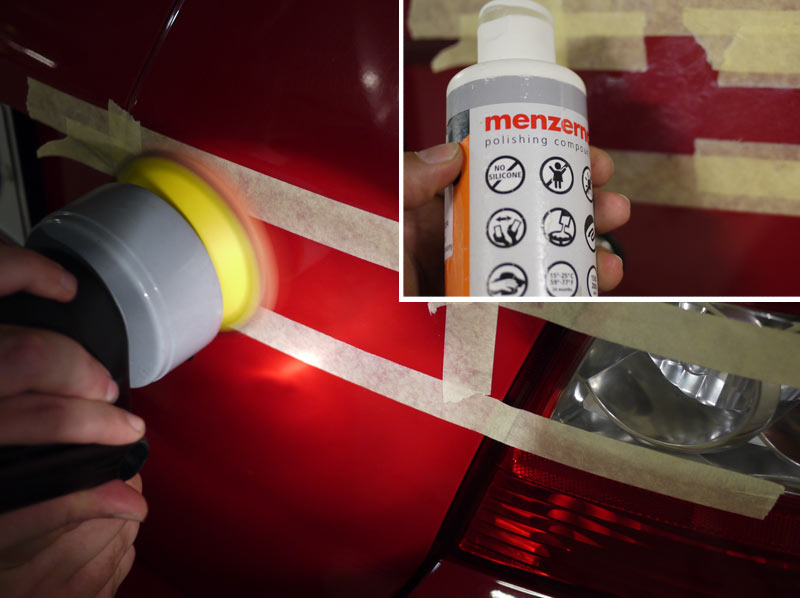
... those marks were taken care of by Polishing Compound and some light machine polishing. After that I wiped the surface with solvent to get any grease or debris particles off the surface.
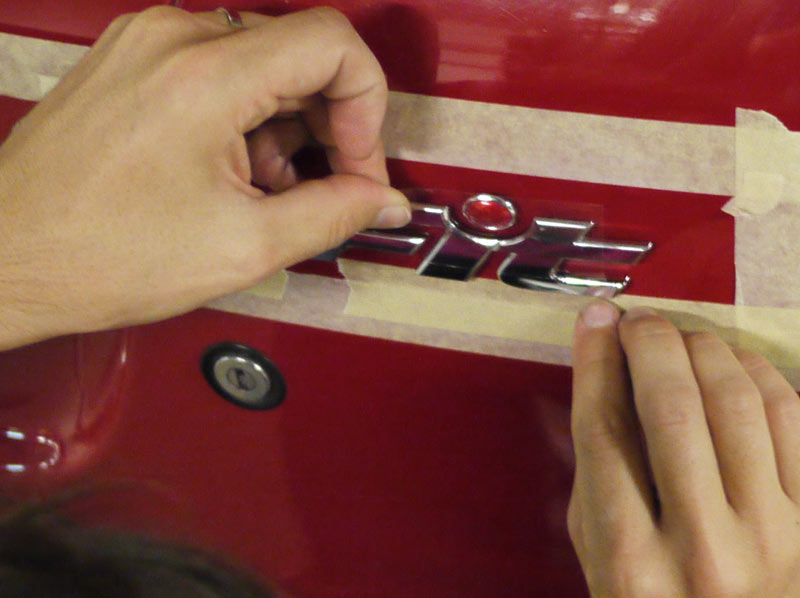
Time to rebadge with the new Fit logo.
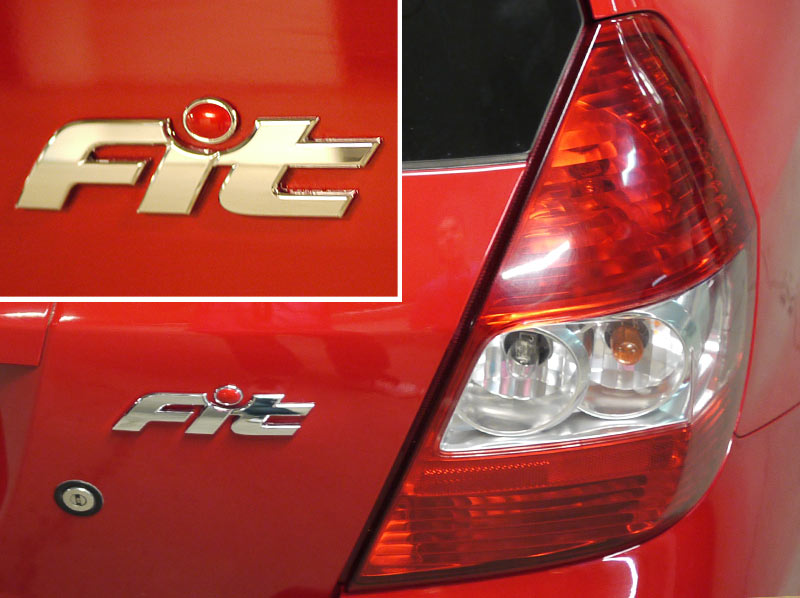
Job done! GD1 - JDM spec, like it should have left the shores of Japan in the first place.
Ooh, and the best of all - my Swedish neighbours will love me
Time to get rid of the "European" look. Some of you might think "ooh no -why do you change those Jazz badges over to the 'common' Fit badge".
Well, in Europe they're all branded Jazz, which to me is boring. I see Jazz's all the time. Haven't seen a single Fit in Europe. (Seen a lots of them in my trips to US & Japan, etc).
Also the car is JDM model/built in Japan, so it should have the original badging.
The reason it's not named Fit on the European market is Sweden. Yes, Fit is a curse word in Sweden/swedish. It's short for slang word 'Fitta' which means... Vulva or cunt - LOL
So the strategy for Honda was to rebrand and rename it for our European markets. In the Scandinavian/Nordic countries, like Finland, Sweden, Norway we pretty much understand each others languages, and like Finland we speak two different languages, Finnish & Sweden. That's the reason for the Jazzy model name.
OK, lession over kids. Time to de-badge.
I used the OEM Japanese version of the badge, which has a red dot. JDM badge's are also mounted on the right side of the boot. I wanted to make sure it sits in the right place compared the Japanese model. So there's a pic of JDM spec GD Fit. I measured & marked the spot with Painters Tape.
To debadge & remove the old Jazz logo I used Waxed Dental Floss - this stuff is strong but it doesen't harm the paint. Just zig-zag back and forth.
I removed the old tape by sticker glue remover. You might see the light spots under the Jazz text...
... those marks were taken care of by Polishing Compound and some light machine polishing. After that I wiped the surface with solvent to get any grease or debris particles off the surface.
Time to rebadge with the new Fit logo.
Job done! GD1 - JDM spec, like it should have left the shores of Japan in the first place.
Ooh, and the best of all - my Swedish neighbours will love me

JDM LED tail light installation, DIY with bumber removed, EDM models
Tools used in this DIY-project:
Flash light or enough working light.
8 mm socket & small wrench � for taillights, inner nuts
10 mm socket & small wrench � for bumper/taillight outer bracket
Allen-key � for bumper bolts
Phillips-head screwdriver � for bumper screws
Flat-head screwdriver � for bumper studs/expansion clips
Cowling clip removal/Fork tool � for expansion clips
Park your car and make sure you have enough light; there are some tricky spots that need light. I used LED-flash light to cover the darkest spots.
The start. Make sure all your lights work, as they should before doing anything else. By this you void any bulb related problems. If, for some reason after you change your lights, one of the light functions does not work, at least you know it's not bulb related. (You might have pulled one of them harness cables too hard during the install and that causes the light not to lit, etc).
Start by removing the 2 countersunk bolts with an Allen-key.
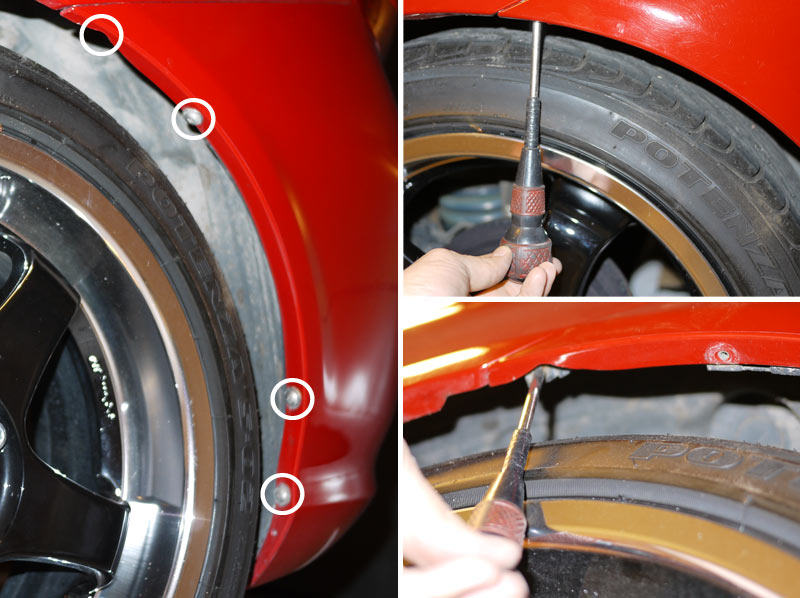
Then remove the 4 (total of 8) Phillips screws located each side of the rear wheel guard. One of them is hiding on the top of the bumper corner, behind the wheel well.
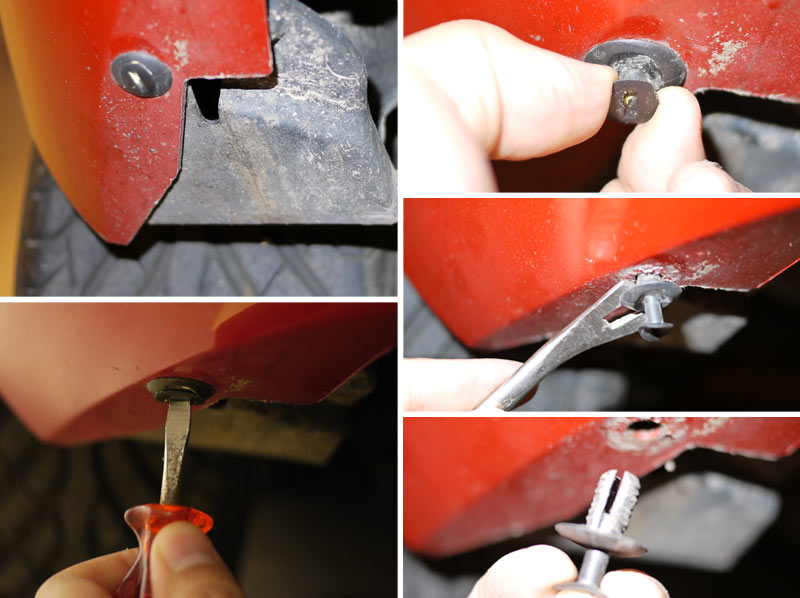
There are 2 big expansion clips on both underside corners of the bumper. To get these loose. Use flat tip screwdriver to open the screw, then lightly push a fork tool under the expansion part and wiggle the plastic clip out. They might be really stuck, so take it easy. You don't want to break these. Also don't use too much force to avoid scratching the paint with the fork-tool. Just pry, twist & wiggle and they'll come out.
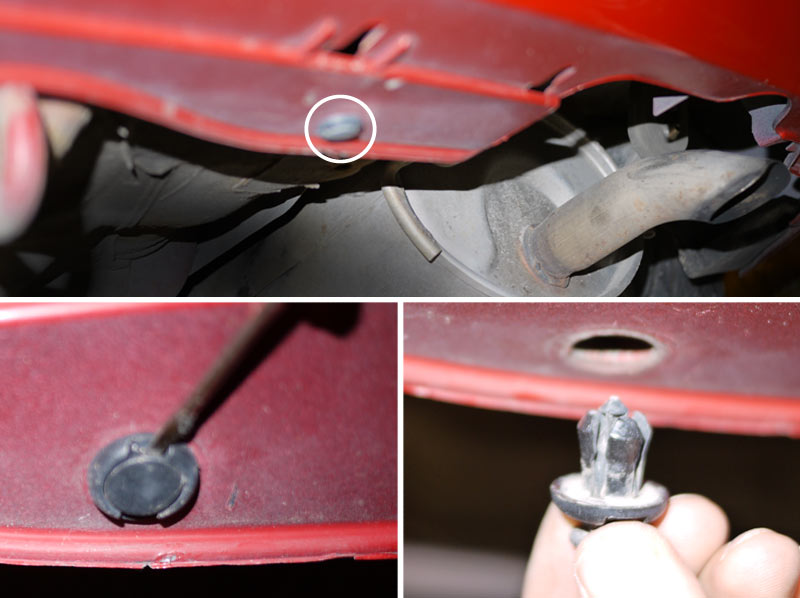
While you're under there, remove the other 2 small expansion clips that are located in the middle part of the underside of the bumper.
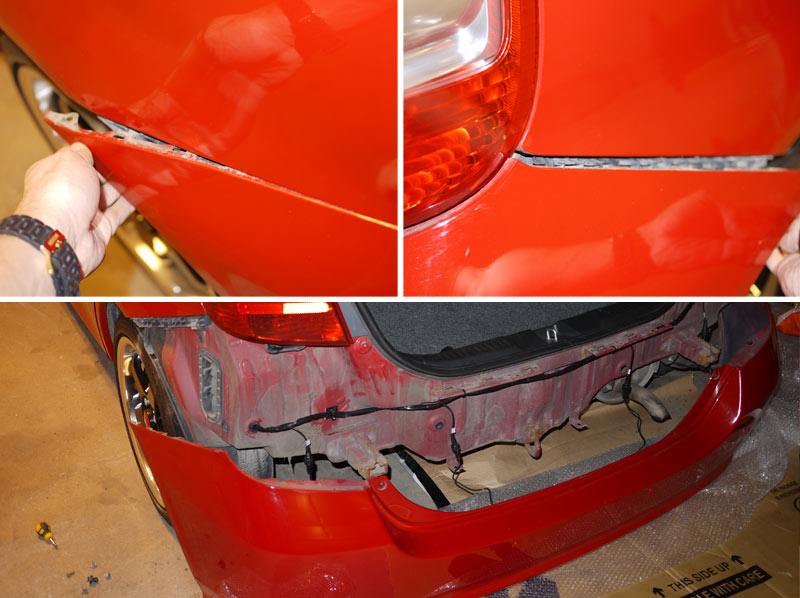
Now all the screws and clips are off. Just pull the corners of the bumper outward and they'll pop open. Then pull and lift the bumper backwards and it'll slide off.
(Notice in my pics you'll see the previously installed parking sensors, the four black cables).
I also used some cardboard and bubble wrap not to scratch the bumper while it's on the ground.
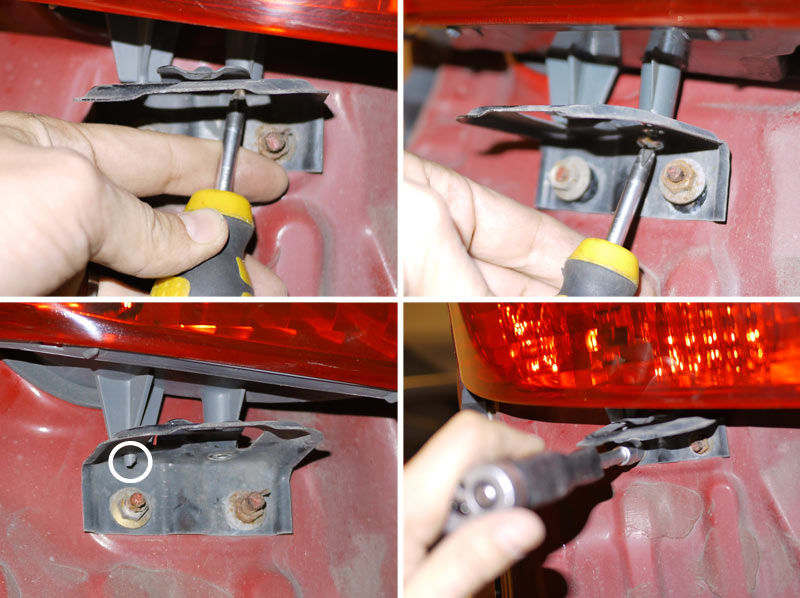
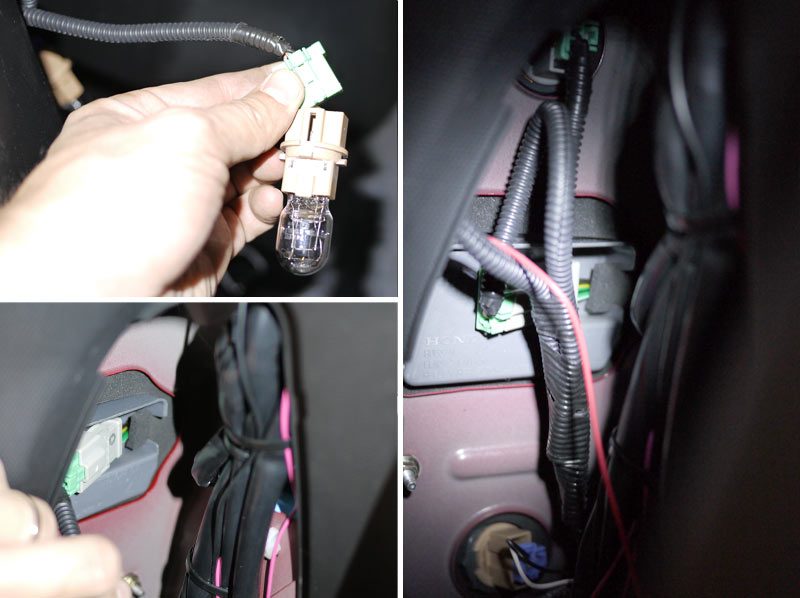
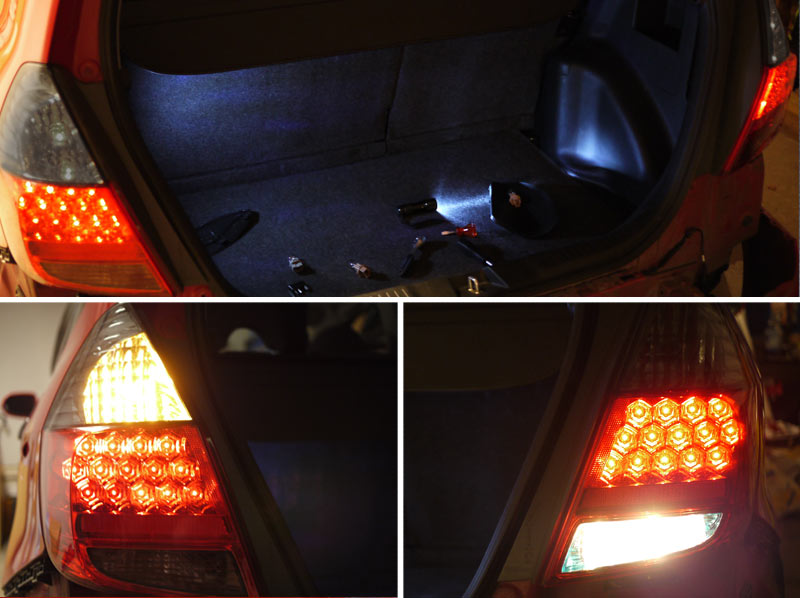
The bottom of the light is held on, by a tiny plastic prong and a Phillips-screw. This is where most installers have done a short cut. If you don't take your bumper off, you wont be able to loosen these two nuts. By loosing these two (10 mm) nuts and the lights inner three nuts, the lights come of nicely without bending the bracket or breaking the prongs.
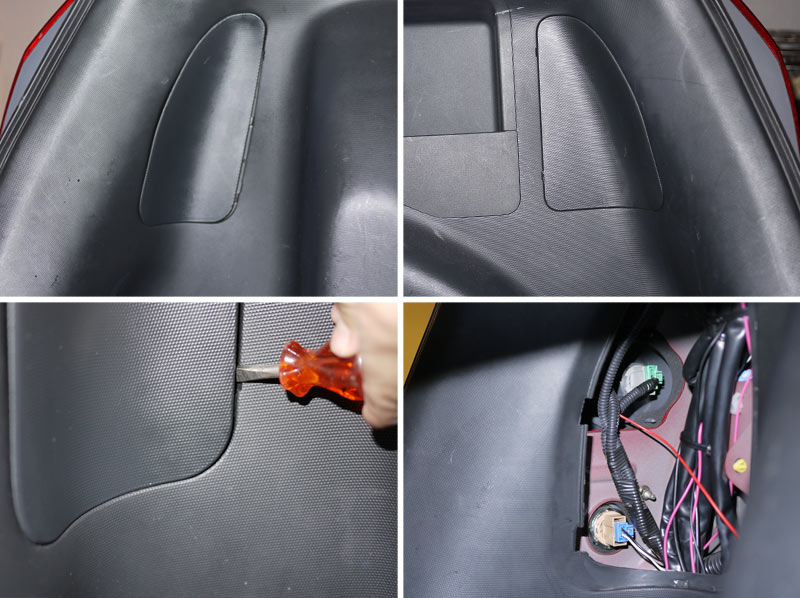
Time to look inside of the boot and open those light covers. Use flat-head screwdriver or plastic body trim removal tool.
You'll see three 8 mm nuts in there. Open these with the 8 mm wrench socket. Loosen the bulbs by turning the counter-clockwise out of their sockets. Then it's time to take the light cluster off. The left-hand side cluster has the rear-foglight bulb connected to the bottom of the cluster. This means that the light is designed for LHD traffic.
Now strip the other side as well. You can spot the gray circular plug at the bottom of the OEM light. That's a dummy plug for RHD rear-foglight.
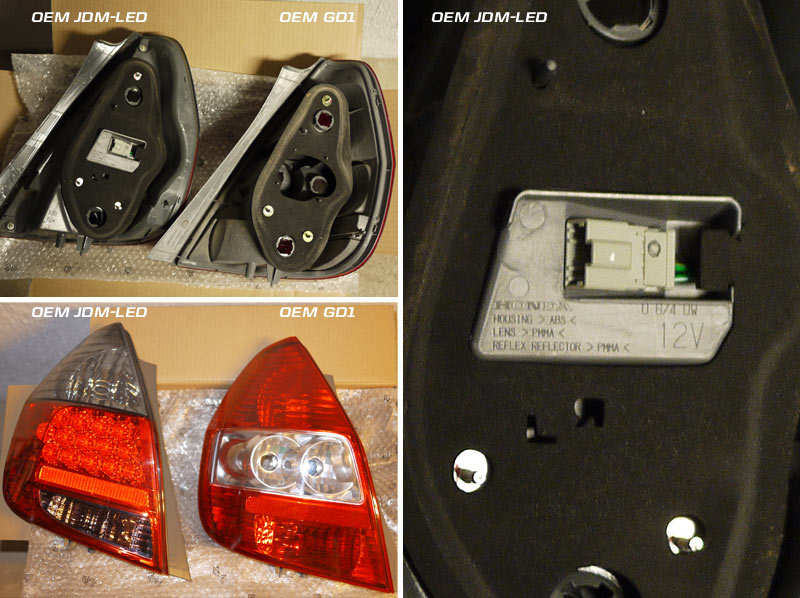
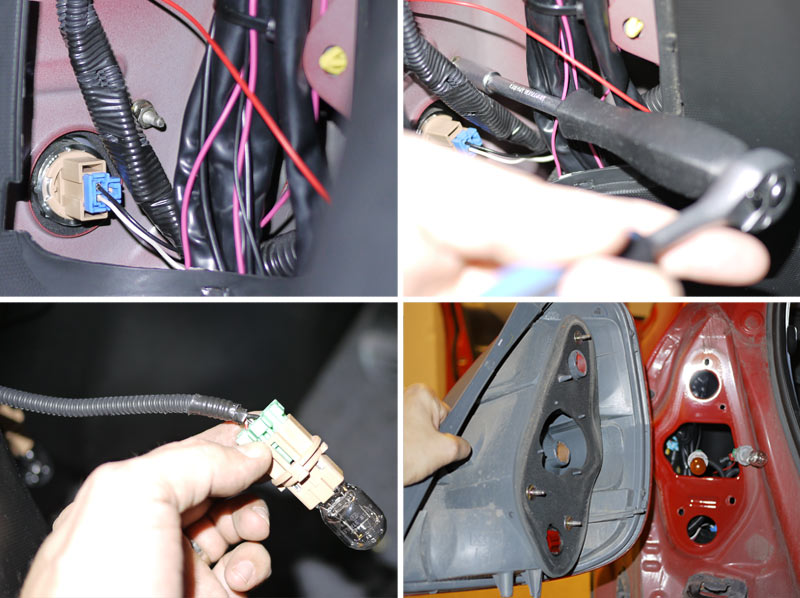
Here's the difference with the OEM vs. JDM-LED's. The OEM's have the rear-light/brake on top of the light. Turn signal and reverse in the middle. The rear fog light is on the bottom of the left cluster only.
JDM-LED has turn signal on the top, rear light/brake with LED's in the middle and a reverse lights at the bottom. You'll notice that there's no fog light socket � I'll have a fix for this later on the DIY
Mount the LED clusters on in reverse order of the previous disassemble of the OEM lights.
Then remove the rear light/brake light bulb from its connector. Mount this to the LED-lights cluster panel.
I know some of the USDM Fit's need harness extensions and wire soldering as the USDM model's harness is shorter vs. JDM/EDM models harness. Some have managed to pull some slack by yanking the wires...
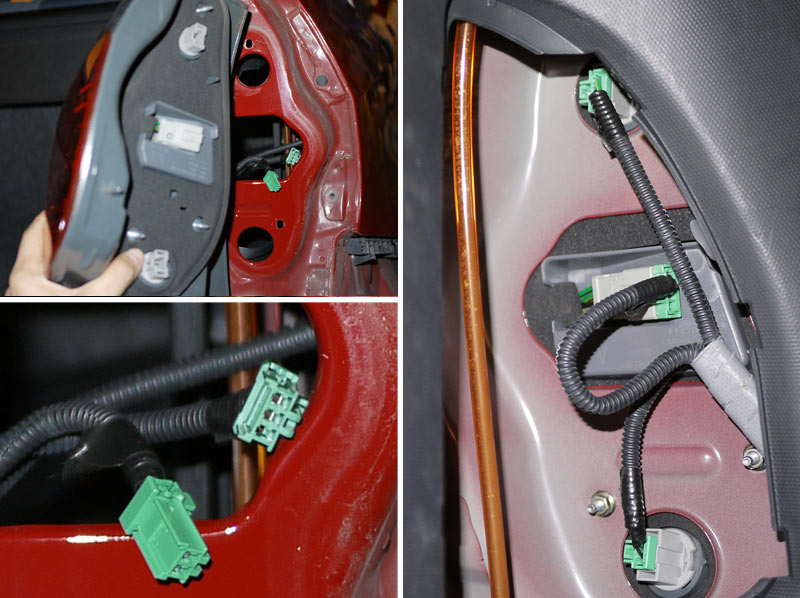
I connected the bulbs to the cluster before mounting it. This helps when you plug everything back together, as there isn't that much space. My EDM/JDM harness was long enough to reach all sockets & connections easily.
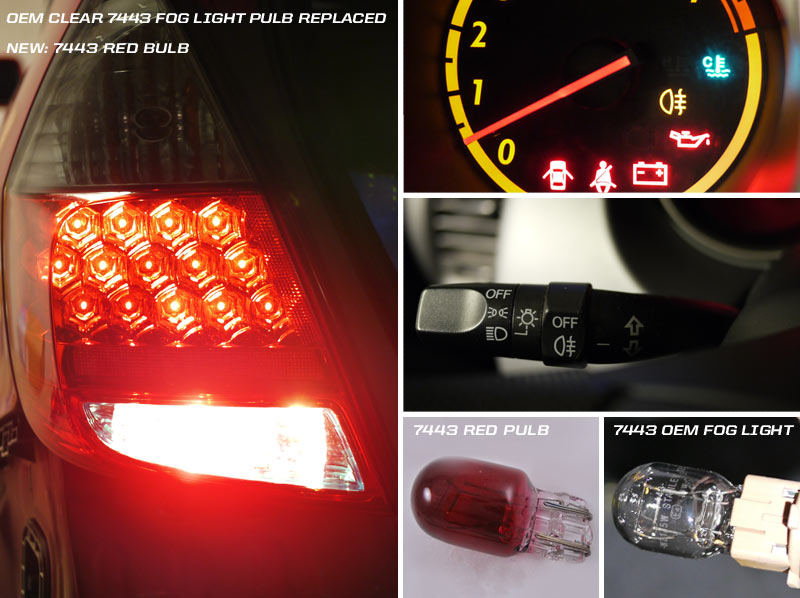
OK. Back to that rear fog-light "issue", the fact that JDM-lights don't have socket for rear fog. My solution was simple. I just replaced the OEM clear fog-light bulb with red bulb. Place this bulb to the left clusters reverse-lights socket. You leave the left reverse-light out (don't leave it inside, just remove the bulb).
Now you have rear fog on the left side, and on the right side the reverse. Voila!
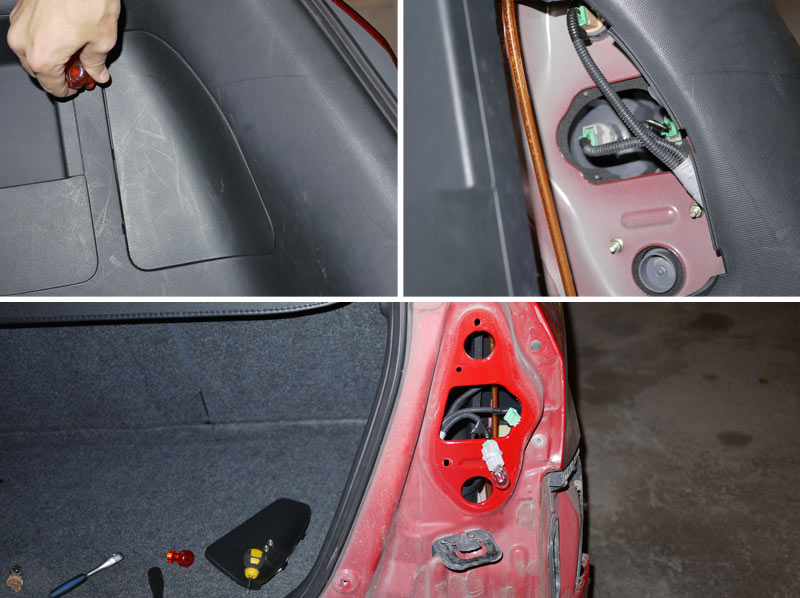
Make sure all the lights work properly before mounting the bumper.

Push the bumper back to it's place. Make sure all the brackets lock into right slots. Push the sides back on and tie the screws back on.
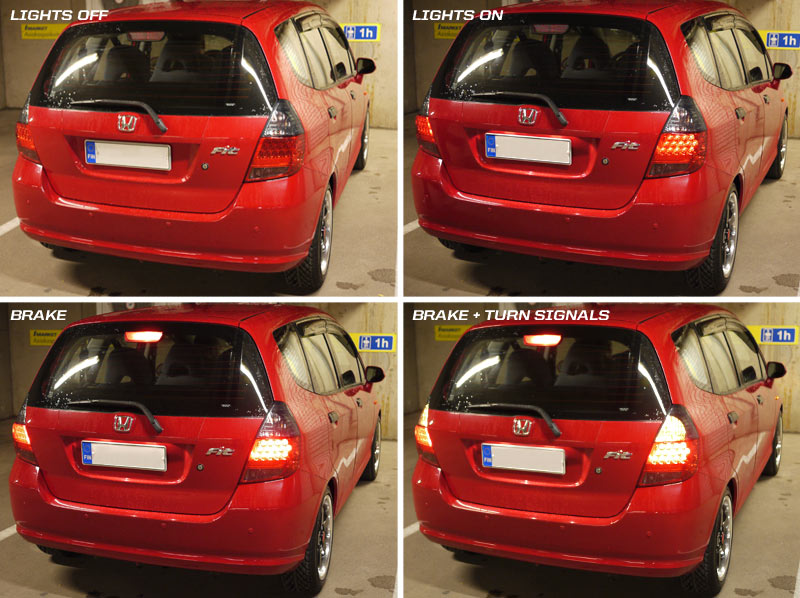
Little show how the lights lit up in different situations.
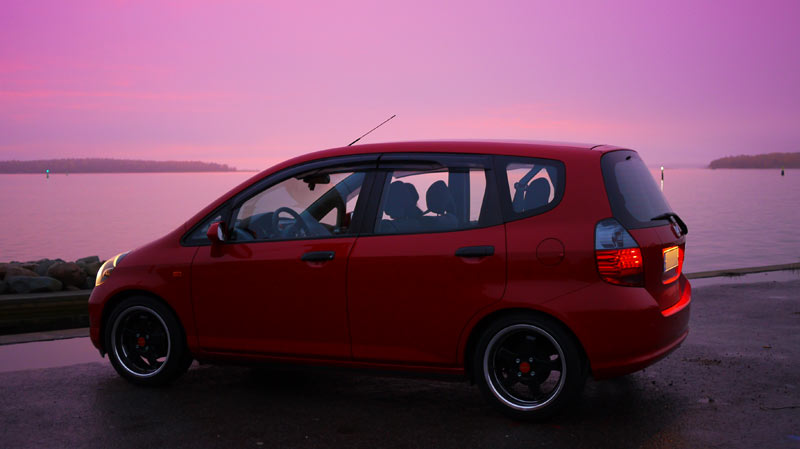
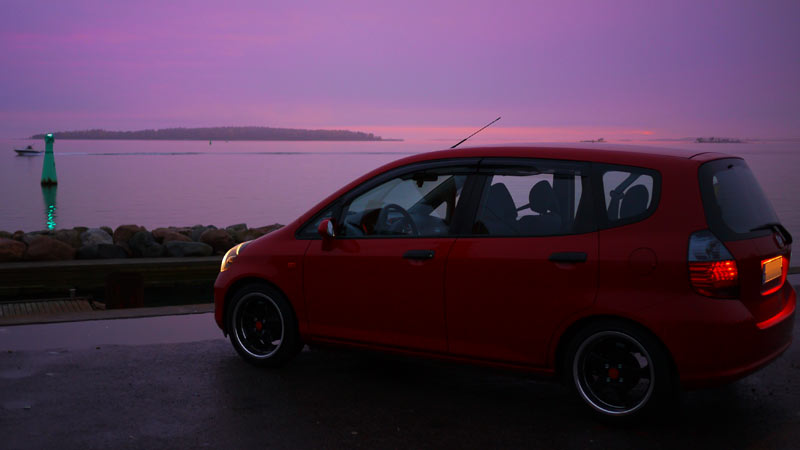
Took the Fit for a spin at the harbor, what a sunset! Foggy weather created some unique colors.
Job done, took me approx 2,5 h. It really transformed the look of the car imo. What do you think? I'm happy about my latest mod.
Flash light or enough working light.
8 mm socket & small wrench � for taillights, inner nuts
10 mm socket & small wrench � for bumper/taillight outer bracket
Allen-key � for bumper bolts
Phillips-head screwdriver � for bumper screws
Flat-head screwdriver � for bumper studs/expansion clips
Cowling clip removal/Fork tool � for expansion clips
Park your car and make sure you have enough light; there are some tricky spots that need light. I used LED-flash light to cover the darkest spots.
The start. Make sure all your lights work, as they should before doing anything else. By this you void any bulb related problems. If, for some reason after you change your lights, one of the light functions does not work, at least you know it's not bulb related. (You might have pulled one of them harness cables too hard during the install and that causes the light not to lit, etc).
Start by removing the 2 countersunk bolts with an Allen-key.
Then remove the 4 (total of 8) Phillips screws located each side of the rear wheel guard. One of them is hiding on the top of the bumper corner, behind the wheel well.
There are 2 big expansion clips on both underside corners of the bumper. To get these loose. Use flat tip screwdriver to open the screw, then lightly push a fork tool under the expansion part and wiggle the plastic clip out. They might be really stuck, so take it easy. You don't want to break these. Also don't use too much force to avoid scratching the paint with the fork-tool. Just pry, twist & wiggle and they'll come out.
While you're under there, remove the other 2 small expansion clips that are located in the middle part of the underside of the bumper.
Now all the screws and clips are off. Just pull the corners of the bumper outward and they'll pop open. Then pull and lift the bumper backwards and it'll slide off.
(Notice in my pics you'll see the previously installed parking sensors, the four black cables).
I also used some cardboard and bubble wrap not to scratch the bumper while it's on the ground.
The bottom of the light is held on, by a tiny plastic prong and a Phillips-screw. This is where most installers have done a short cut. If you don't take your bumper off, you wont be able to loosen these two nuts. By loosing these two (10 mm) nuts and the lights inner three nuts, the lights come of nicely without bending the bracket or breaking the prongs.
Time to look inside of the boot and open those light covers. Use flat-head screwdriver or plastic body trim removal tool.
You'll see three 8 mm nuts in there. Open these with the 8 mm wrench socket. Loosen the bulbs by turning the counter-clockwise out of their sockets. Then it's time to take the light cluster off. The left-hand side cluster has the rear-foglight bulb connected to the bottom of the cluster. This means that the light is designed for LHD traffic.
Now strip the other side as well. You can spot the gray circular plug at the bottom of the OEM light. That's a dummy plug for RHD rear-foglight.
Here's the difference with the OEM vs. JDM-LED's. The OEM's have the rear-light/brake on top of the light. Turn signal and reverse in the middle. The rear fog light is on the bottom of the left cluster only.
JDM-LED has turn signal on the top, rear light/brake with LED's in the middle and a reverse lights at the bottom. You'll notice that there's no fog light socket � I'll have a fix for this later on the DIY
Mount the LED clusters on in reverse order of the previous disassemble of the OEM lights.
Then remove the rear light/brake light bulb from its connector. Mount this to the LED-lights cluster panel.
I know some of the USDM Fit's need harness extensions and wire soldering as the USDM model's harness is shorter vs. JDM/EDM models harness. Some have managed to pull some slack by yanking the wires...
I connected the bulbs to the cluster before mounting it. This helps when you plug everything back together, as there isn't that much space. My EDM/JDM harness was long enough to reach all sockets & connections easily.
OK. Back to that rear fog-light "issue", the fact that JDM-lights don't have socket for rear fog. My solution was simple. I just replaced the OEM clear fog-light bulb with red bulb. Place this bulb to the left clusters reverse-lights socket. You leave the left reverse-light out (don't leave it inside, just remove the bulb).
Now you have rear fog on the left side, and on the right side the reverse. Voila!
Make sure all the lights work properly before mounting the bumper.
Push the bumper back to it's place. Make sure all the brackets lock into right slots. Push the sides back on and tie the screws back on.
Little show how the lights lit up in different situations.
Took the Fit for a spin at the harbor, what a sunset! Foggy weather created some unique colors.
Job done, took me approx 2,5 h. It really transformed the look of the car imo. What do you think? I'm happy about my latest mod.
Member
Joined: May 2010
Posts: 3,417
From: Capital Distric New York

License plate & front park/clearance light LED's
Few weeks back I replaced dull the interior lights to LED's. Those really brighten the look and feel. I got the GD LED-kit from a member FITFITFITFITFIT here. Now I fitted the rest of the LED kit � the exterior lights. Started of with the rear license plate lights.
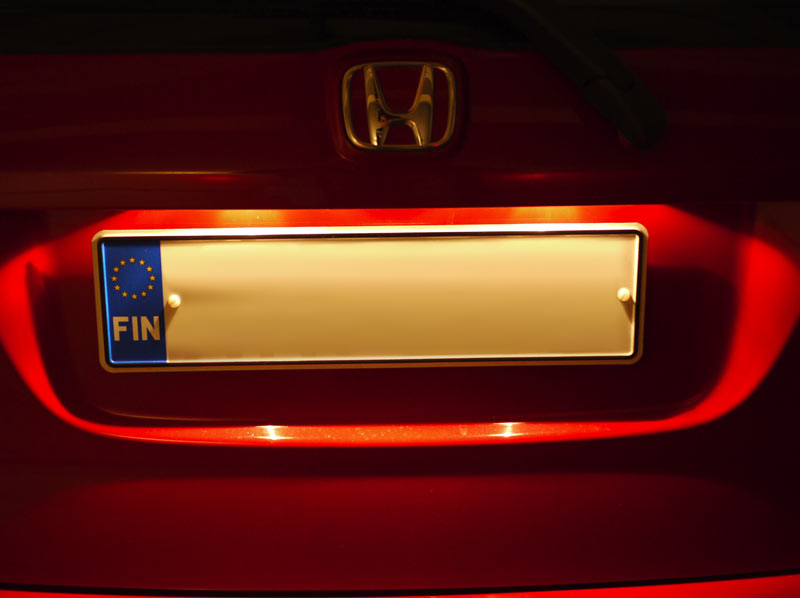
Here's the warm feel of the original lights.
Now, open your hatch to the eye-level. It's easier to work like that. You'll see the clear plastic cover/dome.
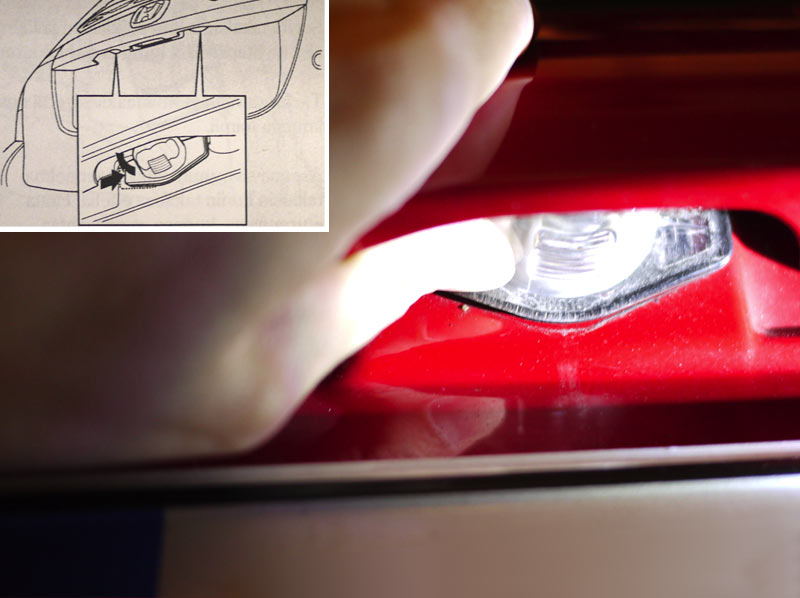
To unmount these, it's pretty easy, but just need some gentle force. You need to slide the cover to the right. They might be stuck, so take your time. Just wiggle it back and forth and it should pop open.
Release the light module from the harness. Make sure you don't let that harness drop into the hatch.
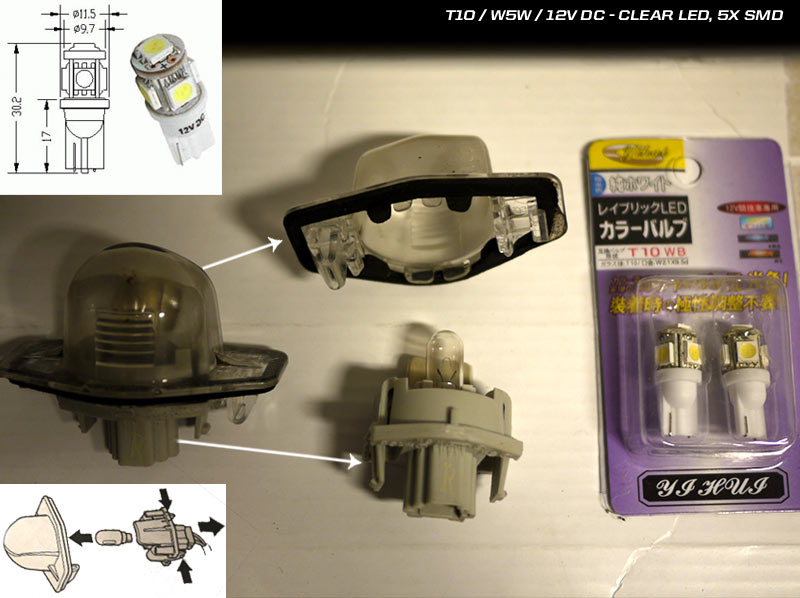
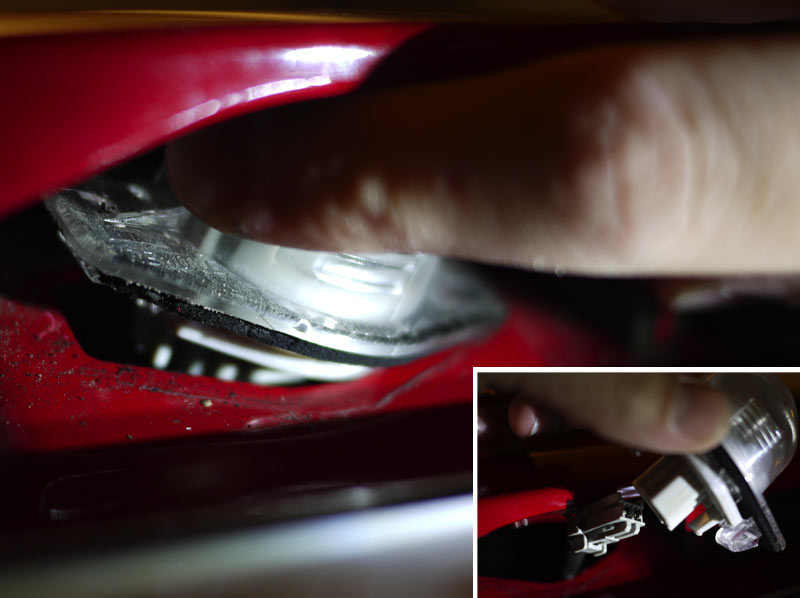
Here's the new replacement LED's. As you can see they're the T10 W5W, 5x SMD bulbs (360 degree). The color is clear/white. Pop the light cover domes open by pressing the little clips.
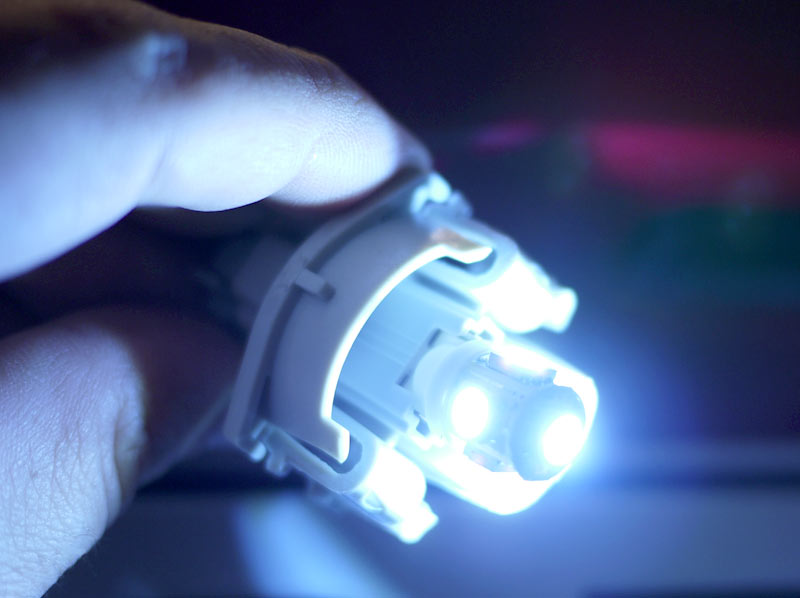
Replace the bulb and make sure it's turns on, by turning the lights on. If the LED bulb wont turn on, simply turn off the lights and have then LED bulb turn 180 degrees (180�) and try this again. Make sure both LED bulbs light up. Assemble the covers back on. Snap the harness clip in and mount them back in.
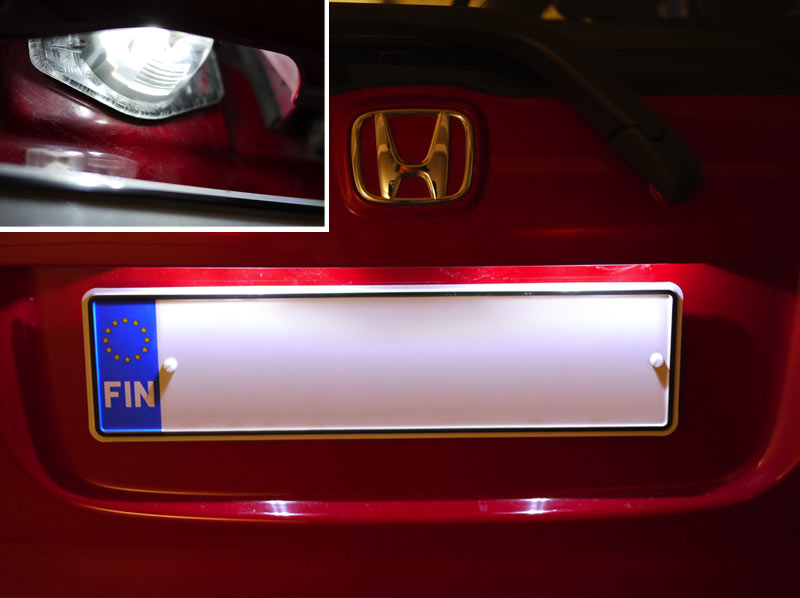
Done! Brightens up the rear a lot.
The front parking/clearance lights were the next.
The oem bulbs looked tired and too warm in color.
Start by turning the wheels to the max. You'll need all the room you can get. Use flat head screwdriver to open the clip located in the under guard. Take your time. You don't want to break these.
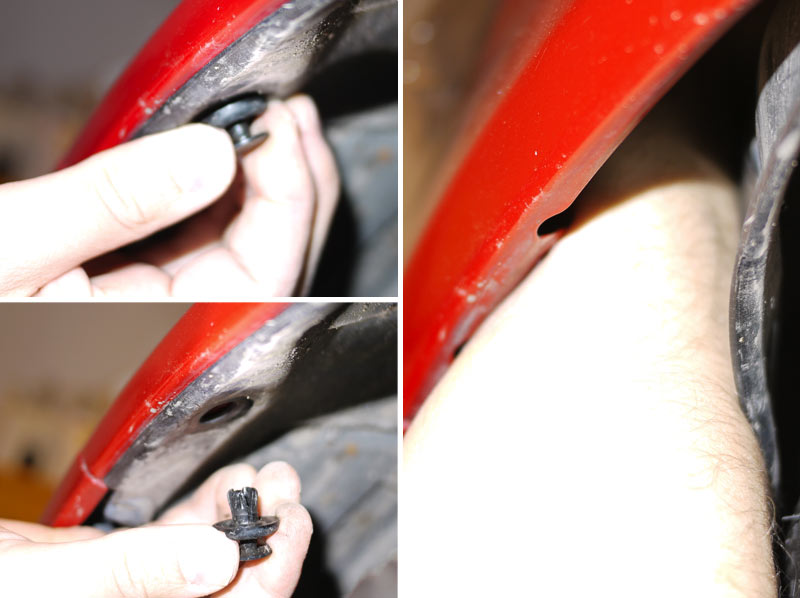
Wiggle and it'll pop off. Now push your hand in the fender and locate the parking light bulb. Turn the light socket counter clockwise to open.
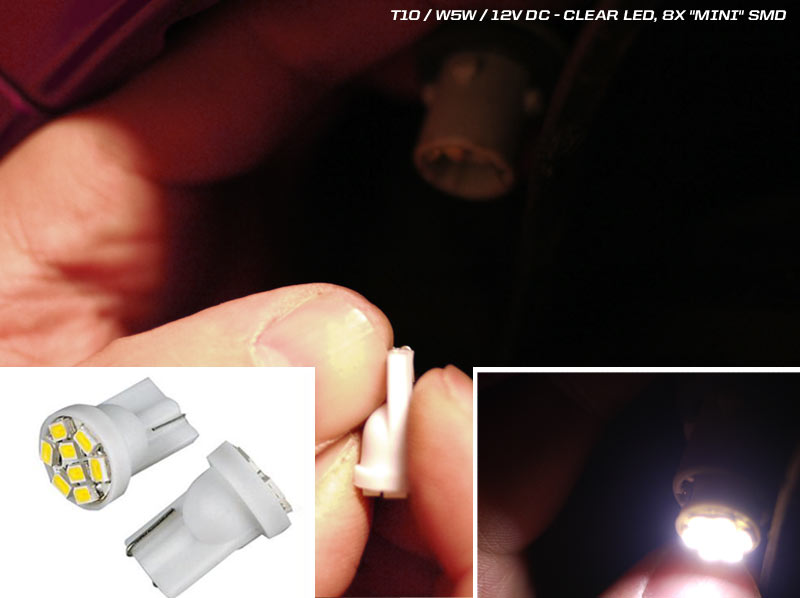
You should get the harness out just a bit, so you can replace the bulb. Here's what I replaced the normal T10 bulb with. An 8x "mini" SMD led bulb (168/194). Make sure the LED's light up before putting the socket back in.
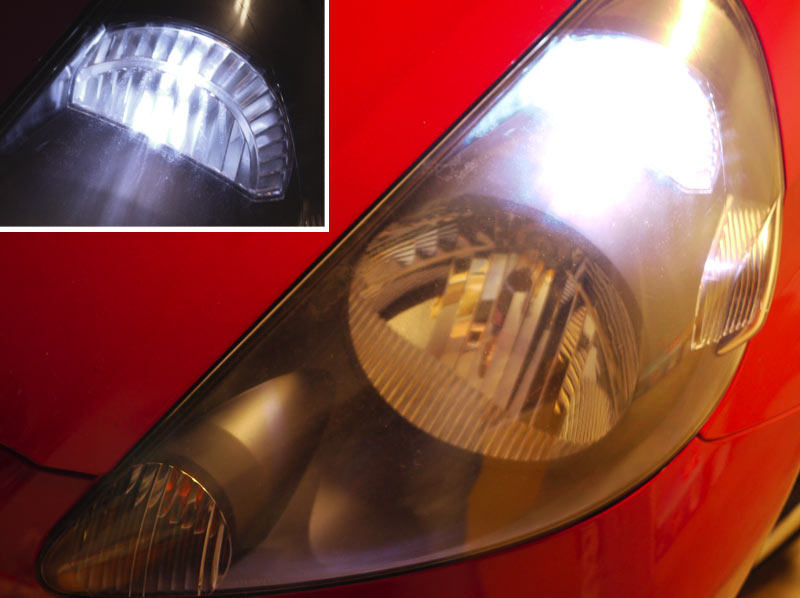
Done! It's quite bright vs. the oem.
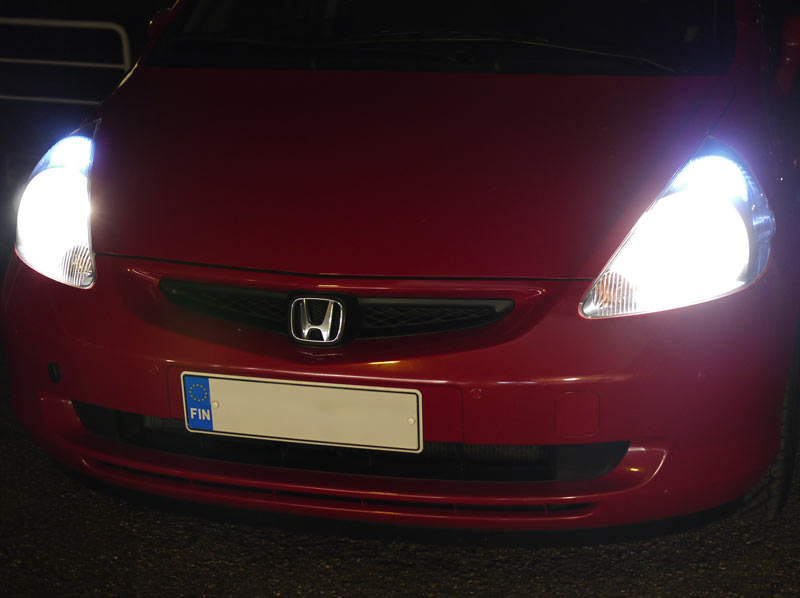
Picture with headlights on.
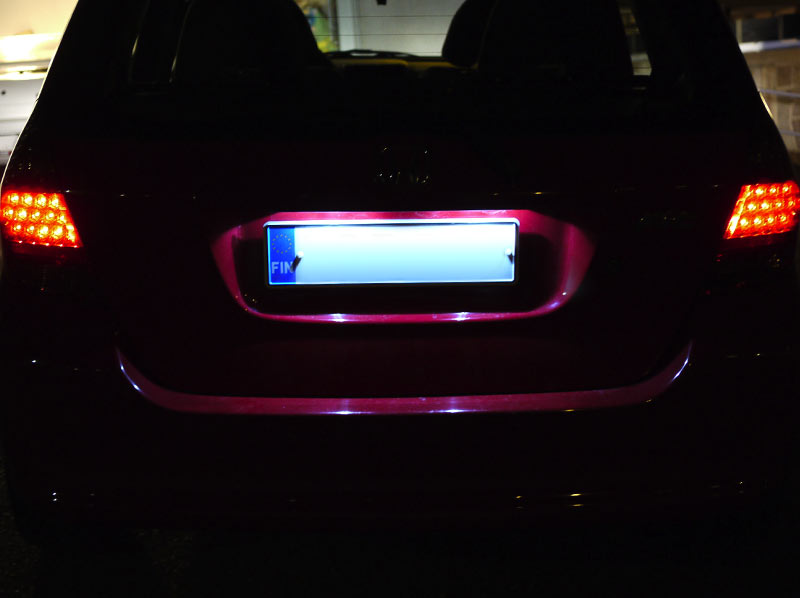
One more snap of the rear in the dark.
Now, before someone comment's that I used the Front park/clearance 5-LED beams in the wrong end (license plate vs head lights) and License plate 8-LED's in the front...
Well, I know the sales ad states to use the 360� 5-LEDS in the front and "straight" 8-LEDS in the rear. To me they looked better this way. As the rear plate light was really sharp createing almost an shadow between the bulp-housings to the license plate, the 360� light bulb gives smoother light. And the front's are brighter this way � heading straight ahead.
Here's the warm feel of the original lights.
Now, open your hatch to the eye-level. It's easier to work like that. You'll see the clear plastic cover/dome.
To unmount these, it's pretty easy, but just need some gentle force. You need to slide the cover to the right. They might be stuck, so take your time. Just wiggle it back and forth and it should pop open.
Release the light module from the harness. Make sure you don't let that harness drop into the hatch.
Here's the new replacement LED's. As you can see they're the T10 W5W, 5x SMD bulbs (360 degree). The color is clear/white. Pop the light cover domes open by pressing the little clips.
Replace the bulb and make sure it's turns on, by turning the lights on. If the LED bulb wont turn on, simply turn off the lights and have then LED bulb turn 180 degrees (180�) and try this again. Make sure both LED bulbs light up. Assemble the covers back on. Snap the harness clip in and mount them back in.
Done! Brightens up the rear a lot.
The front parking/clearance lights were the next.
The oem bulbs looked tired and too warm in color.
Start by turning the wheels to the max. You'll need all the room you can get. Use flat head screwdriver to open the clip located in the under guard. Take your time. You don't want to break these.
Wiggle and it'll pop off. Now push your hand in the fender and locate the parking light bulb. Turn the light socket counter clockwise to open.
You should get the harness out just a bit, so you can replace the bulb. Here's what I replaced the normal T10 bulb with. An 8x "mini" SMD led bulb (168/194). Make sure the LED's light up before putting the socket back in.
Done! It's quite bright vs. the oem.
Picture with headlights on.
One more snap of the rear in the dark.
Now, before someone comment's that I used the Front park/clearance 5-LED beams in the wrong end (license plate vs head lights) and License plate 8-LED's in the front...
Well, I know the sales ad states to use the 360� 5-LEDS in the front and "straight" 8-LEDS in the rear. To me they looked better this way. As the rear plate light was really sharp createing almost an shadow between the bulp-housings to the license plate, the 360� light bulb gives smoother light. And the front's are brighter this way � heading straight ahead.
Honda Custom Performance � Modulo
My thread is way too long overdue for an Update... so here it goes.
Back in November 2011 I scored some parts from eBay Germany. A brand new GD1, OEM Honda Custom Performance Modulo kit!!!
Parts: Rear wing, front mask, side skirts, front & rear lip. Rare kit to find it unused in boxes.


They were in wrong color, but it didn't bother me as my friends own a body shop with paint booth. I gatherd some parts here and there, like a Genuine Mugen mask etc.

So, this is what it would look like painted.

AAAAnnnnnd.... Then the parts gathered dust for the next 2,5 years - ouch! (to be continued).
Back in November 2011 I scored some parts from eBay Germany. A brand new GD1, OEM Honda Custom Performance Modulo kit!!!
Parts: Rear wing, front mask, side skirts, front & rear lip. Rare kit to find it unused in boxes.
They were in wrong color, but it didn't bother me as my friends own a body shop with paint booth. I gatherd some parts here and there, like a Genuine Mugen mask etc.
So, this is what it would look like painted.
AAAAnnnnnd.... Then the parts gathered dust for the next 2,5 years - ouch! (to be continued).
Fit GD JDM Type-S front bumper - Yahoo auctions
OK... some time later. I scored again � big time!

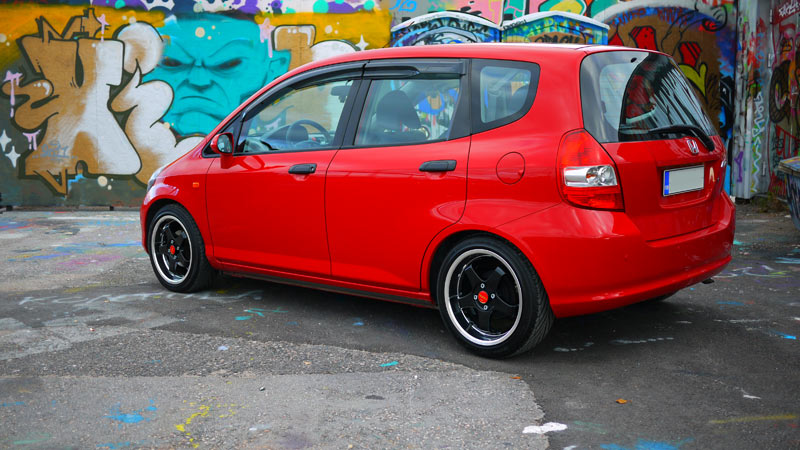
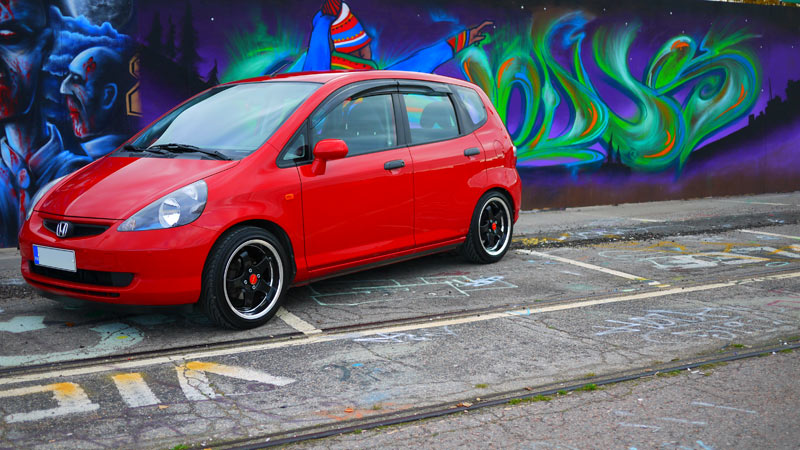
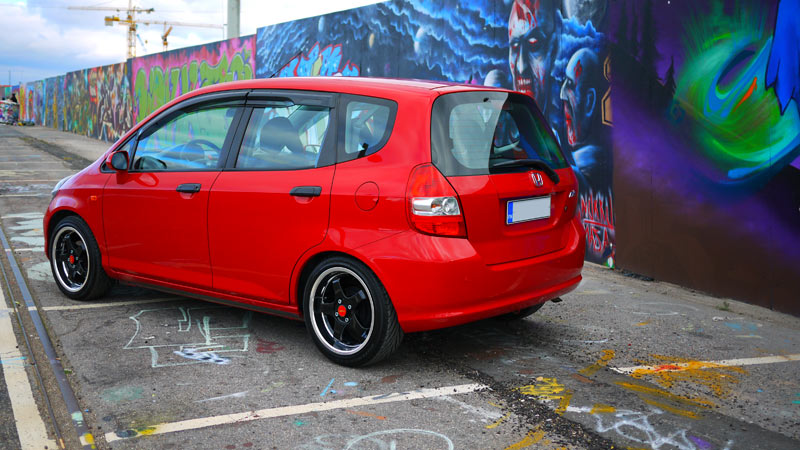
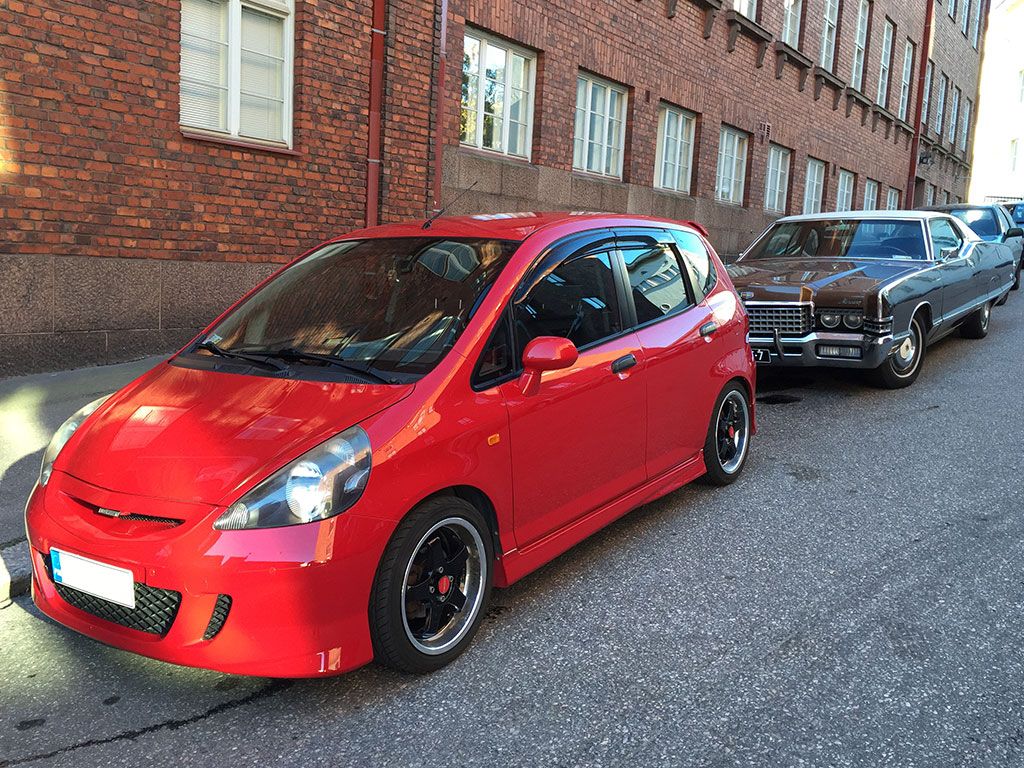
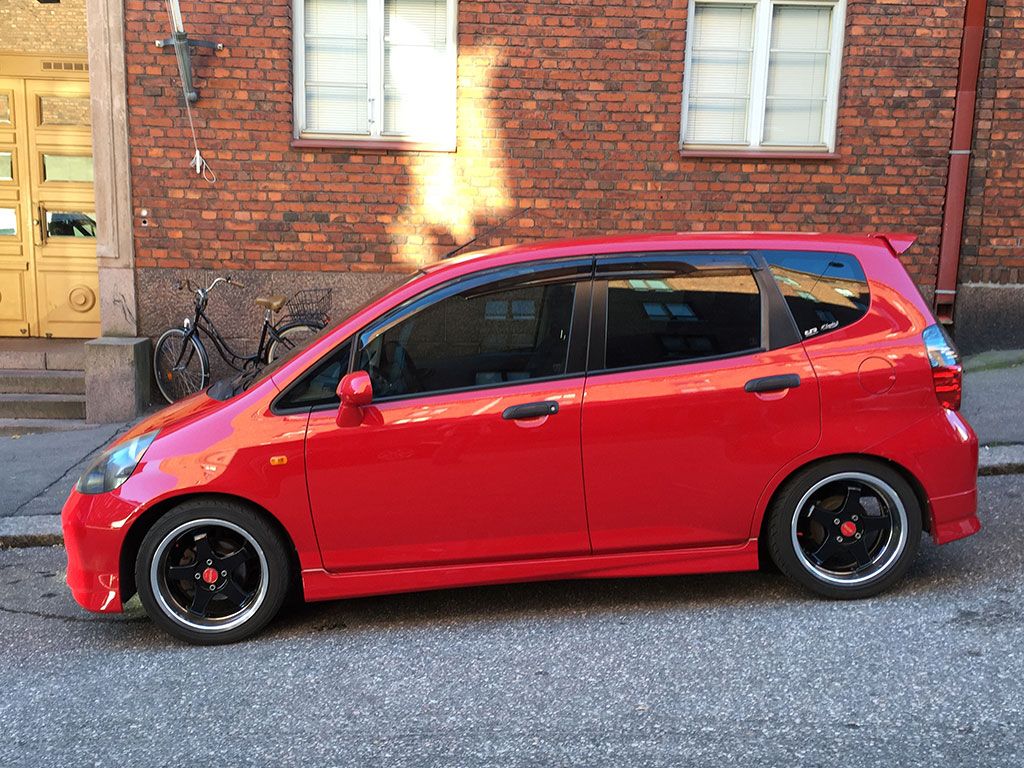
This is how my ride has been for the past 2 years � never missing a beat! Such a good little trooper.
So, I've been a soursing some parts again
I got lucky at Yahoo Japan Auctions few weeks back, here's the result:

Yen 14.499 = USD140... WIN!!! Genuine GD1 Type-S front bumper, incl all bits & pieces � In a right color too (Milano Red R81).
Forward 12 days (Tokyo � Helsinki) and here she is.

Just a quick try out, hah.


A bit lower than stock GD1 JDM bumper...
The car & parts are scheduled on paint shop in 2 weeks. So I'll slap my Honda Custom Performance Modulo side skirts & wing on as well.
Can't wait till those new parts are on. See ya soon!
This is how my ride has been for the past 2 years � never missing a beat! Such a good little trooper.
So, I've been a soursing some parts again
I got lucky at Yahoo Japan Auctions few weeks back, here's the result:
Yen 14.499 = USD140... WIN!!! Genuine GD1 Type-S front bumper, incl all bits & pieces � In a right color too (Milano Red R81).
Forward 12 days (Tokyo � Helsinki) and here she is.
Just a quick try out, hah.
A bit lower than stock GD1 JDM bumper...
The car & parts are scheduled on paint shop in 2 weeks. So I'll slap my Honda Custom Performance Modulo side skirts & wing on as well.
Can't wait till those new parts are on. See ya soon!
Fit GD1 Type-S / Modulo / Mugen
Here's some quick snaps I took � sorry for crappy iPhone4 pic quality...

JDM Type-S bumper and Genuine Mugen grille painted. Sikaflex'ed to the bumper.

Mmmmmm... Muuuu-Geeeen

JDM Wiper conversion aka the Stiffy Mod.

We also painted the license plate "shied" shiny black. The Honda Red (DC5 Type-R) emblem is not yet in the pics. Note the Modulo rear skirt & wing.

Pro Carnauba wax � Wax on, Wax off... and full machine polishing.

Shiny paint again!
Back in the down town... quick snaps.

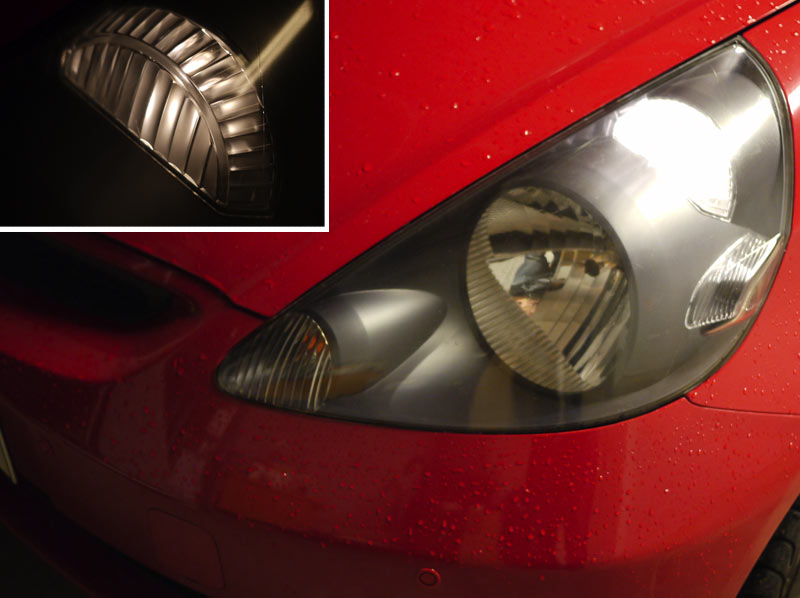
JDM Type-S front bumper with Mugen grille. Polished headlights.

Modulo skirts flow nicely with the bumper lines.

Dat assszzz
Well happy for these mods. Have to ad that Type-R Honda badge, tint the windows... and... and ...
Stay tuned!
JDM Type-S bumper and Genuine Mugen grille painted. Sikaflex'ed to the bumper.
Mmmmmm... Muuuu-Geeeen
JDM Wiper conversion aka the Stiffy Mod.
We also painted the license plate "shied" shiny black. The Honda Red (DC5 Type-R) emblem is not yet in the pics. Note the Modulo rear skirt & wing.
Pro Carnauba wax � Wax on, Wax off... and full machine polishing.
Shiny paint again!
Back in the down town... quick snaps.
JDM Type-S front bumper with Mugen grille. Polished headlights.
Modulo skirts flow nicely with the bumper lines.
Dat assszzz
Well happy for these mods. Have to ad that Type-R Honda badge, tint the windows... and... and ...
Stay tuned!
OEM GD1 JDM, Type-S bumper from Yahoo Auctions Japan, really nice score for Yen 14.499 / 110 Euros (USD140).
OEM Honda Custom Performance � Modulo: front lip & grille (unused now, as I changed the front bumper to different model), rear lip & wing. Bought them two years ago from eBay Germany. A local Honda dealer had them listed as "Accord or similar parts" - LOL. I checked the part numbers listed, as I had seen similar shape parts on JDM Fit's in the Japanese Magazines... well, they turned out to be Fit/Jazz parts not "Accord". I had a super deal... 180 Euros (USD 233) for the whole lot!
The Genuine Mugen Grille was bought from a Fitfreak Forum member.
Happy parts hunting


Massive. I plan to use my Modulo emblems. I found a set for sale in eBay and ICB. Mine are black with chrome text.
Little update:

The DC5 Type R Honda Red emblem sits fits perfect.
For everyone who's looking for the right part number � Fit/Jazz GD1-3 Red H badge... 75701-S6M-Z01
Time for an update...
This little trooper has run like champ for the past 6 years I've had her. Never missing a beat. Really, the best car I've ever had. (Still have my R32 GT-R, '63 VW Beetle).
I got 154000 KMS (95600 Miles) on the odometer. So it was time to look something new to the car family. I've been looking for it a while as there's only a handful of them in Finland. But maybe that needs a "new Build Thread"!?! Can you guess what is it
Here's the current status of the Jazz (Fit), sadly she's looking for a new home.
I've been so happy with this Honda, that the latest addition to my car life had to be a FIT! a HYBRID to be exact.
So, I'll start a new thread for that � You'll find it here: Domo-kun's GP1 Fit-Jazz Hybrid.
Thanks for the support on this GD build. It's been fun!

Thread
Thread Starter
Forum
Replies
Last Post
Plim
Fit Photos & Videos
11
Apr 6, 2007 06:14 PM