DIY: GD Rear Disc Brake Conversion
#1
 01-22-2015, 01:22 PM


DIY: GD Rear Disc Brake Conversion
this is a diy for you gd owners who want to convert their rear drum to rear disc as honda likely would've done it from factory (so no large/upsized discs and calipers here)... effective, oem look, maintains front/rear proportioning, and cheaper than the $800+ kits out there...
as always: #notresponsibleforyouscrewingupordoinganythingstup idtoyourowncarokbye
PARTS LIST
CONVERSION BRACKETS
-Scarebird GD Rear Disc Conversion Brackets
DISC
-any rear disc from a 1997 Acura Integra (NOT the type R)
-the ones I used: Centric rear disc - 12140017 - Rockauto (***5/22/16 Update: now using Centric Premium - 12040017***)
PAD
-any rear pad from a 1997 Acura Integra (NOT the type R)
-the ones I used: Stoptech Street Perf rear pad - 30903740 - Rockauto (***5/22/16 Update: now using Centric Premium Ceramic - 10503740***)
CALIPER
-rear calipers from a 1997 Acura Integra (NOT the type R)
-the ones I used (came with clips, bleeders, banjo, and crush washers): Centric reman rear caliper - 14140532 L; 14140531 R - Rockauto
-you'll also need the parking brake arms and bolts: 43267-sh3-931 L arm; 43247-sh3-931 R arm; 45240-sc2-003 bolts (4 bolts needed) - Hondapartsnow
PARKING BRAKE CABLES
-87 acura legend coupe: BC94043 rear left; BC94044 rear right - Rockauto
-holding and cotter pin: 43471-SD2-930 holding pin, 90705-SD2-931 cotter pin - Hondapartsnow
BRAKE LINES
-contact Fastbrakes.com and ask for the Honda Fit conversion brake lines - swivel end, good quality/price
OR, make your own
-approximately 36" in length, female 10x1mm end, 30-45* banjo 10x1mm end
you can do it cheaper than I did, but I spent $540 total... the largest expense being the calipers, then the conversion brackets, then the brake lines, and on down...
TOOLS
metric sockets
ratchets
17mm box wrench (if getting brake lines from fastbrakes)
10mm flare wrench (not absolutely needed but highly recommended)
4 jack stands
dremel with grinding wheel
32mm socket (yes - 32mm)
other basic tools: phillips driver, flat head driver, etc
HOW TO
here's what i did, your mileage may vary:
putting the discs/calipers on is by far the easiest part of this entire adventure... the parking brake cables, as suspected, are what take quite a while... BUT, with some basic know-how and tools you can do it...
before you start - i preassembled the rear calipers with all the clips, grease, pads, and even the brake line... this helps it go faster when you actually get there...
1. rear wheels off
2. use a screw to get the drum off
3. remove the cover for the hub nut
4. undimple the hub nut, and remove nut
5. remove bearing/hub assembly
6. unclip two brake line clips holding the junctions in place, and unhook from all hardline clips
7. unscrew frame hardline from soft junction, having the new caliper/brake line next to you so you don't leak too much brake fluid everywhere... unscrew old, screw in the new
8. unscrew 4 bolts that hold the parking brake assembly to the axle - set assembly aside (it will still be attached to the car by the parking brake - i couldn't for the life of me get the parking cable loose from the drum assembly)
9. install scarebird brackets - tabs going inboard and to the rear, and secure using the 4 bolts you just removed
10. reinstall the bearing/hub/nut and redimple
11. install rotor
12. install caliper
13. bleed the system (do all four corners in order)
at this point you can route the brake lines and secure them as you see fit (you'll be able to reuse one of the brake clips per side for the new junction, and DO SAVE THE OTHER ONE... you'll be able to use it for the parking brake attachment at the caliper) - i used a few rubber sections to protect the line as i secured it at a few points
good breaking point (get it)... get lunch, beer, or whatever...
go inside the car
14. lift the rear of the center console and position yourself in the back seat
15. loosen the parking brake adjustment nut, and remove cable ends from the equalizer
16. unscrew cable holding bracket and set aside
17. going underneath the car, you'll need to remove the bracket that protects the fuel filler where it enters the tank, the plastic undertray, and the mid-frame brace as well as the parking brake bracket nuts
-it helps to have two people here - one inside one underneath
18. push the grommets through from the top, and pull the cables out of the bottom - drivers side first, then passenger side
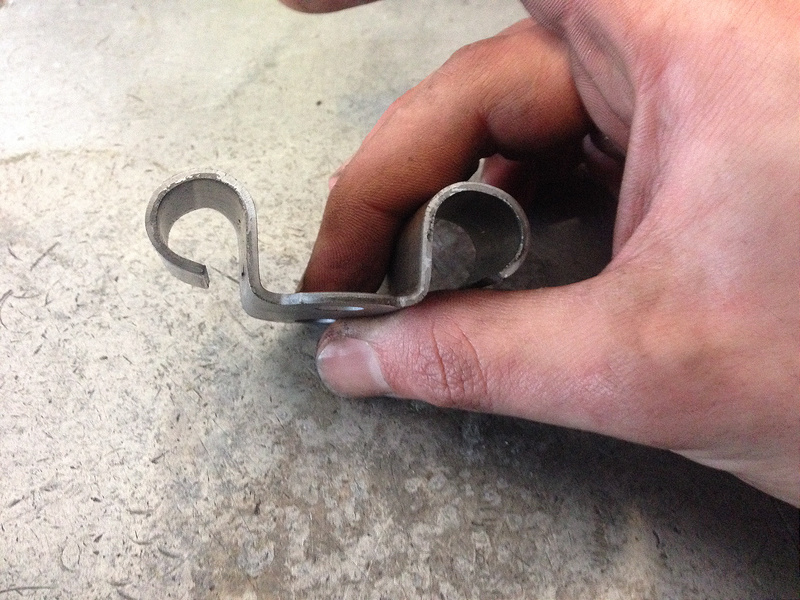
19. rebend the cable holding bracket to accommodate the larger ends of the new parking brake cables
20. transfer the stock grommets to the new cables (silicone/wd40/lube helps a lot here)
21. remove new and stock cable brackets from each set, and hold onto them - you'll want to use them, but how and where is up to you
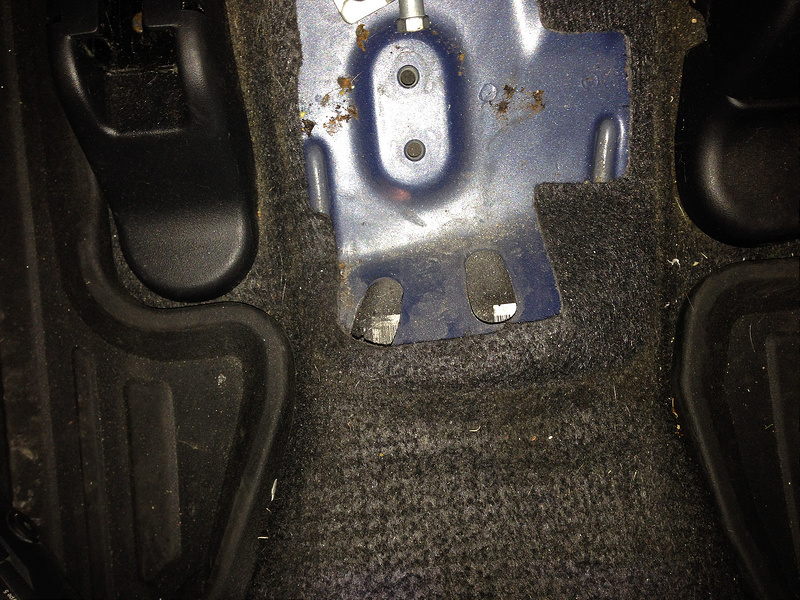
22. you'll need to dremel the cable slots in the floor to accommodate the larger width of the new cables... keep grinding and testing (about 1/8" of additional width is needed per slot)
23. put the new cables in from the bottom - passenger side first, then drivers (REALLY helps to have someone helping at this point)
24. reinstall cable holding bracket, and put cable ends back on equalizer
25. using the brake junction clips that you saved from earlier, attach the parking brake to the caliper arm and secure using the brake clip - and use pin and cotter pin to attach cable end to the caliper spring arm
26. creativity time - using all the new/old cable brackets, secure the rest of the parking brake cable taking care to keep the cable close to the axle as it leaves the caliper (you'll need to check for wheel clearance to be sure)
27. adjust parking brake cable adjustment screw inside
28. profit
PICTARS
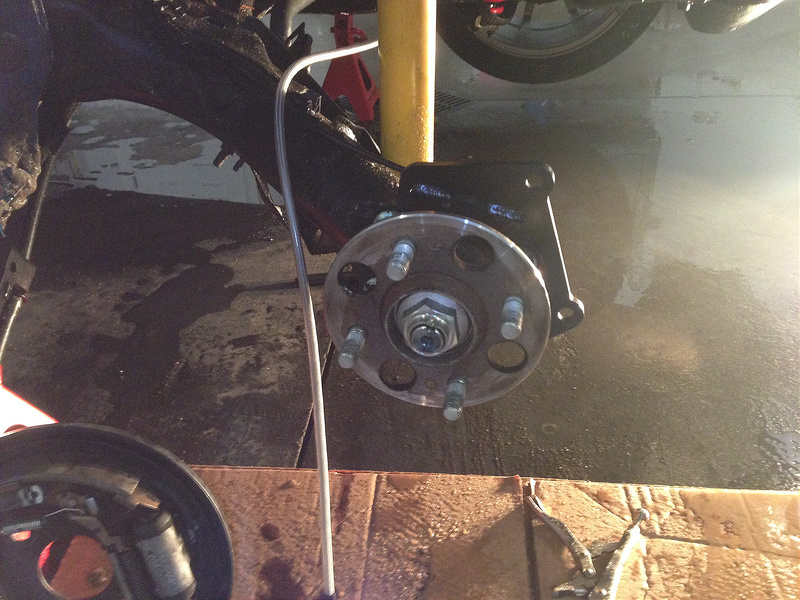
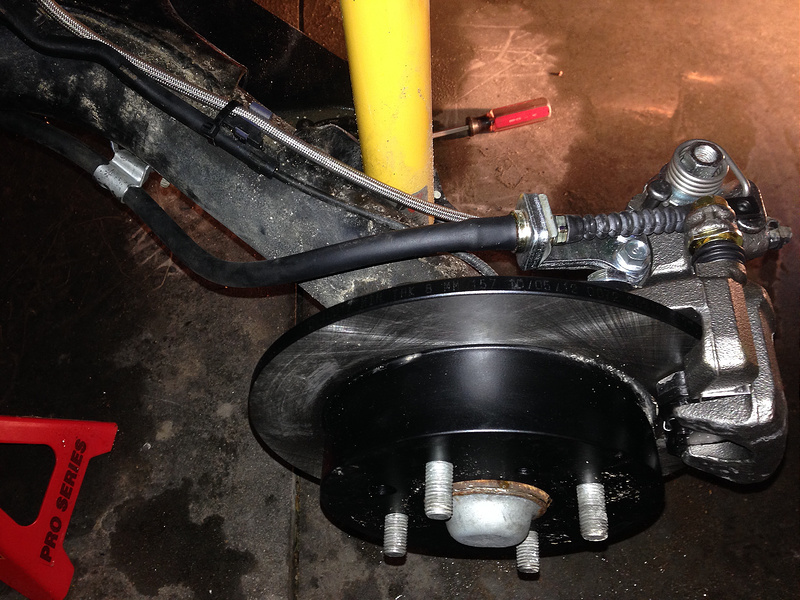
scarebird brackets mounted, new brake line attached

bearing/hub reattached
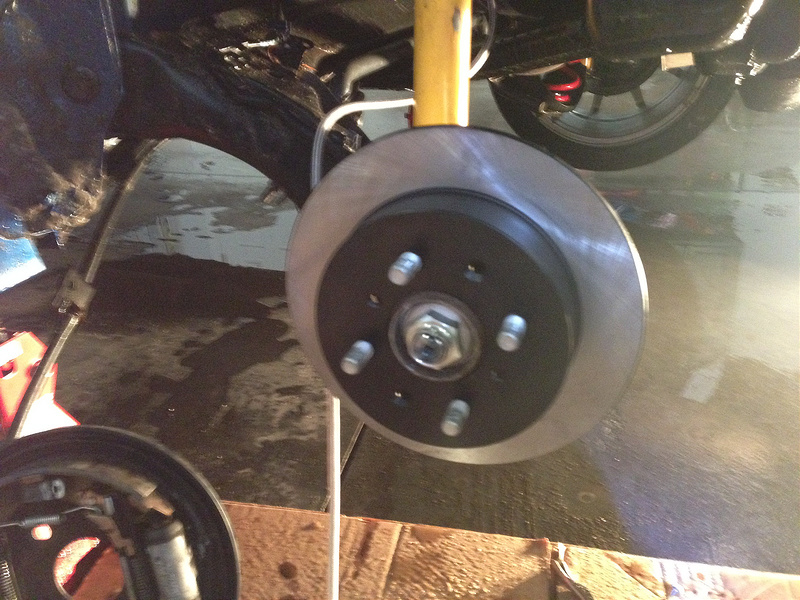
rotor on
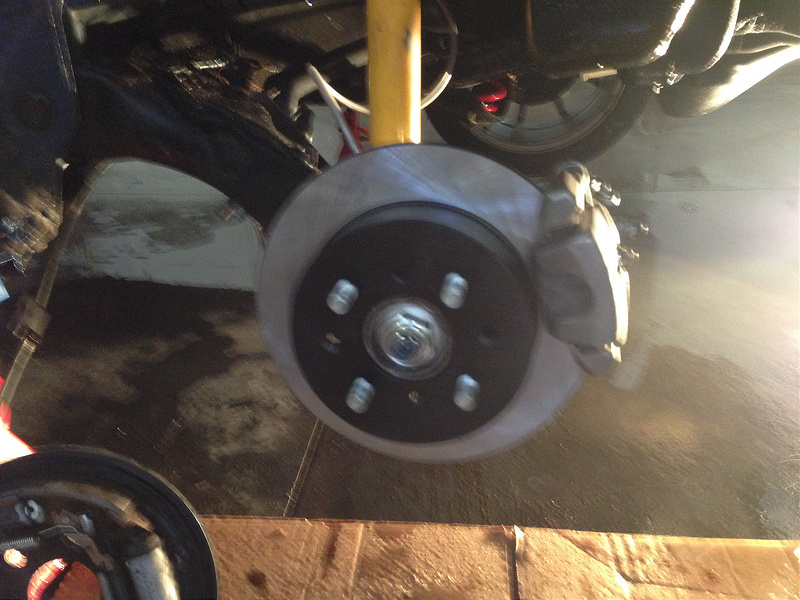
caliper assembly on
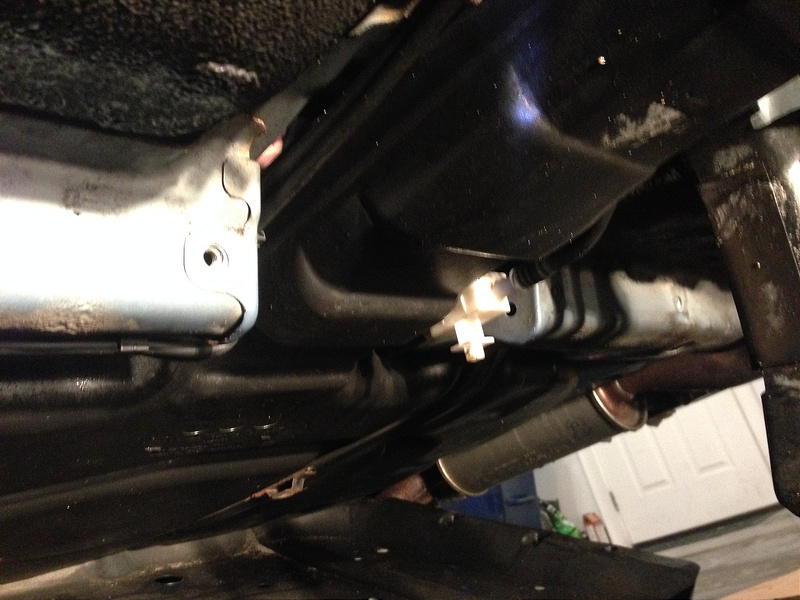
midframe brace, undertray, and fuel plate removed
parking brake cable holding bracket bent to accommodate new cables (right is done, left is stock)
dremel'd slots to accomodate wider cable ends
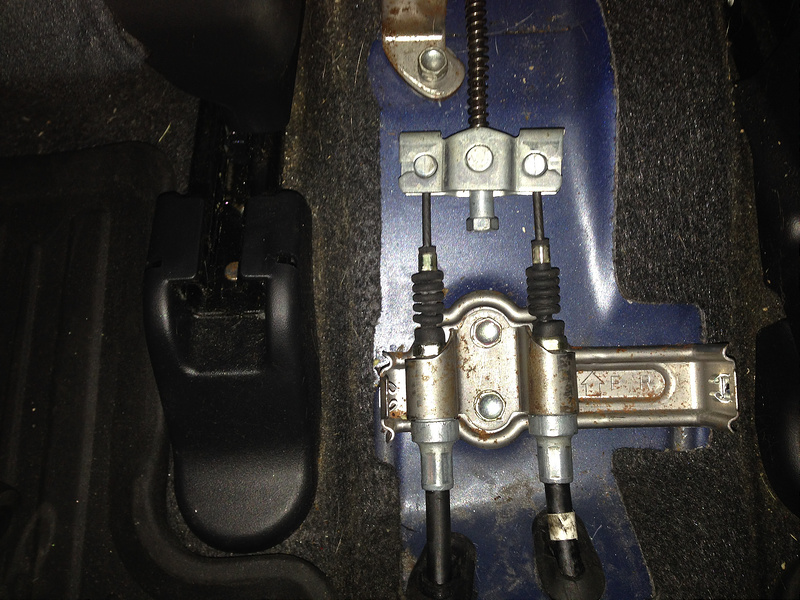
new cables installed
routed lines/cables, attached cable to caliper arm

as it sits now (yes... the car is dirty... its winter in michigan...)


as always: #notresponsibleforyouscrewingupordoinganythingstup idtoyourowncarokbye
PARTS LIST
CONVERSION BRACKETS
-Scarebird GD Rear Disc Conversion Brackets
DISC
-any rear disc from a 1997 Acura Integra (NOT the type R)
-the ones I used: Centric rear disc - 12140017 - Rockauto (***5/22/16 Update: now using Centric Premium - 12040017***)
PAD
-any rear pad from a 1997 Acura Integra (NOT the type R)
-the ones I used: Stoptech Street Perf rear pad - 30903740 - Rockauto (***5/22/16 Update: now using Centric Premium Ceramic - 10503740***)
CALIPER
-rear calipers from a 1997 Acura Integra (NOT the type R)
-the ones I used (came with clips, bleeders, banjo, and crush washers): Centric reman rear caliper - 14140532 L; 14140531 R - Rockauto
-you'll also need the parking brake arms and bolts: 43267-sh3-931 L arm; 43247-sh3-931 R arm; 45240-sc2-003 bolts (4 bolts needed) - Hondapartsnow
PARKING BRAKE CABLES
-87 acura legend coupe: BC94043 rear left; BC94044 rear right - Rockauto
-holding and cotter pin: 43471-SD2-930 holding pin, 90705-SD2-931 cotter pin - Hondapartsnow
BRAKE LINES
-contact Fastbrakes.com and ask for the Honda Fit conversion brake lines - swivel end, good quality/price
OR, make your own
-approximately 36" in length, female 10x1mm end, 30-45* banjo 10x1mm end
you can do it cheaper than I did, but I spent $540 total... the largest expense being the calipers, then the conversion brackets, then the brake lines, and on down...
TOOLS
metric sockets
ratchets
17mm box wrench (if getting brake lines from fastbrakes)
10mm flare wrench (not absolutely needed but highly recommended)
4 jack stands
dremel with grinding wheel
32mm socket (yes - 32mm)
other basic tools: phillips driver, flat head driver, etc
HOW TO
here's what i did, your mileage may vary:
putting the discs/calipers on is by far the easiest part of this entire adventure... the parking brake cables, as suspected, are what take quite a while... BUT, with some basic know-how and tools you can do it...
before you start - i preassembled the rear calipers with all the clips, grease, pads, and even the brake line... this helps it go faster when you actually get there...
1. rear wheels off
2. use a screw to get the drum off
3. remove the cover for the hub nut
4. undimple the hub nut, and remove nut
5. remove bearing/hub assembly
6. unclip two brake line clips holding the junctions in place, and unhook from all hardline clips
7. unscrew frame hardline from soft junction, having the new caliper/brake line next to you so you don't leak too much brake fluid everywhere... unscrew old, screw in the new
8. unscrew 4 bolts that hold the parking brake assembly to the axle - set assembly aside (it will still be attached to the car by the parking brake - i couldn't for the life of me get the parking cable loose from the drum assembly)
9. install scarebird brackets - tabs going inboard and to the rear, and secure using the 4 bolts you just removed
10. reinstall the bearing/hub/nut and redimple
11. install rotor
12. install caliper
13. bleed the system (do all four corners in order)
at this point you can route the brake lines and secure them as you see fit (you'll be able to reuse one of the brake clips per side for the new junction, and DO SAVE THE OTHER ONE... you'll be able to use it for the parking brake attachment at the caliper) - i used a few rubber sections to protect the line as i secured it at a few points
good breaking point (get it)... get lunch, beer, or whatever...
go inside the car
14. lift the rear of the center console and position yourself in the back seat
15. loosen the parking brake adjustment nut, and remove cable ends from the equalizer
16. unscrew cable holding bracket and set aside
17. going underneath the car, you'll need to remove the bracket that protects the fuel filler where it enters the tank, the plastic undertray, and the mid-frame brace as well as the parking brake bracket nuts
-it helps to have two people here - one inside one underneath
18. push the grommets through from the top, and pull the cables out of the bottom - drivers side first, then passenger side
19. rebend the cable holding bracket to accommodate the larger ends of the new parking brake cables
20. transfer the stock grommets to the new cables (silicone/wd40/lube helps a lot here)
21. remove new and stock cable brackets from each set, and hold onto them - you'll want to use them, but how and where is up to you
22. you'll need to dremel the cable slots in the floor to accommodate the larger width of the new cables... keep grinding and testing (about 1/8" of additional width is needed per slot)
23. put the new cables in from the bottom - passenger side first, then drivers (REALLY helps to have someone helping at this point)
24. reinstall cable holding bracket, and put cable ends back on equalizer
25. using the brake junction clips that you saved from earlier, attach the parking brake to the caliper arm and secure using the brake clip - and use pin and cotter pin to attach cable end to the caliper spring arm
26. creativity time - using all the new/old cable brackets, secure the rest of the parking brake cable taking care to keep the cable close to the axle as it leaves the caliper (you'll need to check for wheel clearance to be sure)
27. adjust parking brake cable adjustment screw inside
28. profit
PICTARS
scarebird brackets mounted, new brake line attached
bearing/hub reattached
rotor on
caliper assembly on
midframe brace, undertray, and fuel plate removed
parking brake cable holding bracket bent to accommodate new cables (right is done, left is stock)
dremel'd slots to accomodate wider cable ends
new cables installed
routed lines/cables, attached cable to caliper arm
as it sits now (yes... the car is dirty... its winter in michigan...)
Last edited by apexanimal; 05-22-2016 at 03:44 PM.


#6
01-23-2015, 09:13 PM
i updated the first post - the scarebird brackets are now up for sale...
Scarebird GD Rear Disc Conversion Brackets
again, i can't say enough about the fact that those guys fabbed up this new bracket quick, and make a quality product with excellent communication... it was a real pleasure to work with these guys...
*disclosure: Scarebird did give me a discount for doing the test-fit, and coming up with the parts list needed for this conversion*
Last edited by apexanimal; 01-23-2015 at 09:19 PM.


#11
02-11-2015, 07:35 PM
as a follow-up, the centric rear calipers are great b/c they come with everything and all, BUT they have developed surface rust on them pretty quickly... i'm not concerned about it, but i was disappointed with the quality considering how much i paid for them...
just wanted to share my experience...
everything else is awesome
just wanted to share my experience...
everything else is awesome
#13
02-12-2015, 09:15 AM
the surface rust is on the calipers...
feels good stopping from highway speeds... i feel like i can go deeper on the pedal and keep getting more and more... modulation and release are so much better too...
feels good stopping from highway speeds... i feel like i can go deeper on the pedal and keep getting more and more... modulation and release are so much better too...
#16
04-01-2015, 07:23 PM
have fun!
the disc/caliper stuff is easy, it's the parking brake that takes some patience...
what calipers/pads/rotors did you end up getting?
post up pics!
the disc/caliper stuff is easy, it's the parking brake that takes some patience...
what calipers/pads/rotors did you end up getting?
post up pics!
#17
04-01-2015, 10:44 PM
I also got the Centric calipers. Of the choices on Rockauto they seemed to have the best reputation after doing a little research. Even with wholesale pricing at NAPA/Advance/Autozone the prices at Rockauto can't be beat, the core charge thing is brutal at the local parts stores. I've never seen a reman caliper that didn't turn rust colored orange pretty quickly, unless painted that's going to happen to freshly blasted/cleaned metal(at least in the rust belt where you and I live, the Cali guys probably don't have that problem). I have Ate slotted rotors with EBC Greenstuff pads in the front, Ate didn't have rear rotors listed so I bought crap Advance rotors and EBC pads for the rear. The brake hoses from Fastbrakes are high quality like you said, I didn't expect them to be that nice. I also got front SS replacement hoses from them, I still have stock rubber hoses up front. I guess up next is the front Wilwood calipers.
Last edited by ragingti; 04-02-2015 at 09:17 AM.
#18
04-03-2015, 07:53 PM
sounds good...
i may wire brush and paint the rear calipers... and i'd like to get ss lines for the front as well - how much were the fronts from fastbrakes?
i may wire brush and paint the rear calipers... and i'd like to get ss lines for the front as well - how much were the fronts from fastbrakes?
#20
04-04-2015, 04:36 PM
and i paid 85 shipped for the rears only... not too bad then...
imho - paint the calipers if you think it might bug you...
did the conversion brackets from scarebird come powder coated?
imho - paint the calipers if you think it might bug you...
did the conversion brackets from scarebird come powder coated?

