
DIY: "Stealth" fiberglass sub box.

Here are some more pictures from my box so far


This is my amazing architectual skills in action!I didnt have any dowels so i just used scrap pieces of wood.It was hella sturdy for sure!


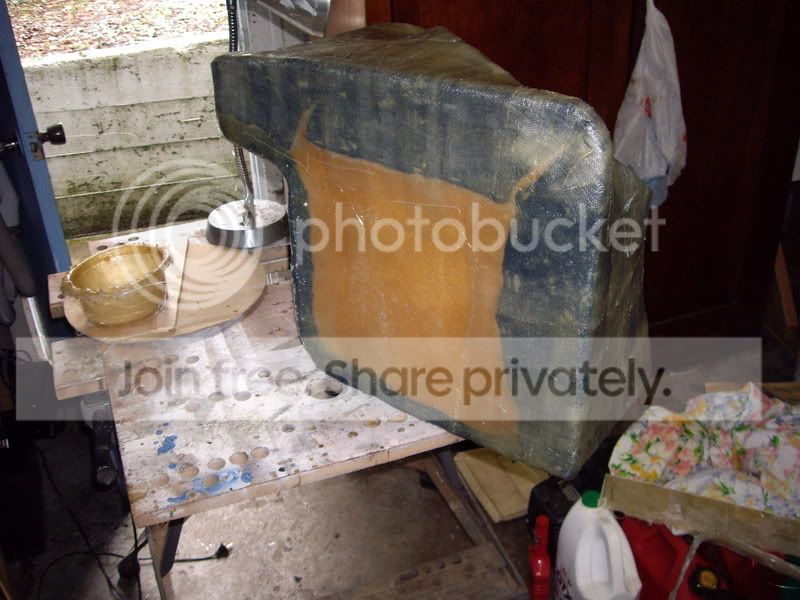
Here is before i put resin all over the face of the box,just around the edges.

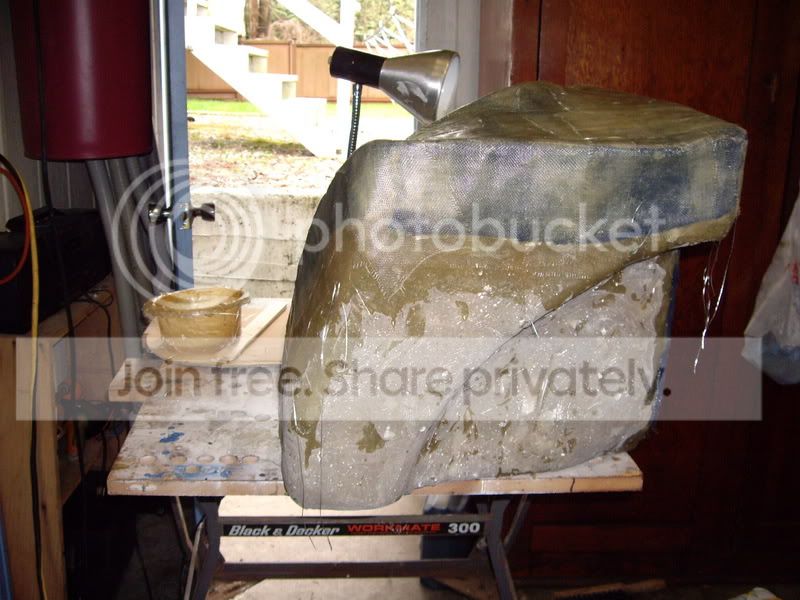
This is after the resin has dried on the face of the box.Well im off right now to go do some more glassing so ill post even more pics when i get them.
This is my amazing architectual skills in action!I didnt have any dowels so i just used scrap pieces of wood.It was hella sturdy for sure!
Here is before i put resin all over the face of the box,just around the edges.
This is after the resin has dried on the face of the box.Well im off right now to go do some more glassing so ill post even more pics when i get them.
Yeah im hoping i wont need more than a thin layer of bondo by the time im done sanding the fiberglass.Here are some more pics:

Here it is after one layer of chop mat and 2 layers of weave mat.I prefer weave mat now,it's much easier to work with,and you get a lot less air bubbles.Im going to put one more layer on the face, maybe 2 in some area's, on wednesday, because im not happy yet with the amount of flex in some places.
This is the back where the amps, capacitor, and crossover will be mounted.I put some glass layers there because fiberglass doesn't bond super amazing to mdf so to be safe i made it like one piece of fiberglass on the outside.Ill be doing the same inside as well.
Here is the part that will be touching the inside of the trunk area.You might notice i decided to be unlazy and i got all that tape off finally.I used a sanding disc on a grinding and BLAM! It came off super easy.It also smoothed everything out really well so i wont be needing bondo there.


These are some shots of it in the trunk so far.As you can see it is pretty big,but ill still have TONS of space.You may also notice that i have it somewhat facing the hatch.That's so i get the best sound quality.And it'll look awesome when someone opens the hatch and a big ol' type R is staring them right in the face.
That's it for now.I've added up what the supplies so far have cost me,and the total so far is,remembering that i still need some more mat and bondo and maybe another jug of resin AND carpet AND a sub grill AND the little speaker wire connection thing, $300!So yeah this is only the way to go if you really want something different.I've probably put 15 hours into this so far,maybe more,and i still have a bunch left to do.So this is gonna be expensive and take a heck of a lot of time.But it'll be worth it in the end.
Ill post more pics when i have more to show.
Here it is after one layer of chop mat and 2 layers of weave mat.I prefer weave mat now,it's much easier to work with,and you get a lot less air bubbles.Im going to put one more layer on the face, maybe 2 in some area's, on wednesday, because im not happy yet with the amount of flex in some places.
This is the back where the amps, capacitor, and crossover will be mounted.I put some glass layers there because fiberglass doesn't bond super amazing to mdf so to be safe i made it like one piece of fiberglass on the outside.Ill be doing the same inside as well.
Here is the part that will be touching the inside of the trunk area.You might notice i decided to be unlazy and i got all that tape off finally.I used a sanding disc on a grinding and BLAM! It came off super easy.It also smoothed everything out really well so i wont be needing bondo there.
These are some shots of it in the trunk so far.As you can see it is pretty big,but ill still have TONS of space.You may also notice that i have it somewhat facing the hatch.That's so i get the best sound quality.And it'll look awesome when someone opens the hatch and a big ol' type R is staring them right in the face.
That's it for now.I've added up what the supplies so far have cost me,and the total so far is,remembering that i still need some more mat and bondo and maybe another jug of resin AND carpet AND a sub grill AND the little speaker wire connection thing, $300!So yeah this is only the way to go if you really want something different.I've probably put 15 hours into this so far,maybe more,and i still have a bunch left to do.So this is gonna be expensive and take a heck of a lot of time.But it'll be worth it in the end.
Ill post more pics when i have more to show.
Member

Joined: Feb 2007
Posts: 49
From: PacNW
The terminal cup shouldn't be more than $5. Parts-Express.com has a bunch
Search Results Page
I've even just drilled two holes and put bolts through them. And I've drilled a single hole and siliconed a wire in it. You don't need something fancy. You're mounting the amp to the box. It only has to stick out a foot or less to reach the terminal of the amp. Don't make it too difficult. Beside, the smaller the hole, the better.
Last edited by ABuckFitty; Mar 19, 2007 at 10:23 PM.

Member
Joined: Apr 2007
Posts: 821
From: Nanuet, NY

TotallyFit:
That's it for now.I've added up what the supplies so far have cost me,and the total so far is,remembering that i still need some more mat and bondo and maybe another jug of resin AND carpet AND a sub grill AND the little speaker wire connection thing, $300!So yeah this is only the way to go if you really want something different.I've probably put 15 hours into this so far,maybe more,and i still have a bunch left to do.So this is gonna be expensive and take a heck of a lot of time.But it'll be worth it in the end.
And some people think the JL Audio Stealthboxes at $650 or so are expensive.
$300 cost of materials, add a really good subwoofer, 15 hours and still more to do, deal with toxic hazardous materials.......
Nice job with the enclosure TFit! I am going to be doing one as well.
Would Fit members buy a Stealthbox for $650 or so?

Member
Joined: Jun 2007
Posts: 47
From: Boston, MA
All those different enclosures look pretty good. I usually use 2 trim rings so that my subs are flush mounted and look a little bit cleaner. Good job to all of you guys that posted pics of your sub enclosure builds.
beautiful thread, I want to do this but with a smaller 8" sub... I really want it super stealth. I have to put my traveling bag every weekend to go to work, so I need the space... 12 and 10's are to big for my bags. 
Member
Joined: Jun 2007
Posts: 47
From: Boston, MA
You can definitely get good sound from an 8" driver. If space is your main concern, yet you want a larger driver, you may want to consider one of the JL Audio TW5's. They have a 13" driver that's 2.5" deep. Their 12" version is coming out this spring, and their 10" version will probably be out in the summer or fall.
One suggestion I'd make to the guys building their FG sub enclosures, is to not use bondo or extra chop mat to build up the outside of the enclosure. That's going to make more work for you in the end with all the additional sanding you need to do. It's better to make a mixture called "dog sh!t" or a "milkshake" instead. You can either use sawdust, thixotropic powder, bondo, or short hair filler (duraglass) to thicken up polyester or epoxy resin and then slop it all on the inside of the enclosure. That way you reinforce it with another layer that you don't need to sand smooth and you seal any leaks that you may have at the seams of your enclosure.
One suggestion I'd make to the guys building their FG sub enclosures, is to not use bondo or extra chop mat to build up the outside of the enclosure. That's going to make more work for you in the end with all the additional sanding you need to do. It's better to make a mixture called "dog sh!t" or a "milkshake" instead. You can either use sawdust, thixotropic powder, bondo, or short hair filler (duraglass) to thicken up polyester or epoxy resin and then slop it all on the inside of the enclosure. That way you reinforce it with another layer that you don't need to sand smooth and you seal any leaks that you may have at the seams of your enclosure.


nice build man, i was checking it out. Good job!!!
how are the races in adelaide going? i had a friend a while back that had a rotary mazda, 1970 something... fast as heck...
how are the races in adelaide going? i had a friend a while back that had a rotary mazda, 1970 something... fast as heck...
Here is another option.
This is my setup that sits in the spare tyre rim.
Honda Jazz Club Australia :: View topic - 06 Sub Install
not sure if the US fits have a full size spare or a space saver??
This is my setup that sits in the spare tyre rim.
Honda Jazz Club Australia :: View topic - 06 Sub Install
not sure if the US fits have a full size spare or a space saver??


You can definitely get good sound from an 8" driver. If space is your main concern, yet you want a larger driver, you may want to consider one of the JL Audio TW5's. They have a 13" driver that's 2.5" deep. Their 12" version is coming out this spring, and their 10" version will probably be out in the summer or fall.
One suggestion I'd make to the guys building their FG sub enclosures, is to not use bondo or extra chop mat to build up the outside of the enclosure. That's going to make more work for you in the end with all the additional sanding you need to do. It's better to make a mixture called "dog sh!t" or a "milkshake" instead. You can either use sawdust, thixotropic powder, bondo, or short hair filler (duraglass) to thicken up polyester or epoxy resin and then slop it all on the inside of the enclosure. That way you reinforce it with another layer that you don't need to sand smooth and you seal any leaks that you may have at the seams of your enclosure.
One suggestion I'd make to the guys building their FG sub enclosures, is to not use bondo or extra chop mat to build up the outside of the enclosure. That's going to make more work for you in the end with all the additional sanding you need to do. It's better to make a mixture called "dog sh!t" or a "milkshake" instead. You can either use sawdust, thixotropic powder, bondo, or short hair filler (duraglass) to thicken up polyester or epoxy resin and then slop it all on the inside of the enclosure. That way you reinforce it with another layer that you don't need to sand smooth and you seal any leaks that you may have at the seams of your enclosure.