Valentine One (V1) Hardwire DIY
#1
 08-29-2010, 12:49 PM


Valentine One (V1) Hardwire DIY
V1 Hardwire Installation
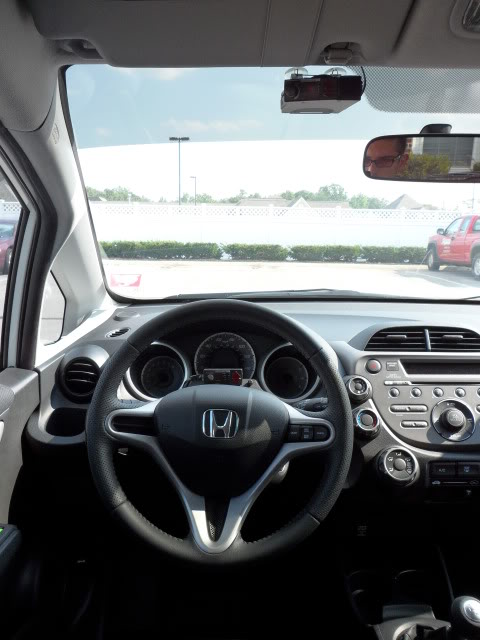
Summary: In 2 of the 3 previous cars that the V1 has spent the majority of it's time, I've had the V1 Hardwired as it saves me a 12V Accessory Port, moves the V1 up and out of the way, and also allows for the concealed display to be placed in a much more convenient location. sooo... I decided it would be a good Idea to hardwire it in the FIT. In previous cars I've tapped into wiring, for this one, I've gone right to the fusebox and used a "plug-in" method using an "Add-a-Fuse". I Cannot recommend this method enough. it was Simple and SOOOO much better than tapping into wires as it is 100% removable in about 10 seconds and doesn't risk piercing wires.
As for the install... it is EASY! - if you can work pliers, you can do this.
what you'll need is:
- an "Add-A-Fuse" from your local autoparts store. (Or From Amazon.com)
- Extra Mini Fuses - Non-Low Profile - (Add-a-Fuse doesn't come with any & the stock Low-Profile Mini Fuse won't work)
- A 9' 4-wire phone cable (6' works but is tight - no slack)
- A 6' 4-wire phone cable (if you are mounting the concealed display as well)
- Either A Soldering Iron and heatshrink tubing (or some buttsplices and crimpers)
- A Fork Terminal (with Crimp end) or one you can put a screw through - this is for the ground.
- Phillips Head Screwdriver. (No2)
- About 1 hour of your life that a significant other can do without.
Note: The Fit fuse is a low profile Mini fuse (Here's the link to wikipedia - Thx Steve F. from FitFreak.net) but we'll be using the Mini Fuses for this so you'll need 2 fuses.
Click the Pics for full size.
Step 1: - Attach the (+) red Lead from the V1 Hardwire Kit to the Wire coming out of the Add-a-Fuse (the Buttsplice connector was already attached at the add-a fuse end on the one I purchased so I just had to strip 1/4" off the V1 red wire, insert into the blue buttsplice connector, and Crimp)Step 2: - Strip about 1/4" off of the black wire on the V1 Hardwire adapter & Crimp the Fork Terminal or loop terminal to the black wire.
Step 3: - Put a 20a Mini(regular profile) fuse in the fuse slot closest to the Add-a-Fuse Prongs. Plug a smaller amp fuse (I used a 7.5 - smallest I had) for the other slot.
Step 4: - Remove the 12V accessory Fuse (2nd column, 4th one down I believe) and plug in the Add-a-Fuse. (Direction doesn't matter here because the V1 has it's own dedicated inline fuse.)

Step 5: - Attach the ground lead to the screw that holds the top of the fuse box in place. (Top of Photo Below)

Step 6: - Plug the Phone line into the V1 Port, then into the V1 itself and turn the car on. The V1 should fire right up. (If not, check to make sure the add-a-fuse is seated correctly by testing the 12v accessory socket - I recommend using the V1's Cig ligher and the cord you are planning on using to be sure it isn't the cord too.)
Running the Wire.
Step 7: - Attach the phone cord to the V1 Hardwire unit in the fuse box area (The Hardwire kit isn't yet tapped into the fusebox) Use the 7'-9' Phone cord if you plan on mounting the V1 to the right of the Rearview Mirror (6' cord if you want 0" of slack or are mounting to the left of the Rearview mirror.)
Step 8: - Fish the phone cord behind the dash (from the left side of the Fuse Box)...

to where the headliner meets the A-Pillar Trim. Slide it between the two and work it down the a pillar a little until it's past the edge of the headliner (which is behind the a pillar trim), and then work it back up so the wire is behind the headliner and not in the way of the A Pillar Trim.

Tuck the phone cord behind the head liner across the top of the windshield until you get to the location where you want the radar, leave the end hanging down a little bit.

Step 9: - clean up the fuse Box - push the V1 hardwire adaptor around to the left of the fusebox and next to the dash frame. secure it with wire ties, velcro, or other method if desired. clean up the wiring so it isn't flapping around and hanging everywhere. (See photo from Step 4 above - V1 Hardwire adapter is just to the left of the fusebox and you can see the Phone cord coming out of the top of it - adaptor says "Made in China")
Step 10: - Mount the V1 on the windshield using the suction cup mount (I'm still on the originals after 10+ years and 6 different Cars) and Plug in the V1.
VOILA!!!! Your V1 is Hardwired.
~SB


#6
09-01-2010, 09:00 AM
im not 100% but i think its just to prevent sun glare on the rear view. I have part of an ez pass suction mounted there, no problems sticking or being read by the toll booth. The dealer also mounted my remote starter receiver there (under the liner) as well.
#7
09-05-2010, 10:41 PM
~SB
 haha i just about died reading this
#10
04-18-2011, 09:28 AM
V1 Hardwire Installation
Summary: In 2 of the 3 previous cars that the V1 has spent the majority of it's time, I've had the V1 Hardwired as it saves me a 12V Accessory Port, moves the V1 up and out of the way, and also allows for the concealed display to be placed in a much more convenient location. sooo... I decided it would be a good Idea to hardwire it in the FIT. In previous cars I've tapped into wiring, for this one, I've gone right to the fusebox and used a "plug-in" method using an "Add-a-Fuse". I Cannot recommend this method enough. it was Simple and SOOOO much better than tapping into wires as it is 100% removable in about 10 seconds and doesn't risk piercing wires.As for the install... it is EASY! - if you can work pliers, you can do this.
what you'll need is:
- an "Add-A-Fuse" from your local autoparts store. (Or From Amazon.com)
- Extra Mini Fuses - Non-Low Profile - (Add-a-Fuse doesn't come with any & the stock Low-Profile Mini Fuse won't work)
- A 9' 4-wire phone cable (6' works but is tight - no slack)
- A 6' 4-wire phone cable (if you are mounting the concealed display as well)
- Either A Soldering Iron and heatshrink tubing (or some buttsplices and crimpers)
- A Fork Terminal (with Crimp end) or one you can put a screw through - this is for the ground.
- Phillips Head Screwdriver. (No2)
- About 1 hour of your life that a significant other can do without.
Note: The Fit fuse is a low profile Mini fuse (Here's the link to wikipedia - Thx Steve F. from FitFreak.net) but we'll be using the Mini Fuses for this so you'll need 2 fuses.
Click the Pics for full size.
Step 1: - Attach the (+) red Lead from the V1 Hardwire Kit to the Wire coming out of the Add-a-Fuse (the Buttsplice connector was already attached at the add-a fuse end on the one I purchased so I just had to strip 1/4" off the V1 red wire, insert into the blue buttsplice connector, and Crimp)Step 2: - Strip about 1/4" off of the black wire on the V1 Hardwire adapter & Crimp the Fork Terminal or loop terminal to the black wire.
Step 3: - Put a 20a Mini(regular profile) fuse in the fuse slot closest to the Add-a-Fuse Prongs. Plug a smaller amp fuse (I used a 7.5 - smallest I had) for the other slot.
Step 4: - Remove the 12V accessory Fuse (2nd column, 4th one down I believe) and plug in the Add-a-Fuse. (Direction doesn't matter here because the V1 has it's own dedicated inline fuse.)
Step 5: - Attach the ground lead to the screw that holds the top of the fuse box in place. (Top of Photo Below)
Step 6: - Plug the Phone line into the V1 Port, then into the V1 itself and turn the car on. The V1 should fire right up. (If not, check to make sure the add-a-fuse is seated correctly by testing the 12v accessory socket - I recommend using the V1's Cig ligher and the cord you are planning on using to be sure it isn't the cord too.)
Running the Wire.
Step 7: - Attach the phone cord to the V1 Hardwire unit in the fuse box area (The Hardwire kit isn't yet tapped into the fusebox) Use the 7'-9' Phone cord if you plan on mounting the V1 to the right of the Rearview Mirror (6' cord if you want 0" of slack or are mounting to the left of the Rearview mirror.)
Step 8: - Fish the phone cord behind the dash (from the left side of the Fuse Box)...
to where the headliner meets the A-Pillar Trim. Slide it between the two and work it down the a pillar a little until it's past the edge of the headliner (which is behind the a pillar trim), and then work it back up so the wire is behind the headliner and not in the way of the A Pillar Trim.
Tuck the phone cord behind the head liner across the top of the windshield until you get to the location where you want the radar, leave the end hanging down a little bit.
Step 9: - clean up the fuse Box - push the V1 hardwire adaptor around to the left of the fusebox and next to the dash frame. secure it with wire ties, velcro, or other method if desired. clean up the wiring so it isn't flapping around and hanging everywhere. (See photo from Step 4 above - V1 Hardwire adapter is just to the left of the fusebox and you can see the Phone cord coming out of the top of it - adaptor says "Made in China")
Step 10: - Mount the V1 on the windshield using the suction cup mount (I'm still on the originals after 10+ years and 6 different Cars) and Plug in the V1.
VOILA!!!! Your V1 is Hardwired.
~SB


#17
07-29-2013, 03:56 AM

The only POSSIBLE problem doing this may come about if you get stopped. Having it hardwired as opposed to just sitting on the dash shows intent to use it and that may make a different in being told to throw it in the glovebox and get out of here or wait here while I write this summons.
#19
03-08-2015, 04:52 PM
The only POSSIBLE problem doing this may come about if you get stopped. Having it hardwired as opposed to just sitting on the dash shows intent to use it and that may make a different in being told to throw it in the glovebox and get out of here or wait here while I write this summons.
The V1 is still removable quite easily as it's wired in by an RJ11 (phone jack) and attached by the suction cups. (I bought the thing back in 2000 and I'm still only on the first set of suction cups). 2 seconds and the whole thing can come down. If I tuck the phone plug up into the headliner, there's no evidence of anything. The other thing is with it being so high in the front windshield, it almost can't be seen except by someone in the car looking up. (Most officers won't get down on their knees at your window and look up into the car). I'd think more police would think along the lines of "he's mounted it high up so it is out of his line of sight" vs. "he's intending to speed more because he has it hardwired". I could however be wrong though.
That said, the V1 is still going strong after 15 years of use in 6 different vehicles.
~SB
#20
03-08-2015, 06:35 PM
Have you sent in your V1 to get the new TMF2 update? Cuts down a lot on the falsing from blind spot monitoring systems that plague our roads with K-band today.