Buddy Club Extended Ball Joint Install
#1
 11-20-2013, 04:29 PM


Buddy Club P1 Racing Extended Front Lower Control Arm Ball Joint GE8 Install.
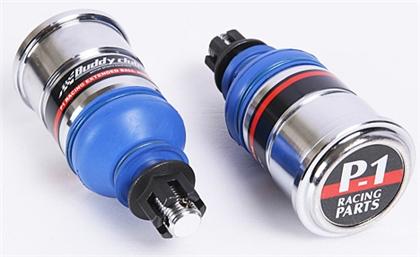
Part Number: BC02-BJP1-H005
$144 @THM Buddy Club P1 Racing Extended B Joint HONDA FIT 2009 - 2013 BC02-BJP1-H005
What's the point of this mod?
After cars are lowered the control arm becomes horizontal (bottom image). This mod puts the control arm back at the OEM angle restoring suspension geometry (upper image). This moves the roll center up, and closer to the center of gravity of the car, which increases steering responds and decreases front body roll.

TOOLS
You will need this special tool to remove and install the ball joints. You can rent it FREE at Napa:
Part Number: 776-8012

19mm 1/2" Drive Socket (remove inner bolts)
1/2" Breaker Bar
1/2" Ratchet
19mm Open Box Wrench (remove ball joint nut)
Pocket Screw Drive or Picks (remove clip on ball joint boot)
Pliers or Diag Cutters (remove cotter pin)
C-Clamp Pliers (if you decide to use them)
22mm 1/2" Drive Socket (used with Napa Press Tool)
This is what you get in the kit: Two Ball Joints w/nuts, Two Cotter Pins, Two C-Clamps

Difficulty level: 3
Time: 2 hours, I was able to do it in less than an hour due to experience.
Additional: You will need an alignment afterwards, I suggest using camber bolts, at this time, to get more camber.
Ball Joint Length: 15mm~.5" longer
INSTALL
Step one:
Remove wheel. Remove one control arm at a time. Remove the ball joint pin and nut completely (Green Arrow) (do not discard reuse). Hammer on the knuckle at the ball joint to release joint from knuckle (Orange Arrow).

Step two:
Remove the x4 (one front and three rearward) inboard bolts of the control arm (WARNING: all 4 bolts are different length, DO NOT mix up). Remove control arm.

Step Three:
On the BC P1 ball joint you will need to carefully remove the lower clip and boot to fit the boot through the hole of the control arm.

Step four:
Use Napa tool to remove OEM ball joint.

Clean control arm.

Step five;
Install BC P1 joint using Napa tool. Set up tool by hand, make sure the joint is centered before pressing in.
Off Center is bad:

Centered is good:

DO NOT use impact gun. Only use the breaker bar because you will feel when it seats or if the ball joint is not going in straight. You will feel it seat. The joint will stick out the bottom a bit (Green arrow). The Red Arrow is the amount it will move.

StepSix:
I used the "C-Ring" that came with the kit, but it is not needed, and doesn't sit very well (Orange Arrow). You might think that you didn't press the joint in all the way, but that's not true, the Green is the joint set all the way in. Refit the bottom of the boot and re-install clip (Red Arrow).

Re-install:
I reused all the Honda Bolts, Nuts and Cotter Pins. I prefer using the OEM stuff when I can, it usually lasts longer. But that's preference.
This is a side by side comparison:

Driving Impression:
Right away I could tell the steering was more responsive (most obvious). The front body roll lessened, but it took taking a few familiar turns to feel how much. I feel a bit of bump steer, but nothing to complain about.
Was it worth it:
Yes, It brought back the steering responds from when the car was lowered. I am a bit disappointed that Buddy Club only made them in a .5" length. I have 17" wheels that could accommodate longer ball joints. I would do this mod again, definite improvement.
___
Part Number: BC02-BJP1-H005
$144 @THM Buddy Club P1 Racing Extended B Joint HONDA FIT 2009 - 2013 BC02-BJP1-H005
What's the point of this mod?
After cars are lowered the control arm becomes horizontal (bottom image). This mod puts the control arm back at the OEM angle restoring suspension geometry (upper image). This moves the roll center up, and closer to the center of gravity of the car, which increases steering responds and decreases front body roll.
TOOLS
You will need this special tool to remove and install the ball joints. You can rent it FREE at Napa:
Part Number: 776-8012
19mm 1/2" Drive Socket (remove inner bolts)
1/2" Breaker Bar
1/2" Ratchet
19mm Open Box Wrench (remove ball joint nut)
Pocket Screw Drive or Picks (remove clip on ball joint boot)
Pliers or Diag Cutters (remove cotter pin)
C-Clamp Pliers (if you decide to use them)
22mm 1/2" Drive Socket (used with Napa Press Tool)
This is what you get in the kit: Two Ball Joints w/nuts, Two Cotter Pins, Two C-Clamps
Difficulty level: 3
Time: 2 hours, I was able to do it in less than an hour due to experience.
Additional: You will need an alignment afterwards, I suggest using camber bolts, at this time, to get more camber.
Ball Joint Length: 15mm~.5" longer
INSTALL
Step one:
Remove wheel. Remove one control arm at a time. Remove the ball joint pin and nut completely (Green Arrow) (do not discard reuse). Hammer on the knuckle at the ball joint to release joint from knuckle (Orange Arrow).
Step two:
Remove the x4 (one front and three rearward) inboard bolts of the control arm (WARNING: all 4 bolts are different length, DO NOT mix up). Remove control arm.
Step Three:
On the BC P1 ball joint you will need to carefully remove the lower clip and boot to fit the boot through the hole of the control arm.
Step four:
Use Napa tool to remove OEM ball joint.
Clean control arm.
Step five;
Install BC P1 joint using Napa tool. Set up tool by hand, make sure the joint is centered before pressing in.
Off Center is bad:
Centered is good:
DO NOT use impact gun. Only use the breaker bar because you will feel when it seats or if the ball joint is not going in straight. You will feel it seat. The joint will stick out the bottom a bit (Green arrow). The Red Arrow is the amount it will move.
StepSix:
I used the "C-Ring" that came with the kit, but it is not needed, and doesn't sit very well (Orange Arrow). You might think that you didn't press the joint in all the way, but that's not true, the Green is the joint set all the way in. Refit the bottom of the boot and re-install clip (Red Arrow).
Re-install:
I reused all the Honda Bolts, Nuts and Cotter Pins. I prefer using the OEM stuff when I can, it usually lasts longer. But that's preference.
This is a side by side comparison:
Driving Impression:
Right away I could tell the steering was more responsive (most obvious). The front body roll lessened, but it took taking a few familiar turns to feel how much. I feel a bit of bump steer, but nothing to complain about.
Was it worth it:
Yes, It brought back the steering responds from when the car was lowered. I am a bit disappointed that Buddy Club only made them in a .5" length. I have 17" wheels that could accommodate longer ball joints. I would do this mod again, definite improvement.
___
Last edited by De36; 02-25-2014 at 09:39 PM.
#3
11-21-2013, 01:01 PM
Awesome DIY man, gave you some rep. I was thinking about doing these ever since I got Buddy Club c/o's. Thanks for the good pointers! I'll definitely give this a shot in the near future. 

#8
11-21-2013, 08:35 PM
Buddy Club P1 Racing Extended B Joint HONDA FIT 2009 - 2013 BC02-BJP1-H005
#9
11-21-2013, 09:25 PM
I am glad I could help inspire something, that's all I aim to do here really.
The install looks fairly easy. I am glad you posted it I always mean to look underneath and see what I'm working with on this, but forget and put the car on the ground and don't feel like putting it back up lol
Only so many hours these days, meh
The install looks fairly easy. I am glad you posted it I always mean to look underneath and see what I'm working with on this, but forget and put the car on the ground and don't feel like putting it back up lol
Only so many hours these days, meh

#11
11-21-2013, 11:39 PM

very nice! so few understand that by slamming their car, they are ruining the handling. i don't slam mine for ground clearance, but if i did, this mod is a must. be glad you have these available to you and get em if you are riding low.
#12
11-22-2013, 08:51 AM
I will post installed pics.
#13
11-27-2013, 01:41 PM

how low to justify?
Interested in this mod, but curious to know how low is low enough to justify the purchase of these ball joints?
I am running swift springs for a moderate drop and was told they were designed for oem shocks and travel rates. Definitely a selling point for me at the time since I wasnt planning on upgrading other suspension parts other than a rsb and wider tires.
I am running swift springs for a moderate drop and was told they were designed for oem shocks and travel rates. Definitely a selling point for me at the time since I wasnt planning on upgrading other suspension parts other than a rsb and wider tires.
#14
11-27-2013, 02:04 PM
Interested in this mod, but curious to know how low is low enough to justify the purchase of these ball joints?
I am running swift springs for a moderate drop and was told they were designed for oem shocks and travel rates. Definitely a selling point for me at the time since I wasnt planning on upgrading other suspension parts other than a rsb and wider tires.
I am running swift springs for a moderate drop and was told they were designed for oem shocks and travel rates. Definitely a selling point for me at the time since I wasnt planning on upgrading other suspension parts other than a rsb and wider tires.
I wish they made different lengths or adjustables. But its not cost effective and most people run 16in wheels that wouldn't be able to clear longer ball joints.
#15
11-27-2013, 02:04 PM
Look at your LCAs, if they're angled significantly downward on the body side you will benefit from these. I have a hunch you're OK without them with the Swifts. Probably close to 2" drop is where these will make the most significant difference (cost vs. reward) but I am completely guessing.
On Teins (~1.8" lower and soft) and stock camber I can tell I need either RCAs or camber bolts, the car feels like it's rolling over way too much on corner (camber gain, high/soft sidewalls). I got camber bolts because they were cheap but this is a better alternative and less bandaidy (not a word). Even better with both RCA + camber bolts if you really like to hustle corners.
On Teins (~1.8" lower and soft) and stock camber I can tell I need either RCAs or camber bolts, the car feels like it's rolling over way too much on corner (camber gain, high/soft sidewalls). I got camber bolts because they were cheap but this is a better alternative and less bandaidy (not a word). Even better with both RCA + camber bolts if you really like to hustle corners.
#16
11-27-2013, 02:09 PM
On Teins (~1.8" lower and soft) and stock camber I can tell I need either RCAs or camber bolts, the car feels like it's rolling over way too much on corner (camber gain, high/soft sidewalls). I got camber bolts because they were cheap but this is a better alternative and less bandaidy (not a word). Even better with both RCA + camber bolts if you really like to hustle corners.
I put in camber bolts in and an alignment over the weekend and the car feels really feels great. I laugh when im driving it because It still just a FIT. But its so mush fun!
#17
11-30-2013, 01:26 AM
[QUOTE=De36;1211794]Like Wanderer said; $144 at THM Shipped.
Buddy Club P1 Racing Extended B Joint HONDA FIT 2009 - 2013 BC02-BJP1-H005[/Q
I was thinking about the j's racing one's ,
http://www.j-sracingusa.com/jsusa/ga...BADJ%2D1%2Ejpg
Buddy Club P1 Racing Extended B Joint HONDA FIT 2009 - 2013 BC02-BJP1-H005[/Q
I was thinking about the j's racing one's ,
http://www.j-sracingusa.com/jsusa/ga...BADJ%2D1%2Ejpg
Last edited by sr.sedan; 11-30-2013 at 01:29 AM.
#18
11-30-2013, 01:50 PM
Ohh, that makes sense, (BC=15mm, Js=10mm). Buddy Club is quality stuff so justifying J's racing really depends on how much you want to spend.
#19
12-01-2013, 07:14 PM
Nice write up. Here's a third company offering them, hardrace. Not sure of the cost but might be helpful if someone was shopping around and wanted to check with them.
HARDRACE - Performance Suspension Parts
HARDRACE - Performance Suspension Parts
#20
12-01-2013, 10:04 PM
Nice write up. Here's a third company offering them, hardrace. Not sure of the cost but might be helpful if someone was shopping around and wanted to check with them.
HARDRACE - Performance Suspension Parts
HARDRACE - Performance Suspension Parts