Clutch Delay Valve Delete ♫DIY♪
#1
 02-10-2013, 01:53 AM

GE8 Clutch Delay Valve Delete ♫DIY♪
In this article I recommend a 96-00 civic CMC. That will work great with a little extra mod as you will see.
The best CMC to use is one from a 01-05 Civic! It will fit nearly exactly like the stock Fit unit with minimal modding and will cost you around $60 as opposed to $40 for a factory NISSIN unit.

So I've had my Fit for about a week and I found myself shunning it in favor of driving my 99 civic HX the past few days.
Reason being, the Clutch Delay Valve makes the car jerky, unfun, non communicative, and lazy feeling. It's a huge issue for me and a lot of you all probably agree. It's not as easy as deleting a CDV from a BMW, no. In the Fit the CDV is built in to the Clutch Master Cylinder in such a way that drilling it is not a fix.
Before I bought my Fit, I'd done much searching and only found two resources on how to get rid of it. One Fit owner used a $120 omni power CMC. That's expensive, and the extra bore stiffens the pedal a little too much for my tastes.
Another Fit owner found that 96-00 Civic CMC's will fit and they have the same 5/8th's bore for that stock feel! Only problem is there is no definitive DIY on this topic for those of us who want to delete the CDV but aren't complete car wizards (like myself).
So I ordered an Adler/Nissin (OEM Supplier) CMC from a 96-00 Civic.
It showed up today and once I got home from work, I set out to swap the CMCs.
My camera sucks and I myself had no real plan, so this DIY isn't perfect. I ran out of daylight halfway through, it was raining, I was working in a shitty apartment parking lot /excuses... Maybe the next Foo to delete their CDV can one up me with a quality DIY, but for now here is the best CDV Deletre resource we have (to my knowledge).
I finished the job just a few minutes ago - the results are literally perfect. It is exactly what I wanted/expected from driving my manual transmission Fit. This should be the very first mod on any enthusiastic Fit Manual owner's list of things to do. Right up there above replacing the shit OEM Dunlop tires.
I am not responsible for any injury or property damage incurred by following these steps. This guide is to serve as an informational resource. This is how I did it. Maybe there's a better way, but this is what worked for me.
DIY TIME!
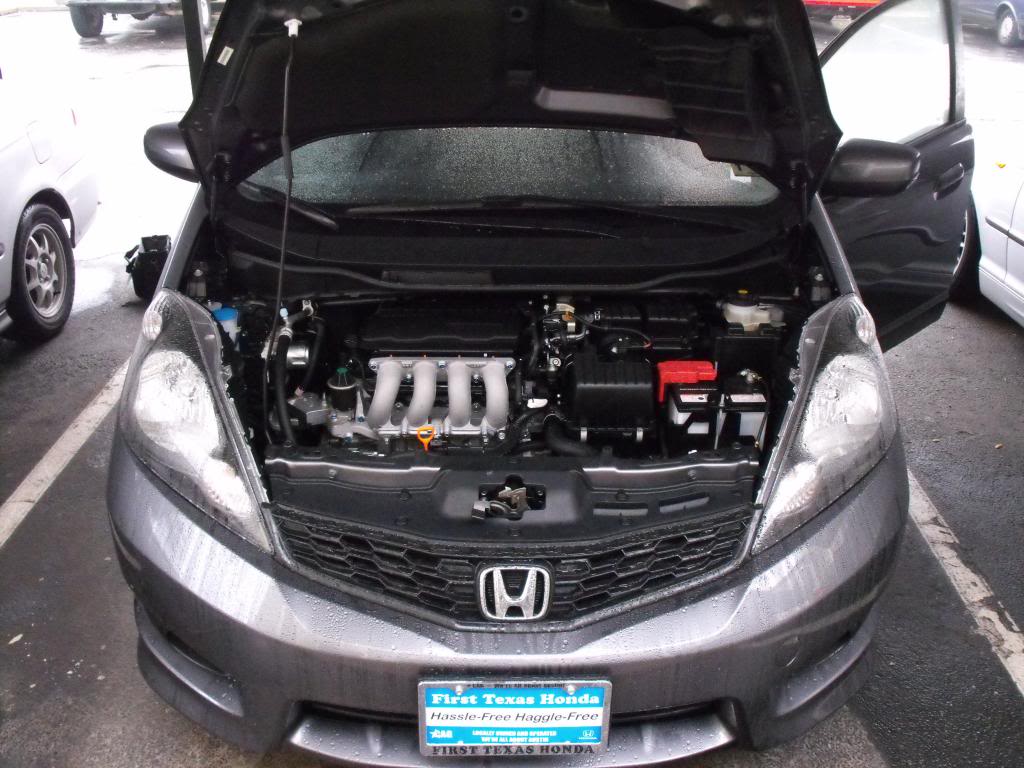
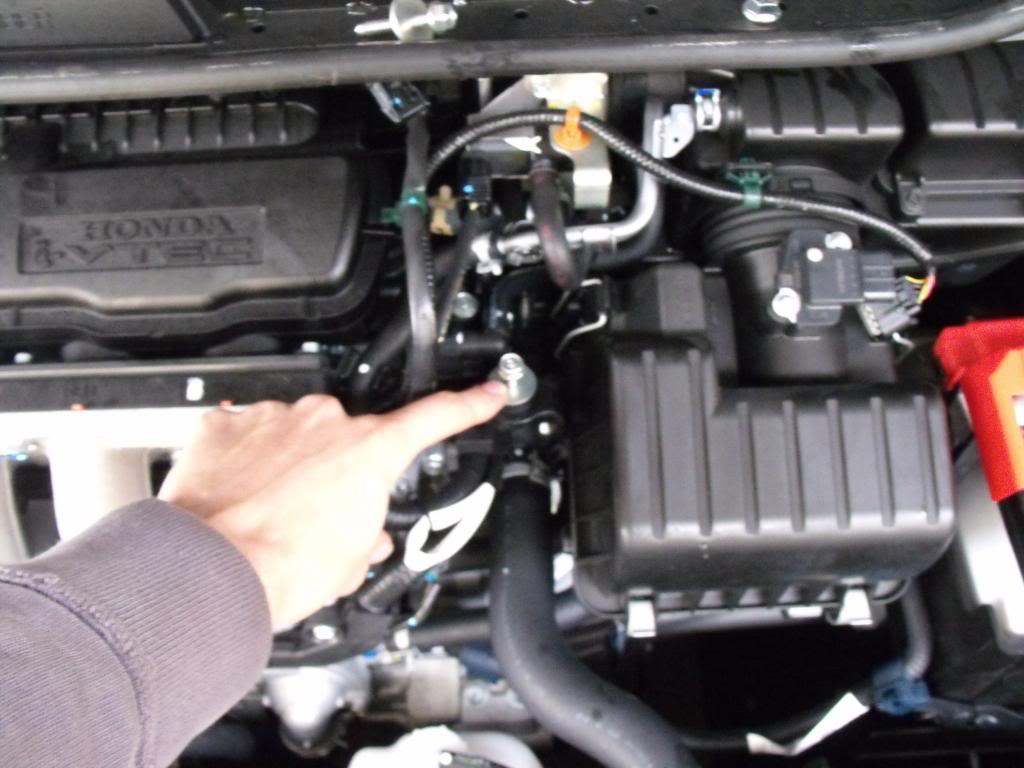
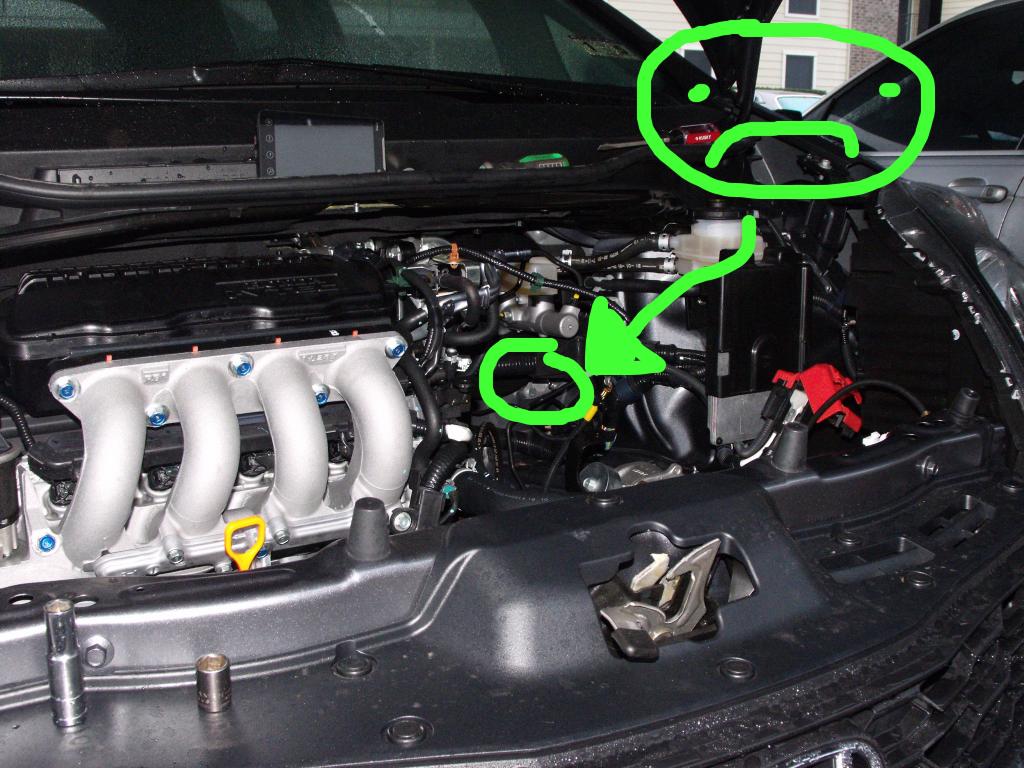
First thing's first. Get acquainted with your engine bay if you have not already. Owner, engine bay. Engine bay, owner.
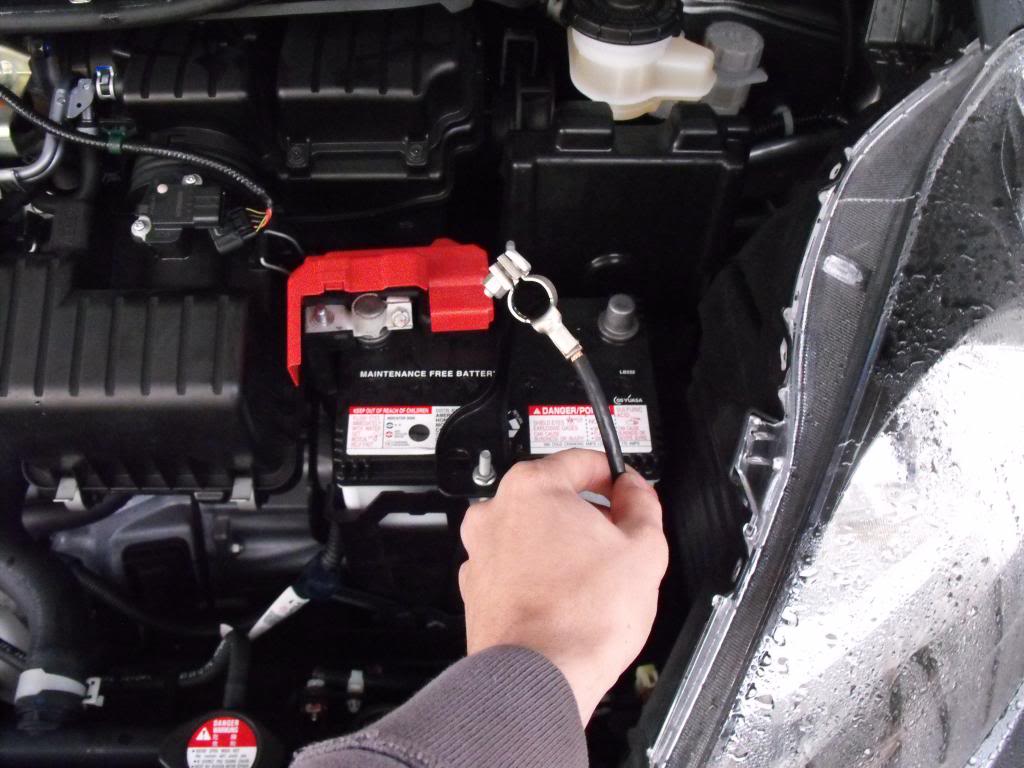
Now it's time to get that pesky battery out of the way. Seriously, it's exactly where we need there to not be a battery for this job.
Start by loosening the 10mm nut to disconnect the negative battery terminal.
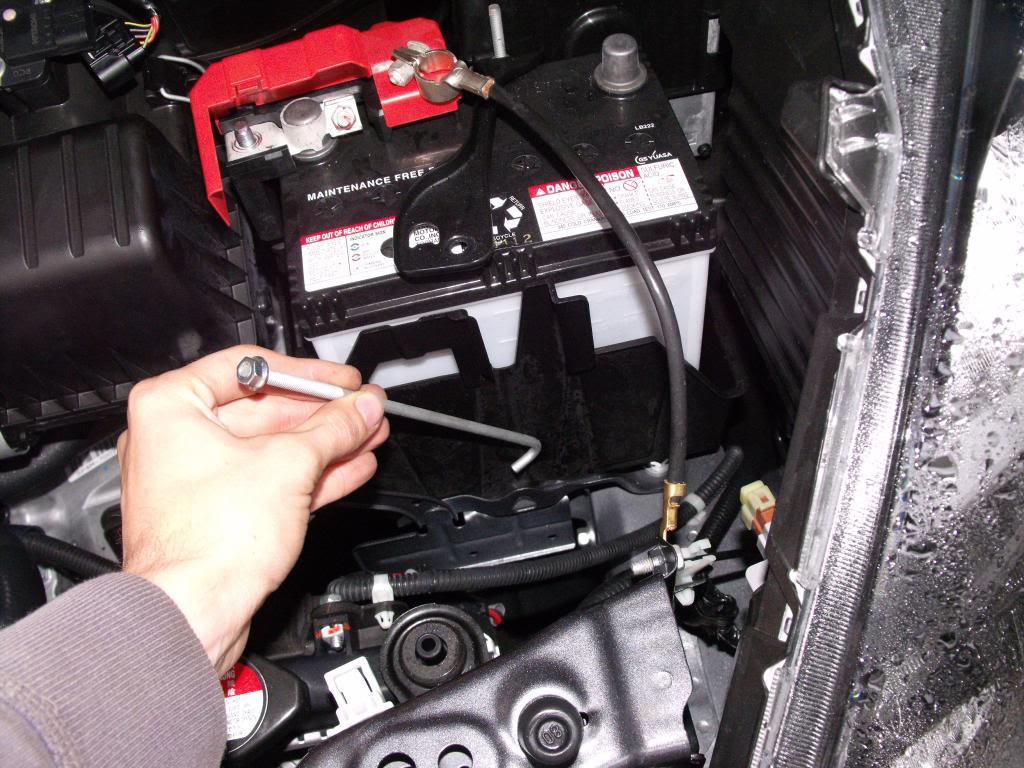
Now undo the 10mm nut on the positive battery terminal. Completely remove the nut holding on the front of the battery mounting clamp and take the front tie down bar out. Pull the battery out along with the plastic battery holder. Easy business.
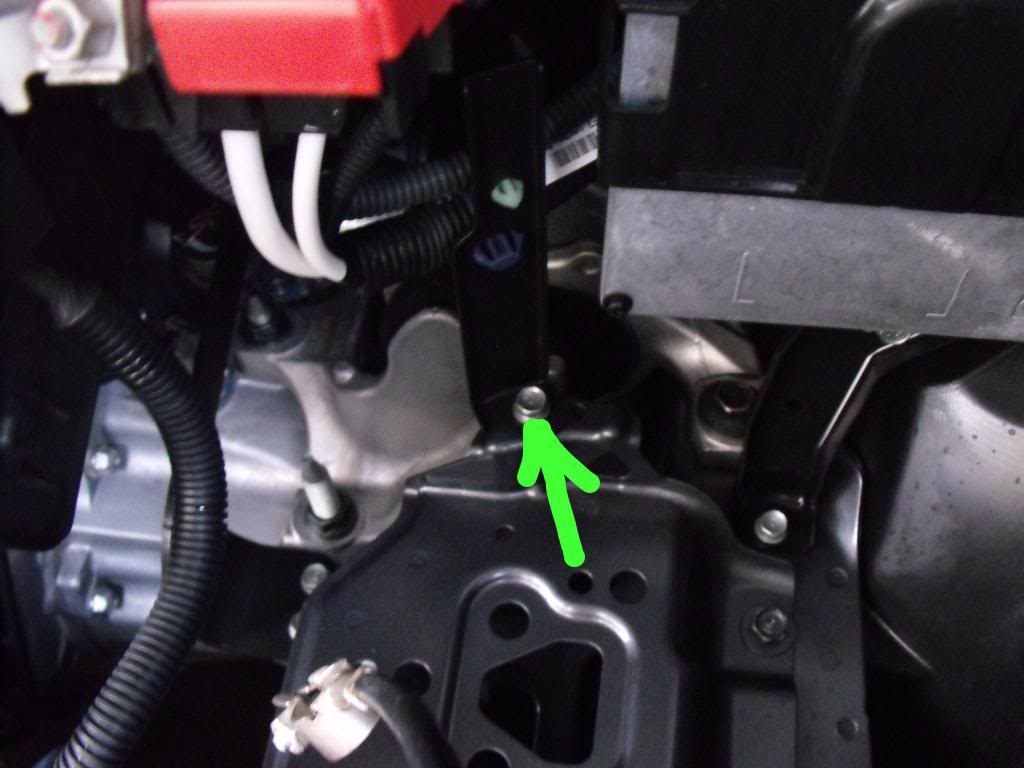
Now that the battery is out, you now have access to this little 10mm bolt holding in the bracket that keeps the positive terminal/voltage distribution block directly in your way. There it is. Take it out.
The Airbox is the next thing to get out of the engine bay. This is almost as easy as the battery to remove.
Two 10mm bolts hold it in place. They are located left and right of the main airbox assembly, take em out.
(I had the battery in when I did this. It is easier with the battery out.)
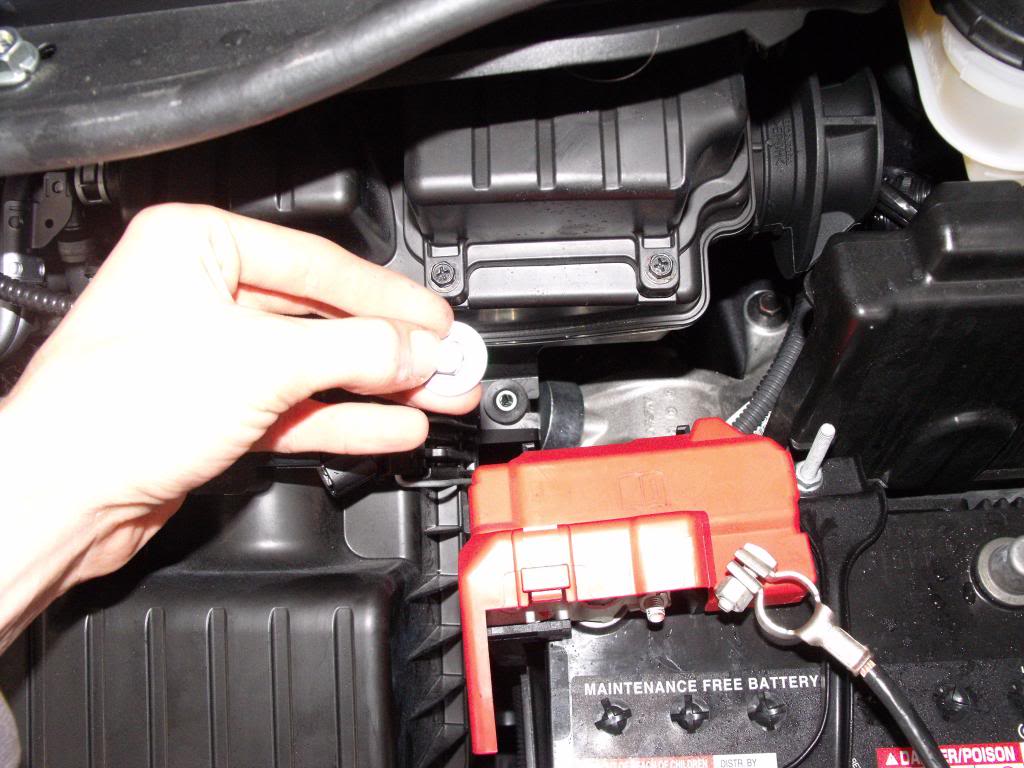
Marvel at Honda's foresight. How kind of their engineers to consider DIY'ers by building this little bolt holding storage compartment into the Fit! Oh wait that's not what it's for? Ah well, whatever works..
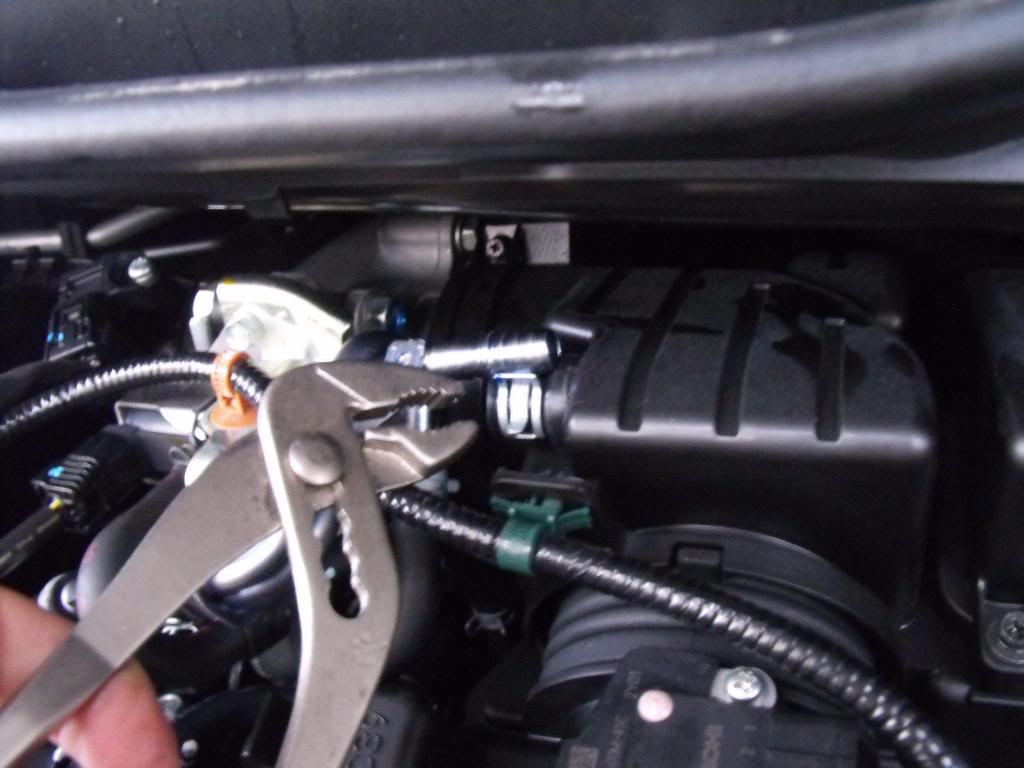
Now grab some pliers and pinch this little vacuum line clamp and puuuulllll the metal nipple out of the airbox. It's going to take a bit of oomph.
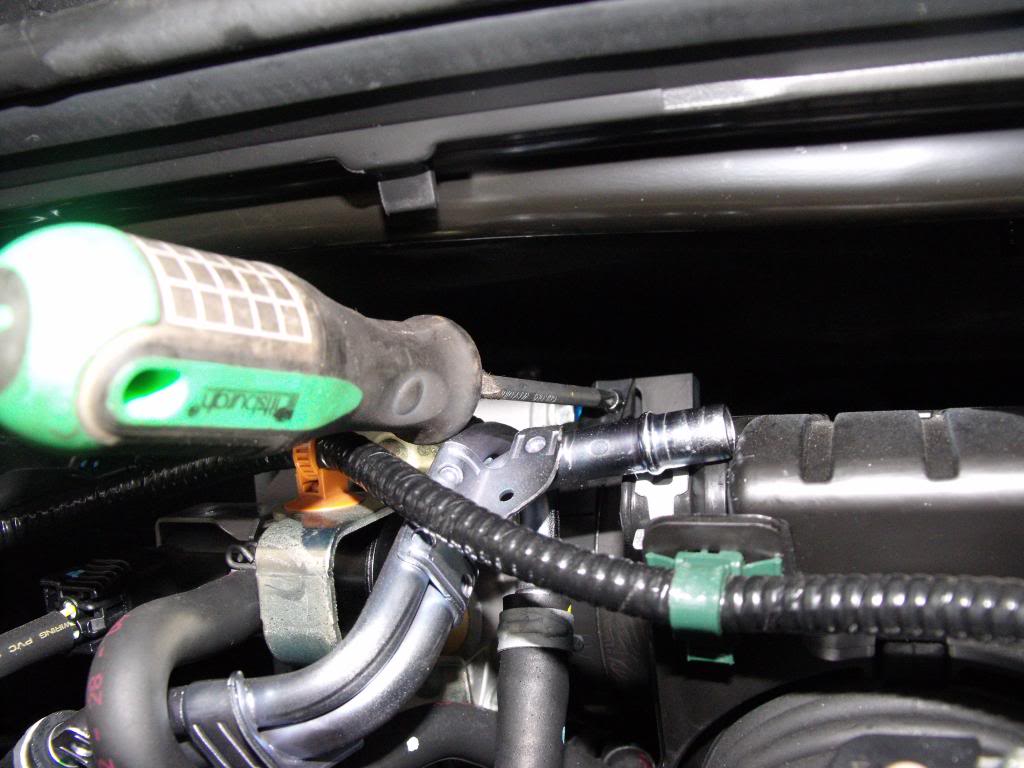
With that vacuum fitting out, now grab a long philips screw driver and undo the hose clamp holding the airbox on to the throttle body inlet. *****DISCLAIMER***** it takes a rare/awkward sized philips to get this job done safely without stripping the hose clamp. If you don't have the right screw driver STOP and get one that works, OR!!!! a 5.5mm socket fits perfectly around the bolt. 5.5mm socket and 1/4" drive is the desired method if you have a nice long extention.*******DISCLAIMER******
Now disconnect the Mass Air Flow sensor and use a pair of pliers/flat head to remove the little green clamp mounting the MAF wiring to the airbox.
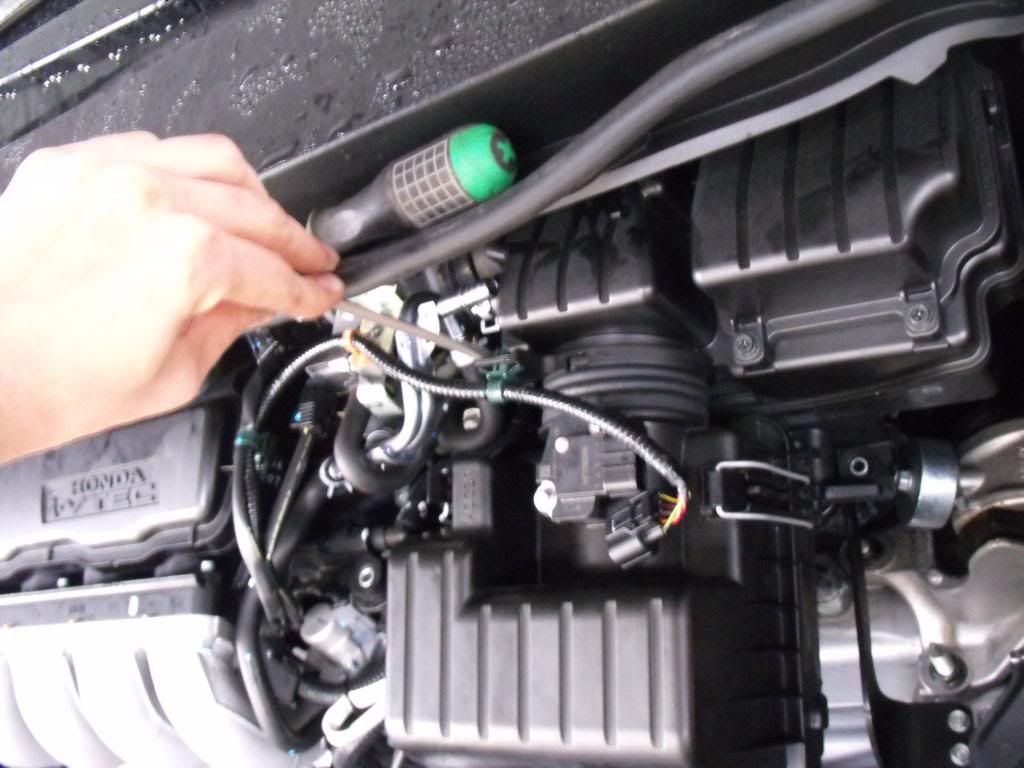
Once that bugger is loose, you gotta get the airbox out. It won't want to come out and no amount of reasoning will make it want to leave the cozy engine bay. You just gotta WIGGLE WIGGLE WIGGLE WIGGLE WIGGLE (yeah) it out.
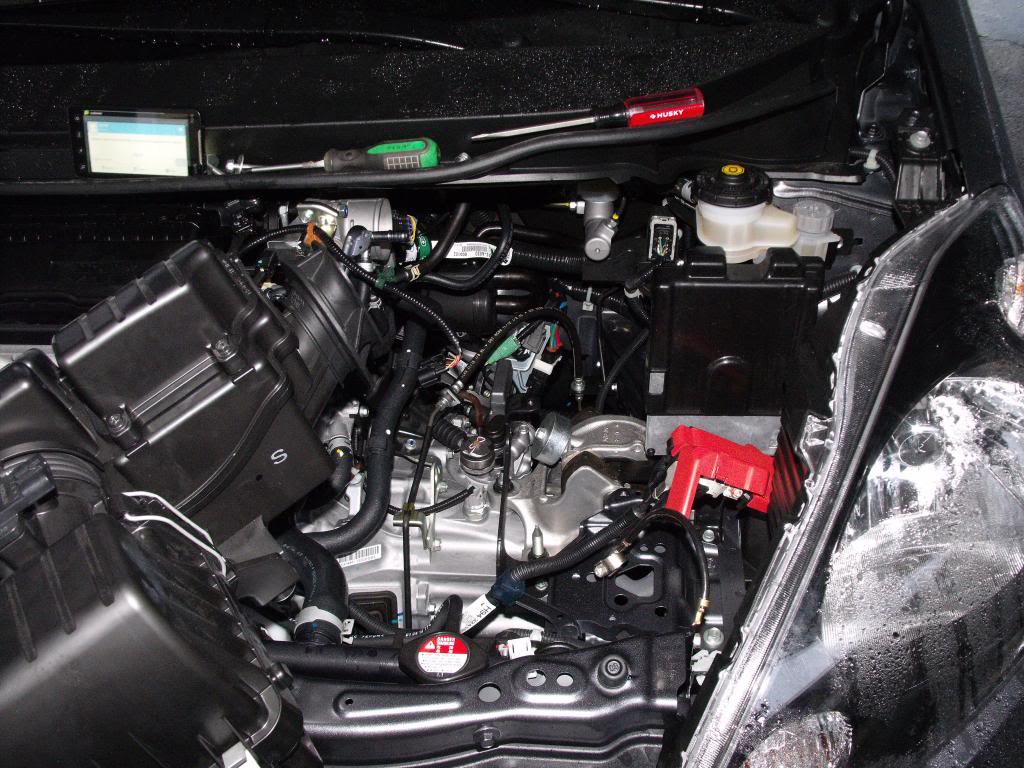
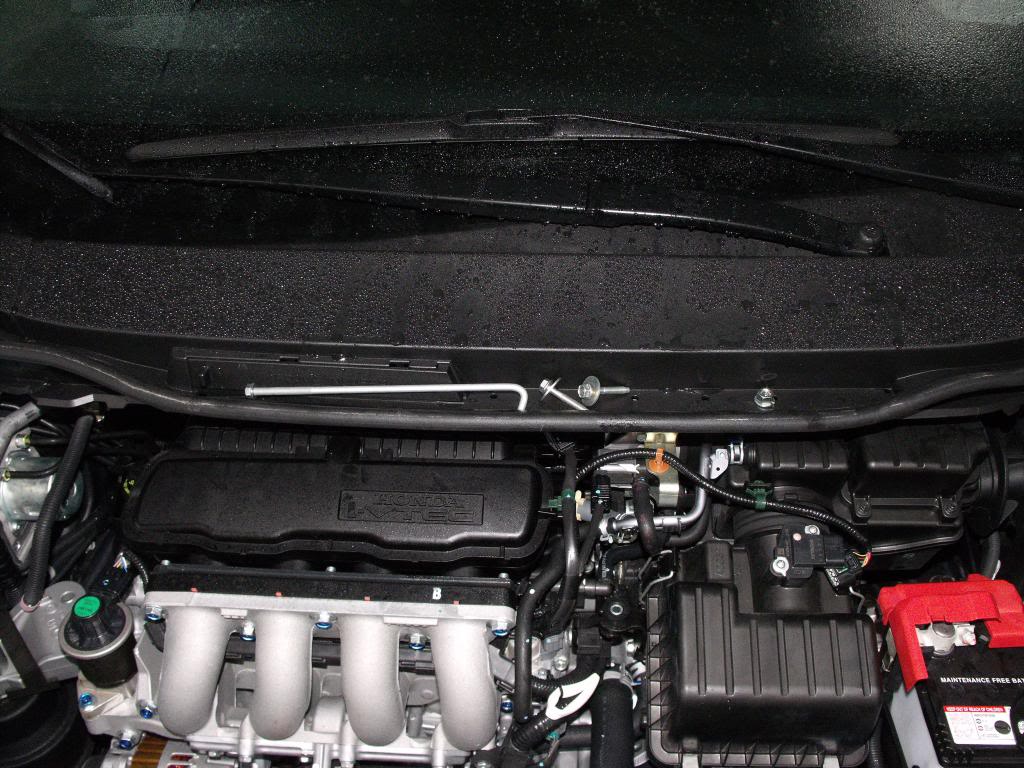
NOW. Here is your prize.

A better look.....oh dear.
Now to get dat ho out.
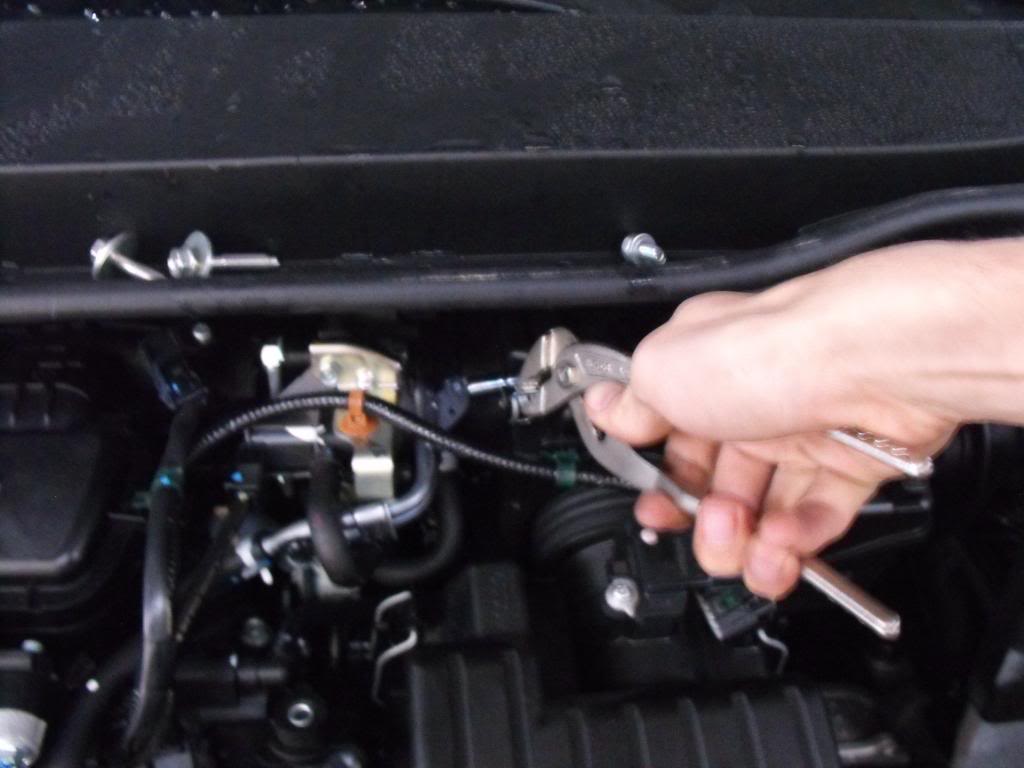
Remove the two 10mm bolts holding on the bracket for the solid clutch line against the frame rail.
You may also need to unplug that large electrical connector. It's a bit in the way, it's also strange to unplug.
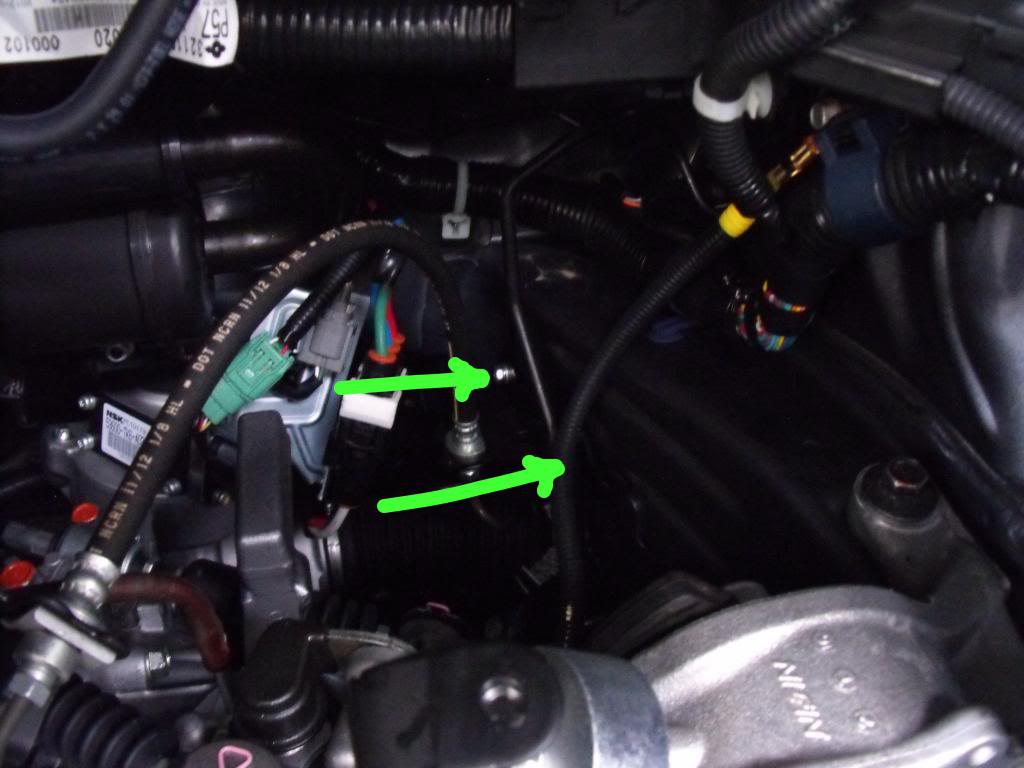
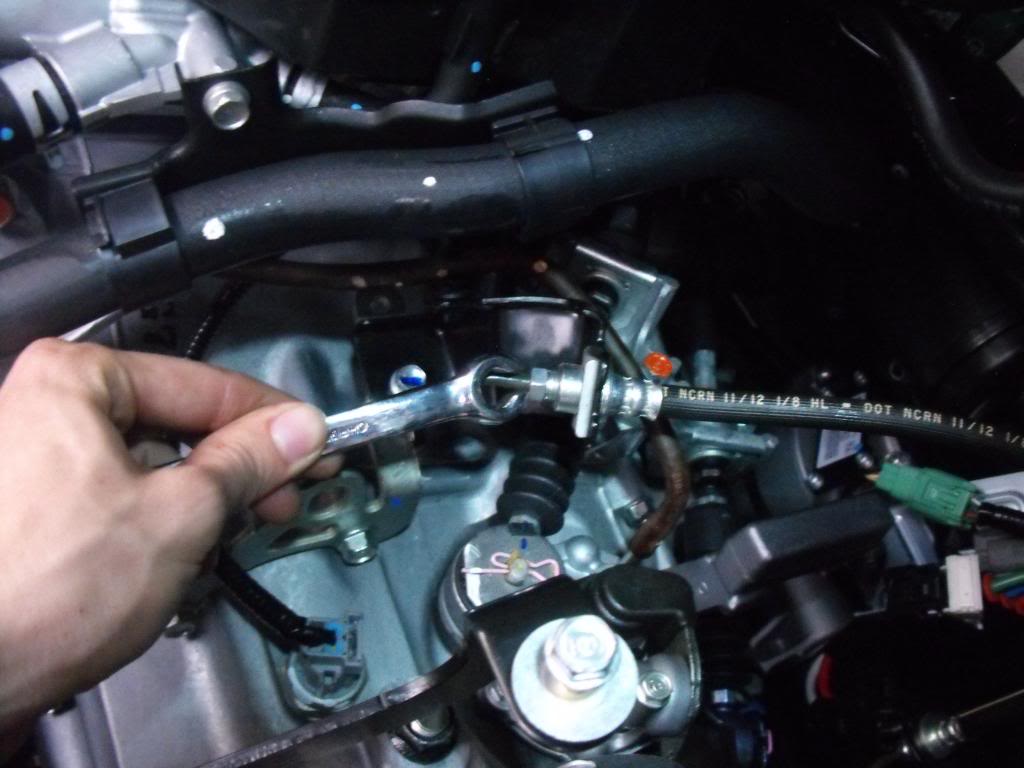
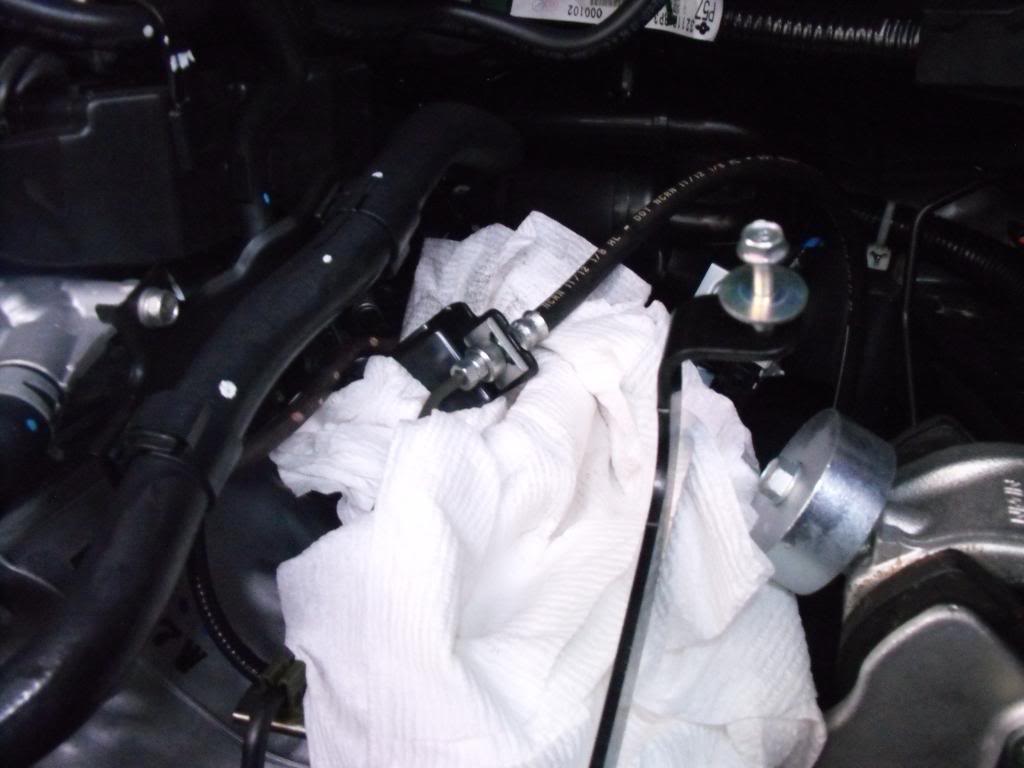
With that out, it's time to disconnect this end of the clutch line. Be prepared. Brake fluid will come out. Line a bunch of towels underneath the line as you undo it. Brake fluid is nasty corrosive stuff.
AND DON'T FORGET TO USE A FLARE NUT/BOX END WRENCH. You will hate your life if you use a regular wrench and you round the brake line off.
Once off, use a flat head to pry the silver locking plate out. This will release the rubber brake line from the bracket.
Okay, we're done with the engine bay for now.
Get under the dash board. There's a little underdash trim piece that comes right off that's in the way. Twist the little mounting knob close to the hood latch release. once you twist that little latch, pull straight down on the right side of the trim piece to release the final plastic clip holding it on. zoop!
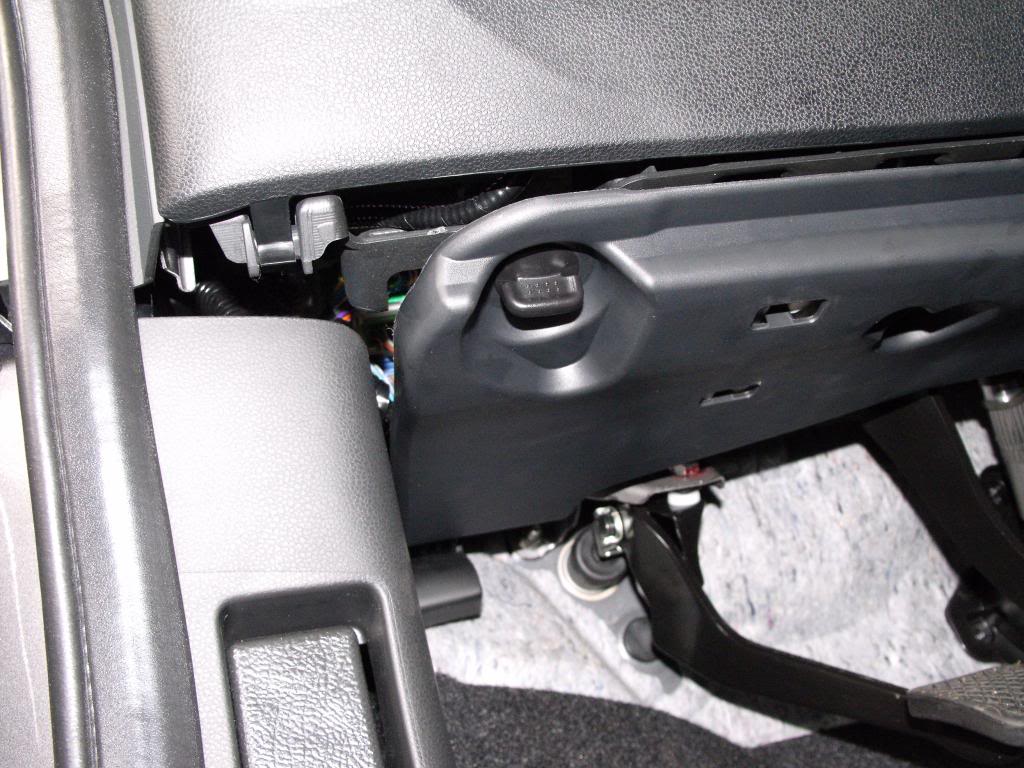
Direct your attention to your clutch pedal. Behind it to be specific. This is where your CMC attaches to the pedal.
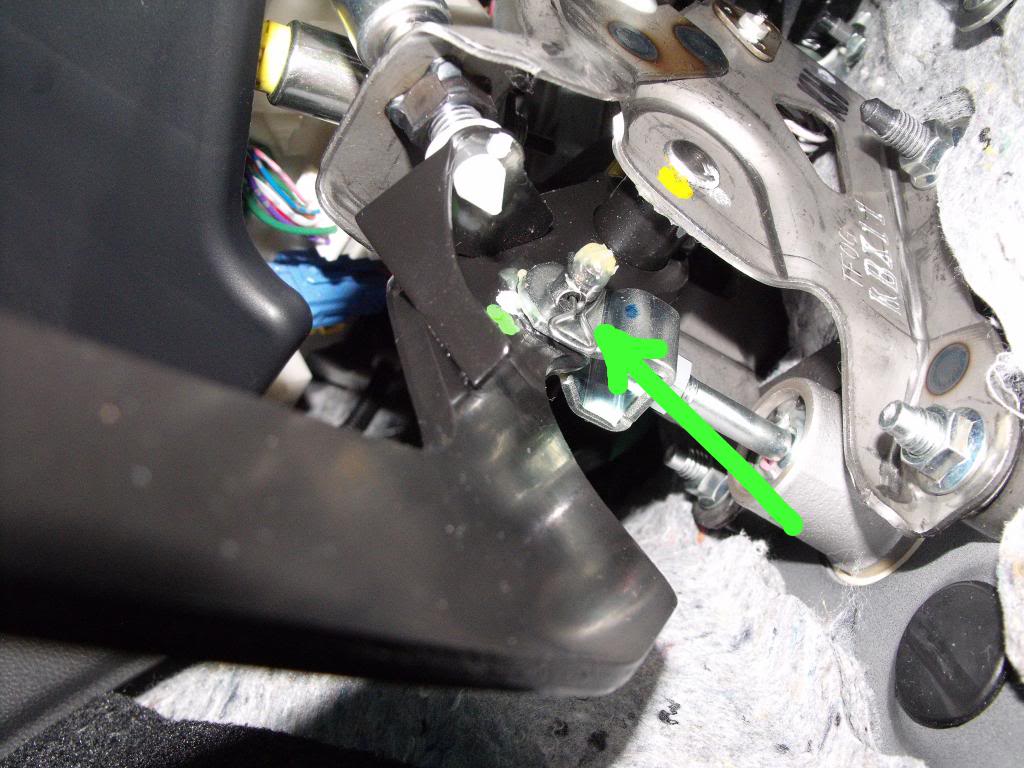
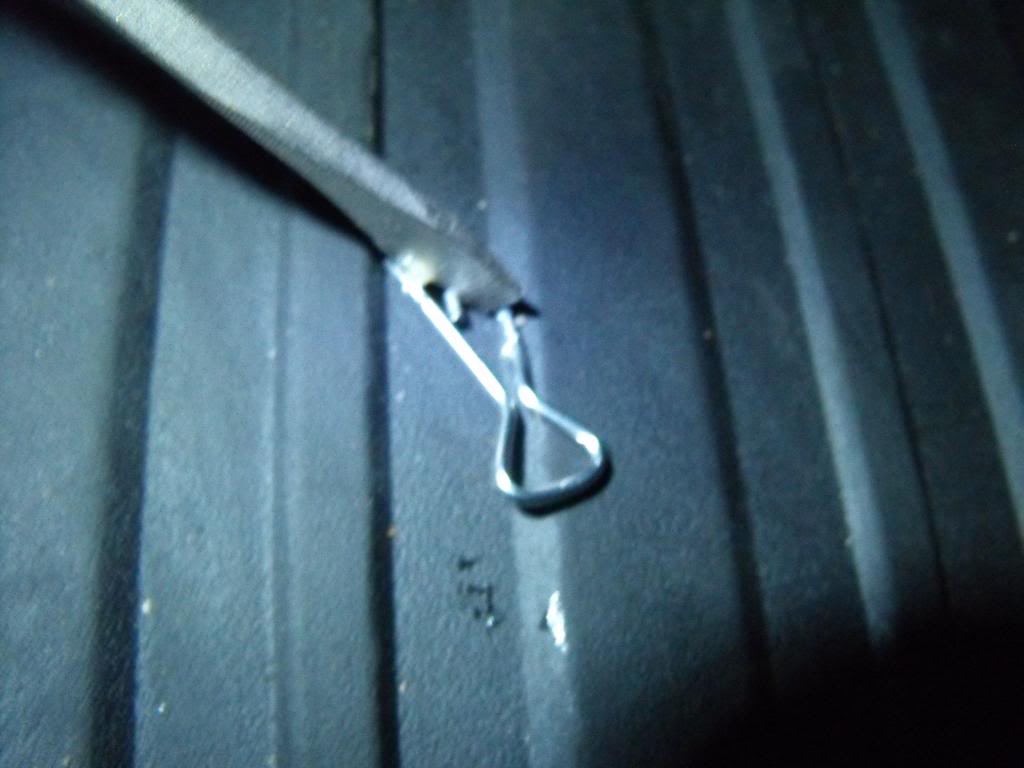
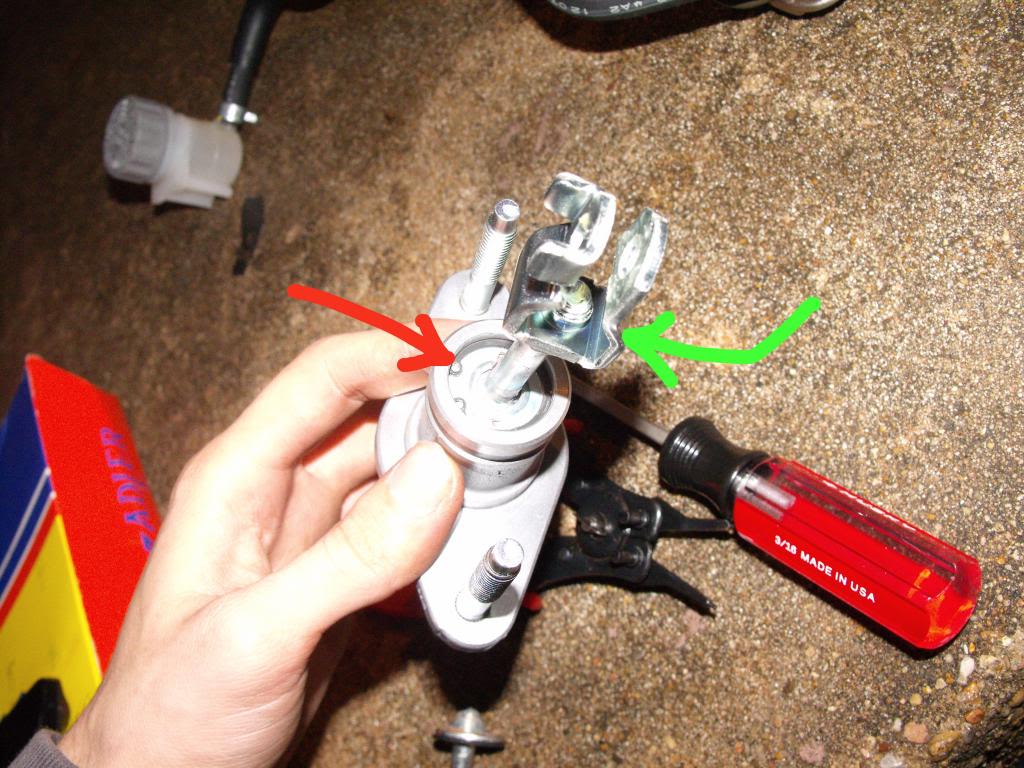
Remove the pretty little cotter pin that goes through the black pivot pin. Use a screw driver and push on it as the picture shows. Don't be afraid to push a bit hard. Tiny pliers would be useful here (guess what I don't have)
Now that the cotter pin is out, pry the black pivot pin out with a small flat head (yellow arrow)
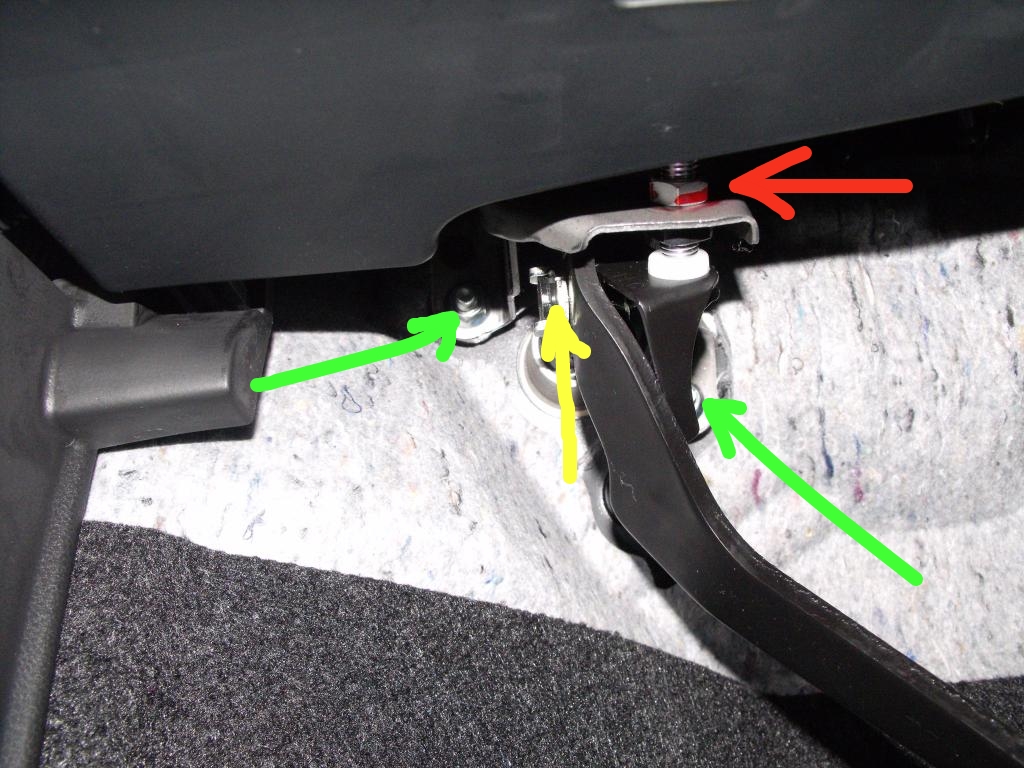
Unfasten the two 12mm nuts that mount the CMC in to the firewall. (green arrows)
With all that done, loosen the nut at the Red Arrow and back the clutch stop/sensor out all the way till the end of the threads are flush with the bracket and the clutch pedal is all the way up as high as it will go. This is very easy to adjust later and will affect how much of a clutch "dead zone" you have.
Okie doke. You're done in there for now.
Get back in that engine bay!
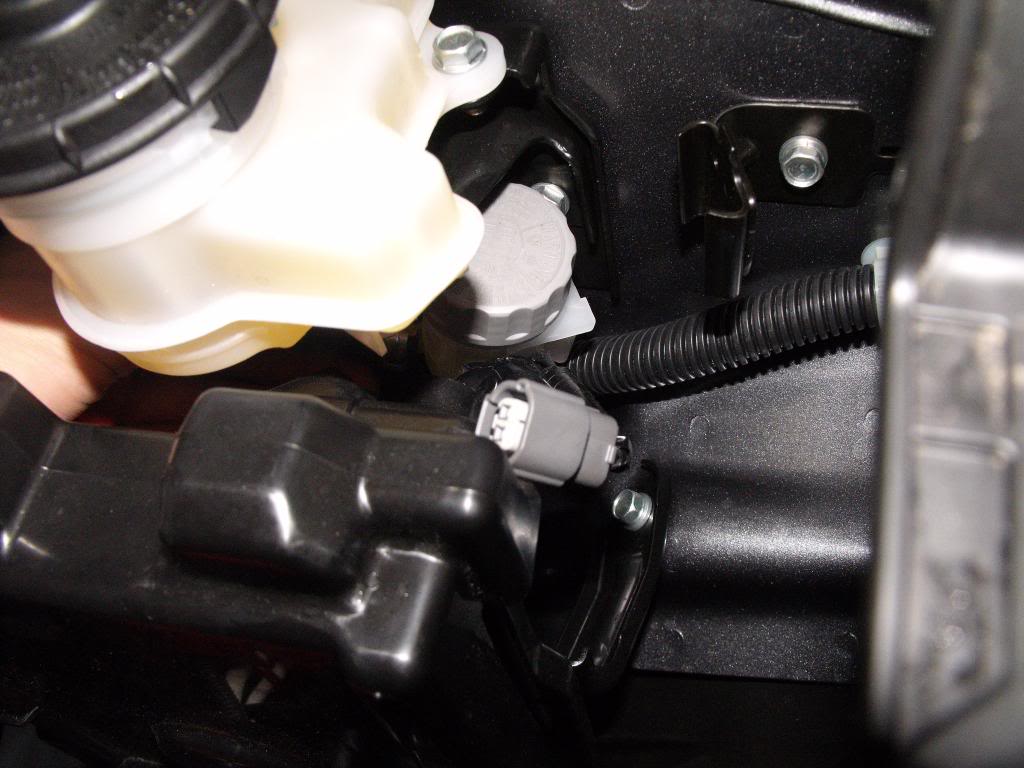
Grab the clutch fluid reservoir and pull up and toward you to release it from the bracket.
While you're there, unplug the brake fluid level sender on the bottom of the brake fluid reservoir (small grey connector)
Fish the clutch fluid reservoir out from under the brake fluid reservoir and toward the CMC. The cleanest way I found to remove the CMC is to remove the entire hydraulic assembly from the fluid reservoir all the way down to that rubber line you used the box end wrench to disconnect. Again you do NOT want brake fluid on yo shit. It ruins paint and munches rubber if left untended.
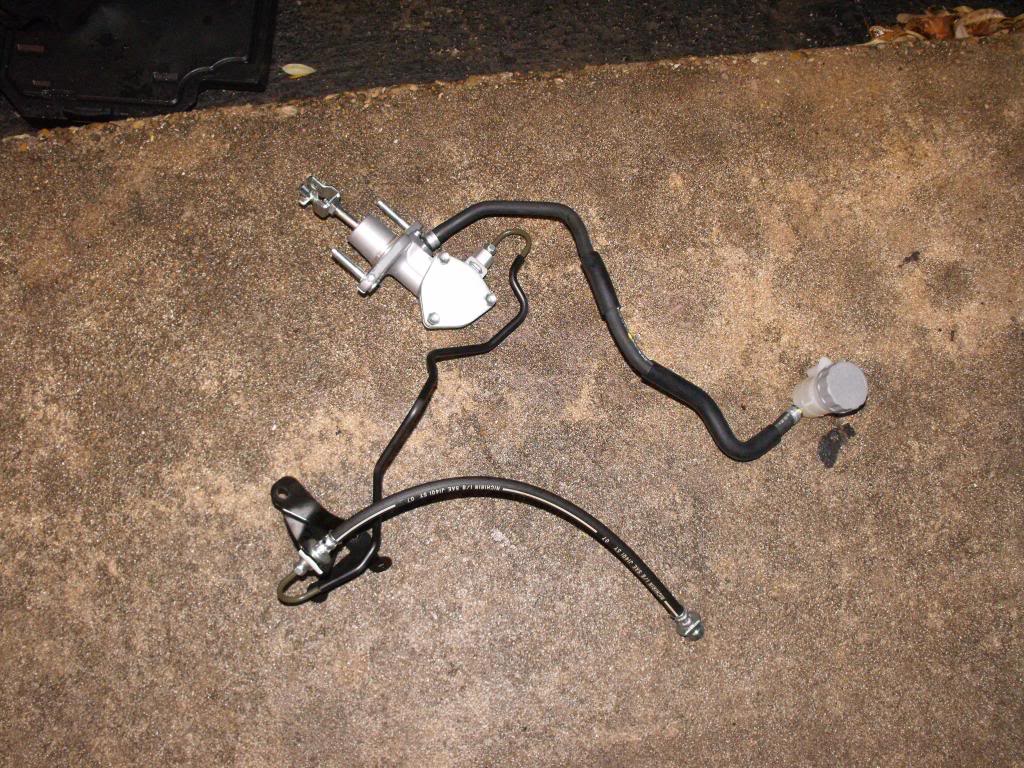
Now tug, pull, wriggle, maneuver, etc until the CMC comes out along with the line and the reservoir.
TADAAA!!! Thanks Honda, for looking out for me. It's great that you really care about my car so much that you added a delay valve so that I don't accidentally hurt the motor mounts or the drive line. You really seem to know best, Honda. In fact, why don't you just drive the car for me entirely since I'm apparently such an incompetent pillock that I can't even be allowed to use an unrestricted clutch without your permission?
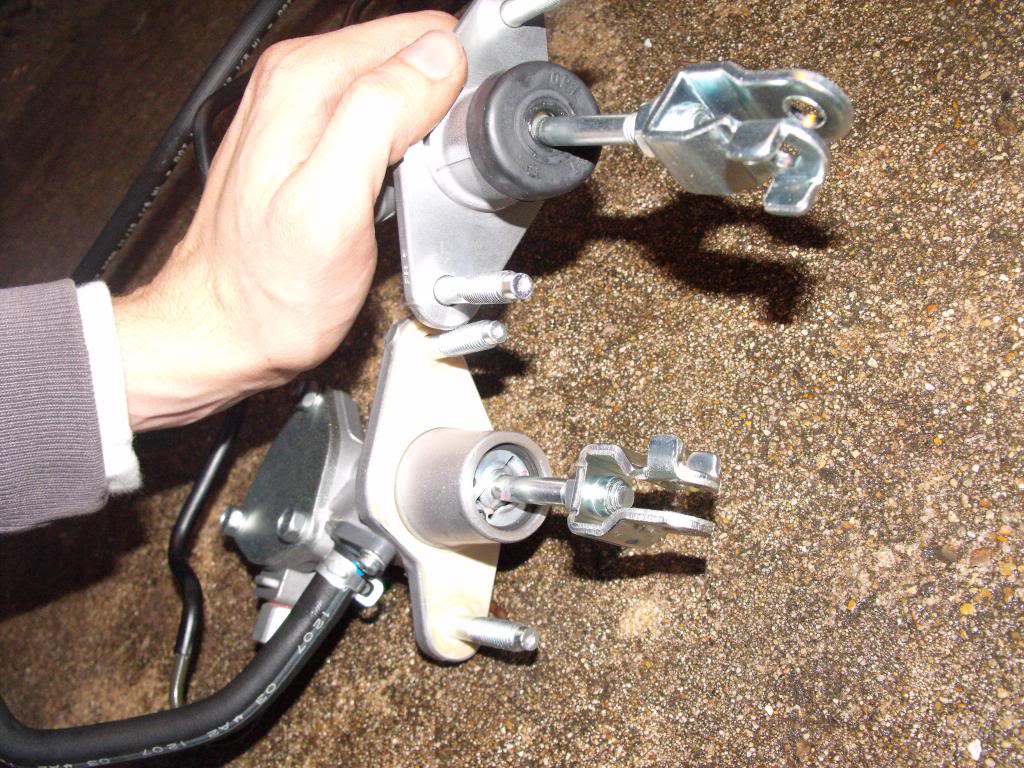
Now, compare your two different CMCs. The Fit CMC has a notch taken out of the mounting part. It also has a shorter pin, but we'll get that sorted. Don't you fret.
The Fit CMC doesn't come with the rubber protective boot that the Civic CMC came with. Just for grins I swapped that over too.
First off, use some pliers and a 12mm wrench to loosen the clamp where the CMC attaches to the clutch pedal. (Green Arrow)
These will need to come off of both CMCs.
Now use some snap-ring pliers to pull out the snap ring holding in the clutch pedal pin on both CMCs. (Red Arrow)
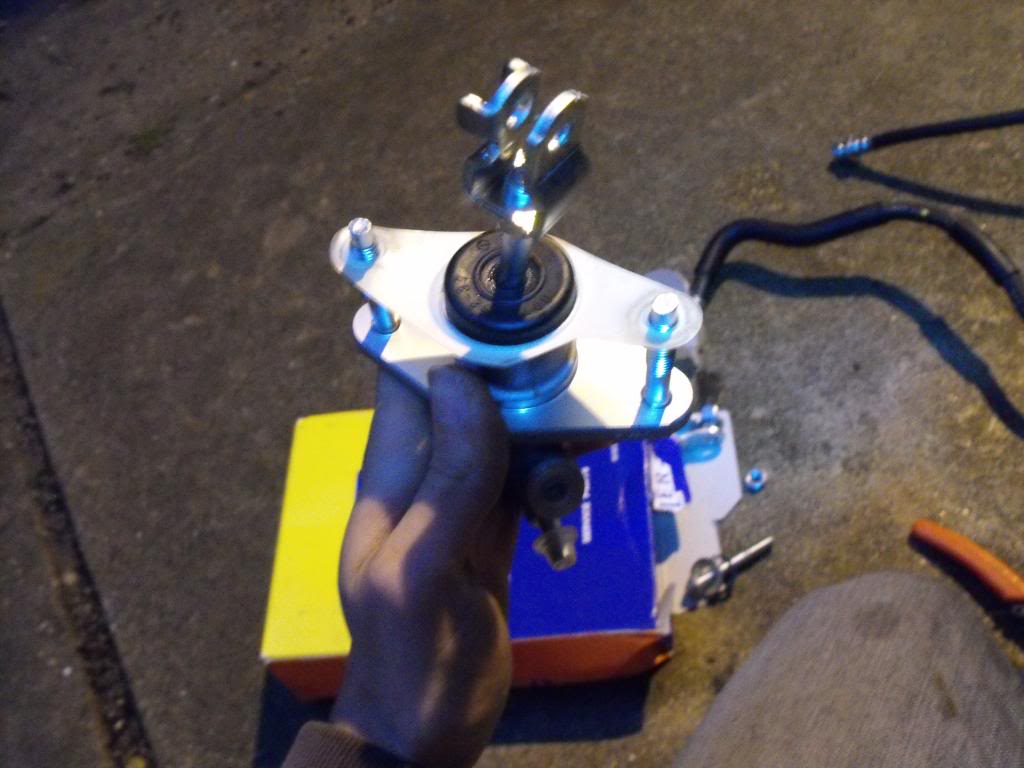
Take the Fit clutch pedal pin and install it on your new Civic CMC. Slip the rubber boot back on once the snap-ring is in place.
Now reinstall the Fit clutch pedal clamp on the end of the clutch pedal pin. Take this time to run the clamp alllll the way down the threads and lock it in place. This is the PERFECT setting to make your Fit feel like a real car. After much headaching and adjusting in the car, this setting is spot on.
Slip the gasket from the Fit on to your new civic CMC and you're ready for the next step.
Attach the hard line and the fluid hose to your new CMC. Attach the hard line first, then the rubber hose onto the nipple.
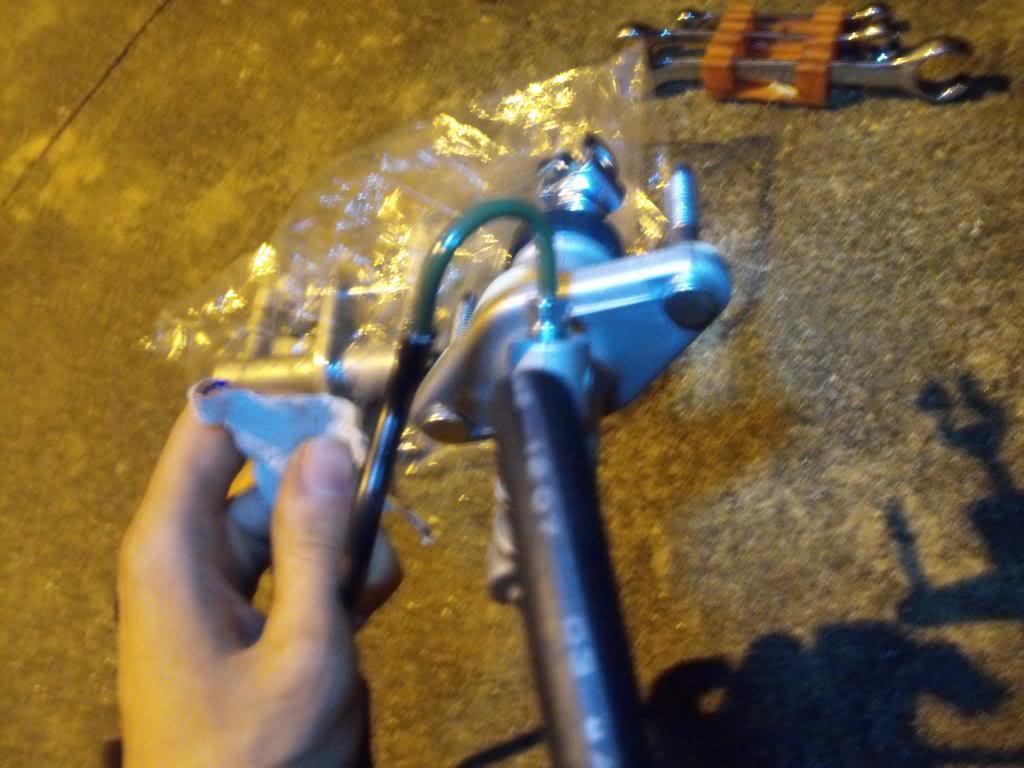
Here's the buggery part you'll need to be very careful with. This setup didn't clear the brake booster for me. The hard line gets in the way. It will need bending. use some pliers to bend it.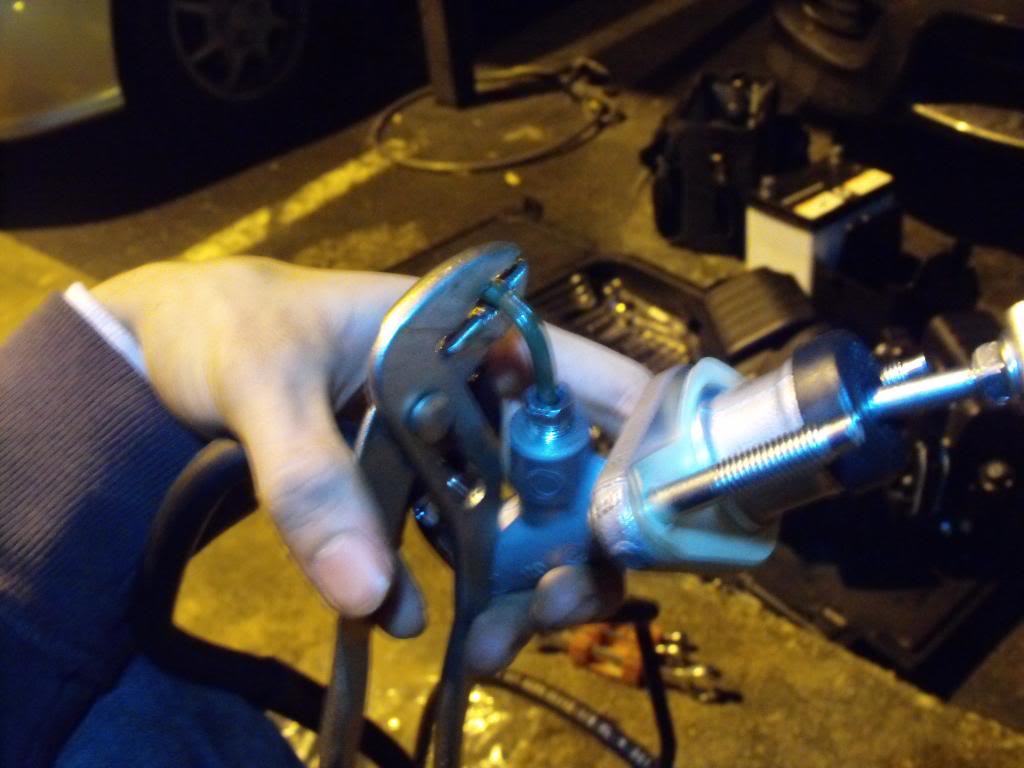
...Until it looks like so. *****DISCLAIMER****** I actually bent it just a little further down to clear after this picture was taken*******DISCLAIMER*******
INSTALL TIME! HOORAY!
This is a pain in the ass. Wriggling the CMC back in to place is a huge feat. It's tough to clear the brake booster. The rest is quite simple. Installation is the reverse of removal.
Go ahead and install it now. I'll wait.
....k.
Now we have to bleed the clutch. Hooboy this is not a terribly fun job.
You'll need a bottle of brake fluid and hopefully a friend to pump the pedal for you.
I won't go into great detail about this part. There's a million resources for you here. Loads of "how to's" and DIY's for clutch bleeding.
However I will say that you'll need to remove the coolant expansion tank to get at the slave cylinder bleeder screw.
In this shot I have removed it, but I am showing you which bolt had to come out.
Once bled, take it for a quick spin. Like it?
You should have:
1) a clutch pedal that's just a little higher than the brake pedal
2) about 1/4 ~ 1/2 inch of freeplay in the clutch pedal before it engages (you can feel vibrations when it begins to engage)
3) a catch point right smack in the middle of the travel
4) actual clutch feel instead of a dead feel
5) the "throttle float" is MUCH less noticeable with the CDV gone. I am thrilled with this mod.
It only cost me $40 to perform. Could've spent less, but I went with an OEM supplier for reliability's sake.
The best CMC to use is one from a 01-05 Civic! It will fit nearly exactly like the stock Fit unit with minimal modding and will cost you around $60 as opposed to $40 for a factory NISSIN unit.
So I've had my Fit for about a week and I found myself shunning it in favor of driving my 99 civic HX the past few days.
Reason being, the Clutch Delay Valve makes the car jerky, unfun, non communicative, and lazy feeling. It's a huge issue for me and a lot of you all probably agree. It's not as easy as deleting a CDV from a BMW, no. In the Fit the CDV is built in to the Clutch Master Cylinder in such a way that drilling it is not a fix.
Before I bought my Fit, I'd done much searching and only found two resources on how to get rid of it. One Fit owner used a $120 omni power CMC. That's expensive, and the extra bore stiffens the pedal a little too much for my tastes.
Another Fit owner found that 96-00 Civic CMC's will fit and they have the same 5/8th's bore for that stock feel! Only problem is there is no definitive DIY on this topic for those of us who want to delete the CDV but aren't complete car wizards (like myself).
So I ordered an Adler/Nissin (OEM Supplier) CMC from a 96-00 Civic.
It showed up today and once I got home from work, I set out to swap the CMCs.
My camera sucks and I myself had no real plan, so this DIY isn't perfect. I ran out of daylight halfway through, it was raining, I was working in a shitty apartment parking lot /excuses... Maybe the next Foo to delete their CDV can one up me with a quality DIY, but for now here is the best CDV Deletre resource we have (to my knowledge).
I finished the job just a few minutes ago - the results are literally perfect. It is exactly what I wanted/expected from driving my manual transmission Fit. This should be the very first mod on any enthusiastic Fit Manual owner's list of things to do. Right up there above replacing the shit OEM Dunlop tires.
I am not responsible for any injury or property damage incurred by following these steps. This guide is to serve as an informational resource. This is how I did it. Maybe there's a better way, but this is what worked for me.
DIY TIME!
First thing's first. Get acquainted with your engine bay if you have not already. Owner, engine bay. Engine bay, owner.
Now it's time to get that pesky battery out of the way. Seriously, it's exactly where we need there to not be a battery for this job.
Start by loosening the 10mm nut to disconnect the negative battery terminal.
Now undo the 10mm nut on the positive battery terminal. Completely remove the nut holding on the front of the battery mounting clamp and take the front tie down bar out. Pull the battery out along with the plastic battery holder. Easy business.
Now that the battery is out, you now have access to this little 10mm bolt holding in the bracket that keeps the positive terminal/voltage distribution block directly in your way. There it is. Take it out.
The Airbox is the next thing to get out of the engine bay. This is almost as easy as the battery to remove.
Two 10mm bolts hold it in place. They are located left and right of the main airbox assembly, take em out.
(I had the battery in when I did this. It is easier with the battery out.)
Marvel at Honda's foresight. How kind of their engineers to consider DIY'ers by building this little bolt holding storage compartment into the Fit! Oh wait that's not what it's for? Ah well, whatever works..
Now grab some pliers and pinch this little vacuum line clamp and puuuulllll the metal nipple out of the airbox. It's going to take a bit of oomph.
With that vacuum fitting out, now grab a long philips screw driver and undo the hose clamp holding the airbox on to the throttle body inlet. *****DISCLAIMER***** it takes a rare/awkward sized philips to get this job done safely without stripping the hose clamp. If you don't have the right screw driver STOP and get one that works, OR!!!! a 5.5mm socket fits perfectly around the bolt. 5.5mm socket and 1/4" drive is the desired method if you have a nice long extention.*******DISCLAIMER******
Now disconnect the Mass Air Flow sensor and use a pair of pliers/flat head to remove the little green clamp mounting the MAF wiring to the airbox.
Once that bugger is loose, you gotta get the airbox out. It won't want to come out and no amount of reasoning will make it want to leave the cozy engine bay. You just gotta WIGGLE WIGGLE WIGGLE WIGGLE WIGGLE (yeah) it out.
NOW. Here is your prize.
A better look.....oh dear.
Now to get dat ho out.
Remove the two 10mm bolts holding on the bracket for the solid clutch line against the frame rail.
You may also need to unplug that large electrical connector. It's a bit in the way, it's also strange to unplug.
With that out, it's time to disconnect this end of the clutch line. Be prepared. Brake fluid will come out. Line a bunch of towels underneath the line as you undo it. Brake fluid is nasty corrosive stuff.
AND DON'T FORGET TO USE A FLARE NUT/BOX END WRENCH. You will hate your life if you use a regular wrench and you round the brake line off.
Once off, use a flat head to pry the silver locking plate out. This will release the rubber brake line from the bracket.
Okay, we're done with the engine bay for now.
Get under the dash board. There's a little underdash trim piece that comes right off that's in the way. Twist the little mounting knob close to the hood latch release. once you twist that little latch, pull straight down on the right side of the trim piece to release the final plastic clip holding it on. zoop!
Direct your attention to your clutch pedal. Behind it to be specific. This is where your CMC attaches to the pedal.
Remove the pretty little cotter pin that goes through the black pivot pin. Use a screw driver and push on it as the picture shows. Don't be afraid to push a bit hard. Tiny pliers would be useful here (guess what I don't have)
Now that the cotter pin is out, pry the black pivot pin out with a small flat head (yellow arrow)
Unfasten the two 12mm nuts that mount the CMC in to the firewall. (green arrows)
With all that done, loosen the nut at the Red Arrow and back the clutch stop/sensor out all the way till the end of the threads are flush with the bracket and the clutch pedal is all the way up as high as it will go. This is very easy to adjust later and will affect how much of a clutch "dead zone" you have.
Okie doke. You're done in there for now.
Get back in that engine bay!
Grab the clutch fluid reservoir and pull up and toward you to release it from the bracket.
While you're there, unplug the brake fluid level sender on the bottom of the brake fluid reservoir (small grey connector)
Fish the clutch fluid reservoir out from under the brake fluid reservoir and toward the CMC. The cleanest way I found to remove the CMC is to remove the entire hydraulic assembly from the fluid reservoir all the way down to that rubber line you used the box end wrench to disconnect. Again you do NOT want brake fluid on yo shit. It ruins paint and munches rubber if left untended.
Now tug, pull, wriggle, maneuver, etc until the CMC comes out along with the line and the reservoir.
TADAAA!!! Thanks Honda, for looking out for me. It's great that you really care about my car so much that you added a delay valve so that I don't accidentally hurt the motor mounts or the drive line. You really seem to know best, Honda. In fact, why don't you just drive the car for me entirely since I'm apparently such an incompetent pillock that I can't even be allowed to use an unrestricted clutch without your permission?
Now, compare your two different CMCs. The Fit CMC has a notch taken out of the mounting part. It also has a shorter pin, but we'll get that sorted. Don't you fret.
The Fit CMC doesn't come with the rubber protective boot that the Civic CMC came with. Just for grins I swapped that over too.
First off, use some pliers and a 12mm wrench to loosen the clamp where the CMC attaches to the clutch pedal. (Green Arrow)
These will need to come off of both CMCs.
Now use some snap-ring pliers to pull out the snap ring holding in the clutch pedal pin on both CMCs. (Red Arrow)
Take the Fit clutch pedal pin and install it on your new Civic CMC. Slip the rubber boot back on once the snap-ring is in place.
Now reinstall the Fit clutch pedal clamp on the end of the clutch pedal pin. Take this time to run the clamp alllll the way down the threads and lock it in place. This is the PERFECT setting to make your Fit feel like a real car. After much headaching and adjusting in the car, this setting is spot on.
Slip the gasket from the Fit on to your new civic CMC and you're ready for the next step.
Attach the hard line and the fluid hose to your new CMC. Attach the hard line first, then the rubber hose onto the nipple.
Here's the buggery part you'll need to be very careful with. This setup didn't clear the brake booster for me. The hard line gets in the way. It will need bending. use some pliers to bend it.
...Until it looks like so. *****DISCLAIMER****** I actually bent it just a little further down to clear after this picture was taken*******DISCLAIMER*******
INSTALL TIME! HOORAY!
This is a pain in the ass. Wriggling the CMC back in to place is a huge feat. It's tough to clear the brake booster. The rest is quite simple. Installation is the reverse of removal.
Go ahead and install it now. I'll wait.
....k.
Now we have to bleed the clutch. Hooboy this is not a terribly fun job.
You'll need a bottle of brake fluid and hopefully a friend to pump the pedal for you.
I won't go into great detail about this part. There's a million resources for you here. Loads of "how to's" and DIY's for clutch bleeding.
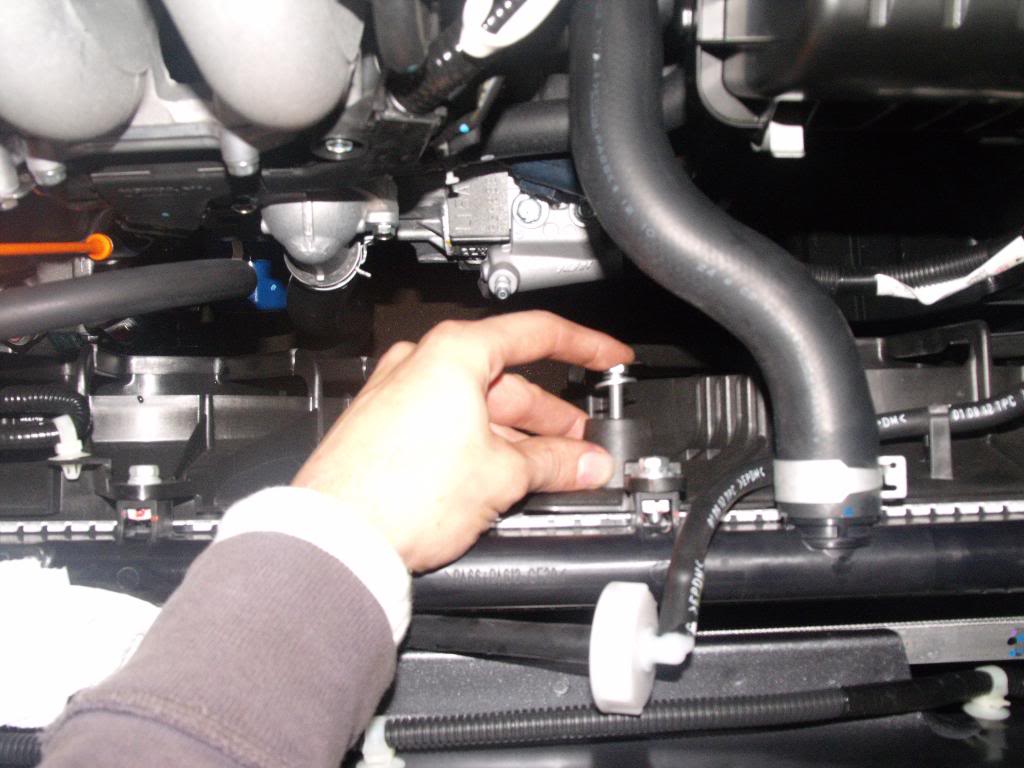
However I will say that you'll need to remove the coolant expansion tank to get at the slave cylinder bleeder screw.
In this shot I have removed it, but I am showing you which bolt had to come out.
Once bled, take it for a quick spin. Like it?
You should have:
1) a clutch pedal that's just a little higher than the brake pedal
2) about 1/4 ~ 1/2 inch of freeplay in the clutch pedal before it engages (you can feel vibrations when it begins to engage)
3) a catch point right smack in the middle of the travel
4) actual clutch feel instead of a dead feel
5) the "throttle float" is MUCH less noticeable with the CDV gone. I am thrilled with this mod.
It only cost me $40 to perform. Could've spent less, but I went with an OEM supplier for reliability's sake.
Last edited by Delraco; 04-11-2013 at 10:00 PM.
#2
02-10-2013, 11:48 AM

Nice job. I like it. My last car was an 02 Civic Si. It had that same triangle plate setup that the fit has on the clutch master cylinder. I assume that is where the delay valve is.... idk. I just thought I would share that the 01-05 Civic Clutch Master Cylinder (46920-S5A-G05) has the brake line and the reservoir reversed (same as the Fit). It was a popular swap for the Civic Si and the Acura RSX guys as they shared a triangle plate cmc which was prone to noise and failure. Picture from KSeriesparts.com. I have no idea about the size of the bore... Do you think the 01-05 Civic CMC may get around having to make the bend in the hard clutch line?
#3
02-10-2013, 12:49 PM
Nice job. I like it. My last car was an 02 Civic Si. It had that same triangle plate setup that the fit has on the clutch master cylinder. I assume that is where the delay valve is.... idk. I just thought I would share that the 01-05 Civic Clutch Master Cylinder (46920-S5A-G05) has the brake line and the reservoir reversed (same as the Fit). It was a popular swap for the Civic Si and the Acura RSX guys as they shared a triangle plate cmc which was prone to noise and failure. Picture from KSeriesparts.com. I have no idea about the size of the bore... Do you think the 01-05 Civic CMC may get around having to make the bend in the hard clutch line?

YES!
I think that might work even better! It has a notch cut out in the mounting base and the reversed lines should make it clear with no bending.
Only complaint being the plastic nipple screwed in to the CMC instead of a metal fitting...but that's just nit picking. I would've ordered this one in a heartbeat knowing that it would fit better!
Epic good info.

#5
02-10-2013, 02:44 PM
For future DIY'ers
Get this one as previously mentioned.
Honda Civic 2001 2002 2003 2004 2005 Clutch Master Cylinder Nissin 46920S5AG03 | eBay
You won't need to bend hydraulic lines nearly as much and the pin may not even need to be swapped out!!
Yeah it's $20 more but it is WELL worth it at half the price of the omni and less than half the work.

#8
02-11-2013, 04:38 PM
Hey guys, I have a plug and play solution that should accomplish the same thing without bending any hard lines to make it work. It uses the OEM CMC. Drilling is only half of what needs to get done to delete the CDV; it needs to be completely bypassed. I TIG welded the two holes shut and then drilled the bypass. I've installed two already on CR-Zs and it works great!
I plan on making them for the GE8 as well. I have 3 GE8 cores to work with and I should have something ready to ship very soon. Please send me a PM if you any interest in this or any questions.
Here is a link to the CDV discussion on the CR-Z forum:
Clutch Delay Valve - Page 2 - Honda CRZ Forum: Honda CR-Z Hybrid Car Forums
And a few pics for those too lazy to click on the link:
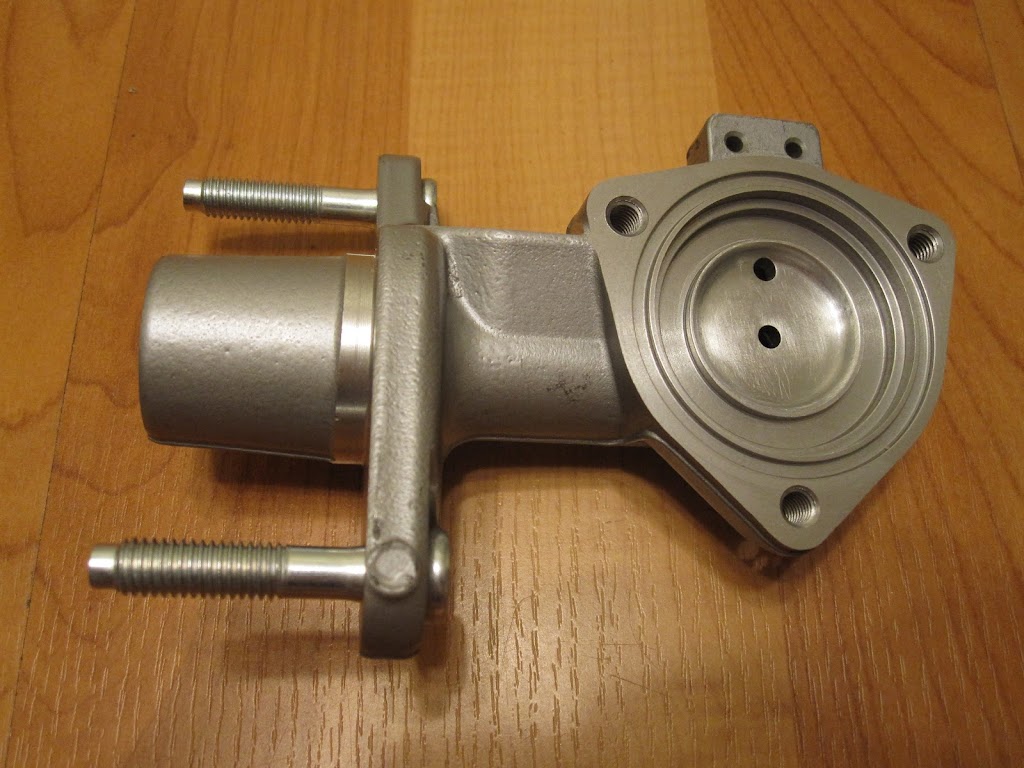
Stock CMC with weld area sanded down.

Welded. Not bad for my first one.

Drilled through to the cylinder.
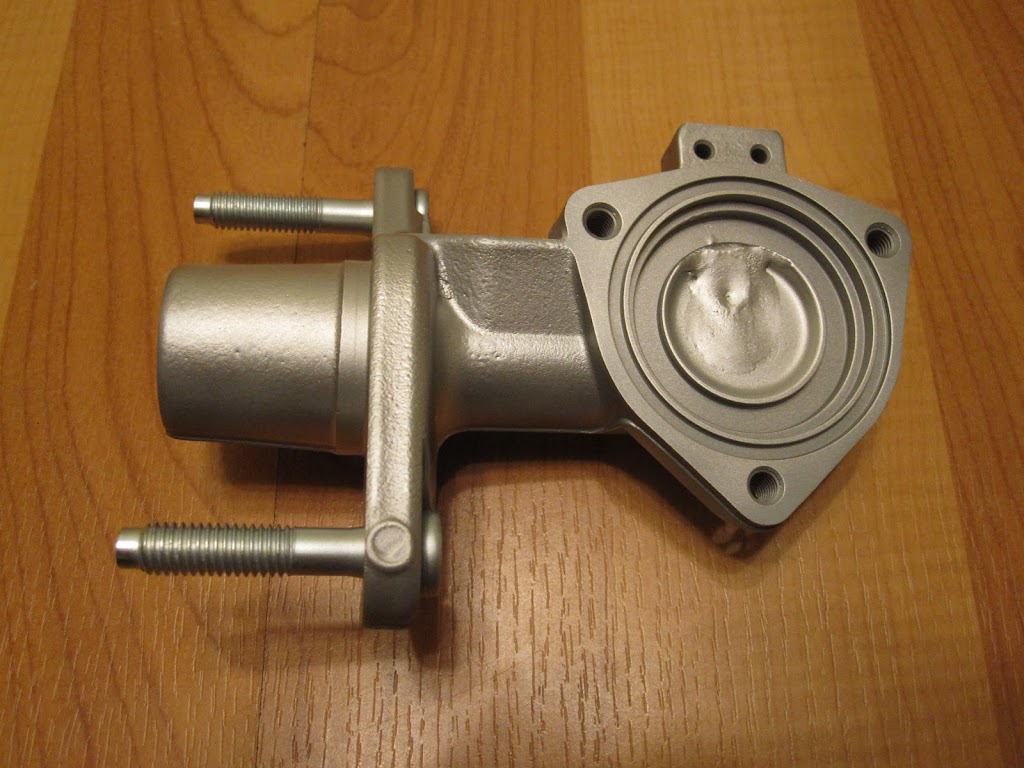
Bead blasted.
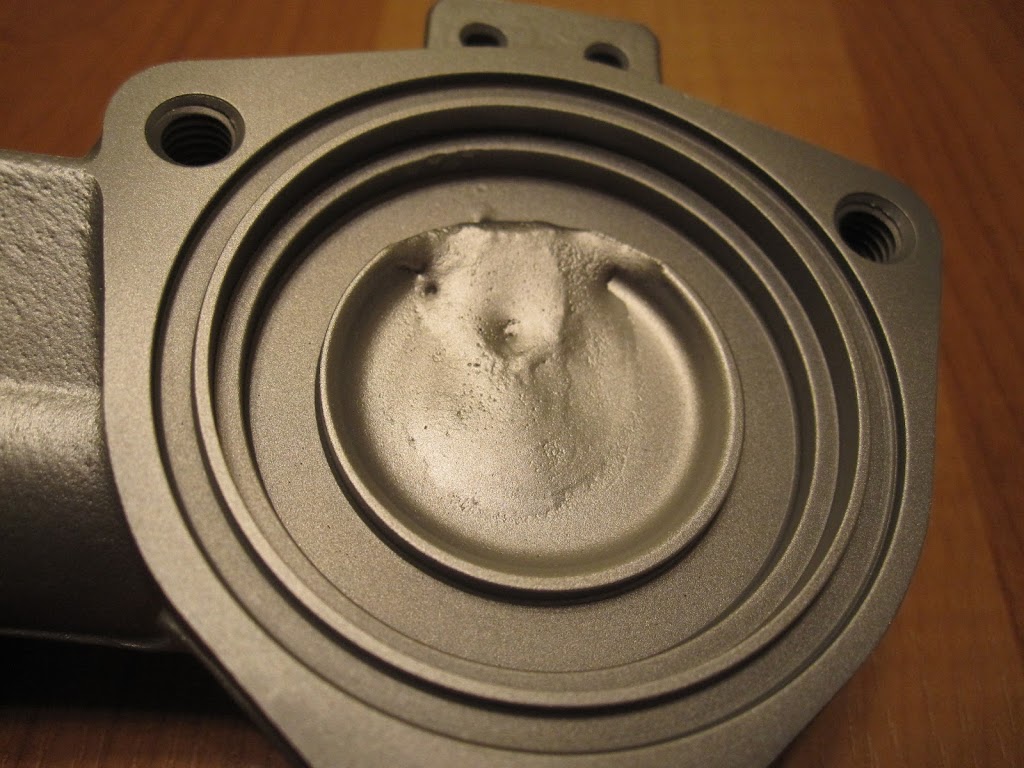
Closer up.
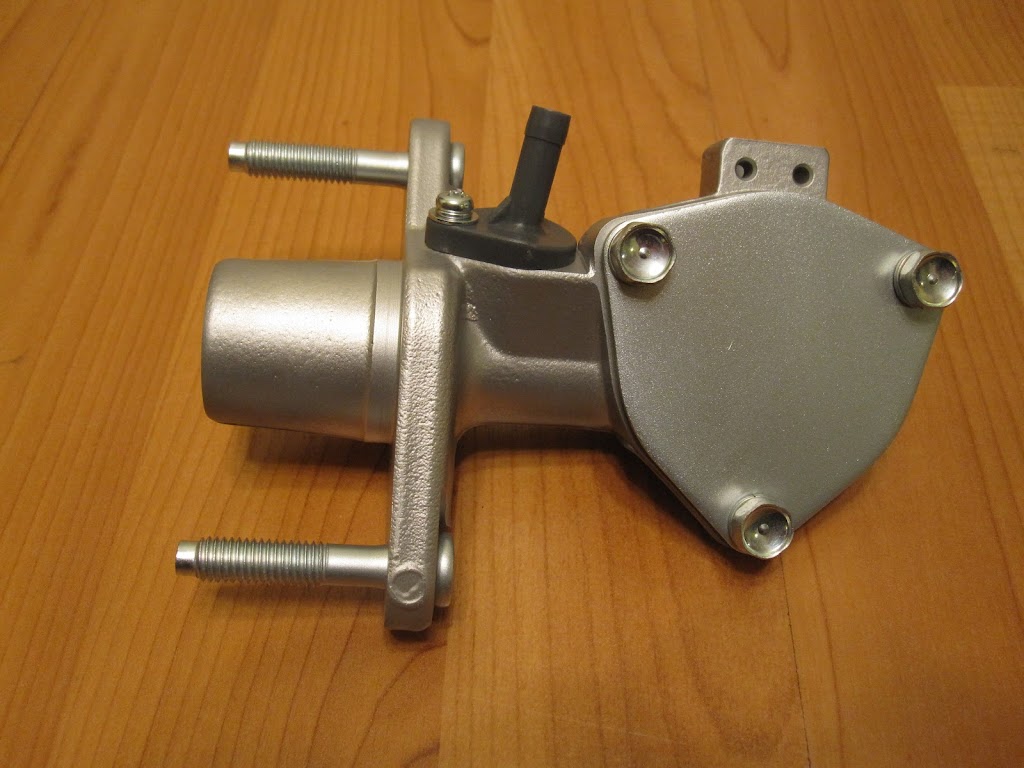
Partly assembled. The cover plate is also bead blasted.
Great install DIY btw!
I plan on making them for the GE8 as well. I have 3 GE8 cores to work with and I should have something ready to ship very soon. Please send me a PM if you any interest in this or any questions.
Here is a link to the CDV discussion on the CR-Z forum:
Clutch Delay Valve - Page 2 - Honda CRZ Forum: Honda CR-Z Hybrid Car Forums
And a few pics for those too lazy to click on the link:
Stock CMC with weld area sanded down.
Welded. Not bad for my first one.
Drilled through to the cylinder.
Bead blasted.
Closer up.
Partly assembled. The cover plate is also bead blasted.
Great install DIY btw!
#9
02-11-2013, 07:47 PM
 I would really research before you try one of those.
#10
02-12-2013, 01:20 PM


Delraco,
When you swapped the pedal pin from the old CMC to the new one, did you also swap the old internal parts to the new one? Or is it just the pedal pin that you swapped out?
Reason I asked is because of this: Hybrid Racing How To: EM1 CMC into 06+ Civic Si - Hybrid Racing
I'm thinking of using one from the GD3 though. 46920-SAA-P03, supercedes P02.
Last edited by onemiglandicho; 02-12-2013 at 01:29 PM.
#11
02-12-2013, 04:22 PM
Just the pedal pin. It's basically an open "ball and socket" kind of joint. With that snap-ring out, it just pulls straight out and drops straight in to the new one.
Great info going on here!
So far the best swap over would probably be the 01-05 civic CMC. My setup works great, but an 01-05 may save you from having to bend the hard line and swap out the pedal pins.
Great info going on here!
So far the best swap over would probably be the 01-05 civic CMC. My setup works great, but an 01-05 may save you from having to bend the hard line and swap out the pedal pins.
#12
02-12-2013, 04:45 PM
^^^ Ok.
Yeah looks like the 01-05 Civic CMC would be best.
I'm just wondering the GD3 CMC would hopefully have the same pedal pin length so that I won't have to swap pedal pins, but wouldn't mind if necessary if it ends up being diff. in length. It also has the reverse reservoir nipple/clutch line.
For those interested to see, go to bernardiparts.com and use the part number I posted above.
Thanks Delraco!
Edit: pic. does not show when using just the p/n. You'll have to select the model (Fit), year (07-08) etc...
Last edited by onemiglandicho; 02-12-2013 at 04:50 PM.


#14
03-27-2013, 09:39 AM

Nice write up! I wish this had been around when I did mine (probably on the same bits of info you found to do yours). I took pictues but never got a write up done. Reinstalling that sucker (I used one from a 97 civic, $10 since rock auto had the top model one on close out) was such a PITA though. That hard line sucked and took forever to get in the right spot. Worth it though!
#15
03-29-2013, 10:13 PM
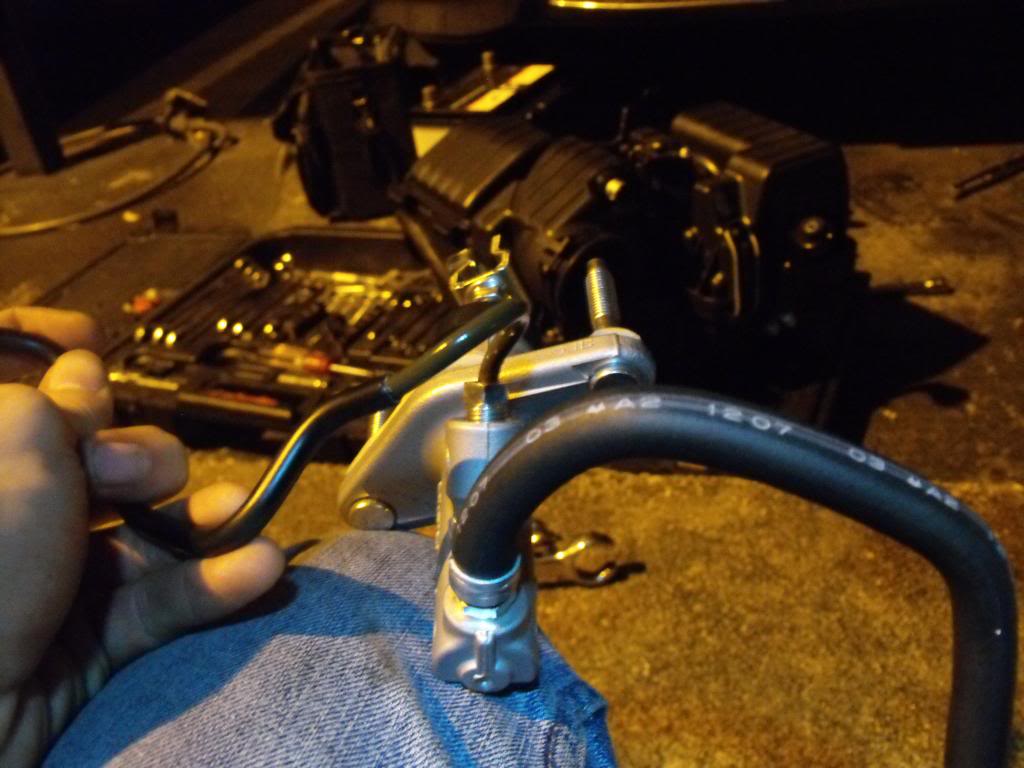
Just wanted to provide these, from my swap.
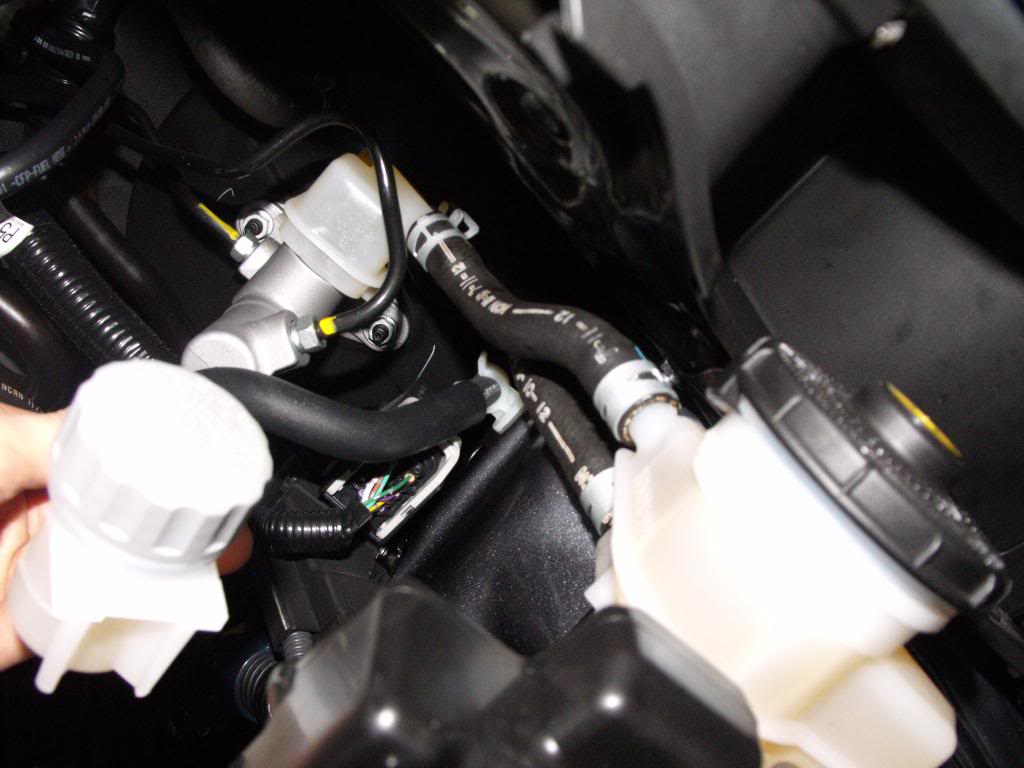
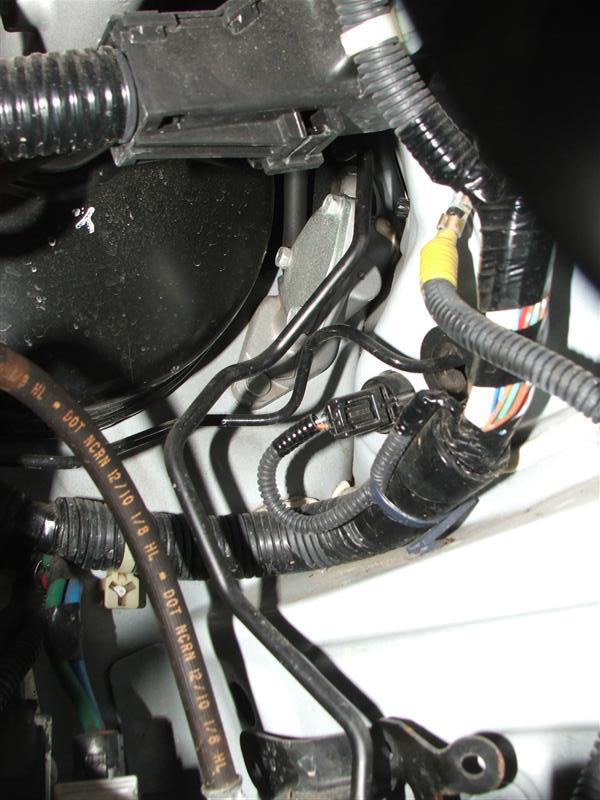
This is the CMC in it's natural habitat. you can see just how smashed up in there it is!
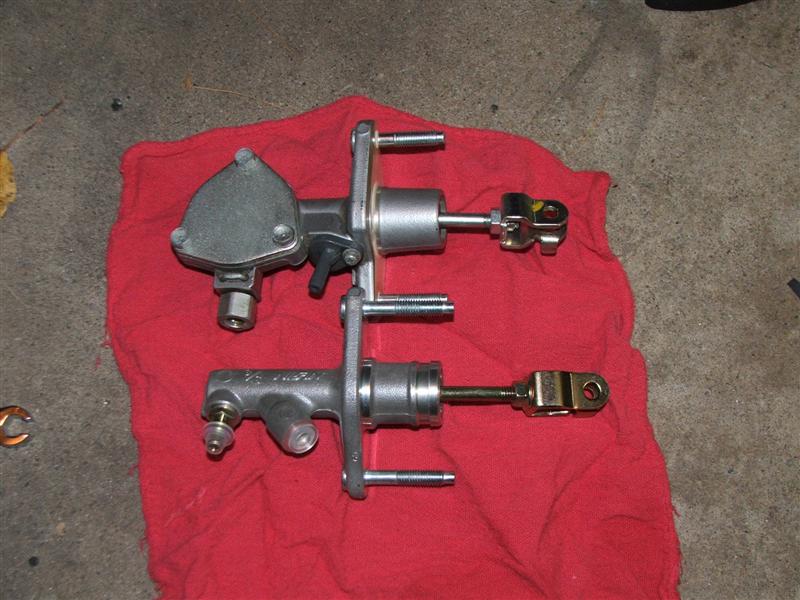
and here is a nice comparison between the stock one and the 97 civic one I used (a Nissin no less!)
This is the CMC in it's natural habitat. you can see just how smashed up in there it is!
and here is a nice comparison between the stock one and the 97 civic one I used (a Nissin no less!)
#16
04-03-2013, 04:09 AM

Thank you for making this thread. My fit is the first car I've driven with a manual transmission, but from time to time it does seem difficult to engage the clutch. After driving around other cars with manual transmissions(WRXs, Civics), I found that they were actually much easier to engage the clutch and drive than my fit. I'm very motivated in trying this modification after reading your DIY. I do have a nice camera, so hopefully I will attempt this in the near future and take pictures along the way.
#18
04-03-2013, 12:53 PM
This is on my list to get done, soon....
I'm probably going to go with the weld/drill-bypass GE8 CMC Item9's been modifying... mainly cause it should be a direct swap, and I don't feel like bending those lines out of the way... with my luck I'll crack one.
Thanks again OP for the detailed pics & DIY!!!!!

I'm probably going to go with the weld/drill-bypass GE8 CMC Item9's been modifying... mainly cause it should be a direct swap, and I don't feel like bending those lines out of the way... with my luck I'll crack one.
Thanks again OP for the detailed pics & DIY!!!!!
#19
04-20-2013, 01:04 PM
Ok guys, just found this out, DO NOT USE THE CMC FROM A GD3. The mounting bolts that goes through the firewall is narrower than the stock GE8 CMC.
#20
04-20-2013, 02:26 PM
Does everything else about them match up? Smaller bolts simply means you can get threaded sleeves that can act sort of like a lugnut, tapered on one side, to center and make the install rigid