
Satellite Radio Install?


Thread Starter
|
Member
Joined: Oct 2008
Posts: 577
From: NJ

Satellite Radio Install?
Just wondering if anyone has done any satellite radio installs in the '09s yet.
I am thinking of getting the XM Delphi XpressRC... just wondering where I should mount it and the antenna.
Two mounting locations - low beside the accessory power socket is one (keeps it out of the way, wires can be hidden in that recessed cubby) or above the center AC vents (much easier access and viewing while driving, but more exposed wires).
For the antenna, I was thinking maybe on the roof on the driver's side just after the hatch, and routing the wires via the hatch and around the sides to hide it away.
Anyone with installs to share?
Member
Joined: Jul 2008
Posts: 55
From: Oxford, Pa
Just wondering if anyone has done any satellite radio installs in the '09s yet.
I am thinking of getting the XM Delphi XpressRC... just wondering where I should mount it and the antenna.
Two mounting locations - low beside the accessory power socket is one (keeps it out of the way, wires can be hidden in that recessed cubby) or above the center AC vents (much easier access and viewing while driving, but more exposed wires).
For the antenna, I was thinking maybe on the roof on the driver's side just after the hatch, and routing the wires via the hatch and around the sides to hide it away.
Anyone with installs to share?
I am thinking of getting the XM Delphi XpressRC... just wondering where I should mount it and the antenna.
Two mounting locations - low beside the accessory power socket is one (keeps it out of the way, wires can be hidden in that recessed cubby) or above the center AC vents (much easier access and viewing while driving, but more exposed wires).
For the antenna, I was thinking maybe on the roof on the driver's side just after the hatch, and routing the wires via the hatch and around the sides to hide it away.
Anyone with installs to share?
Thread Starter
|
Member
Joined: Oct 2008
Posts: 577
From: NJ
Sat radios have a very think wire that's pretty easy to route - its more like 1/16" plus the length of wire provided is pretty long.
I still haven't figured out how to best get in via the hatch... the top part of the rubber weatherseal doesn't seem to want to pop out on the GE8s... if I could find a part of the rubber that I can easily pull off and route the cable under, it would be really nice.
Waiting for the radio to arrive though, once it does I'll have something on how I did it. Trying to get ideas for a really neat install where everything is hidden as much as possible.
Member
Joined: Aug 2008
Posts: 89
From: Richmond, VA
+1
Easily ran the wire under the rubber seal around the hatch, dropped it into a hole that a wire loom used to ender the car. Took out the panels in the hatch and ran the wire to the front under the trim pieces. Once I reached up behind the taillight and was able to grab the wire (I think the cuts on my arm will leave scars) and pull it down into behind the interior panels, it was actually really easy to stuff it under the panels and trim to get it to the front of the car.
Now I just need to find a permanent mount for it.
The crappy power outlet introduces a lot of whine into the audio, so I'm gonna hardwire my XM radio. I just don't know where yet to put it. I have an older Airware, and due to it's large size, my options are limited.
Here's a post I made about it in a great forum for XM related stuff.
New Member
Joined: Oct 2008
Posts: 18
From: Walnut, CA
I installed my Pioneer Inno with the antenna on the dash and the power I hardwired to the car to make it a cleaner installation as well as to keep the accessory plug available. A small detail when hard wiring, be sure that you check whether your unit needs 12v or 5v (or other). Mine was 5v so I could not simply wire it to the accessory power, I had to use the 12v to 5v converter built into the accessory plug unit.
The Inno has a remote which makes this mounting location ideal. It keeps it out of sight for thieves and keeps the dash clean.
The antenna is mounted using the vecro tape that came with the unit, which is why the antenna is not sitting flush to the dash. I may switch this out with regular double sided tape. The wire is routed along the glass and down the side of the dash where the dast and window moulding meet (dark grey to light grey interface).
See pics:
Thread Starter
|
Member
Joined: Oct 2008
Posts: 577
From: NJ
Very nice install - do you have any reception cutouts due to the antenna being mounted inside the car instead of on the exterior roof?
I'm planning to put the radio in the same spot as you have it at. Did you manage to get behind the accessory outlet to hardwire it? What does that involve?
I'm planning to put the radio in the same spot as you have it at. Did you manage to get behind the accessory outlet to hardwire it? What does that involve?
New Member
Joined: Oct 2008
Posts: 18
From: Walnut, CA
I do have reception cut outs, but its not a result of where the antenna is installed, rather there is an area near my house that just does not like XM no matter where the antenna is placed. Other than that I have no drop outs.
Yes getting behind the accessory outlet was easier then I realized. It requires removing the panel above the accessory outlet then the panel that has the accessory outlet. These are easy to pry/pull out of place, just use care when prying so as to not scratch the plastic. It did require a fair amount of force which made me nervous but you will be able to feel if it is giving as you pull it out.
The area behind the accessory outlet is very tight and not a lot of room to stash your 12v-5v converter but it is possible. I tapped the 12v power with some of these:
Wire Tap-In Squeeze Connectors (10-Pack) - RadioShack.com
I hope that helps.

Thread Starter
|
Member
Joined: Oct 2008
Posts: 577
From: NJ
I was thinking of just using one of those cigarette lighter taps - two wires that tap in and a power socket that I can put the original adapter into. Just stuff that into the overhead area (behind the remove first cover). There is a bit of space in that area behind the remove first cover, right?
Thread Starter
|
Member
Joined: Oct 2008
Posts: 577
From: NJ
Ok I just figured out how to remove the two covers. I got it the wrong side I think with the top undercover... I popped it from the front side prying it but I think the right way is the pull the back part downwards.
The other cover I couldn't budge - I tried pulling it from behind way back in the recessed area, got the back free, but the front part wasn't moving one bit. The secret is that there are two tabs one on each side of the front - you have to fiddle those tabs from the footwells, my fingers could get in there from the footwell area, and once I found those tabs, it popped out really easy.
I don't have my radio yet but I'm not putting the panels back in till I'm done with the install. Don't need the socket right now anyways. There is a bit of space to work back there but it will be pretty tight to work on the existing wire harness to get the taps in. There's a bit of room beside the outlet to hide away a socket which is what I plan to do.
Thread Starter
|
Member
Joined: Oct 2008
Posts: 577
From: NJ
Got it installed. 
The XM Delphi XpressRC receiver I'm going to install...

This is the under cover trim piece in the center console, you remove this first. I removed it the wrong way, prying from the front. You want to pull it downwards from the back to do it right - but the front clips are strong enough so nothing broke.
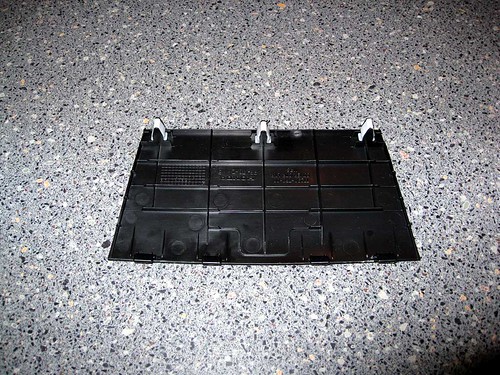
This is the lower part where the accessory socket is. I tried forever to get it out until I figured out how - at first it just wouldn't budge. You see the two side tabs - they need to be pushed, you have to reach your fingers from the sides in the driver and passenger footwell and release it by feel, then it pops out really easy.

Now that the covers are off, use inline taps to get a second accessory socket to power your radio. Notice the antenna wiring coming out the top area, you want the antenna out of the bigger opening, and use the smaller opening for the power (depends on where it is on your set though). Also make sure your inline taps work right - I tested it and the first attempt was a no go - it didn't tap the wire of the extra socket I added, I had to pull them out and redo (they do snap open, so its not a total disaster). Test it all first before proceeding to cover things up.
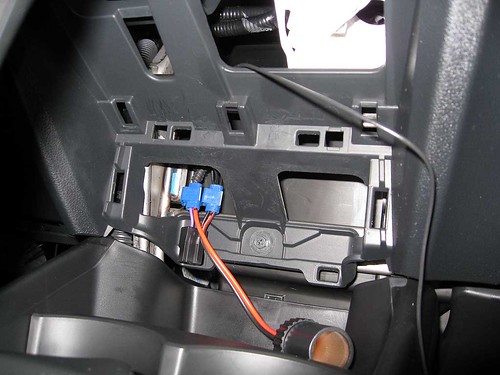
Now I hid the cigarette socket in the opening area on behind the top lower cover, and used a zip tie so everything is snug and wouldn't create rattles. You can also see the power cable hanging now for my radio that comes for the cigarette adapter.

Now I put the covers back and get the radio into place. I did mount the mount before installing the covers back. Note I didn't hardwire my aux, chose to use a retractable aux wire, this way the aux wire can be used with some other device if I have a passenger with their iPod or something else they wanted to hook up. You can run the aux power partially hidden if you wanted to (involved pulling the head unit, still part of it will show).
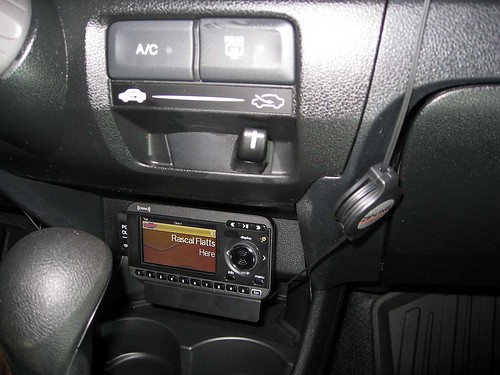
Another view from the driver's side...

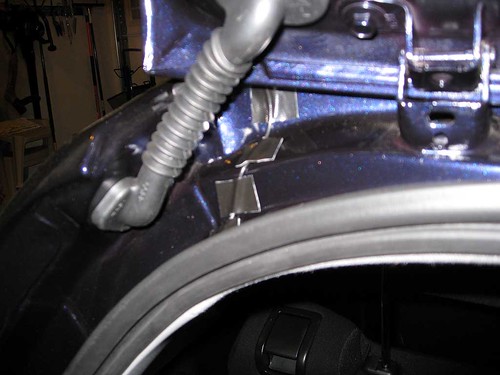
Oh and the antenna placement, I chose the back by the hatch. There is a rubber thing that adjusts the antenna wire so it goes straight down, so I used that, and kept the antenna really close to the hatch so no wire shows.
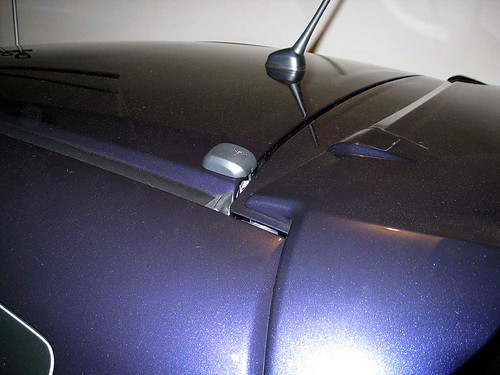
And I used some Gorilla Tape to tape down the wiring that is exposed. The rest of it is tucked into the trim, running into the spare tire area under trim, into the back seat and along the side trim. All hidden away.
That's it. Bigger pictures available if you want to go here..
2009 Honda Fit - Satellite Radio Install - a set on Flickr
The XM Delphi XpressRC receiver I'm going to install...
This is the under cover trim piece in the center console, you remove this first. I removed it the wrong way, prying from the front. You want to pull it downwards from the back to do it right - but the front clips are strong enough so nothing broke.
This is the lower part where the accessory socket is. I tried forever to get it out until I figured out how - at first it just wouldn't budge. You see the two side tabs - they need to be pushed, you have to reach your fingers from the sides in the driver and passenger footwell and release it by feel, then it pops out really easy.
Now that the covers are off, use inline taps to get a second accessory socket to power your radio. Notice the antenna wiring coming out the top area, you want the antenna out of the bigger opening, and use the smaller opening for the power (depends on where it is on your set though). Also make sure your inline taps work right - I tested it and the first attempt was a no go - it didn't tap the wire of the extra socket I added, I had to pull them out and redo (they do snap open, so its not a total disaster). Test it all first before proceeding to cover things up.
Now I hid the cigarette socket in the opening area on behind the top lower cover, and used a zip tie so everything is snug and wouldn't create rattles. You can also see the power cable hanging now for my radio that comes for the cigarette adapter.
Now I put the covers back and get the radio into place. I did mount the mount before installing the covers back. Note I didn't hardwire my aux, chose to use a retractable aux wire, this way the aux wire can be used with some other device if I have a passenger with their iPod or something else they wanted to hook up. You can run the aux power partially hidden if you wanted to (involved pulling the head unit, still part of it will show).
Another view from the driver's side...
Oh and the antenna placement, I chose the back by the hatch. There is a rubber thing that adjusts the antenna wire so it goes straight down, so I used that, and kept the antenna really close to the hatch so no wire shows.
And I used some Gorilla Tape to tape down the wiring that is exposed. The rest of it is tucked into the trim, running into the spare tire area under trim, into the back seat and along the side trim. All hidden away.
That's it. Bigger pictures available if you want to go here..
2009 Honda Fit - Satellite Radio Install - a set on Flickr
Member
Joined: Aug 2008
Posts: 89
From: Richmond, VA
Those look fantastic!

Great place for the install.
This is the radio I currently own.


Here is a side by side comparison.
")
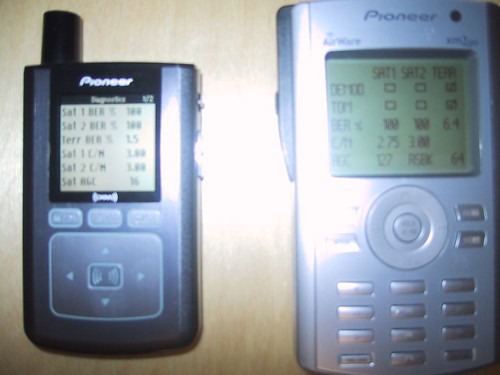
I had little intention of shelling out money to replace it, but after seeing your sweet install, I just may.
Last edited by FyrFytr; Nov 16, 2008 at 09:09 PM.
Thread Starter
|
Member
Joined: Oct 2008
Posts: 577
From: NJ
The XpressRC does come with a nice remote too... however it doesn't store nicely into the long slim box by the brake, a bit too long. So I ended up storing it into one of the center console cupholders, since they are pretty unusable anyways given their location. You can hide most of the aux cable too if you wanted... to bad there is no way to tap behind the aux port since that's actually the head unit itself. If you did that, almost nothing will show except for the short bit of the aux cable (unless you have the Navi, then, well, its right next to the XM unit, so no worries there).
I like the new receivers - tried it in a store first too. Control layout is very intuitive, nice to be able to see more information... but its a good thing we have aux ports. The FM modulator in it is absolute junk with almost no range... my old Roady 2 had a much better modulator. I do think the color screen is nice too.
Almost went for a Streetpilot 7200 (one of the few XM capable GPS units around), would have installed that on the dash, but decided to save and just get the XpressRC. I can still use my reliable Tomtom One when needed, and this way there won't be something on the dash attracting someone to break in since I only have the GPS hooked up when I really need it.
Member
Joined: Aug 2008
Posts: 89
From: Richmond, VA
I wish I knew why the aux. input jack was mounted on the radio face in the non-navi models, and down next to the power outlet in the navi model.
Yo Honda! The aux jack mounted down low, next to the power outlet, is what 99% of us prefer. WTF over?
Yo Honda!
The aux jack mounted down low, next to the power outlet, is what 99% of us prefer. WTF over?