
DIY - get access to spark plug 2009 sport

Thread Starter
|
Member
Joined: Jul 2009
Posts: 126
From: Indiana

DIY - get access to spark plug 2009 sport
First of all, look at the lowering DIY:https://www.fitfreak.net/forums/2nd-...r-ge8-fit.html
The difference is that you don't need to remove the wiper motor mount, but you do need to remove the black plate.
What you need to do is remove the 3 bolts attached to the wiper harness(10mm) and the black panel and disconnect the power connector temporarily. I copied the picture from DIY above. My pictures are pretty bad as I had to use a cheapy phone camera.
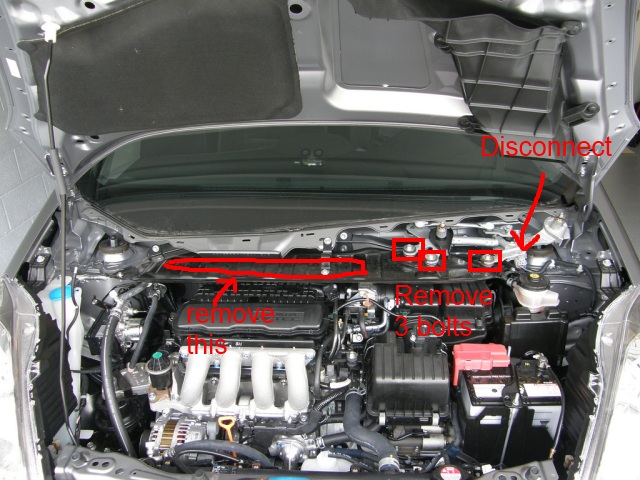
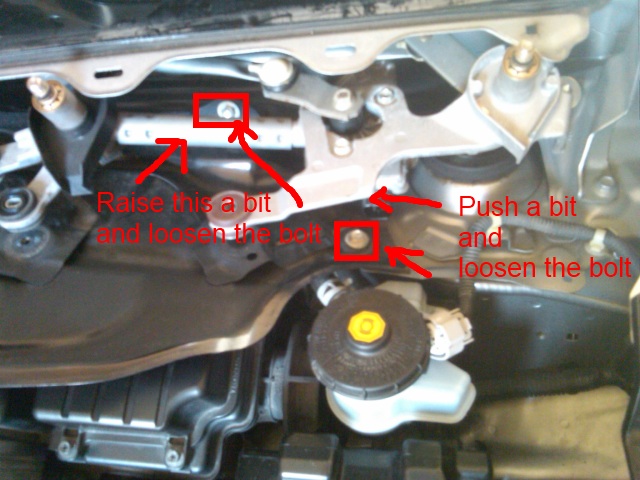
Once done, you remove the 10mm bolts around the black panel. The difficult part is the two bolts hidden by the wiper harness. You basically push the harness out of the way to remove the bolt
Once all the bolts are removed, you can pull up on the black panel and it will be released. (BTW, it is being held to the car by double face tape/sponge )
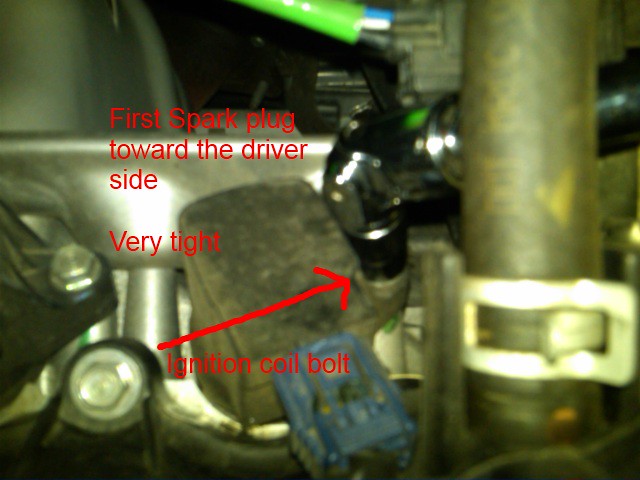
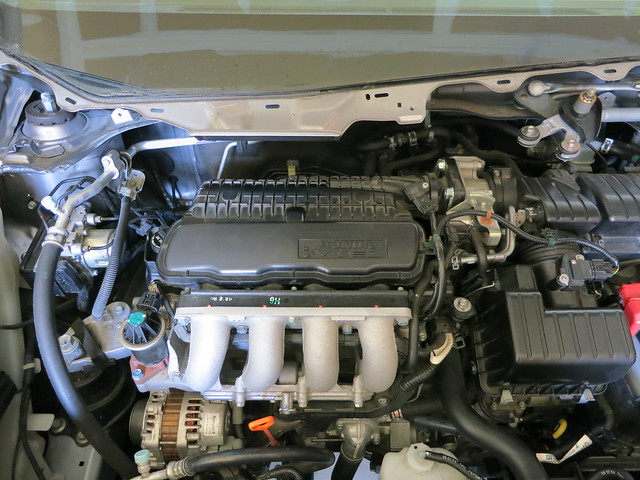
Now you can get access to the spark plugs toward the firewall. All the coils are relatively easy to access, except for the right most coil next to the driver side. See picture below. It's rather tight. ??? Any thoughts on how to get easy access to this first coil/spark plug?
Manual says Fit will accept these two spark plugs. I haven't pulled one out yet.
NGK: IZFR6K13
DENSO: SKJ20DR-M13
What I learned.
When you assemble, the 2 small end plastic that attach to the cowl should be put in place LAST with the hood closed. The main cowl should be pushed in toward the windshield and then have the 7 clips pushed into the holes from the top. If you push in the 7 clips first, you will see a gap between the cowl and the black plate. I damaged couple "tabs" on the front of the cowl, not the clips toward the windshield side by forcing it a bit, but it's okay. If you push in and push down on the main cowl, it will firmly "click" in and stay in place.
The difference is that you don't need to remove the wiper motor mount, but you do need to remove the black plate.
What you need to do is remove the 3 bolts attached to the wiper harness(10mm) and the black panel and disconnect the power connector temporarily. I copied the picture from DIY above. My pictures are pretty bad as I had to use a cheapy phone camera.
Once done, you remove the 10mm bolts around the black panel. The difficult part is the two bolts hidden by the wiper harness. You basically push the harness out of the way to remove the bolt
Once all the bolts are removed, you can pull up on the black panel and it will be released. (BTW, it is being held to the car by double face tape/sponge )
Now you can get access to the spark plugs toward the firewall. All the coils are relatively easy to access, except for the right most coil next to the driver side. See picture below. It's rather tight. ??? Any thoughts on how to get easy access to this first coil/spark plug?
Manual says Fit will accept these two spark plugs. I haven't pulled one out yet.
NGK: IZFR6K13
DENSO: SKJ20DR-M13
What I learned.
When you assemble, the 2 small end plastic that attach to the cowl should be put in place LAST with the hood closed. The main cowl should be pushed in toward the windshield and then have the 7 clips pushed into the holes from the top. If you push in the 7 clips first, you will see a gap between the cowl and the black plate. I damaged couple "tabs" on the front of the cowl, not the clips toward the windshield side by forcing it a bit, but it's okay. If you push in and push down on the main cowl, it will firmly "click" in and stay in place.
Last edited by CasualFitOwner; May 10, 2013 at 06:56 PM. Reason: changed text to url
Thread Starter
|
Member
Joined: Jul 2009
Posts: 126
From: Indiana
I pulled the spark plugs today.
Tools used:
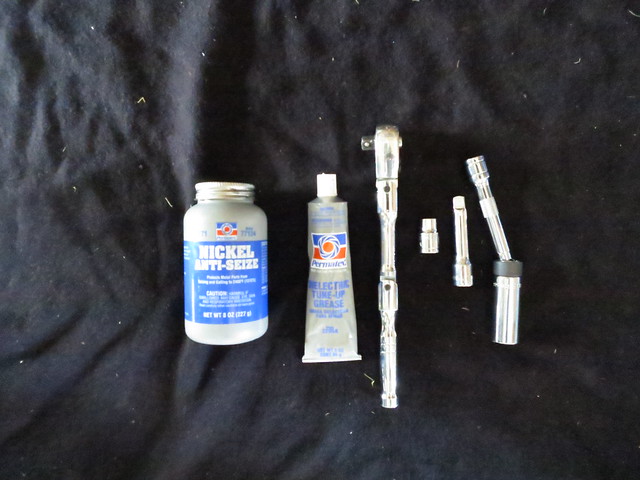
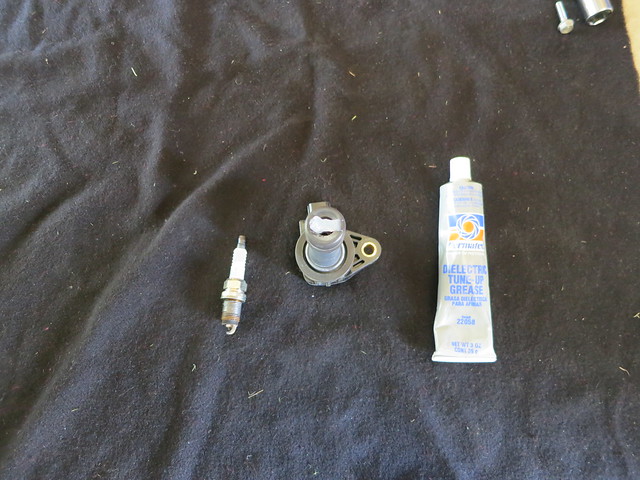
Anti seize, dialectic grease, ratchet, 10mm socket, magnet swivel 5/8 spark plug socket. (Gear Wrench 5/8" x 6" )
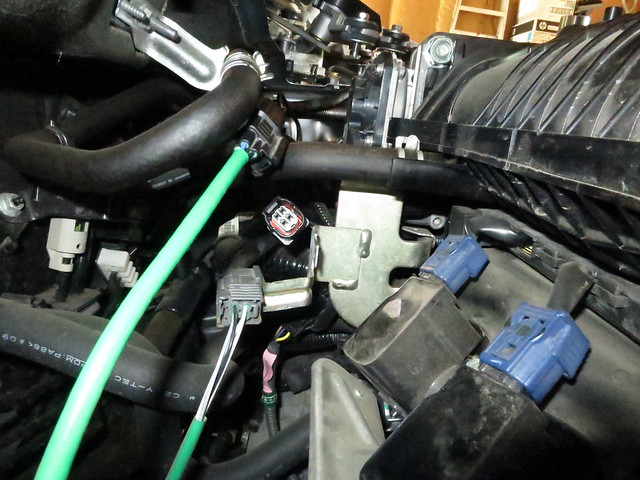
This is how the engine bay looks with the blackboard removed
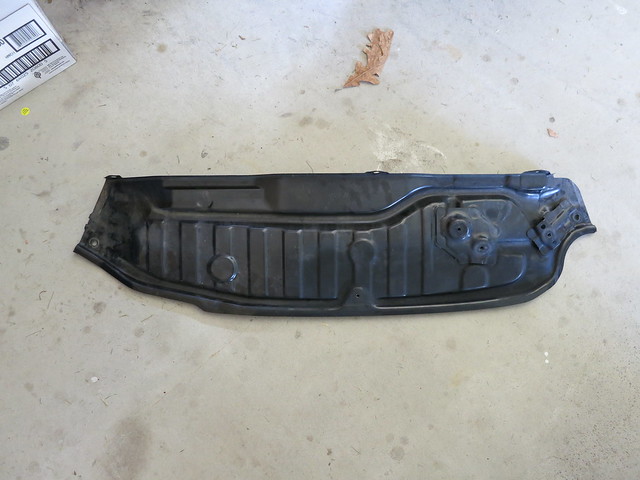
The blackboard
It's easier to work from the passenger side
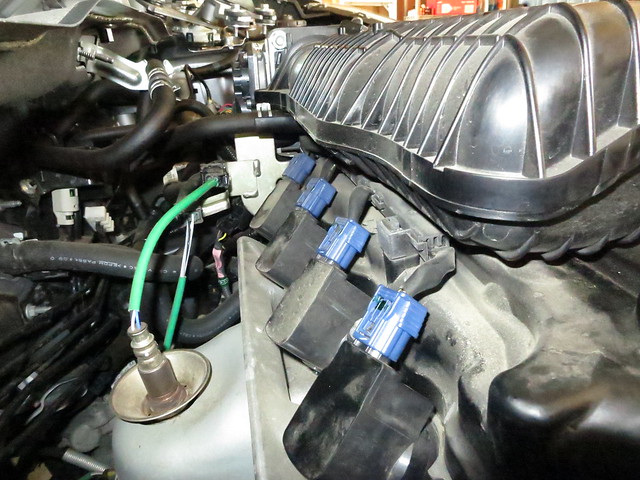
The first 3 from the passenger side are easy. Remove the wire by pressing on the top of the blue connector and pull. It should come off easily. Find the bolt holding the coil (it's on the other side from the picture). Using 10mm socket break it and use hand to pull it out. Pull out the coil. Use spark plug socket to break the plug and hand loosen. The spark plug was VERY tightly held. The thread looked brown( whether due to rust or because the thread was copper based? don't know). Anyway, I put some anti seize (high temp anti seize - either nickel or copper based) on the thread and dialectic grease on the coil. See below. The spark plug is Denso SKJ20DR-M13. The gap was still 13 mm and the plug look OK.
Put back the spark plug, hand tighten, and use ratchet to tighten until resistance and turn about 1/16 to 1/8 turn. Put on the coil, connect the blue connector, and thread the coil bolt into the hole by feel and tighten.
When working on the 4th plug, you don't have much room, so I removed the oxygen sensor connector temporarily. See before:
and AFTER
For the 4th plug, due to lack of space, you cannot pull out the blue connector until the coil bolt is removed and then you turn the coil a bit to get some space to pull out the connector. The rest is easy.
Misc Info.
I found out that the shop that replaced my windshield literally destroyed about 7 of 9 plastic clips that held the cowl and one of the white clip that holds the little cowl on the edge of the window. If you plan to remove the cowl for the first time, I suggest you buy some spare BEFORE you start the job.
90602-TK6-A00 (white clip that holds the little cowl piece on the edge of windshield) There are total of two clips
90602-TA0-003 (green/blue clip that holds the main cowl) There are 9 clips
Tools used:
Anti seize, dialectic grease, ratchet, 10mm socket, magnet swivel 5/8 spark plug socket. (Gear Wrench 5/8" x 6" )
This is how the engine bay looks with the blackboard removed
The blackboard
It's easier to work from the passenger side
The first 3 from the passenger side are easy. Remove the wire by pressing on the top of the blue connector and pull. It should come off easily. Find the bolt holding the coil (it's on the other side from the picture). Using 10mm socket break it and use hand to pull it out. Pull out the coil. Use spark plug socket to break the plug and hand loosen. The spark plug was VERY tightly held. The thread looked brown( whether due to rust or because the thread was copper based? don't know). Anyway, I put some anti seize (high temp anti seize - either nickel or copper based) on the thread and dialectic grease on the coil. See below. The spark plug is Denso SKJ20DR-M13. The gap was still 13 mm and the plug look OK.
Put back the spark plug, hand tighten, and use ratchet to tighten until resistance and turn about 1/16 to 1/8 turn. Put on the coil, connect the blue connector, and thread the coil bolt into the hole by feel and tighten.
When working on the 4th plug, you don't have much room, so I removed the oxygen sensor connector temporarily. See before:
and AFTER
For the 4th plug, due to lack of space, you cannot pull out the blue connector until the coil bolt is removed and then you turn the coil a bit to get some space to pull out the connector. The rest is easy.
Misc Info.
I found out that the shop that replaced my windshield literally destroyed about 7 of 9 plastic clips that held the cowl and one of the white clip that holds the little cowl on the edge of the window. If you plan to remove the cowl for the first time, I suggest you buy some spare BEFORE you start the job.
90602-TK6-A00 (white clip that holds the little cowl piece on the edge of windshield) There are total of two clips
90602-TA0-003 (green/blue clip that holds the main cowl) There are 9 clips
Last edited by CasualFitOwner; Apr 1, 2017 at 11:57 PM. Reason: fix picture link

Great job- VERY nice write-up, and you are the first person that I have seen to use a magnetic spark plug socket in a DIY post (besides me). The o-ring sockets that are supposed to keep plugs from falling out always were worthless as soon as the o-ring gets any grease on it. Magnetic sockets now make the o-ring type completely obsolete.
A lot of your details don't even show up in the Honda Fit Repair Manual, and you have to learn the tricks with the tabs by experience (which means breaking some to learn how not to do that in the future).
A lot of GE owners who had the valve spring warranty repair done at dealerships went home with broken cowl tabs because the Honda mechanics didn't even know the technique.
Last edited by Triskelion; Sep 8, 2012 at 02:00 PM.

 Nice THanks for Diy


Member
Joined: Jun 2014
Posts: 23
From: Pittsburgh, PA
Nice DIY. I'm bummed to see that you have to remove the metal "cowl shelf" to access the plugs and coils. It's the same way on my 08 Si, and while not difficult, it's simply a pain to have to remove all the little pieces to gain access to the coils/plugs.

New Member
Joined: Aug 2015
Posts: 2
From: USA
Hey, necro posting, I know, but - I really wanted to thank CasualFitOwner for the DIY. It really made changing the plugs a lot easier. I thought I was going to have to pull the intake manifold and throttle body.
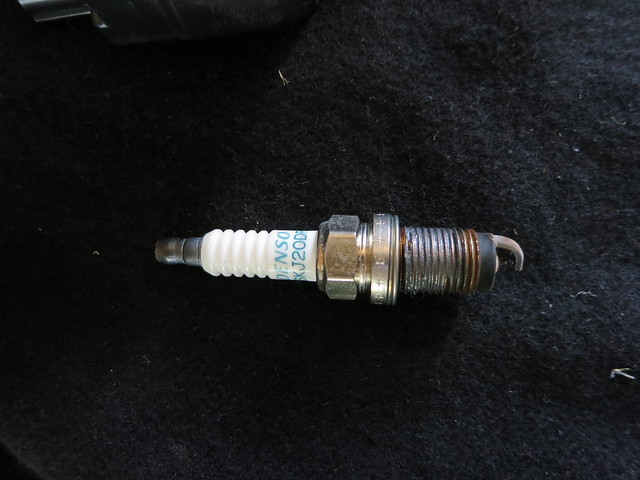
At 140000 miles, it was time to swap those plugs. I also found 2 plugs that were not tight at all, and one of those was discolored from blowby! So, it was a good thing I checked 'em.
You can see from the pic that the plugs (this is the blowby plug) are pretty worn.

At 140000 miles, it was time to swap those plugs. I also found 2 plugs that were not tight at all, and one of those was discolored from blowby! So, it was a good thing I checked 'em.
You can see from the pic that the plugs (this is the blowby plug) are pretty worn.
New Member
Joined: Sep 2015
Posts: 12
From: Melbourne, Australia
+1 for this writeup. I changed the plugs on my GE8 today and everything went smoothly.
I didn't pay close attention to the part about disconnecting the wiper assembly, and I ended up leaving it attached to the black metal panel and removing both together. There is a single bolt at the far end holding the wiper assembly to the chassis which required a wobble bar to get to but it wasn't a problem.
Also the big plastic cowling is one piece on my car, not two like in the writeup. I don't know if that's because my car is right hand drive...?
Member
Joined: Sep 2013
Posts: 42
From: Northeast FL
Thanks CasualFitOwner - nice DIY. I could have figured it out myself, but your instructions let me know what to expect and how much time to put on my calendar.
My wife was out of town today, so I spent the afternoon replacing the spark plugs on her 2009 Fit Sport. 140,593 miles on the original NGK plugs and they looked great. Never in my life did I have to take so much off the car just to gain access to the plugs. Should have been a 20 minute job, not a 3-1/2 hour project. Thanks Honda.
I did learn something VERY IMPORTANT. My car has an external filter for the automatic transmission fluid. I just spent 30 minutes looking through the owner's manual and can't find a reference to it anywhere. I'll be replacing it soon. Thanks again Honda!

Member
Joined: Jul 2015
Posts: 38
From: British Columbia
Planning on adjusting the valves and replacing the sparks and I think I will try removing the cowl as your diy describes. Not sure if I will need to remove the throttle body, air filter, etc as has been described in diys for valve adjustment but that seems like a lot of work. Cheers and thanks for the write up.


