NEW Side Moldings from Zeta Products!!!!! DIY w/photos
#1
Join Date: Sep 2006
Location: Boulder Creek, CA, USA
Posts: 3,288
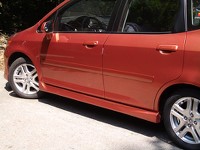
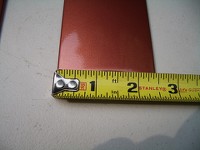
BRAND NEW, WIDE Fit Moldings from Zeta Products.
Available in ALL 07-08 Honda Fit colors. Each molding set is made to order, and ships in three days (that's how long it takes to paint in YOUR color). This new product is unusual in several ways:
Most moldings are molded from soft, flexible polyurethane or PVC. They don't prevent impact from denting the metal of the door underneath. Zeta's new moldings are made of ABS plastic that has high structural strength. The advantage is that impact from car doors, shopping carts, etc., is radiated and absorbed over a large area. This prevents dents. EXTREMELY strong 3M foam-core double faced tape is used to install the moldings. Same stuff that is used on the OEM Honda and Mugen window visors. Because of the strong material and mounting adhesive, these moldings carry a 5-YEAR, 50,000 MILE WARRANTY!!
Click on the thumbnails to enlarge photos---


DIY Installation Instructions
This is how I installed the prototype moldings. I am not a professional at this kind of thing, but I am very detailed and careful. You only get one chance to do this job right. Patience and accuracy really count. Since this is a completely new product, some changes may come up as improvements in the future. So these instructions may be edited later to incorporate product improvements. If you follow my instructions, your results will be the same as my photos so don't be scared. It is very easy.
Your moldings are shipped in a massive, strong cardboard cylinder- looks like a rocket launcher. Inside, the moldings are surrounded by an elastic knit giant sock about 6 feet long. Un-knot the sock to carefully slide out the molding pieces. KEEP THE SOCK- YOU WILL USE IT AGAIN LATER.
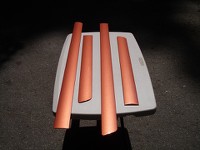
Tools and Supplies needed:
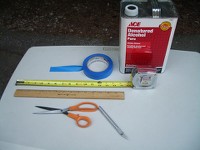
You will need some denatured alcohol (not necessarily a gallon- a pint will do from Ace Hardware or any local hardware store), GOOD scissors, a lockable tape measure, Scotch Blue Painter's Masking Tape (1" wide), an X-Acto Knife, and either a wood or a plastic ruler. Not pictured, but necessary- a clean shop rag or a clean terry cloth washrag.
1. Thoroughly wash and dry all doors (you may as well wash & dry the whole car, but at least wash the doors to remove all dust, grit and pollen).
2. Pull the tape out of your tape measure, and lock it with about 18" exposed. Make sure that your blue masking tape has the end cut squarely at 90 degrees (cut straight across the end). Stick the cut end exactly at the 13" mark on the tape measure, pull the roll along the 13" length, sticking it down on the metal tape, and bring your scissors right up against the end of the tape measure and cut the blue masking tape exactly 13" long. Stick that piece temporarily on your left outside mirror, and repeat the process for the right side. Now cut two pieces of masking tape exactly 14" long, and stick them temporarily on the door handles of both rear doors.
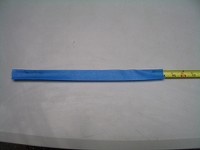
3. Open the front doors, and stick the 13" tape pieces by aligning the bottom of the tape with the very bottom edge of the door, and stick the tape straight up on the door surface. Get the bottom of the tape as close to the front edge of the door as you can, but be sure that the tape end is flush with the bottom edge of the door. Do the same with the 14" tapes on the rear doors. Bottom end of the tape exactly flush with the bottom of the door and as close to the back edge of the door as possible. Like this:
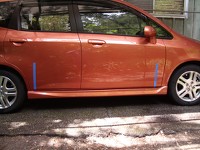
4. Lay your ruler across the tops of the front and back tape uprights, top edge of the ruler flush with the top edge of the tape like the top of a letter "T", and put a small piece of tape along the top edge of the ruler on the fender next to the edge of the door. This step is not necessary if you have a helper, but is necessary if you are working alone.
Now, take the roll of tape, pull out 3-4", line up the free end with the piece of tape on the fender and stick the free end down. Now pull the roll along the side of the car (keeping it away from the car for now) and keep a lot of tension on the tape as you pull it along to keep it straight without any slack. The front of the tape should be exactly flush with the top edge of the forward upright, and as you pull, the tape should wind up exactly flush with the top edge of the rear upright. Remember, the BOTTOM edge of the long horizontal strip is positioned along the top edge of the front and back upright. It becomes the guideline for the TOP edge of your moldings.
Use the small piece of tape on the rear fender as an alignment guide, and when the long tape is straight and flush with the tops of the uprights, stick down the rear end, tear the roll away, and smooth the tape against the doors along the whole length.
The bottom edge of the tape across the car is the alignment guide for the top edge of your moldings.
5. With your fingernail, pry loose the top edge of the upright pieces of tape just under the bottom edge or your long horizontal guides. Pull the uprights away for about half their length. Hold your ruler under the non-sticky paper side of the tape, line up the free end that you pulled lose at exactly the 3 1/2" mark on the ruler, lay your scissors against the end of the ruler, and cut off exactly 3 12" of the upright and stick it back down against the door. Do the same with the other upright.
Now use the roll of tape to lay down a horizontal guideline for the bottom edge of your moldings. Make sure that the horizontal tape is exactly flush with the top edges of the uprights. You will have an exact 2 1/2" window between the horizontal guides for your 2 1/2" wide moldings.
6. For each of the four molding pieces, tear off a 3-4" long piece of masking tape, and wind it backwards (sticky side out) into little tube about the diameter of a cigarette or a felt tip pen. Stick these sticky tubes vertically on each end of the BACK SIDE of the moldings. Carefully stick the moldings inside the masking tape windows on the side of the car. Be sure to line up the front, wedge cut vertical edges of the rear moldings precisely with the vertical edge of the door. Do the same with the rear vertical edge of the molding- make it exactly flush with the rear edge of the door. Now tear off about 4" of masking tape, and lay the strip flush with the angled ends of each piece of molding. This makes a complete box outline of the outer edges of all the molding pieces.
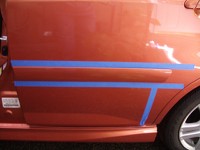
Now remove the moldings and set them aside face down with the adhesive side up.

7. SURFACE PREPARATION:
Wet your shop rag or wash cloth with the denatured alcohol thoroughly, then wring it out. You don't want alcohol running all over the rest of your door surface. Carefully wash all of the paint within th taped box outline of your moldings. If alcohol gets on the tape, it won't do any harm and will dry immediately.
Whatever "magic" properties make you buy your brand of wax or polish, you don't want ANY of those "magic" properties to prevent the bonding of your moldings. That's why I suggest denatured alcohol, instead of the supplied Isopropyl alcohol packets that come with your moldings. It works better to remove ALL wax, polish oil, fingerprints, etc.
This is the first step of the surface prep. Your moldings are supplied with a "pen applicator" final surface prep solvent. It looks like a short felt-tip pen marker, and is a thin glass vial inside of a cardboard cylinder. You crush it with your fingers on the "Crush Here" mark, and that releases the solvent from the vial and allows it to soak the felt tip. VERY QUICKLY, use the felt tip applicator to rub a 1/2" wide area all around the inside of the tape boundary- top, bottom, and ends, on ALL DOORS, BOTH SIDES of the car. The solvent in the prep pen evaporates very quickly, so use it on the doors without wasting any time.
Surface prep is done.
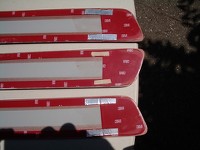
8. This view shows you the adhesive side of the moldings. The foam-core adhesive tape has a red plastic protective liner. This pic shows one molding with a paper tape bridging the cut ends of the plastic liner pieces, and it shows two moldings where I replaced the paper tape bridge with stronger stainless steel tape. You have to remove the red liner to stick the moldings to the doors. The tape bridges at the joints between the liner strips are meant to allow the liner to be removed as all one piece- just keep pulling on the liner and it is supposed to keep peeling off.

Unfortunately, for the time being, the red liner just tears apart at each of the joints. The paper joint reinforcement tape does not work, and my stainless steel tape did not work either. So, there are two ways that this can be solved:
One way is to remove ALL of the red liner before you begin to stick the molding to your car. If you have very steady hands and a lot of confidence, you'll probably be OK. I would rather make mistakes impossible. This is how I did that:
The molding adhesive strips are in the shape of a tall letter "U" with an open end and a closed end. The closed end also has a square-shaped piece of adhesive that fills the space between the strips so that the closed ends are securely glued down.
9. Start with the REAR molding piece FIRST, either side of the car- it doesn't matter. Hold the molding up against the car and make sure you have it oriented the way you want it. The rear end is angled, and the front end has a sharp taper, like a chisel blade. The taper allows the molding to pass behind the rear edge of the front door when you open only the back door. Now turn the molding face down across your leg, and with your fingernail or X-Acto knive, start to peel the liner away from the top adhesive strip. Peel away about 3" of liner, and pull the free end up and over the top edge of the molding.
Now hold the molding up to the door and align the BOTTOM of the molding with the BOTTOM tape guide, holding the molding with the exposed adhesive slanted toward you and away from the door. At the same time, lay the fingers of your hand closest to the edge of the door against the door edge, and slowly tilt the molding along the inside of your fingers until the molding almost touches the door. When you are satisfied that the sharp, chisel edge of the molding is flush (NOT overlapping) with the edge of the door, making sure that the free end of the liner is hanging over the top edge of the molding toward you, press the molding firmly against the door. If the rest of the molding is aligned straight along the bottom edge of the top tape guide, great. If not, pull back a little on the molding to loosen the adhesive slightly, and either raise or lower the molding so that it is straight and follows the bottom line of the upper tape guide.
Pull out some more of the liner and push the newly exposed adhesive against the door. When about one-half of the top liner has bee pulled away, stop pulling.
10. Pull the back end (the unstuck end) of the molding away with as little force as possible, and reach in with your X-Acto knife blade. With the knife point, hook an edge of the large square patch of liner, and pull the liner completely off the adhesive tape. Also hook the knife into the liner of the bottom strip of adhesive tape, and pull it away and DOWN so that you have about 2" of the BOTTOM liner hanging down from the molding. Now, while keeping the unstuck end of the molding slightly away from the door, pull on what's left of the upper liner and stick the rest of the back end of the molding to the door. Then slowly pull the bottom liner down as you continue to press the molding against the door until all of the liner is pulled out, and the molding is stuck down everywhere.
That packing "sock" I told you to save? Wad it up and use it to rub all over the molding with pressure to ensure that all of the adhesive is completely stuck to the door.
11. Repeat this process with the front molding. Be very careful to exactly align the front molding with the tape guidelines so that the front and back moldings are exactly on the same line and match perfectly. Also be sure to line up the back edge of the front molding with the back edge of the door. Do not overlap the door edge.

That's it people. Wonderful quality, great warranty, and installation is easy but requires care and patience. Visit Zeta Products and order RIGHT NOW! You won't regret it.
Dave
Last edited by manxman; 07-26-2008 at 01:16 PM.
#3
Good stuff!
Personally I am against door moldings in general since they look like an after thought on most cars.
These wide one's look thousand times better than OEM thin moldings. Fit doors are much "taller" from bottom door edge to the window just screaming for wider door moldings to match them. These also blend a lot better with the car itself!
Good find Angelo!
Excellent write up Dave!
I actually prefer catroonish Fit logo moldings because they are more sculpted at the ends. Too bad Chinese supplier is unreliable. If they eventually become available I might jump on them. If not, I will go for these for sure.
My neighbors are not being kind to my doors! I have two medium dings on the driver door and a single small one on the front passenger door. Jerks drive Rangers and other beaters so they could care less.
Props to Zeta and Angelo for constant research even on product type they already sell just in different style.
Ivan
#4
Join Date: Sep 2006
Location: Boulder Creek, CA, USA
Posts: 3,288
Good stuff!
Personally I am against door moldings in general since they look like an after thought on most cars.
These wide one's look thousand times better than OEM thin moldings. Fit doors are much "taller" from bottom door edge to the window just screaming for wider door moldings to match them. These also blend a lot better with the car itself!
Good find Angelo!
Excellent write up Dave!
I actually prefer catroonish Fit logo moldings because they are more sculpted at the ends. Too bad Chinese supplier is unreliable. If they eventually become available I might jump on them. If not, I will go for these for sure.
My neighbors are not being kind to my doors! I have two medium dings on the driver door and a single small one on the front passenger door. Jerks drive Rangers and other beaters so they could care less.
Props to Zeta and Angelo for constant research even on product type they already sell just in different style.
Ivan
Personally I am against door moldings in general since they look like an after thought on most cars.
These wide one's look thousand times better than OEM thin moldings. Fit doors are much "taller" from bottom door edge to the window just screaming for wider door moldings to match them. These also blend a lot better with the car itself!
Good find Angelo!
Excellent write up Dave!
I actually prefer catroonish Fit logo moldings because they are more sculpted at the ends. Too bad Chinese supplier is unreliable. If they eventually become available I might jump on them. If not, I will go for these for sure.
My neighbors are not being kind to my doors! I have two medium dings on the driver door and a single small one on the front passenger door. Jerks drive Rangers and other beaters so they could care less.
Props to Zeta and Angelo for constant research even on product type they already sell just in different style.
Ivan
#6

#7
Join Date: Sep 2006
Location: Boulder Creek, CA, USA
Posts: 3,288
I can guess the reason behind Matt's (solbrothers) question- if the moldings could be had in black unpainted ABS plastic (but ABS isn't always true black- sometimes it is gray), but anyway if black was acceptable to the buyer, a hit from a car door might not show any damage to the molding. A hit on painted moldings will damage the paint on the molding, and require touch-up painting.
#10
Join Date: Sep 2006
Location: Boulder Creek, CA, USA
Posts: 3,288
Maybe any Honda black and sand off the clear coat?
#12
Join Date: Sep 2006
Location: Boulder Creek, CA, USA
Posts: 3,288
But then YOU have to paint them. According to Angelo, it ain't gonna happen. Good luck- they are worth the price Matt. Try to find a Honda, Toyota, Ford, etc. flat black factory color number. These are custom-made for Zeta by a manufacturer of moldings selling the products to OEM car manufacturers. Moldings installed on Fords, Chevys, Chryslers, etc. come from this manufacturer. If you can find a flat black color listed by a car maker, these guys can probably duplicate it. Worth a try, yes? No??
Last edited by manxman; 07-16-2008 at 10:02 PM.
#13
i bet they are worth the price, and i can paint. they look awesome, but i dont want to sand paint then paint again lol.
#15
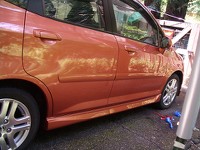
Zeta side moldings on my SSM Sport...
I ordered a set from Zeta on July 25th, and they arrived in perfect condition 10 days later. The flawless paint matches perfectly. I am very happy with the look. They pass for OEM.
Here are the pictures that I took during the install, and end product. I have to say that the install was much easier than I had anticipated. The hardest part of the install was gathering up enough courage to peel the backing off of the 3M tape. Note that Dave's DIY install guide/pictorial helped immensely in calming my nerves.
As for my install, I elected to install above the 12" and 13" guideline marks, since my car is lowered about 1.25 inches. In doing so, the installed molding on my Fit is centered about 22" from ground level.


I found that using a "jig" helped make the process go a bit less stressfully.

Once I carefully placed the initial edge down, I was able to align the other end of the molding by using this "jig" as a reference point.

I could have used anything, but the expended "surface prep" tube seemed handy at the time. I just made sure that the solvent had totally evaporated before placing it against the paint.

Here is the end product...


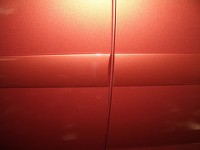
BTW, here is the reason I wanted door moldings in the first place..."Door Dings."

Here you can see how the wide molding will eventually cover the problem.

The purchase price seemed relatively steep at first, but then considering how much I avoided/will avoid in body repair, I think the money was very well spent!
-macbuddy-
Here are the pictures that I took during the install, and end product. I have to say that the install was much easier than I had anticipated. The hardest part of the install was gathering up enough courage to peel the backing off of the 3M tape. Note that Dave's DIY install guide/pictorial helped immensely in calming my nerves.
As for my install, I elected to install above the 12" and 13" guideline marks, since my car is lowered about 1.25 inches. In doing so, the installed molding on my Fit is centered about 22" from ground level.


I found that using a "jig" helped make the process go a bit less stressfully.

Once I carefully placed the initial edge down, I was able to align the other end of the molding by using this "jig" as a reference point.

I could have used anything, but the expended "surface prep" tube seemed handy at the time. I just made sure that the solvent had totally evaporated before placing it against the paint.

Here is the end product...


BTW, here is the reason I wanted door moldings in the first place..."Door Dings."

Here you can see how the wide molding will eventually cover the problem.

The purchase price seemed relatively steep at first, but then considering how much I avoided/will avoid in body repair, I think the money was very well spent!
-macbuddy-
#16
I just bought mine, and also noticed a ding in that area. Thankfully I'm on a 5 year service contract through the dealer for 12 PDRs annually, but I would have covered it up with the side moldings, I'll post when I install them! SSM
#17
Join Date: Sep 2006
Location: Boulder Creek, CA, USA
Posts: 3,288
I ordered a set from Zeta on July 25th, and they arrived in perfect condition 10 days later. The flawless paint matches perfectly. I am very happy with the look. They pass for OEM.
Here are the pictures that I took during the install, and end product. I have to say that the install was much easier than I had anticipated. The hardest part of the install was gathering up enough courage to peel the backing off of the 3M tape. Note that Dave's DIY install guide/pictorial helped immensely in calming my nerves.
As for my install, I elected to install above the 12" and 13" guideline marks, since my car is lowered about 1.25 inches. In doing so, the installed molding on my Fit is centered about 22" from ground level.


I found that using a "jig" helped make the process go a bit less stressfully.

Once I carefully placed the initial edge down, I was able to align the other end of the molding by using this "jig" as a reference point.

I could have used anything, but the expended "surface prep" tube seemed handy at the time. I just made sure that the solvent had totally evaporated before placing it against the paint.

Here is the end product...


BTW, here is the reason I wanted door moldings in the first place..."Door Dings."

Here you can see how the wide molding will eventually cover the problem.

The purchase price seemed relatively steep at first, but then considering how much I avoided/will avoid in body repair, I think the money was very well spent!
-macbuddy-
Here are the pictures that I took during the install, and end product. I have to say that the install was much easier than I had anticipated. The hardest part of the install was gathering up enough courage to peel the backing off of the 3M tape. Note that Dave's DIY install guide/pictorial helped immensely in calming my nerves.
As for my install, I elected to install above the 12" and 13" guideline marks, since my car is lowered about 1.25 inches. In doing so, the installed molding on my Fit is centered about 22" from ground level.


I found that using a "jig" helped make the process go a bit less stressfully.

Once I carefully placed the initial edge down, I was able to align the other end of the molding by using this "jig" as a reference point.

I could have used anything, but the expended "surface prep" tube seemed handy at the time. I just made sure that the solvent had totally evaporated before placing it against the paint.

Here is the end product...


BTW, here is the reason I wanted door moldings in the first place..."Door Dings."

Here you can see how the wide molding will eventually cover the problem.

The purchase price seemed relatively steep at first, but then considering how much I avoided/will avoid in body repair, I think the money was very well spent!
-macbuddy-
Thanks, Angelo, for another typically great quality Zeta product.
Last edited by manxman; 07-31-2008 at 09:24 PM.
#19
Join Date: Sep 2006
Location: Boulder Creek, CA, USA
Posts: 3,288
The DIY may appear to be overly detailed, but if you follow the instructions, you will avoid making any mistakes.
#20
I just got my side moldings from zeta and although they color match perfectly they seem to have slight knicks/imperfections on the paint.
Should I just install them now (I was planning to) or send them back?
Should I just install them now (I was planning to) or send them back?


