
DIY: Fiberglass in-spare sub box (56k beware, tons of pics)


DIY: Fiberglass in-spare sub box (56k beware, tons of pics)
Inspired by this thread (thanks niko3257!), I decided to try to make my own in-spare sub box. I've never worked with fiberglass before this project, so I thought this DIY might be good for other newbies.
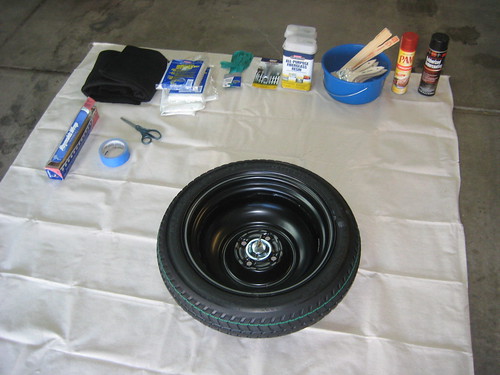
Supplies:
So here are all the supplies I needed to start the fiberglass process:
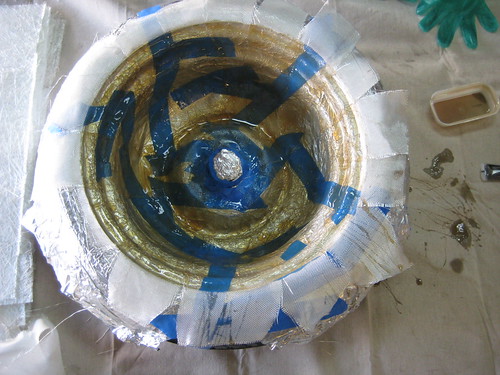
Use the aluminum foil and tape to make a circular nub where the bolt that holds the spare can sit. You don't want to make this taller than necessary, since your sub will need 3" mounting depth.

Cover the rest of the spare with aluminum foil/tape and spray a light layer of PAM over the whole thing. This will make removing the foil a lot easier later in the process.

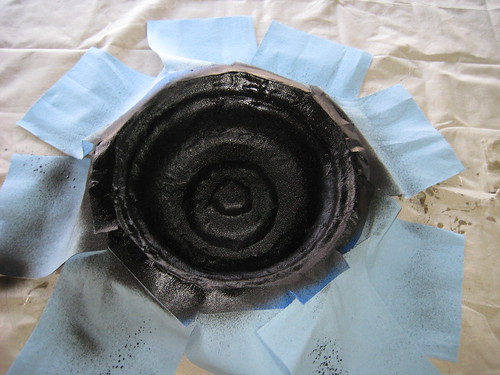
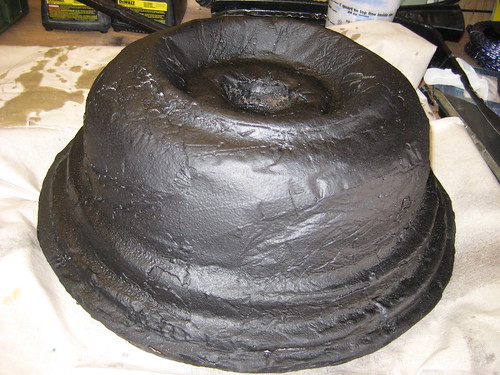
Cut the fiberglass mat into 3"ish strips and follow the directions on the resin can to do your first layer of fiberglass. I found that mixing 10oz of resin with 5.5mL hardener was about the perfect amount to work with - I'd use it all up right before it started hardening. Basically, just lay the strips of mat in the tire and use a paintbrush to soak the strips with resin. Do one layer and let it dry according to the directions.
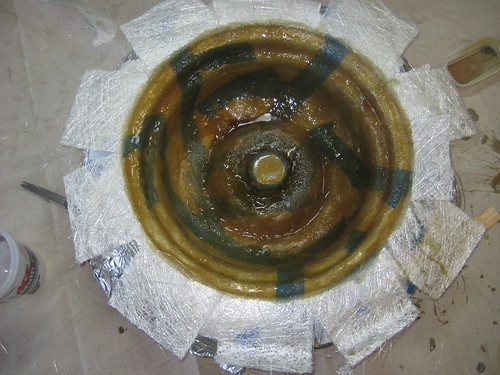
Once the first layer has dried, put a light coat of resin on that, then lay down your next layer of strips. Soak with resin as before. I experimented a little here and went with a heavier mat, which was much more difficult to work with. I'd stick with the lighter mat for all three layers if I were doing it again, but the heavy mat does build up the thickness quickly.
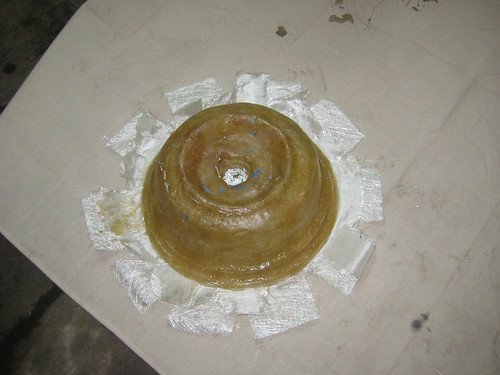
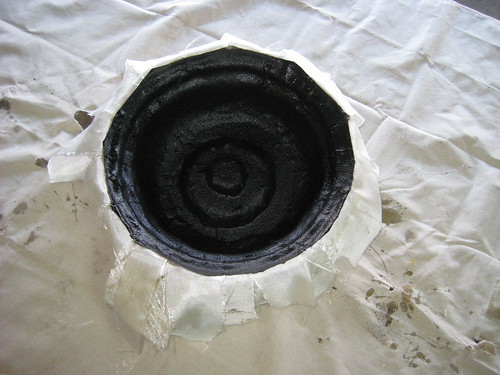
Let it dry. At this point, the structure should be strong enough that you can pull it out, put the spare away, and remove the foil/tape.
If you want some instant gratification for all the hard work, you can see what it looks like in the spare.

I did one more (third) layer of the light mat.

Follow the directions on the underliner spray to give the interior a nice coat. This part probably isn't necessary, but I like to think it'll help seal up the box.
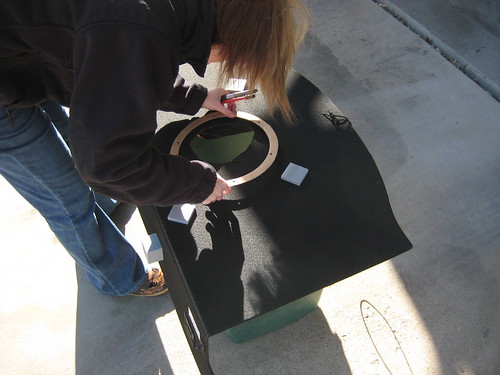
Use a jigsaw to cut out your MDF. For my GE (not sure if GD is different) I made the outside circle an 18" diameter, I think. My sub came with a template on the box, so I cut that out (don't throw it away, you'll need it later). The terminal should be easy to trace after that. Drill pilot holes for the screws so that you don't risk cracking the MDF later.
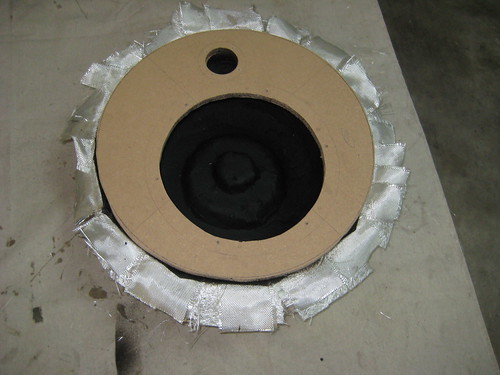
Spray one side of the MDF with underliner spray.
With the underliner side down, put the MDF back in the box and resin the flaps of fiberglass mat over the top. I got a little sloppy here because some of the resin had dried on the flaps, which made them hard to shape. If you're more careful, you may be able to skip the next few steps.
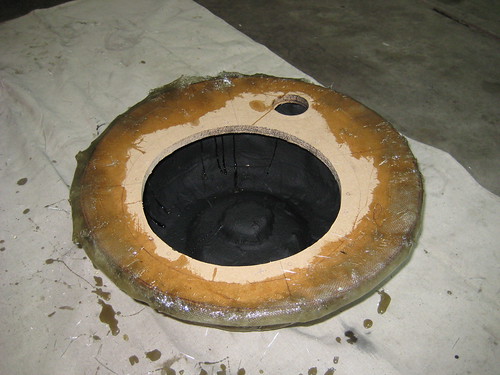

Here's where some of my flaps goofed up because they already had some dried resin holding them in a strange shape. If you can avoid this, it will make your job a little easier.
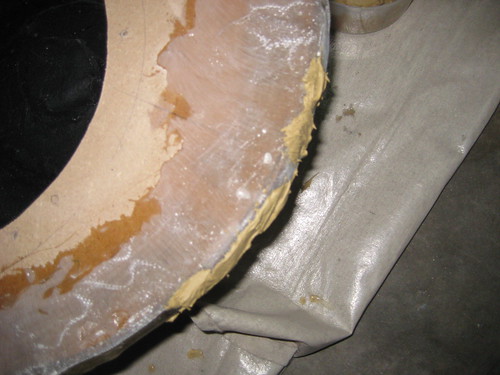
I used a combination of dremel and angle grinder to cut/sand down the parts that were sticking out like that. There were a few places where the resin hadn't totally sealed the space between the MDF and fiberglass box, so I used Bondo putty to fill in those gaps. If you're more skilled, you probably won't have to do this part.
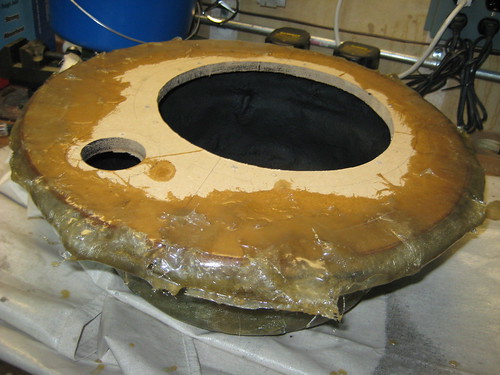
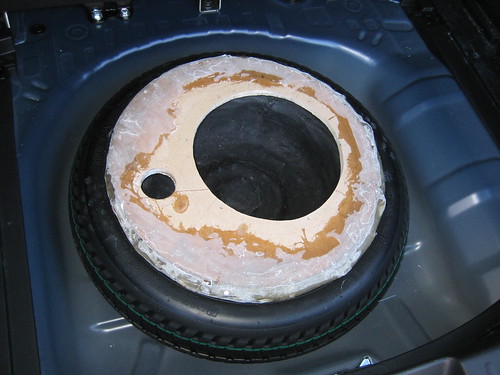
After shaving down some of the resin drips, it still fits great in the spare. The cargo floor won't lay totally flat anymore, but you can hardly tell. I'm putting the speaker off to the right since the spare isn't totally centered in the trunk.
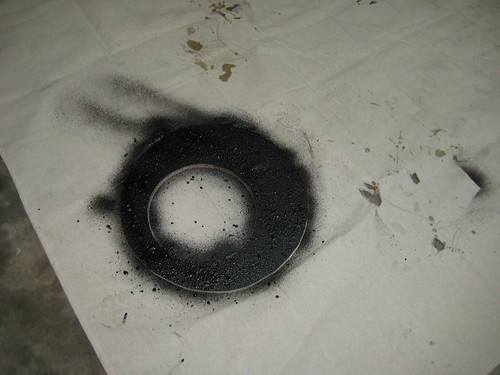
Spray the exterior with underliner spray, following the directions on the can.
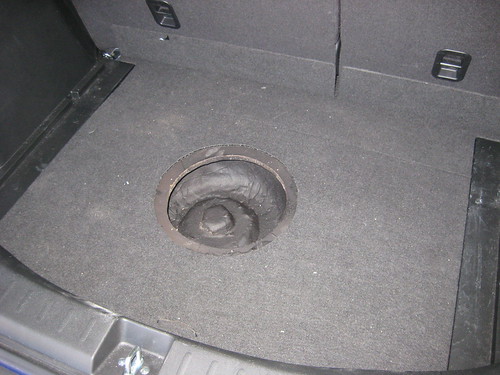
Now to cut the hole in the cargo tagboard. Put the box in the position you want, then cut a rough hole in the middle (large enough to get my hand through with room to spare). Use a graphite pencil to trace the size of the hole on the underside of the tagboard.
Matche up the inside circle of the template to the circle you just traced. Then trace around the outside of the template. This is where you'll want to cut, since the entire top of the sub will need to come through. You'll also want to rip off those foam rubber feet (the flat ones, not the cube ones) since the tagboard will now be supported by the sub.
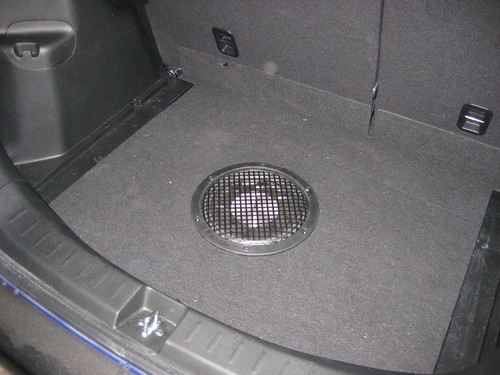
Cut out the hole (I used a jigsaw) and put the tagboard back in the trunk.
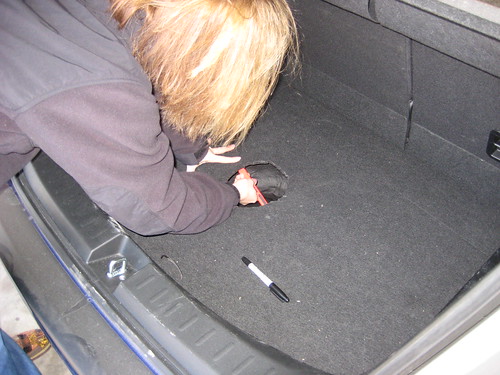
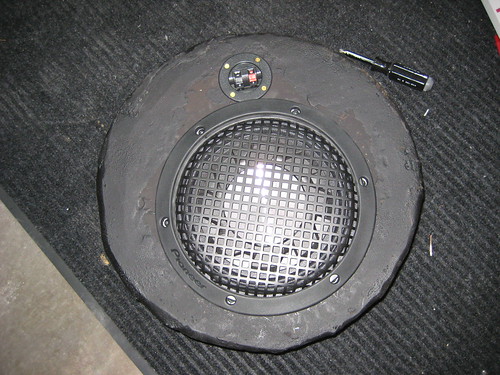
Now you get to put your sub together! You'll need speaker wire to connect the terminal (soldered) to the sub (clipped). Screw everything together using the pilot holes you drilled earlier. In these pictures, you can see the grill I used. I just tucked it under the rubber piece on the sub, which required no hardware (although I had to cut away some of the rubber to make it sit flat).
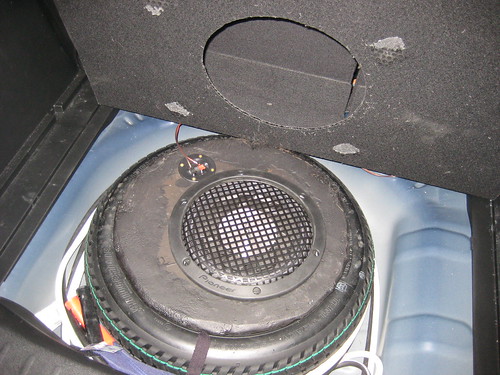
Run your wire, install sub! I'm planning to do a writeup on my complete audio setup, and I'll link to it here when that's done.
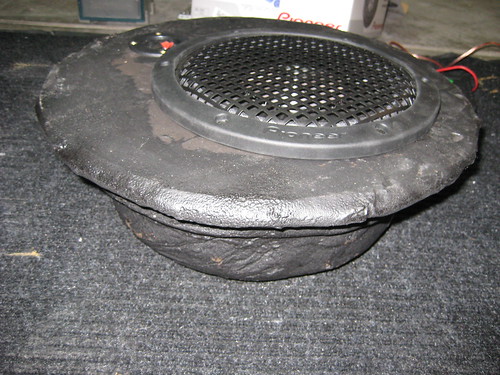
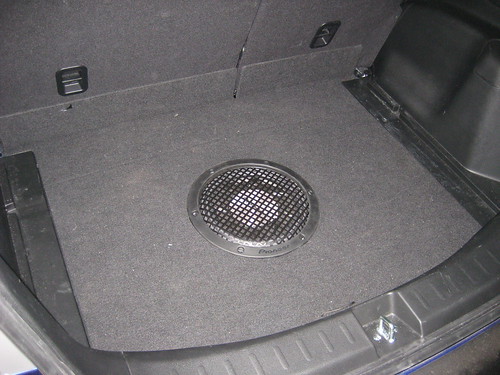
Here's what my finished product looks like.
I'm hoping to finish head unit install tomorrow, then I'll be able to talk about how it SOUNDS. This DIY will be edited/continued with that info. Questions/comments welcome!
Supplies:
- Spare tire (duh)
- Aluminum foil
- Tape (scotch tape or painter's tape works well)
- Scissors
- Fiberglass mat
- Latex gloves
- Fiberglass resin and hardener (this is in the paint section of Home Depot - I went for the cheap stuff but I'm sure there's more high quality resin elsewhere)
- Disposable paint mixing cups and stirrers
- Cheap disposable paint brushes
- A 2'x2' square of 1/2" MDF (medium density fiberboard, you can find this in the lumber section of Home Depot)
- Basic powertools: jigsaw, drill, angle grinder or some sort of sander, dremel might help
- PAM (that stuff you spray on cooking surfaces so that the food doesn't stick)
- Underliner spray (I found this at AutoZone, ranges $4-$8 per can)
- Bondo putty (optional, see below)
- Sub speaker (I'm using the Pioneer TS-SW2541D) - you'll need to make sure it's low profile and doesn't need much volume in the enclosure
- Terminal - make sure it's sunken, such as this one
- A grill to protect your sub (optional). I'm using this one, which tucks right into the rubber surrounding the sub; no hardware required!
- A clean place to work; I spread out a big canvas on my garage floor
- Mineral spirits in case you get resin on your skin, lots of paper towels
- Soldering iron, solder
So here are all the supplies I needed to start the fiberglass process:
Use the aluminum foil and tape to make a circular nub where the bolt that holds the spare can sit. You don't want to make this taller than necessary, since your sub will need 3" mounting depth.
Cover the rest of the spare with aluminum foil/tape and spray a light layer of PAM over the whole thing. This will make removing the foil a lot easier later in the process.
Cut the fiberglass mat into 3"ish strips and follow the directions on the resin can to do your first layer of fiberglass. I found that mixing 10oz of resin with 5.5mL hardener was about the perfect amount to work with - I'd use it all up right before it started hardening. Basically, just lay the strips of mat in the tire and use a paintbrush to soak the strips with resin. Do one layer and let it dry according to the directions.
Once the first layer has dried, put a light coat of resin on that, then lay down your next layer of strips. Soak with resin as before. I experimented a little here and went with a heavier mat, which was much more difficult to work with. I'd stick with the lighter mat for all three layers if I were doing it again, but the heavy mat does build up the thickness quickly.
Let it dry. At this point, the structure should be strong enough that you can pull it out, put the spare away, and remove the foil/tape.
If you want some instant gratification for all the hard work, you can see what it looks like in the spare.
I did one more (third) layer of the light mat.
Follow the directions on the underliner spray to give the interior a nice coat. This part probably isn't necessary, but I like to think it'll help seal up the box.
Use a jigsaw to cut out your MDF. For my GE (not sure if GD is different) I made the outside circle an 18" diameter, I think. My sub came with a template on the box, so I cut that out (don't throw it away, you'll need it later). The terminal should be easy to trace after that. Drill pilot holes for the screws so that you don't risk cracking the MDF later.
Spray one side of the MDF with underliner spray.
With the underliner side down, put the MDF back in the box and resin the flaps of fiberglass mat over the top. I got a little sloppy here because some of the resin had dried on the flaps, which made them hard to shape. If you're more careful, you may be able to skip the next few steps.
Here's where some of my flaps goofed up because they already had some dried resin holding them in a strange shape. If you can avoid this, it will make your job a little easier.
I used a combination of dremel and angle grinder to cut/sand down the parts that were sticking out like that. There were a few places where the resin hadn't totally sealed the space between the MDF and fiberglass box, so I used Bondo putty to fill in those gaps. If you're more skilled, you probably won't have to do this part.
After shaving down some of the resin drips, it still fits great in the spare. The cargo floor won't lay totally flat anymore, but you can hardly tell. I'm putting the speaker off to the right since the spare isn't totally centered in the trunk.
Spray the exterior with underliner spray, following the directions on the can.
Now to cut the hole in the cargo tagboard. Put the box in the position you want, then cut a rough hole in the middle (large enough to get my hand through with room to spare). Use a graphite pencil to trace the size of the hole on the underside of the tagboard.
Matche up the inside circle of the template to the circle you just traced. Then trace around the outside of the template. This is where you'll want to cut, since the entire top of the sub will need to come through. You'll also want to rip off those foam rubber feet (the flat ones, not the cube ones) since the tagboard will now be supported by the sub.
Cut out the hole (I used a jigsaw) and put the tagboard back in the trunk.
Now you get to put your sub together! You'll need speaker wire to connect the terminal (soldered) to the sub (clipped). Screw everything together using the pilot holes you drilled earlier. In these pictures, you can see the grill I used. I just tucked it under the rubber piece on the sub, which required no hardware (although I had to cut away some of the rubber to make it sit flat).
Run your wire, install sub! I'm planning to do a writeup on my complete audio setup, and I'll link to it here when that's done.
Here's what my finished product looks like.
I'm hoping to finish head unit install tomorrow, then I'll be able to talk about how it SOUNDS. This DIY will be edited/continued with that info. Questions/comments welcome!
Last edited by blythe; Mar 1, 2009 at 07:13 AM. Reason: Added pics of installed sub.

Bingo. I think eventually I'd like to replace the entire floor of the cargo area; that tagboard is so cheap and I plan on hauling a lot of stuff around.
Just over 3" mounting depth; it's a pretty close call with the sub I'm using. The biggest problem is that little nub you have to make for the bolt to sit in. If you found a different flatter bolt for the spare, you'd be able to get more mounting depth. I never actually measured volume, but it would be just a little less than the interior of your spare (so you could fill that with popcorn or whatever to measure it yourself). If I had to make a wild guess, maybe between .75 and 1 cubic foot?
Member
Joined: Jan 2008
Posts: 449
From: Allen (Dallas), TX

Decent little project... however, I'm quite sure that the port/tuning of that box for any sub is far from correct. You would be better off doing a sealed box, measuring the total cuft using water or even packing peanuts, then buying a sub to match the available air space.
Not hating.... just being a bit more specific for sound quality and results of the sound
Not hating.... just being a bit more specific for sound quality and results of the sound

Member
Joined: Nov 2007
Posts: 578
From: Wilton, CT
Just over 3" mounting depth; it's a pretty close call with the sub I'm using. The biggest problem is that little nub you have to make for the bolt to sit in. If you found a different flatter bolt for the spare, you'd be able to get more mounting depth. I never actually measured volume, but it would be just a little less than the interior of your spare (so you could fill that with popcorn or whatever to measure it yourself). If I had to make a wild guess, maybe between .75 and 1 cubic foot?
But I'd be surprised amazed if the enclosure had that much airspace. If my notes are accurate, the inside of the spare is about 11" across and between 4 & 5.5" deep, depending on where you measure. So best case scenario I can come up with is about .3 cubic feet . . . Barely enough for my shallow mount sub - but I was figuring I'd be losing volume in the fiberglassing process. And, of course, the driver itself takes up some space. That's only doing a generic cylinder volume calculation, though. I hadn't gotten around to using packing peanuts or popcorn to figure it out more accurately.
But regardless, I had kind of resigned myself to the idea that I'd need to sacrifice the spare to get an enclosure in the wheel well. Not a huge risk, imo, since I always have an air compressor & tire patch kit in the car. But the other good news is that without the donut in there, there's enough room for both a .5-.7 cubic foot enclosure and my 4-channel amp.
It is a sealed enclosure, not vented . . .
I'm a dumbass, totally forgot about that. Regardless, the TS-SW2541D only requires .35 to .7 cu ft, so I think this should be fine. Niko's used it, and he said it sounded good (see the original thread).
I'm determined to keep the spare just because I hate doing the "damsel in distress" thing. I want to be as self-sufficient as possible, and keeping the spare will help keep me prepared for any situation. But I still have to figure out where I want to put the amp, good point. I think it'll probably fit under the driver/passenger seat, but I haven't tried yet. Otherwise I guess I'm stuck with the back of the rear seat.
But regardless, I had kind of resigned myself to the idea that I'd need to sacrifice the spare to get an enclosure in the wheel well. Not a huge risk, imo, since I always have an air compressor & tire patch kit in the car. But the other good news is that without the donut in there, there's enough room for both a .5-.7 cubic foot enclosure and my 4-channel amp.
Looks good blythe, it should do exactly what you wanted it to. I on the other hand dont really care about cargo space so I have a decent sized box for SPL. its a shame that I wish it was louder
")
Member
Joined: Apr 2007
Posts: 821
From: Nanuet, NY
Very nice job. More air space will make a huge improvement in sound quality, and yes if you heard the difference, you would want the improved sound quality. You could consider doing a raised floor at this time. You could then extend the box higher off the tire and give yourself more air space. .30 cubes is a decent air space for a sealed 8 inch. Just because a sub will fit doesn't mean it won't sound like your beating a 2x4 against a concrete block. That's what I call Boofer bass, because the notes sound like Boof, boof, boof, boof....
I would love to rep you because it's this exact thing that repping was designed for. However, you definitely don't need any more points. I wish the abuse of the system was monitored and controlled for the real purpose of why it was started. Not hatin', just statin'.
I would love to rep you because it's this exact thing that repping was designed for. However, you definitely don't need any more points. I wish the abuse of the system was monitored and controlled for the real purpose of why it was started. Not hatin', just statin'.
Last edited by radareclipse; Feb 24, 2009 at 07:54 AM.
Very nice job. More air space will make a huge improvement in sound quality, and yes if you heard the difference, you would want the improved sound quality. You could consider doing a raised floor at this time. You could then extend the box higher off the tire and give yourself more air space. .30 cubes is a decent air space for a sealed 8 inch. Just because a sub will fit doesn't mean it won't sound like your beating a 2x4 against a concrete block. That's what I call Boofer bass, because the notes sound like Boof, boof, boof, boof....
I really like how it came out, looks good. The only thing I am wondering about is that if the grill will interfere with the throw of the sub when it is playing. Im sure you will find out when it is all hooked up and playing.
It sounds pretty good. There's a little bit of "boof" but it certainly succeeds in rattling the whole car at top levels. I've got it set about halfway, and it's perfect for listening to music (as opposed to forcing others to listen to the bass of your music). Overall I'm thrilled with the end result, but I'm biased since I put so much work into it.