
JDM Roof storage console installed !

Member
Joined: Jul 2007
Posts: 1,584
From: Memphis, TN

I don't know if anyone cares, but if the JDM maplights and Element maplights are the same, then you're in luck! Go to hondapartsdeals.com and look up the maplights on a 2007 Element SC (because the other Element's maplights aren't listed for sale or in stock).
Together it'd be about $32 + shipping for the parts (2 clear plastic covers and the housing, nothing else).
Together it'd be about $32 + shipping for the parts (2 clear plastic covers and the housing, nothing else).

New Member
Joined: Jul 2007
Posts: 21
From: Worcester, MA
I want the cl maplights with the homelink so bad but I can't find it anywhere...what a shame - anyone have one they'd like to sell? 
Rather I did find it I think: 34400-SS8-A02ZA ...and it costs like $180! wtf?
Rather I did find it I think: 34400-SS8-A02ZA ...and it costs like $180! wtf?
Last edited by eman; Aug 6, 2007 at 07:22 PM.
New Member
Joined: Jul 2007
Posts: 21
From: Worcester, MA
Well if you really wanna shell out...here's one example:
Acura Parts @ AcuraAutomotiveParts.org - Genuine Acura OEM Parts from Acura Carland
Not 100% positive it's the part number
Acura Parts @ AcuraAutomotiveParts.org - Genuine Acura OEM Parts from Acura Carland
Not 100% positive it's the part number
Member
Joined: Jun 2007
Posts: 587
From: Manitoba, Canada
What about the template seen in Ben's photographs? And what exactly is the point of the "Home Link"?
Member
Joined: Feb 2007
Posts: 779
From: Montreal' Canada
Installed the overhead console today. Was very straight forward and easy. Just 2 things to be careful with.
1: One of the tabs that gets held in by the dome light screw needs to be bent straight before installation.
2: The template isn't perfect. Alighn it about 1/4" Forward of there your supposed to.
1: One of the tabs that gets held in by the dome light screw needs to be bent straight before installation.
2: The template isn't perfect. Alighn it about 1/4" Forward of there your supposed to.


Member

Joined: Feb 2008
Posts: 22
From: chicago
I've been looking at the pics in this thread for a long time and really want to get one of the overhead storage consoles, but when I was in my Fit today, I looked at the roof area where the console would go, and it seems awfully steep at that point. Can anyone get some pics that aren't at some extreme angle, like from the backseat looking forward, or outside, looking in through the window?
I want to get one of these roof consoles, but I don't want it too be too awkward or out of reach to be of any use.
Also, the cutting that's required for this wouldn't void any sort of warranty on the car, would it?
I want to get one of these roof consoles, but I don't want it too be too awkward or out of reach to be of any use.
Also, the cutting that's required for this wouldn't void any sort of warranty on the car, would it?
Member
Joined: Jul 2007
Posts: 1,584
From: Memphis, TN
I've been looking at the pics in this thread for a long time and really want to get one of the overhead storage consoles, but when I was in my Fit today, I looked at the roof area where the console would go, and it seems awfully steep at that point. Can anyone get some pics that aren't at some extreme angle, like from the backseat looking forward, or outside, looking in through the window?
I want to get one of these roof consoles, but I don't want it too be too awkward or out of reach to be of any use.
Also, the cutting that's required for this wouldn't void any sort of warranty on the car, would it?
I want to get one of these roof consoles, but I don't want it too be too awkward or out of reach to be of any use.
Also, the cutting that's required for this wouldn't void any sort of warranty on the car, would it?

New Member
Joined: Mar 2008
Posts: 1
From: Vacaville, CA
Hey, bro. I just had a question about your maplight/homelink unit. I noticed yours does not have a sunglass holder. I just ordered one from 03 CL and i just noticed that it does have a sunglass holder. My problem is i dont know if it would fit with the sunglass holder. Can you verify that you got yours from a CL? My thing is on its way and I'm freaking out if it'll fit or not. Can you possibly give me some advise? Thanks a lot!


Hey, bro. I just had a question about your maplight/homelink unit. I noticed yours does not have a sunglass holder. I just ordered one from 03 CL and i just noticed that it does have a sunglass holder. My problem is i dont know if it would fit with the sunglass holder. Can you verify that you got yours from a CL? My thing is on its way and I'm freaking out if it'll fit or not. Can you possibly give me some advise? Thanks a lot!

New Member
Joined: Dec 2008
Posts: 1
From: Singapore
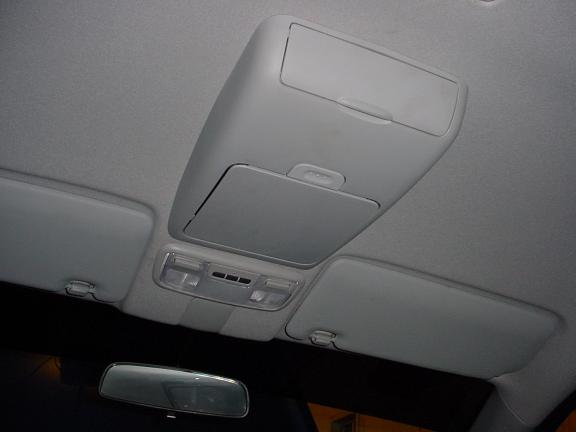
Roof
Just got my JDM roof storage console installed. The installation was easier than I expected. I would like to share the installation procedures for anyone who would like to get this part in the future.
Necessary tools:
-philips head screw driver
-small flat head screw driver
-cutter
-scissors
The kit comes with :
-roof storage console x 1
-cushioning foam x 3
-bolts x 5
-long bracket x 1
-small rectangular bracket x 1
-template x 1
-lid stopper x 1
Step 1 :
Remove the cover underneath rear view mirror then use the philips head screw driver to unscrew the rear view mirror.
Step 2 :
Remove the room light lens cover then use philips head screw driver to unbolt the room light unit then unplug room light.
Step 3 :
Use the scissors to cut the template which supplied with the JDM roof storage console then tape it on to the head liner. Check out the pic below.

Step 4 :
Use the cutter start to cut the hole on the template. The liner is made out of foam material and it makes it very easy to cut. Then after you cut it, remove the foam inside the liner between the big square hole to the place where the rear view mirror bolt hole.

Step 5:
Slide in the long square mounting plate from the area where the room light sits until you see it sits under the hole of the rear view mirror. After you slide in the backet, you will see the hols on the mounting plate align to holes which holds the room light and the holes location for the rear view mirror.

Step 6 :
Bolt the rectangular metal piece (comes with the roof storage console) on to the smaller rectangular hole close to the roof lamp location.
Step 7 :
Install the rear view mirror and the room light assy back on. Make sure all the holes align before you do it. Then you may put the cover for the rear view mirror and room light back on.
Step 8 :
Now, you will need to put the new cushion foam which supplied with this kit inside the liner, the parts between the rear view mirror and the big cut out for cushioning.
Step 9 :
Slide the roof console on to the long bracket of the top, you may need to gently push the liner to do so. Use the screws which supplied with this kit to bolt the rear part of the console with the lid stopper.

It's DONE
The total procedure took me 30 mins. Hope this will help for the ones who wanted this part in the future.
Thanks
Ben
Necessary tools:
-philips head screw driver
-small flat head screw driver
-cutter
-scissors
The kit comes with :
-roof storage console x 1
-cushioning foam x 3
-bolts x 5
-long bracket x 1
-small rectangular bracket x 1
-template x 1
-lid stopper x 1
Step 1 :
Remove the cover underneath rear view mirror then use the philips head screw driver to unscrew the rear view mirror.
Step 2 :
Remove the room light lens cover then use philips head screw driver to unbolt the room light unit then unplug room light.
Step 3 :
Use the scissors to cut the template which supplied with the JDM roof storage console then tape it on to the head liner. Check out the pic below.
Step 4 :
Use the cutter start to cut the hole on the template. The liner is made out of foam material and it makes it very easy to cut. Then after you cut it, remove the foam inside the liner between the big square hole to the place where the rear view mirror bolt hole.
Step 5:
Slide in the long square mounting plate from the area where the room light sits until you see it sits under the hole of the rear view mirror. After you slide in the backet, you will see the hols on the mounting plate align to holes which holds the room light and the holes location for the rear view mirror.
Step 6 :
Bolt the rectangular metal piece (comes with the roof storage console) on to the smaller rectangular hole close to the roof lamp location.
Step 7 :
Install the rear view mirror and the room light assy back on. Make sure all the holes align before you do it. Then you may put the cover for the rear view mirror and room light back on.
Step 8 :
Now, you will need to put the new cushion foam which supplied with this kit inside the liner, the parts between the rear view mirror and the big cut out for cushioning.
Step 9 :
Slide the roof console on to the long bracket of the top, you may need to gently push the liner to do so. Use the screws which supplied with this kit to bolt the rear part of the console with the lid stopper.
It's DONE
The total procedure took me 30 mins. Hope this will help for the ones who wanted this part in the future.
Thanks
Ben
this is cool

Member
Joined: Jul 2008
Posts: 108
From: Los Angeles, CA
I don't know if anyone cares, but if the JDM maplights and Element maplights are the same, then you're in luck! Go to hondapartsdeals.com and look up the maplights on a 2007 Element SC (because the other Element's maplights aren't listed for sale or in stock).
Together it'd be about $32 + shipping for the parts (2 clear plastic covers and the housing, nothing else).
Together it'd be about $32 + shipping for the parts (2 clear plastic covers and the housing, nothing else).
theres black/ gray, black/blue too, for non SC.. they all have gray headliner though