
"A Spec" Front Strut Bar Review and DIY Install W/Photos


Disclaimer: The following is provided as a GUIDE ONLY, and neither myself, nor FITFREAK.NET endorse, recommend, encourage nor take any responsibility for the outcome of someone else doing the following. You follow these steps at your own risk!
When thinking about handling modifications, we should remember that we already HAVE a car with exceptional handling. Driving your new Fit home from the dealer, you already have the ability to beat any new Corvette on a slalom course. There is no such thing as "perfection", but there is nothing wrong with making a good car better. As long as the mods you buy are of good quality.
While waiting the 6-8 weeks for my Progress Technology Rear Anti-Sway Bar to be made and shipped, I decided that I probably should add at least a front strut tower bar to "balance" the handling of my Fit. Now, I don't really KNOW that a front strut bar is necessary or beneficial, because it is hard to imagine that the front struts flop around like a limp wrist.
The car's body is a long, rectangular tube, and the only structural bulkhead that keeps the sides of the body at 90 degrees to the floor and roof is the firewall, so it has to be really strong. Just a few inches in front of the firewall are the strut towers. How weak and flexible can they be?? However, an incident with one of my previous vehicles lends some support to the idea that added rigidity between the strut towers might be helpful.
My wife used to drive a 1990 Dodge Caravan minivan with strut suspension in front. We live in the mountains with a LOT of twists and turns in every road we travel. Our minivan would make sounds under the dashboard, on every tight turn, like someone was squeezing and releasing an empty beer can. Annoying as hell. I pulled up the carpet under the dash and found several cracks running across the center of the firewall! So I went to a wrecking yard and paid to have a section of about 1 1/2 sq. feet of a firewall cut out of a Dodge Caravan, brought it home and welded up the cracks in it, then put it over our own firewall and spot welded the reinforcement in place. No more noise.
So, assuming that a front bar may not be NECESSARY but may help, whose bar should I buy? Not the really cheap junk for $40.00 on Ebay. But not necessarily the $300.00 Mugen bar made entirely of stainless steel. I asked our members for advice on front strut bars and got absolutely no replies, but decided to go with a bar made of 6061 T-6 aluminum rather than any other material. This aluminum alloy is used to make thousands of parts for military and commercial aircraft, including some landing gear components, because of its corrosion resistance and extremely high strength-to-weight ratio.
In the $100.00 or less price range, we have the bar from Tanabe, who stresses that their bar is best because it is "adjustable for pre-load" on the strut towers, and stresses that you must raise the front wheels off the ground to relieve the weight on the strut towers for the installation. We also have the front bar from A Spec, who told me that their bar mounts the same way as Tanabe, is also made of 6061 T-6, but costs $25.00 less. So I bought from fellow Californians. I was disappointed in the overall quality of the A Spec product, and e-mailed them with my opinion and suggestions for improvement. No reply from A Spec They do not provide installation instructions. Maybe this article will embarrass them enough to make the necessary corrections in quality.
THE REVIEW:
The A Spec bar itself is OK. It appears to be solid (the Tanabe is hollow with what looks like RTV rubber filling the interior (good? bad? ??). The A Spec tower mounting brackets are big, heavy, "clunky" steel weldments with a rough, grit-blasted finish under the black paint. If I were making this product, I would have made the tower brackets out of aluminum as well, not painted steel. The brackets rest directly on top of the painted sheet metal strut towers. If there really IS movement of the towers, I believe that the rough surface of the steel brackets will abrade away the body paint and cause rust eventually.
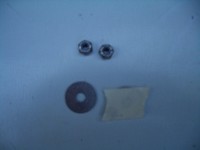
The A Spec attaching hardware (nuts, bolts, washers) are PURE JUNK and should be thrown away. They supply steel, metric, socket head cap screws, zinc plated tiny washers, and zinc plated hex nuts with no lock washers. The bolts are steel with only enough black oxide coating to keep them from rusting while in stock, waiting to ship. They are GUARANTEED to rust on your car. The design of the brackets and their attaching bolts is POOR. The bolt holes are only about 1 millimeter smaller than the diameter of the cap screw heads. If you could tighten the nuts under the fender enough, you could actually pull the bolt heads THROUGH the holes in the brackets. At best, you get a weak "friction fit" to keep the bolt heads from pulling through. What you also get is enough scuffing of the paint in the bolt holes to start rust IMMEDIATELY. (See photos below).
CLICK ON THE PHOTOS TO SEE LARGER IMAGES. (I apologize for the poor quality of some photos- forgot to set my camera for "macro: focus for close-ups).

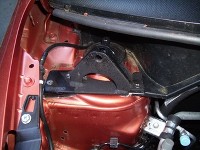
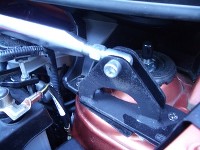
This installation DIY is actually a RE-INSTALLATION, because of severe rust that was evident after the bar had only been on the car for one month. One rain storm, two car washes. Here you see the installed bar before re-installation starts.

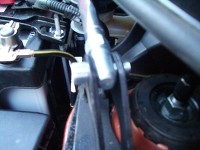
Here is the rust on the mounting bolts, and around the bolt holes in the brackets. This is the passenger side with the windshield washer hose.
When you get your strut bar, throw away the provided nuts, bolts, and washers. Go to either a hardware store (like Ace) or better yet if you have one in town, an industrial fastener supply company. At a hardware store, buy the following: stainless steel flat head machine screws, either phillips drive or hex drive if you can find them- either 1/4-20 or (bettter) 1/4-28. You need 4, 1" length, and 2, 1/2" length. Get 4, 1"o.d. X 1/4 stainless steel fender washers, and 6 "aero" or "Nylock" 1/4" nuts, either coarse or fine thread to match the bolts. The A Spec nuts & bolts provided are 6 mm, which is the same as 1/4" SAE.
Start your installation by prying out the plastic plugs that anchor the black plastic facia (against the upper firewall) to the inboard area of the strut towers, and pry out the plastic clip holding the windshield washer hose on the passenger side, and the clip that holds the wire loom on the driver's side. Leave the clips on the hose and the wire cable, but you will need the holes where they came from for your bolts.
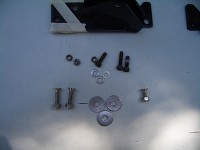
This shows the provided hardware compared to the stainless steel hardware store stuff. The washers and nuts are attached under your fenders and there WILL be considerable vibration on the nuts if there is any movement of the strut towers that is being prevented by the addition of the strut bar. Because of this vibration, YOU NEED LOCKING NUTS, AND YOU NEED LARGE FENDER WASHERS to spread the clamping force of the nuts and bolts over a larger area under the sheet metal of your fender.
Because of the rust already there, and to prevent it in the future, I masked the bolt holes in the brackets and coated these areas with areosol rubberized undercoat spray, available from any auto parts store in the paint section.

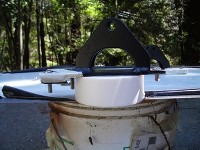
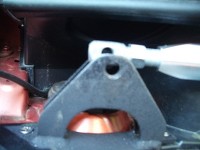
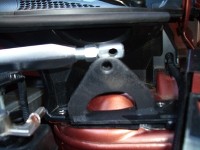
Here's a top and side view of the stainless steel bolts placed in the bracket holes.
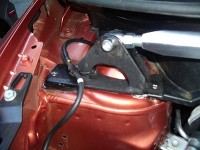
I was concerned about preventing paint abrasion and the propagation of rust from the steel bracket to the strut tower sheet metal, so I placed rubber washers used in garden hose fittings, over each bolt hole in the towers, and set the brackets over the rubber washers. The clamping force of the nuts & bolts flattens the rubber washers, but they still prevent contact of the underside of the brackets against the painted body sheet metal.
On the passenger side, place the inboard end of the bracket over the lip of the plastic facia, and put the bolt through the bracket and the hole in the facia lip. You won't need a rubber washer or gasket material under this end of the bracket because the facia insulates it here. On the driver's side, you either have to cut the facia to make room for the bracket (facia is a different shape here), or, as I did, you can place the bracket end UNDER the facia, with a rubber washer under the bracket, and bolt through the facia, bracket, and sheet metal. The INBOARD bolt holes are in a small "finger" of sheet metal that sticks out from the tops of the strut towers. The two OUTBOARD bolt holes go through the strut towers and under the fenders.
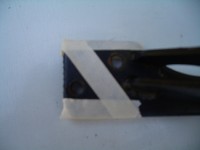
Here's a tip for easy installation- put a strip of masking tape (or Scotch tape) over the two fender washers for each side. You will be placing a washer and a nut underneath the fender, inside the strut tower, beside the spring, and there is ALMOST NO ROOM FOR YOUR HAND. Once you bolts are in place, push the taped side of each washer over the threaded bolt and it will stay there without falling off while you thread on the lock nuts.
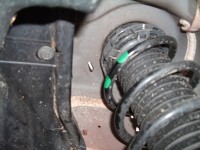
See? NO ROOM, and this is the easy to reach bolt. The other one is invisible and you have to do things by feel. If you have one, use a ratcheting box wrench (7/16" or 11 mm) to tighten the nuts. Trying to get things tight by turning the phillips drive bolt heads will just screw up the bolt heads. Hex drive heads are better but harder to find.
So, your brackets are mounted as tightly as you can get them, and you have isolated the underside of the rough bracket from the painted strut towers with either rubber washers over the bolt holes, or some kind of rubber gasket sheet material to prevent scuffing and rust.
Now you have to adjust the threaded eye bolts on the ends of the bar so that the holes match up with the holes in the end brackets. You have to be careful to match up the holes exactly. The hex shape machined on the inboard side of the eye bolt prevents proper fit if you are off only 1/2 turn of either of the eye bolts. The hex rests right against the vertical sides of the bracket.
Once you get a good visual alignment of the holes, start to gently thread the bolts through the holes. You will need the proper size of Allen wrench to do this. The fit of the first bolt is easy, but the fit of the second one is hard and you will have to be careful not to screw up the bolt threads by using too much pressure forcing the aluminum bolt through the steel bracket sides. Once the bolts are in, screw on the provided aluminum lock nuts and tighten with an open end or box wrench and the Allen wrench.
Last of all, use black zip ties to fasten the hose and wire loom to the end brackets. Put the zip tie through the plastic clip that used to hold the hose to the tower-- do not put the zip tie around the hose itself or you won't get any washer fluid to the washer nozzles.
The Tanabe and A Spec bars are inexpensive, but I think that if ANY bar is really effective, stainless steel, Titanium, or 6061 T-6 aluminum bars will all work the same. I e-mailed Tanabe and their dealer who advertises on this forum, and asked how the pre-load adjustment they speak of in their ads is done, and asked what kind of attaching hardware they supply. NO ANSWER from anybody.
One of our members, fit4kris, bought the Tanabe bar. I hope that he can share his experience in installing it with us when he gets around to it.
I suspect that there is NO ADJUSTMENT POSSIBLE for these bars except the adjustment necessary to get the bar mounted in the first place. By lifting the car off its wheels, the gravity on the suspension will probably cause the upper ends of the strut towers to "sag" ,almost immeasurably, somewhere. Probably outboard. When you attach your bar to the towers, if the bar does ANYTHING, it keeps the towers from "sagging" back to where they started from, when you lower the car back to the ground. Once the bar is fully installed, you cannot make it any longer or shorter, so there is no "pre-load" adjustment possible other than the effect of weight and gravity bearing against whatever extra rigidity is provided by the bar.
The only change that I could see after this bar was installed was just a little more road noise from the front end. Maybe that means that it is doing something. I can't say that I felt any real change in the handling, but I have not done any serously hard driving since the installation.
By comparison, the improvement from the installation of the Progress Tech. Rear Anti-Sway Bar was immediate, like night and day.
When thinking about handling modifications, we should remember that we already HAVE a car with exceptional handling. Driving your new Fit home from the dealer, you already have the ability to beat any new Corvette on a slalom course. There is no such thing as "perfection", but there is nothing wrong with making a good car better. As long as the mods you buy are of good quality.
While waiting the 6-8 weeks for my Progress Technology Rear Anti-Sway Bar to be made and shipped, I decided that I probably should add at least a front strut tower bar to "balance" the handling of my Fit. Now, I don't really KNOW that a front strut bar is necessary or beneficial, because it is hard to imagine that the front struts flop around like a limp wrist.
The car's body is a long, rectangular tube, and the only structural bulkhead that keeps the sides of the body at 90 degrees to the floor and roof is the firewall, so it has to be really strong. Just a few inches in front of the firewall are the strut towers. How weak and flexible can they be?? However, an incident with one of my previous vehicles lends some support to the idea that added rigidity between the strut towers might be helpful.
My wife used to drive a 1990 Dodge Caravan minivan with strut suspension in front. We live in the mountains with a LOT of twists and turns in every road we travel. Our minivan would make sounds under the dashboard, on every tight turn, like someone was squeezing and releasing an empty beer can. Annoying as hell. I pulled up the carpet under the dash and found several cracks running across the center of the firewall! So I went to a wrecking yard and paid to have a section of about 1 1/2 sq. feet of a firewall cut out of a Dodge Caravan, brought it home and welded up the cracks in it, then put it over our own firewall and spot welded the reinforcement in place. No more noise.
So, assuming that a front bar may not be NECESSARY but may help, whose bar should I buy? Not the really cheap junk for $40.00 on Ebay. But not necessarily the $300.00 Mugen bar made entirely of stainless steel. I asked our members for advice on front strut bars and got absolutely no replies, but decided to go with a bar made of 6061 T-6 aluminum rather than any other material. This aluminum alloy is used to make thousands of parts for military and commercial aircraft, including some landing gear components, because of its corrosion resistance and extremely high strength-to-weight ratio.
In the $100.00 or less price range, we have the bar from Tanabe, who stresses that their bar is best because it is "adjustable for pre-load" on the strut towers, and stresses that you must raise the front wheels off the ground to relieve the weight on the strut towers for the installation. We also have the front bar from A Spec, who told me that their bar mounts the same way as Tanabe, is also made of 6061 T-6, but costs $25.00 less. So I bought from fellow Californians. I was disappointed in the overall quality of the A Spec product, and e-mailed them with my opinion and suggestions for improvement. No reply from A Spec They do not provide installation instructions. Maybe this article will embarrass them enough to make the necessary corrections in quality.
THE REVIEW:
The A Spec bar itself is OK. It appears to be solid (the Tanabe is hollow with what looks like RTV rubber filling the interior (good? bad? ??). The A Spec tower mounting brackets are big, heavy, "clunky" steel weldments with a rough, grit-blasted finish under the black paint. If I were making this product, I would have made the tower brackets out of aluminum as well, not painted steel. The brackets rest directly on top of the painted sheet metal strut towers. If there really IS movement of the towers, I believe that the rough surface of the steel brackets will abrade away the body paint and cause rust eventually.
The A Spec attaching hardware (nuts, bolts, washers) are PURE JUNK and should be thrown away. They supply steel, metric, socket head cap screws, zinc plated tiny washers, and zinc plated hex nuts with no lock washers. The bolts are steel with only enough black oxide coating to keep them from rusting while in stock, waiting to ship. They are GUARANTEED to rust on your car. The design of the brackets and their attaching bolts is POOR. The bolt holes are only about 1 millimeter smaller than the diameter of the cap screw heads. If you could tighten the nuts under the fender enough, you could actually pull the bolt heads THROUGH the holes in the brackets. At best, you get a weak "friction fit" to keep the bolt heads from pulling through. What you also get is enough scuffing of the paint in the bolt holes to start rust IMMEDIATELY. (See photos below).
CLICK ON THE PHOTOS TO SEE LARGER IMAGES. (I apologize for the poor quality of some photos- forgot to set my camera for "macro: focus for close-ups).

This installation DIY is actually a RE-INSTALLATION, because of severe rust that was evident after the bar had only been on the car for one month. One rain storm, two car washes. Here you see the installed bar before re-installation starts.

Here is the rust on the mounting bolts, and around the bolt holes in the brackets. This is the passenger side with the windshield washer hose.
When you get your strut bar, throw away the provided nuts, bolts, and washers. Go to either a hardware store (like Ace) or better yet if you have one in town, an industrial fastener supply company. At a hardware store, buy the following: stainless steel flat head machine screws, either phillips drive or hex drive if you can find them- either 1/4-20 or (bettter) 1/4-28. You need 4, 1" length, and 2, 1/2" length. Get 4, 1"o.d. X 1/4 stainless steel fender washers, and 6 "aero" or "Nylock" 1/4" nuts, either coarse or fine thread to match the bolts. The A Spec nuts & bolts provided are 6 mm, which is the same as 1/4" SAE.
Start your installation by prying out the plastic plugs that anchor the black plastic facia (against the upper firewall) to the inboard area of the strut towers, and pry out the plastic clip holding the windshield washer hose on the passenger side, and the clip that holds the wire loom on the driver's side. Leave the clips on the hose and the wire cable, but you will need the holes where they came from for your bolts.

This shows the provided hardware compared to the stainless steel hardware store stuff. The washers and nuts are attached under your fenders and there WILL be considerable vibration on the nuts if there is any movement of the strut towers that is being prevented by the addition of the strut bar. Because of this vibration, YOU NEED LOCKING NUTS, AND YOU NEED LARGE FENDER WASHERS to spread the clamping force of the nuts and bolts over a larger area under the sheet metal of your fender.

Because of the rust already there, and to prevent it in the future, I masked the bolt holes in the brackets and coated these areas with areosol rubberized undercoat spray, available from any auto parts store in the paint section.


Here's a top and side view of the stainless steel bolts placed in the bracket holes.

I was concerned about preventing paint abrasion and the propagation of rust from the steel bracket to the strut tower sheet metal, so I placed rubber washers used in garden hose fittings, over each bolt hole in the towers, and set the brackets over the rubber washers. The clamping force of the nuts & bolts flattens the rubber washers, but they still prevent contact of the underside of the brackets against the painted body sheet metal.
On the passenger side, place the inboard end of the bracket over the lip of the plastic facia, and put the bolt through the bracket and the hole in the facia lip. You won't need a rubber washer or gasket material under this end of the bracket because the facia insulates it here. On the driver's side, you either have to cut the facia to make room for the bracket (facia is a different shape here), or, as I did, you can place the bracket end UNDER the facia, with a rubber washer under the bracket, and bolt through the facia, bracket, and sheet metal. The INBOARD bolt holes are in a small "finger" of sheet metal that sticks out from the tops of the strut towers. The two OUTBOARD bolt holes go through the strut towers and under the fenders.

Here's a tip for easy installation- put a strip of masking tape (or Scotch tape) over the two fender washers for each side. You will be placing a washer and a nut underneath the fender, inside the strut tower, beside the spring, and there is ALMOST NO ROOM FOR YOUR HAND. Once you bolts are in place, push the taped side of each washer over the threaded bolt and it will stay there without falling off while you thread on the lock nuts.

See? NO ROOM, and this is the easy to reach bolt. The other one is invisible and you have to do things by feel. If you have one, use a ratcheting box wrench (7/16" or 11 mm) to tighten the nuts. Trying to get things tight by turning the phillips drive bolt heads will just screw up the bolt heads. Hex drive heads are better but harder to find.


So, your brackets are mounted as tightly as you can get them, and you have isolated the underside of the rough bracket from the painted strut towers with either rubber washers over the bolt holes, or some kind of rubber gasket sheet material to prevent scuffing and rust.
Now you have to adjust the threaded eye bolts on the ends of the bar so that the holes match up with the holes in the end brackets. You have to be careful to match up the holes exactly. The hex shape machined on the inboard side of the eye bolt prevents proper fit if you are off only 1/2 turn of either of the eye bolts. The hex rests right against the vertical sides of the bracket.


Once you get a good visual alignment of the holes, start to gently thread the bolts through the holes. You will need the proper size of Allen wrench to do this. The fit of the first bolt is easy, but the fit of the second one is hard and you will have to be careful not to screw up the bolt threads by using too much pressure forcing the aluminum bolt through the steel bracket sides. Once the bolts are in, screw on the provided aluminum lock nuts and tighten with an open end or box wrench and the Allen wrench.

Last of all, use black zip ties to fasten the hose and wire loom to the end brackets. Put the zip tie through the plastic clip that used to hold the hose to the tower-- do not put the zip tie around the hose itself or you won't get any washer fluid to the washer nozzles.
The Tanabe and A Spec bars are inexpensive, but I think that if ANY bar is really effective, stainless steel, Titanium, or 6061 T-6 aluminum bars will all work the same. I e-mailed Tanabe and their dealer who advertises on this forum, and asked how the pre-load adjustment they speak of in their ads is done, and asked what kind of attaching hardware they supply. NO ANSWER from anybody.
One of our members, fit4kris, bought the Tanabe bar. I hope that he can share his experience in installing it with us when he gets around to it.
I suspect that there is NO ADJUSTMENT POSSIBLE for these bars except the adjustment necessary to get the bar mounted in the first place. By lifting the car off its wheels, the gravity on the suspension will probably cause the upper ends of the strut towers to "sag" ,almost immeasurably, somewhere. Probably outboard. When you attach your bar to the towers, if the bar does ANYTHING, it keeps the towers from "sagging" back to where they started from, when you lower the car back to the ground. Once the bar is fully installed, you cannot make it any longer or shorter, so there is no "pre-load" adjustment possible other than the effect of weight and gravity bearing against whatever extra rigidity is provided by the bar.
The only change that I could see after this bar was installed was just a little more road noise from the front end. Maybe that means that it is doing something. I can't say that I felt any real change in the handling, but I have not done any serously hard driving since the installation.
By comparison, the improvement from the installation of the Progress Tech. Rear Anti-Sway Bar was immediate, like night and day.
Last edited by manxman; Mar 20, 2007 at 01:30 AM. Reason: add comment, correct spelling

Banned
Joined: Aug 2006
Posts: 349
From: Miami, Florida
Nice write up bro.
Yes, I did get the Tanabe pieces, mainly because this is only my second japanese car and I want to be pseudo-JDM even if it is cheaper than the others. Plus I got all of the same products and I like dealing with one manufacturer.
Needless to say, I actually got to come home from Colombia for a few hours this past weekend to see my kids and to pay some bills. I saw the goodies in the garage and looked at everything. The one thing is that the hardware seems better than what you described of A-Spec's and the finish on the bars seem great. I didn't get a chance to mess with anything as I said, I literally had a few hours, but I suspect I may reconsider. Just for the simple fact that the brackets seem silly. The same as the A-Spec's and not your traditional "Tie to strut's together". More like connect small bolts on towers...Where they don't even touch the struts. Understandable because of the design of the struts but nonetheless, different for me at least.
I should be back in April and I will get the goodies on. I am kind of sad about the drop on the springs once I read AFTER I ordered them, but I don't plan on getting anything larger than a 16" rim so it should fill the left over gap nicely.
I will say that the aesthetics of the Tanabe trump the A-Spec. I am not a fan of the anodized redish color but it does look a little better than the bare aluminum which can get spots here and there.
Nice write up though and I hope to have my book complete in a month as well! Take care.
kris
Yes, I did get the Tanabe pieces, mainly because this is only my second japanese car and I want to be pseudo-JDM even if it is cheaper than the others. Plus I got all of the same products and I like dealing with one manufacturer.
Needless to say, I actually got to come home from Colombia for a few hours this past weekend to see my kids and to pay some bills. I saw the goodies in the garage and looked at everything. The one thing is that the hardware seems better than what you described of A-Spec's and the finish on the bars seem great. I didn't get a chance to mess with anything as I said, I literally had a few hours, but I suspect I may reconsider. Just for the simple fact that the brackets seem silly. The same as the A-Spec's and not your traditional "Tie to strut's together". More like connect small bolts on towers...Where they don't even touch the struts. Understandable because of the design of the struts but nonetheless, different for me at least.
I should be back in April and I will get the goodies on. I am kind of sad about the drop on the springs once I read AFTER I ordered them, but I don't plan on getting anything larger than a 16" rim so it should fill the left over gap nicely.
I will say that the aesthetics of the Tanabe trump the A-Spec. I am not a fan of the anodized redish color but it does look a little better than the bare aluminum which can get spots here and there.
Nice write up though and I hope to have my book complete in a month as well!
Take care.kris
I agree that if these bars are really necessary, in order to REALLY work, they should fasten directly to the strut studs, just like they do on the rear struts. Bolting big honkin' steel brackets to the tops of little tin cans that hold the struts seems like a waste of time.
I do like the idea of pre-loading the struts. But to make the pre-load adjustable, you would have to make the bar itself in three pieces. Here's my idea of a "pre-loadable adjustable bar". Anybody who makes strut bars can have this idea for free. Hey Mugen- hey Tanabe- hey A Spec- hey Cusco---??
Machine the mounting eyes into the ends of the bar. No threads for adjusting the length. Cut the bar into two pieces dead center. Drill and tap the cut center ends, with right hand threads on the right half, left hand threads on the left half. Machine a center hex with threaded studs on both sides to fit the threaded holes in the bars. Once the bars are adjusted so that the mounting bolts are seated in the end brackets, a simple turn or two of the center hex adjuster will draw the bar ends together, toward the center, pre-loading the bar and the struts. Now you have a "turnbuckle" style pre-loadable strut bar. TA-DA! Take it away strut bar guys!
Last edited by manxman; Mar 19, 2007 at 09:53 PM. Reason: add comment
Banned
Joined: Aug 2006
Posts: 349
From: Miami, Florida
Sounds like a floor bar almost! While I don't see their benefit, I see yours and agree. With the floor bar, it seems that it can push out on the sides of the body on the floor to add some rigidness.
Wow...I really am spending a lot of time on here since I am out of the states!
I actually saw a silver Honda Fit here in Colombia. It was SUPER basic but the front looked a little different. Not too versed on the JDM front end and I wouldn't think it would be since they have LHD here...But the front did look a little different.
Kris
Hurry home and mount your Tanabe bar! I am dying to know if the whole assembly is worth the extra $25.00 over the price of the A Spec. (Again assuming that these things actually work).
Dave
Very complete outstanding write up by Manxman again.
Could it be possible that your bar can be adjusted for preload by loosening the lock nuts at each end of the bar itself then rotating the bar. Can't tell from the photos if one end has right hand thread and the other left hand thread.
Could it be possible that your bar can be adjusted for preload by loosening the lock nuts at each end of the bar itself then rotating the bar. Can't tell from the photos if one end has right hand thread and the other left hand thread.
These aren't "lock nuts". They are just threaded eye bolts that attach the bar ends to the brackets on the strut towers. The eye bolt studs have fine threads, and they can only be adjusted to set the overall length of the bar. Once you get the eyes bolted into the tower brackets, no further adjustment is possible. The eye bolts are a solid, one piece item. The inboard hex shoulder serves no purpose because you do not need a wrench to thread the eye bolts in or out to adjust the bar length- hand adjustment is all that is necessary. Thread direction of the eye bolts is right hand thread, and only provides adjustability for length for installation.
Again, to be clear, this is a solid aluminum bar bent into a "bow" to match the curvature of the firewall. The bar ends are drilled and tapped so that the eye bolts can be screwed into the holes. The tower brackets are permanent and unmoving, the bar length is permanent and unmoving. No adjustment is possible.

Thanks- I'm happy to be of some help.
Member
Joined: Aug 2006
Posts: 544
From: Grant, Alabama U.S.A.

Thanks manxman for the write up. I have been debating on the front strut bar for a while now. It just doesn't make sense to me to connect them to the strut housings instead of the strut studs like you said.
As for a solid verses hollow tube goes, the hollow tube is stronger assuming the same metal is used for both and the same quantity.
If you take a straight 6' piece of 1/2 metal tubing and a straight 6' metal rod of the same weight and material and support the ends of each then add equal hanging weights to the middle of each the solid rod will bend with considerably less weight than will take to bend the tubing.
So in that respect the tanabe should have more tensile strength. Is it worth another $25, I don't know.
Guess I'll wait until someone redesigns it or make my own.
2hot-
Based on the description from fit4kris on his new Tanabe bar, it looks as though the attaching nuts and bolts are not as poor as the ones from A Spec, and from other photos, it also appears that the eye bolts that attach the bar ends to the tower brackets are actually two pieces (one piece being a lock nut).
I have not seen a Tanabe bar in person yet, but from all other indications, it looks like the Tanabe bar IS worth the extra few dollars. Your description of the difference in strength between a tubular vs. solid design is correct from an engineering standpoint, but wall thickness would play a part in deciding how well made a tubular bar actually is.
Good luck in making your decision whether to wait for a stud-mounted bar or making your own. If you have the metal fab. ability and access to the right materials, you could pick up some decent side income from sales to other fitfreaks!
Member
Joined: Aug 2006
Posts: 544
From: Grant, Alabama U.S.A.
2hot-
Based on the description from fit4kris on his new Tanabe bar, it looks as though the attaching nuts and bolts are not as poor as the ones from A Spec, and from other photos, it also appears that the eye bolts that attach the bar ends to the tower brackets are actually two pieces (one piece being a lock nut).
I have not seen a Tanabe bar in person yet, but from all other indications, it looks like the Tanabe bar IS worth the extra few dollars. Your description of the difference in strength between a tubular vs. solid design is correct from an engineering standpoint, but wall thickness would play a part in deciding how well made a tubular bar actually is.
Good luck in making your decision whether to wait for a stud-mounted bar or making your own. If you have the metal fab. ability and access to the right materials, you could pick up some decent side income from sales to other fitfreaks!
Based on the description from fit4kris on his new Tanabe bar, it looks as though the attaching nuts and bolts are not as poor as the ones from A Spec, and from other photos, it also appears that the eye bolts that attach the bar ends to the tower brackets are actually two pieces (one piece being a lock nut).
I have not seen a Tanabe bar in person yet, but from all other indications, it looks like the Tanabe bar IS worth the extra few dollars. Your description of the difference in strength between a tubular vs. solid design is correct from an engineering standpoint, but wall thickness would play a part in deciding how well made a tubular bar actually is.
Good luck in making your decision whether to wait for a stud-mounted bar or making your own. If you have the metal fab. ability and access to the right materials, you could pick up some decent side income from sales to other fitfreaks!
Unfortunately I don't have either one. The fabrication ability or the materials to make a marketable one but I'll keep looking for a way to make one that will work.
Perhaps it would be easier if someone just came up with brackets that could replace the ones that come with the A Spec or Tanabe to make it attach to the strut studs. Naturally making them adjustable would be an undertaking of its own.
Yeah, wall thickness would play a part as well. Too bad there are so many obstacles in the way of just having a straight c-pillar type bar for the front.
Unfortunately I don't have either one. The fabrication ability or the materials to make a marketable one but I'll keep looking for a way to make one that will work.
Perhaps it would be easier if someone just came up with brackets that could replace the ones that come with the A Spec or Tanabe to make it attach to the strut studs. Naturally making them adjustable would be an undertaking of its own.
Here is a simple, EFFECTVE, design that any machine shop could make that would outperform any front bar on the market. I do have the skills and the materials are available in any major city. The production cost for one bar would be very high because materials cost less the more you buy, and labor is far less when divided among 50 or 100 pieces as opposed to one at a time.
Making a strut stud mount to replace the ridiculous tower brackets is simple-
just use a large washer about 1/8" thick with a center hole the size of the strut stud. The studs have at least 1" of threads exposed above the mounting nuts- they are presently covered by a plastic sleeve. Use the circular plates (washers) as the bar ends, permanently attached, as in welded. Take off the protective plastic sleeves from the studs, drop the plates over the studs, and tighten down another nut on top of the plates.
I would make the bar out of polished, solid (not hollow) stainless 3/4" or even 1/2" hex bar stock stock of high carbon 4140 stainless steel alloy. There is a reason for the solid vs. hollow--
my design would apply tension by drawing the strut studs together, toward each other.
Because the studs are recessed pretty far back from the position of the current design mounting brackets, the new s.s. bar would have to be bent into much more of a bow to clear the front edge of the center of the firewall. 4140 s.s. has a high degree of structural strength. Even in a bowed shape, and using it to draw the studs toward the center with tension, there is so little tension needed to keep the struts from moving during the hardest of turns that it would be impossible to bend the bar with strut movement.
The tensioning device would be a 1" to 1 1/2" length of hex bar that has threaded studs machined on both ends of it. The threaded studs on the adjuster piece would be about 1 1/2" long on each side. The bar would be cut in the center with drilled and tapped holes to receive the threaded studs on the hex adjuster. We would use fine threads on the adjuster and bar holes, so that one turn of the adjuster would move the bar ends together or apart, depending upon which direction the adjuster is turned, by about 1-2 mm. The adjustability of the bar length would be very easy both in length for installation onto the strut studs, and for pre-load tension.
I don't know what the current per pound cost of 4140 hex bar is from industrial metal suppliers, but my bet is that in quantities of 100 or more, the cost of materials (bar stock, s.s. washers, extra mounting nuts) and machining would be in the neighborhood of $25.00.
I would be in the process of making one of these right now if it weren't for my lack of belief that the front struts have enough movement to even worry about. If I had known in advance how poor the quality of the bar that I bought was, I would have saved my money and my time. Since I have solved the corrosion problems on my A Spec bar, I really don't see the need to throw it away and spend more money to make a better bar.
Also, my past experience in paying machine shops to do production work on my designs has been so negative that I have no interest in making mechanical products for sale anymore.
Member
Joined: Aug 2006
Posts: 544
From: Grant, Alabama U.S.A.
Okay, 2hot-
Here is a simple, EFFECTVE, design that any machine shop could make that would outperform any front bar on the market. I do have the skills and the materials are available in any major city. The production cost for one bar would be very high because materials cost less the more you buy, and labor is far less when divided among 50 or 100 pieces as opposed to one at a time.
Making a strut stud mount to replace the ridiculous tower brackets is simple-
just use a large washer about 1/8" thick with a center hole the size of the strut stud. The studs have at least 1" of threads exposed above the mounting nuts- they are presently covered by a plastic sleeve. Use the circular plates (washers) as the bar ends, permanently attached, as in welded. Take off the protective plastic sleeves from the studs, drop the plates over the studs, and tighten down another nut on top of the plates.
I would make the bar out of polished, solid (not hollow) stainless 3/4" or even 1/2" hex bar stock stock of high carbon 4140 stainless steel alloy. There is a reason for the solid vs. hollow--
my design would apply tension by drawing the strut studs together, toward each other.
Because the studs are recessed pretty far back from the position of the current design mounting brackets, the new s.s. bar would have to be bent into much more of a bow to clear the front edge of the center of the firewall. 4140 s.s. has a high degree of structural strength. Even in a bowed shape, and using it to draw the studs toward the center with tension, there is so little tension needed to keep the struts from moving during the hardest of turns that it would be impossible to bend the bar with strut movement.
The tensioning device would be a 1" to 1 1/2" length of hex bar that has threaded studs machined on both ends of it. The threaded studs on the adjuster piece would be about 1 1/2" long on each side. The bar would be cut in the center with drilled and tapped holes to receive the threaded studs on the hex adjuster. We would use fine threads on the adjuster and bar holes, so that one turn of the adjuster would move the bar ends together or apart, depending upon which direction the adjuster is turned, by about 1-2 mm. The adjustability of the bar length would be very easy both in length for installation onto the strut studs, and for pre-load tension.
I don't know what the current per pound cost of 4140 hex bar is from industrial metal suppliers, but my bet is that in quantities of 100 or more, the cost of materials (bar stock, s.s. washers, extra mounting nuts) and machining would be in the neighborhood of $25.00.
I would be in the process of making one of these right now if it weren't for my lack of belief that the front struts have enough movement to even worry about. If I had known in advance how poor the quality of the bar that I bought was, I would have saved my money and my time. Since I have solved the corrosion problems on my A Spec bar, I really don't see the need to throw it away and spend more money to make a better bar.
Also, my past experience in paying machine shops to do production work on my designs has been so negative that I have no interest in making mechanical products for sale anymore.
Perhaps someone will take your idea and run with it. On to other mods for now.

Member

Joined: May 2006
Posts: 288
From: camarillo,ca,usa
this is the second time that i was about to buy something and it changed my decision because of the review,first was the intake,because of K&Ns fault in design and engineering of its K&N TYPHOON INTAKE, i did not buy one,i just bought a drop in K&N filter,and the rest of my money went to a Modacar catback exhaust which i love so dearly coz the result is noticeable,second, after reading mr.manxman review on the front strut bar it changed my mind not to buy a front strut bar,instead i bought SCANGAUGE 2(i just finished installing today,i got it for $149),i dont mind spending money in mods if i think the product is good quality,perfect in design & engineering,will gain a little power,improved stability,handling,control and the last but not the least something that will help in fuel economy,for right now i will wait till a good front strut bar shows up,with the price of gas nowadays and in the future, fuel economy is my priority,the money that i will spend on front strut bar will go to T1R voltage stabilizer,ignition booster & earthing kit.If theres a soldier that needs recognition i will nominate MR.MANXMAN for the congresional medal of honor,his review on this front strut bar was simple but precise.
Last edited by boyetssilverfit; May 13, 2007 at 12:37 AM.
boyetssilverfit,
Thanks much for the praise. As you can see from the replies to my K & N Typhoon warning thread, some people agree with my thinking, and others think that I'm crazy. As a member of this special interest group, I owe it to fellow members to alert them when I find products that are NOT worth the cost. I don't know everything, because it took the waste of my money to discover the flaws in some of these modifications. But once discovered, why keep it a secret and help the scam manufacturers cheat other people?
Your own logical approach to getting the most out of your car is an example of the kind of people that I try to reach with my product reviews. You and I are thinking along the same lines- after my Hood Edge Protector arrives from Canada, my next project will be the T1R electrical improvements.
I won't wish you luck with your modifications, because you won't need it.
Dave
I agree with your concentration on improving fuel economy however possible. But in place of an unnecessary front strut bar, you will get much more than your money's worth from the Progress Tech. Rear Anti-sway Bar. Even if you are not a "canyon carver", this bar will improve stability on wet pavement, in high cross winds, and save your brakes 'cause you don't even have to slow down to turn a corner. (Kidding) ((not really kidding)).
Member
Joined: May 2006
Posts: 288
From: camarillo,ca,usa
boyetssilverfit,
Thanks much for the praise. As you can see from the replies to my K & N Typhoon warning thread, some people agree with my thinking, and others think that I'm crazy. As a member of this special interest group, I owe it to fellow members to alert them when I find products that are NOT worth the cost. I don't know everything, because it took the waste of my money to discover the flaws in some of these modifications. But once discovered, why keep it a secret and help the scam manufacturers cheat other people?
Your own logical approach to getting the most out of your car is an example of the kind of people that I try to reach with my product reviews. You and I are thinking along the same lines- after my Hood Edge Protector arrives from Canada, my next project will be the T1R electrical improvements.
I won't wish you luck with your modifications, because you won't need it.
Dave
Thanks much for the praise. As you can see from the replies to my K & N Typhoon warning thread, some people agree with my thinking, and others think that I'm crazy. As a member of this special interest group, I owe it to fellow members to alert them when I find products that are NOT worth the cost. I don't know everything, because it took the waste of my money to discover the flaws in some of these modifications. But once discovered, why keep it a secret and help the scam manufacturers cheat other people?
Your own logical approach to getting the most out of your car is an example of the kind of people that I try to reach with my product reviews. You and I are thinking along the same lines- after my Hood Edge Protector arrives from Canada, my next project will be the T1R electrical improvements.
I won't wish you luck with your modifications, because you won't need it.
Dave
Again, if you have the money, I would order the Progress bar ASAP so yours will be the first to ship when they come back into stock. They won't charge your card until they ship. You should order directly from Joey at Progress, because your bar will ship at the same time they ship the multiples to their dealers. That way you might pay a few more dollars for shipping, but won't have to wait for the stock to reach your nearest Progress dealer and then ship out again to you.
I placed the first retail order for this product, and the delay in production was 1 1/2 weeks less than they stated to our other members who ordered later.
Last edited by manxman; May 13, 2007 at 12:37 PM. Reason: add comment
I just looked again at the Progress Bar thread. According to the last couple of posts, although Progress is out of stock, their dealer New Edge Performance might still have a few left. Their number is 301-729-3000. I don't know where New Edge is located (most likely East Coast), but the Progress factory is in Anaheim, CA.