
FS: SuperBRIGHT SMD LED Panels - Interior/Exterior


cargo light
ACleanSC4's cargo light LEDs work fine if you've done the Acura https://www.fitfreak.net/forums/2nd-...t-upgrade.html as well! The old cargo light was DIM!


PM sent!
PM sent!
Sorry PM sent!
Sorry PM sent!


Please light up my 2010 Fit Sport! I can't pass up on the feedback this kit is receiving and at such a wonderful price.
I am looking for the following set: "09+ Fit - 18SMD dome + 12SMD map lights + 6SMD trunk (4 total) - $55 shipped!" shipped to 06033.
PM please.
I am looking for the following set: "09+ Fit - 18SMD dome + 12SMD map lights + 6SMD trunk (4 total) - $55 shipped!" shipped to 06033.
PM please.
I received my LED kit today!
I opted for the GE8 kit: 18SMD dome + 2x 12SMD map lights + 6SMD trunk + 2x 3SMD flank style license plate ($65 shipped). Very much satisfied.
First of all, I'd like to present a timeline of exchanges with the seller. This thread has been around for quite a bit causing me to be a little skeptical going through with this purchase. I regret such feelings.
5/13 - I posted on this thread
5/14 - I was anxious for a reply and figured I would also shoot a PM for email notification purposes. I also included a revision to what my forum post said and asked about the addition of two license plate lights.
5/16 - I made my first contact with the seller when he responded with a price, information on the license plate lights he had to offer, and paypal information.
5/16 - Paypal + shipping info sent.
5/16 - Response from seller letting me know the order would be shipping the next day, including USPS tracking number.
5/20 - Order received. Packaged neatly in a padded envelope. Boxes holding lights appeared clean and untouched.
Installation was a breeze. The festoon adapters for use with dome/map lights were very easy. The wedge adapters for use with trunk and license plate were a bit more of a struggle until I figure out a fix. The female wedge adapters on the car are a tight fit, the male wedge adapters included in this kit were not cooperating. I then realized that the two metal conductor pieces on the wedge were loosely sitting over a ridge designed to pull the metal in closer to the plastic for a tighter fit. Easy fix, I took a pair of needle nose pliers and lightly squeezed the conductors into their little ridge. Voila! Slid right in with a little bit of effort for a tight(not loose) fit.
I chose not to use the adhesive at this time. I have not driven with the new lights. I expect minor vibration and movement without the adhesive but I wanted to leave them unstuck for future comparison photos. I will post those photos as soon as I take them. I dream a photo of my car on a super foggy night. With the combination of my sunroof and this lighting kit, I imagine a tower of light a la the memorial of John Lennon.

As a final note... These lights are very bright. If I were looking for something "not too bright," I would opt out of this kit or downgrade and use the smallest panels all around. If I were on the fence, I would feel comfortable asking the seller for suggestions, advice, or perhaps other possible options OP has to offer.
I opted for the GE8 kit: 18SMD dome + 2x 12SMD map lights + 6SMD trunk + 2x 3SMD flank style license plate ($65 shipped). Very much satisfied.
First of all, I'd like to present a timeline of exchanges with the seller. This thread has been around for quite a bit causing me to be a little skeptical going through with this purchase. I regret such feelings.
5/13 - I posted on this thread
5/14 - I was anxious for a reply and figured I would also shoot a PM for email notification purposes. I also included a revision to what my forum post said and asked about the addition of two license plate lights.
5/16 - I made my first contact with the seller when he responded with a price, information on the license plate lights he had to offer, and paypal information.
5/16 - Paypal + shipping info sent.
5/16 - Response from seller letting me know the order would be shipping the next day, including USPS tracking number.
5/20 - Order received. Packaged neatly in a padded envelope. Boxes holding lights appeared clean and untouched.
Installation was a breeze. The festoon adapters for use with dome/map lights were very easy. The wedge adapters for use with trunk and license plate were a bit more of a struggle until I figure out a fix. The female wedge adapters on the car are a tight fit, the male wedge adapters included in this kit were not cooperating. I then realized that the two metal conductor pieces on the wedge were loosely sitting over a ridge designed to pull the metal in closer to the plastic for a tighter fit. Easy fix, I took a pair of needle nose pliers and lightly squeezed the conductors into their little ridge. Voila! Slid right in with a little bit of effort for a tight(not loose) fit.
I chose not to use the adhesive at this time. I have not driven with the new lights. I expect minor vibration and movement without the adhesive but I wanted to leave them unstuck for future comparison photos. I will post those photos as soon as I take them. I dream a photo of my car on a super foggy night. With the combination of my sunroof and this lighting kit, I imagine a tower of light a la the memorial of John Lennon.
As a final note... These lights are very bright. If I were looking for something "not too bright," I would opt out of this kit or downgrade and use the smallest panels all around. If I were on the fence, I would feel comfortable asking the seller for suggestions, advice, or perhaps other possible options OP has to offer.
Installation is quite simple.
Each package contains the SMD LED Panel and a multitude of different connectors. In the GD package you will be looking to use the "festoon" connector for your dome light and "wedge" connector for your trunk light. You will know which connector you will need for each light when you remove the lenses/covers from the dome/trunk lights. The connector is simply mimicking the bulb you are replacing.
Photo courtesy of ACleanSC4:

In the case of the "festoon" style seen in the dome light, you will see a glass tube looking bulb with metal ends. The bulb is held into place by flexible metal conductors within the dome light housing. This kit mimics this by using a "festoon" style connector to plug into the existing housing. Plug the "festoon" white male connector into the white female panel until you hear it click into place and they can not be pulled apart. Simply pull the glass bulb out and replace it. Flip the light on to see if you have oriented the connection correctly. If the light does not go on, just flip the festoon and try it that way. Play around a little and figure out how you'd like the panel to sit within the housing and when you've got it figured out use the double-stick adhesive on the backside of the panel to stick the panel securely to the housing.
Photo courtesy of Fitting:

The trunk light uses the "wedge" style connector. The stock wedge was a bit more of a production to remove as I was afraid of putting too much concentrated force on the glass bulb crushing it between my fingers. When you pop the trunk lens off you will see how the bulb sits. The wedge is literally "wedged" into the female adapter. Mine was a bit stubborn resulting in about 5 minutes of good wiggling to loosen up the stock glass wedge enough to slide it out. Like the dome connection, choose the wedge connector that mimics what you just pulled out of the stock housing and connect it to the panel then slide the plastic wedge connector into the housing. If the light lights up, you've got it oriented correctly. If not, flip it. Line it up to your liking and stick it the same way you did with the dome.
Photo courtesy of Fitting:

In my post up above I mentioned an issue I had with the wedge connector:
Super easy install. As for popping the lenses off of the housing... You can pop the dome light lens off by using a flathead or something like a credit card between the lens and housing on the rear side of the light (opposite the on/off switch) and simply popping it out. For the trunk light lens you'll want to pry the flathead on the side facing the front of the car.
Regarding availability of this package... In my previous post, right above yours, I outlined the process I went through getting in touch with ACleanSC4. I suggest shooting him a PM in addition to the reply to this thread in order to call attention to your interest and trigger that email notification. He's a wonderful seller and I strongly suggest this kit.
Good luck!
Each package contains the SMD LED Panel and a multitude of different connectors. In the GD package you will be looking to use the "festoon" connector for your dome light and "wedge" connector for your trunk light. You will know which connector you will need for each light when you remove the lenses/covers from the dome/trunk lights. The connector is simply mimicking the bulb you are replacing.
Photo courtesy of ACleanSC4:
In the case of the "festoon" style seen in the dome light, you will see a glass tube looking bulb with metal ends. The bulb is held into place by flexible metal conductors within the dome light housing. This kit mimics this by using a "festoon" style connector to plug into the existing housing. Plug the "festoon" white male connector into the white female panel until you hear it click into place and they can not be pulled apart. Simply pull the glass bulb out and replace it. Flip the light on to see if you have oriented the connection correctly. If the light does not go on, just flip the festoon and try it that way. Play around a little and figure out how you'd like the panel to sit within the housing and when you've got it figured out use the double-stick adhesive on the backside of the panel to stick the panel securely to the housing.
Photo courtesy of Fitting:
The trunk light uses the "wedge" style connector. The stock wedge was a bit more of a production to remove as I was afraid of putting too much concentrated force on the glass bulb crushing it between my fingers. When you pop the trunk lens off you will see how the bulb sits. The wedge is literally "wedged" into the female adapter. Mine was a bit stubborn resulting in about 5 minutes of good wiggling to loosen up the stock glass wedge enough to slide it out. Like the dome connection, choose the wedge connector that mimics what you just pulled out of the stock housing and connect it to the panel then slide the plastic wedge connector into the housing. If the light lights up, you've got it oriented correctly. If not, flip it. Line it up to your liking and stick it the same way you did with the dome.
Photo courtesy of Fitting:
In my post up above I mentioned an issue I had with the wedge connector:
The female wedge adapters on the car are a tight fit, the male wedge adapters included in this kit were not cooperating. I then realized that the two metal conductor pieces on the wedge were loosely sitting over a ridge designed to pull the metal in closer to the plastic for a tighter fit. Easy fix, I took a pair of needle nose pliers and lightly squeezed the conductors into their little ridge. Voila! Slid right in with a little bit of effort for a tight(not loose) fit.
Regarding availability of this package... In my previous post, right above yours, I outlined the process I went through getting in touch with ACleanSC4. I suggest shooting him a PM in addition to the reply to this thread in order to call attention to your interest and trigger that email notification. He's a wonderful seller and I strongly suggest this kit.
Good luck!

Merchant / Group Buy Organizer ( non-certified )
Joined: Sep 2010
Posts: 374
From: Ga
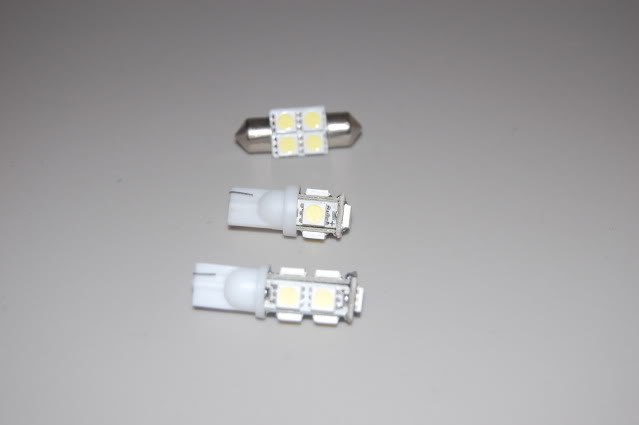
if you guys need some LEDs i have some of the following
4 SMD bulb type
5 SMD wedge
9 SMD wedge
also not pictured i have 12 SMD panels
super cheap prices just PM me with what you need
4 SMD bulb type
5 SMD wedge
9 SMD wedge
also not pictured i have 12 SMD panels
super cheap prices just PM me with what you need
Member
Joined: Jun 2009
Posts: 137
From: Whiteman AFB

Merchant / Group Buy Organizer ( non-certified )
Joined: Sep 2010
Posts: 374
From: Ga
