DIY rear camber mod for gd!!
#41
 09-08-2011, 05:44 PM


#43
04-04-2012, 09:50 PM

Doing this tomorrow. Got 16x8s now with 205/40 and I'm rubbing again  Im going to try .075 thickness of the washer and go with that. Don't want to much of camber, just enough to stop rubbing. I'll post pics when I'm done!
Im going to try .075 thickness of the washer and go with that. Don't want to much of camber, just enough to stop rubbing. I'll post pics when I'm done!


#48
01-11-2013, 02:35 PM

I'm at the part where I need to remove the 4, 14mm bolts. Just a fair warning to everyone, there is one kinda hiding behind a metal piece of the inside assembly. It's hard as hell to losen it. I've been trying tto get it out for 15 minutes. Everything else is pretty easy.
Nice write up!
+rep!
Nice write up!
+rep!
#50
01-29-2013, 05:11 AM
step 8. loosen the bolt enough so you can fit the washer behinde it and you can angle the hub enough so it sits flush

for the washers i used a standered 5/8 square washer from home depot they cast about 25 cents each but they are steele washers
they start out being .121 i shaved one at a angle to flat wise to .098 then the otherone from corner to corner at a angle to .102
front washer is .102
rear washer is .098
and that will compensate for the toe the washer get put in on the bottom bolts the front one going towards the front of the car has .102 and the rear one has .098
#51
03-31-2013, 12:15 AM
I also need some clarification on this. OP, when you say "i shaved one at a angle to flat wise to .098 then the otherone from corner to corner at a angle to .102" what the hell does that mean lol? No offense but that sentence made no sense to me.
Are you trying to say that one washer needs to be .098 thickness on the whole washer? Or is this saying that if you were to look at this as a square where the sides are labelled 1 to 4 in a clockwise direction, that from the top edge of side 1 to the bottom edge being side 3. Your washer would end up as edge 1 @0.121 and down to edge 3 be @0.098?
Sorry man, really wanting to do this but slightly confused. Seeing as you have done the R&D behind this, I'd rather ask for clarity then do a few attempts myself. Thanks so much
Guy
#52
04-11-2013, 08:32 AM

Help,,, i did this mod yesterday and all is well until i see the camber on. i stacked 2 washers on the rear mount hub bolt and it cambered but only for the back half and i now have a TOE in tires, they squeek and i feel it tailwhips the rear end of my car. was i supposed to put 2 washers on the front HUb bolt also?
#53
04-11-2013, 11:48 AM
So...
This has been around for a while, and it has helped numerous folks, but I did not feel comfortable with a hardware store washer being subjected to high G cornering forces I put my car under during AutoX. ESPECIALLY when I usually only have ONE rear wheel on the ground during hard cornering and sweepers:


SO, I ordered a rear hub from Honda ($$$) and had a local machine shop take measurements and create a FULL CONTACT shim ($$$):

These have been made in the USA and intended to provide around -3.0 of camber for the rear.
I am not a vendor, so if you want to know more PM me.
No I do not have pictures installed as my next several events won't require the camber yet. Another local HellaFit member may have his done soon, if so I will ask for photos from him.
This has been around for a while, and it has helped numerous folks, but I did not feel comfortable with a hardware store washer being subjected to high G cornering forces I put my car under during AutoX. ESPECIALLY when I usually only have ONE rear wheel on the ground during hard cornering and sweepers:
SO, I ordered a rear hub from Honda ($$$) and had a local machine shop take measurements and create a FULL CONTACT shim ($$$):
These have been made in the USA and intended to provide around -3.0 of camber for the rear.
I am not a vendor, so if you want to know more PM me.
No I do not have pictures installed as my next several events won't require the camber yet. Another local HellaFit member may have his done soon, if so I will ask for photos from him.
#55
04-11-2013, 12:22 PM
 ...
... Then I showed my alignment/tire guy's this thread and the FLAT OUT refused

They know EXACTLY how and where I drive

Folks who are tracking, might be worth your time to consider...
 Only real benefit is cheaper shipping
#58
09-12-2014, 10:44 AM
Ok you guys i know ive been taken a while on putting this up but here you go. enjoy!!!
NIETHER I OR FITFREAK is responsable for any injury.......................
DISCLAIMER: ONLY ATTEMPT THIS AT YOUR OWN RISK, HAVE ALL THE TOOLS NECESSARY TO DO THE JOB PROPERLY. ONLY ATTEMPT IF YOU ARE COMFORTABLE WITH DIY PROJECTS AND HAVE SOME SORT OF MECHANICAL EXPERIENCE.
**Read everything below before starting on this DIY**
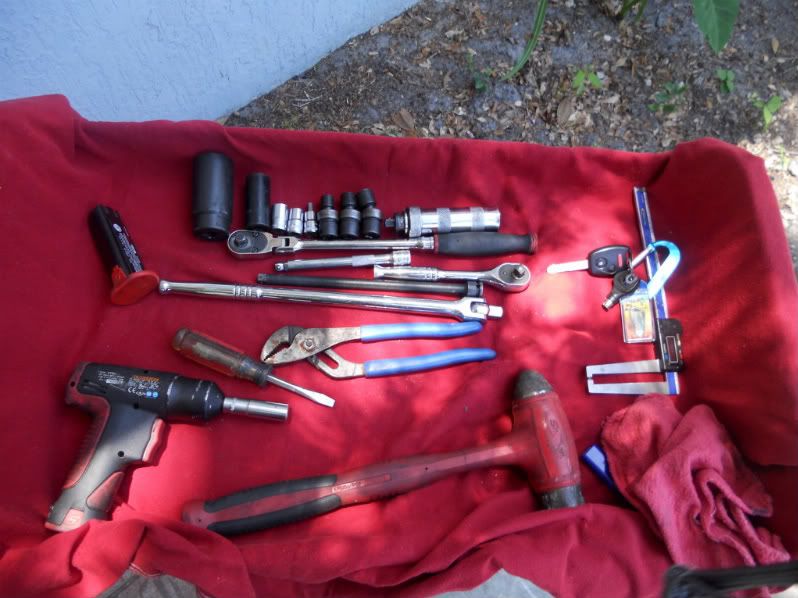
tools you will need are:
1. shallow 10,12,14 3/8
2. 6' extention
3. 3/8 wratchet
4. 32mm socket with breaker bar
5. hammer
6. impact srewdriver with 6mm alan socket
7. a flat head screwdriver
8. a pair of chanel locks
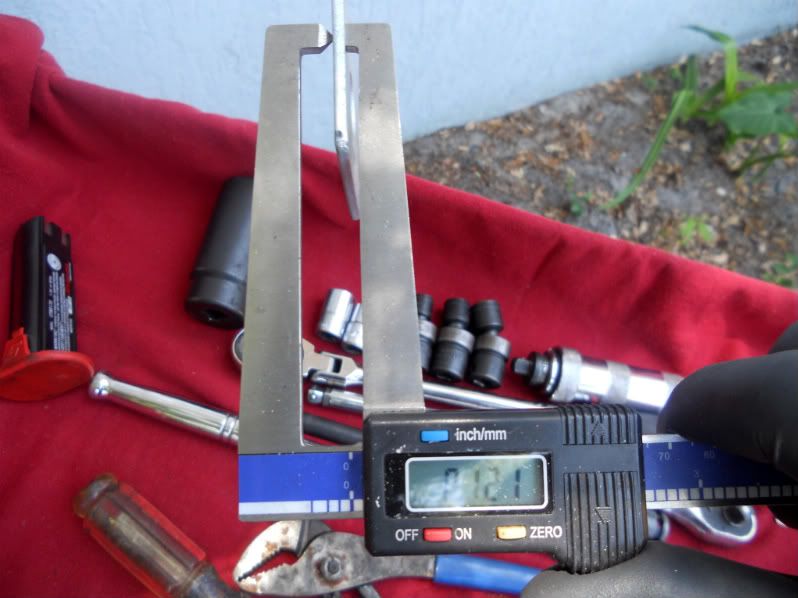
9. a digital micrometer
10. a floor jack!! lol
11. a grinder for the washers
step 1 remove your wheel and remove your drum
take dust boot off.
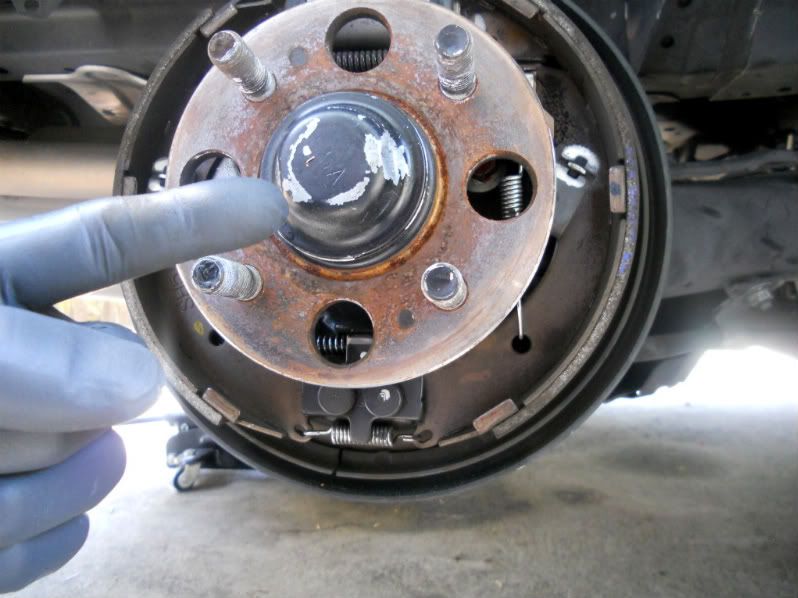
step 2. remove 32mm nut and remove hub

step 3.remove 12mm nut that holds on the Ebrake
step 4. remove ABS sensor bolt 10mm
step 5.remove the 4 14mm bolts that hold on the drum assembley
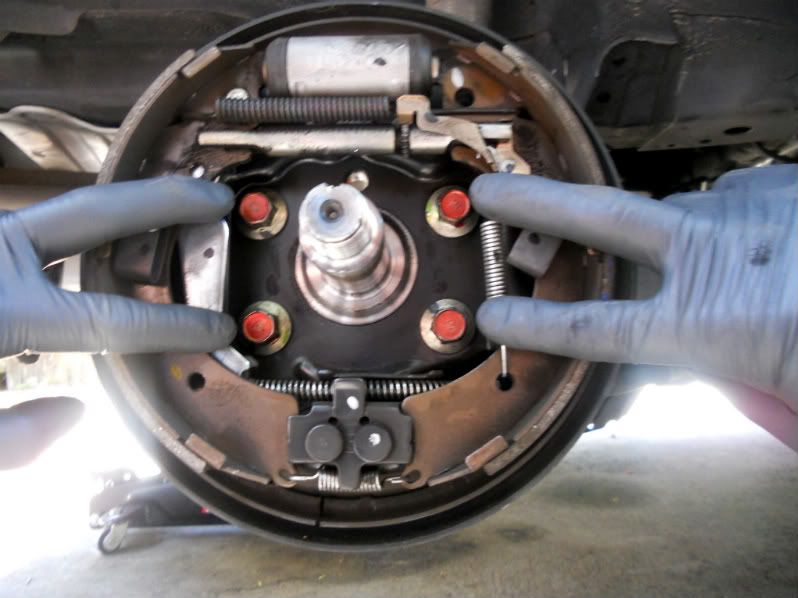
step 6.remove assembley VERY CAFEFULLY!!!! and detatch the clips that hold the brakeline in place
move the assenbley off the hub and up above the hub BE CAREFULL!!

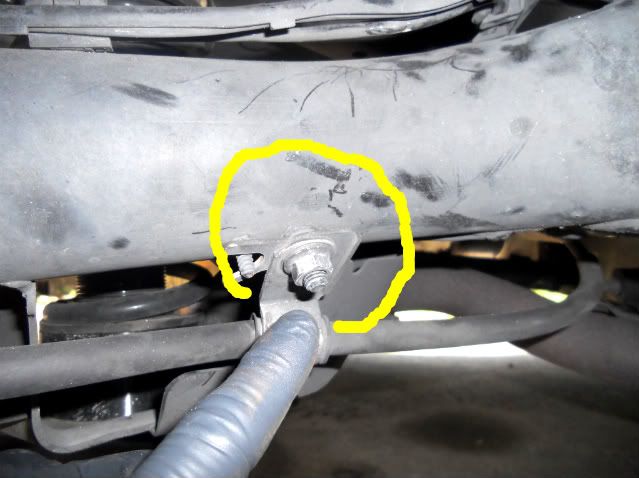
step 7. use the impact screwdriver with the 6mm alan socket and loosen the 6mm bolt BE VERY CAREFULL this bolt likes to strip!!.......
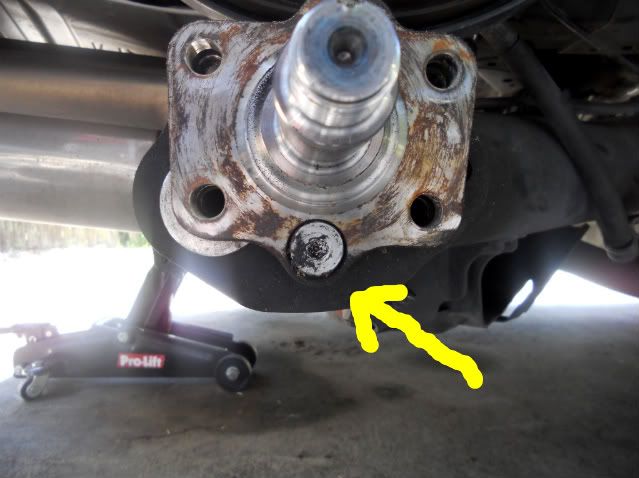
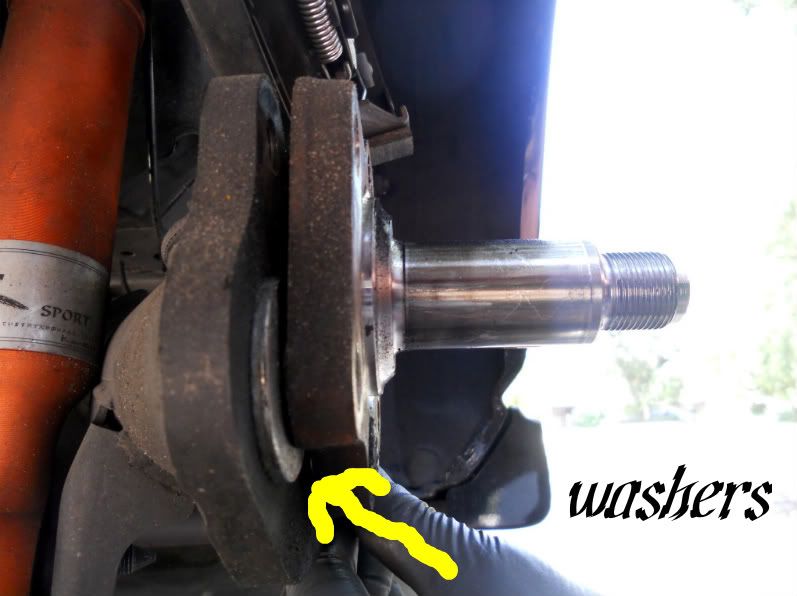
step 8. loosen the bolt enough so you can fit the washer behinde it and you can angle the hub enough so it sits flush
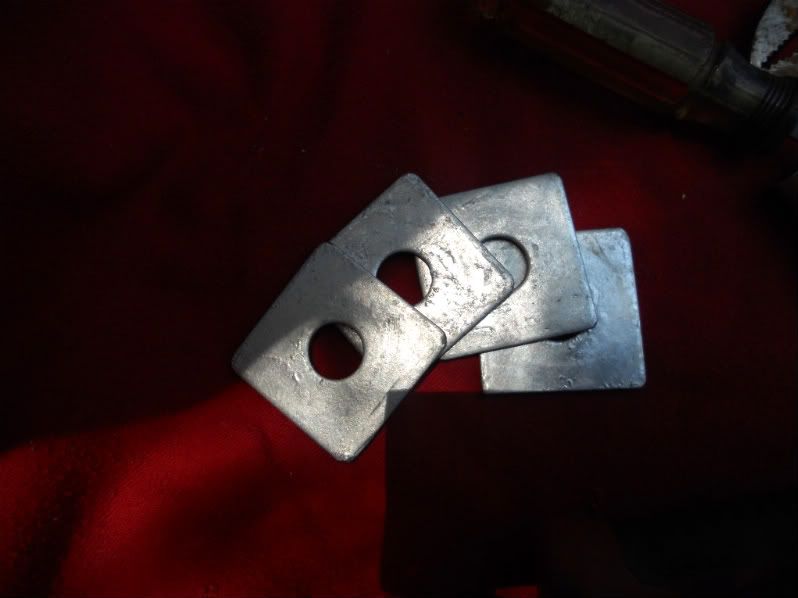
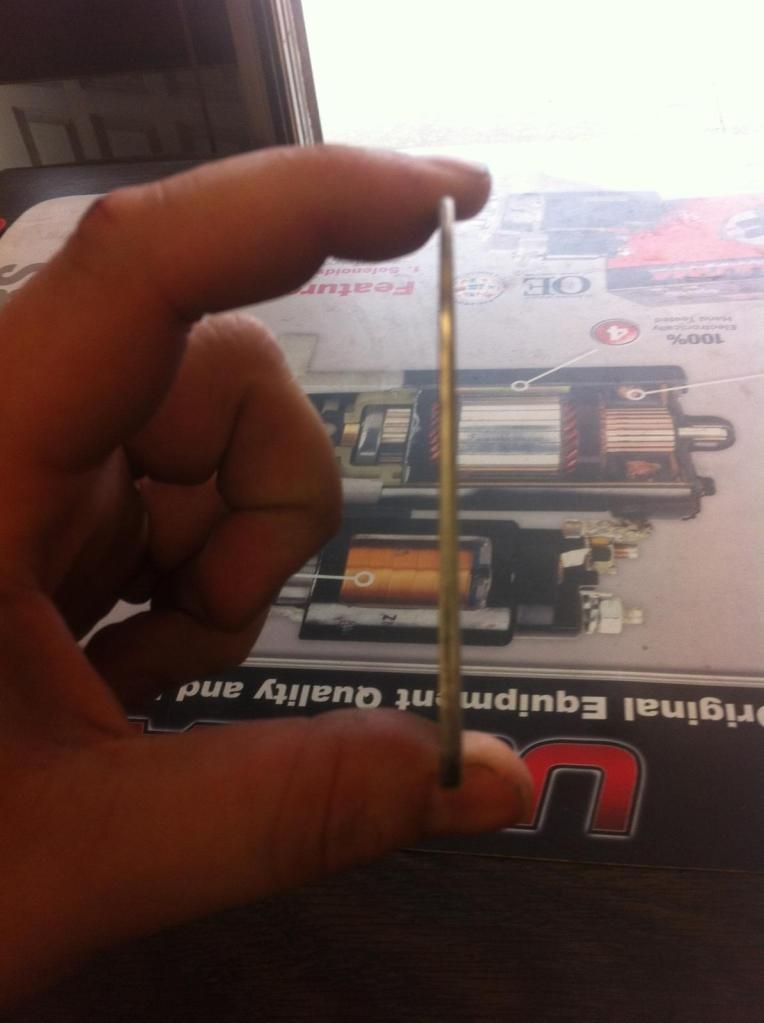
for the washers i used a standered 5/8 square washer from home depot they cast about 25 cents each but they are steele washers
they start out being .121 i shaved one at a angle to flat wise to .098 then the otherone from corner to corner at a angle to .102
front washer is .102
rear washer is .098
and that will compensate for the toe the washer get put in on the bottom bolts the front one going towards the front of the car has .102 and the rear one has .098
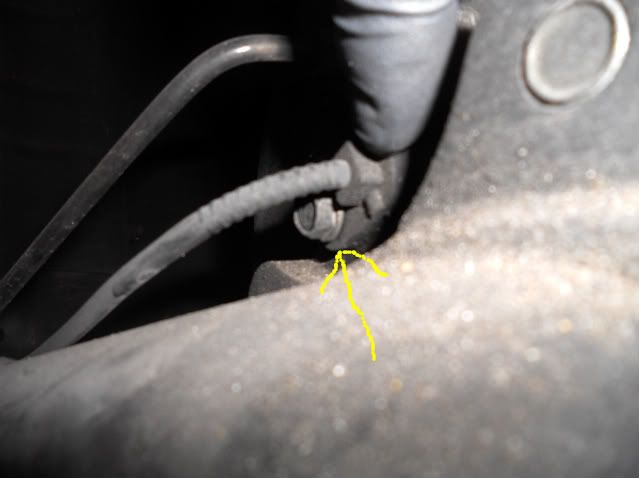
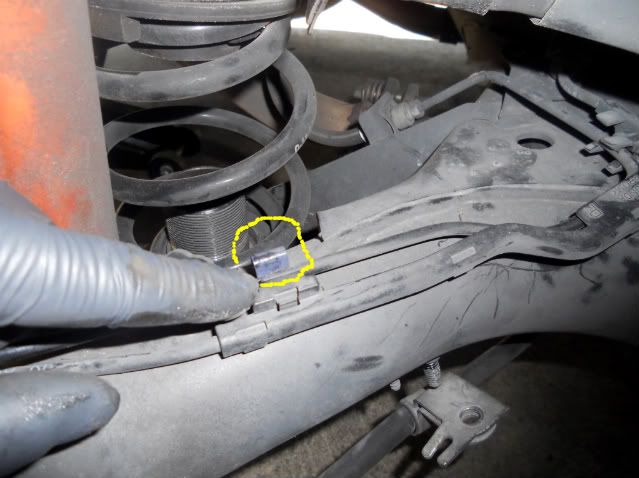
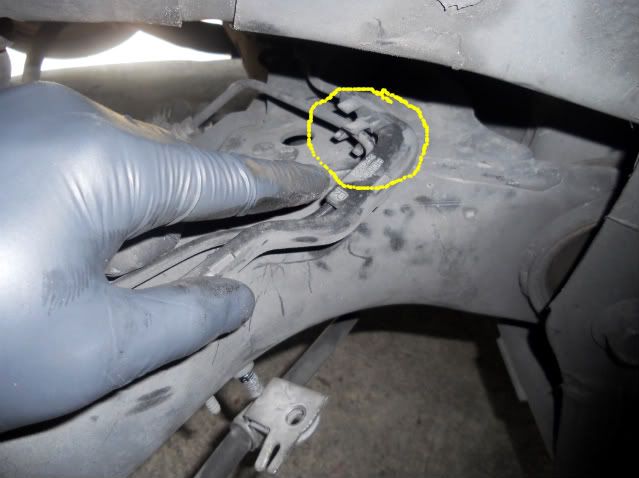
then you put it all back together in reverse for extra safety put some blue thread locker on the 14mm bolt that hold the assembley together just so the dont move but they wont just to have a little safety in the back of your head once you put it back together it will look like this
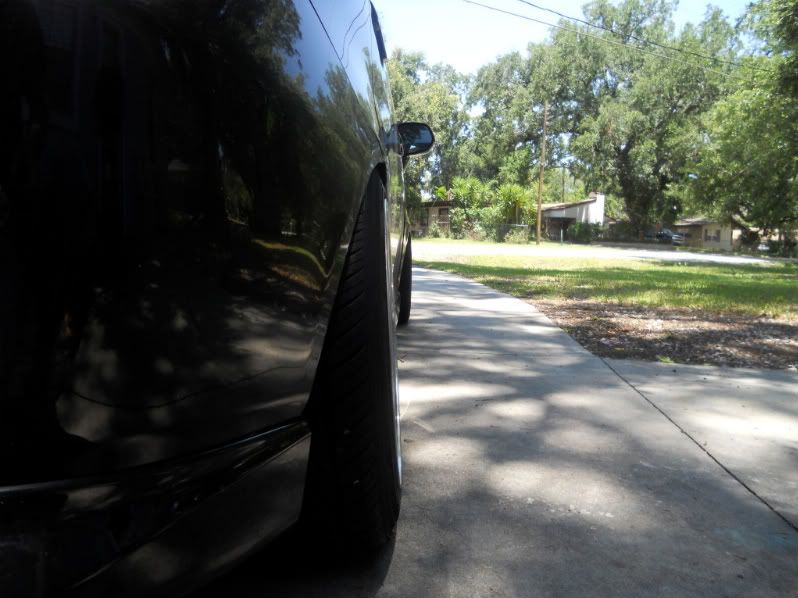
and top veiw
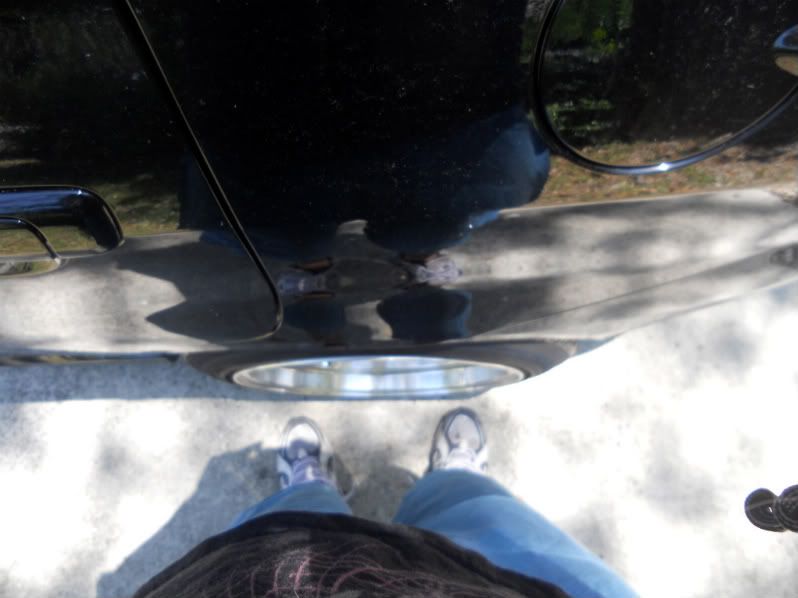
and from the front view

enjoy your new mod!!!!!
NIETHER I OR FITFREAK is responsable for any injury.......................
DISCLAIMER: ONLY ATTEMPT THIS AT YOUR OWN RISK, HAVE ALL THE TOOLS NECESSARY TO DO THE JOB PROPERLY. ONLY ATTEMPT IF YOU ARE COMFORTABLE WITH DIY PROJECTS AND HAVE SOME SORT OF MECHANICAL EXPERIENCE.
**Read everything below before starting on this DIY**
tools you will need are:
1. shallow 10,12,14 3/8
2. 6' extention
3. 3/8 wratchet
4. 32mm socket with breaker bar
5. hammer
6. impact srewdriver with 6mm alan socket
7. a flat head screwdriver
8. a pair of chanel locks
9. a digital micrometer
10. a floor jack!! lol
11. a grinder for the washers
step 1 remove your wheel and remove your drum
take dust boot off.
step 2. remove 32mm nut and remove hub
step 3.remove 12mm nut that holds on the Ebrake
step 4. remove ABS sensor bolt 10mm
step 5.remove the 4 14mm bolts that hold on the drum assembley
step 6.remove assembley VERY CAFEFULLY!!!! and detatch the clips that hold the brakeline in place
move the assenbley off the hub and up above the hub BE CAREFULL!!
step 7. use the impact screwdriver with the 6mm alan socket and loosen the 6mm bolt BE VERY CAREFULL this bolt likes to strip!!.......
step 8. loosen the bolt enough so you can fit the washer behinde it and you can angle the hub enough so it sits flush
for the washers i used a standered 5/8 square washer from home depot they cast about 25 cents each but they are steele washers
they start out being .121 i shaved one at a angle to flat wise to .098 then the otherone from corner to corner at a angle to .102
front washer is .102
rear washer is .098
and that will compensate for the toe the washer get put in on the bottom bolts the front one going towards the front of the car has .102 and the rear one has .098
then you put it all back together in reverse for extra safety put some blue thread locker on the 14mm bolt that hold the assembley together just so the dont move but they wont just to have a little safety in the back of your head once you put it back together it will look like this
and top veiw
and from the front view
enjoy your new mod!!!!!
#59
09-14-2014, 12:20 AM

So...
This has been around for a while, and it has helped numerous folks, but I did not feel comfortable with a hardware store washer being subjected to high G cornering forces I put my car under during AutoX. ESPECIALLY when I usually only have ONE rear wheel on the ground during hard cornering and sweepers:
SO, I ordered a rear hub from Honda ($$$) and had a local machine shop take measurements and create a FULL CONTACT shim ($$$):
These have been made in the USA and intended to provide around -3.0 of camber for the rear.
I am not a vendor, so if you want to know more PM me.
No I do not have pictures installed as my next several events won't require the camber yet. Another local HellaFit member may have his done soon, if so I will ask for photos from him.
#60
09-14-2014, 12:41 AM
So...
This has been around for a while, and it has helped numerous folks, but I did not feel comfortable with a hardware store washer being subjected to high G cornering forces I put my car under during AutoX. ESPECIALLY when I usually only have ONE rear wheel on the ground during hard cornering and sweepers:
SO, I ordered a rear hub from Honda ($$$) and had a local machine shop take measurements and create a FULL CONTACT shim ($$$):
These have been made in the USA and intended to provide around -3.0 of camber for the rear.
I am not a vendor, so if you want to know more PM me.
No I do not have pictures installed as my next several events won't require the camber yet. Another local HellaFit member may have his done soon, if so I will ask for photos from him.
This has been around for a while, and it has helped numerous folks, but I did not feel comfortable with a hardware store washer being subjected to high G cornering forces I put my car under during AutoX. ESPECIALLY when I usually only have ONE rear wheel on the ground during hard cornering and sweepers:
SO, I ordered a rear hub from Honda ($$$) and had a local machine shop take measurements and create a FULL CONTACT shim ($$$):
These have been made in the USA and intended to provide around -3.0 of camber for the rear.
I am not a vendor, so if you want to know more PM me.
No I do not have pictures installed as my next several events won't require the camber yet. Another local HellaFit member may have his done soon, if so I will ask for photos from him.