
DIY rear camber mod for gd!!

Thread Starter
|
Member

Joined: Aug 2008
Posts: 1,170
From: orlando,fl
Ok you guys i know ive been taken a while on putting this up but here you go. enjoy!!!
NIETHER I OR FITFREAK is responsable for any injury.......................
DISCLAIMER: ONLY ATTEMPT THIS AT YOUR OWN RISK, HAVE ALL THE TOOLS NECESSARY TO DO THE JOB PROPERLY. ONLY ATTEMPT IF YOU ARE COMFORTABLE WITH DIY PROJECTS AND HAVE SOME SORT OF MECHANICAL EXPERIENCE.
**Read everything below before starting on this DIY**
tools you will need are:
1. shallow 10,12,14 3/8
2. 6' extention
3. 3/8 wratchet
4. 32mm socket with breaker bar
5. hammer
6. impact srewdriver with 6mm alan socket
7. a flat head screwdriver
8. a pair of chanel locks
9. a digital micrometer
10. a floor jack!! lol
11. a grinder for the washers
DSCN2826.jpg?t=1305744351
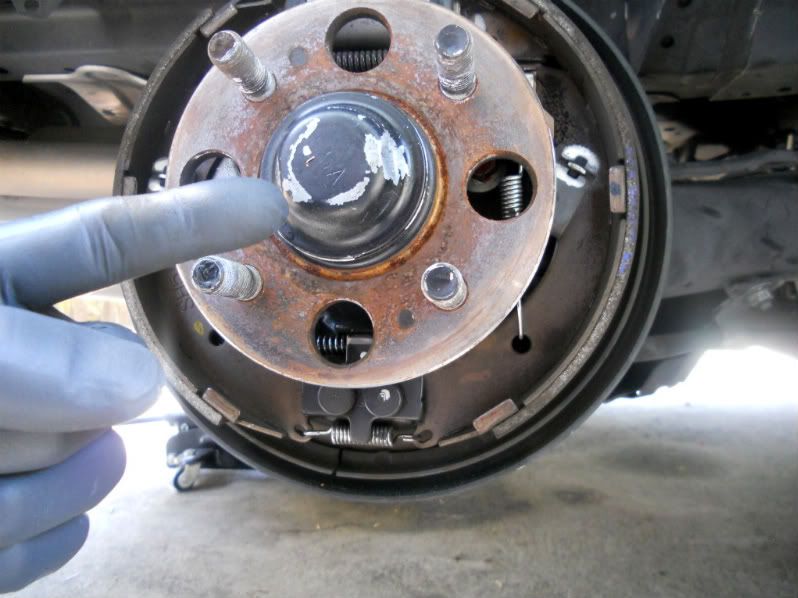
step 1 remove your wheel and remove your drum
take dust boot off.
DSCN2830.jpg?t=1305744486
step 2. remove 32mm nut and remove hub
DSCN2831.jpg?t=1305744486
step 3.remove 12mm nut that holds on the Ebrake
DSCN2832.jpg?t=1305744581
step 4. remove ABS sensor bolt 10mm
DSCN2833.jpg?t=1305744581
step 5.remove the 4 14mm bolts that hold on the drum assembley
DSCN2834.jpg?t=1305744704
step 6.remove assembley VERY CAFEFULLY!!!! and detatch the clips that hold the brakeline in place
DSCN2835.jpg?t=1305744704
DSCN2836.jpg?t=1305744704
move the assenbley off the hub and up above the hub BE CAREFULL!!
DSCN2839.jpg?t=1305744704
step 7. use the impact screwdriver with the 6mm alan socket and loosen the 6mm bolt BE VERY CAREFULL this bolt likes to strip!!.......
DSCN2837.jpg?t=1305744704
step 8. loosen the bolt enough so you can fit the washer behinde it and you can angle the hub enough so it sits flush
DSCN2838.jpg?t=1305744704
for the washers i used a standered 5/8 square washer from home depot they cast about 25 cents each but they are steele washers
DSCN2828.jpg?t=1305745332
DSCN2829.jpg?t=1305745332
they start out being .121 i shaved one at a angle to flat wise to .098 then the otherone from corner to corner at a angle to .102
front washer is .102
rear washer is .098
and that will compensate for the toe the washer get put in on the bottom bolts the front one going towards the front of the car has .102 and the rear one has .098
DSCN2838-1.jpg?t=1305745980
then you put it all back together in reverse for extra safety put some blue thread locker on the 14mm bolt that hold the assembley together just so the dont move but they wont just to have a little safety in the back of your head once you put it back together it will look like this
DSCN2824-1.jpg?t=1305746170
and top veiw
DSCN2825.jpg?t=1305746170
and from the front view
P1012611.jpg?t=1305746300
enjoy your new mod!!!!!
NIETHER I OR FITFREAK is responsable for any injury.......................
DISCLAIMER: ONLY ATTEMPT THIS AT YOUR OWN RISK, HAVE ALL THE TOOLS NECESSARY TO DO THE JOB PROPERLY. ONLY ATTEMPT IF YOU ARE COMFORTABLE WITH DIY PROJECTS AND HAVE SOME SORT OF MECHANICAL EXPERIENCE.
**Read everything below before starting on this DIY**
tools you will need are:
1. shallow 10,12,14 3/8
2. 6' extention
3. 3/8 wratchet
4. 32mm socket with breaker bar
5. hammer
6. impact srewdriver with 6mm alan socket
7. a flat head screwdriver
8. a pair of chanel locks
9. a digital micrometer
10. a floor jack!! lol
11. a grinder for the washers
DSCN2826.jpg?t=1305744351
step 1 remove your wheel and remove your drum
take dust boot off.
DSCN2830.jpg?t=1305744486
step 2. remove 32mm nut and remove hub
DSCN2831.jpg?t=1305744486
step 3.remove 12mm nut that holds on the Ebrake
DSCN2832.jpg?t=1305744581
step 4. remove ABS sensor bolt 10mm
DSCN2833.jpg?t=1305744581
step 5.remove the 4 14mm bolts that hold on the drum assembley
DSCN2834.jpg?t=1305744704
step 6.remove assembley VERY CAFEFULLY!!!! and detatch the clips that hold the brakeline in place
DSCN2835.jpg?t=1305744704
DSCN2836.jpg?t=1305744704
move the assenbley off the hub and up above the hub BE CAREFULL!!
DSCN2839.jpg?t=1305744704
step 7. use the impact screwdriver with the 6mm alan socket and loosen the 6mm bolt BE VERY CAREFULL this bolt likes to strip!!.......
DSCN2837.jpg?t=1305744704
step 8. loosen the bolt enough so you can fit the washer behinde it and you can angle the hub enough so it sits flush
DSCN2838.jpg?t=1305744704
for the washers i used a standered 5/8 square washer from home depot they cast about 25 cents each but they are steele washers
DSCN2828.jpg?t=1305745332
DSCN2829.jpg?t=1305745332
they start out being .121 i shaved one at a angle to flat wise to .098 then the otherone from corner to corner at a angle to .102
front washer is .102
rear washer is .098
and that will compensate for the toe the washer get put in on the bottom bolts the front one going towards the front of the car has .102 and the rear one has .098
DSCN2838-1.jpg?t=1305745980
then you put it all back together in reverse for extra safety put some blue thread locker on the 14mm bolt that hold the assembley together just so the dont move but they wont just to have a little safety in the back of your head once you put it back together it will look like this
DSCN2824-1.jpg?t=1305746170
and top veiw
DSCN2825.jpg?t=1305746170
and from the front view
P1012611.jpg?t=1305746300
enjoy your new mod!!!!!


Thread Starter
|
Member
Joined: Aug 2008
Posts: 1,170
From: orlando,fl
thank you sir work in progress
DDOOOO it get it done
keep me posted if you need any other assistance
work in progressDDOOOO it get it done
keep me posted if you need any other assistance


Thread Starter
|
Member
Joined: Aug 2008
Posts: 1,170
From: orlando,fl
nope not yet but got to go soon tires are starting to feather from toe being out of adjustment but you know what they say got to pay to play!!

p.s. i have way more camber than the other fits i have done 1_bad_fit was at -3 and i have way more i might be around -5 or 6 pictures dont really do justice everyone that sees it in person says that but if i had smaller more stretch tires it would look more aggresive
Last edited by nxtfit_08; May 18, 2011 at 11:54 PM.

Thread Starter
|
Member
Joined: Aug 2008
Posts: 1,170
From: orlando,fl

Thanks for your reply!!!