
Replacing drivers side mirror

Thread Starter
|
Member
Joined: Jan 2006
Posts: 123
From: Philadelphia

Replacing drivers side mirror
I managed to take off my door panel but I have no idea how to get to the 3 bolts that are holding the mirror on. I can see them but they're tucked in the corner almost out of reach but I'm sure it's possible somehow.
Have any of you done this before? I need to replace my mirror. Thanks for any help.
Have any of you done this before? I need to replace my mirror. Thanks for any help.
Thread Starter
|
Member
Joined: Jan 2006
Posts: 123
From: Philadelphia
I could try that but I don't think it would work. It kinda looks like i'd been a small ratchet or something. Whatever I use has to fit between the window and the door, not much space. I'll take another look at it tomorrow or the next day. I'll be sure to bring the wrenches out with me.

Member
Joined: Jun 2008
Posts: 52
From: Virginia
I just replaced mine two weeks ago. All three bolts are reachable with a socket extension. On the inside of your door, just forward of the front vertical edge of the window frame, is a circular black plastic plug. Pry it off with your fingers or a small flat blade screwdriver and you can access the forward nut. There are several circular holes in the door frame near where the inside door handle is located. Kneel down and sight through them and you will see that each hole lines up with one of the other two nuts holding on the side mirror. I ordered an entire replacement mirror housing. When feeding the mirror wiring harness through the frame, be sure to follow the big harness for the door locks and window regulators. I forgot to do this during my initial install and nearly guillotined my brand new harness when I tried to lower my side window
Last edited by kbh; Feb 26, 2010 at 09:47 PM.
Thread Starter
|
Member
Joined: Jan 2006
Posts: 123
From: Philadelphia
I just replaced mine two weeks ago. All three bolts are reachable with a socket extension. On the inside of your door, just forward of the front vertical edge of the window frame, is a circular black plastic plug. Pry it off with your fingers or a small flat blade screwdriver and you can access the forward nut. There are several circular holes in the door frame near where the inside door handle is located. Kneel down and sight through them and you will see that each hole lines up with one of the other two nuts holding on the side mirror. I ordered an entire replacement mirror housing. When feeding the mirror wiring harness through the frame, be sure to follow the big harness for the door locks and window regulators. I forgot to do this during my initial install and nearly guillotined my brand new harness when I tried to lower my side window
Thread Starter
|
Member
Joined: Jan 2006
Posts: 123
From: Philadelphia
How much did the replacement cost you? I know from the online honda parts sites I've found, the whole mirror replacement is $150 plus an outrageous $20 shipping AND handling charge.
Member
Joined: Jun 2008
Posts: 52
From: Virginia
I used CFL Honda on the Vendor subforum here. Excellent service. An entire replacement VBP mirror was $160 shipped and they added a nice LED flexneck flashlight and an oil filter for free. I will buy from them again
Thread Starter
|
Member
Joined: Jan 2006
Posts: 123
From: Philadelphia
I winded up ordering the mirror from CFL as well. Positive experience with this purchase.
I almost feel stupid after installing my new mirror because before I actually tried it, I thought it would be difficult. It was easy as pie thanks to the fact that you pointed out the holes in the door that led to the 3 nuts.
I did wind up dropping all 3 of them and fishing them out with the magnetic pick up tool was the hardest part. I didn't have one on hand so I drove a few blocks to the auto parts store and bought one.
Thanks for all the info/advice.
I would have taken pictures but I did this in the dark as UPS thought 6pm delivery times are cool, and I didn't have any camera besides my cellphone available. Now I have a filthy car with a sparkling clean mirror lol.
Member
Joined: Jun 2008
Posts: 52
From: Virginia
Glad you got it done successfully. I didn't mention being careful about the black sticky adhesive that holds the vapor barrier. I'm still trying to get that stuff off my tools and a small section of my side glass
Thread Starter
|
Member
Joined: Jan 2006
Posts: 123
From: Philadelphia
Yeah, I dealt with that stuff when I opened my door panel before. It's terrible. I tried to be careful but it was all over my hands and tools by the end of the installation. I got it off everything though.

HEY to either the OP or KBH I think it was..... Can I get some pictures of the door panel(outside) once the mirror is removed?
I'd like to get some kind of measurement or surface area of those 3 mounting holes for the mirror. Basically I need to know what kind of carbon mirrors to buy so it will cover all three holes and still be able to use the existing mounting holes for the new mirrors.
Thanks
I'd like to get some kind of measurement or surface area of those 3 mounting holes for the mirror. Basically I need to know what kind of carbon mirrors to buy so it will cover all three holes and still be able to use the existing mounting holes for the new mirrors.
Thanks
Thread Starter
|
Member
Joined: Jan 2006
Posts: 123
From: Philadelphia
HEY to either the OP or KBH I think it was..... Can I get some pictures of the door panel(outside) once the mirror is removed?
I'd like to get some kind of measurement or surface area of those 3 mounting holes for the mirror. Basically I need to know what kind of carbon mirrors to buy so it will cover all three holes and still be able to use the existing mounting holes for the new mirrors.
Thanks
I'd like to get some kind of measurement or surface area of those 3 mounting holes for the mirror. Basically I need to know what kind of carbon mirrors to buy so it will cover all three holes and still be able to use the existing mounting holes for the new mirrors.
Thanks
Member
Joined: Jun 2008
Posts: 52
From: Virginia
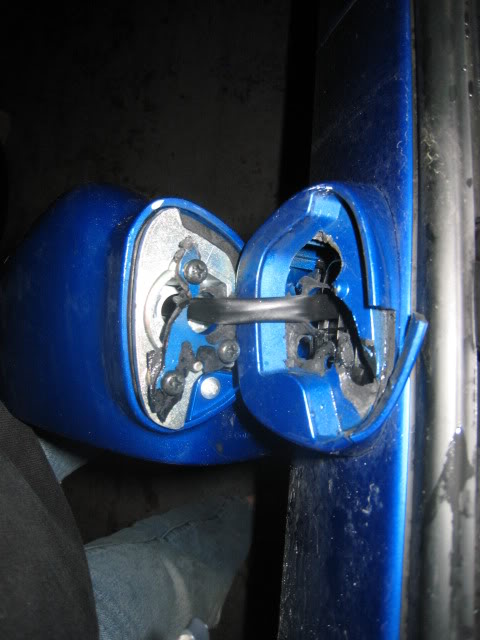
This is the only pic I have. It shows the busted original mirror. Unfortunately it doesn't show the mounting points very well. eL is right that the triangle points forward. It only takes about 10-15 minutes to remove the door panel and the mirror so you can make some precise measurements
Last edited by kbh; Mar 26, 2010 at 01:03 PM.
OK, thanks a lot guys. One more thing, have you guys seen on here if anyone is buying the GT style mirrors I'm talking about? Maybe someone on here already has done this and I can just buy what they bought... see what I'm getting at, laziness lol
I think I remember someone using motorcycle mirrors but I'm not trying to do that.

I think I remember someone using motorcycle mirrors but I'm not trying to do that.

Thread
Thread Starter
Forum
Replies
Last Post
proletariandan
Fit DIY: Repair & Maintenance
6
Jul 7, 2009 09:08 AM
proletariandan
Fit DIY: Repair & Maintenance
1
Jun 1, 2009 01:25 AM
jimmyparky
1st Generation (GD 01-08)
4
Dec 5, 2008 07:58 AM