
Water leak in trunk

Thanks Loudbang and BurntZ we have been having a wild winter rain for the last 2 weeks and I noticed the water coming in on the rear passengers floor, hummm? And this sure looks like what you's guys have described here in this post. I will check this weekend clean and re-seal.
Thanks to everyone that has added their findings here.
It is a shame that Hondee would let this type of poor QC happen. I have pulled cars apart from the late 60's and 70's that where missing seam sealer all together in some spots and just chalked it up to "up in smoke" from back in the day. But WTH were they smoke'n in Japan when they where building the GD3?
( 投石 )
Last edited by Perrenoud Fit; Dec 11, 2013 at 07:35 PM.
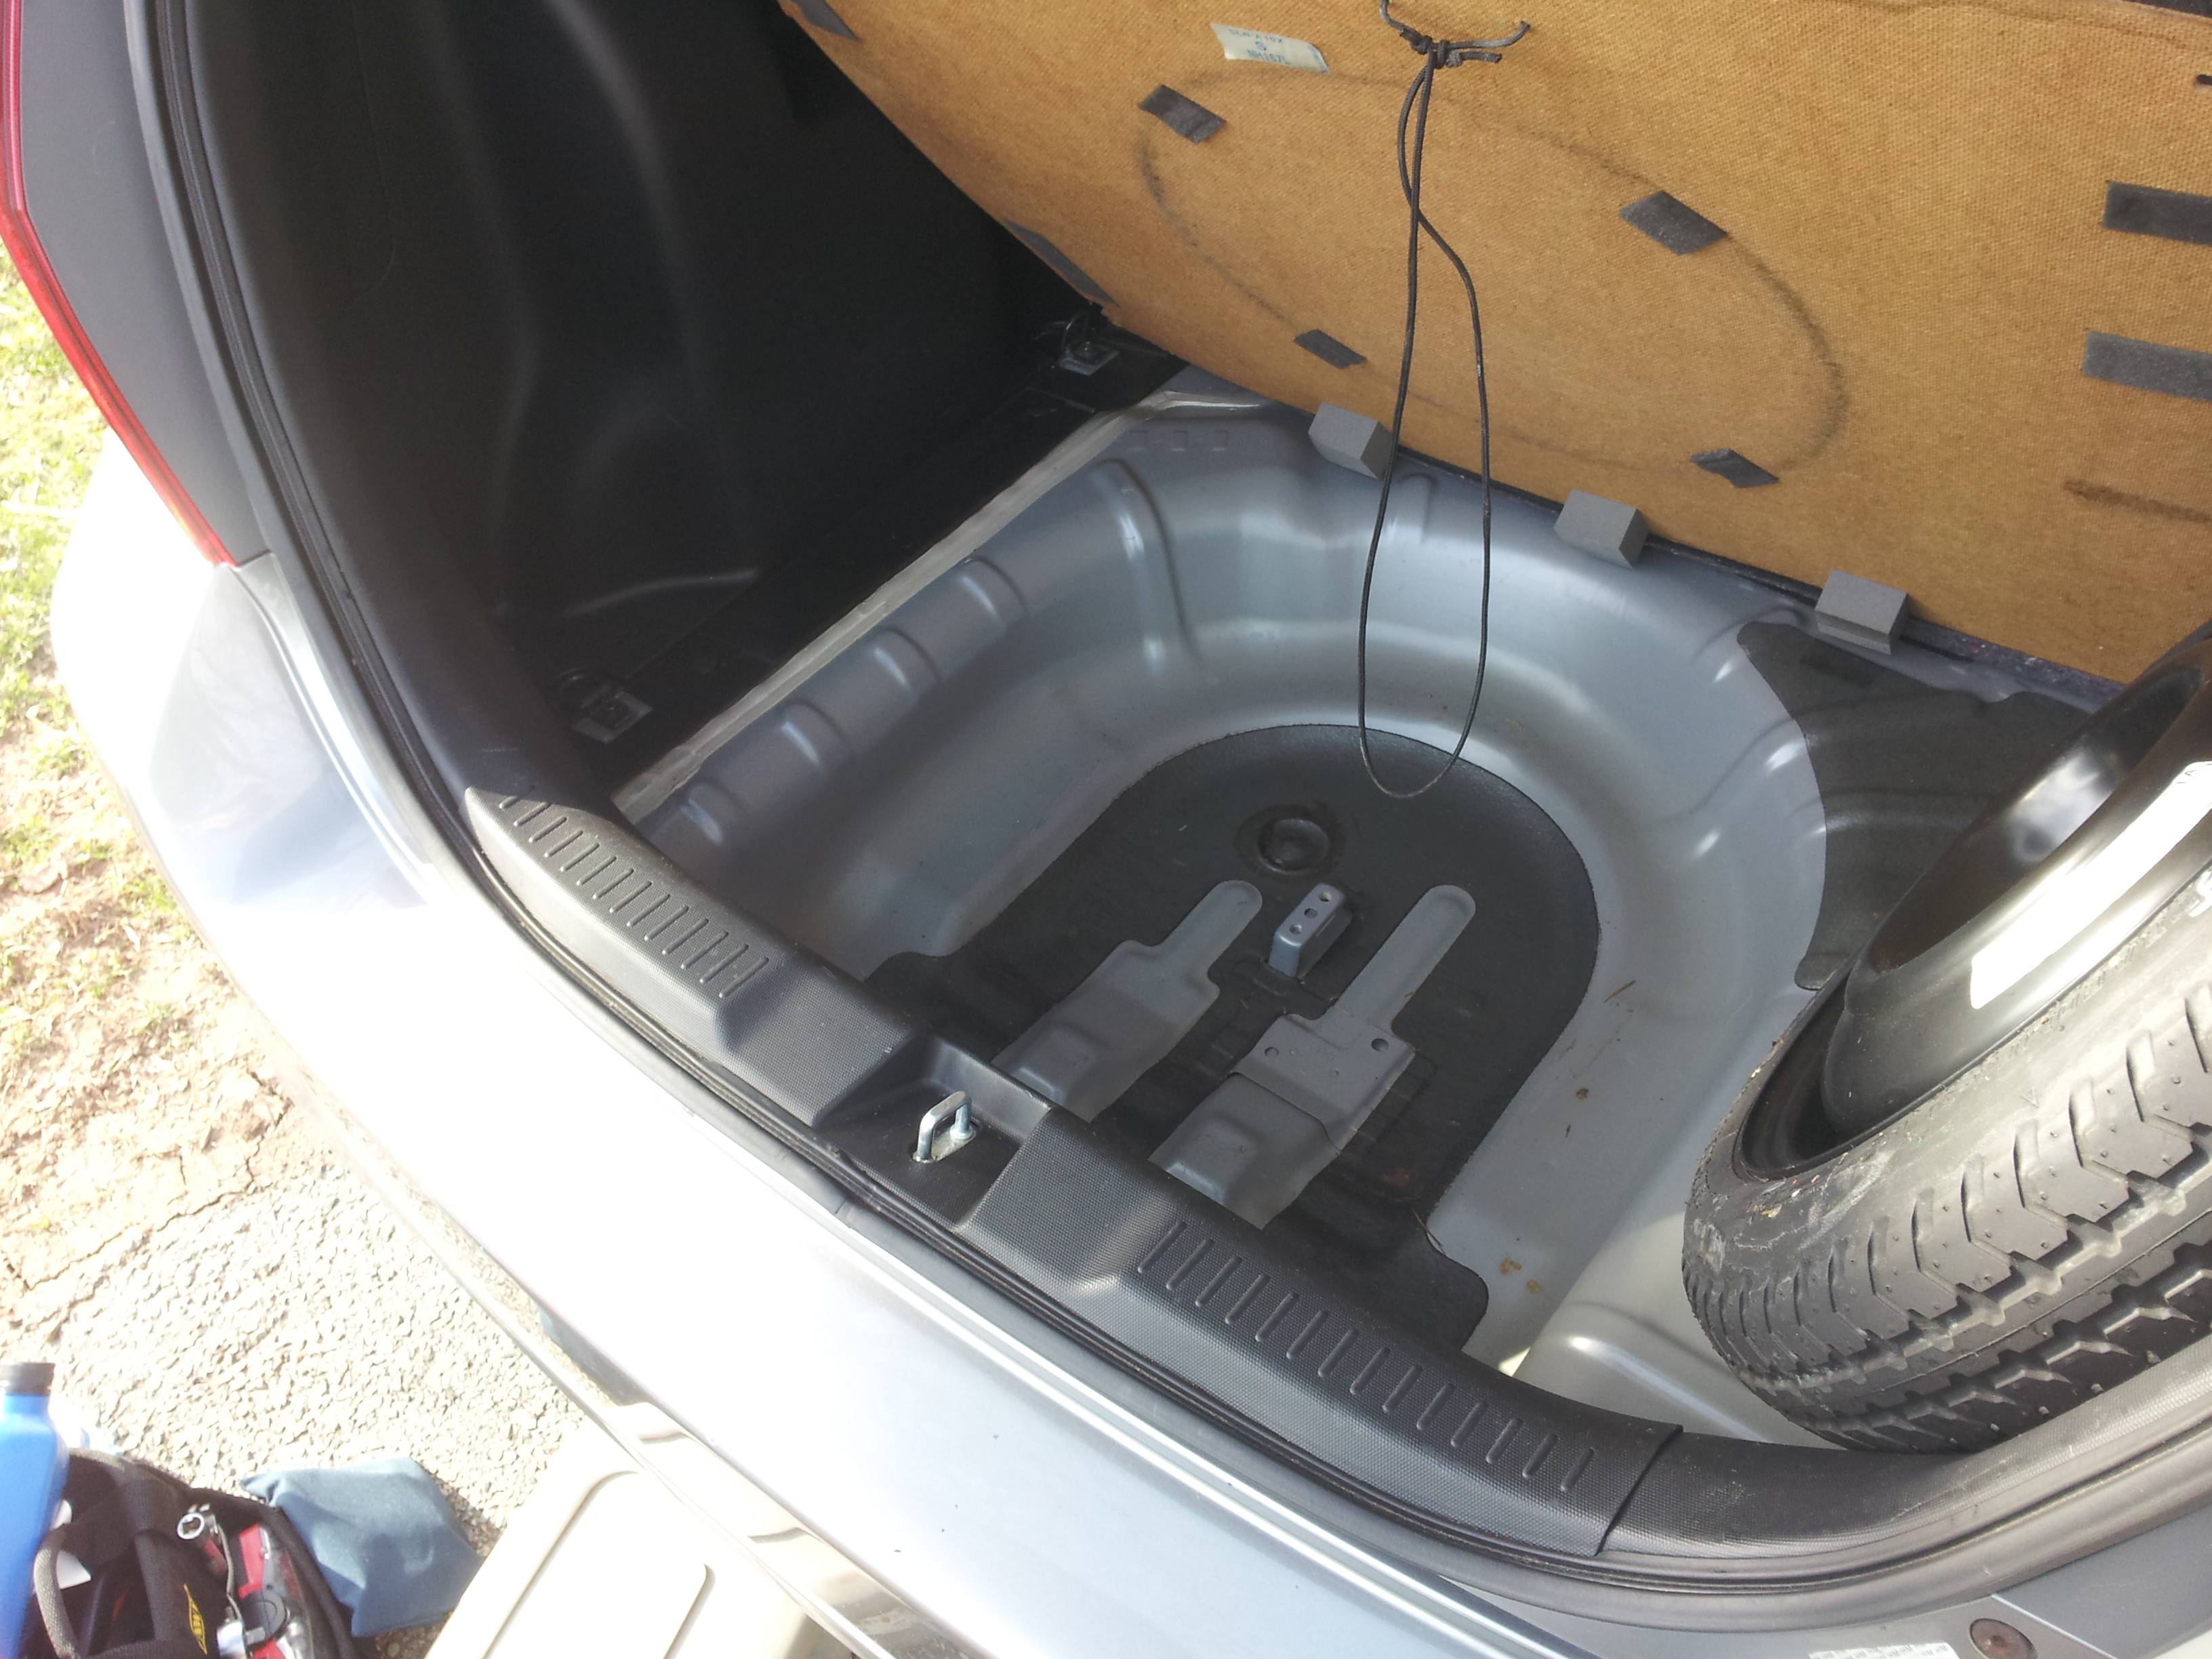
72 degrees today and I knew there was something I wanted to do  on MzFiT then it hit me! check the hatch area for bad seam sealer. And sure enough right in the upper most corner of the hatch frame passenger's side there it was! a 1/64" crack in the seam sealer!! going up into the spot welds on the roof about 5". Cleaned it all up and J.B. welded her up. Also found about 8oz. of water under the spare tire.
Driver's side look alright at this time but the roof moldings are easy enough to remove that this will be a maintenance check from now on.
Thanks again for all the good information on this thread.
on MzFiT then it hit me! check the hatch area for bad seam sealer. And sure enough right in the upper most corner of the hatch frame passenger's side there it was! a 1/64" crack in the seam sealer!! going up into the spot welds on the roof about 5". Cleaned it all up and J.B. welded her up. Also found about 8oz. of water under the spare tire.Driver's side look alright at this time but the roof moldings are easy enough to remove that this will be a maintenance check from now on.
Thanks again for all the good information on this thread.
Last edited by Perrenoud Fit; Dec 21, 2013 at 05:49 PM.
I've got a small amount of water coming in to the passenger side trunk, not quite into the spare tire well tho. I will try removing those rubber strips and looking for cracks...thanks for the info!
Member
Joined: Mar 2007
Posts: 1,704
From: Second house on the left

Glad you found it,  BUT:
BUT:
Will JB Weld be flexible enough not to crack as the body flexes? (which is probably the reason these issues occur)
Other makes have problems with leaks or rust due to this issue, as well. On my wife's van, we used RTV type window glass sealer (that "wicks" into any opening and remains flexible) to fill body seam cracks that could potentially cause rust in the rocker panels.
BUT:Will JB Weld be flexible enough not to crack as the body flexes? (which is probably the reason these issues occur)
Other makes have problems with leaks or rust due to this issue, as well. On my wife's van, we used RTV type window glass sealer (that "wicks" into any opening and remains flexible) to fill body seam cracks that could potentially cause rust in the rocker panels.

Member
Joined: Jan 2011
Posts: 397
From: Omaha, NE
I'd imagine there's probably a lot of people with this issue who'll never know because they never look under hatch floor/cover (or have AAA/some other roadside assistance/simply won't ever change a tire themselves). I noticed some water was getting in and ending up in the spare tire well, but it was only a little, so at first I wrote it off to being residual from me opening the hatch when it was raining/snowing to retrieve things. I dug deeper when I noticed the water would come back after I dried it out and hadn't opened the hatch.
One day I took everything out of the hatch area and removed the rear interior panels, but could find no obvious sources of the leak. Thanks to this thread, I found the true (I think) source of the water ingress! Here's a step-by-step of my experience:
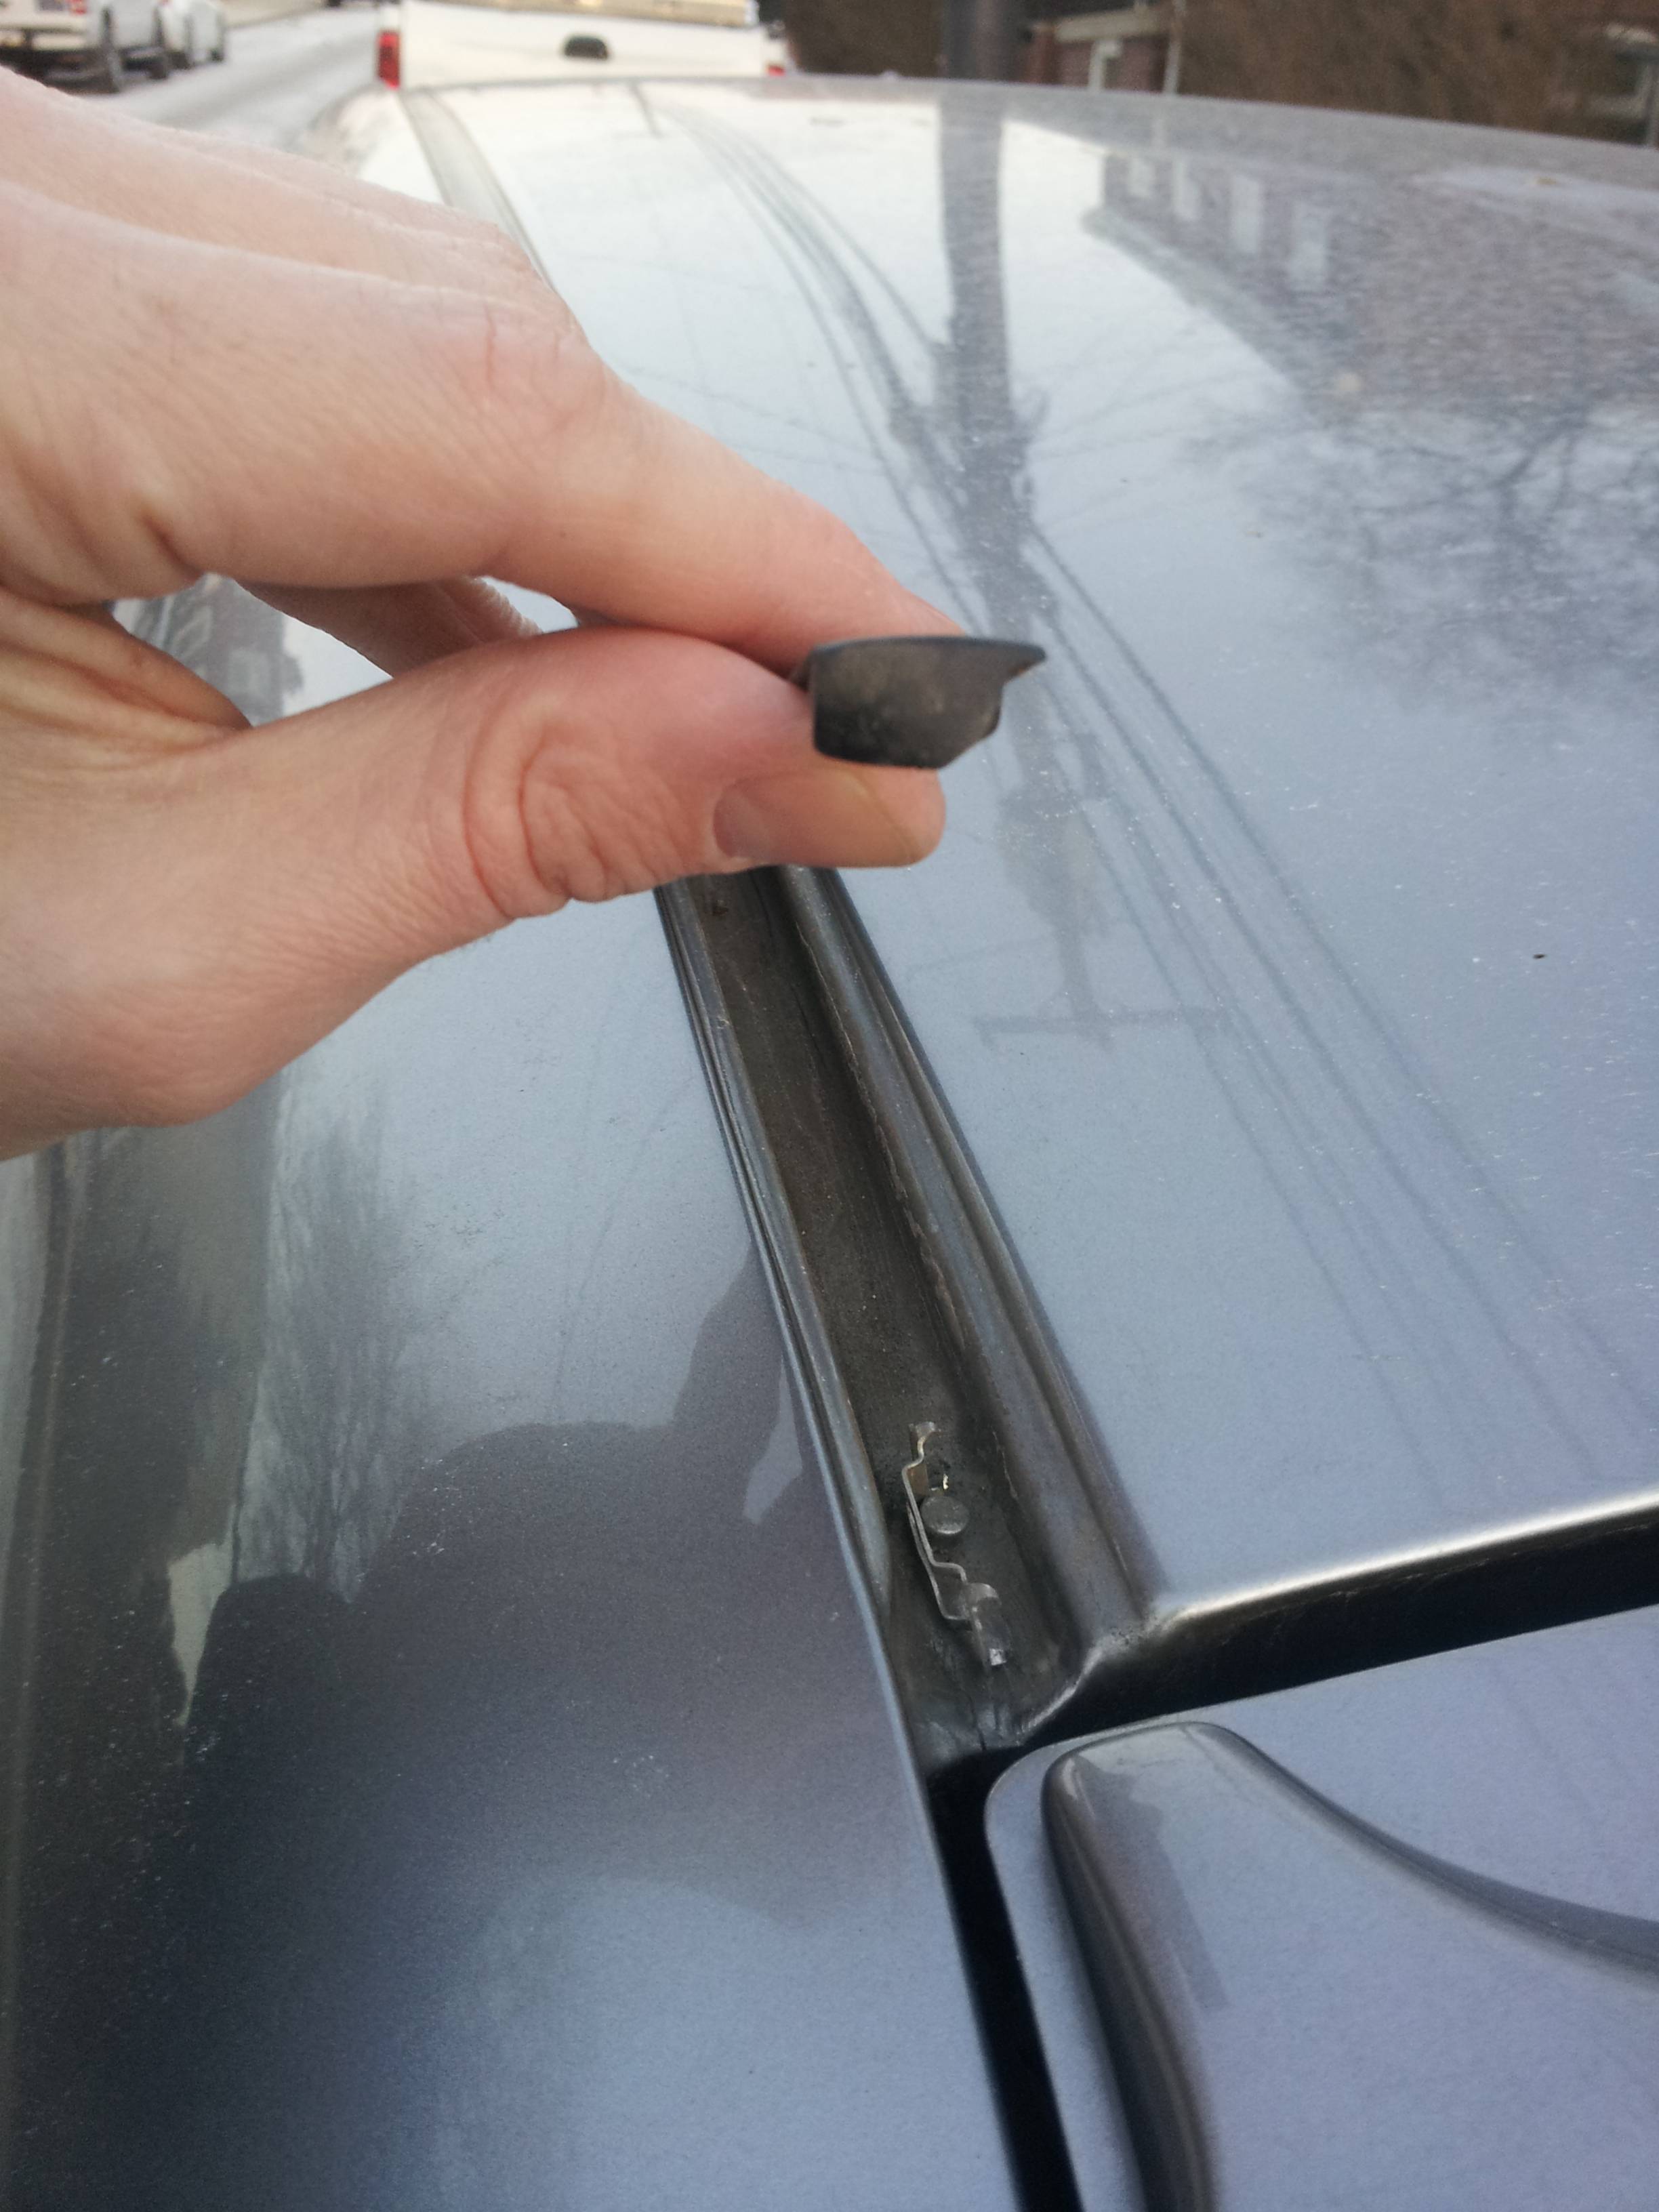
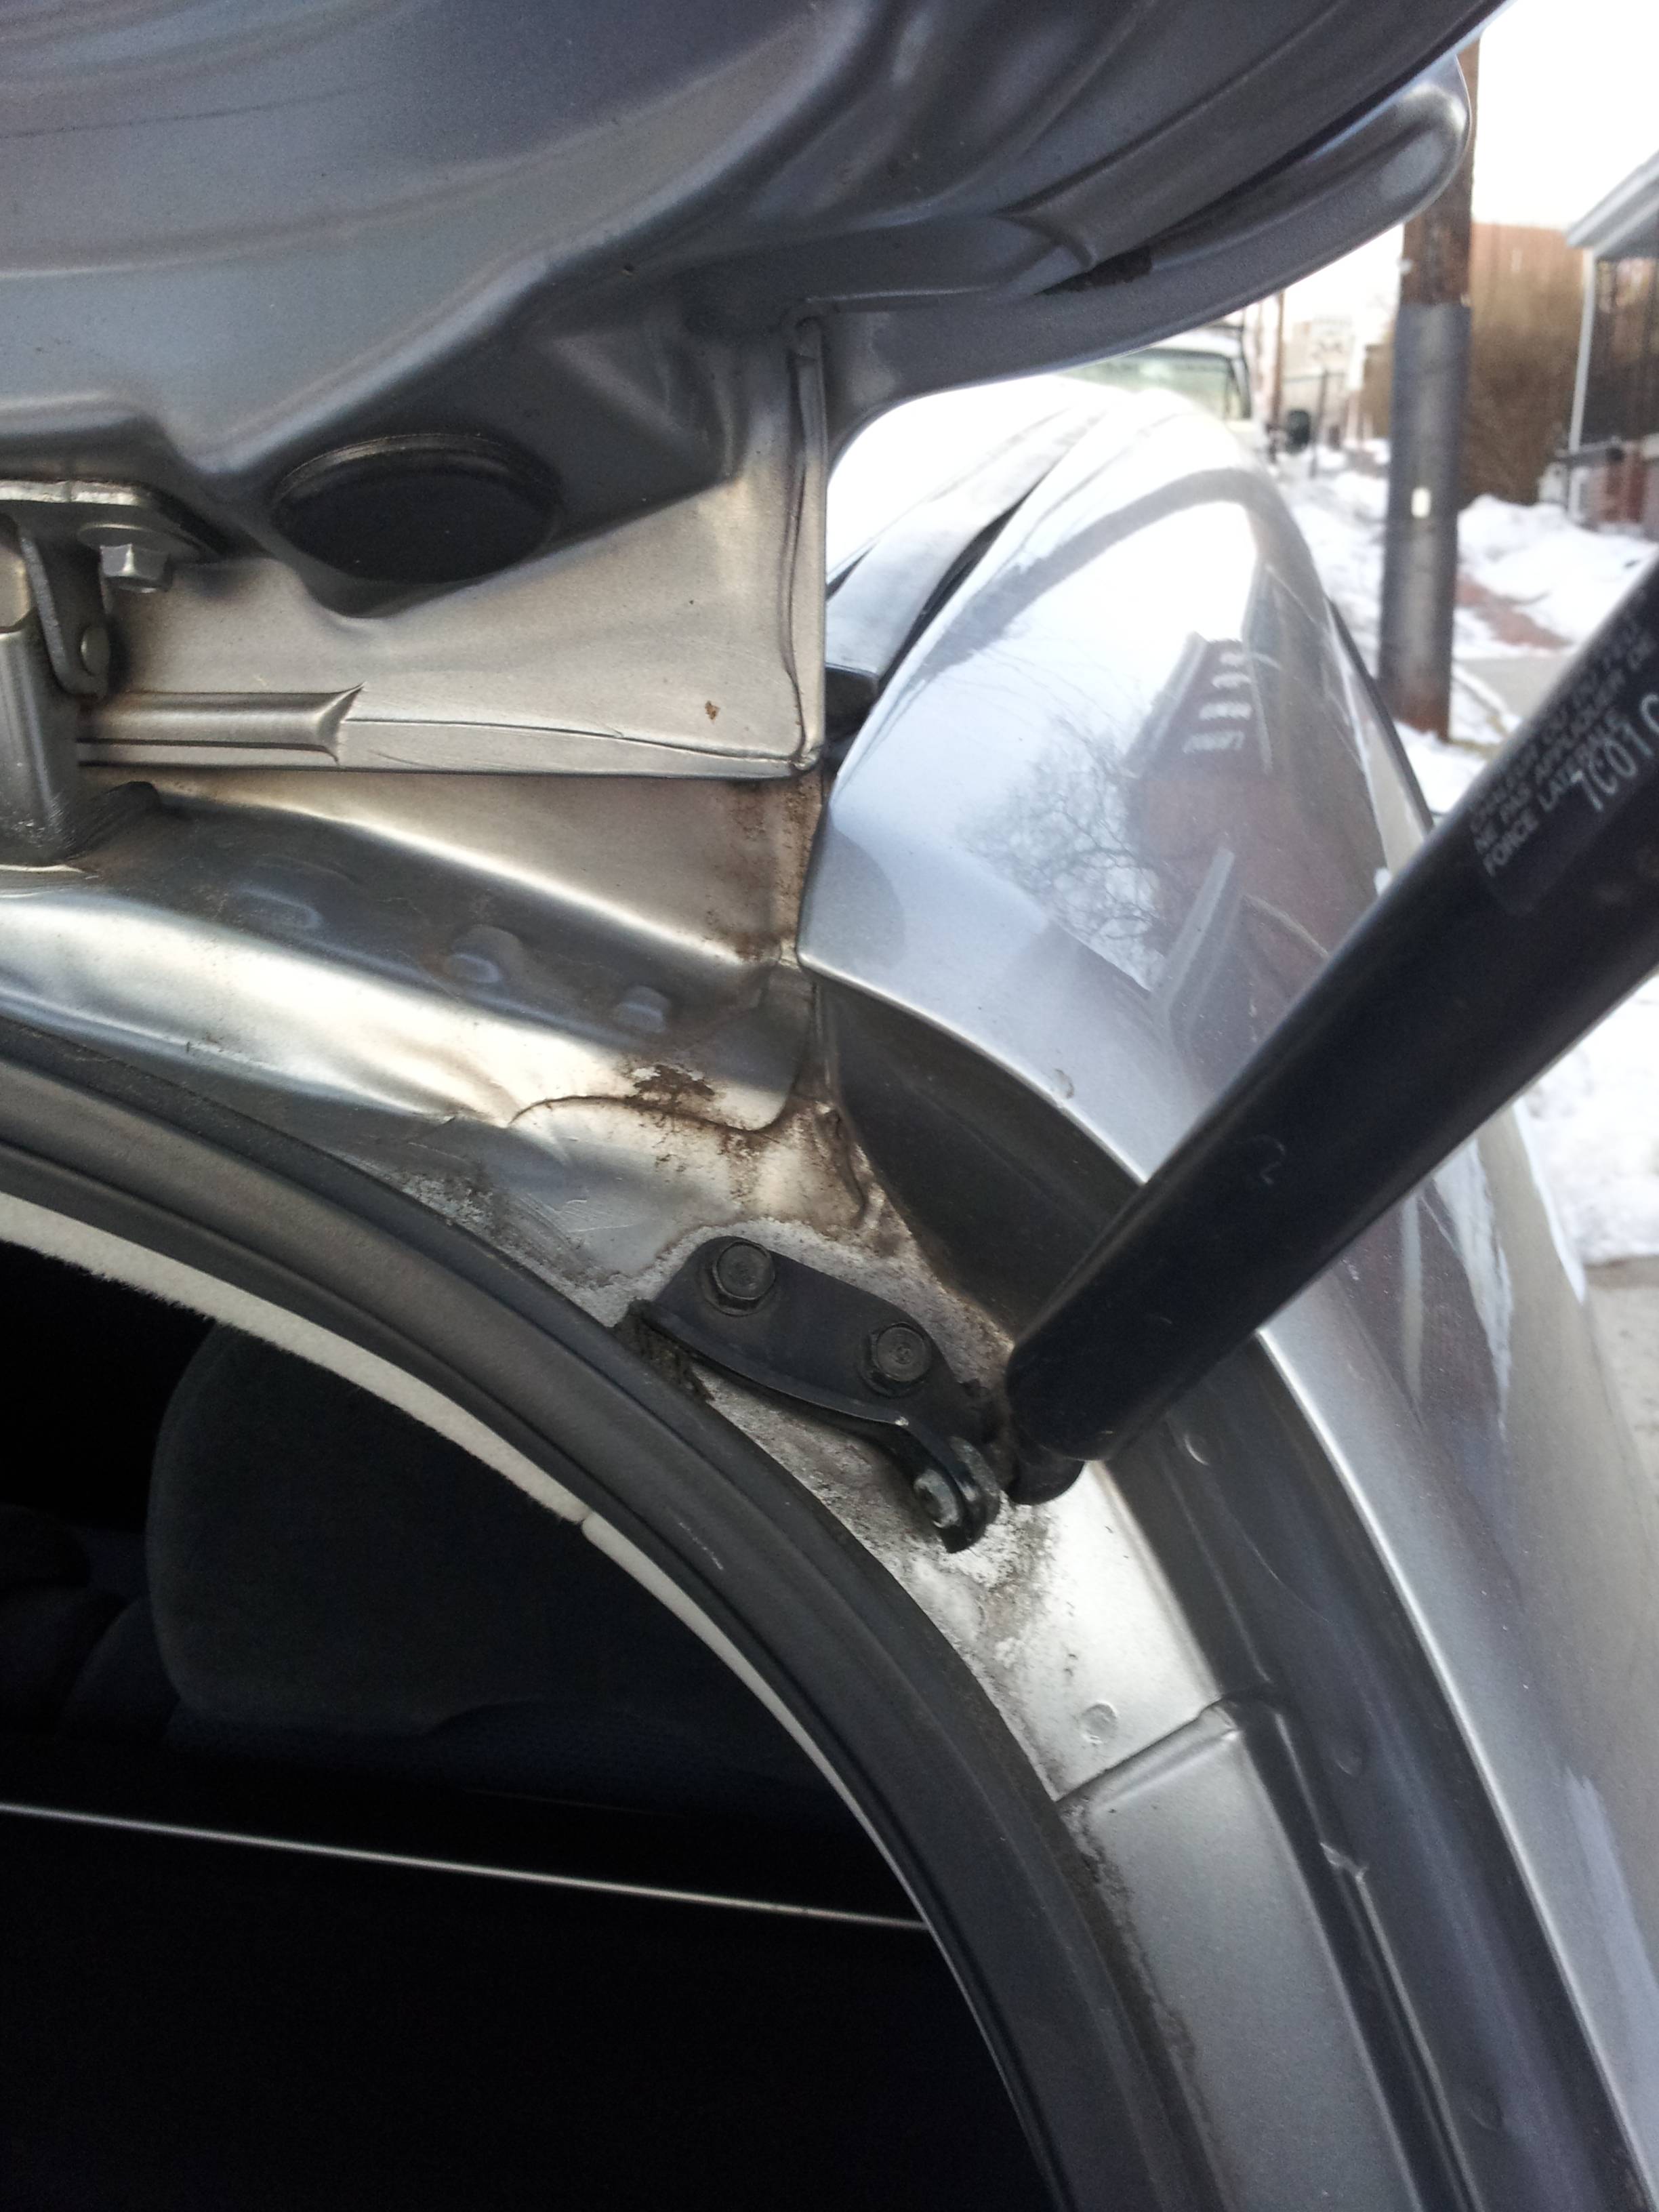
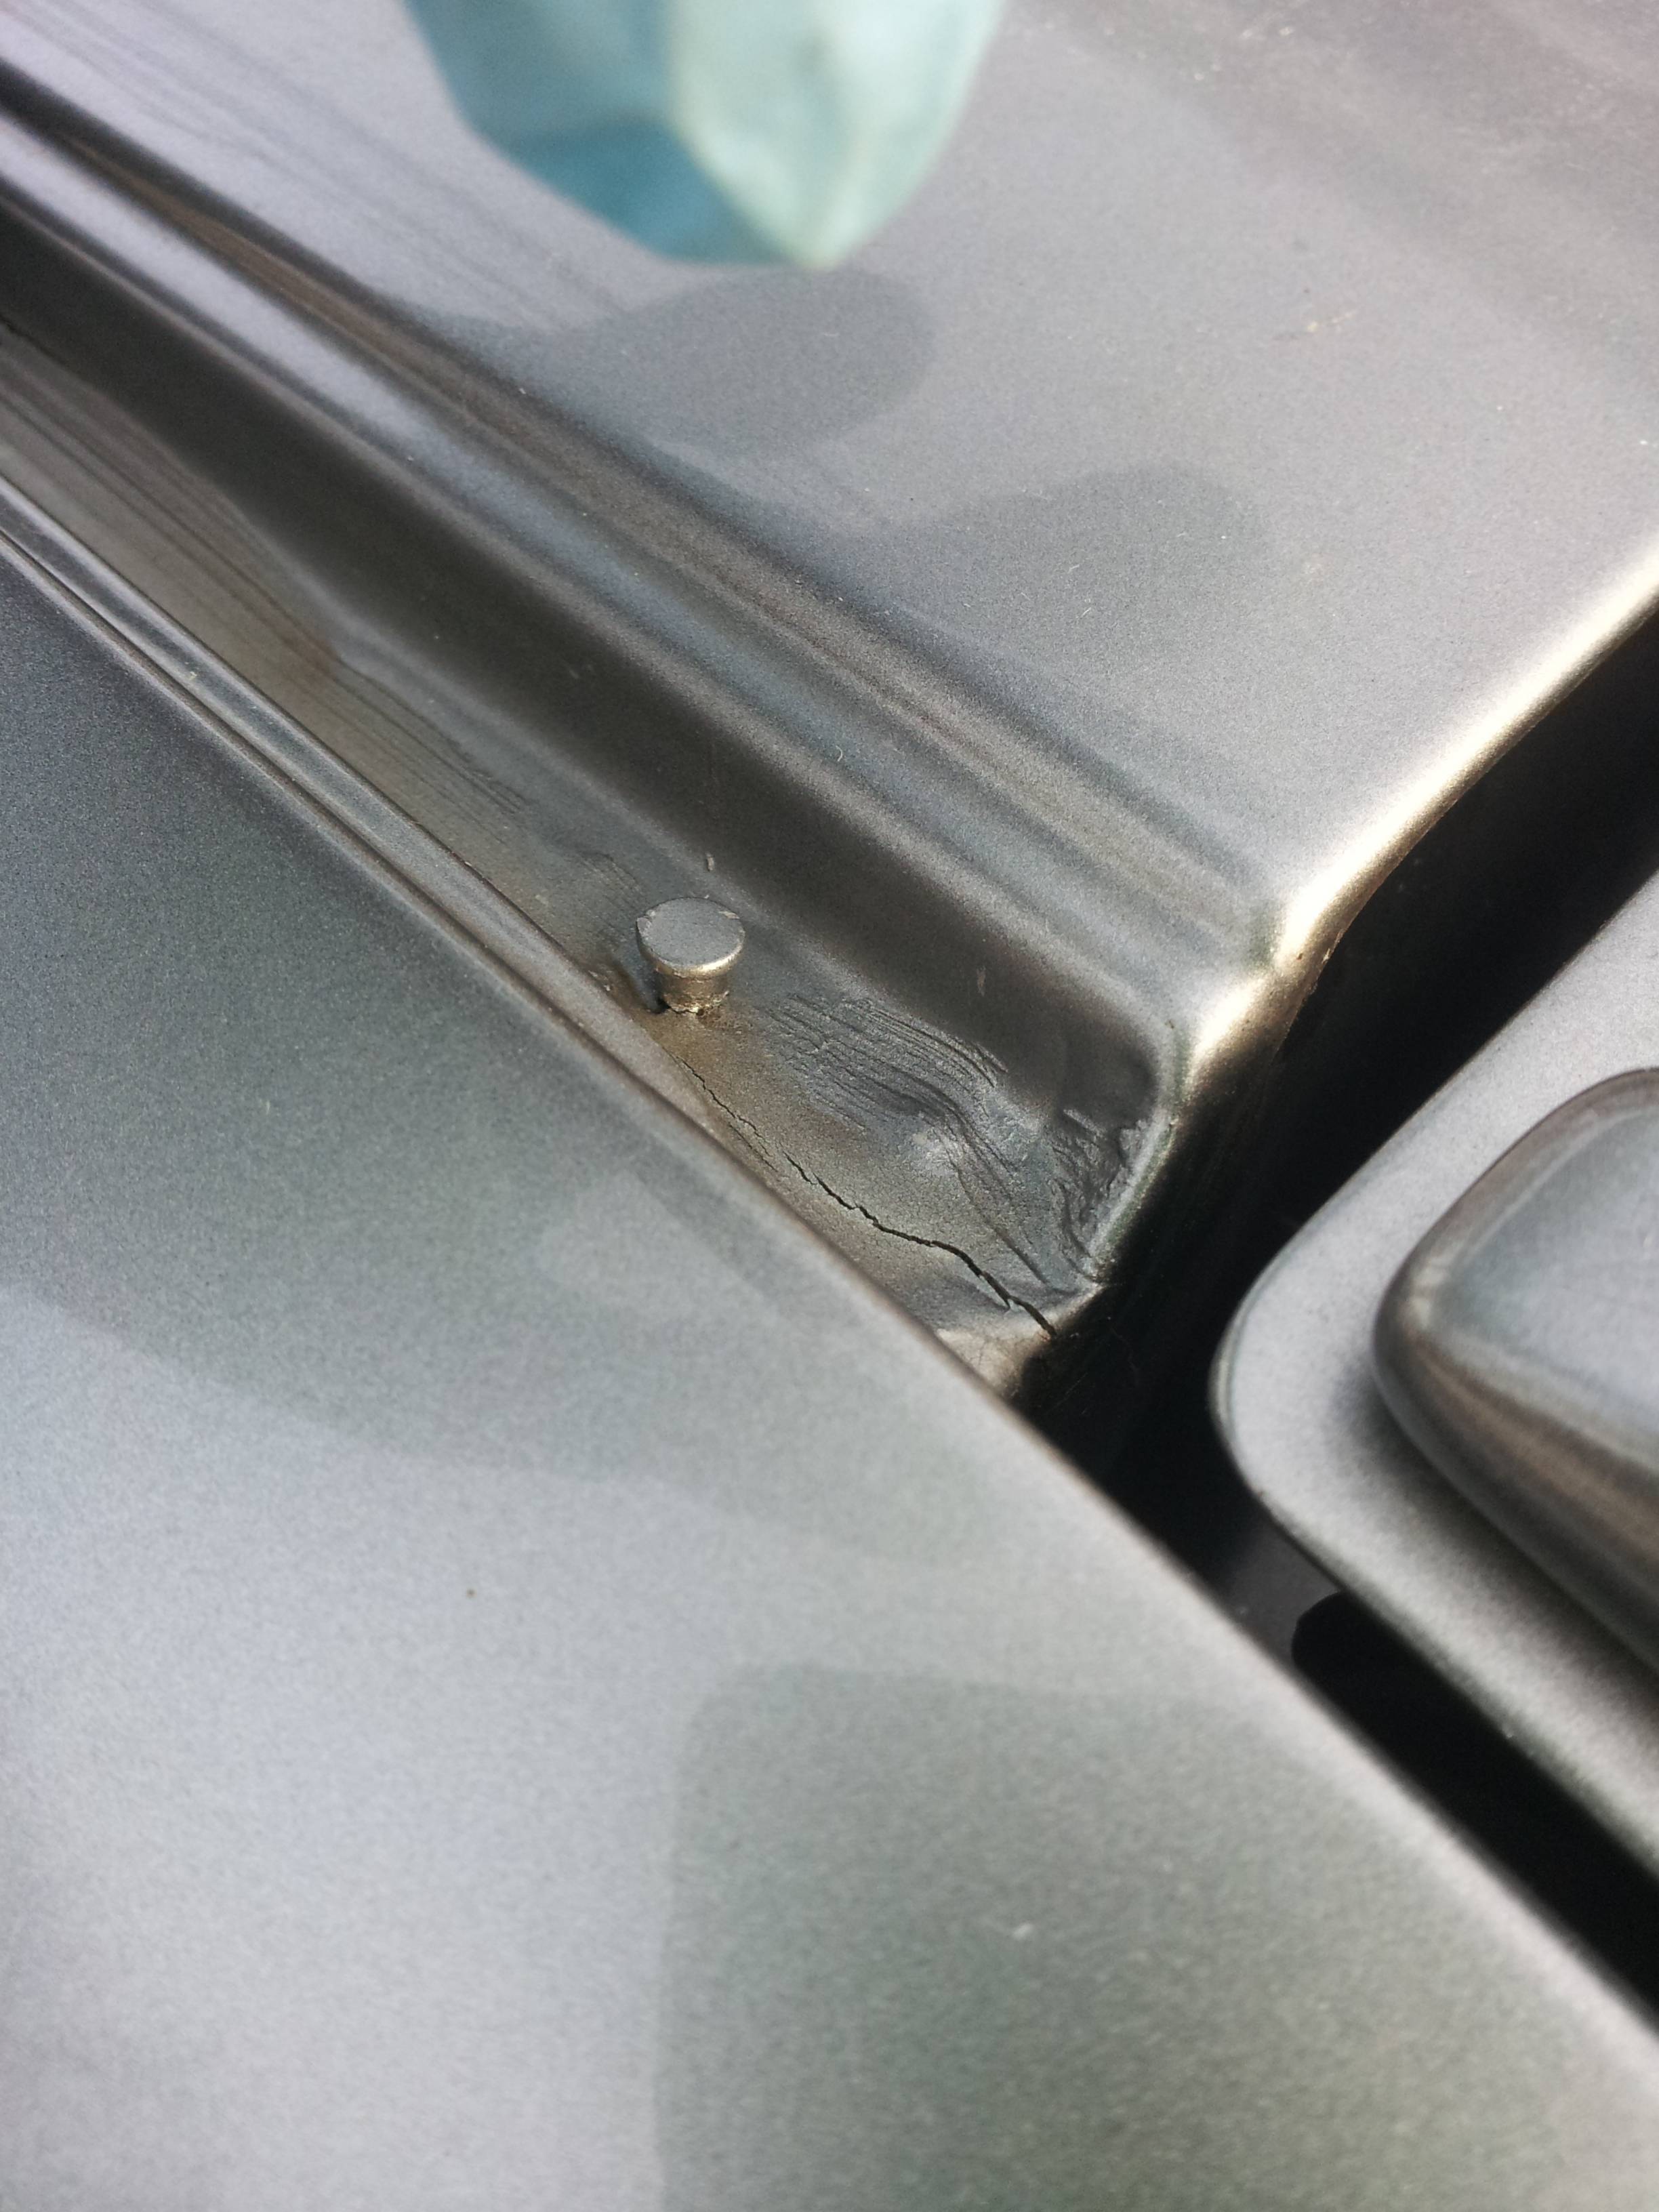
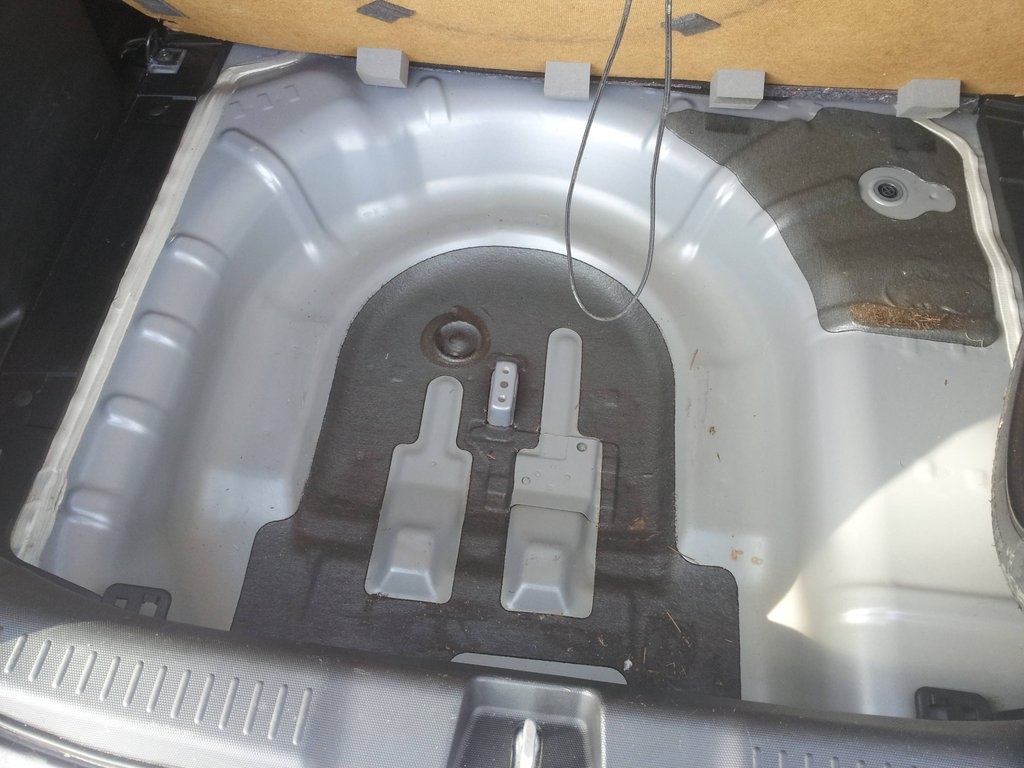
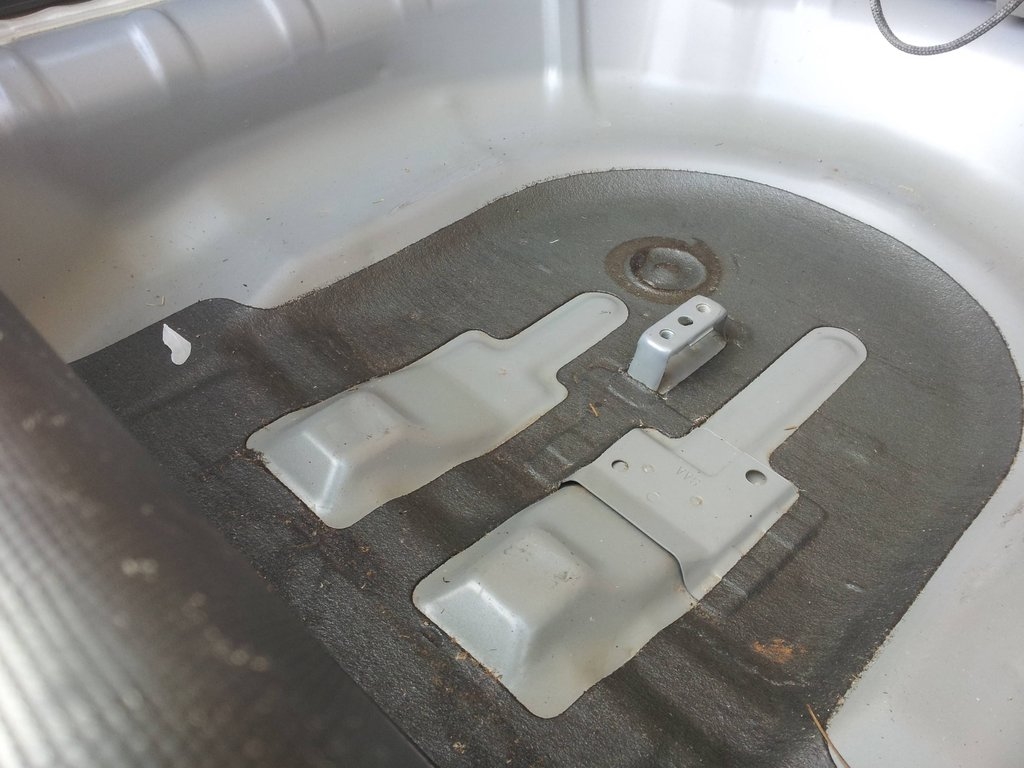
First, I pried up the rubber roof rails. After doing this, I realized the best way to do this is to pry about a foot forward of the rearmost part of the rail, as this pulls the metal clip forward so it's released from the little knob it fits over. You can see in the pictures that there's a lot of little bits of debris under there, which needed to be wiped out before applying silicone.
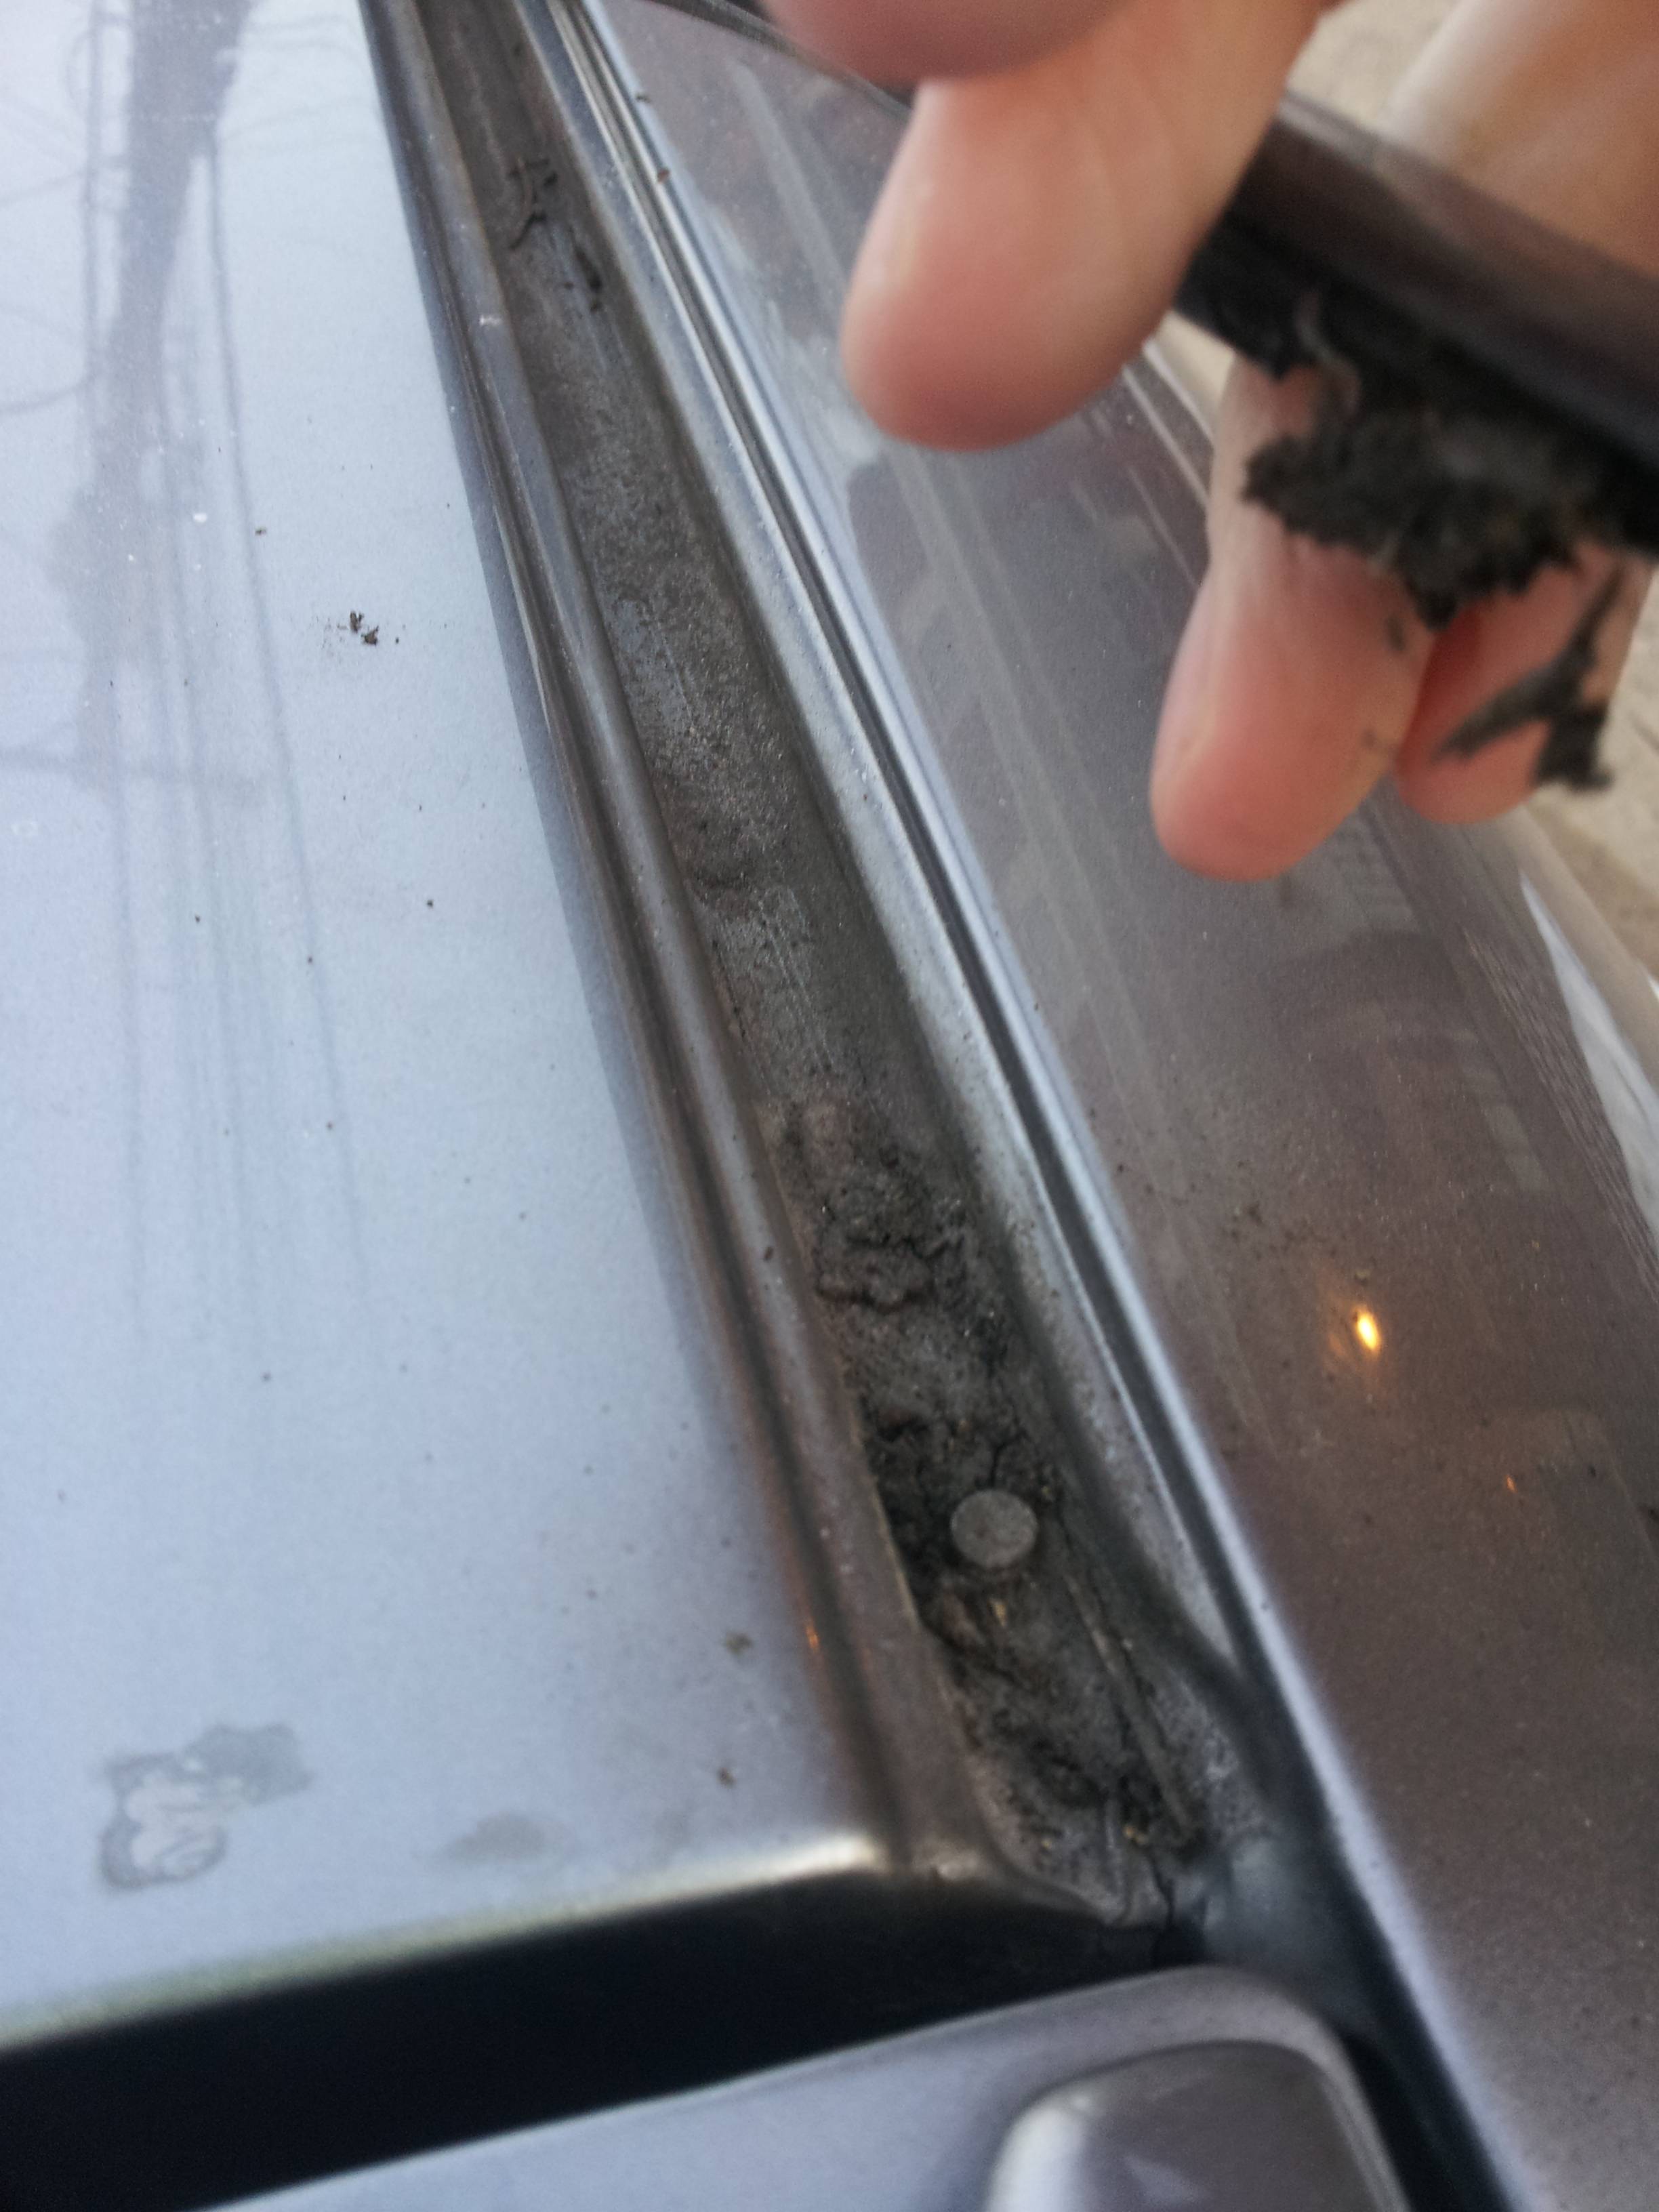
Under passenger-side rail
Under passenger-side rail closeup - You can see the crack running down the right side.
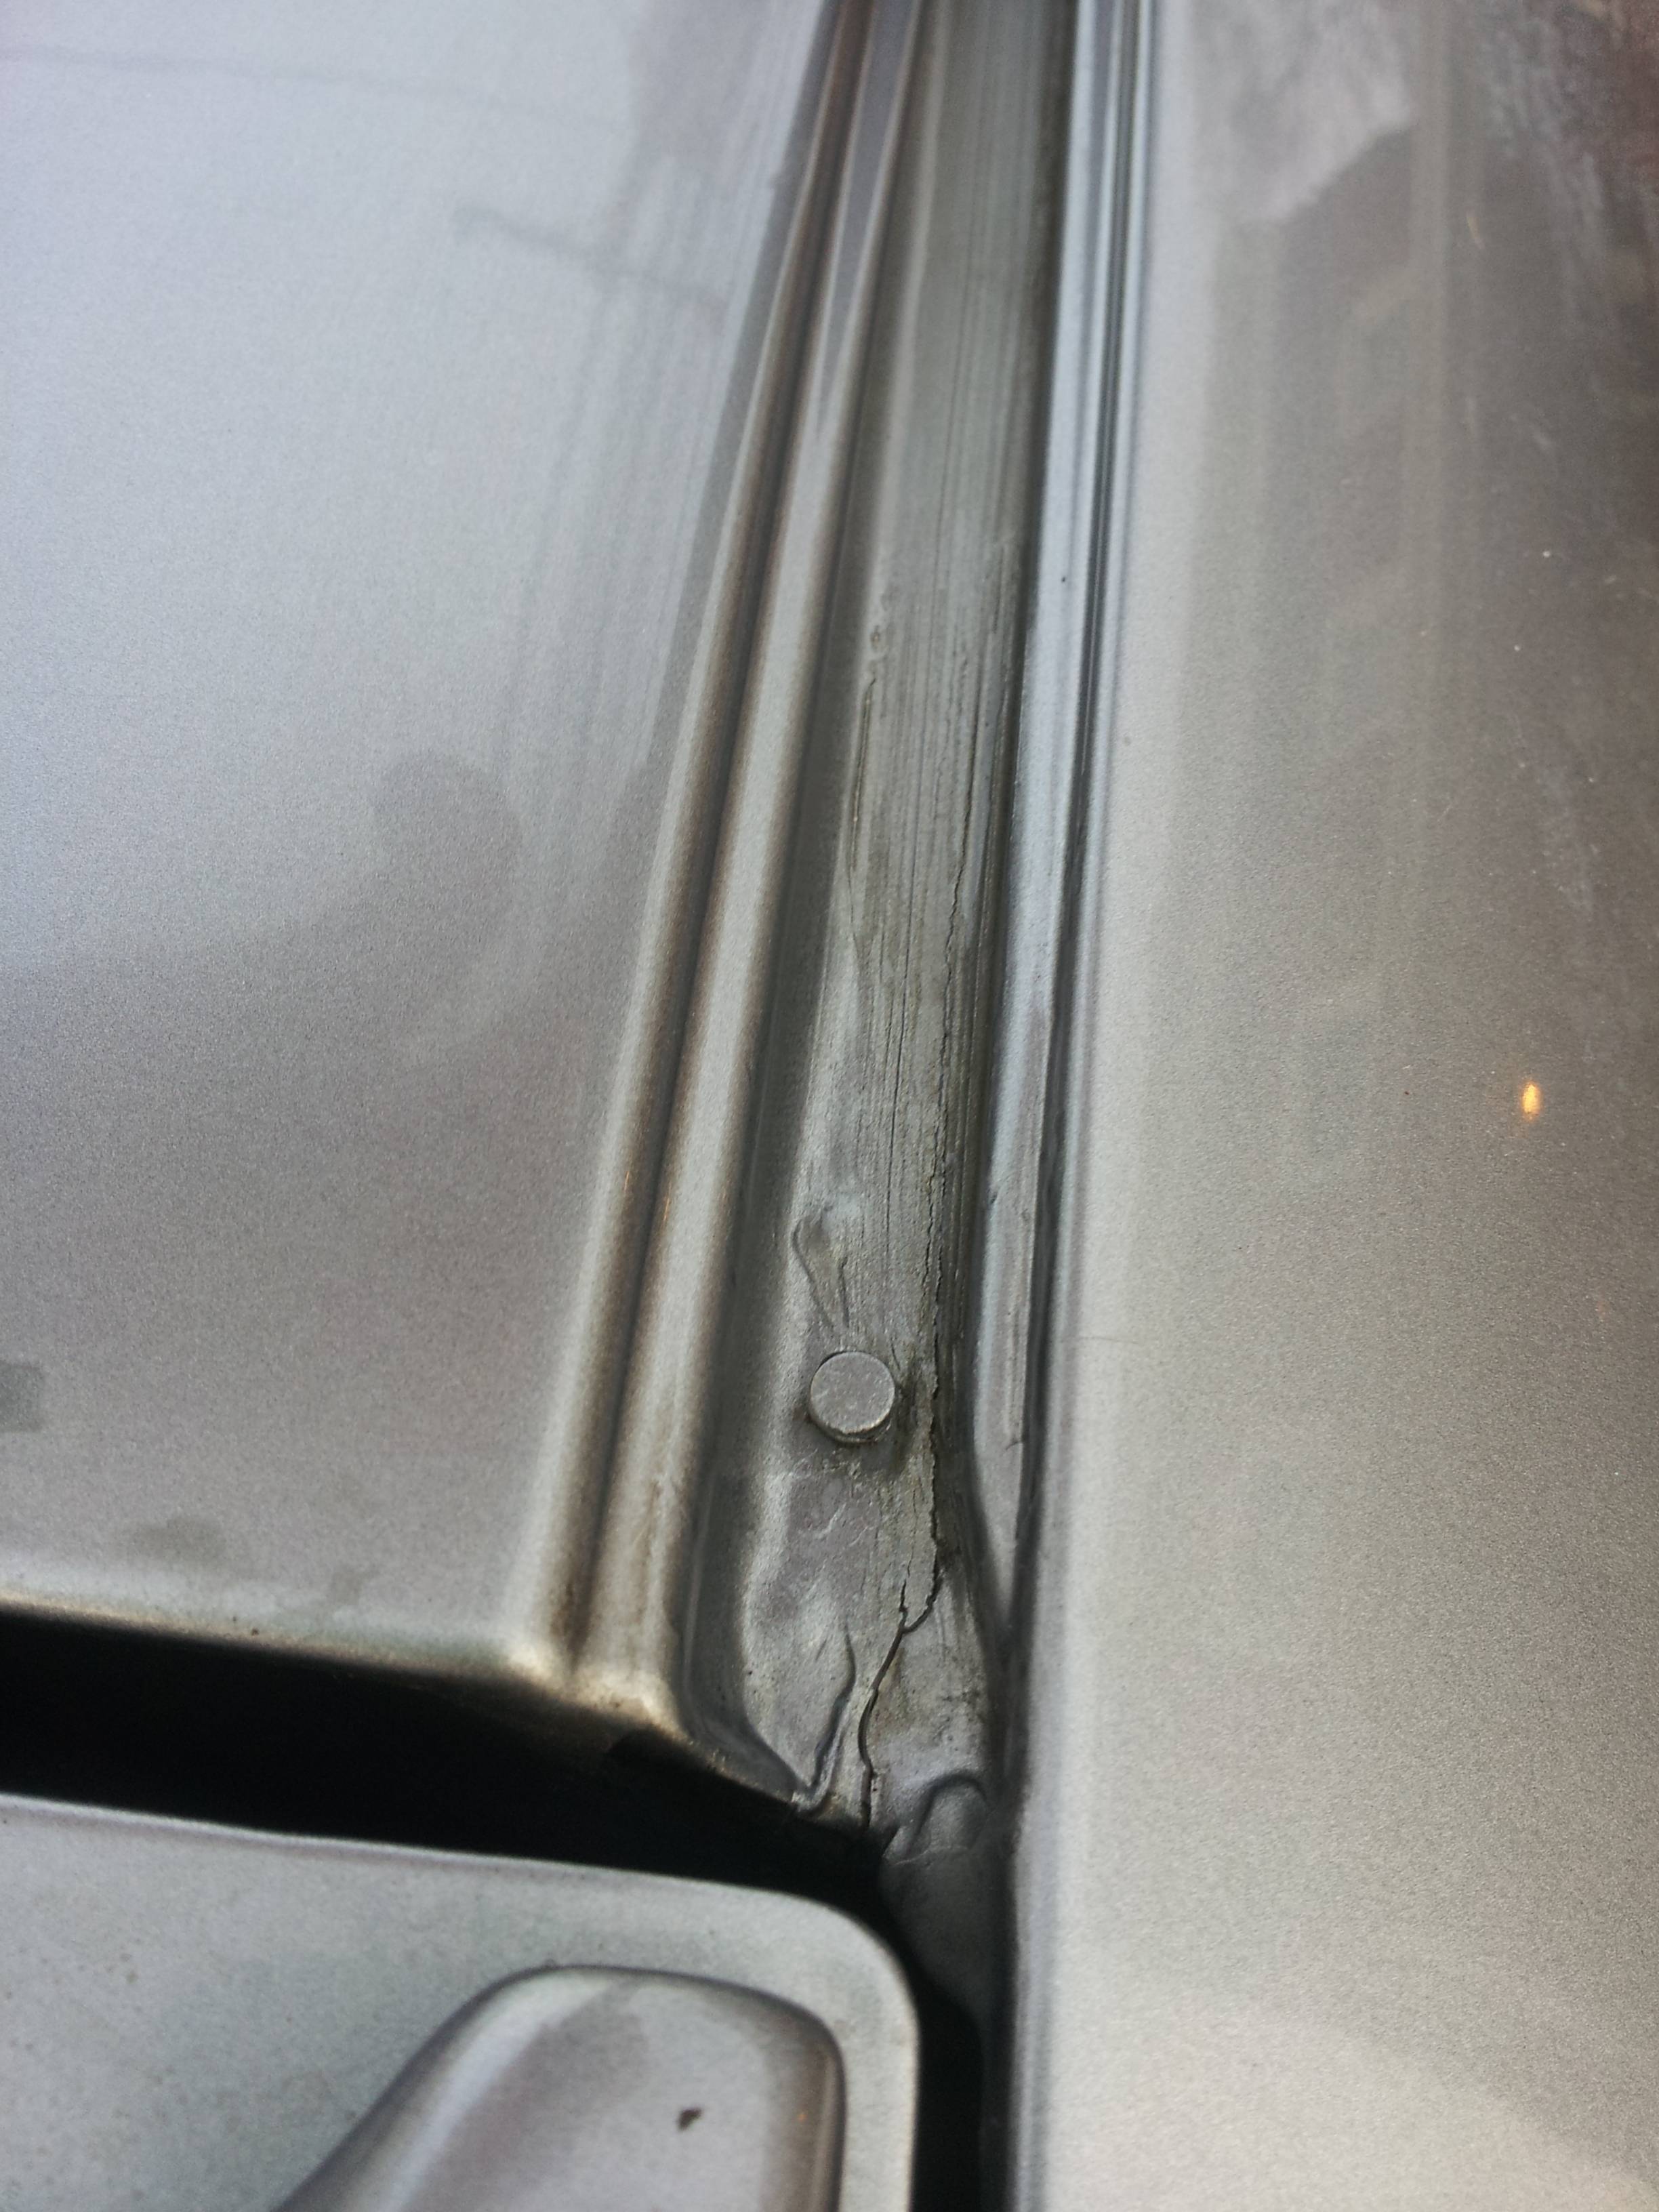
Under driver-side rail (you can see that my prying up from the rear-most part of the rail caused the clip to come off - I levered it back on with a small flathead screwdriver)
Under driver-side rail closeup - Crack is somewhat visible.
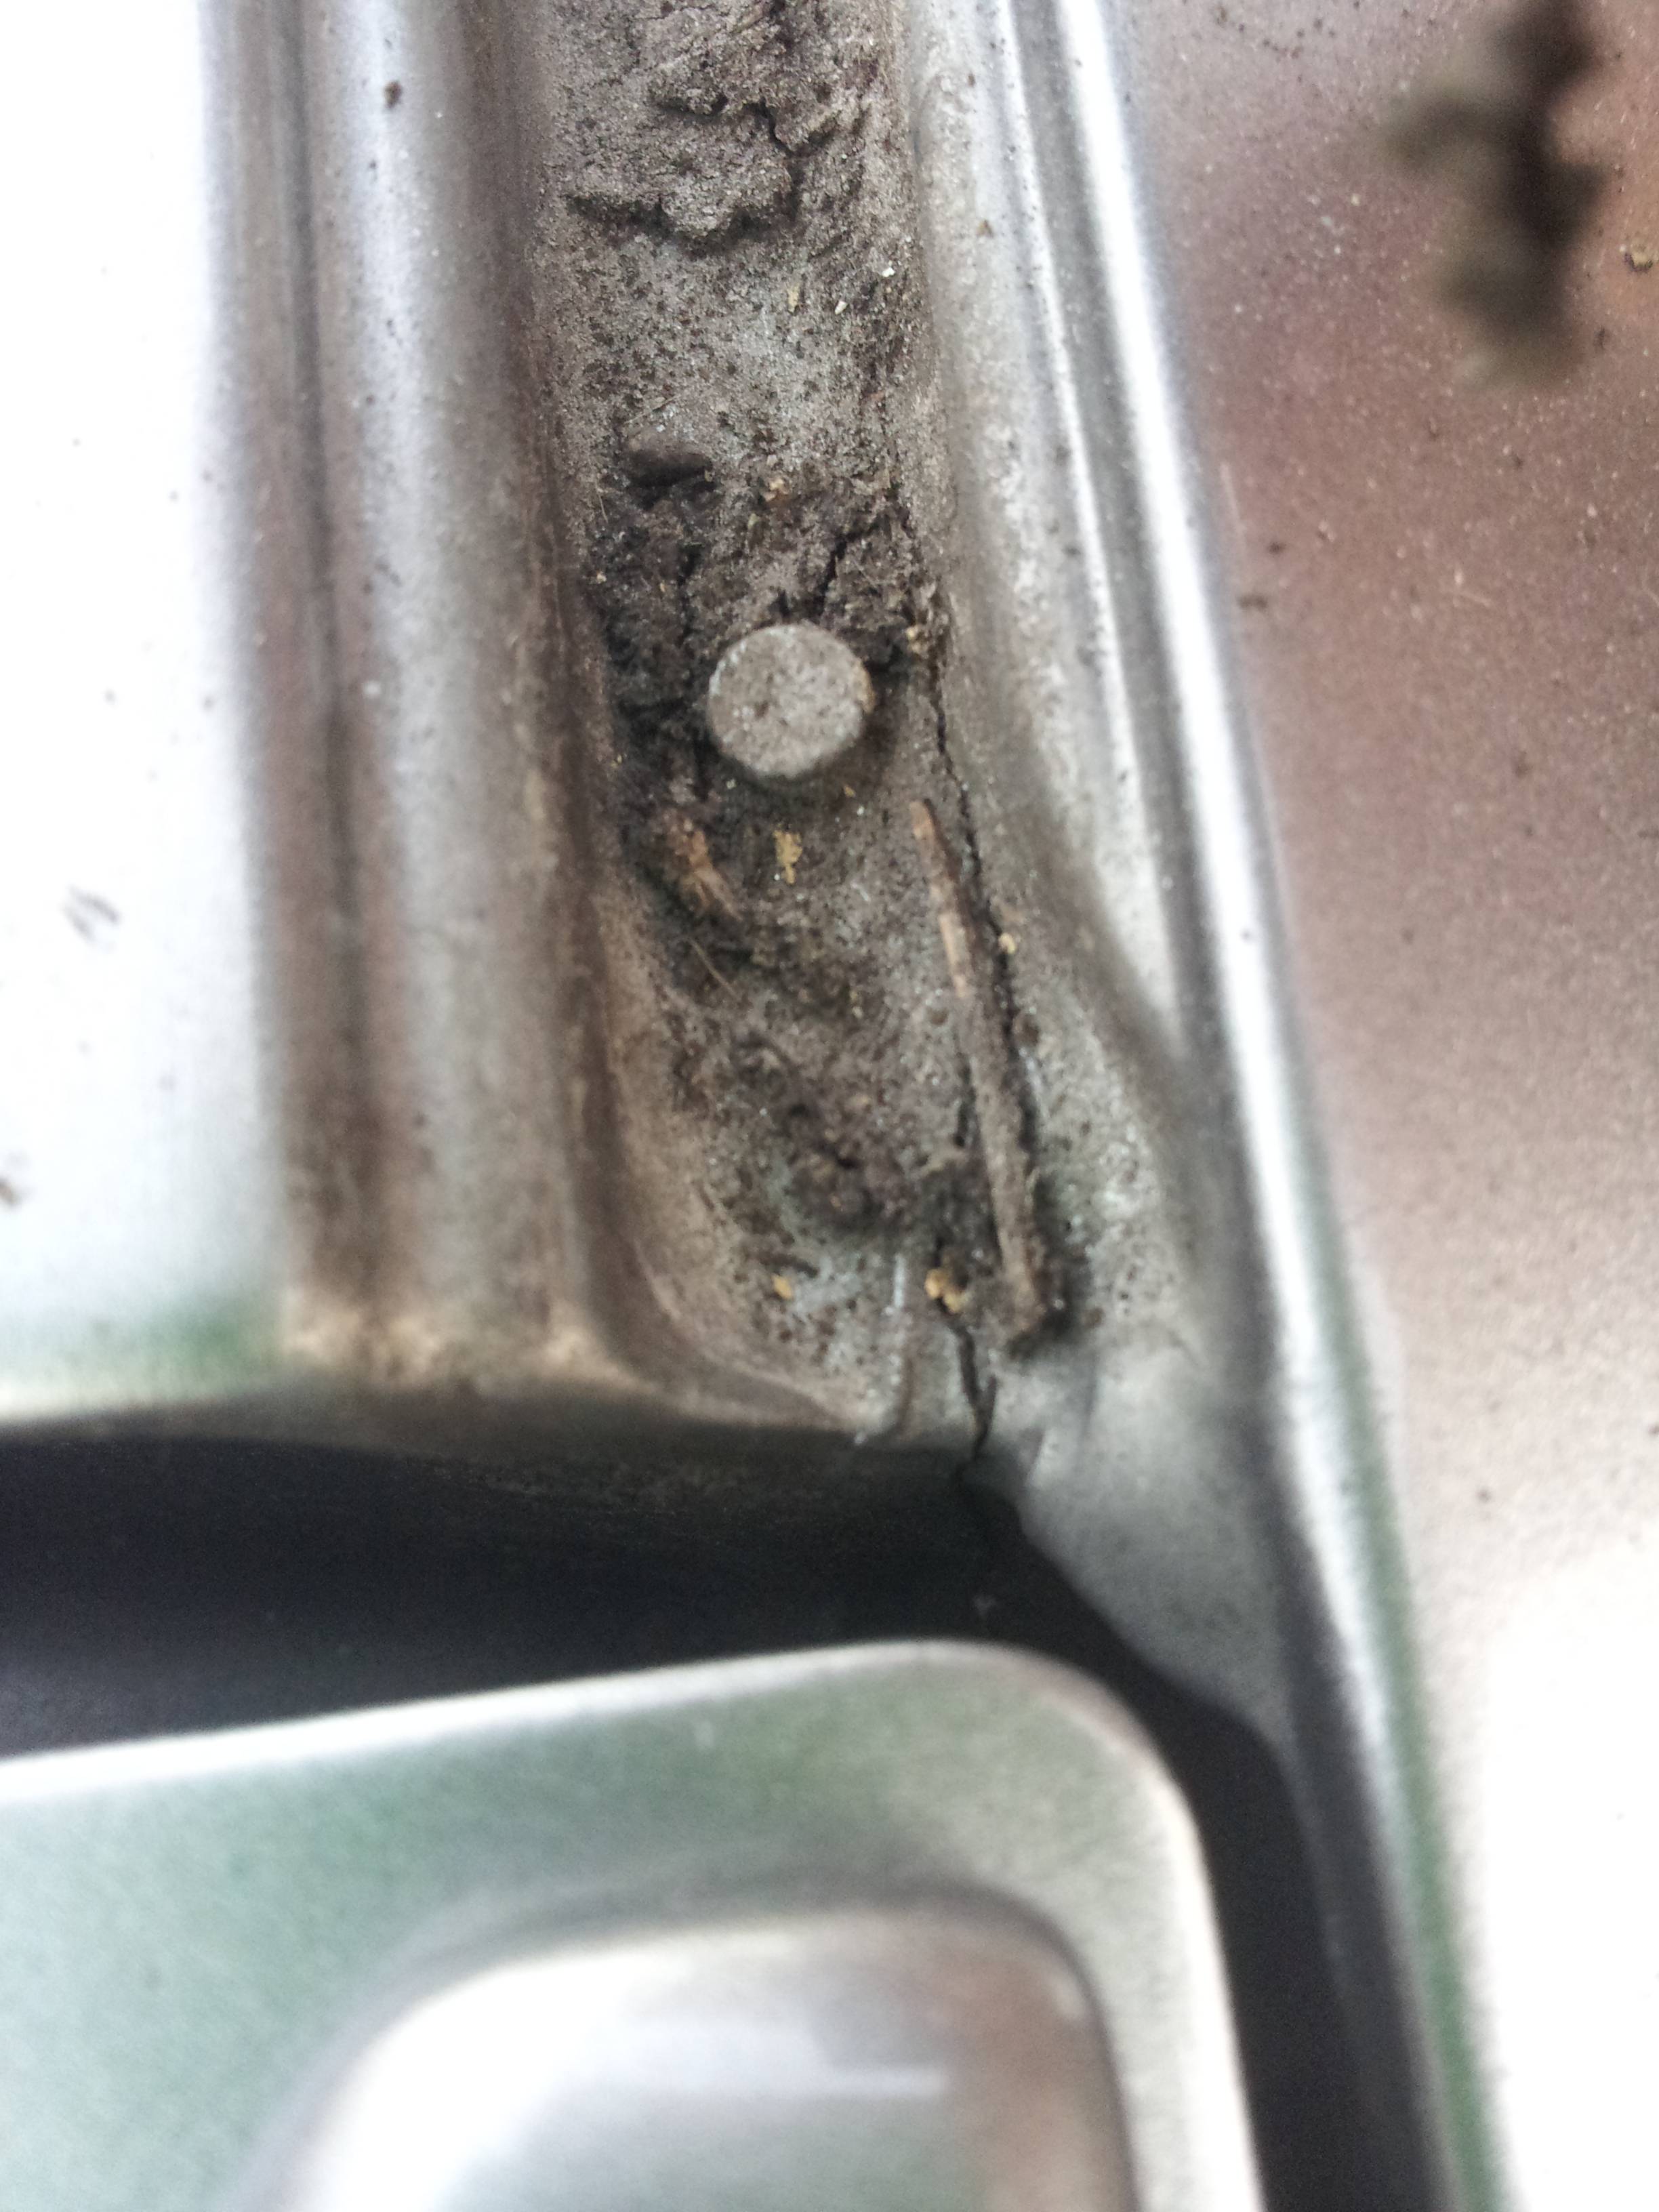
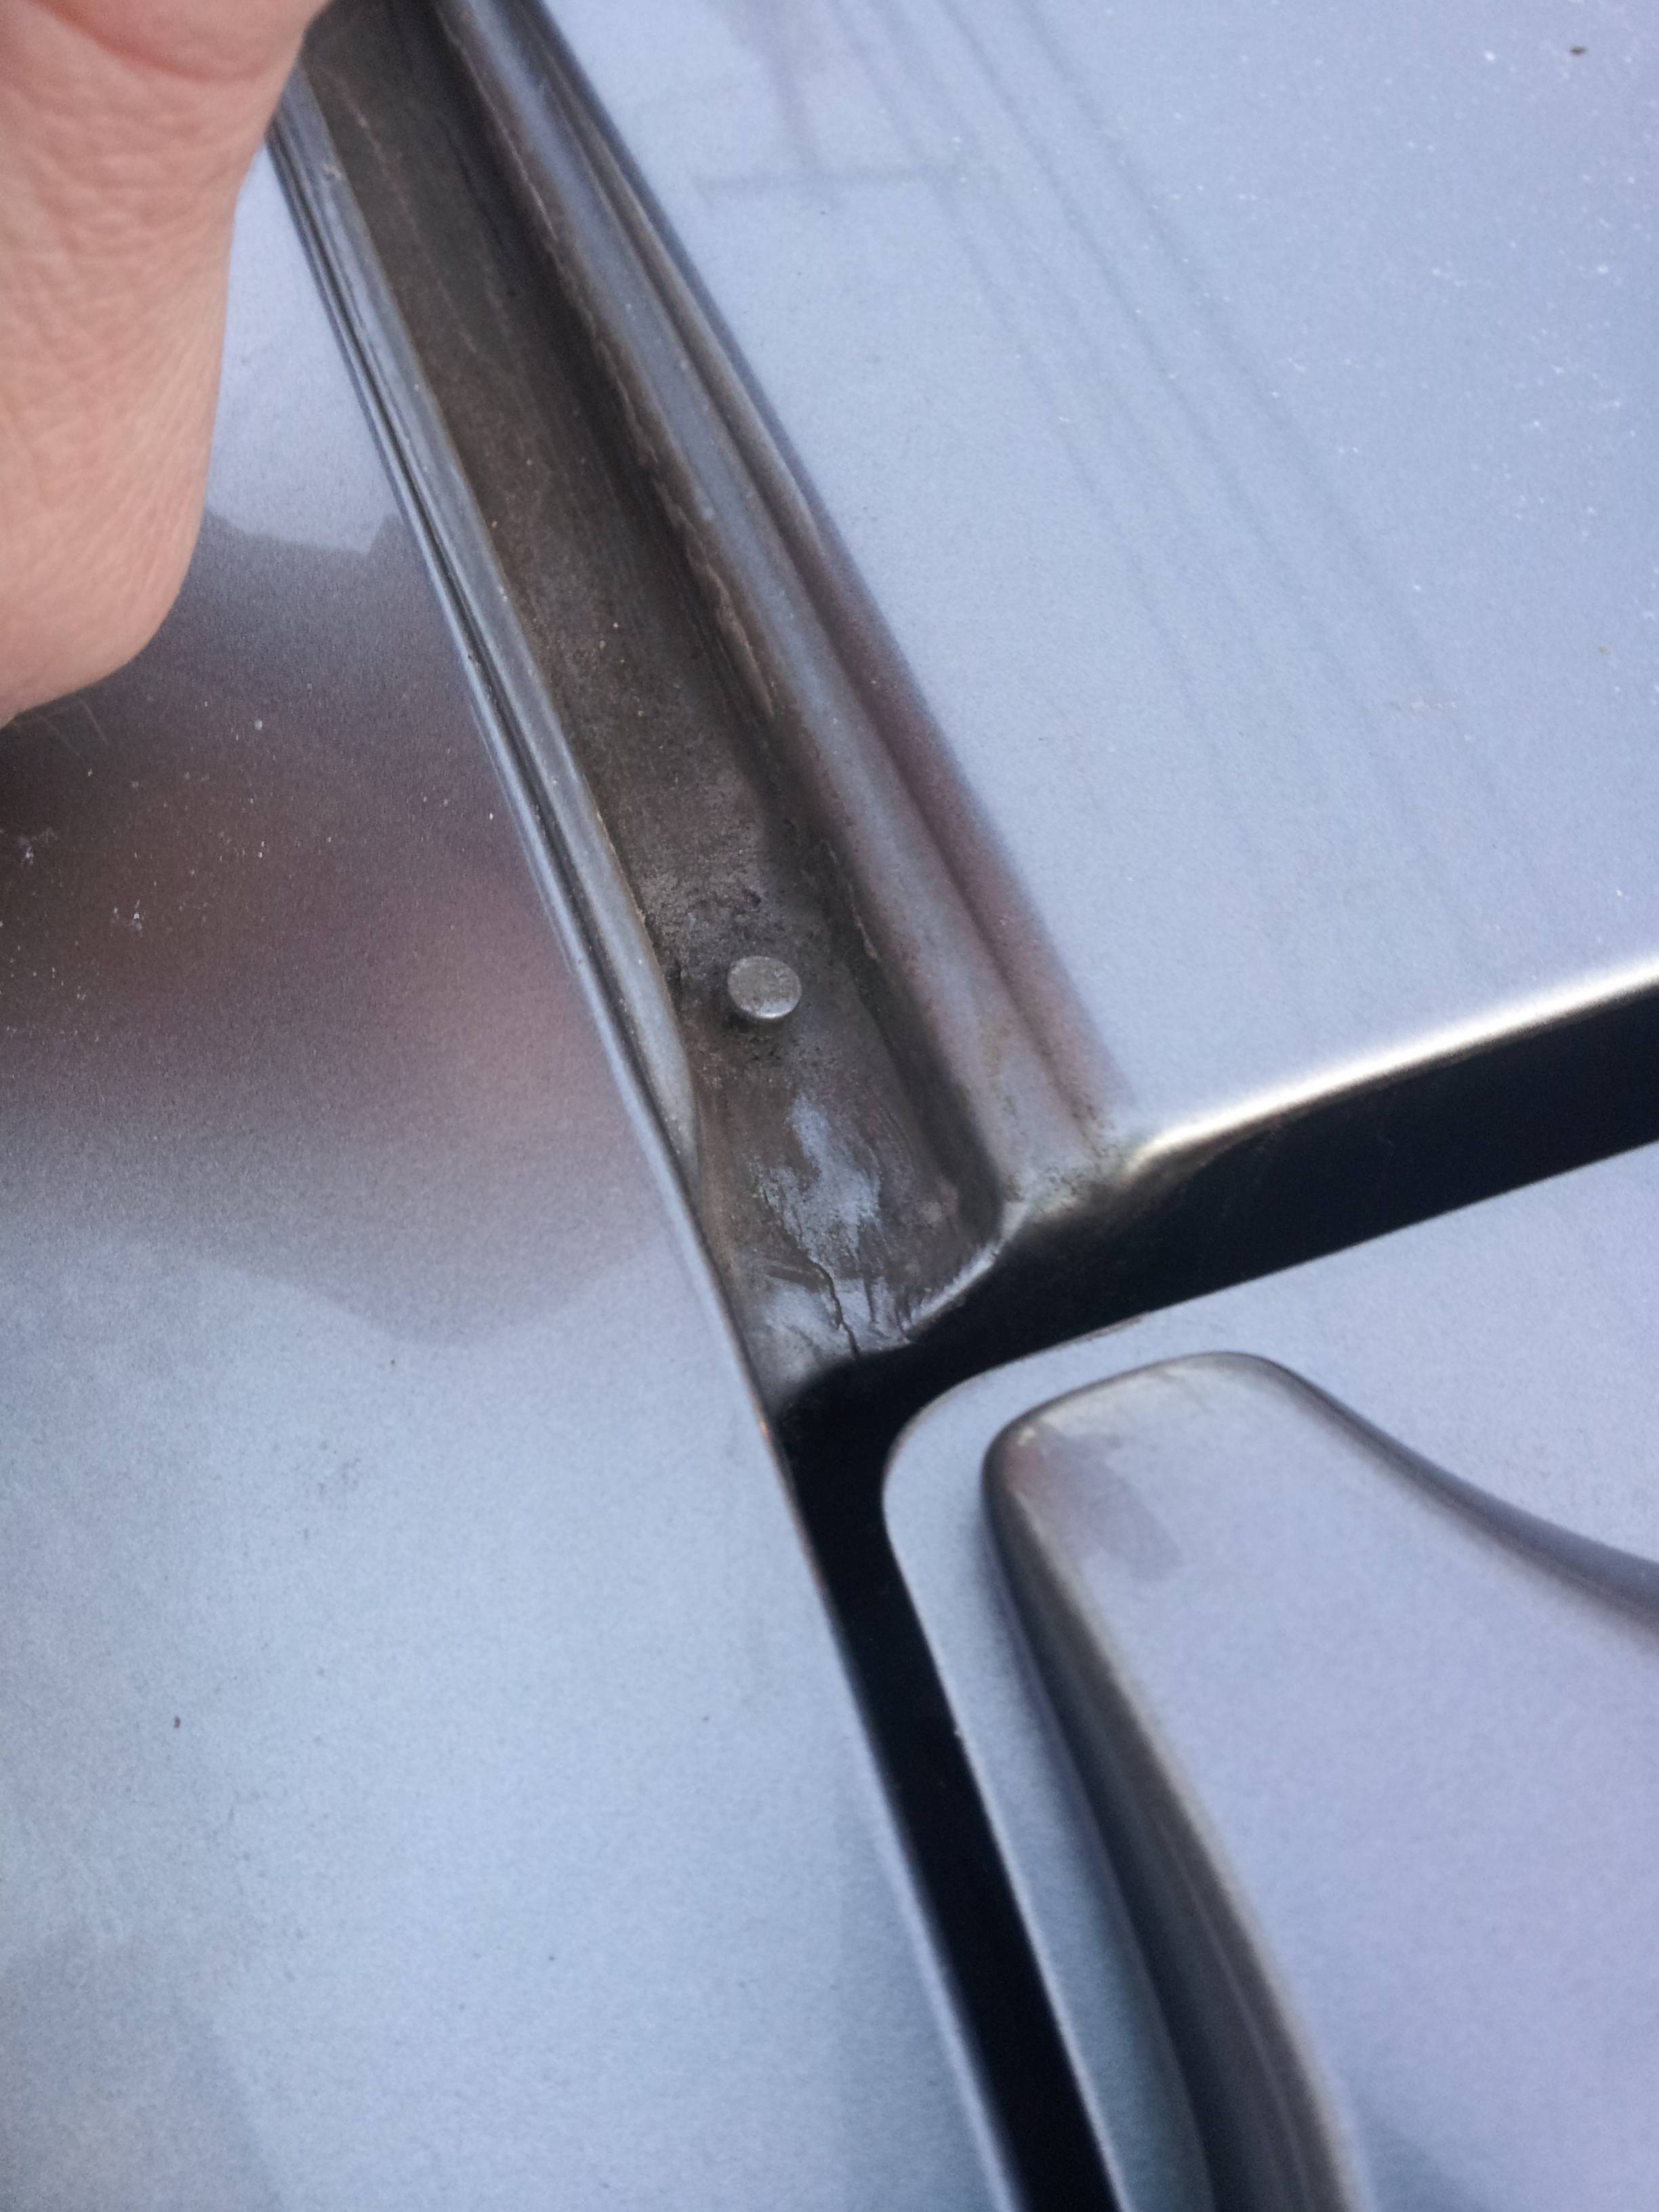
Be sure to open the hatch and see how far the crack goes. You'll need to clean and then seal up the full length of the crack. As you can see here, the crack extends down quite a bit.

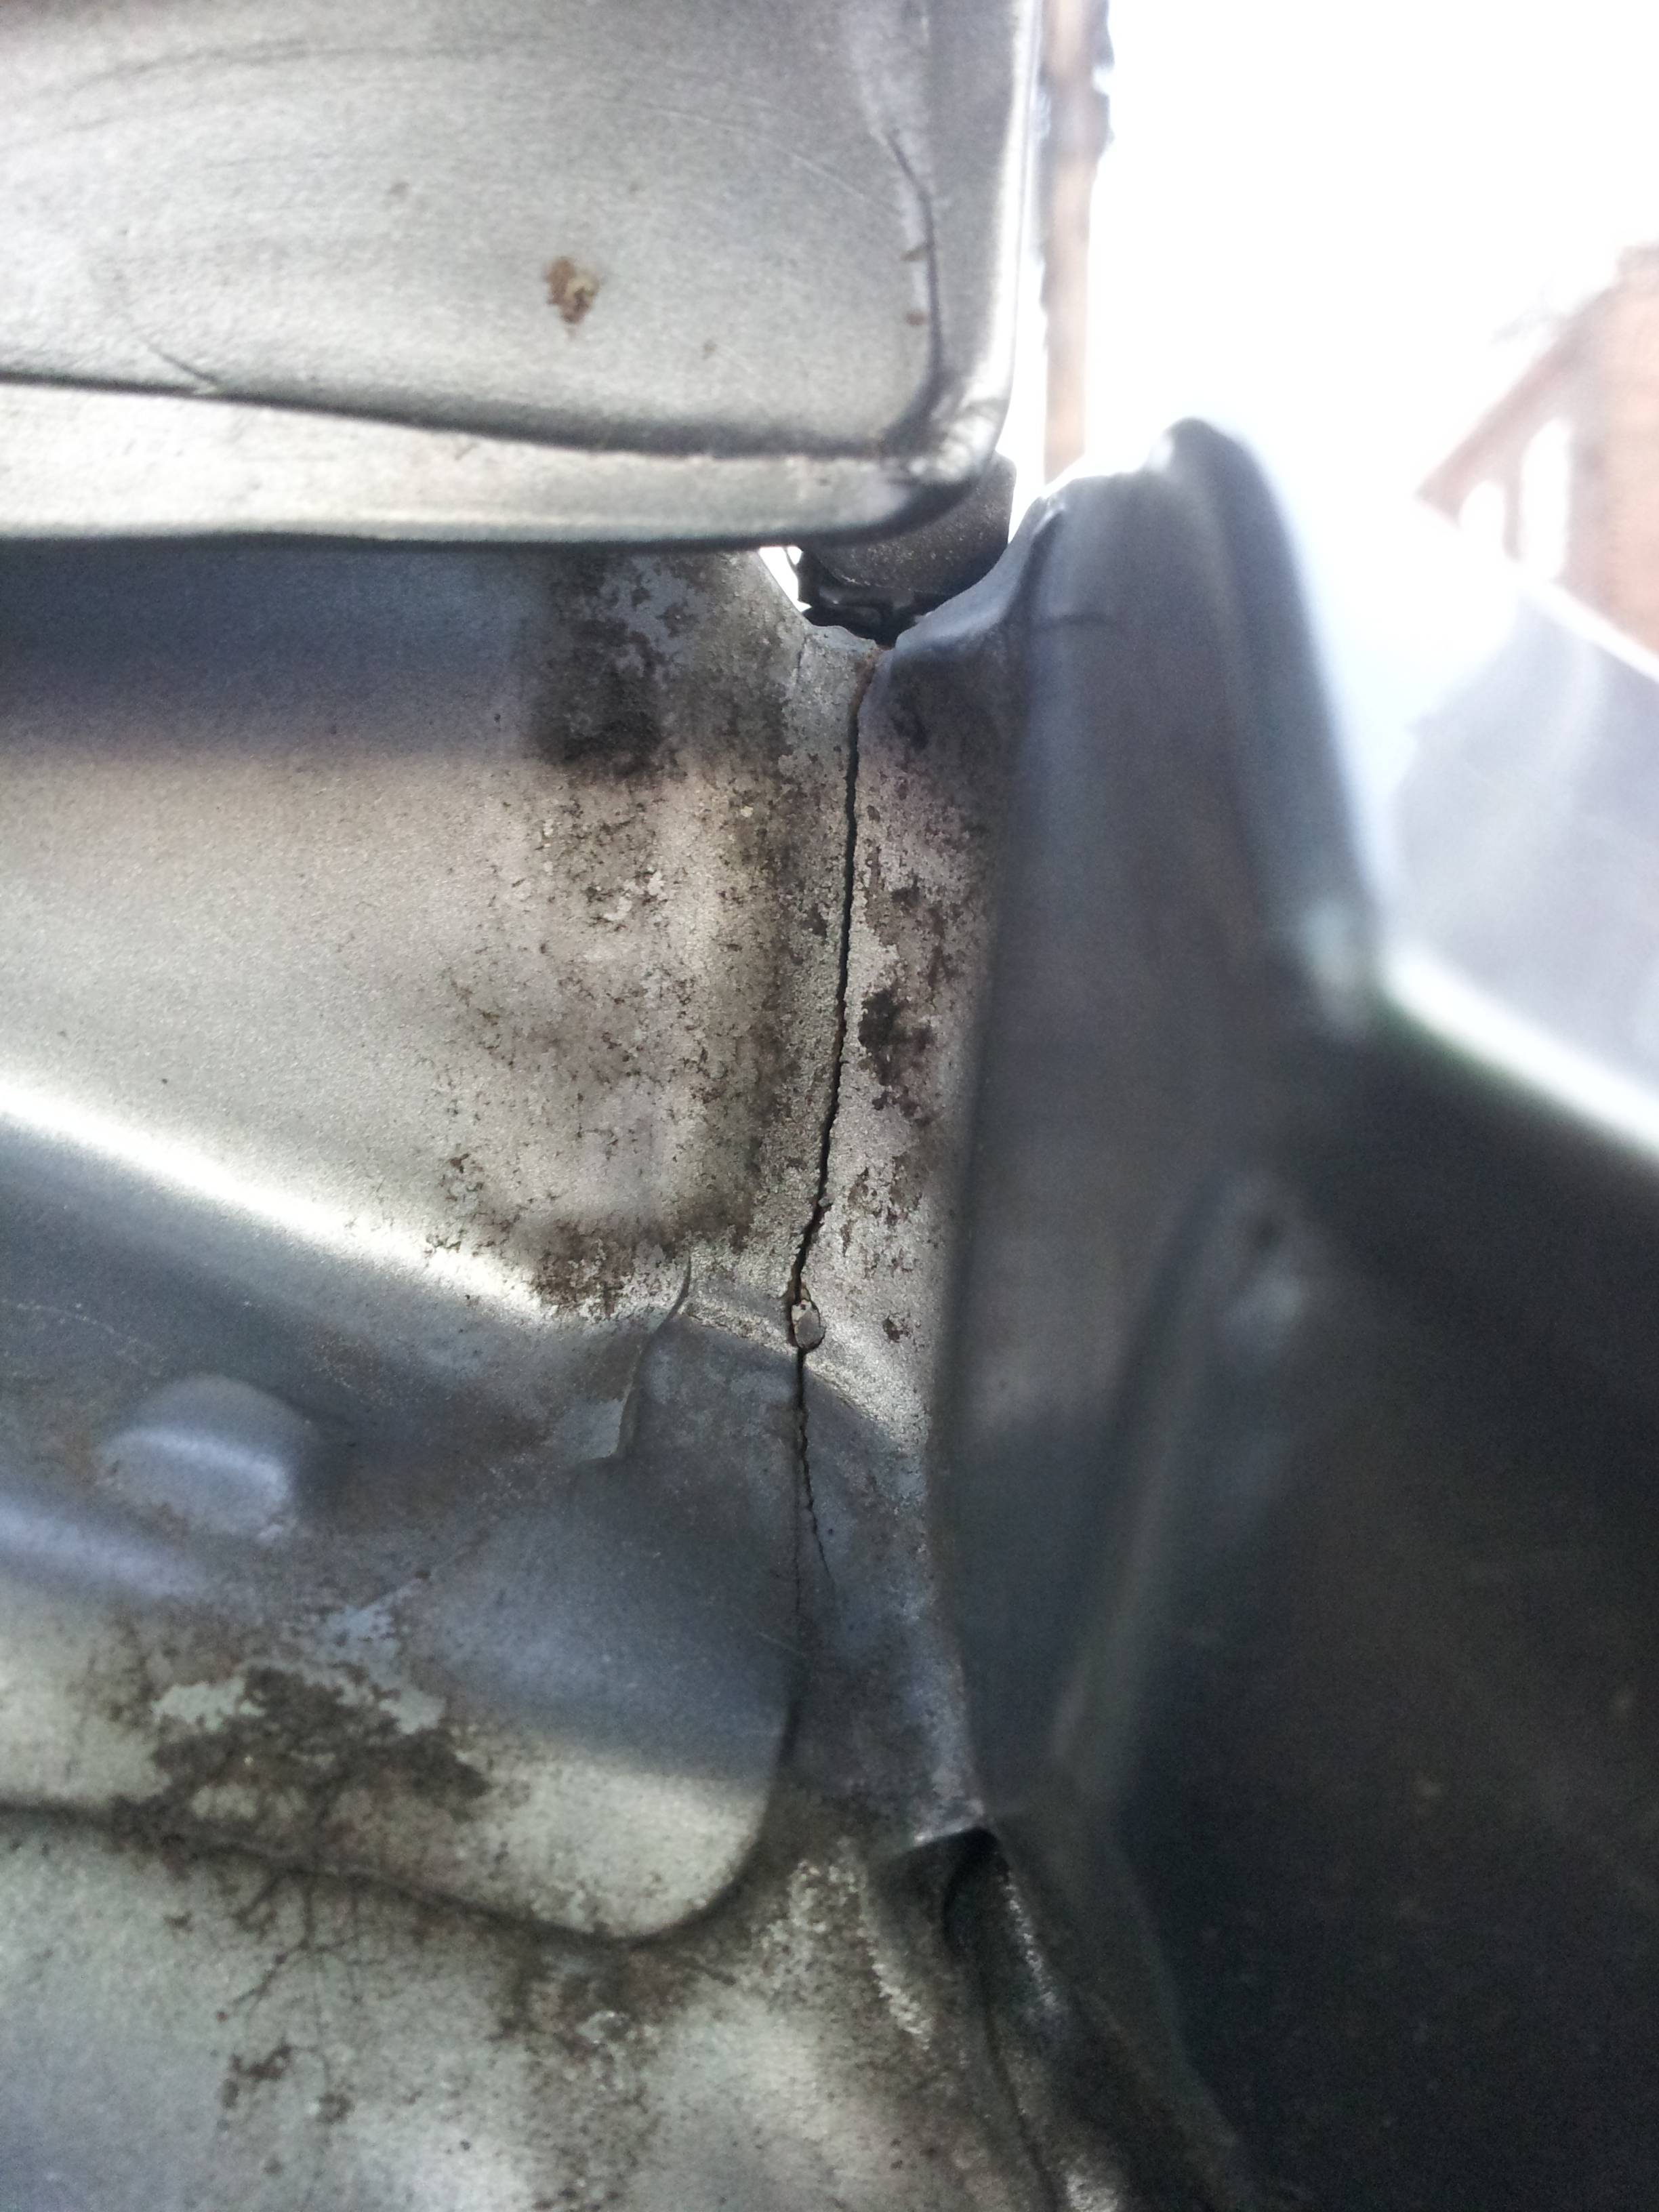
After cleaning, the cracks are more obvious (I used a simple household multi-surface cleaner e.g. 409 but soap and water would be great too):
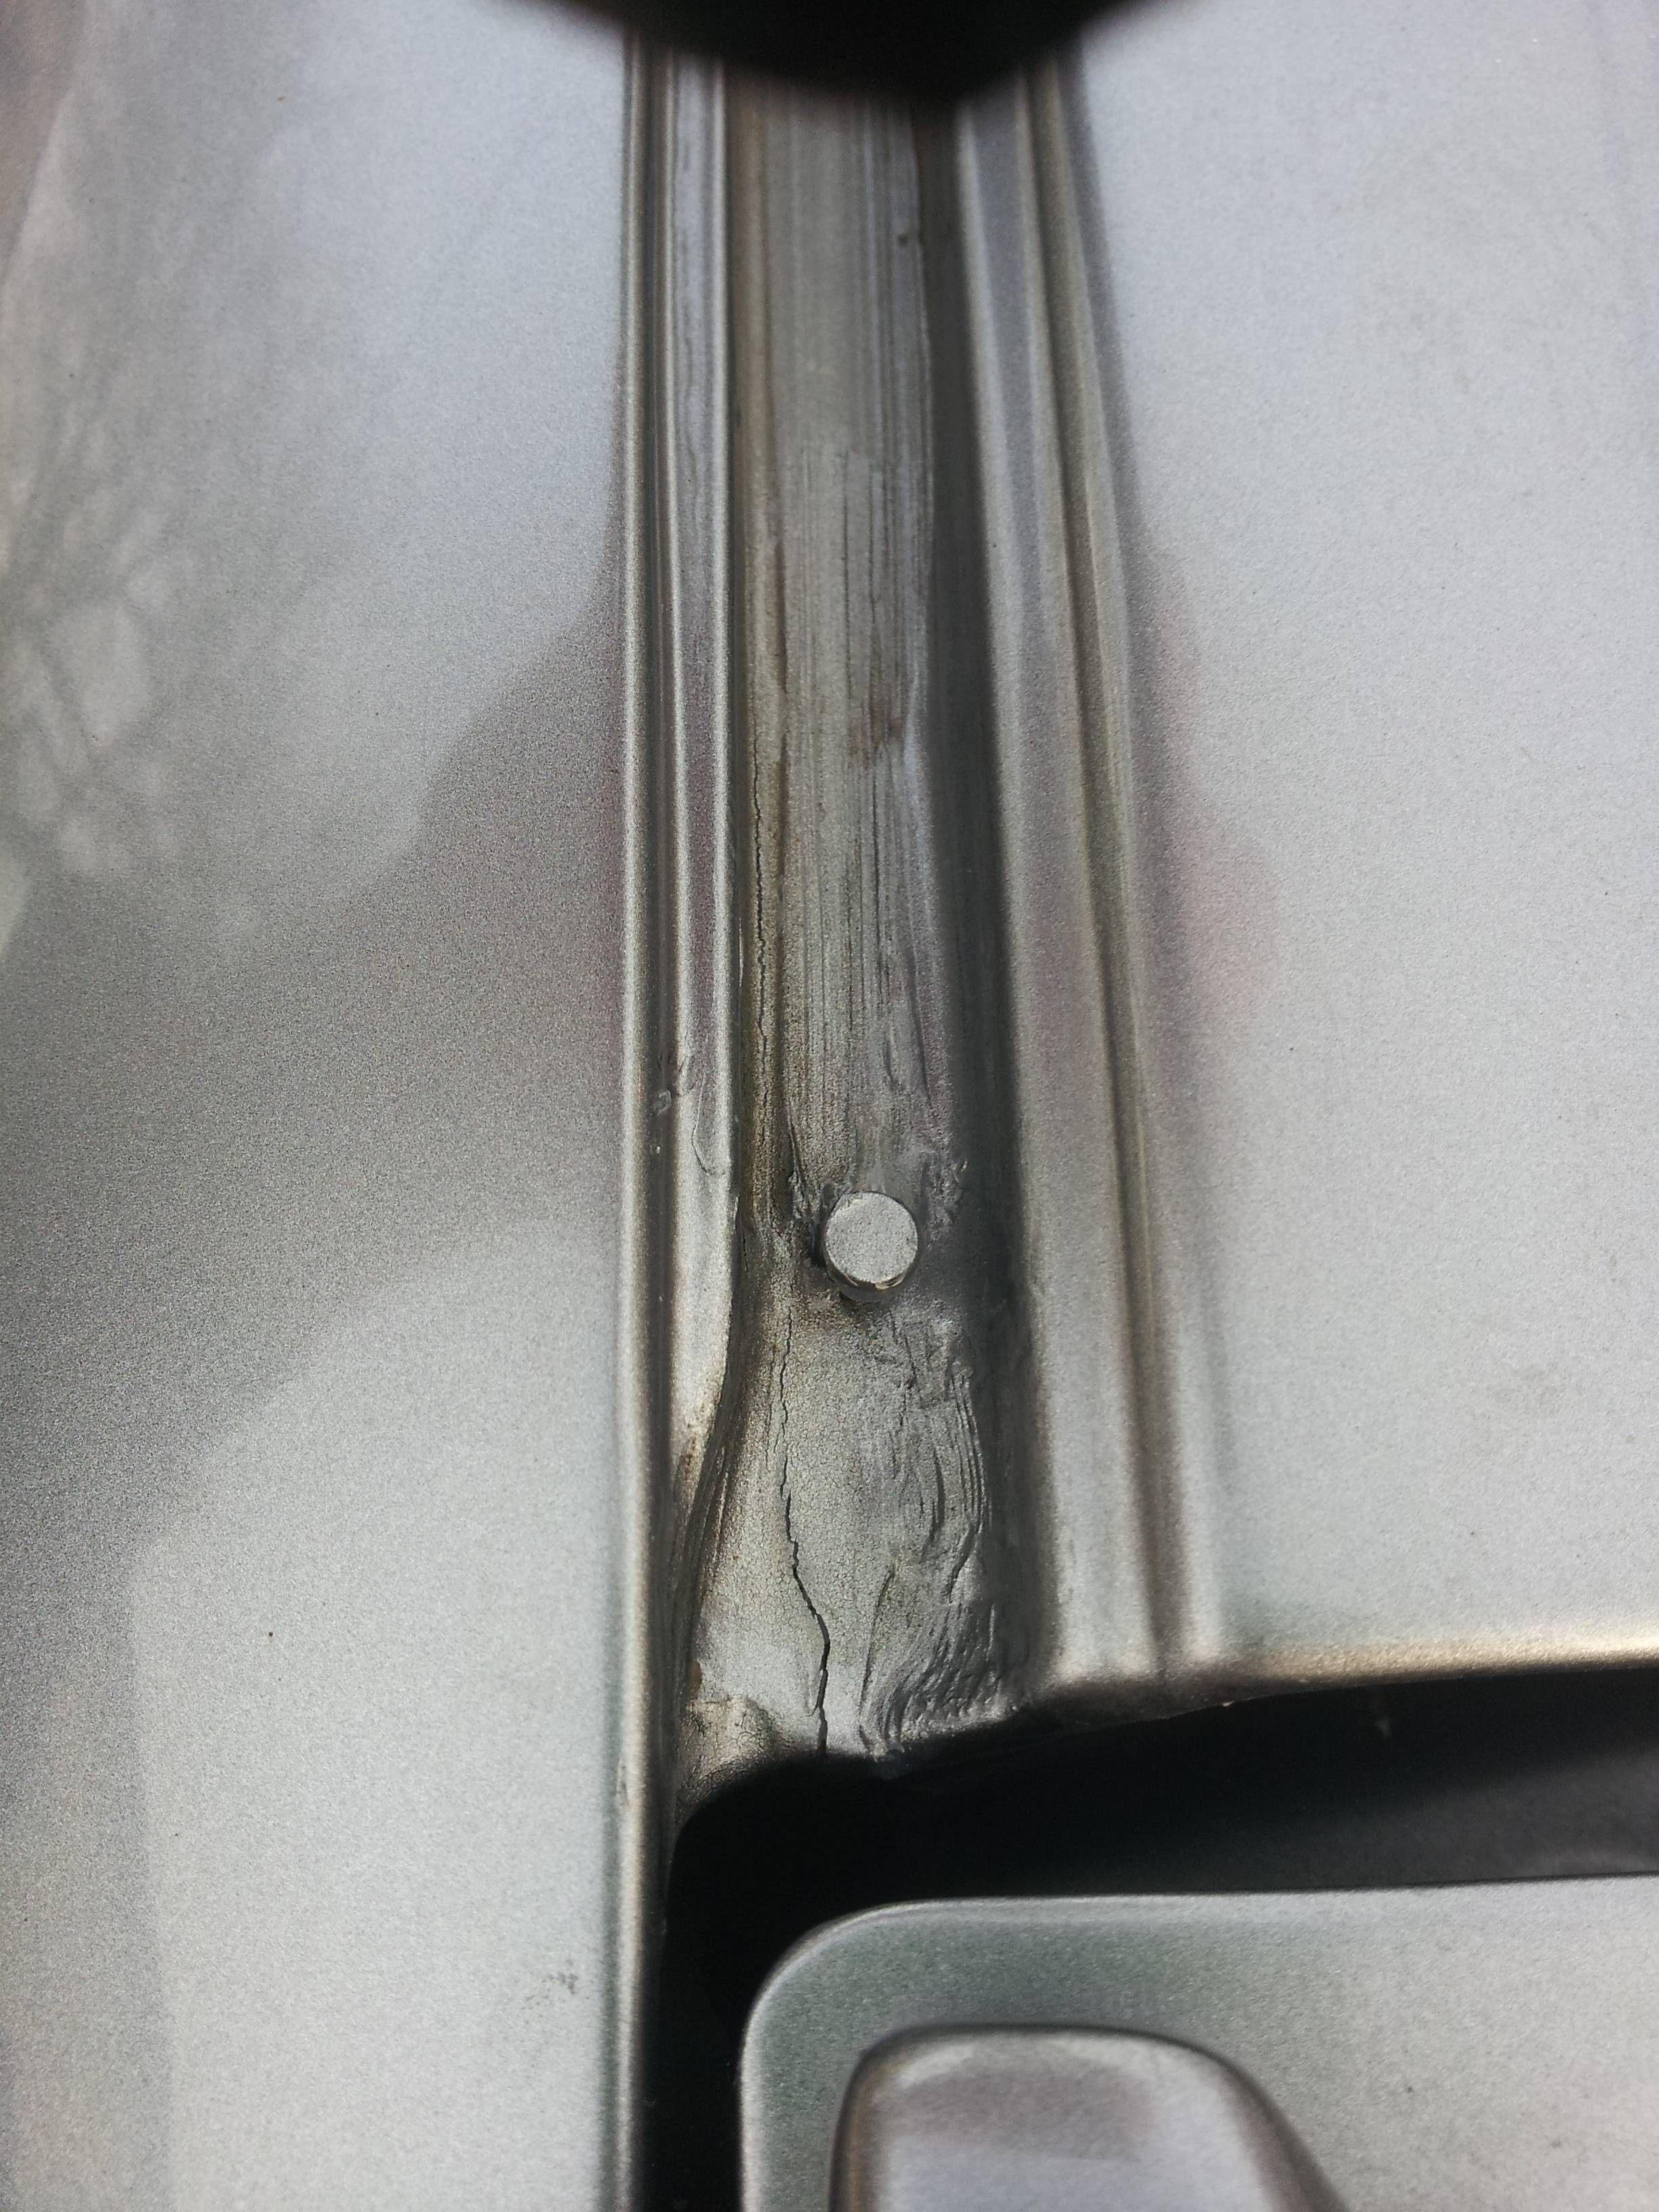
passenger-side crack (upper view)
passenger-side crack (lower view)
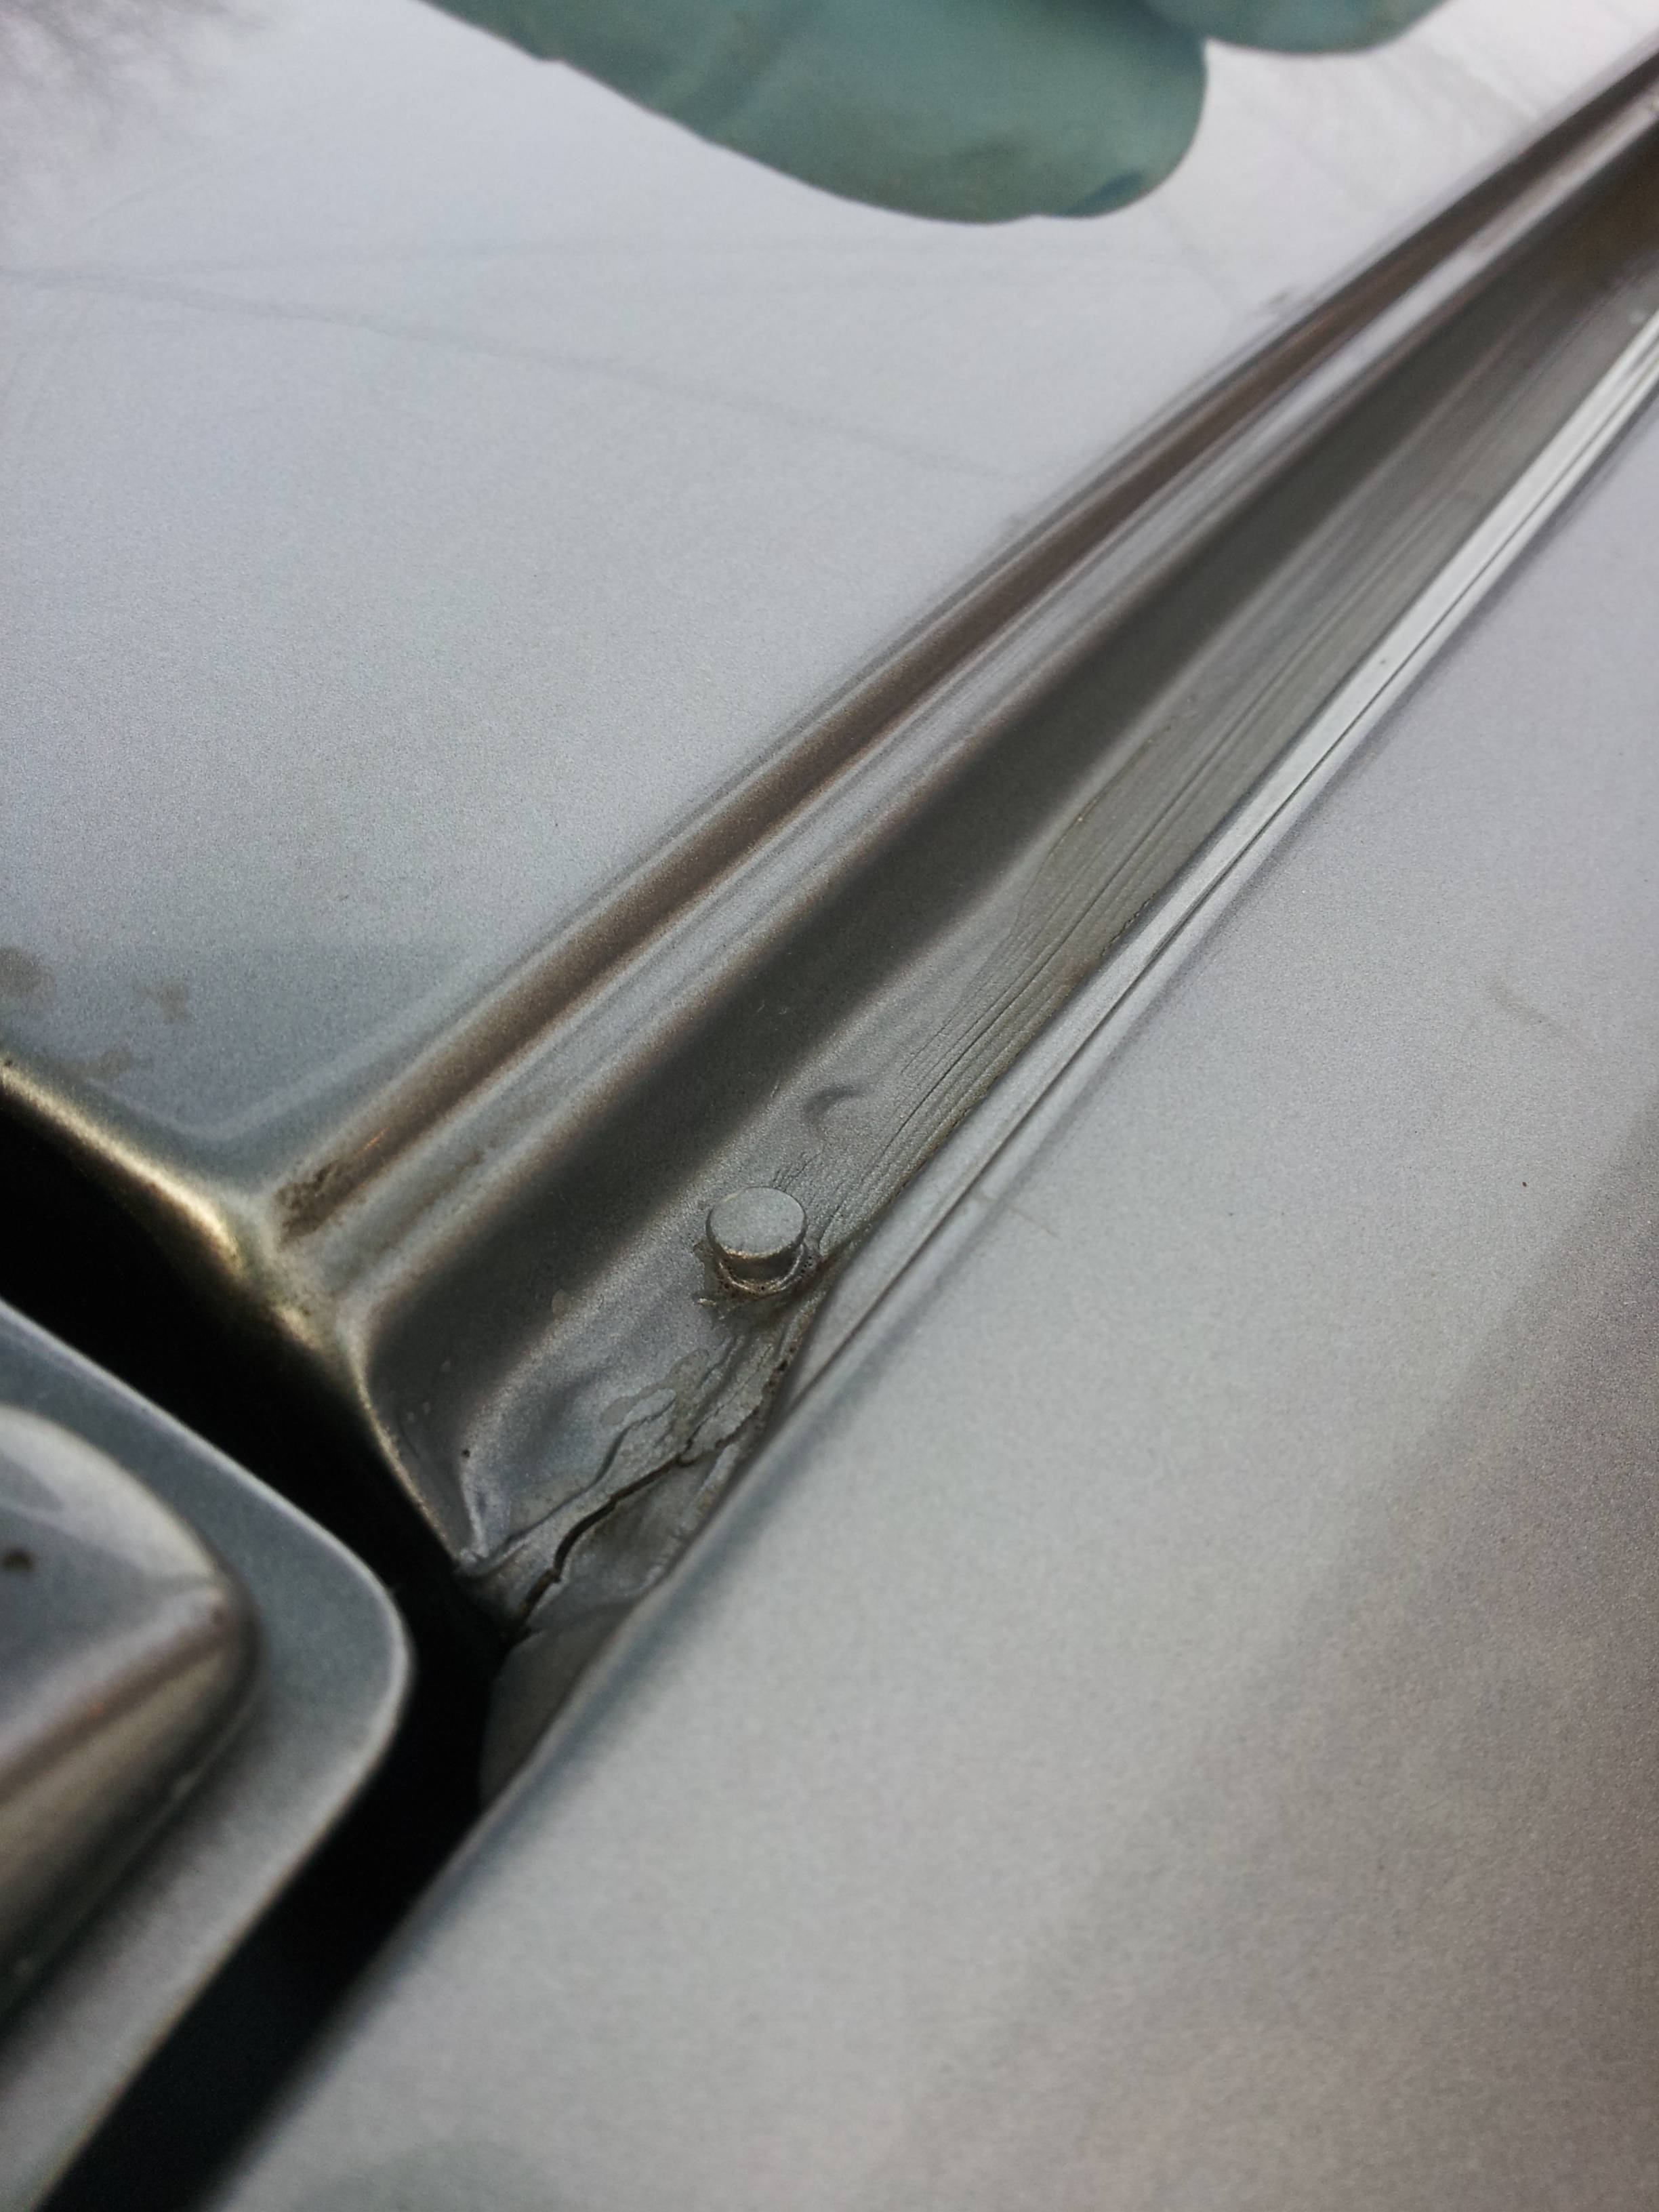
driver-side crack
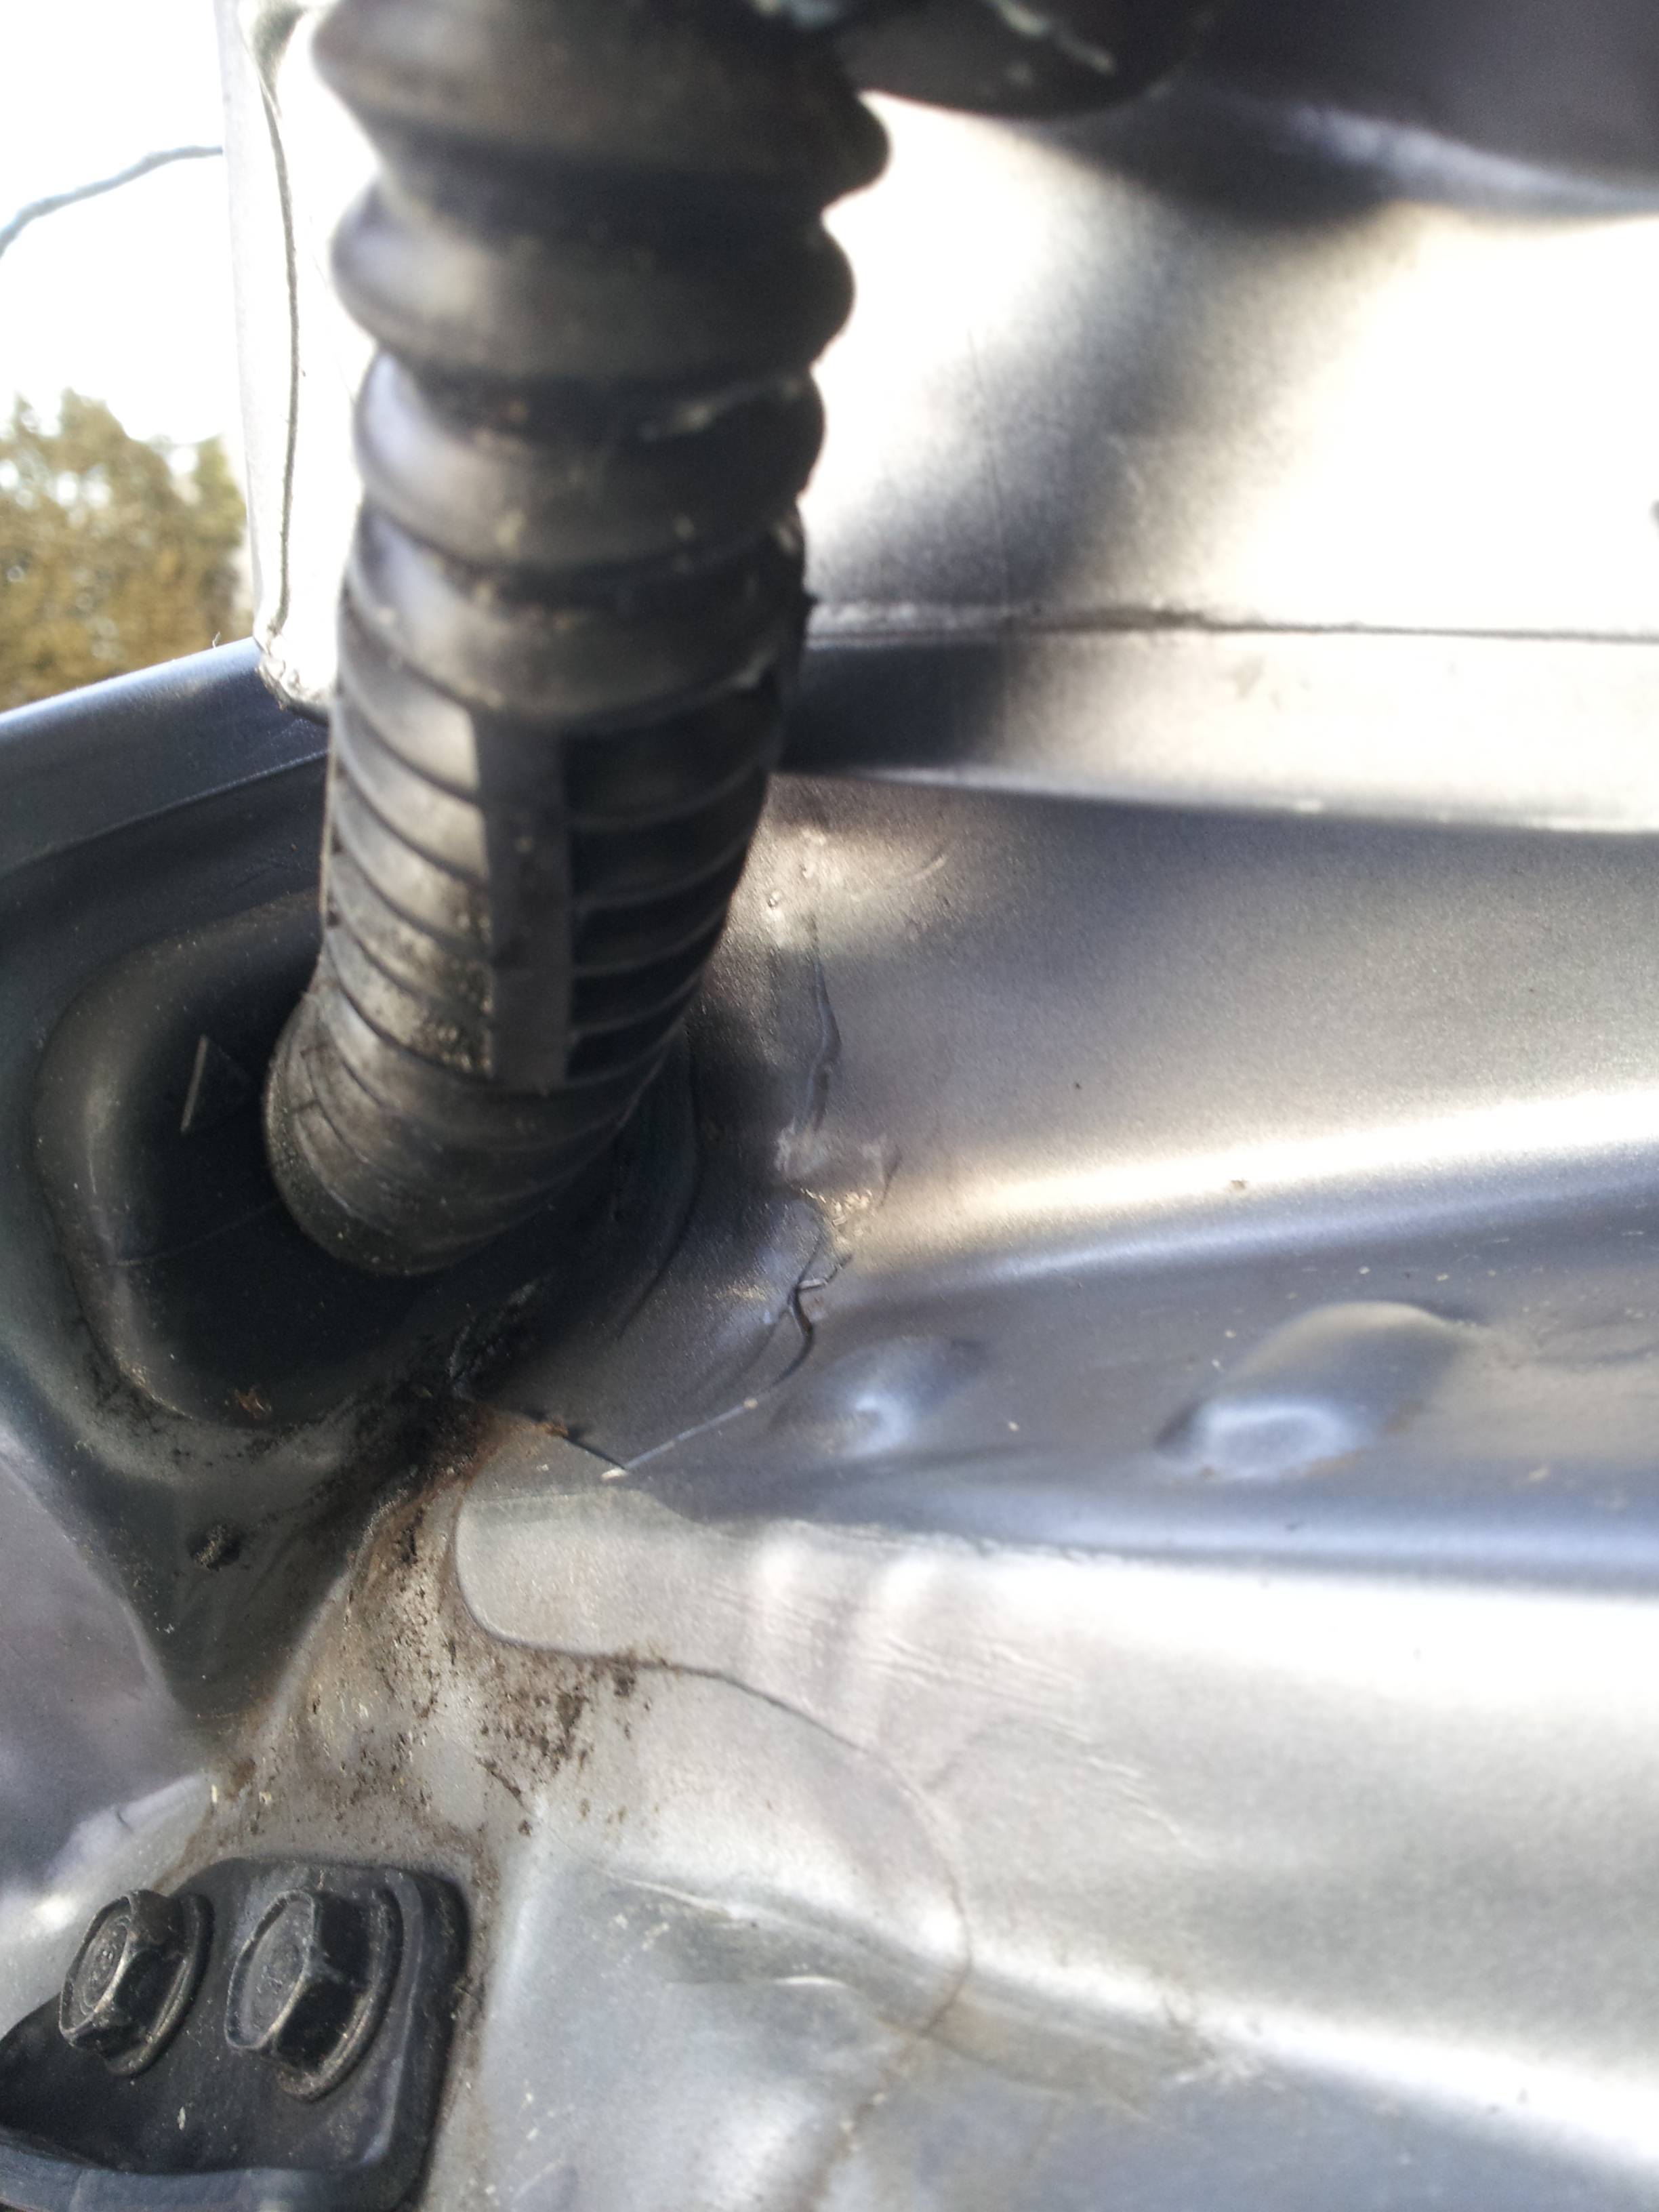
drive-side crack (lower view - hard to see because of rubber electrical conduit)
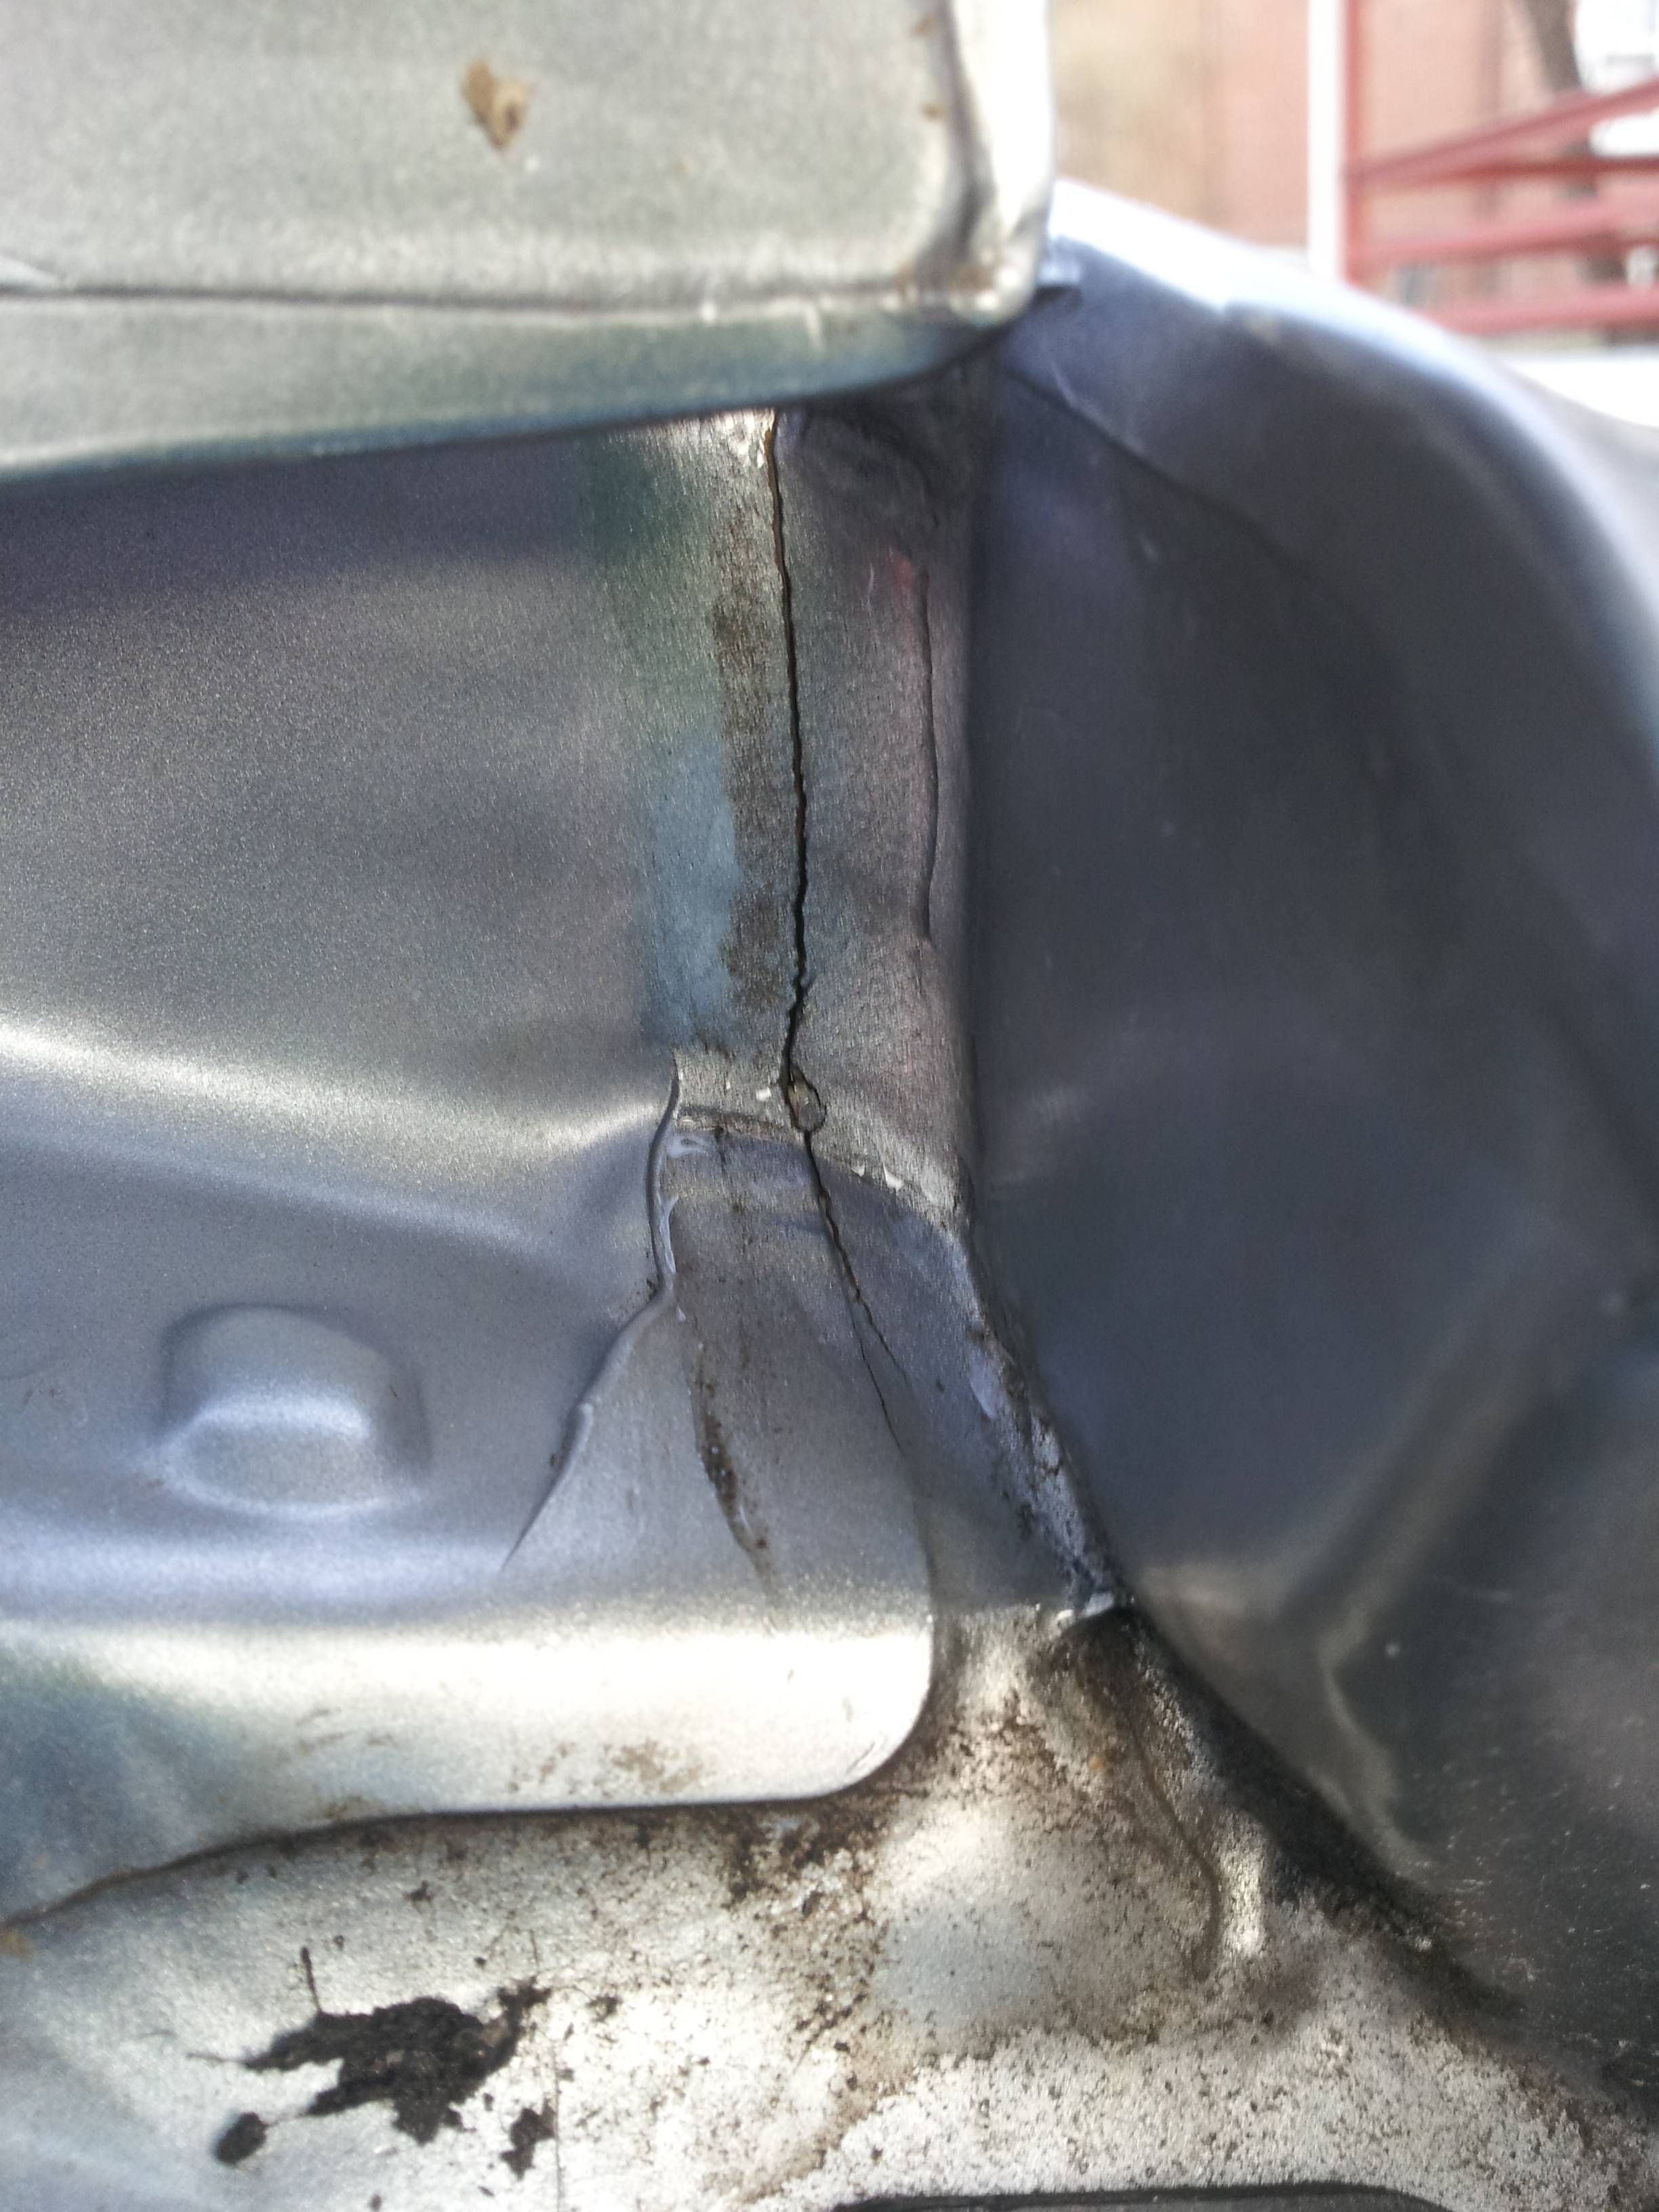
The silicone I used was a small tube of clear GE Silicone II (this stuff: GE Silicone II 2.8-oz. Clear Window and Door Caulk-GE500 3TG at The Home Depot), but any silicone caulk would work here. Whatever you use, you want it to be something that can flex, as otherwise it'll just crack again the first time the car's chassis flexes.
passenger-side crack after applying (clear) silicone caulk and smoothing with my (nitrile-gloved) finger
driver-side crack after same
It was about 32 degrees Fahrenheit outside when I did this, which is not preferable (the stuff I used wants 40 degrees at a minimum), so hopefully it'll still cure ok. I went a little light on the amount of silicone applied because of this. If you're working in temperatures above 40 degrees, go ahead and lay it on thick if you like. I left the rails loose while it cures, as I don't want the rails to be effectively glued down should I need to get in there again.
One day I took everything out of the hatch area and removed the rear interior panels, but could find no obvious sources of the leak. Thanks to this thread, I found the true (I think) source of the water ingress! Here's a step-by-step of my experience:
First, I pried up the rubber roof rails. After doing this, I realized the best way to do this is to pry about a foot forward of the rearmost part of the rail, as this pulls the metal clip forward so it's released from the little knob it fits over. You can see in the pictures that there's a lot of little bits of debris under there, which needed to be wiped out before applying silicone.
Under passenger-side rail
Under passenger-side rail closeup - You can see the crack running down the right side.
Under driver-side rail (you can see that my prying up from the rear-most part of the rail caused the clip to come off - I levered it back on with a small flathead screwdriver)
Under driver-side rail closeup - Crack is somewhat visible.
Be sure to open the hatch and see how far the crack goes. You'll need to clean and then seal up the full length of the crack. As you can see here, the crack extends down quite a bit.
After cleaning, the cracks are more obvious (I used a simple household multi-surface cleaner e.g. 409 but soap and water would be great too):
passenger-side crack (upper view)
passenger-side crack (lower view)
driver-side crack
drive-side crack (lower view - hard to see because of rubber electrical conduit)
The silicone I used was a small tube of clear GE Silicone II (this stuff: GE Silicone II 2.8-oz. Clear Window and Door Caulk-GE500 3TG at The Home Depot), but any silicone caulk would work here. Whatever you use, you want it to be something that can flex, as otherwise it'll just crack again the first time the car's chassis flexes.
passenger-side crack after applying (clear) silicone caulk and smoothing with my (nitrile-gloved) finger
driver-side crack after same
It was about 32 degrees Fahrenheit outside when I did this, which is not preferable (the stuff I used wants 40 degrees at a minimum), so hopefully it'll still cure ok. I went a little light on the amount of silicone applied because of this. If you're working in temperatures above 40 degrees, go ahead and lay it on thick if you like. I left the rails loose while it cures, as I don't want the rails to be effectively glued down should I need to get in there again.

Member
Joined: Apr 2010
Posts: 62
From: Quebec
Thank Jared.
That is exactly how the cracks look on my car, i did not have time to seal them before winter,i gonna wait in april, I planned to use leak seal, might spray some on nitril glove and apply it that way. Thank it is a really good post. that's will help a lot.
That is exactly how the cracks look on my car, i did not have time to seal them before winter,i gonna wait in april, I planned to use leak seal, might spray some on nitril glove and apply it that way. Thank it is a really good post. that's will help a lot.

New Member
Joined: Jan 2014
Posts: 6
From: Stratford, CT
Jared592: Appreciate the detailed explanation and photos. I spent 3 hrs removing and resealing my taillight housings to no avail. I will try your approach and report back. A big, big thank you if it works.
Frisbeedad that was exactly where mine was. Almost the exact cracks in the seam sealer. Mine was mostly coming into the rear P.S. It took abit of time for all the moisture to dry up from the padding. The thing is if your car has moisture on the inside of the glass, there's a leak letting water in.
The D.S. has the wiring coming out under the crack and is a little more challenging to seal w/o getting on the rubber seal. But be sure to check there too.
You're headed in the right direction here!
Carbuff said he had other vehicles leaking in the same areas.
I used JB weld which is supper strong and so far it looks like the day I applied it. I used a 3/16 craft brush with a squared tip not tapered, after cleaning w/ a tooth brush and Tile-x, rinsed w/ water and let dry or use a hair dryer to speed things up. The hair dryer will also flow the JBW out really smooth.
L.B. thanks again brother! good info.
The Hatch Man

New Member
Joined: Nov 2013
Posts: 2
From: queens ny
I brought my 2007 honda fit to an auto upholstery shop yesterday for the same problem. I have had my carpet soaked and causing a smell from the mold. I bought a used carpet from a junkyard but wanted to make sure I get the leak fixed before replacing. Here are some pictures from today's water test. The tech is going to try silicone but not sure if it will work. I will keep everyone posted on the progress.
[IMG] [/IMG]
[IMG]
[/IMG]

New Member
Joined: Mar 2014
Posts: 3
From: Harrison, NY
Jared 592 could you please let us know if what you did fixed the problem? And thank you so much for your photos as well as everyone else's helpful information.
I am having a similar problem. I first noticed moisture underneath the very back of the rear seats which I originally thought was from melted snow. After a heavy rain over the weekend and the floors considerably more wet, we looked in the trunk trying to figure out how the water was getting in and found water in the trunk spare tire well. After having seen everyone's photos here, I took at look at the trunk and saw a crack inside the trunk at the top on the passenger side, which is the side that seems to get wetter. I believe if I take the strip off the roof, I will find the crack continues.
I've caulked bathrooms before, but never any kind of major car maintenance work. Would you say it is similar to caulking a bathtub?
New Member
Joined: Nov 2013
Posts: 2
From: queens ny
Ok guys so after this weekends 3 day downpour I am happy to report that there are no more water leaks entering my 2007 honda fit sport. After the last water test and after stripping the entire interior molding including door panels, the upholstery shop found 4 points of entry. 2 in the trunk just behind the tail lights which also came in through the cracks on the rear roof under the rubber seal. (same as Jared592 pictures). Basically water traveled through the cracks into the chassis and leaked out through two points behind the taillights. To fix this they had to seal the cracks in the roof and remove the tail lights and caulk inside to prevent water from leaking into the trunk. The 3rd entry was coming from the rear passenger door and this was fixed by replacing the inner plastic lining and caulking along the bottom of the door. They also recommended that I replace the window molding which I have not done yet but the problem seems to be gone. The last point of entry was coming from a poor installation of the windshield by Safelite. The upholstery shop tried to address it with caulking but in the end I had to take it to a Safelite location where they replaced the windshield free of charge since they have a lifetime guarantee on all work. The shop manager told me that he was going to help me out because technically they could not warranty the work after someone else tampered with the windshield so thanks to him! I hope this helps because I know how frustrating this problem can be for Fit owners and I do plan on contacting Honda corporate to file a complaint on the poor integrity of this model.
Member
Joined: Jan 2011
Posts: 397
From: Omaha, NE
Jared 592 could you please let us know if what you did fixed the problem? And thank you so much for your photos as well as everyone else's helpful information.
I am having a similar problem. I first noticed moisture underneath the very back of the rear seats which I originally thought was from melted snow. After a heavy rain over the weekend and the floors considerably more wet, we looked in the trunk trying to figure out how the water was getting in and found water in the trunk spare tire well. After having seen everyone's photos here, I took at look at the trunk and saw a crack inside the trunk at the top on the passenger side, which is the side that seems to get wetter. I believe if I take the strip off the roof, I will find the crack continues.
I've caulked bathrooms before, but never any kind of major car maintenance work. Would you say it is similar to caulking a bathtub?
I am having a similar problem. I first noticed moisture underneath the very back of the rear seats which I originally thought was from melted snow. After a heavy rain over the weekend and the floors considerably more wet, we looked in the trunk trying to figure out how the water was getting in and found water in the trunk spare tire well. After having seen everyone's photos here, I took at look at the trunk and saw a crack inside the trunk at the top on the passenger side, which is the side that seems to get wetter. I believe if I take the strip off the roof, I will find the crack continues.
I've caulked bathrooms before, but never any kind of major car maintenance work. Would you say it is similar to caulking a bathtub?

I've been planning on getting in the spare tire well, getting it bone dry, and then checking back after a rain storm (or simulating one with a hose). I'll post an update with results when I do that.
New Member
Joined: Mar 2014
Posts: 3
From: Harrison, NY
Thanks so much Jared592 especially for the photos! Sorry I didn't realize sooner you had posted a reply, I really appreciate it. And thank you illardscott, your description was really helpful too. I have a feeling water is entering my car from several points as well, including the rear passenger door.
Evidently this is a known flaw with this year's model and in Japan if you take it to the dealer, they will fix it for free. Unfortunately I couldn't find any official notice, but it was written about on a message board in Japanese. I am also planning on writing to Honda.
Evidently this is a known flaw with this year's model and in Japan if you take it to the dealer, they will fix it for free. Unfortunately I couldn't find any official notice, but it was written about on a message board in Japanese. I am also planning on writing to Honda.
Still dry inside MzFiT no more moisture problems. The roof seams are def. faulty design.
4 months with lots of rain & snow and all is dry I call this prob. repaired.
At first I thought it was the rear P.S. door leaking, until one day at work is was really coming down so I folded the rear seat back down and saw a little stream of water going towards the r.p.s. foot well. So with that I came back here to our F.F. search engine and found Loudbangs posts and pix from there. On 12/12/13 I found the cracks and repaired with JB Weld and an hobby brush 3/16" wide square tip short stiff brissels. Clorox spray cleaner and a toothbrush.
It took about 3 weeks for everything to dry out and the windows to stop getting moisture on the inside of the glass. Now we are receiving heavy spring rains and all is dry.
Thanks to everyone for adding pix and their own personal stories on this thread.
"I love it when a plan comes together"... John "Hannibal" Smith
Big Mike
Last edited by Perrenoud Fit; Apr 15, 2014 at 09:43 PM.
I have cracks too. But living in Vegas I don't really worry too much about the rain!
I'll probably end up sealing them when I have time but right now they don't pose a problem.
____
I think Honda should really do something about this. I'm pretty sure every GD Fit has this problem, and like Jared said; people don't mind touching the spare tire well area, hence never finding out.
Like some reinforcement welds, and make a fuss about how it hampers the structural rigidity of the car (which it probably doesn't, but still), etc. etc. lol.

New Member
Joined: Jan 2014
Posts: 6
From: Stratford, CT
More Spare Tire Well info
The roof rail procedure outlined by Jared592 (and others) is spot-on and eliminated 90 - 95% of the water coming into the spare tile well. I had already sealed the taillight gaskets which seemed like the answer but didn't do much. By the way, if you're not afraid to flex the rear bumper cover you can get the taillights out without removing the whole bumper cover. BUT, to stop the last 5 - 10%, I had to completely seal the rubber tailgate gasket. The lip that supports the gasket is formed from overlapping layers of sheet metal that are spot welded in various places. Even though my gasket looked good and seemed to be seated flush somehow water gets under it and flows down the ridges of this lip. You wouldn't believe the tiny trickle of water that eventually created a small puddle. Basically I covered this lip (all the way across the top and past the midpoint of the taillight mount on each side) with auto/boat silicone sealer and pushed the rubber gasket back on. You have to make sure it goes back UNDER the gray part of the taillight mount and OVER the black interior trim at the bottom (if you have taken that off before). It rained over night and it seems to be holding. No rain today until right now as I write this. If I check it tomorrow and there's a puddle, you won't hear from 'cause I'll shoot myself. I have some great pictures but I don't know how to post them.
Member
Joined: Jan 2011
Posts: 397
From: Omaha, NE
The roof rail procedure outlined by Jared592 (and others) is spot-on and eliminated 90 - 95% of the water coming into the spare tile well. I had already sealed the taillight gaskets which seemed like the answer but didn't do much. By the way, if you're not afraid to flex the rear bumper cover you can get the taillights out without removing the whole bumper cover. BUT, to stop the last 5 - 10%, I had to completely seal the rubber tailgate gasket. The lip that supports the gasket is formed from overlapping layers of sheet metal that are spot welded in various places. Even though my gasket looked good and seemed to be seated flush somehow water gets under it and flows down the ridges of this lip. You wouldn't believe the tiny trickle of water that eventually created a small puddle. Basically I covered this lip (all the way across the top and past the midpoint of the taillight mount on each side) with auto/boat silicone sealer and pushed the rubber gasket back on. You have to make sure it goes back UNDER the gray part of the taillight mount and OVER the black interior trim at the bottom (if you have taken that off before). It rained over night and it seems to be holding. No rain today until right now as I write this. If I check it tomorrow and there's a puddle, you won't hear from 'cause I'll shoot myself. I have some great pictures but I don't know how to post them.
New Member
Joined: Jan 2014
Posts: 6
From: Stratford, CT
Photo upload
Haha, don't shoot yourself over a moist rear. Upload the pictures on imgur: the simple image sharer. The site'll give you links to use on message boards like this one.