
Tour of a GD head gasket replacement.


Thread Starter
|
Member
Joined: Oct 2015
Posts: 1,465
From: Portland Or

Tour of a GD head gasket replacement.
Extra chapter from https://www.fitfreak.net/forums/gene...fit-log-2.html
This is not a full how to.. But it is some notes on falling down the Honda Rabbit hole to replace a blown head gasket on a 2007 GD Fit Sport Auto. Hopefully supporting the standard procedures from the manuals.
The victim in this story is a 2007 Honda Fit Sport GD/AT and 130ish k miles..
So the initial symptoms was loss of coolant which I attributed to a crack in the factory radiator. If I had only known. I replaced the radiator and all was well for about 3 days the car over heated again and I dropped it at a local indy shop and asked them to check the car out. They checked the car and decided The replacement radiator had failed and put in another new radiator and pressure tested the system. About a week later poof.. The new radiator blows, the shops verdict is its a head gasket. Arg..
First things first,,, Tools This one is not too bad. If you have a regular set of 3/8 drive metric sockets your most of the way there.
Sizes I used from memory of the bolts that I had to remove were, 10imm,12mm,14mm, and a 1/2 inch drive 19mm(Deep well impact) The first three doing 98% of the job. You'll also want 10,12,14 in box end wrenches, and if they are the ones with the ratcheting box end you'll be way ahead of the game.
Next tool you'll need is the Crankshaft Pully wrench for honda, this is not optional, literally if you start this job without it you WILL fail. Its the only way to get the crank pulley bolt off without risking the wrath of the gods. To accompany this jewel which you can rent for free from Oreilly Auto parts (And others.) You need 2 half inch breaker bars a MINIMUM of 25" long. The 19mm socket mentioned above goes with this.
Ok,, on with the tour,, I didn't think of snapping pics till I was about a half hour in,, so no pics of the before engine bay (You've got your own to look at...)
First step is to remove the topside stuff ,, air cleaner and all the associated stuff, the battery, intake manifold, (Both halves) fuel rail, exhaust manifold, alternator, water pump, etc.. If you pay attention you can get away without totally removing the throttle body and most of the wiring it can all just kinda hang around. I highly recommend pulling the water pump BEFORE the timing-cover if your going to replace it so you don't dump a quart of antifreeze in the oil pan. I also removed the front bumper at the start and removed the radiator since I knew it was going to need replaced anyway, getting it out of the way does give you a lot more access to taking things apart.
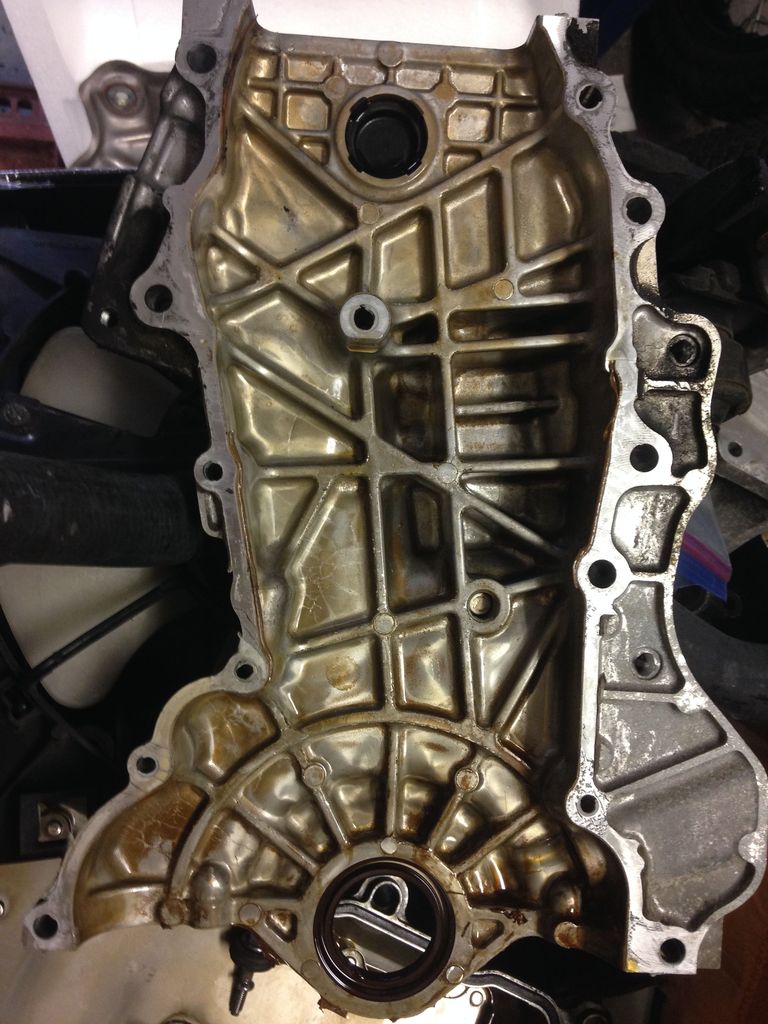
Then you need to remove the timing cover and this gets you to the hardest part of the job, Getting the crank pulley off the crank so you can get the timing cover off.
To give you an idea, I'm fairly big guy and I regularly lift heavy 100 lb servers, I tried everything, wasting about an hour,, ended up taking a hour to go to harbor freight for 2 breaker bars, and Oreillys for the wrench. According to Internet legend 1/2 inch air tools even good ones often fail to get the crank bolt out. Once equipped with the proper tools it took < 10 minutes. You put the crank pulley wrench in the pulley the 19mm socket on the crank pulley bolt through the middle of your fancy schmancy honda crankshaft pulley wrench.. The breaker bar for the pulley wrench needs to be put on so the breaker bar hits either the cross member or the underside of the bumper. I used a 4' cheater bar on on the breaker bar for the 19mm socket breaker bar. It then took pretty much everything I had lifting up on the bar to pop the thing loose.. POP being the key word then it comes out easy..
Once you get the bolt out the crank pulley slides off with just your hands, its not a pressed on pulley, there is a woodruf key in it that you should leave in once you get the cover off you put the pulley back on and finger tight the crank pulley bolt because you'll be manipulating the engine with the fancy crank pulley wrench.
Next the passenger side motor mount has to come off, to do this you have to support the motor with a jack, and you need a wood or something suitable to put between the jack and the oil pan to prevent cracking the pan. Gently support the motor then remove the two bolts that hold the timing cover and the others that hold the mount to the chassis. You can then get the mount out by careful turning and pulling. Now your ready to unbolt the head. Follow the manual on removing the bolts to prevent damaging the head.
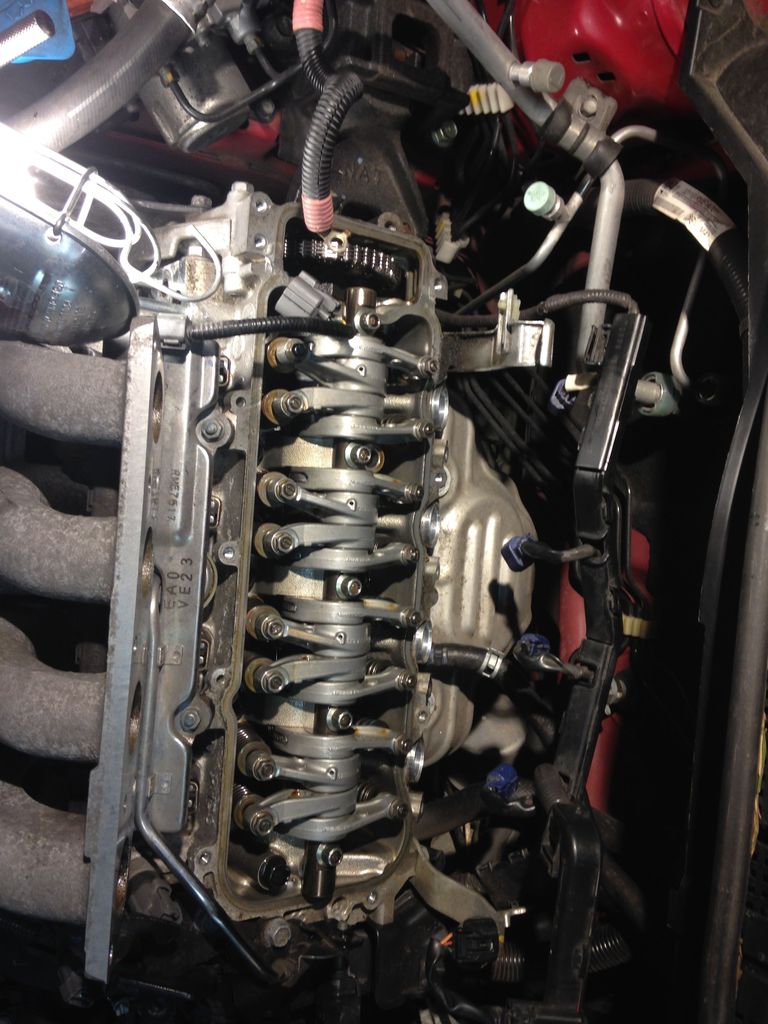
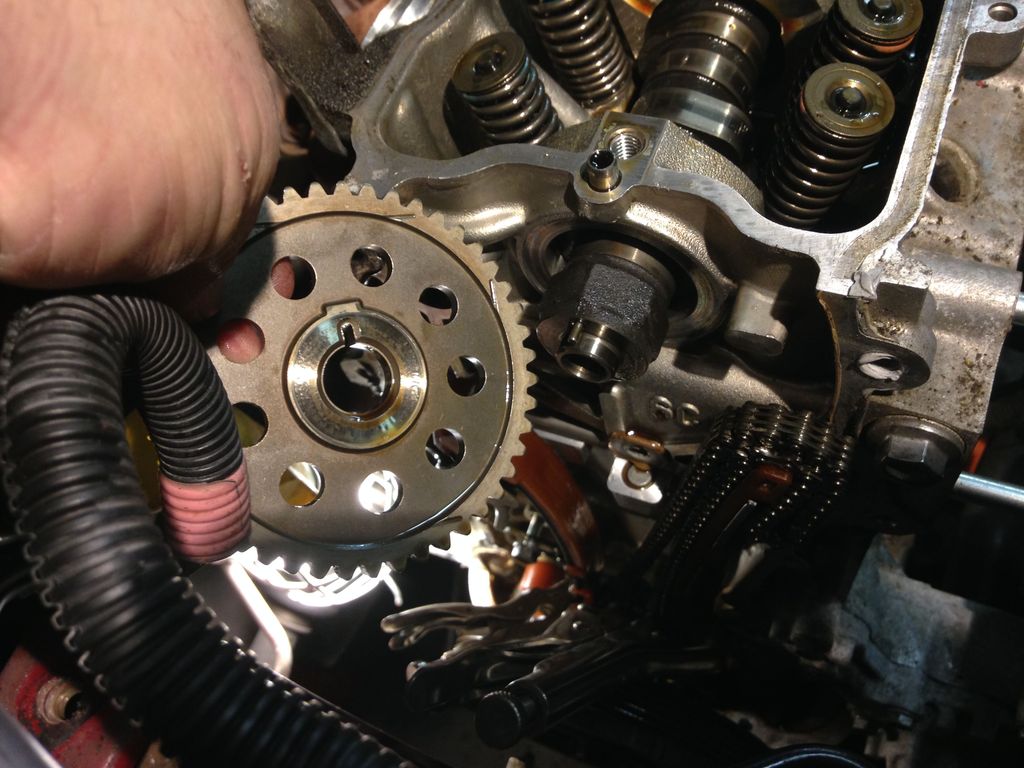
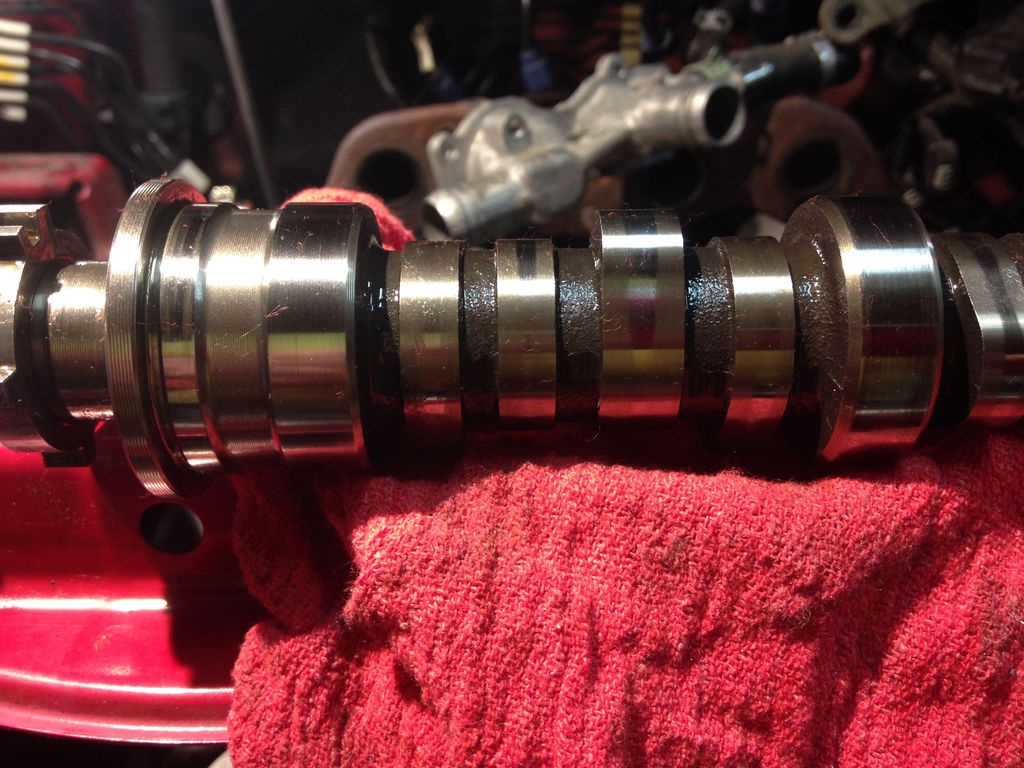
You need to remove the chain from the end of the camshaft, without dropping it in to the oil pan, I do this by using two small clamps and clamping the chain to the guides Don't use much pressure the idea is to hold the chain in place on the lower sprocket without breaking the expensive guides/tensioners. You can see where I used a silver sharpie to mark the chain to the cam sprocket.
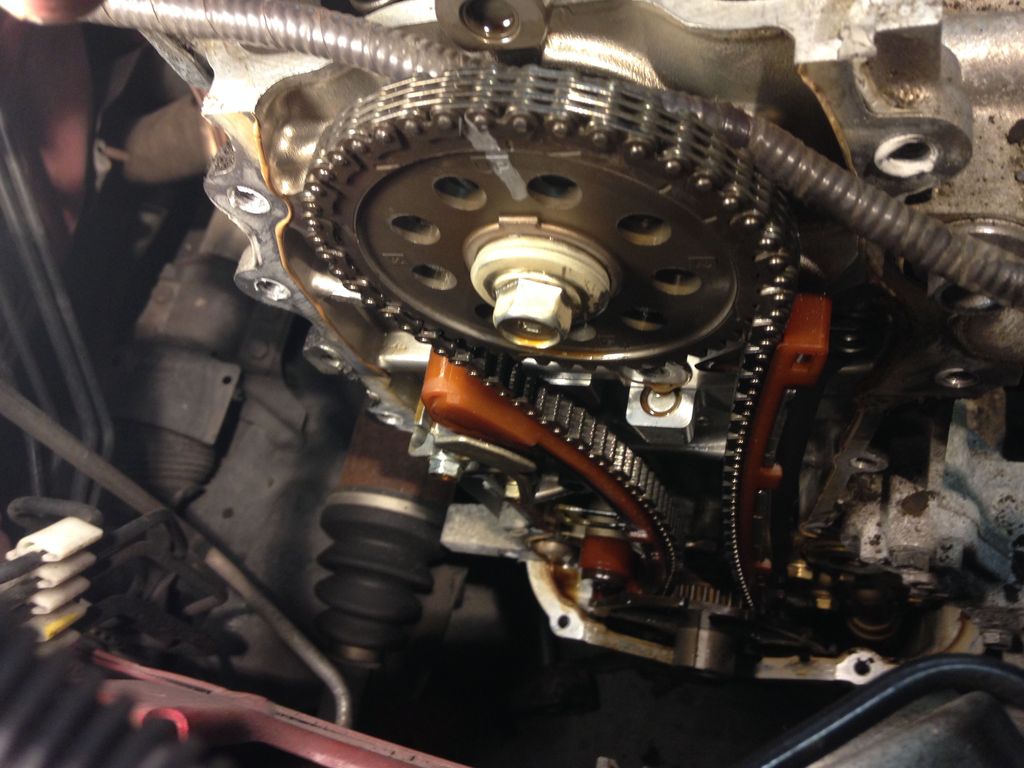
The sprocket is keyed on to the cam shaft, it only fits one way.
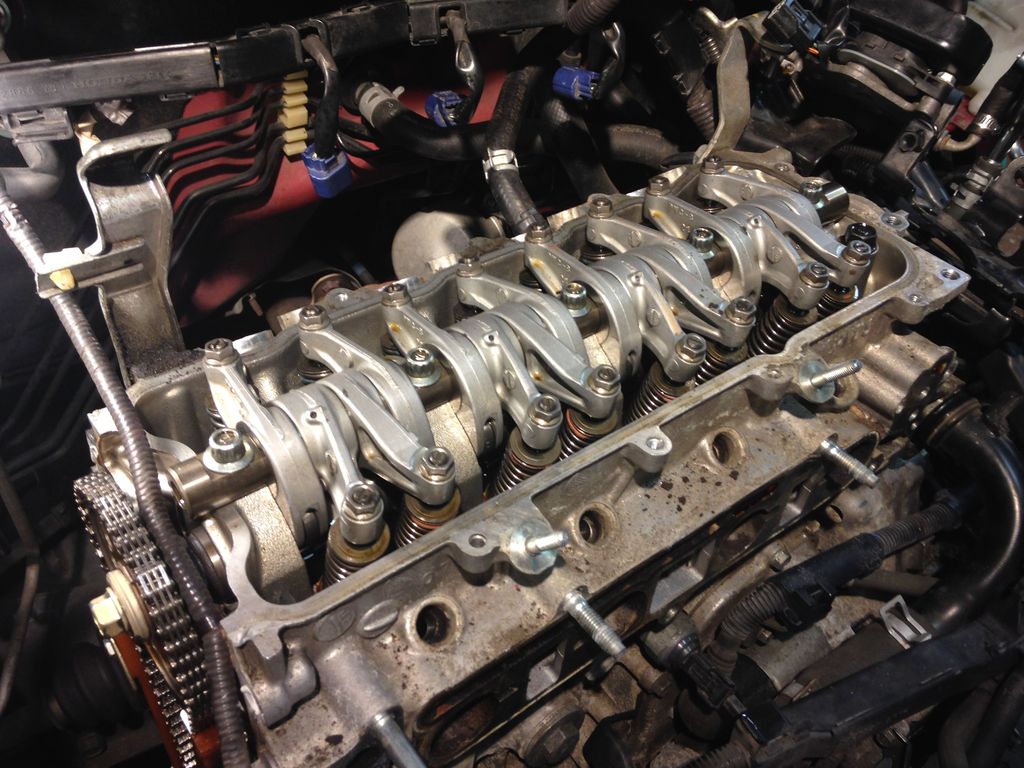
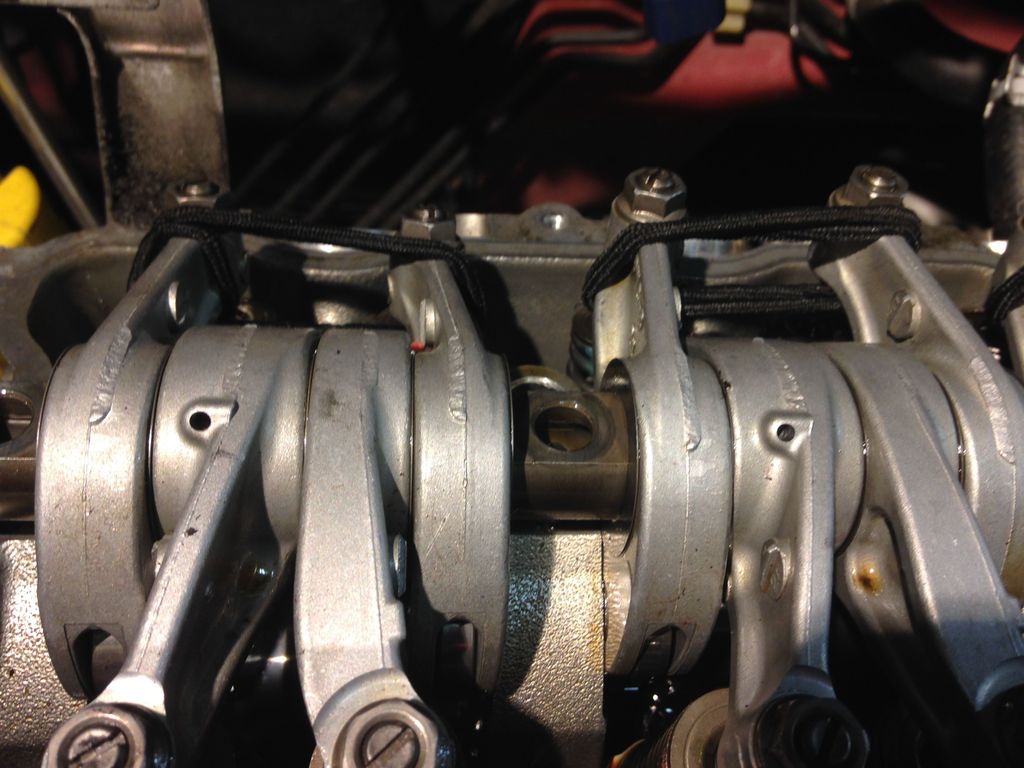
Once the sprocket is off you take off the rocker arms, first remove the 5 shaft bolts that hold the shaft to the head, then DO NOT JUST LIFT IT OFF!!! Gently lift the shaft at both ends about 1/4 to 1/2 inch and put heavy rubber bands around the exhaust side rocker arms, this keeps the rocker arm groups together so you don't drop the VTEC pistons and springs out. (I thought I was pretty clever figuring this out till I noticed the next page on the manual said what I just did.. ) Would have saved me having to fish the parts out of small areas in the head with a magnet and figuring out how to put the darn things back together. RTFM a lot in this section please!
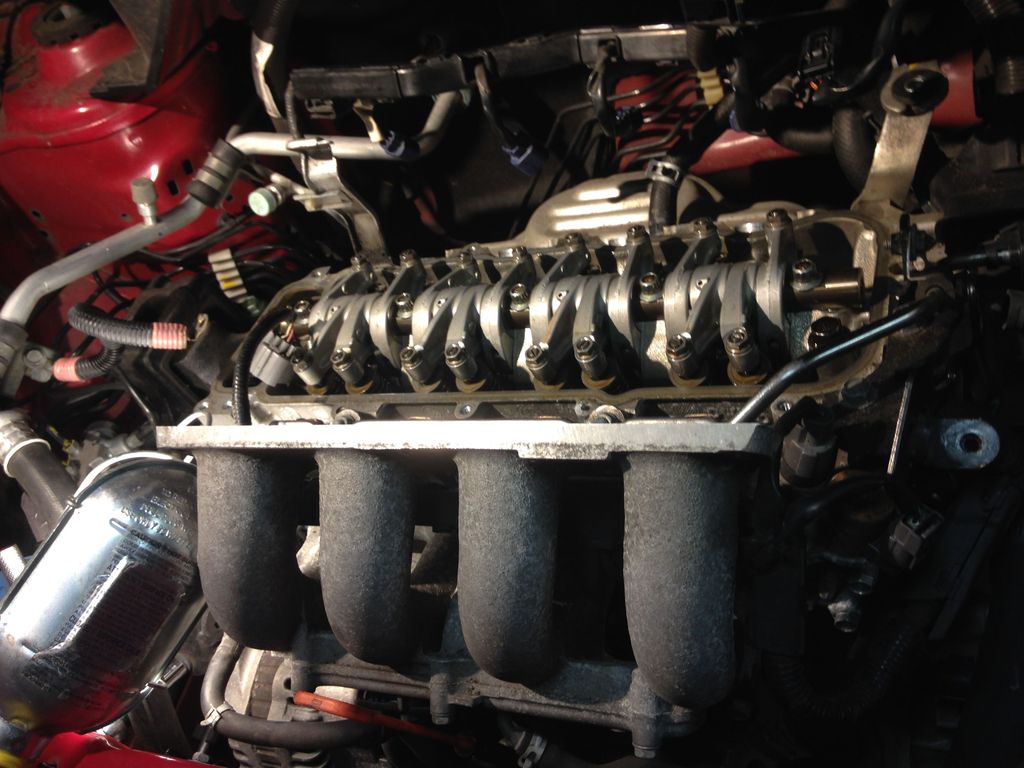
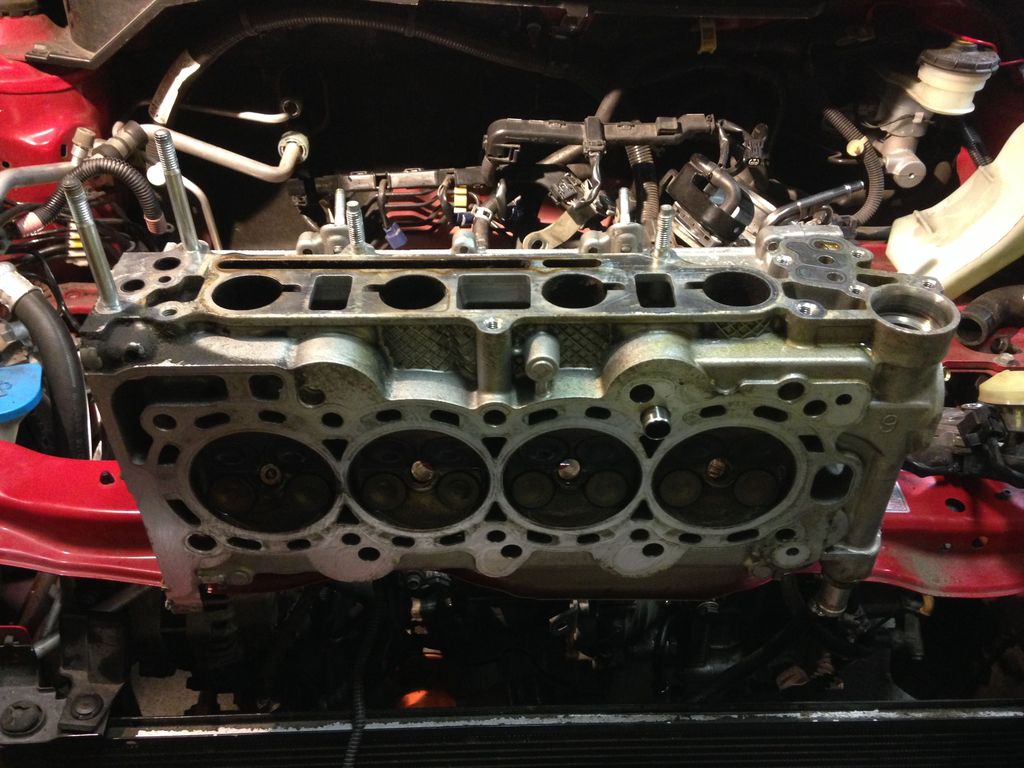
The next step was to unbolt the exhaust manifold, you'll have to remove the heat shield then the bolts that hold the manifold to the head. Once hte head is off remove the bolts that hold the manifold to the downpipe it will make getting the head back on way easier.
Then its time to remove the head bolts, again FOLLOW THE MANUAL!!! for the correct sequence they need to be done about 1/2 turn each until you get them finger loose then you can spin them off however you choose.
Once the bolts are out, you'll need to pop the head loose, the way I do it is to pry between the head and block in the areas where there is no gasket GENTLY its all aluminum! A big orange dead blow plastic hammer from harbor freigt to provide some jolt helps it come loose off the dowels.
And there you are!
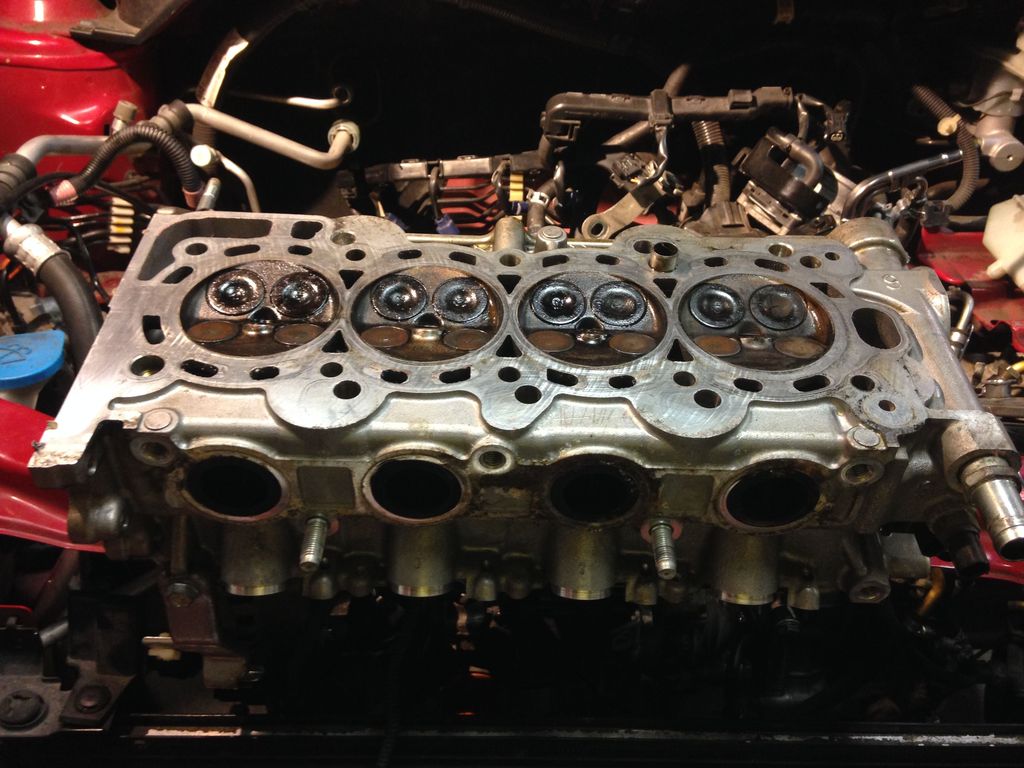
The Sharpie is so you get a feel for the size of the stuff in the pic
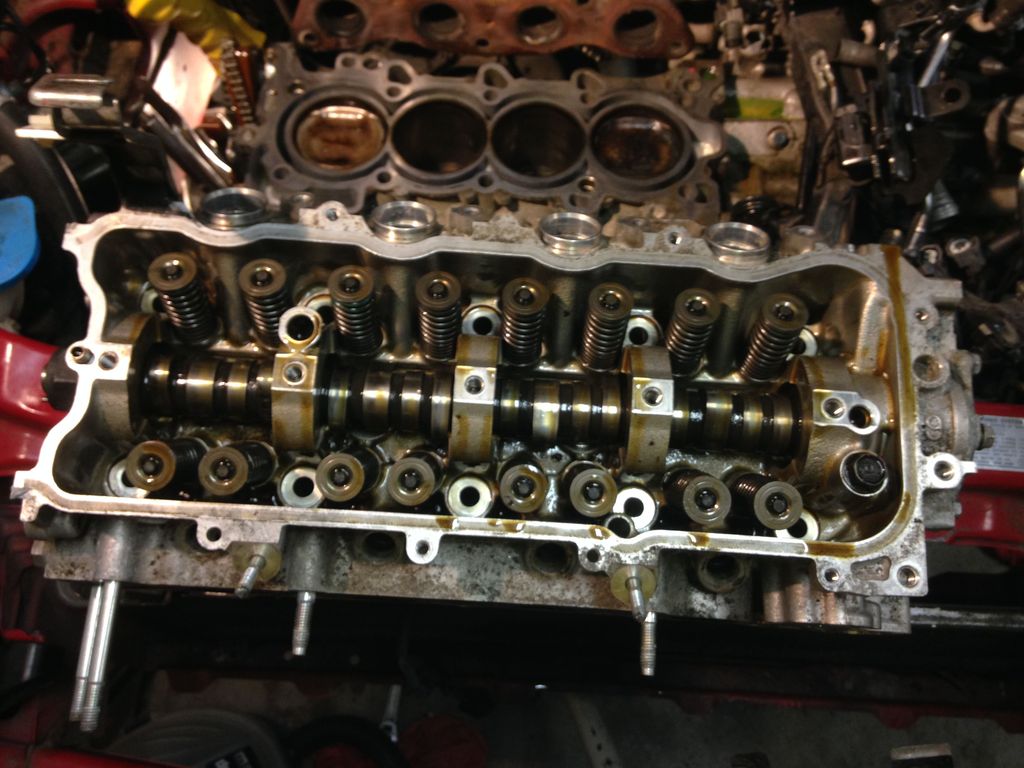
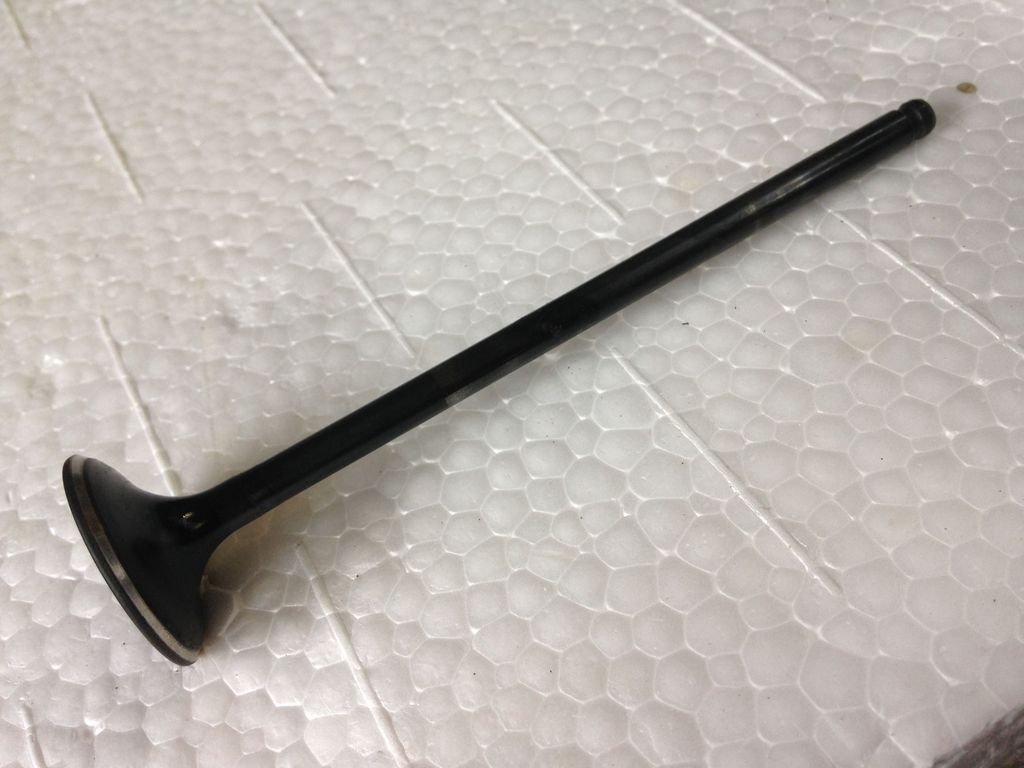
The head will need to go to a head service specialty shop or good auto machine shop to be pressure tested, crack checked and have its deck surfaced. Most of them want the head stripped to at least no cam, no sensors. Leave the valves in (I'd recommend having the shop install the new valve seals that come in the gasket kit, its worth the 20 bucks.. I promise.. ) A regular valve spring compressor wont work, neither will the one I rented from Oreilly's , A regular valve compressor would not work I think you need one for a street bike motor. After the machine shop checked I opted not to replace the seals. Read the steps in the manual about removing the cam, basically you take off the end cover on the drives side end of the head that's covers the Cam Position sensor, remove the cam sensor, slide the cam out of the head to the passenger end direction, iyou want to be very gentle and not ding any surfaces, the bearing surface of the camshaft is the head there are no inserts, so a screwup is $$$. Now normally if you pull a head youd consider a full valve job "since its off there..." My car has 130K on the odometer but the first owner put a bunch of the miles on it towing it behind a motor home, the actual engine miles were supposedly about half or less that. Now that i've been in the motor I kinda believe it there is very little wear on any of the parts that should show wear if the engine had the indicated mileage, the valves and camshaft and cylinder walls were all almost like new.
Almost no cam or valve wear. Or deposits on the valves..
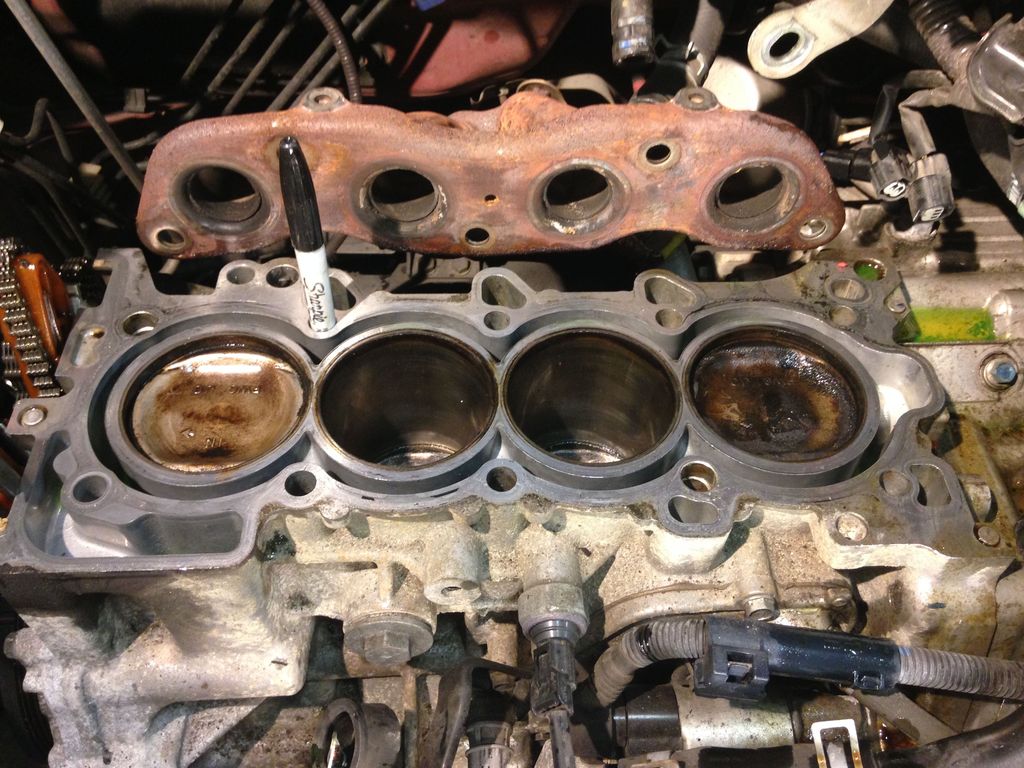
So a failed head gasket on these looks like this
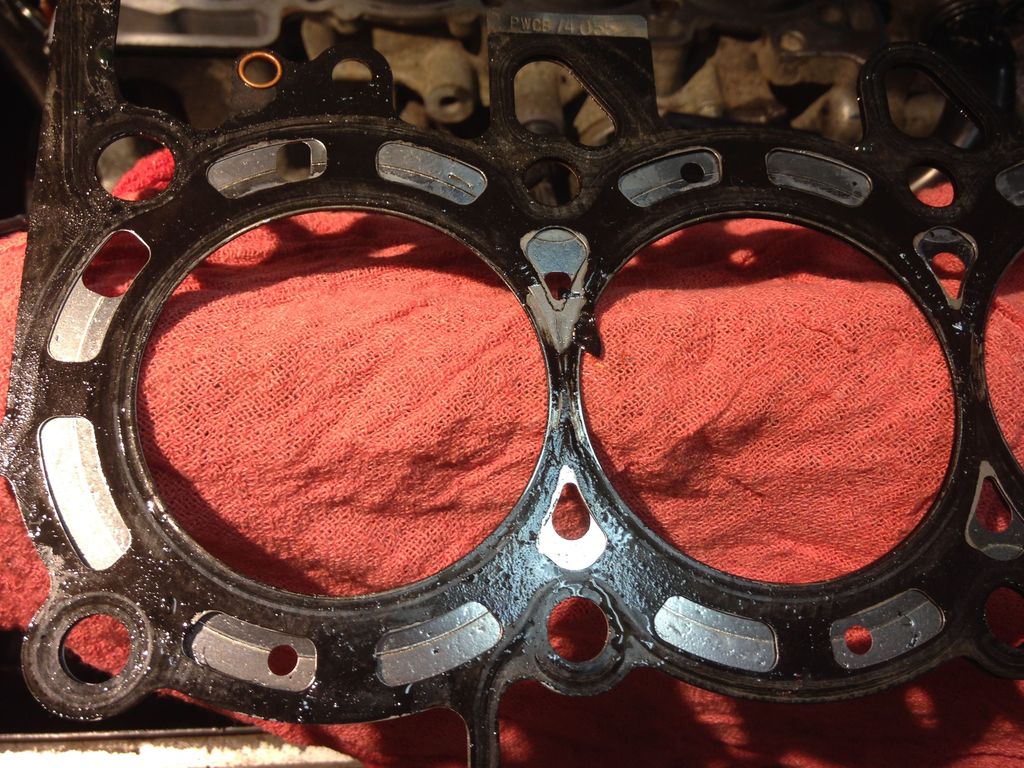
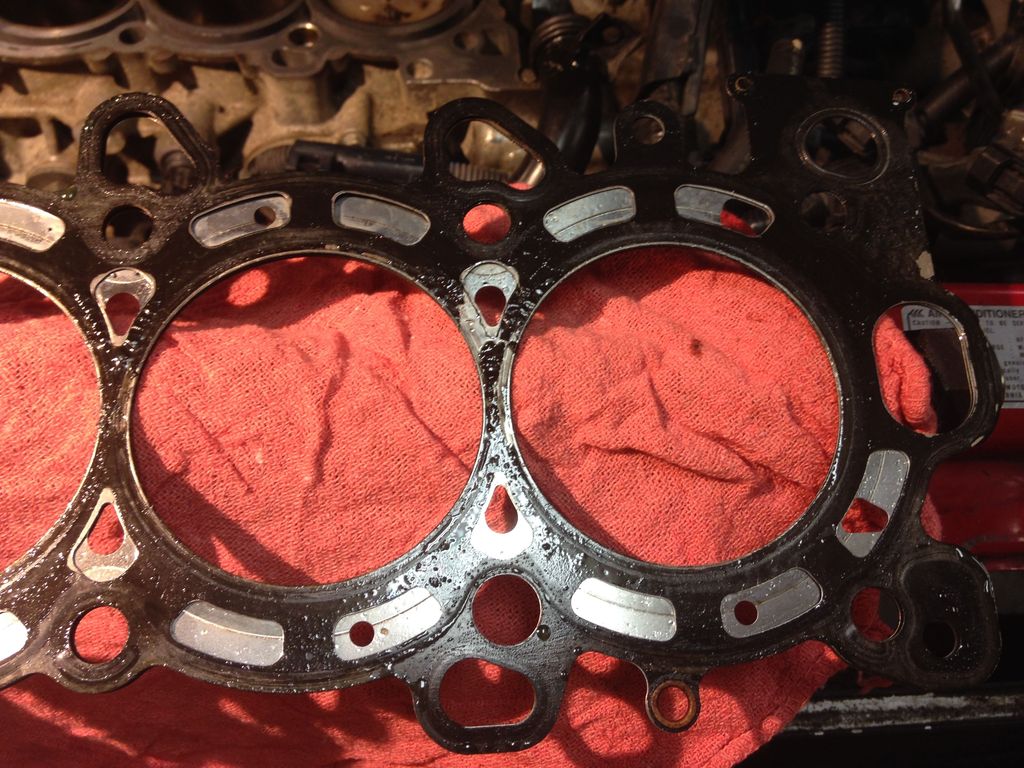
You can see gaps in the black plastic/rubber stuff thats where the leaks were. The factory gasket on the L15A is a MLS (Multi layer steel) gasket that is almost exactly like a Cometic gasket. I've personally never had great luck with the Cometics, I prefer graphite/asbestos gaskets even if I do have to re-torque them at 2500 miles.. But there are few choices for these engines. I used a full Felpro gasket set. Was about 1/2 or less the price of the factry Honda set.
All total actual work time it took me about 5 hours to get the head off the block. The good thing is it looks like the gasket failed and despite a couple overheats the head is not warped. The gasket is a multi layer steel with a plastic layer on the sealing areas. The failure seems to be the coolant being sucked through the layers of metal when the plastic failed.
Some interesting stuff about the L15 I noticed once in to it,, It has siamesed cylinders with steel dry sleeves, Much like the LS6/LS7 corvette engines. It also has very similar cooling IE flows a lot of coolant directly through the head and only diverts a smaller flow around the cylinders.. The pistons only come up to within about 1/4 inch of the top of the bore, and the chambers are thin, no matter what piston was ever put in it would need valve reliefs in the tops, these pistons are also dished slightly, if flat top pistons were used and had a higher deck I'd see the compression going up quickly. The transmission is almost as big as the engine..
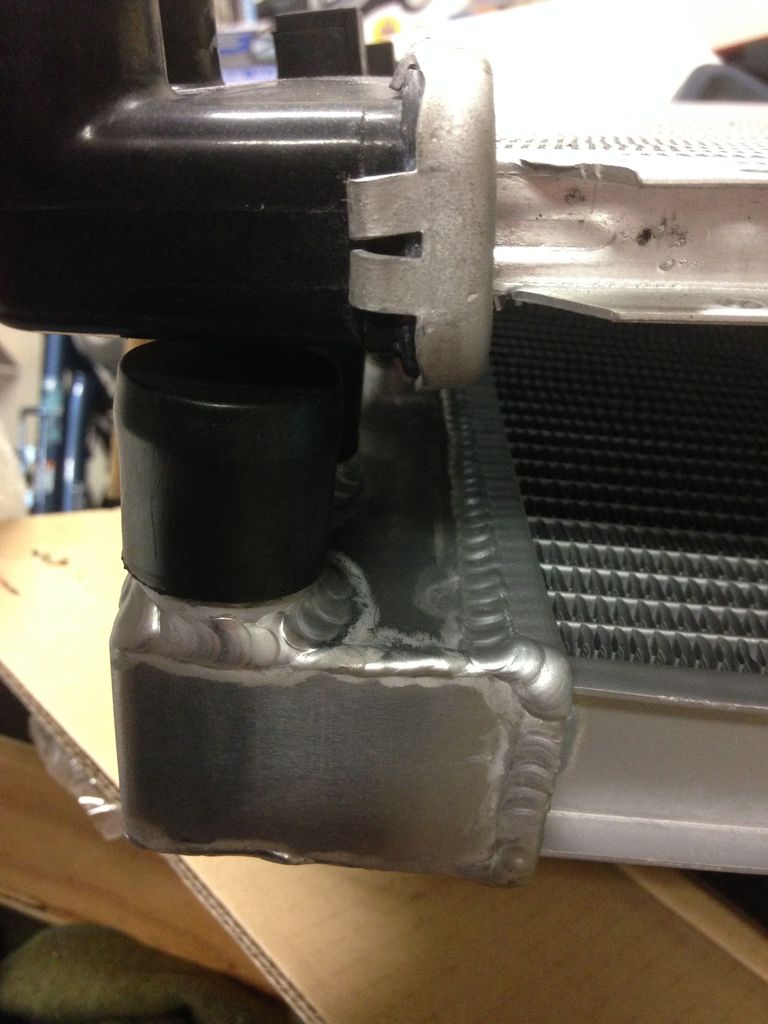
If your car has overheated, carefully inspect the crimp that holds the plastic radiator tanks to the aluminum core. I would pull the radiator during this process and have it tested at a radiator shop while the head is being checked and surfaced.
Internally the motor looks awesome, clean as a new engine, and only light wear on the cam (Break in pattern) the Pistons and cylinders were in good shape, walls clean tops of pistons only a skiff of carbon. considering the car has about 130K on it I'm kinda impressed. My head came back OK from th shop, they pressure tested it, cleaned it, pulled a valve to see if they needed anything and they said "put it in an drive it we cant take your money".
I reassembled the thing over the period of a week working an hour or two a night, I think I could have got it back together in about 6 hours, if I had a lift, and a air compressor to speed up some of the work. As it was I probably put in a hour a night 4 days and about 3 hours on a Saturday. then took a couple hours to check things, change the oil, fill the cooling system. Tip on filing the GD fit cooling system, there is a hose that connects th throttle body to the engine to carry water to heat the throttle body, it runs between the intake and air cleaner connected to a stainless tube its visible right on top of the motor. If you take the hose on teh front side off at the upper end, it will allow the air to bleed out of the engine as you fill the radiator and the block, reducing the effort to purge air out of the system. THe new radiator is a full welded unit from Ebay, cost me 90 bucks. Its 2x the cooling of the stock one and replaces it like it was made for it..
The new core is double the thickness and the whole assembly is aluminum no plastic.
View of the old and new
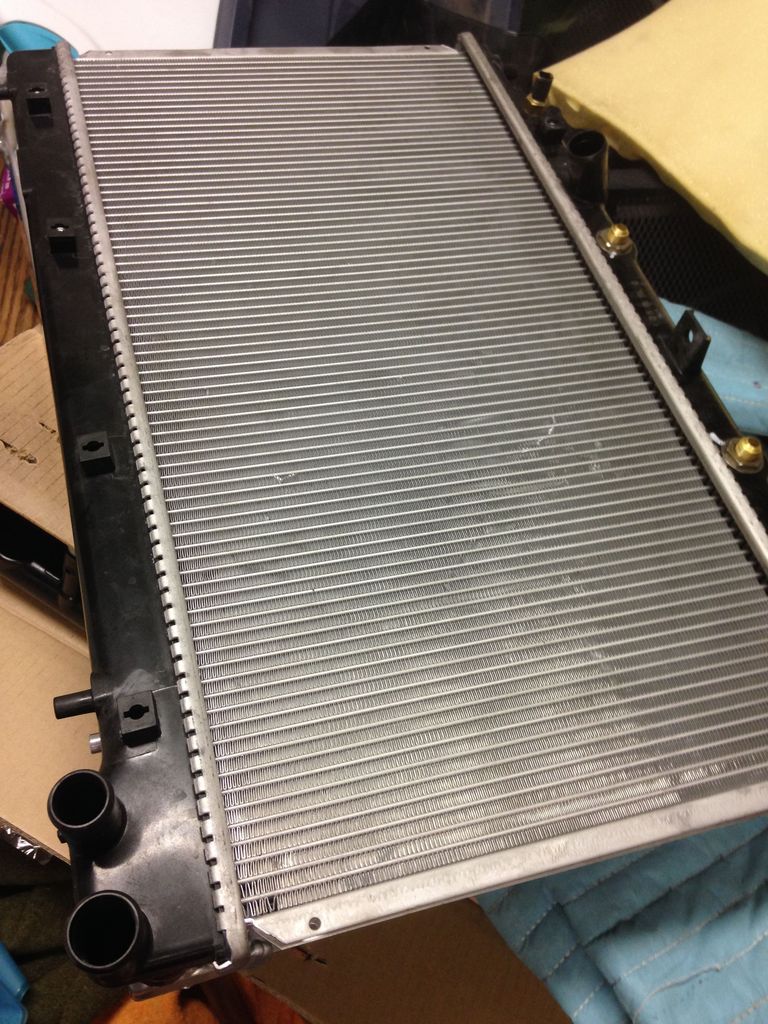
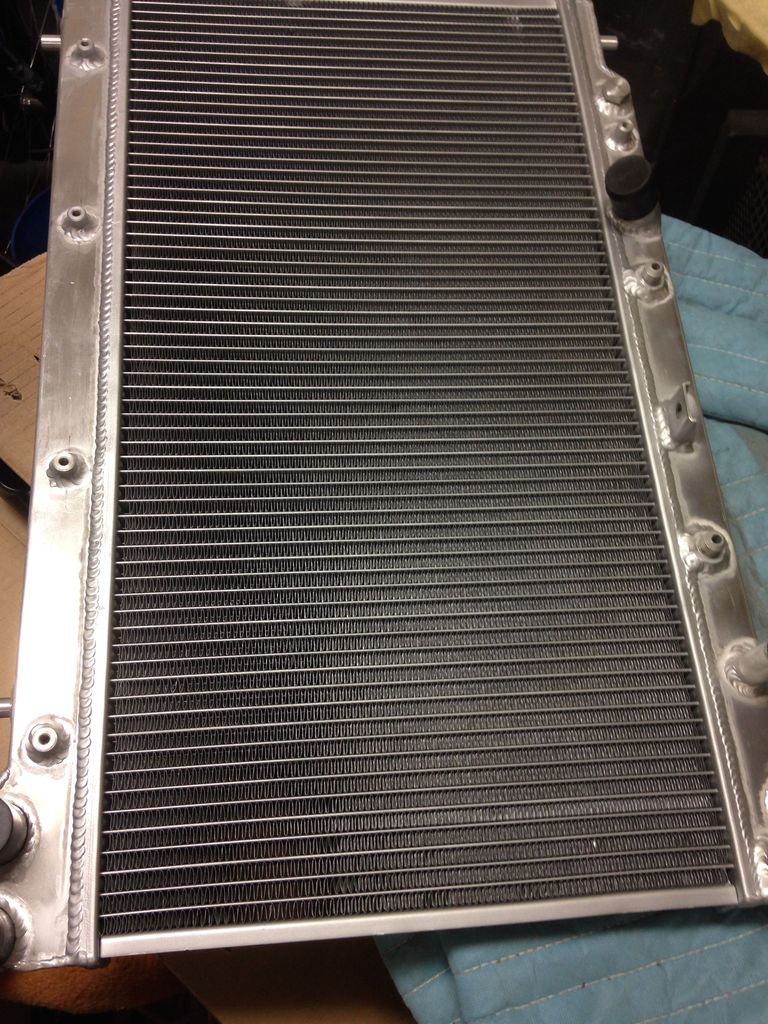
Couple issues with it,, they used AN style trans cooler fittings so I had to buy 2 of those for 23 bucks.. and the threads for the temperature sender on the lower passenger side were wrong(10x1.5 instead of 10x1.25) so I drilled it out and taped it for 1/4 NPT and used a 1/8 to 1/4 bushing that I drilled and tapped for a 1/25 thread to adapt the sensor in.
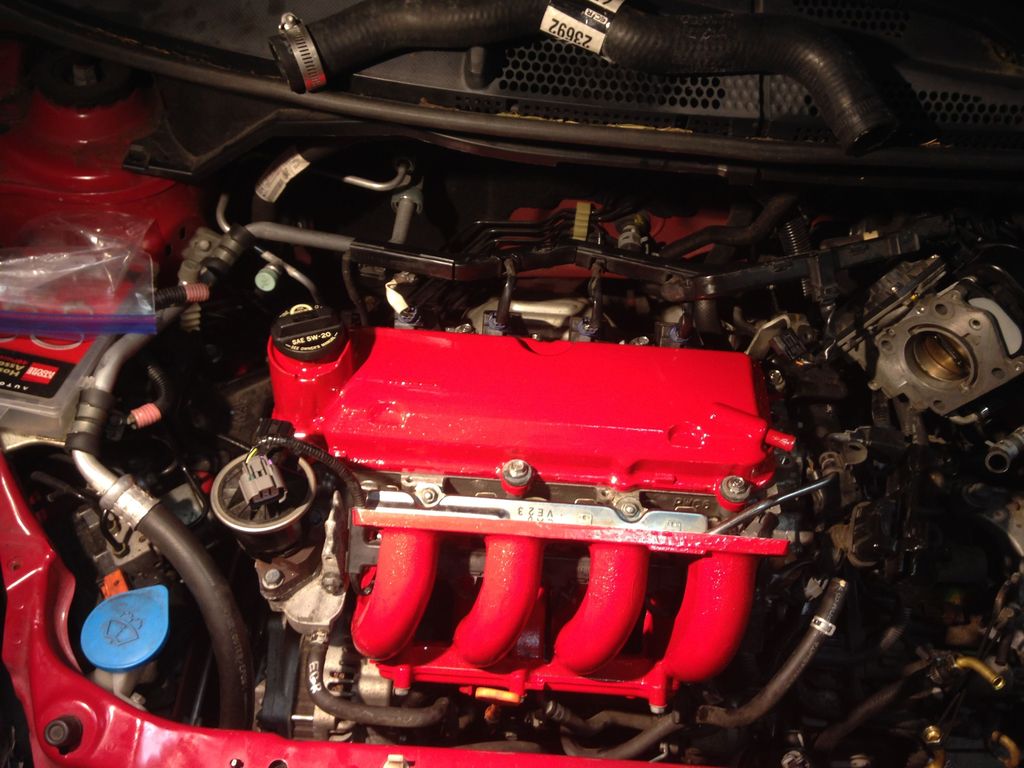
When I put the engine back together I did spend some time making it purdier..Painted the lower intake and valve cover bright red with rustoleum gloss, its the paintbrush version not the spray, took 8 hours to dry...

The engine running after 45 minutes with the heat on high, the fan never came on, and the ultraguage shows the temps at 165...
So thats the tour of the task.. If you click on the pic there are some more in the album.
This is not a full how to.. But it is some notes on falling down the Honda Rabbit hole to replace a blown head gasket on a 2007 GD Fit Sport Auto. Hopefully supporting the standard procedures from the manuals.
The victim in this story is a 2007 Honda Fit Sport GD/AT and 130ish k miles..
So the initial symptoms was loss of coolant which I attributed to a crack in the factory radiator. If I had only known. I replaced the radiator and all was well for about 3 days the car over heated again and I dropped it at a local indy shop and asked them to check the car out. They checked the car and decided The replacement radiator had failed and put in another new radiator and pressure tested the system. About a week later poof.. The new radiator blows, the shops verdict is its a head gasket. Arg..
First things first,,, Tools This one is not too bad. If you have a regular set of 3/8 drive metric sockets your most of the way there.
Sizes I used from memory of the bolts that I had to remove were, 10imm,12mm,14mm, and a 1/2 inch drive 19mm(Deep well impact) The first three doing 98% of the job. You'll also want 10,12,14 in box end wrenches, and if they are the ones with the ratcheting box end you'll be way ahead of the game.
Next tool you'll need is the Crankshaft Pully wrench for honda, this is not optional, literally if you start this job without it you WILL fail. Its the only way to get the crank pulley bolt off without risking the wrath of the gods. To accompany this jewel which you can rent for free from Oreilly Auto parts (And others.) You need 2 half inch breaker bars a MINIMUM of 25" long. The 19mm socket mentioned above goes with this.
Ok,, on with the tour,, I didn't think of snapping pics till I was about a half hour in,, so no pics of the before engine bay (You've got your own to look at...)
First step is to remove the topside stuff ,, air cleaner and all the associated stuff, the battery, intake manifold, (Both halves) fuel rail, exhaust manifold, alternator, water pump, etc.. If you pay attention you can get away without totally removing the throttle body and most of the wiring it can all just kinda hang around. I highly recommend pulling the water pump BEFORE the timing-cover if your going to replace it so you don't dump a quart of antifreeze in the oil pan. I also removed the front bumper at the start and removed the radiator since I knew it was going to need replaced anyway, getting it out of the way does give you a lot more access to taking things apart.


Then you need to remove the timing cover and this gets you to the hardest part of the job, Getting the crank pulley off the crank so you can get the timing cover off.
To give you an idea, I'm fairly big guy and I regularly lift heavy 100 lb servers, I tried everything, wasting about an hour,, ended up taking a hour to go to harbor freight for 2 breaker bars, and Oreillys for the wrench. According to Internet legend 1/2 inch air tools even good ones often fail to get the crank bolt out. Once equipped with the proper tools it took < 10 minutes. You put the crank pulley wrench in the pulley the 19mm socket on the crank pulley bolt through the middle of your fancy schmancy honda crankshaft pulley wrench.. The breaker bar for the pulley wrench needs to be put on so the breaker bar hits either the cross member or the underside of the bumper. I used a 4' cheater bar on on the breaker bar for the 19mm socket breaker bar. It then took pretty much everything I had lifting up on the bar to pop the thing loose.. POP being the key word then it comes out easy..

Once you get the bolt out the crank pulley slides off with just your hands, its not a pressed on pulley, there is a woodruf key in it that you should leave in once you get the cover off you put the pulley back on and finger tight the crank pulley bolt because you'll be manipulating the engine with the fancy crank pulley wrench.
Next the passenger side motor mount has to come off, to do this you have to support the motor with a jack, and you need a wood or something suitable to put between the jack and the oil pan to prevent cracking the pan. Gently support the motor then remove the two bolts that hold the timing cover and the others that hold the mount to the chassis. You can then get the mount out by careful turning and pulling. Now your ready to unbolt the head. Follow the manual on removing the bolts to prevent damaging the head.

You need to remove the chain from the end of the camshaft, without dropping it in to the oil pan, I do this by using two small clamps and clamping the chain to the guides Don't use much pressure the idea is to hold the chain in place on the lower sprocket without breaking the expensive guides/tensioners. You can see where I used a silver sharpie to mark the chain to the cam sprocket.

The sprocket is keyed on to the cam shaft, it only fits one way.

Once the sprocket is off you take off the rocker arms, first remove the 5 shaft bolts that hold the shaft to the head, then DO NOT JUST LIFT IT OFF!!! Gently lift the shaft at both ends about 1/4 to 1/2 inch and put heavy rubber bands around the exhaust side rocker arms, this keeps the rocker arm groups together so you don't drop the VTEC pistons and springs out. (I thought I was pretty clever figuring this out till I noticed the next page on the manual said what I just did.. ) Would have saved me having to fish the parts out of small areas in the head with a magnet and figuring out how to put the darn things back together. RTFM a lot in this section please!

The next step was to unbolt the exhaust manifold, you'll have to remove the heat shield then the bolts that hold the manifold to the head. Once hte head is off remove the bolts that hold the manifold to the downpipe it will make getting the head back on way easier.
Then its time to remove the head bolts, again FOLLOW THE MANUAL!!! for the correct sequence they need to be done about 1/2 turn each until you get them finger loose then you can spin them off however you choose.
Once the bolts are out, you'll need to pop the head loose, the way I do it is to pry between the head and block in the areas where there is no gasket GENTLY its all aluminum! A big orange dead blow plastic hammer from harbor freigt to provide some jolt helps it come loose off the dowels.
And there you are!


The Sharpie is so you get a feel for the size of the stuff in the pic

The head will need to go to a head service specialty shop or good auto machine shop to be pressure tested, crack checked and have its deck surfaced. Most of them want the head stripped to at least no cam, no sensors. Leave the valves in (I'd recommend having the shop install the new valve seals that come in the gasket kit, its worth the 20 bucks.. I promise.. ) A regular valve spring compressor wont work, neither will the one I rented from Oreilly's , A regular valve compressor would not work I think you need one for a street bike motor. After the machine shop checked I opted not to replace the seals. Read the steps in the manual about removing the cam, basically you take off the end cover on the drives side end of the head that's covers the Cam Position sensor, remove the cam sensor, slide the cam out of the head to the passenger end direction, iyou want to be very gentle and not ding any surfaces, the bearing surface of the camshaft is the head there are no inserts, so a screwup is $$$. Now normally if you pull a head youd consider a full valve job "since its off there..." My car has 130K on the odometer but the first owner put a bunch of the miles on it towing it behind a motor home, the actual engine miles were supposedly about half or less that. Now that i've been in the motor I kinda believe it there is very little wear on any of the parts that should show wear if the engine had the indicated mileage, the valves and camshaft and cylinder walls were all almost like new.
Almost no cam or valve wear. Or deposits on the valves..


So a failed head gasket on these looks like this


You can see gaps in the black plastic/rubber stuff thats where the leaks were. The factory gasket on the L15A is a MLS (Multi layer steel) gasket that is almost exactly like a Cometic gasket. I've personally never had great luck with the Cometics, I prefer graphite/asbestos gaskets even if I do have to re-torque them at 2500 miles.. But there are few choices for these engines. I used a full Felpro gasket set. Was about 1/2 or less the price of the factry Honda set.
All total actual work time it took me about 5 hours to get the head off the block. The good thing is it looks like the gasket failed and despite a couple overheats the head is not warped. The gasket is a multi layer steel with a plastic layer on the sealing areas. The failure seems to be the coolant being sucked through the layers of metal when the plastic failed.
Some interesting stuff about the L15 I noticed once in to it,, It has siamesed cylinders with steel dry sleeves, Much like the LS6/LS7 corvette engines. It also has very similar cooling IE flows a lot of coolant directly through the head and only diverts a smaller flow around the cylinders.. The pistons only come up to within about 1/4 inch of the top of the bore, and the chambers are thin, no matter what piston was ever put in it would need valve reliefs in the tops, these pistons are also dished slightly, if flat top pistons were used and had a higher deck I'd see the compression going up quickly. The transmission is almost as big as the engine..
If your car has overheated, carefully inspect the crimp that holds the plastic radiator tanks to the aluminum core. I would pull the radiator during this process and have it tested at a radiator shop while the head is being checked and surfaced.
Internally the motor looks awesome, clean as a new engine, and only light wear on the cam (Break in pattern) the Pistons and cylinders were in good shape, walls clean tops of pistons only a skiff of carbon. considering the car has about 130K on it I'm kinda impressed. My head came back OK from th shop, they pressure tested it, cleaned it, pulled a valve to see if they needed anything and they said "put it in an drive it we cant take your money".
I reassembled the thing over the period of a week working an hour or two a night, I think I could have got it back together in about 6 hours, if I had a lift, and a air compressor to speed up some of the work. As it was I probably put in a hour a night 4 days and about 3 hours on a Saturday. then took a couple hours to check things, change the oil, fill the cooling system. Tip on filing the GD fit cooling system, there is a hose that connects th throttle body to the engine to carry water to heat the throttle body, it runs between the intake and air cleaner connected to a stainless tube its visible right on top of the motor. If you take the hose on teh front side off at the upper end, it will allow the air to bleed out of the engine as you fill the radiator and the block, reducing the effort to purge air out of the system. THe new radiator is a full welded unit from Ebay, cost me 90 bucks. Its 2x the cooling of the stock one and replaces it like it was made for it..
The new core is double the thickness and the whole assembly is aluminum no plastic.

View of the old and new


Couple issues with it,, they used AN style trans cooler fittings so I had to buy 2 of those for 23 bucks.. and the threads for the temperature sender on the lower passenger side were wrong(10x1.5 instead of 10x1.25) so I drilled it out and taped it for 1/4 NPT and used a 1/8 to 1/4 bushing that I drilled and tapped for a 1/25 thread to adapt the sensor in.
When I put the engine back together I did spend some time making it purdier..Painted the lower intake and valve cover bright red with rustoleum gloss, its the paintbrush version not the spray, took 8 hours to dry...


The engine running after 45 minutes with the heat on high, the fan never came on, and the ultraguage shows the temps at 165...

So thats the tour of the task.. If you click on the pic there are some more in the album.
Last edited by dwtaylorpdx; Apr 8, 2017 at 01:28 AM.
Member
Joined: Mar 2007
Posts: 1,704
From: Second house on the left
I too enjoyed your write-up, THANKS.
Next time you refill the coolant, just run it for 10 minutes then shut down. Heat-soak will then open the thermostat, and you can then purge the air from the system a lot quicker.
Next time you refill the coolant, just run it for 10 minutes then shut down. Heat-soak will then open the thermostat, and you can then purge the air from the system a lot quicker.
Member
Joined: Aug 2008
Posts: 1,606
From: Orange, CA, USA
Gasket and aluminum surfaces had no pits or corrosion, so most likely, the gasket moved relative to aluminum (shearing action) due to overheating caused its failure.
IIRC, this is multi-layer steel gasket,
IIRC, this is multi-layer steel gasket,
Last edited by doctor J; Apr 8, 2017 at 04:37 PM.

Thread Starter
|
Member
Joined: Oct 2015
Posts: 1,465
From: Portland Or
Yea the initial failure I think was radiator #1 had a crack by the mount ,, I think the PO drove it and kept putting water in, probably when the light came on.. (teenage girl who hated the car because it was not her favorite color.. )
According to the machine shop that did the head, most of the fails they see are MLS gaskets, once the plastic coating gives way its all over. hope the new one hold, I've been taking it easy driving it around.. I'm seriously considering a flush and converting to Hayes Waterless coolant and a zero pressure cap.. The cooling path on these engines is wacky as hell, It makes sense why they are so hard to bleed once you see in the head where the water passages are.. 165 is the highest I've seen, In 40 degree weather its dropping to 128 while driving in town on the street.. I'm running a stock thermostat ,, but I did add another air bleed (1/16 dia) in the stat because I never liked how long either stat I've had in the car took to open. It definitely sped that up
The radiator was ebay, a seller called superadiators the deal was nice and quick. Likely from china but I have this style form various sources on my Quad, my Jeep Wrangler and now the fit. SO far all have been good except for the jeep one had a leak on the first one so they sent me a replacement right away, it was just inconvenient..
Thread Starter
|
Member
Joined: Oct 2015
Posts: 1,465
From: Portland Or
Update: the car is still running and is with my daughter at college,
I added a bypass fan control to the driver side fan using some ebay parts,
I used a in hose fitting adapter that I put in the hose from the thermostat
block to the upper radiator. Added a relay bolted near the fuse box. (With a fuse)
And added a switch on the left side of the steering wheel where there was a empty spot.
The hose adapter has a on at 190 off at 180 thermostat switch I got off ebay.
For wiring I tapped direct off the battery for the relay feed to the fan, and for the
control power I tapped hot off the electric mirror switch power through the switch
to the control power lug on the relay then from the relay to the thermostat in the
radiator hose adapter than to ground. I put a 2A fuse in the control circuit as well.
The switch is to allow turning off the fan if in really cold weather she is having trouble
getting it to warm up, I doubt the fan will be needed as much at sub freezing temps..
So now the car never sees temps much above 195. drove it to Montana from Oregon at
70 to 80 MPH (In Early august) Ac on and even on big hills it stayed in line.
No more of the not turning the fan on till 230F like Honda has programmed.
Last edited by dwtaylorpdx; Sep 30, 2017 at 01:51 PM.
Member
Joined: May 2017
Posts: 187
From: Missouri
steel and aluminum expand, contract at different rates, bad combo to begin with.
Thread Starter
|
Member
Joined: Oct 2015
Posts: 1,465
From: Portland Or
Yep all the honda head gaskets are MLS as far as I can tell for quite a while, The MLS gaskets are stainless which doesn't really change much, GM uses them on all the LS* series V8's on all the combinations of Head and block materials, If properly torqued a MLS is amazing tech. But I'd still prefer a more standard gasket I think they are more forgiving..
I blame honda for the ridiculous high fan setting in their ECU as the trouble maker, The combination of the High pressure cap (1.5bar) and the high temps mean the pressure in the system is stressing all the cooling system components more than needed, as well as the crazy way the FIT engine circulates the coolant, its quite bizarre compared to any other engine I've torn down. With honda's fan on setting the engine hits 240 occasionally on big hills.. It also thermally cycles much more than I've seen on other engines, cools down to 170 than back up to 190, heat cycling is almost always bad in mechanical things.. I like to see it stick a temp and stay there within 5 degrees total spread.
I blame honda for the ridiculous high fan setting in their ECU as the trouble maker, The combination of the High pressure cap (1.5bar) and the high temps mean the pressure in the system is stressing all the cooling system components more than needed, as well as the crazy way the FIT engine circulates the coolant, its quite bizarre compared to any other engine I've torn down. With honda's fan on setting the engine hits 240 occasionally on big hills.. It also thermally cycles much more than I've seen on other engines, cools down to 170 than back up to 190, heat cycling is almost always bad in mechanical things.. I like to see it stick a temp and stay there within 5 degrees total spread.


New Member
Joined: Jan 2019
Posts: 3
From: Pretoria, South africa
Hi @dwtaylorpdx
Can you maybe include a picture of the Crankshaft Pully wrench that is required? Alternatively, supply a part number of it as I will have to buy this most probably, if i don't leave this job for the agents.
kind regards
Fred
Can you maybe include a picture of the Crankshaft Pully wrench that is required? Alternatively, supply a part number of it as I will have to buy this most probably, if i don't leave this job for the agents.
kind regards
Fred

Thread
Thread Starter
Forum
Replies
Last Post
john21031
2nd Generation GE8 Specific DIY: Repair & Maintenance Sub-Forum
0
Nov 26, 2015 01:39 AM
Jeff Pirkey
Fit DIY: Repair & Maintenance
6
Feb 5, 2012 11:06 AM