
Definitive answer for red "JDM" Honda badges? (2012 GE8)


Thread Starter
|
Member
Joined: Jun 2012
Posts: 141
From: Irvine, CA
Definitive answer for red "JDM" Honda badges? (2012 GE8)
I know this pops up every now and then, but there is never a definitive answer.
Does anyone know for sure which part number/red badges will fit the newer (specifically 2012) Fit? I've seen some that fit with ~0.25" spacing. I've seen some fit with some dremeling of the plastic of the grill. And I've also seen some claim to fit perfectly, but as luck would have it, the member never posted info about the badge.
Prices seem to range from $20-200. I don't mind spending the money if the fitment is perfect.
Thanks!

Mine are available from my third 2012 Fit. Paid $140 for them and they took forever to arrive, but they're the real thing.
https://www.fitfreak.net/forums/2nd-...d-partout.html
https://www.fitfreak.net/forums/2nd-...d-partout.html
Here is a link where to get the ones you need and are looking for your 2012. I have a 2012 as well.
CorSport: Honda - 2009+ Honda Fit - EP3034
My build thread in my sig has all the part numbers if you wish.
CorSport: Honda - 2009+ Honda Fit - EP3034
My build thread in my sig has all the part numbers if you wish.
Thread Starter
|
Member
Joined: Jun 2012
Posts: 141
From: Irvine, CA
Will do! Just received them today via USPS.
I know I can probably figure it out myself when I start, but I figure I'd ask anyway. When putting the front emblem on, did you have to "shave down" the plastic behind the OEM one to make it flat? There was a DIY on the prior generation Fit where the member did that.
If not, I'll just put the front one on now. If I do, then I'll wait for the weekend. Light is getting low now.
Thread Starter
|
Member
Joined: Jun 2012
Posts: 141
From: Irvine, CA
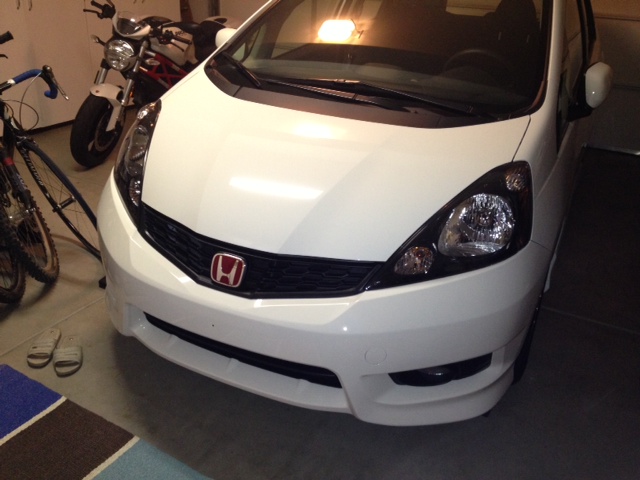
Here's a picture of the front mounted one. I must say that the front badge from www.corsport.com is PERFECT. It has a very slight curve to it that matches the front. There is no need to "flatten" the plastic behind the OEM emblem.
I did however, take a razor blade because there are small little raised sections (~1mm x 5mm) behind the emblem. As seen in other DIYs, the red badge has mounting "pins" that are in different locations. Some people just clip them off. I just took a small drillbit and made two tiny holes in the grill where they should go. This way there's at least a little bit extra "support". Then I just lined it up nicely and gave it a nice firm push.
I haven't attempted the rear yet as I ran out of time. The red badge is not curved at all and the rear emblem seems to have a very slight curve to mate with the surface. I'm going to brainstorm on this a bit.
I'm such a ricer. :P
Hey looks good! TW with red emblems look sharp to me!
The back one well...I put it on there as best I could. That 3m tape is solid stuff.
Red badges do not make you car RICE. Believe me. I made the same mistake of calling my car rice and I got jumped on pretty quick. There is a difference between performance parts, parts that look like they make the car faster (rice) and accessories (like your red badges)
Red flames painted down the car well...I would still call that an accessory some might call that RICE...but that would be a loosy goosy interpretation of the meaning IMO.
Rice is more like an over sized wing or well like this picture
Thread Starter
|
Member
Joined: Jun 2012
Posts: 141
From: Irvine, CA
Had some time to play last weekend. Removed the OEM badge in the rear. As I suspected, the surface is very slightly curved, as well as the OEM badge. The "JDM" rear badge from Corsport is totally flat. There is definitely some room on the top or bottom of the badge if I attempt to press it on. I even tried to remove the double sided tape in the middle so it could fit more flush, but that tape is already so thin, it didn't make a significant difference.
Any suggestions? I'm thinking of slightly thicker 3M tape on just the top/bottom of the badge. I don't want to try as it sits now just because I spent so much on these "real" badges.
On a related note, I had a small factory paint issue on the front bumper. The dealer agreed to patch up the license plate hole and fix the paint issue for free! I'm going to give them the rear black garnish piece for them to paint Taffeta White. Hopefully they won't mind since I'm just handing them the piece.
The red badge should look nice on that.
Any suggestions? I'm thinking of slightly thicker 3M tape on just the top/bottom of the badge. I don't want to try as it sits now just because I spent so much on these "real" badges.
On a related note, I had a small factory paint issue on the front bumper. The dealer agreed to patch up the license plate hole and fix the paint issue for free! I'm going to give them the rear black garnish piece for them to paint Taffeta White.
Hopefully they won't mind since I'm just handing them the piece.The red badge should look nice on that.
There is definitely some room on the top or bottom of the badge if I attempt to press it on. I even tried to remove the double sided tape in the middle so it could fit more flush, but that tape is already so thin, it didn't make a significant difference.
Any suggestions? .
Any suggestions? .

Had some time to play last weekend. Removed the OEM badge in the rear. As I suspected, the surface is very slightly curved, as well as the OEM badge. The "JDM" rear badge from Corsport is totally flat. There is definitely some room on the top or bottom of the badge if I attempt to press it on. I even tried to remove the double sided tape in the middle so it could fit more flush, but that tape is already so thin, it didn't make a significant difference.......
I didn't know the OEM rear emblem is that curved (from what I've read on here). I know the JDM Honda chrome rear garnish emblem is very curved, so when I was trying to apply the "Type-R" red emblem it was way off. You could use a Dremel to flatten that center area out, I found it easier with my Fein Multimaster tool (able to get a flatter area with the "finger" attachments). I started off with the finger rasp, and finished off with the finger sandpaper (80 then 150). By doing it that way I was able to use the existing pins on the red emblem for more security (I had to redrill new holes on the garnish to line up).
Here's a pic of the JDM garnish

you can see the curvature (although the garnish is chrome not metal buff as shown in the pic).
None of the JDM/Type-R emblems will fit perfectly for the Fit since it was never offered as a Type-R, which is why these emblems are off other Hondas.
Last edited by FitStir; Oct 25, 2012 at 11:12 AM. Reason: Edit formatting
Thread Starter
|
Member
Joined: Jun 2012
Posts: 141
From: Irvine, CA
After a few weeks of being lazy I finally mounted the rear badge. I didn't feel like trimming anything off the factory garnish, so I "customized" the double sided sticky tape on the rear. I removed all the tape in the middle and doubled up some heavy duty 3M tape on the top/bottom. This allowed for the little curve of the mounting surface to "fit" in between the sticky tape. Came out nice, and it's VERY strong.

Thread Starter
|
Member
Joined: Jun 2012
Posts: 141
From: Irvine, CA
Member
Joined: Oct 2012
Posts: 62
From: Toronto
Will do when I get home. FYI, I got the front one from www.corsport.com and it was perfectly curved like the OEM "H" and fit perfectly. I'll measure both the OEM badge and aftermarket red one when I get home today.
Thread Starter
|
Member
Joined: Jun 2012
Posts: 141
From: Irvine, CA
Will get more pics today for you.
Last edited by shamoo; Nov 20, 2012 at 04:50 PM.
Thread Starter
|
Member
Joined: Jun 2012
Posts: 141
From: Irvine, CA
I almost forgot, sorry! Here's the best I could do in a dimly lit garage:
Some measurements for the front. Now it's obviously not a perfect square/rectangle so here's the measurement for the widest portion on top. Sorry for the upside down measuring tape. :P
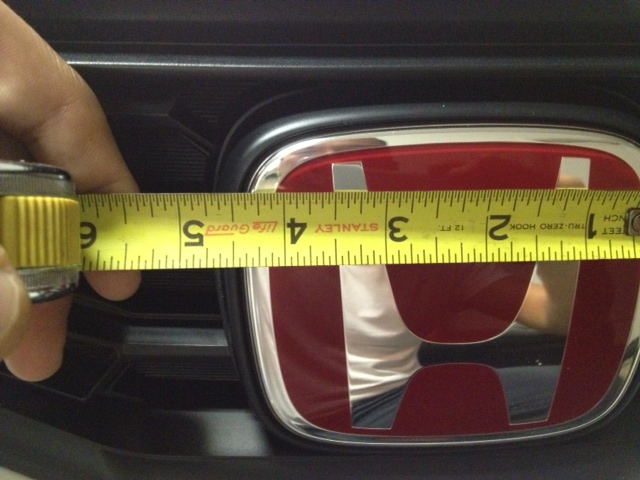
Then the bottom at roughly the same area.
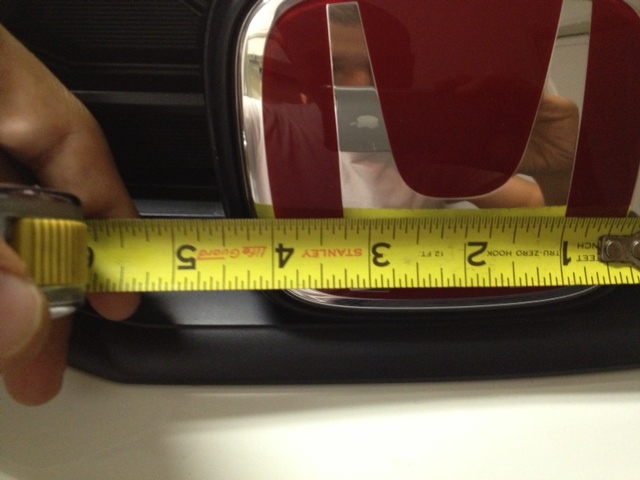
Top to bottom.
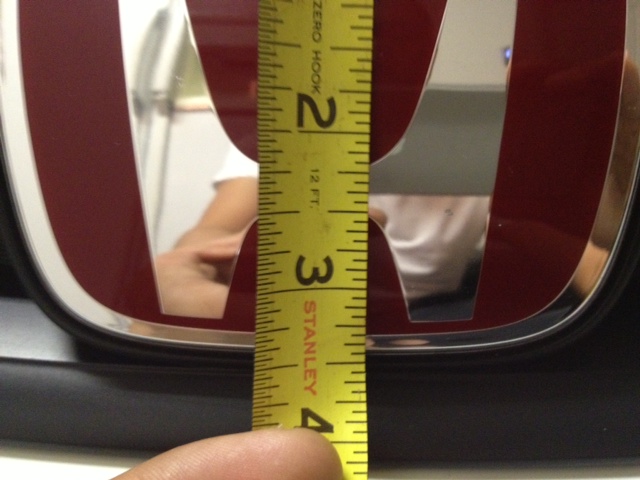
Some measurements for the front. Now it's obviously not a perfect square/rectangle so here's the measurement for the widest portion on top. Sorry for the upside down measuring tape. :P
Then the bottom at roughly the same area.
Top to bottom.