
Sound Deadening Project (Lots of Pics)

Thread Starter
|
Member
Joined: Feb 2010
Posts: 176
From: Richmond, VA
Sound Deadening Project (Lots of Pics)
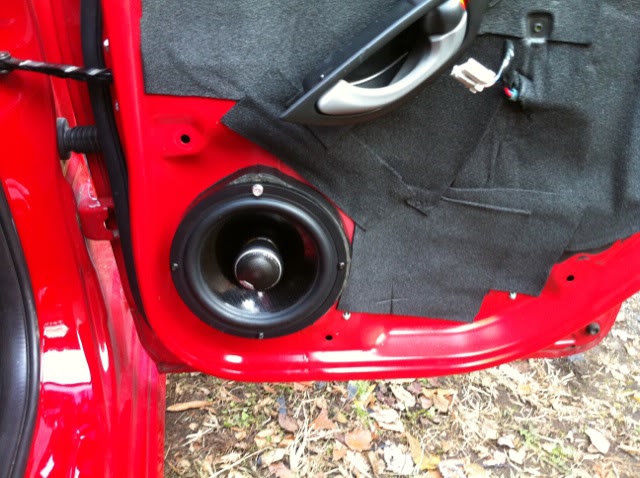
I spent the last few weekends sound deadening my GE8 Fit and thought I would share some pics and info. I used Raamat CLD tiles, Peel & stick ensolite foam, and 1/8" Mass Loaded vinyl (MLV). I did the trunk, hatch, doors, and floorboard.
Total time spent: 4 days
Cost (Materials): ~$250
Total Weight added: 48lbs
My Fit is much quieter now. Pretty much the only thing I can hear is the whiny engine. Very little road noise coming up through the floor, and its hard to hear tractor trailers passing on the highway. The fit also feels MUCH sturdier and heavier. I can drive down cobblestone roads without hearing creaking coming from every panel. I'm happy with the results
Audio stuff added:
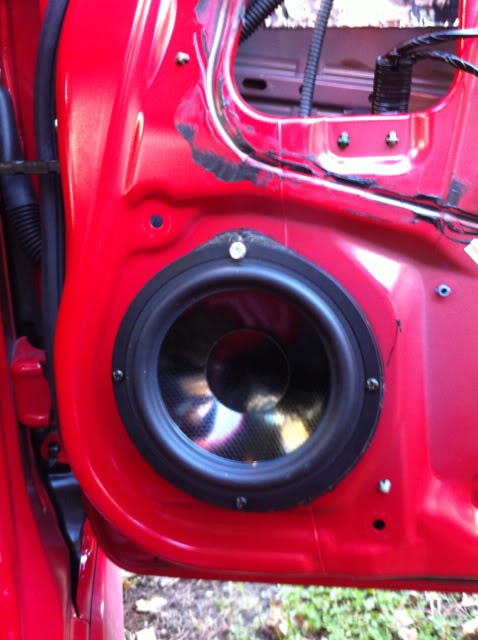
Polk MM6501 in front
Polk MM651 in back
JL 300/4 amp
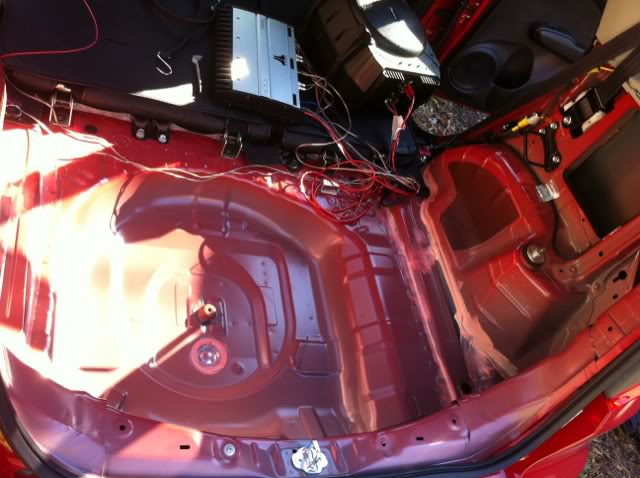
Okey, I started with he trunk and wheel wells:
Stripped Trunk:
Added CLD Tiles:
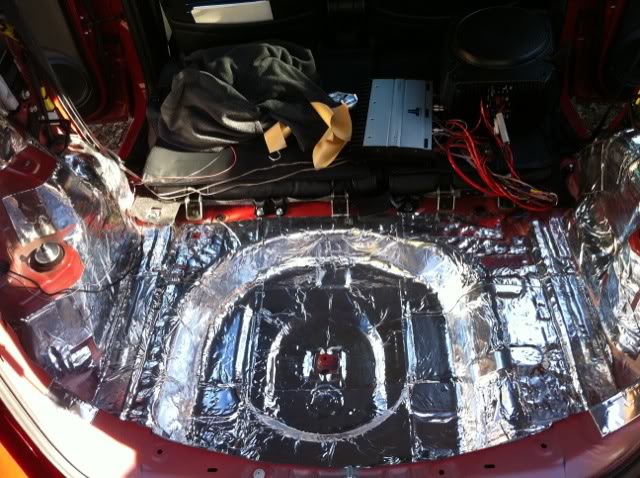
Ensolite:

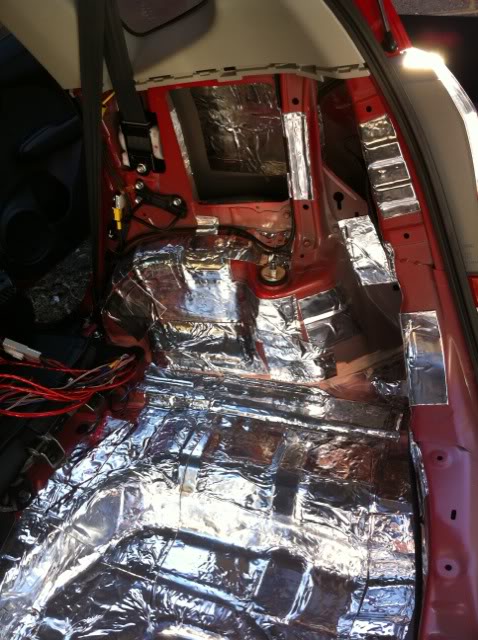
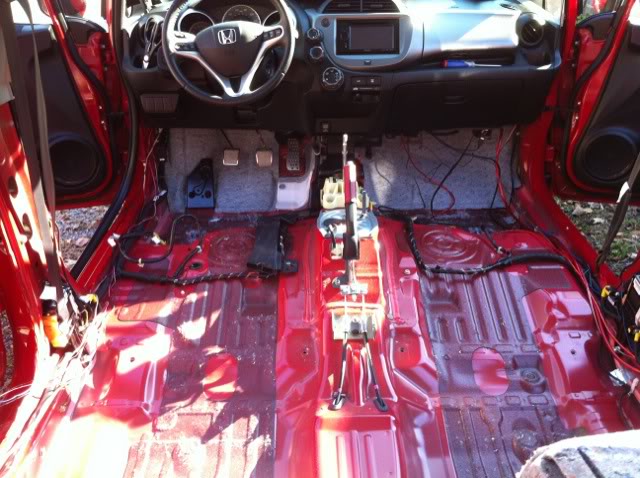
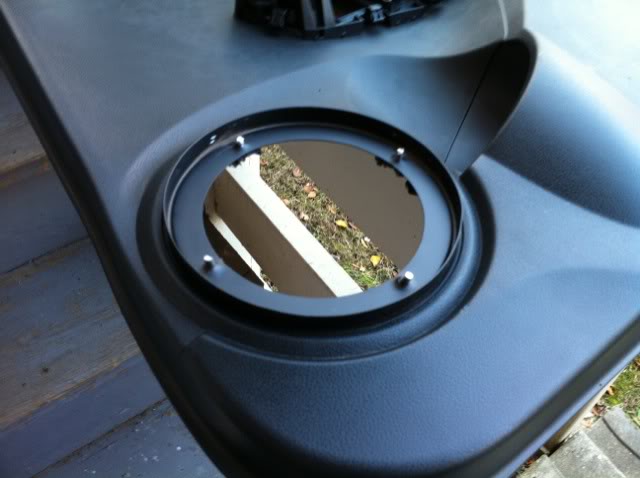
Floor:
Stripped:
I started by placing CLD tiles in some locations:

Now I cut out some underlayment foam as a decoupler. Its easier to cut the foam and then transfer that to the MLV as its quite heavy.
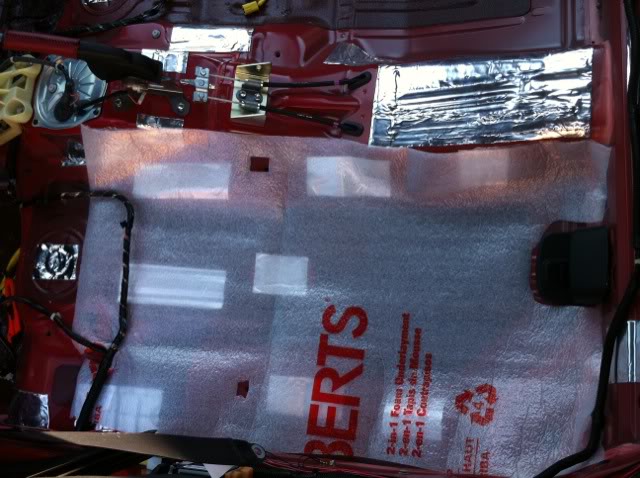
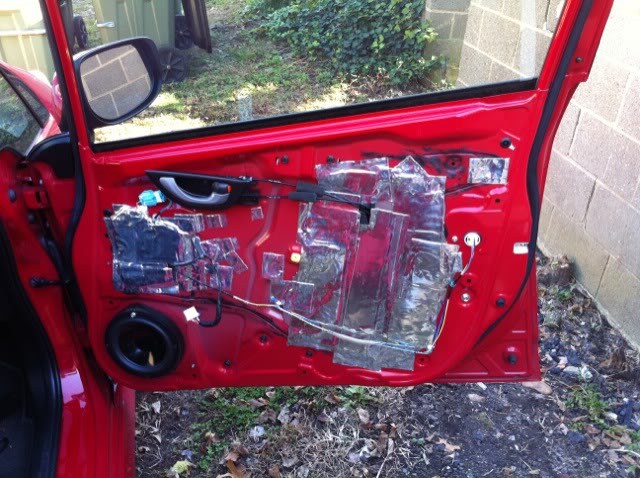
Now some MLV:
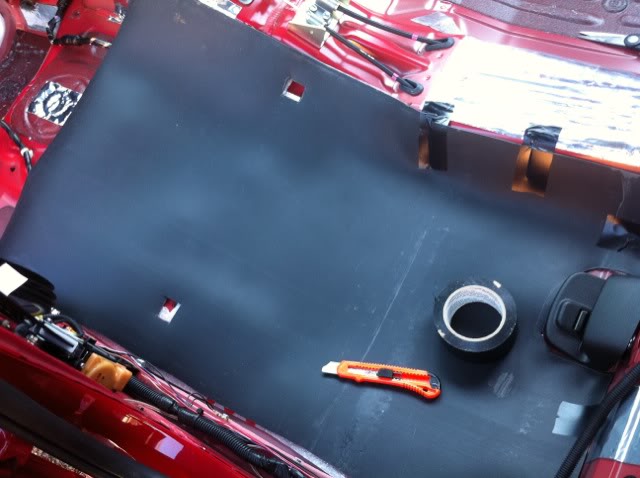
Seal up any seams with vinyl tape, and make sure to get up as far as possible under the cotton matts in the firewall.

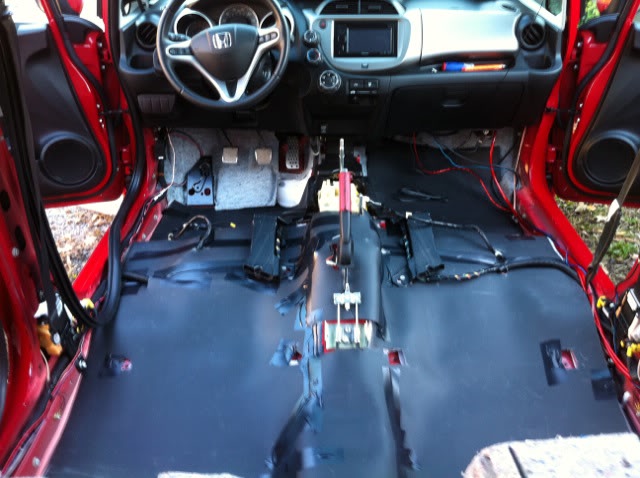
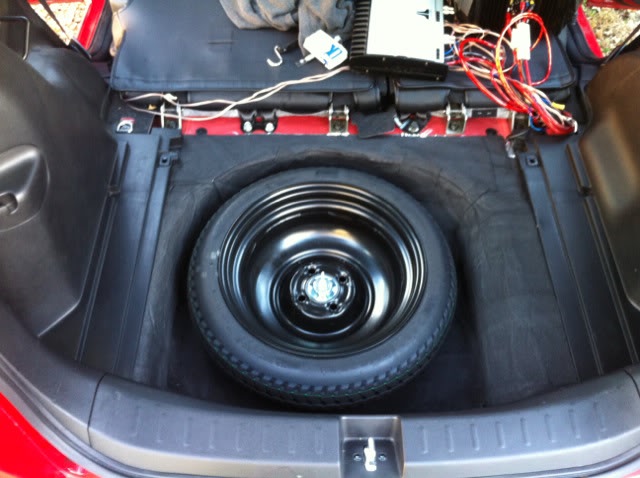
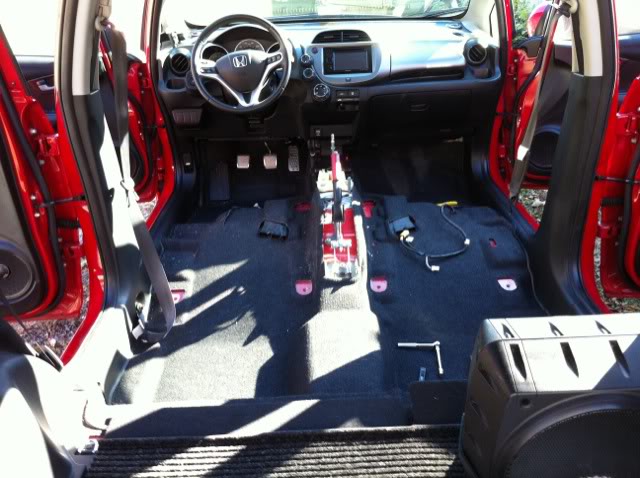
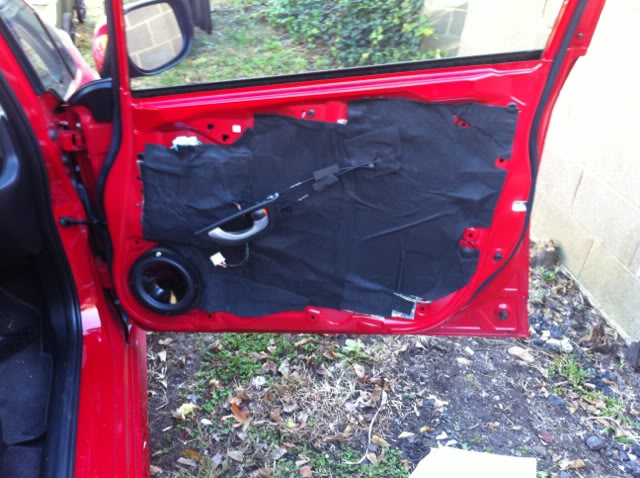
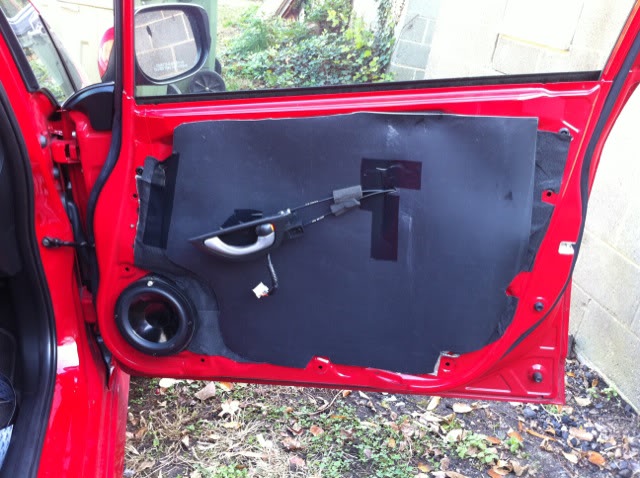
Now pull the carpet back over and make sure everything lines up:
Total time spent: 4 days
Cost (Materials): ~$250
Total Weight added: 48lbs
My Fit is much quieter now. Pretty much the only thing I can hear is the whiny engine. Very little road noise coming up through the floor, and its hard to hear tractor trailers passing on the highway. The fit also feels MUCH sturdier and heavier. I can drive down cobblestone roads without hearing creaking coming from every panel. I'm happy with the results
Audio stuff added:
Polk MM6501 in front
Polk MM651 in back
JL 300/4 amp
Okey, I started with he trunk and wheel wells:
Stripped Trunk:
Added CLD Tiles:
Ensolite:
Floor:
Stripped:
I started by placing CLD tiles in some locations:
Now I cut out some underlayment foam as a decoupler. Its easier to cut the foam and then transfer that to the MLV as its quite heavy.
Now some MLV:
Seal up any seams with vinyl tape, and make sure to get up as far as possible under the cotton matts in the firewall.
Now pull the carpet back over and make sure everything lines up:
Last edited by jcuecker; Nov 24, 2010 at 12:36 PM.


Member
Joined: Jan 2010
Posts: 63
From: los angeles, CA
nice work
reminds me of when i moved across the country in my 1990 civic dx. i loaded it up to the ceiling with all my worldy possessions, including a taken-apart desk, about 20 trashbags full of my clothes, and 3 thick comforters. the thing drove as quiet as a lexus!
reminds me of when i moved across the country in my 1990 civic dx. i loaded it up to the ceiling with all my worldy possessions, including a taken-apart desk, about 20 trashbags full of my clothes, and 3 thick comforters. the thing drove as quiet as a lexus!

Thread Starter
|
Member
Joined: Feb 2010
Posts: 176
From: Richmond, VA
Thanks guys!
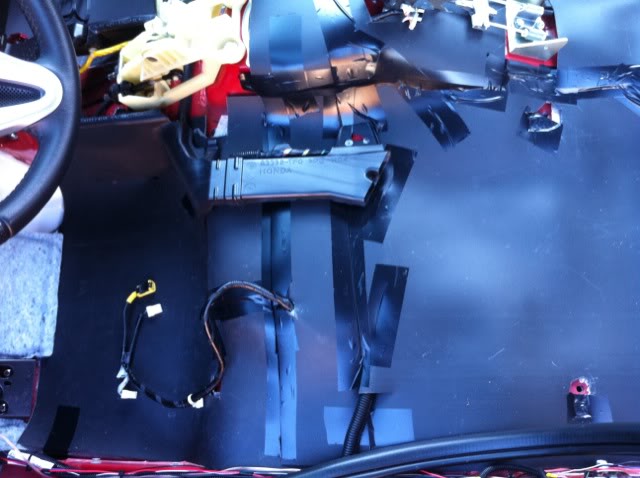
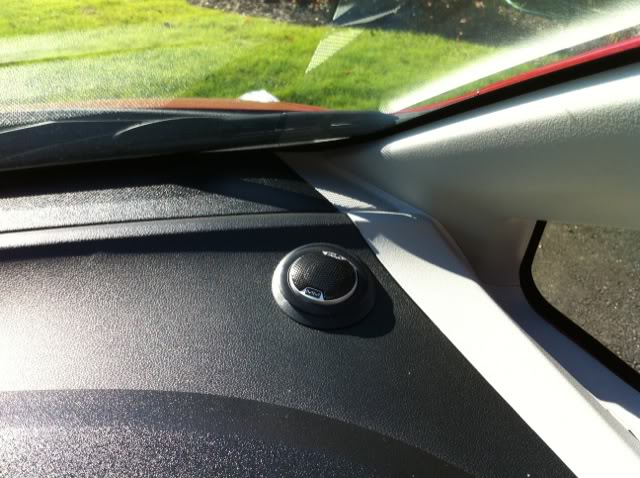
This weekend I also stuffed a lot of acoustical foam panels behind the steering column and glove box. Short of pulling the entire dash its probably the only way to quite down the engine noise a bit.
This weekend I also stuffed a lot of acoustical foam panels behind the steering column and glove box. Short of pulling the entire dash its probably the only way to quite down the engine noise a bit.
Great Job! Really informative. + rep for you sir.
Question: What made you go with the CLD tiles/foam/MLV combo and not just a Dynomat type product? Also, why did you use the CLD tiles just sparingly instead of covering the surface completely? Lastly, how hard was it to install the wiring and tweeters in the dash?
I an SUPER NEWBIE to the whole sound deadening and it looks like you know what you are doing. Thanks for posting. I tip my hat to you sir!
Thread Starter
|
Member
Joined: Feb 2010
Posts: 176
From: Richmond, VA
Hey, thanks man!
I decided to use the CLD/ensolite/MLV combo after doing quite a bit of research about sound deadening. BTW Rammat BXT (CLD tiles) is the same thing as Dynamat. Here are some things to remember:
1) CLD tiles (aka dynamat) is used to convert vibrations into heat and thereby dampening the piece of sheet-metal they are attached to. It is not designed to block sound. You need to cover approc 25-35 percent of the sheetmetal with CLD to do the job. Anything extra is really cost prohibitive and not that much more effective. (NOTE: I did use a lot in the trunk simply because I have a sub back there, its probably still way more that necessary.
2) Ensolite is a brand of closed cell foam that allows the MLV to function by decoupling it from the sheet-metal. It does absorbe some sound as well but not all that much.
3) MLV or Mass Loaded Vinyl is a sound blocker. This is what most people actual want to use when they want to reduce the overall cabin sound level. This is very heavy material, I think the stuff I got was 1/8" and weighs about 0.75lbs/sqft. It blocks soundwaves from actually entering the cabin and therefor must be as tightly sealed as possible. Any gaps will let an unproportionately large amount of the sound through. Hence the overlapping and sealing with vinyl tape.
The way most people used to approach the problem was to cover everything with CLD/dynamat. will this does end up blocking some sound as well its not really what its designed for. Its always important to use the right tool for the job. CLD for vibration deadedning, Foam for sound absorbtion, and MLV for sound blocking.
I recommend reading the information available over at:
Sound Deadener Showdown - Your Source for Sound Deadening Products and Information
Automotive Noise Control - Soundproofing
I'm not endorsing their products but they have great information. I used supplies from other sources.
I recommend trying to find MLV locally. Half the cost in buying online is shipping.
Awesome! Thanks so much for the info!!!! Yeah I will check out the site.
I would love to know how your set up is with the speakers and sub. I have been looking at getting an Infinity basslink for my Fit. How does it sound? Where do you have it mounted?
Also, I previously asked (in my barrage of questioning) about the tweeter install in the stock locations. Could you speak to how easy/difficult it was?
Looking at your sig, I really wanna try the polk/infinity/sound deadening. Let us know how that combo works. I have OEM NAV headunit that i wanna keep, so I would like to get a "clean sweep" processor to clean up the sound before the amp.
I can't believe I just now stumbled upon your thread! You have done many things that I would like to do. Keep up the

Awesome pics! I want to do it but am afraid that I won't be able to put everything back together without any plastic rattles...
But I have a Disassemble Q: As seen in

How do you remove the rear plastic black panels around where the tailgate latch is? I could never figure that out and I was too afraid to just pull hard on it. TIA.
But I have a Disassemble Q: As seen in
How do you remove the rear plastic black panels around where the tailgate latch is? I could never figure that out and I was too afraid to just pull hard on it. TIA.
Thread Starter
|
Member
Joined: Feb 2010
Posts: 176
From: Richmond, VA
Awesome! Thanks so much for the info!!!! Yeah I will check out the site.
I would love to know how your set up is with the speakers and sub. I have been looking at getting an Infinity basslink for my Fit. How does it sound? Where do you have it mounted?
Also, I previously asked (in my barrage of questioning) about the tweeter install in the stock locations. Could you speak to how easy/difficult it was?
Looking at your sig, I really wanna try the polk/infinity/sound deadening. Let us know how that combo works. I have OEM NAV headunit that i wanna keep, so I would like to get a "clean sweep" processor to clean up the sound before the amp.
I can't believe I just now stumbled upon your thread! You have done many things that I would like to do. Keep up the
I would love to know how your set up is with the speakers and sub. I have been looking at getting an Infinity basslink for my Fit. How does it sound? Where do you have it mounted?
Also, I previously asked (in my barrage of questioning) about the tweeter install in the stock locations. Could you speak to how easy/difficult it was?
Looking at your sig, I really wanna try the polk/infinity/sound deadening. Let us know how that combo works. I have OEM NAV headunit that i wanna keep, so I would like to get a "clean sweep" processor to clean up the sound before the amp.
I can't believe I just now stumbled upon your thread! You have done many things that I would like to do. Keep up the
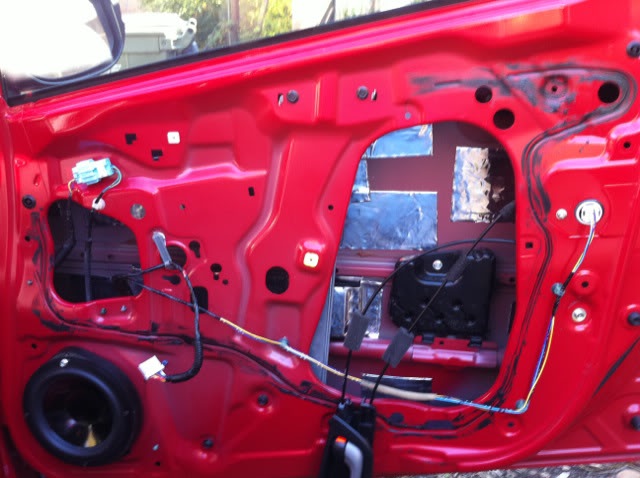
Also, replacing the tweeters is way easy. You can reach the bottom of the passenger side by just removing the glove box. On the other side just push the wiring through the tweeter hole opening and fish it out at the bottom near the pedals, again very easy. The hardest part in wiring up the car is going through the gaskets in the door, I used a close-hanger to get the wires through there.
I'm also quite pleased with the Basslink. I used quick disconnects on the power/ground connections so i can remove the whole unit in a flash. But it doesnt really take up much room to begin with. Its not gonna rattle the windows of a car next to you but it way more then enough inside the cabin.
Nicely done....
how hard was it to remove the front seats and the center console?
is it sufficient just to use the raamat and the ensolite foam?
i will do the doors and the rear first how many orders of raamat/ensolite/MLV do i need.
what kind of surface cleaning materials do you recommend that i buy?
thanks
how hard was it to remove the front seats and the center console?
is it sufficient just to use the raamat and the ensolite foam?
i will do the doors and the rear first how many orders of raamat/ensolite/MLV do i need.
what kind of surface cleaning materials do you recommend that i buy?
thanks
Last edited by phenoyz; Dec 24, 2010 at 12:21 AM.
Thread Starter
|
Member
Joined: Feb 2010
Posts: 176
From: Richmond, VA
Nicely done....
how hard was it to remove the front seats and the center console?
is it sufficient just to use the raamat and the ensolite foam?
i will do the doors and the rear first how many orders of raamat/ensolite/MLV do i need.
what kind of surface cleaning materials do you recommend that i buy?
thanks
how hard was it to remove the front seats and the center console?
is it sufficient just to use the raamat and the ensolite foam?
i will do the doors and the rear first how many orders of raamat/ensolite/MLV do i need.
what kind of surface cleaning materials do you recommend that i buy?
thanks
Removing the front seats is very easy. Just pop off the plastic covers on the feat to expose four bolts per seat. Just unscrew them, unplug the airbag wire and remove the seats. Of course make sure to disconnect the battery first.
The center console you just remove the shift knob adn then there are two plastic screws on either side near the front. There is also a small panel just infront of the e-brake to remove. After that just bull it out.
The rammat and esolite by themselves will deaden the panels of the car and thus make the sound quality much better but they will not reduce incoming noise very much, simply not what they are designed to do. You will need the MLV to make a significant reduction in the noise floor. Check out some of the articles at cascade audio (they explain all this very nicely).
For the doors/hatch area you will need approx 30 sq ft of each material.
For cleaning I just used soap & water and finished with windex.
jcuecker thanks for the reply I really appreciate it since i'm gonna do it
soon.
For now i intend to deaden the 4 doors, the rear hatch and rear
passenger floor area first. will 2 yards "MLV", 1 yard raamat be sufficient?
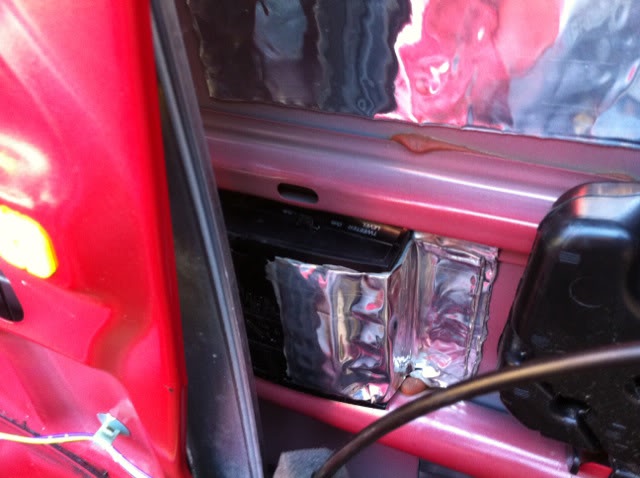
Another thing, what is this for and where did you buy it? ""aluminum roof flashing""
Thanks again.
soon.
For now i intend to deaden the 4 doors, the rear hatch and rear
passenger floor area first. will 2 yards "MLV", 1 yard raamat be sufficient?
Another thing, what is this for and where did you buy it? ""aluminum roof flashing""
Thanks again.
Last edited by phenoyz; Dec 30, 2010 at 12:03 AM.

excellent!!
Excellent sound deadening guide! I own a GD3 but overall the project shouldn't be much different. It'll have to be a project for a long OCD weekend.
Last edited by feddup; Jan 15, 2011 at 08:45 PM.

Member
Joined: Jun 2007
Posts: 524
From: Dallas, TX
jcuecker... a couple more questions... any reason you did the CLD tile/Ensolite combo in the hatch area and then the CLD/underlayment/MLV on the floor? I've done dynamat in the cargo area and still need to do the doors and floor. Was thinking of doing dynamat/CLD, ensolite, and MLV throughout. Just wondered why you didn't do Ensolite throughout or MLV in the hatch area and/or spare tire well.
Any plans to do the hatch door?
Thanks,
Matt
Any plans to do the hatch door?
Thanks,
Matt
Thread Starter
|
Member
Joined: Feb 2010
Posts: 176
From: Richmond, VA
jcuecker... a couple more questions... any reason you did the CLD tile/Ensolite combo in the hatch area and then the CLD/underlayment/MLV on the floor? I've done dynamat in the cargo area and still need to do the doors and floor. Was thinking of doing dynamat/CLD, ensolite, and MLV throughout. Just wondered why you didn't do Ensolite throughout or MLV in the hatch area and/or spare tire well.
Any plans to do the hatch door?
Thanks,
Matt
Any plans to do the hatch door?
Thanks,
Matt
I did actually end up putting some MLV in the trunk. I did the hatch the weekend before the MLV arrived and didn't take additional pics when I finished it. The hatch door has CLD and Ensolite but no MLV (because I ran out).

awesome write up! You have inspired me to try to do some sort of deadening to my sort-of noisy fit!
I was wondering how much total material you used of each type? I am going to try to find somewhere local that I could get some/all of my material to save on shipping costs.
Also, any idea of the total added weight? Is the ensolite very heavy? I was thinking of using some of that on the flooring as well but I think all of that extra material will start to add up! I am a total n00b at sound stuff so thanks again for posting up pics!
Thread Starter
|
Member
Joined: Feb 2010
Posts: 176
From: Richmond, VA
Thanks ATL,
I used approx 40 sqft of CLD. About 45 sqft of Ensolite/underlayment, and 45 sqft MLV. Total weight was just under 50 lbs.
The ensolite provides no sound dampening and only marginally effective sound absorption (unless you use thicker versions or multiple layers). Its real purpose is to decouple the MLV from the cars sheet-metal and CLD. It weighs next to nothing.
The MLV is very heavy. I would try calling flooring places locally, but I couldn't find it in my area.
Good luck!