
Max Cargo Space: Stealthy Fiberglass Goodness

Thread Starter
|
Member
Joined: Feb 2010
Posts: 176
From: Richmond, VA
Stealthy Fiberglass Goodness
So I have decided to finally overhaul my amp/sub setup. The goals for this project:
1. Maximum cargo space
2. Full use of spare tire
3. SQ
So I decided on the following equipment:
Alpine PDX-5: a 5 channel class D amp small enough to fit inside the spare tire.
Image Dynamics IDQ10v2 Sub: Great SQ, and should do great in a small fiberglass enclosure (recommended space .55 sqft)
This will be paired with my Polk MM6501, MM651 speakers and Pioneer F700BT headunit.
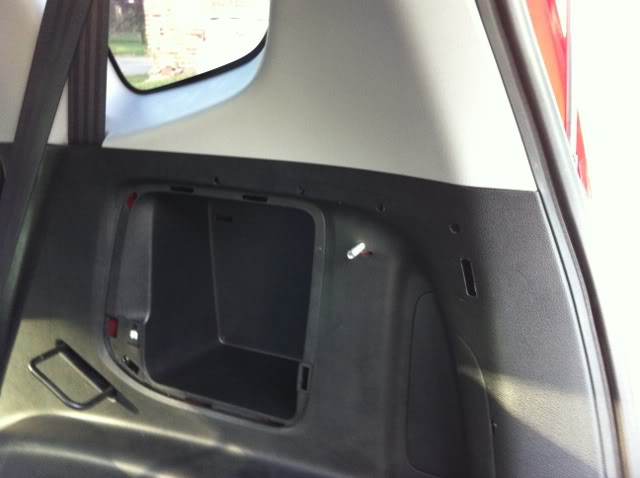
Okey so here we go; first step is to create the fiberglass box. The box will be molded to fit the right side of the cargo area and take advantage of the square cubby in that location. Credit has to be given to member Danger69 who did a very similar box, and was my inspiration.
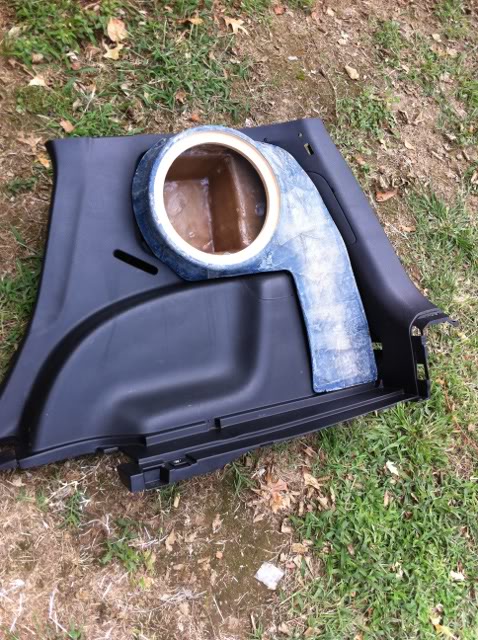
I removed the plastic molding in that area so I did not have to work with the fiberglass in the car. I'm glad I did as this stuff stinks and makes an absolute mess of anything it touches. Mask of the area to which the fiberglass will be applied an add the first couple of layers of glass/resin:
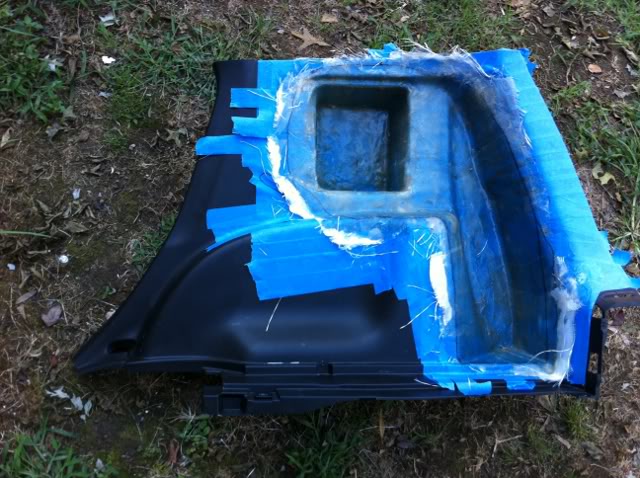
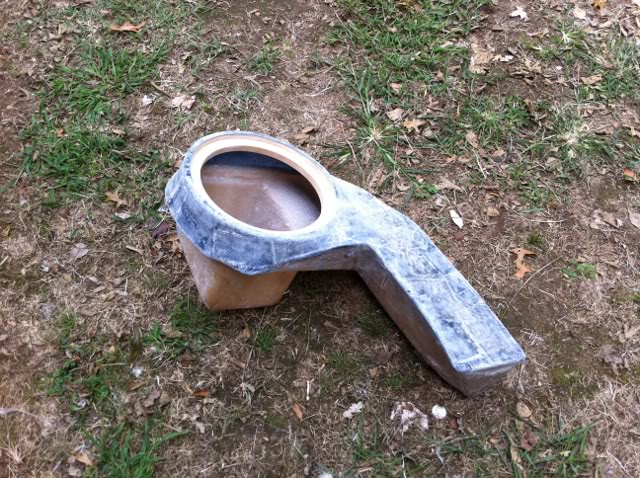
Once that has cured we pop it out and remove as much of the tape as possible:
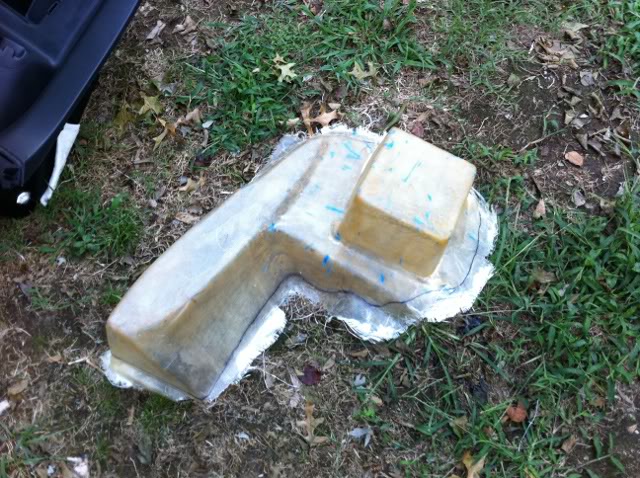
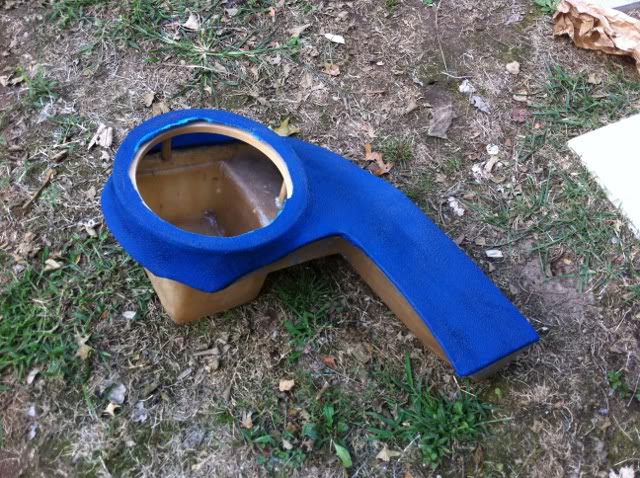
Now I added several more layers of fiberglass and again allowed the piece to cure. Then I cut the edges off using a jig-saw. This is the back side of the enclose and sits pretty much flush with the tire well:
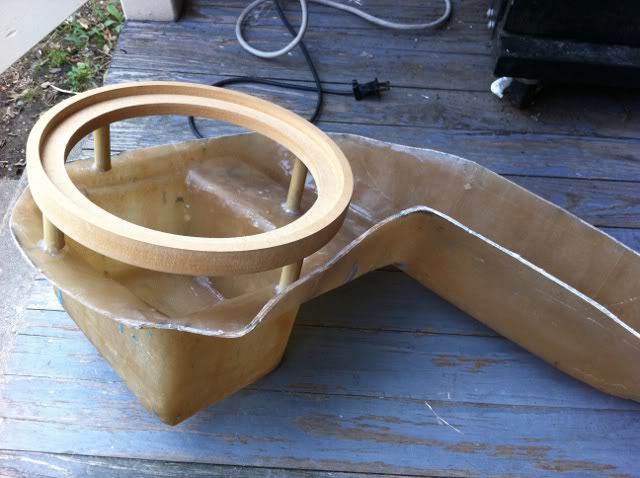
Next we install the mounting ring for the sub. In this case the ring is sunk for a flush look in the end. It is held in place for the time being using dowel rods and hot glue:
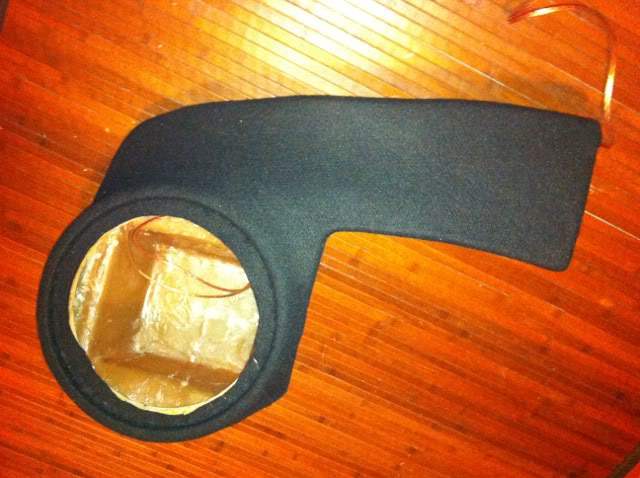
Now I took a piece of a fleece blanket and stretched it over the top of the enclosure, securing the edges using 3M spary glue.
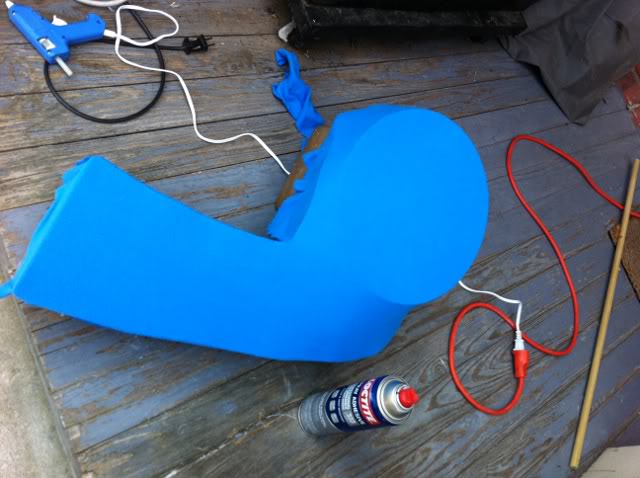
The cloth gets socked in resin and allowed to dry:
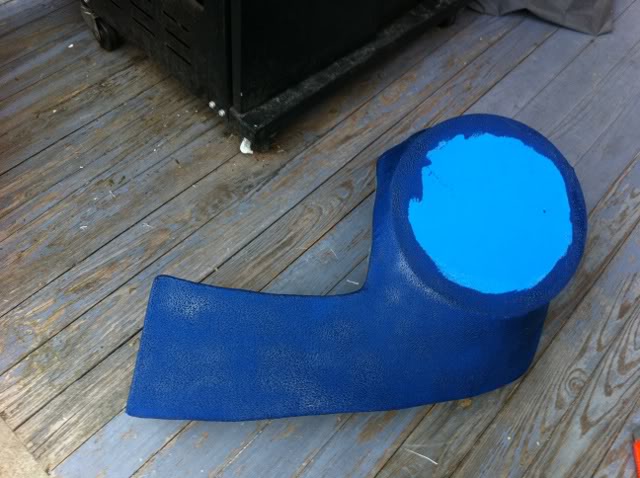
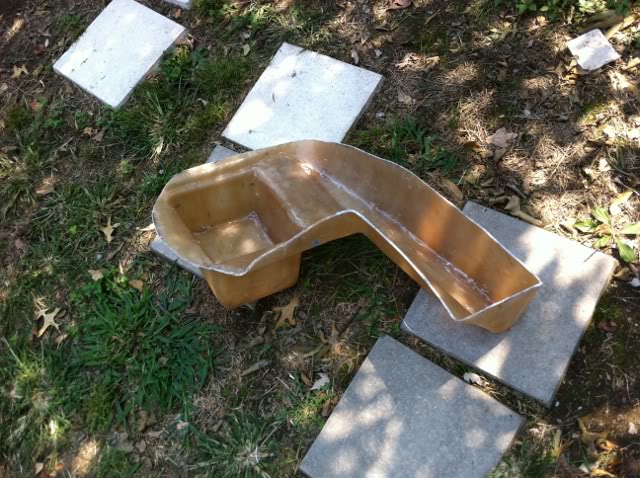
Now I added a few more layers of fiberglass & resin on top of the fleece. Then some sanding:
A quick test fit to make sure everything still lines up:
The box will be bolted to the side of the car using rubber washers and a wingnut. Here is the location of the bolt I added:
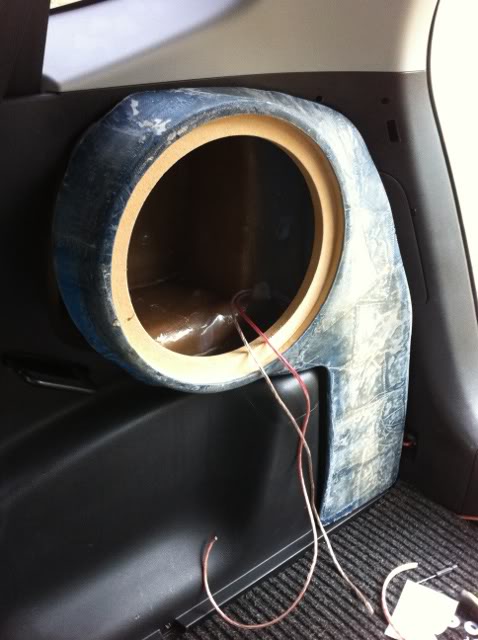
Now its time to add carpeting to the box. I again used the 3M spary glue to secure the material to the front of the enclose.
Now the sub:
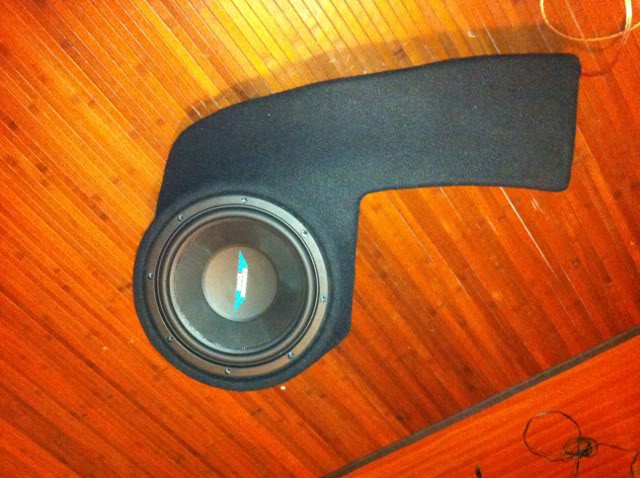
And the grill:
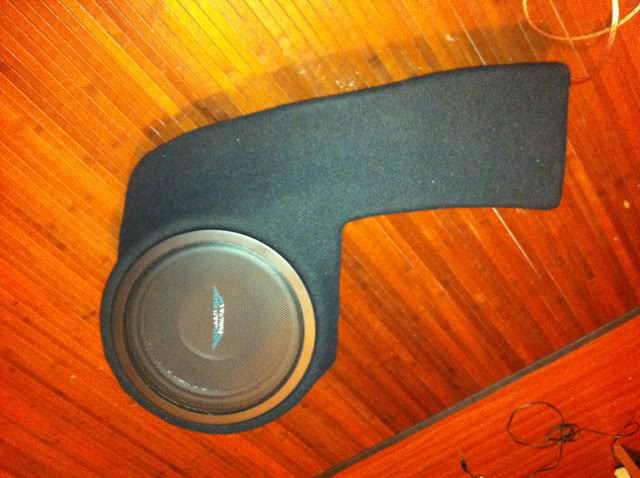
Now lets fit the enclose and sub into the car. Everything fits great. I do loose the ability to lean back the rear right seat (never happens anyway).
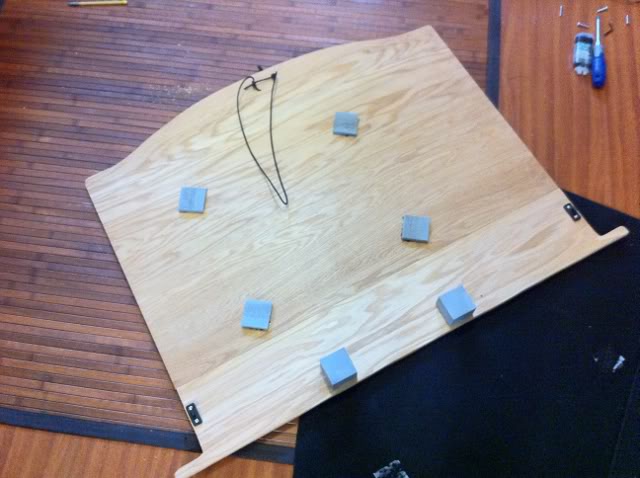
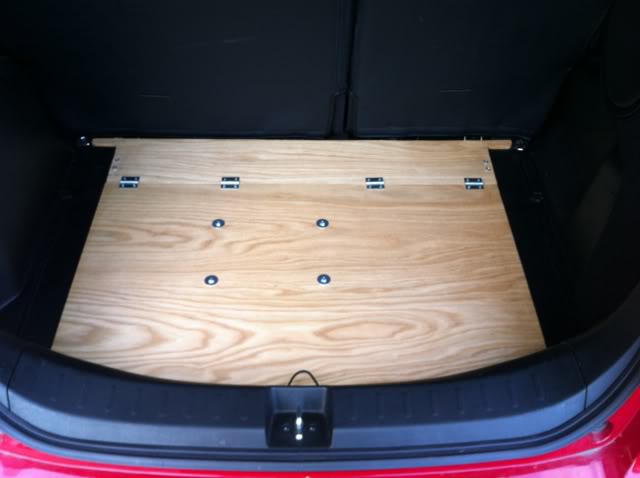
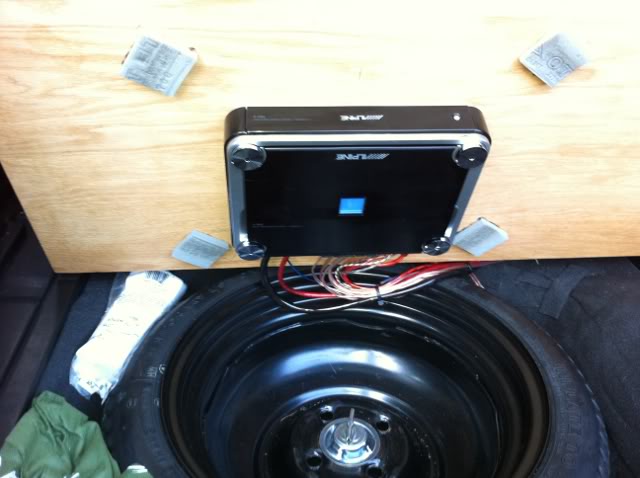
Okey now its time to mount the amp. As I mentioned the PDX5 will sit inside the spare tire. I decided to replace the dinky rear floor with a solid wood substitute. The amp will be mounted upside down to this and basically hang in the center of the spare tire.
Pics:
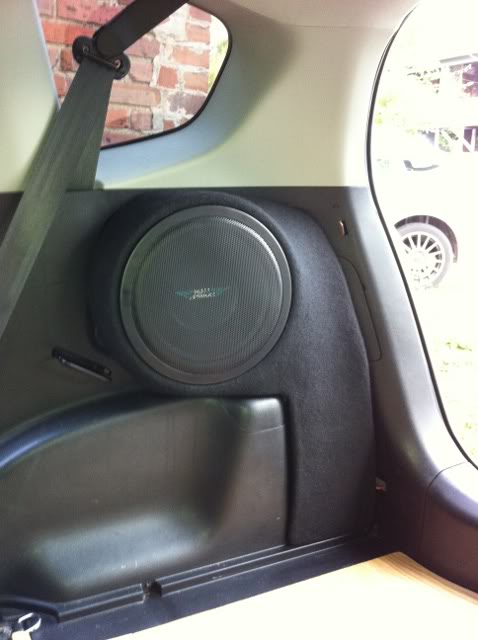
Now here is the final result with the carpeting returned to the trunk area :
:

So, how does everything sound? Incredible! I'm really impressed with the PDX5. Its a truly tiny amp but the birthsheet puts it at 108wrms x4 + 402wrms x1. More than enough power for the speakers and sub. I was worried the class D couldn't compete with an A/B, but this sounds better than the JL 300/4 I had in there before. The IDQ10v2 is also doing great; simply a fantastic SQ sub. Very tight, accurate bass. Not an SPL monster but more that enough output inside the fit. Does great with all kinds of music. Enclosure ended up with approx .65 cuft of volume.
1. Maximum cargo space
2. Full use of spare tire
3. SQ
So I decided on the following equipment:
Alpine PDX-5: a 5 channel class D amp small enough to fit inside the spare tire.
Image Dynamics IDQ10v2 Sub: Great SQ, and should do great in a small fiberglass enclosure (recommended space .55 sqft)
This will be paired with my Polk MM6501, MM651 speakers and Pioneer F700BT headunit.
Okey so here we go; first step is to create the fiberglass box. The box will be molded to fit the right side of the cargo area and take advantage of the square cubby in that location. Credit has to be given to member Danger69 who did a very similar box, and was my inspiration.
I removed the plastic molding in that area so I did not have to work with the fiberglass in the car. I'm glad I did as this stuff stinks and makes an absolute mess of anything it touches. Mask of the area to which the fiberglass will be applied an add the first couple of layers of glass/resin:
Once that has cured we pop it out and remove as much of the tape as possible:
Now I added several more layers of fiberglass and again allowed the piece to cure. Then I cut the edges off using a jig-saw. This is the back side of the enclose and sits pretty much flush with the tire well:
Next we install the mounting ring for the sub. In this case the ring is sunk for a flush look in the end. It is held in place for the time being using dowel rods and hot glue:
Now I took a piece of a fleece blanket and stretched it over the top of the enclosure, securing the edges using 3M spary glue.
The cloth gets socked in resin and allowed to dry:
Now I added a few more layers of fiberglass & resin on top of the fleece. Then some sanding:
A quick test fit to make sure everything still lines up:
The box will be bolted to the side of the car using rubber washers and a wingnut. Here is the location of the bolt I added:
Now its time to add carpeting to the box. I again used the 3M spary glue to secure the material to the front of the enclose.
Now the sub:
And the grill:
Now lets fit the enclose and sub into the car. Everything fits great. I do loose the ability to lean back the rear right seat (never happens anyway).
Okey now its time to mount the amp. As I mentioned the PDX5 will sit inside the spare tire. I decided to replace the dinky rear floor with a solid wood substitute. The amp will be mounted upside down to this and basically hang in the center of the spare tire.
Pics:
Now here is the final result with the carpeting returned to the trunk area
:So, how does everything sound? Incredible! I'm really impressed with the PDX5. Its a truly tiny amp but the birthsheet puts it at 108wrms x4 + 402wrms x1. More than enough power for the speakers and sub. I was worried the class D couldn't compete with an A/B, but this sounds better than the JL 300/4 I had in there before. The IDQ10v2 is also doing great; simply a fantastic SQ sub. Very tight, accurate bass. Not an SPL monster but more that enough output inside the fit. Does great with all kinds of music. Enclosure ended up with approx .65 cuft of volume.
Last edited by jcuecker; Sep 11, 2011 at 01:56 PM.
 Will def try to make the meet, hopefully we can get it re-scheduled.


That's bad ass dude. I wish I knew how to do stuff like that. I'd put one on each side to make of for the SPL. If you decide you want to sell "boxes" molded for the ge back let me know. I'll definitely buy.

Member
Joined: May 2010
Posts: 93
From: Atlanta

That sub box is EXACTLY the sort of thing I'm looking for.
Can't believe no one makes something like this that can be ordered.
...out of curiosity, anyone have any idea of what a sound shop would charge to build me something like this? There's no way I'm attempting this myself. Never touched any sort of fiberglass projects...and simply don't have the time anyway.
Or if someone wants to build one of these for a GE8, shoot me a price.
I would find Jeff Smith in Atlanta. He is a great installer and an all around great guy. He can do anything you would want, but at a price. Fiberglass enclosures are a little expensive due to the complexity and materials. I would charge somewhere around 6-800 to build a box and it would take around a weeks worth of time.
Fiberglass can be a great way to get started with construction since it's easy to figure out and you don't have to have all of your angles perfect for proper sealing. One thing to remember is that you can always scrap it and start over. I built three or four fiberglass boxes before I starting picking up on some tricks.
Fiberglass can be a great way to get started with construction since it's easy to figure out and you don't have to have all of your angles perfect for proper sealing. One thing to remember is that you can always scrap it and start over. I built three or four fiberglass boxes before I starting picking up on some tricks.
this is EXACTLY what im look for.. def want some thump in the fit but nothng to raddle the block but i would love this.... only two things that suck, like u said u cant lean back, which i really dont do either and two, getting to the taillights , if u ever have to replace the bulb or whateva , u would have to take that out to get to it. but other than that, thats exacly what i want..
Thread Starter
|
Member
Joined: Feb 2010
Posts: 176
From: Richmond, VA
Thanks for all the positive feedback guys.
Some notes about the fiberglass box:
Cost: Materials ~$130 Sub $90
Time: In total I spent approx 12 working hours on this. This does not include the curing time between layers, etc.
Difficulty: This is the first box I've ever built (fiberglass or otherwise) but didn't have too much trouble. Just read up on the general procedure and went from there. The fiberglass resin puts out a lot of fumes, and despite doing this outside I felt high most of the time (and not in a good way). I would get a respirator if I did it again. The whole process is very time consuming mainly because of the curing time. Maybe a few hours on hot sunny days but it takes forever when its humid and cloudy.


Awesome job. I'm attempting the same thing and it's a LOT of work. Props to you for doing a professional job. I'd like to secure the sub also but I'm unclear about how your did this. Can you take a pic of the rear of the box to show how you secured it to the bolt? Great write up!

Thread Starter
|
Member
Joined: Feb 2010
Posts: 176
From: Richmond, VA
Awesome job. I'm attempting the same thing and it's a LOT of work. Props to you for doing a professional job. I'd like to secure the sub also but I'm unclear about how your did this. Can you take a pic of the rear of the box to show how you secured it to the bolt? Great write up!
Yeah, it really does help. I kinda thought that was how you did it but just wanted to confirm that you drilled a hole into the box before I did it. I just got mine out from the plastic trim yesterday and that was a huge PITA!! It took me almost 5 hours of prying before it finally was out. I even used aluminum foil and vaseline as a releasing agent and it still gave me a hard time. I'm excited now that it's out so I can finish this up. I'll post pics when I'm done. Thanks, you've been a GREAT help to me and other members.
Thread Starter
|
Member
Joined: Feb 2010
Posts: 176
From: Richmond, VA
Yeah, it really does help. I kinda thought that was how you did it but just wanted to confirm that you drilled a hole into the box before I did it. I just got mine out from the plastic trim yesterday and that was a huge PITA!! It took me almost 5 hours of prying before it finally was out. I even used aluminum foil and vaseline as a releasing agent and it still gave me a hard time. I'm excited now that it's out so I can finish this up. I'll post pics when I'm done. Thanks, you've been a GREAT help to me and other members.
No prob Sooner! BTW, some advice before you add the mounting ring; make sure you will have enough clearance between the box and anchor point of the rear seat. As I mentioned before, I cant put the rear seat in the reclined position, but even the standard position is a little tight. I would insert the bottom shell of the box with the seat locked in place and then deterime the best location for the mouting ring before locking it in place with the resin/fleece.
Finally finished my sub box.. It took me a long time to finish but it turned out great. I made it a little bigger since the 8W7 need about 0.8 cubic feet of space. It was a fun project and I really appreciate your help, jcuecker! You gave me the confidence to tackle this project.