
For Mature Fit Owners Only (PG 40K+ rated)


Member
Joined: May 2011
Posts: 129
From: IL

We drive a lot. I mean a whole lot. We have had three oil changes in one year and presently have 36K on the car. Don't scream anyone, I believe in synthetics. Anyway, last time in the service dude commented that the pads had almost original thickness and asked if I had changed them. I commented that, "we almost never use the bakes". He looked at me kinda strange. I fessed up and said there were lots of highway miles on the car. He relaxed and caught my joke. It was pretty funny watching him take that in, LOL
Thread Starter
|
Member
Joined: Aug 2009
Posts: 3,661
From: Georgia
Synthetics are universally regarded as better than mineral oil I thought.
The only application I've read where they might not be recommended is older high mileage cars; they may clean out gunk that's keeping them from leaking around gaskets. But using them from new (or low mileage) keeps the seals in better shape and no gunk.
The only application I've read where they might not be recommended is older high mileage cars; they may clean out gunk that's keeping them from leaking around gaskets. But using them from new (or low mileage) keeps the seals in better shape and no gunk.
Member
Joined: May 2011
Posts: 129
From: IL
Synthetics are universally regarded as better than mineral oil I thought.
The only application I've read where they might not be recommended is older high mileage cars; they may clean out gunk that's keeping them from leaking around gaskets. But using them from new (or low mileage) keeps the seals in better shape and no gunk.
The only application I've read where they might not be recommended is older high mileage cars; they may clean out gunk that's keeping them from leaking around gaskets. But using them from new (or low mileage) keeps the seals in better shape and no gunk.
Absolutely. Once synthetic, always synthetic. It can get tricky using it on old things though.
Thread Starter
|
Member
Joined: Aug 2009
Posts: 3,661
From: Georgia
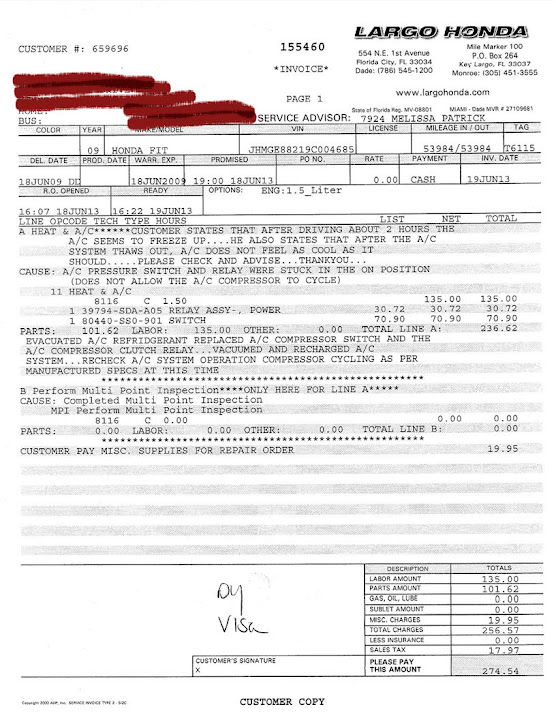
aaaak. A/C lost its cool around Macon GA in route to Key Largo. Owner lost his cool around Valdosta. Film at 11.
Thing was freezing up. Symptoms were reduced airflow and loss of cooling. Some cool humid air was exiting the vents. Switching off and turning back on helped for about 15 minutes then the cycle would repeat. The heartbreak of frozen evaporator... sob...
A visit at the Honda Spa in Florida City, $275 and a day later it was as good as it ever was (which is to say, not great, but at least it kept us cool).

Corona Honda did the same thing to me telling me my brake pads were down to 2mm.... I was going to have them do, but told them forget it and I bought pads too.... Turned out there were over 6mm still..... I hate that you can't even trust the dealerships!
aaaak. A/C lost its cool around Macon GA in route to Key Largo. Owner lost his cool around Valdosta. Film at 11.
Thing was freezing up. Symptoms were reduced airflow and loss of cooling. Some cool humid air was exiting the vents. Switching off and turning back on helped for about 15 minutes then the cycle would repeat. The heartbreak of frozen evaporator... sob...
A visit at the Honda Spa in Florida City, $275 and a day later it was as good as it ever was (which is to say, not great, but at least it kept us cool).
Thing was freezing up. Symptoms were reduced airflow and loss of cooling. Some cool humid air was exiting the vents. Switching off and turning back on helped for about 15 minutes then the cycle would repeat. The heartbreak of frozen evaporator... sob...
A visit at the Honda Spa in Florida City, $275 and a day later it was as good as it ever was (which is to say, not great, but at least it kept us cool).
Thanks for this post though, kept me from having to make a new thread.
Last edited by BakedCookies; Jun 25, 2013 at 08:40 AM.
Thread Starter
|
Member
Joined: Aug 2009
Posts: 3,661
From: Georgia
Rainy July Saturday put a crimp in yard work so decided to check the front brake pads that Honda told me needed replacing a year ago. It was at 40K then, and 55K now. It might have lasted until 65K.
The outside pads were at 4mm, and the inside pads were at 3mm. I agonized over leaving them on; the service limit is 1.6mm so they may have lasted another year at the current rate of wear. Anyway since I had the pads (ordered OE pads from Majestic a year ago for $43) I decided to put them on, rather than wait for the audible wear-sensor to start wailing. Inspecting the new pads, the wear sensor tabs engage the rotor surface when the pads are at 2mm leaving 0.4mm extra material after this point. Anyway, unless you want to wait for the screeching sound and then replace them, it's probably a good idea to do them when they are 3mm or less.
I won't post a DIY other than to say here are the Honda instructions. It took me about 45 minutes for the driver's side, and 15 minutes for the passenger (after I sorta knew what I was doing).
Have some brake fluid handy (Honda fluid only, please). I had to remove some (swiped my wife's turkey baster. Again) as I'd topped this off at 3 years when I did the brake fluid flush tango (takes two). After compressing the brake cylinders this would have overflowed the reservoir. It took some fresh fluid to bring it back up to the max line when the new pads were installed and the pedal worked a couple times.
Have lots of rubber gloves handy. The installation compound (grease?) that you smear all over the shims is messy. Not to mention the brake powder over everything.
A small torque wrench might be a good idea; the 2 bolts you undo per side require re-torquing to 16 lbft.
A caliper piston compressor tool might be handy. Others use C-Clamps but I found it expands inside the caliper to push the cylinder flush.
Honda wanted $230 to do front brakes. Saving $190 wasn't a bad thing. Yeah sure I didn't refinish the rotors, but the service manual doesn't recommend doing this unless they are uneven. The circular grooves don't hurt a thing.
Last edited by Steve244; Jul 20, 2013 at 09:22 PM.
Member
Joined: Jul 2009
Posts: 126
From: Indiana
Did you lube the caliper sliding bolt? On wife's Fit, it was starting to get stuck so I put ton's of silicone paste on it:
Thread Starter
|
Member
Joined: Aug 2009
Posts: 3,661
From: Georgia
Naw, it seemed fine working it back and forth. There's a rubber boot over it (are we talking about the same thing? Page 19-13 step 5)
Last edited by Steve244; Jul 20, 2013 at 09:30 PM.

Member
Joined: Apr 2013
Posts: 189
From: Englewood
When reinstalling your wheels, it's a good idea to torque them to spec.
At Auto Zone stores, they lend tools, and they have torque wrenches. After you have to replace warped rotors, because of over torquing, you will use a torque wrench.
At Auto Zone stores, they lend tools, and they have torque wrenches. After you have to replace warped rotors, because of over torquing, you will use a torque wrench.

Member
Joined: Jul 2009
Posts: 126
From: Indiana
Yes. The pin with rubber boot. If it was moving back and forth fine, then you're okay. For whatever reason, mine was getting stuck a bit, so pull it out, clean it, and lubed it again.

Member
Joined: Oct 2009
Posts: 4,295
From: Wandering around.
A caliper piston compressor tool might be handy. Others use C-Clamps but I found this tool pretty slick; it expands inside the caliper to push the cylinder flush.
Put the socket end in opening of the piston and the shaft against the opposite side... then leverage it until the piston is roughly flat with the bracket. Probably takes (a little) less time than the spreader tool (and you've already paid for the "tool" since it came with the car).

Member

Joined: Feb 2009
Posts: 285
From: NYC
For those who have replaced the brake fluid themselves, can you get away with a single bottle of OEM fluid, or should we have more than one bottle on hand? Also, is there much advantage to waiting for a low-humidity day to do the work? I'm going to ask the shadetree mechanic here in the town replace the pads and flush the lines, while I take the usual mother's role of pumping the pedal.
Thanks.
Thanks.
Thread Starter
|
Member
Joined: Aug 2009
Posts: 3,661
From: Georgia
Depends on the size of the bottle. I used 3.5 bottles of 12fl ounce Honda DOT-3 fluid, so 42 fl ounces. I had 5 bottles on hand (60fl oz).
Here's the procedure from the shop manual. I couldn't find any specification for what flushing the brake lines typically requires. I continued to bleed until the color of the fluid coming out was lighter.
Here's the procedure from the shop manual. I couldn't find any specification for what flushing the brake lines typically requires. I continued to bleed until the color of the fluid coming out was lighter.
Last edited by Steve244; Jul 21, 2013 at 10:58 AM.
Member
Joined: Jul 2009
Posts: 126
From: Indiana
You will need about 1/2 quart or 16 fluid once to be safe. I've used super blue brake fluid (compatible with DOT3/4) a while back to make sure I see the color change, and it took a little less than 1/2 quart.
The next time around, I will use the yellow/clear color so I can also see the color change again.
The next time around, I will use the yellow/clear color so I can also see the color change again.
