
DIY lower your GE8 Fit

 , It happend to me... i thought i was gonna have buy a whole axle. and get my car towed home!
 but then we twisted and turned and wiggled and then POP! it went back in. lol then we laughed!
Glad to see everything worked out for you!
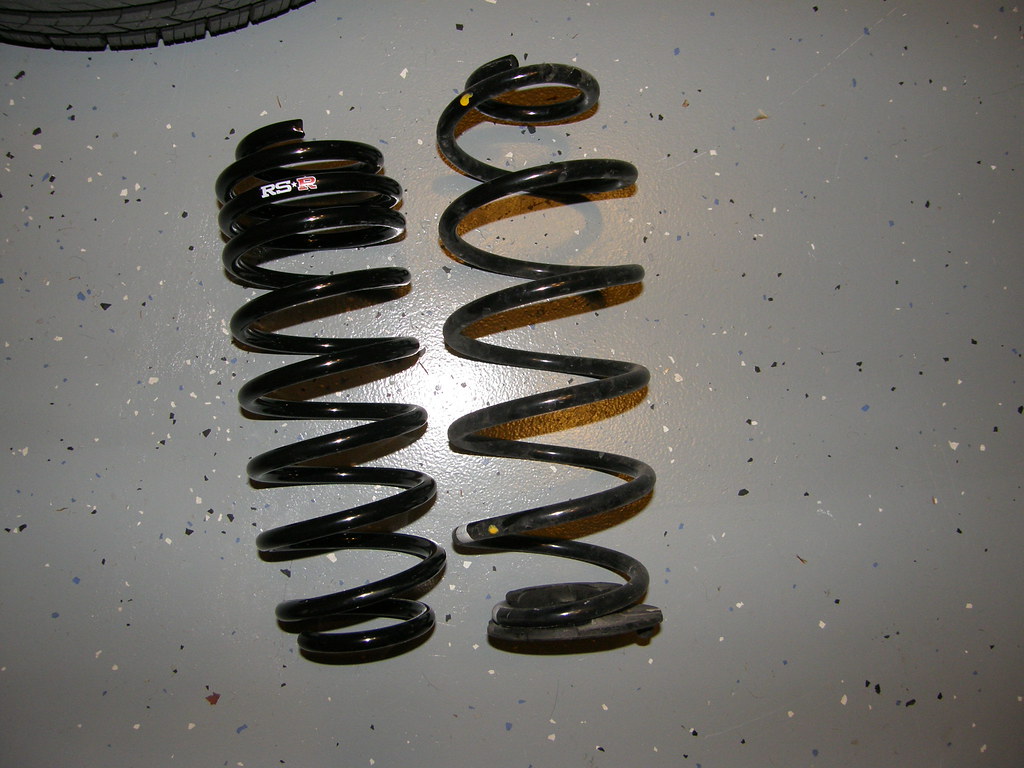
I wanted to kick myself for not having taken pics as I did my RS*R spring install last Sunday, but the last time I did that for a mod on my Audi, I screwed something up and got it in my head that I jinxed myself by taking pictures.
I know some people might think the bungee cords are a bit over-the-top, but it's worth saving a person from having to have their car pushed out of my garage and towed to a shop to finish the job.

Member
Joined: Sep 2008
Posts: 138
From: California
Wow. Awesome write up. I looked at the all that plastic under the hood and thought, "forget it". Nice job in figuring out how to get it all apart. Doesn't look like it was made to be easy. The rear shocks, however, pretty much drop right out. I guess you'll see if you need a spring compressor in the rear. Thanks for all the pics!!!
Wow. Awesome write up. I looked at the all that plastic under the hood and thought, "forget it". Nice job in figuring out how to get it all apart. Doesn't look like it was made to be easy. The rear shocks, however, pretty much drop right out. I guess you'll see if you need a spring compressor in the rear. Thanks for all the pics!!!
And the back spring install does not require a spring compressor at all. The key in the back is to get the entire rear end of the car up on jack stands and unbolt BOTH side rear shocks to drop the axle. The OEM springs can be pulled out with a small amount of effort at that point and the new springs swapped in. Should take a person about 20 minutes to do the entire rear install.

Joined: Aug 2008
Posts: 1,929
From: Palm Coast FLA

thanks everyone.
yes the axles were a pain.who ever does this
be carefull they don't slip out.
coming soon Dave
yes the axles were a pain.
who ever does thisbe carefull they don't slip out.
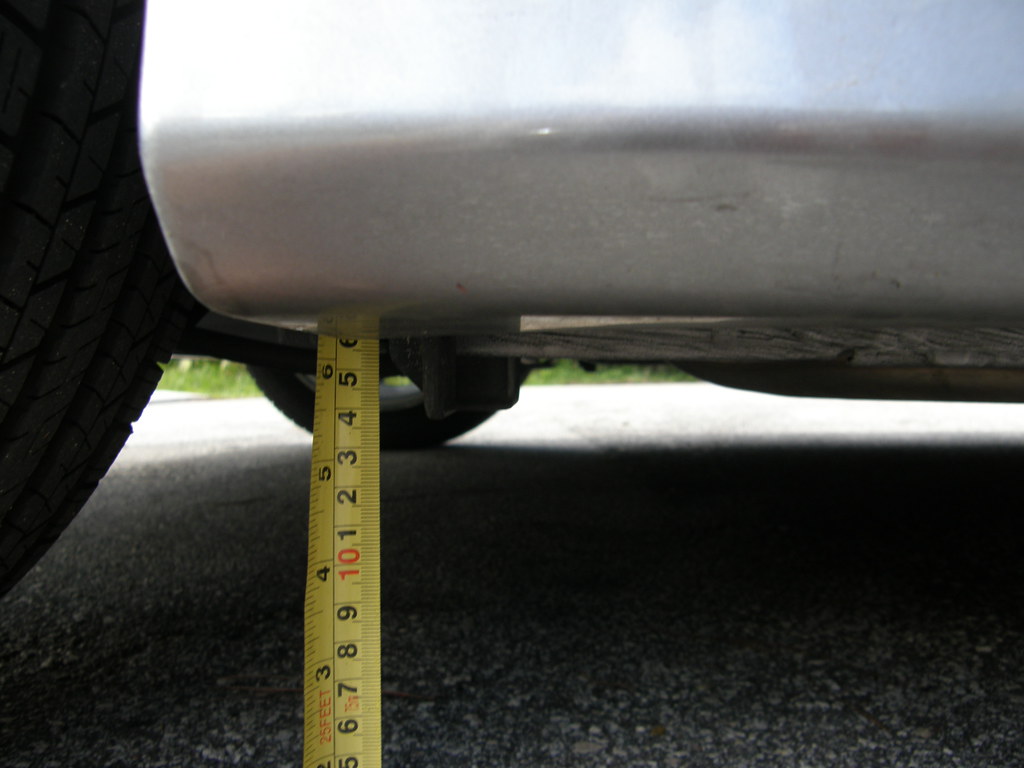
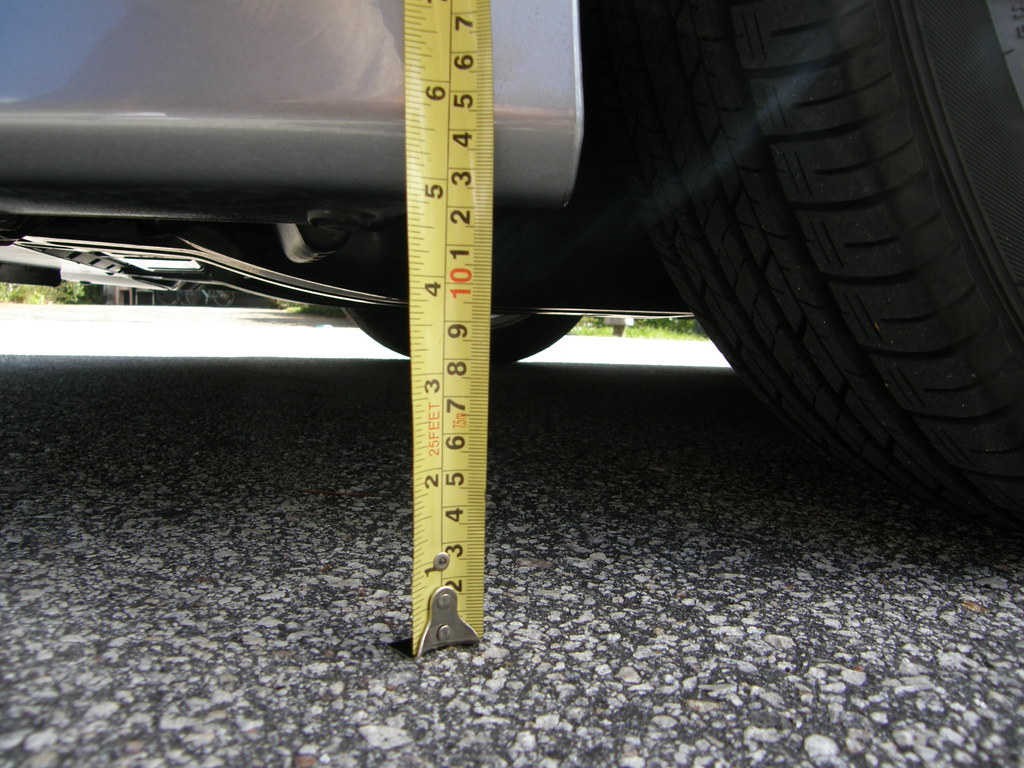
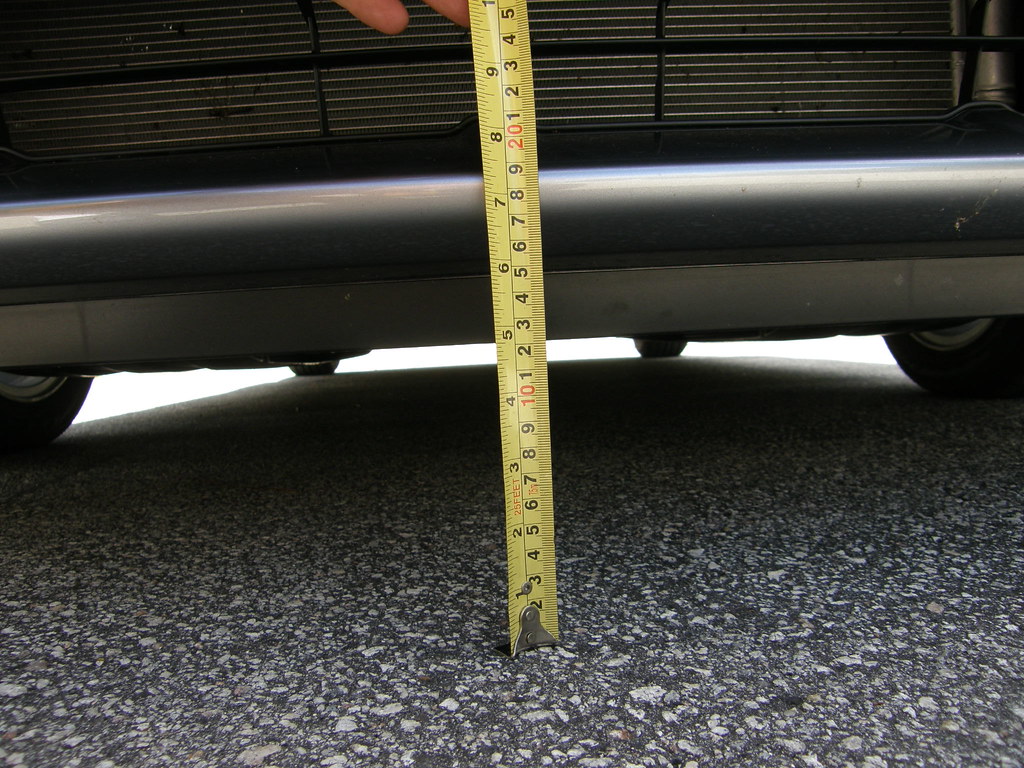
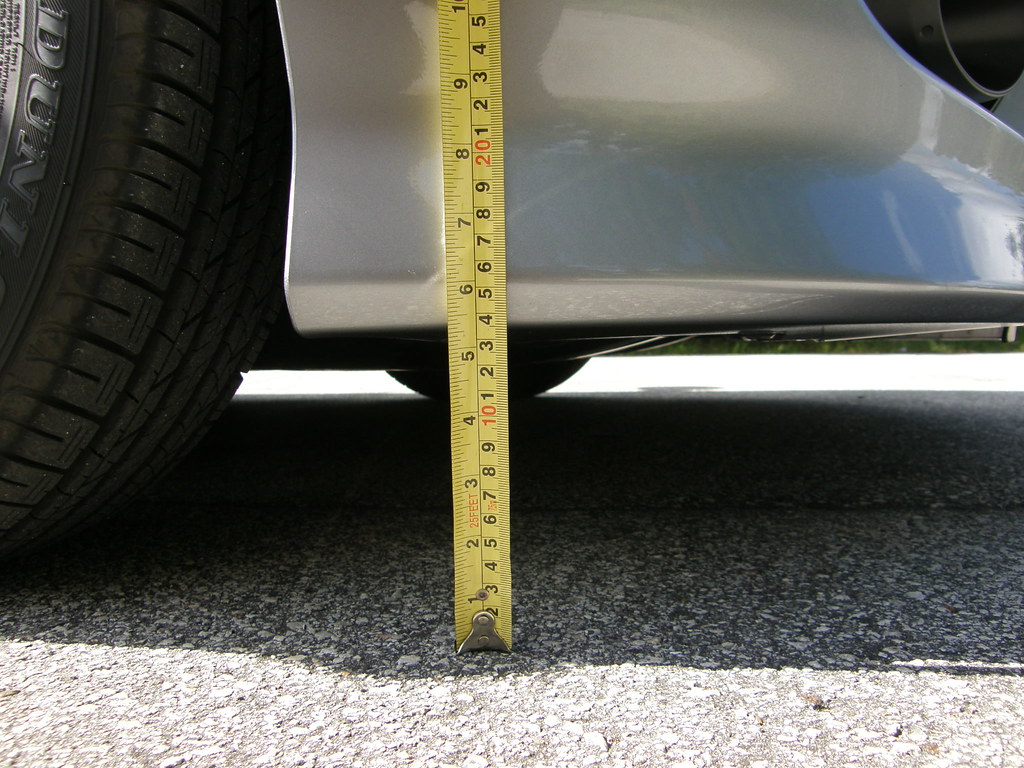
Wow Nick!!! Great write up!!! dod you get the final measurments lowered... on the fenders and lower valance..?? I did not see them...
Joined: Aug 2008
Posts: 1,929
From: Palm Coast FLA
alright i'm back for a little. it's been a long day
well lets get started on the back of the car.
for this to be done you have to have the hole back
end of you car lifted. and not by the suspension.
so i began by lifting one side at a time by the bottom
of the spring. look at my picture and see where the jack is.
this is where i jacked each end up from and while up i placed
jack stands up.

now you should have both jack stands on the car and the wheels off.
before we go any further make sure you unhook you abs wires on
both sides.

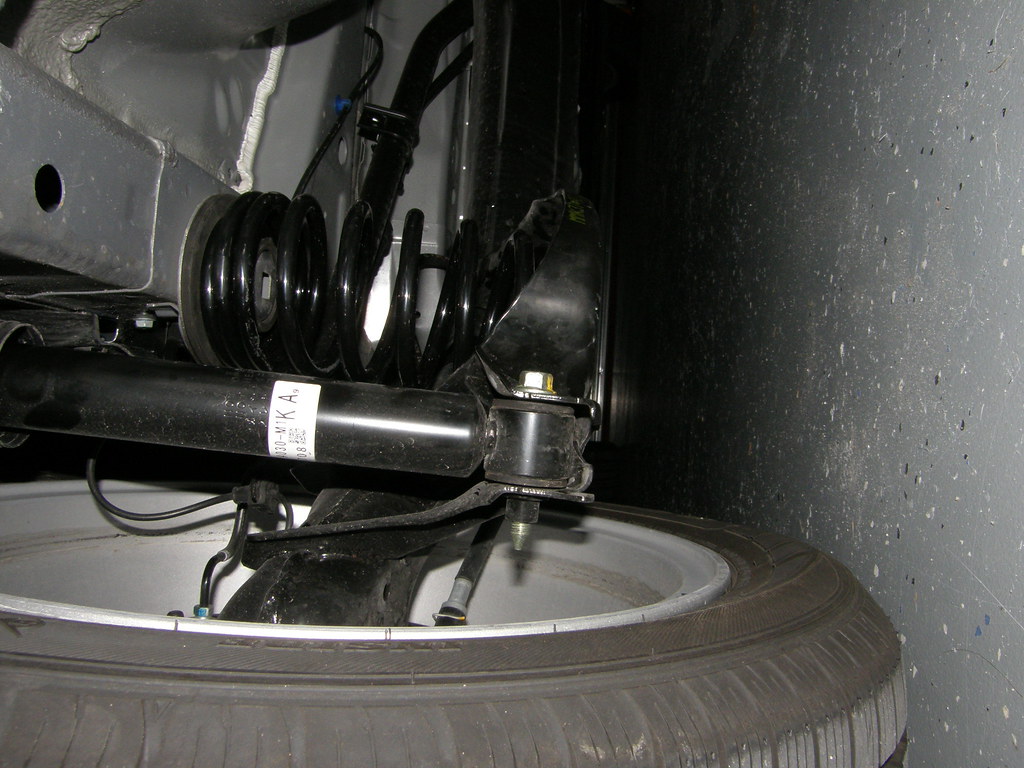
now take your jack again and place it on the car just like in the picture.
right under the spring. jack it up like an inch or so.
then take off both bottom shock bolts completly. right and left.
after you have done that take your jack out. it will look similar to this.
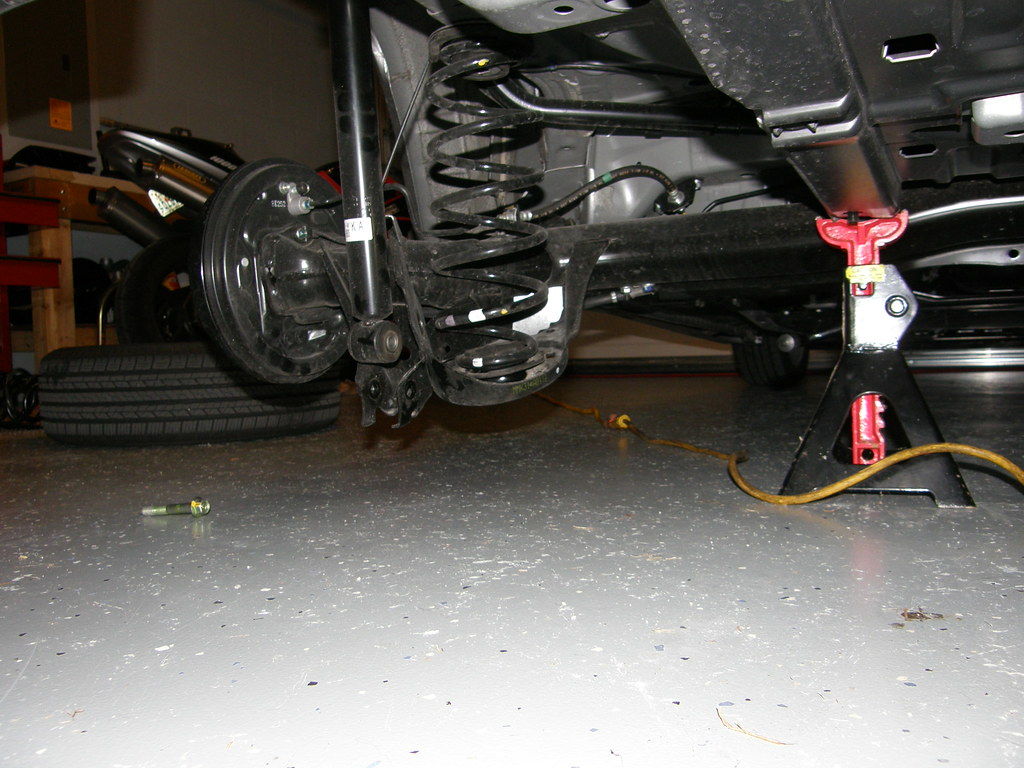
all you do now is just give it a little push and wam both springs will
just pop right out.
now we can compare again. lets see.
very nice
it's been a long daywell lets get started on the back of the car.
for this to be done you have to have the hole back
end of you car lifted. and not by the suspension.
so i began by lifting one side at a time by the bottom
of the spring. look at my picture and see where the jack is.
this is where i jacked each end up from and while up i placed
jack stands up.
now you should have both jack stands on the car and the wheels off.
before we go any further make sure you unhook you abs wires on
both sides.
now take your jack again and place it on the car just like in the picture.
right under the spring. jack it up like an inch or so.
then take off both bottom shock bolts completly. right and left.
after you have done that take your jack out. it will look similar to this.
all you do now is just give it a little push and wam both springs will
just pop right out.
now we can compare again. lets see.
very nice
Joined: Aug 2008
Posts: 1,929
From: Palm Coast FLA
next pop open the hatch. pop out the two shock tower covers.
right and left. i only have a picture of the right one. look and
you will see a hook facing up wards. this is the cover to pop
off using a screw driver. repeat on the left side.
now that the covers are off unbolt the shocks.
ah before i forget. we are taking the shocks out because
of this.
the one to the left is for the front.
the one to the right is for the back.
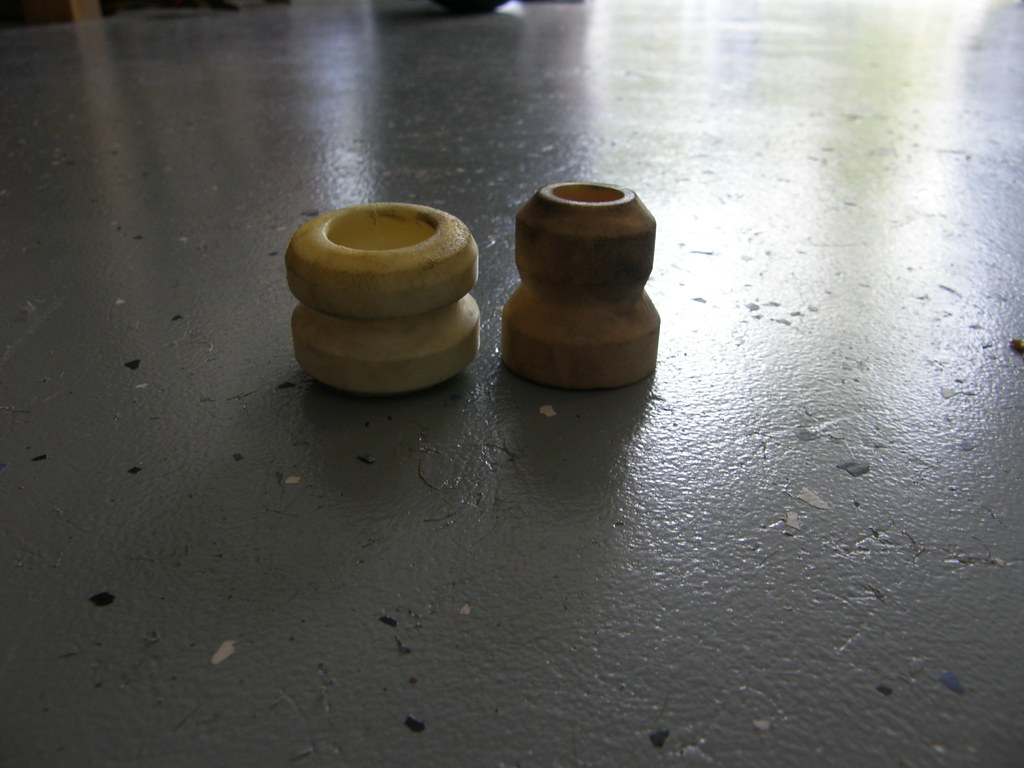
the bump stop is under the shock cover well hidden.
now that we have the shocks out take out you bump stops
and cut them.
ah but wait it's not that easy. make sure you have a small and medium
screw drivers handy for this. also a hammer and a vise.
hard to explain. sorry i didn't take pics of this process. by this time
i was very frustrated.
but anyway you will see a sleeve on there that just doesn't want
to come out. this sleeve is crimped in. so start with your small screw driver an dhammer it in the crack of the sleeve. thus speeding the
sleeve and making it bigger. you will most likely have to move to
the bigger screw driver to achieve this.
but now the sleeve will come out.
cut you bumps off and your all set.
here are some pics thanks to Malice101
the first one shows the top of the rear shock.
you must remove that metal sleeve to get to the bumpstop.
i used a screw driver to open it up by twisting it.


also don't forget when putting your new springs on. watch out for
that bottom rubber bushing. it only goes on one way. it has a nipple
on it and goes back only the whole it came out of. it may look like it
will go back in any hole but it doesn't. so make sure you mark it
so you don't forget.
now you can put everything back together in reverse.
should look like this when done.
This is a add on from TORK
2/4/2010
I just noticed a nice correction can be made here.
The rear shock collars, you do not have to pry them open to get to the rear bump stops. Just put the allen wrench in the shock end, clamp a vice grip on the collar. Then apply a little bit of pull up pressure while turning the vice grip counter clock wise. They simply unscrew right off.
I have done it twice this way. Back early summer with springs/cutting bump stop and a month ago when I installed air shocks. Sorry I did not mention this sooner.
Sorry if someone else caught this. I didn't go back and read the 10 pages of posts.
Mike
right and left. i only have a picture of the right one. look and
you will see a hook facing up wards. this is the cover to pop
off using a screw driver. repeat on the left side.
now that the covers are off unbolt the shocks.
ah before i forget. we are taking the shocks out because
of this.
the one to the left is for the front.
the one to the right is for the back.
the bump stop is under the shock cover well hidden.
now that we have the shocks out take out you bump stops
and cut them.
ah but wait it's not that easy. make sure you have a small and medium
screw drivers handy for this. also a hammer and a vise.
hard to explain. sorry i didn't take pics of this process. by this time
i was very frustrated.
but anyway you will see a sleeve on there that just doesn't want
to come out. this sleeve is crimped in. so start with your small screw driver an dhammer it in the crack of the sleeve. thus speeding the
sleeve and making it bigger. you will most likely have to move to
the bigger screw driver to achieve this.
but now the sleeve will come out.
cut you bumps off and your all set.
here are some pics thanks to Malice101
the first one shows the top of the rear shock.
you must remove that metal sleeve to get to the bumpstop.
i used a screw driver to open it up by twisting it.
also don't forget when putting your new springs on. watch out for
that bottom rubber bushing. it only goes on one way. it has a nipple
on it and goes back only the whole it came out of. it may look like it
will go back in any hole but it doesn't. so make sure you mark it
so you don't forget.
now you can put everything back together in reverse.
should look like this when done.
This is a add on from TORK
2/4/2010
I just noticed a nice correction can be made here.
The rear shock collars, you do not have to pry them open to get to the rear bump stops. Just put the allen wrench in the shock end, clamp a vice grip on the collar. Then apply a little bit of pull up pressure while turning the vice grip counter clock wise. They simply unscrew right off.
I have done it twice this way. Back early summer with springs/cutting bump stop and a month ago when I installed air shocks. Sorry I did not mention this sooner.
Sorry if someone else caught this. I didn't go back and read the 10 pages of posts.
Mike
Last edited by niko3257; Feb 4, 2010 at 12:16 AM.
Joined: Aug 2008
Posts: 1,929
From: Palm Coast FLA
now we can go for a test drive and let the suspension
set back down a bit.
after i got back from the test drive i was impressed and alot lower
but i also noticed my car didn't need a alignment. maybe after the suspension finally settles. i'm not sure. but for now i'm opting not
to do it. as we all know by now there is no camber/caster
adjustments on the Fit. thus meaning there is nothing to align
but toe. and as for the toe i never disconnected it so it should
be alright. and so far it is. i let go of the wheel and the car tracks
perfect.
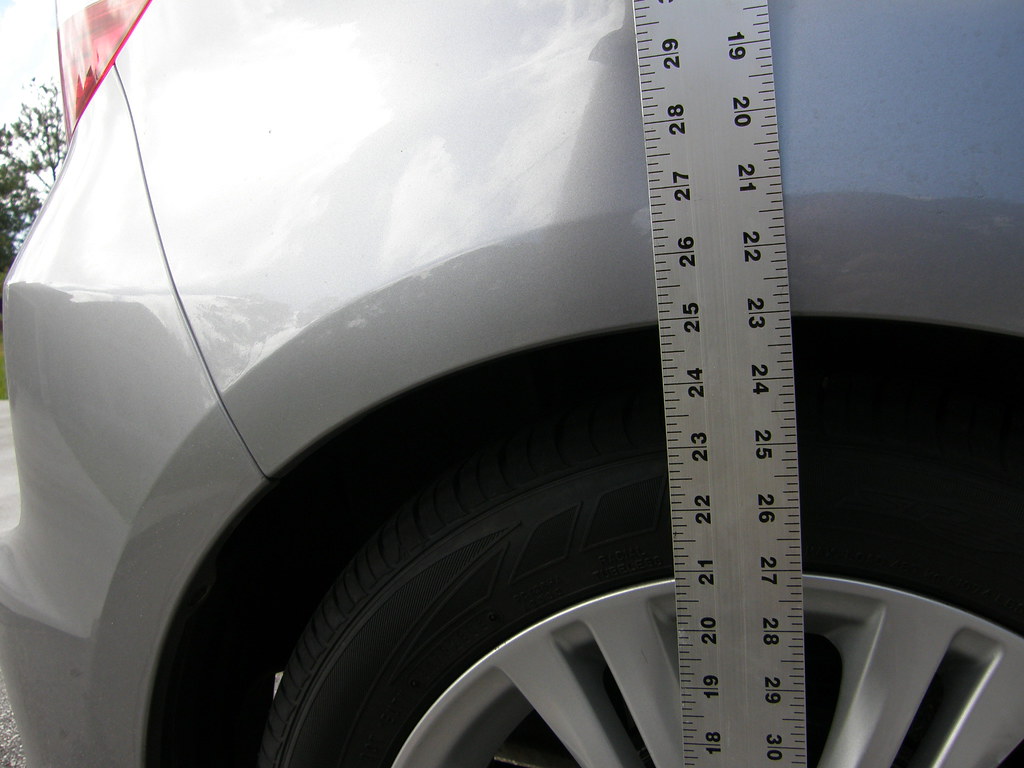
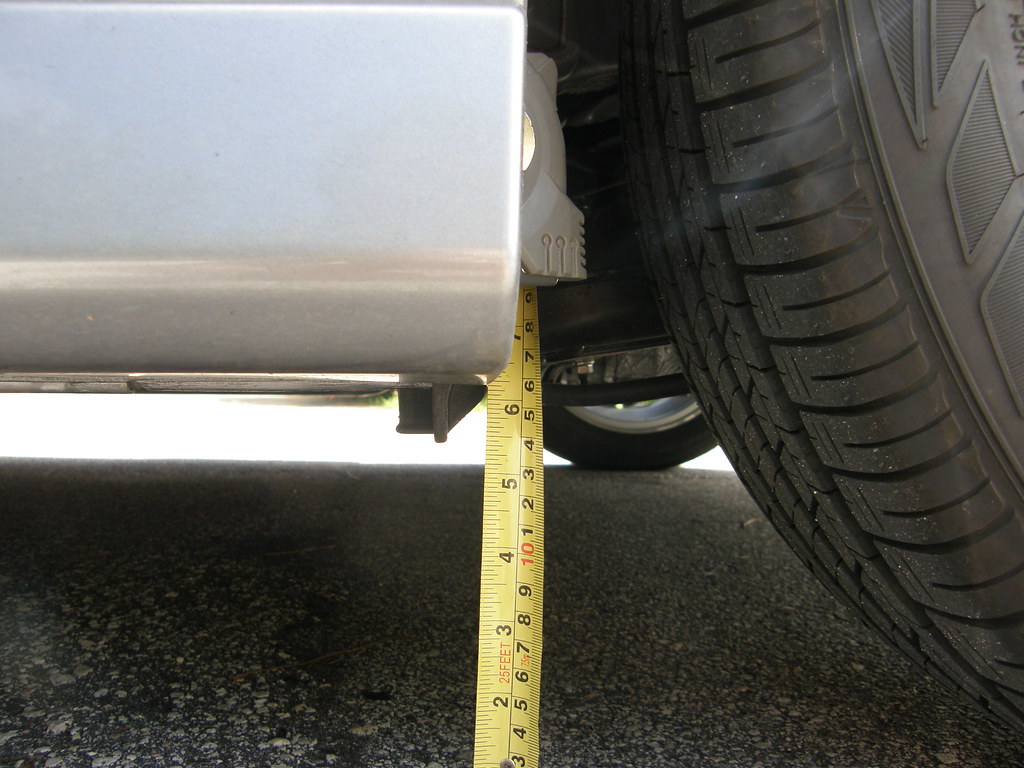
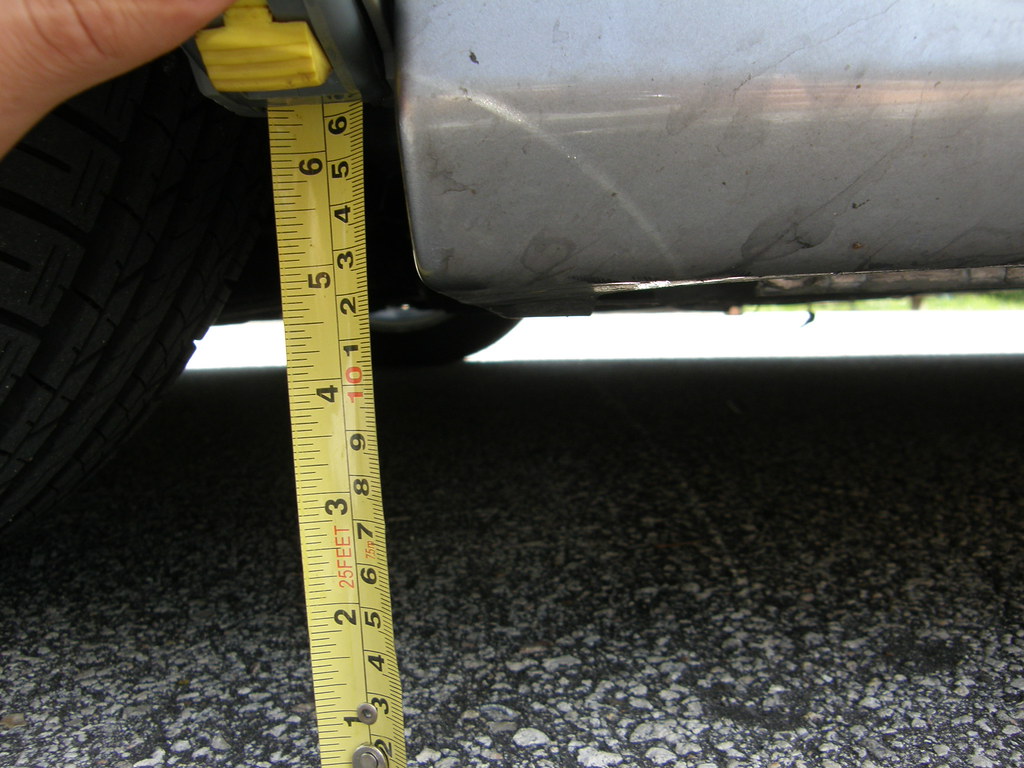
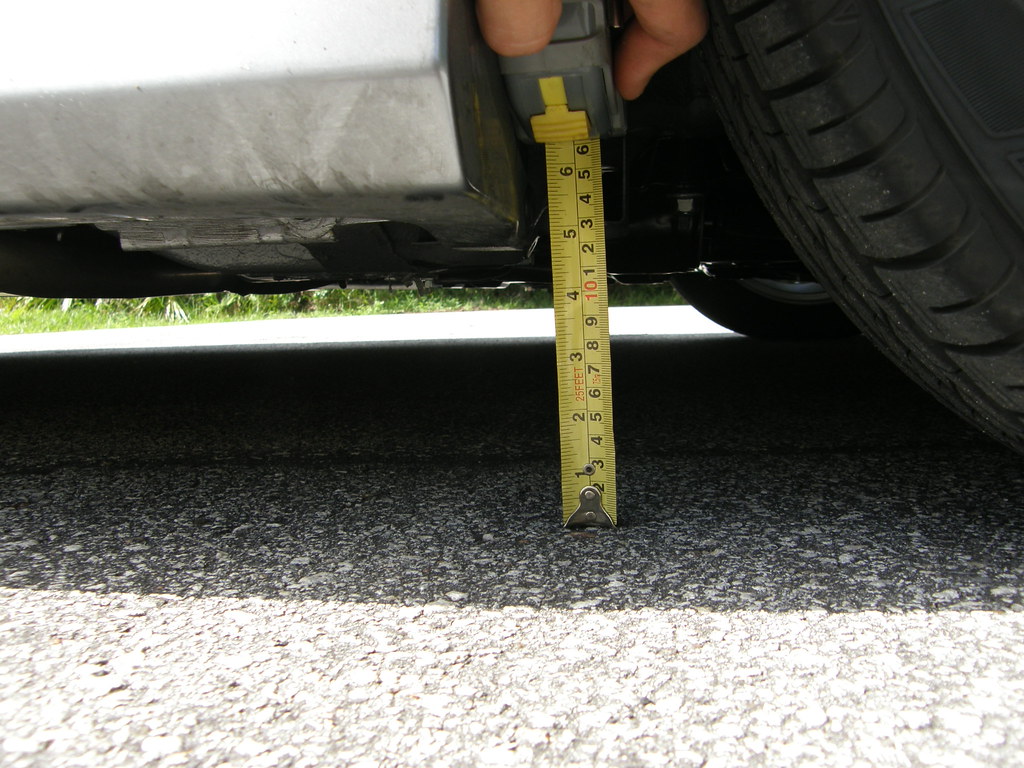
well with that said time to take measurements again.
left rear after
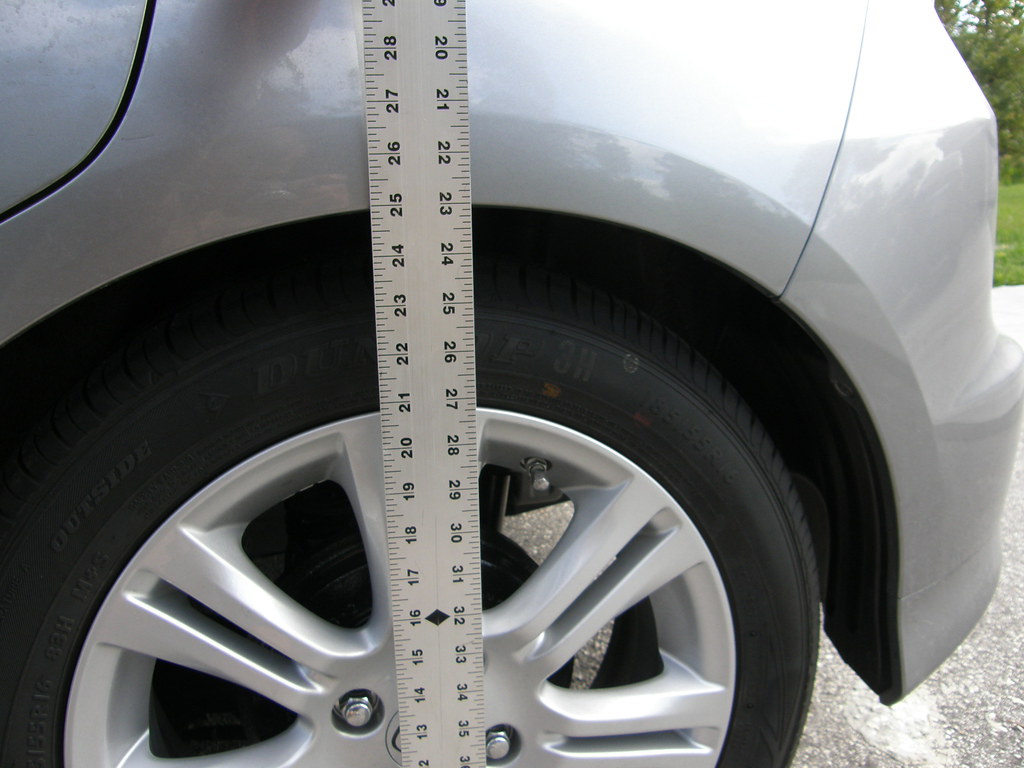
left front after
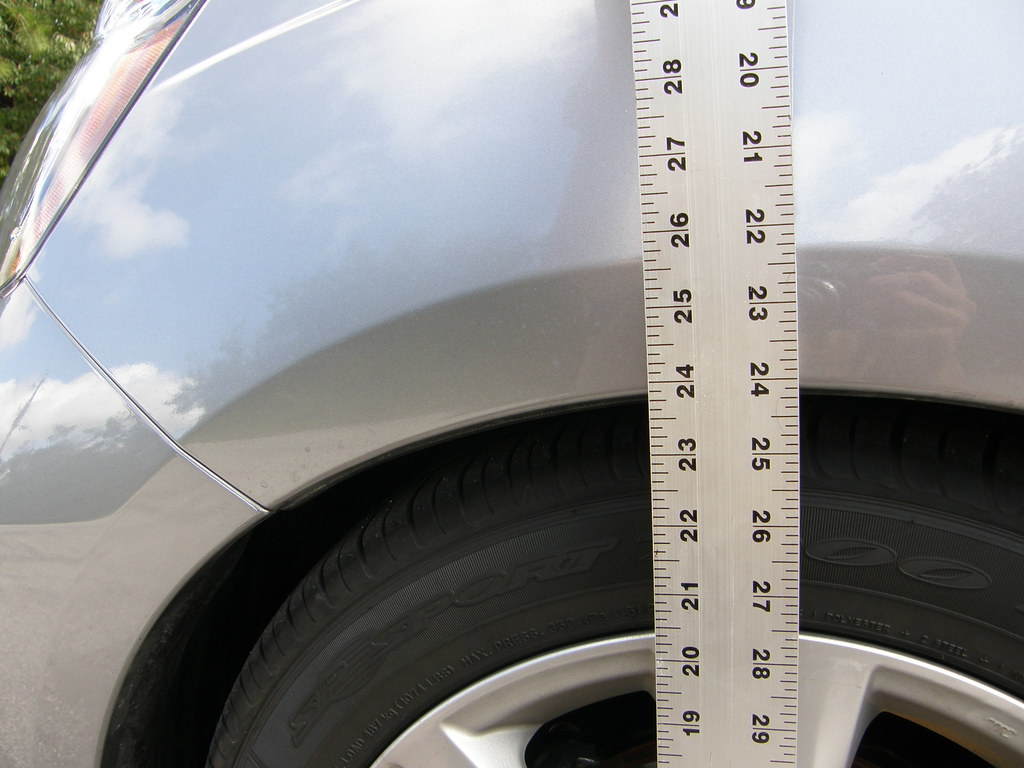
right front after
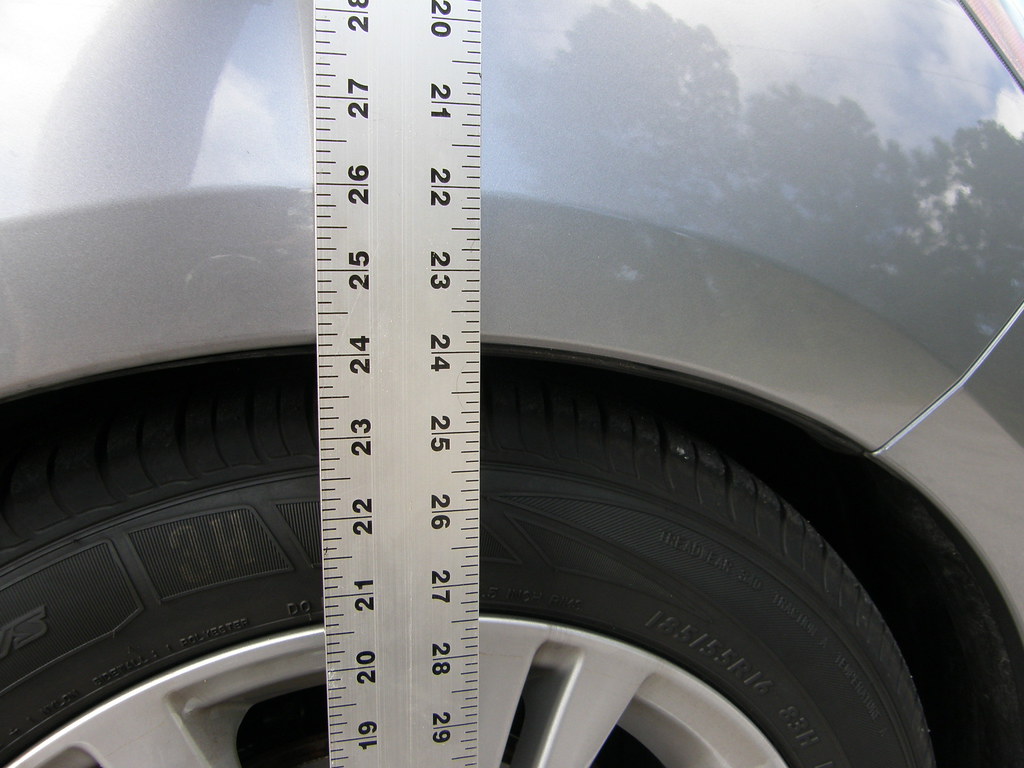
right rear after
and let the suspensionset back down a bit.
after i got back from the test drive i was impressed and alot lower
but i also noticed my car didn't need a alignment. maybe after the suspension finally settles. i'm not sure. but for now i'm opting not
to do it. as we all know by now there is no camber/caster
adjustments on the Fit. thus meaning there is nothing to align
but toe. and as for the toe i never disconnected it so it should
be alright. and so far it is. i let go of the wheel and the car tracks
perfect.
well with that said time to take measurements again.
left rear after
left front after
right front after
right rear after


Member
Joined: Sep 2008
Posts: 138
From: California
Very nice, AGAIN! I saw that crimped sleeve on the shocks as well. Couldn't figure out what it did, so I left it alone--for now. Is it just a sleeve on the threaded part? Did you crimp it back on? I was thinking I might replace it with something threaded. Looks like a pretty half-@$$ed way of Honda to save 10 cents and/or perhaps force normal users to replace the whole thing as one assembly. Nice job!
Member
Joined: Sep 2008
Posts: 138
From: California
P.S. If you get a chance can you measure the height of the bump stops F and R? I was trying do some measurements on mine at stock ride height, and I think there was at least 1" clearance (but that's only by memory). Removing them (or cutting them) may depend on how much you lower a Fit.
Joined: Aug 2008
Posts: 1,929
From: Palm Coast FLA
Very nice, AGAIN! I saw that crimped sleeve on the shocks as well. Couldn't figure out what it did, so I left it alone--for now. Is it just a sleeve on the threaded part? Did you crimp it back on? I was thinking I might replace it with something threaded. Looks like a pretty half-@$$ed way of Honda to save 10 cents and/or perhaps force normal users to replace the whole thing as one assembly. Nice job!
yeah honda went to far with this one.
but yes its about half on the thread and half on the
shaft. after i was done i put it back on and then in the vise.
squeezed it back on.
as for the height what did you mean? the whole bump stop or
the parts i cut out? anyway i can def get you the measurements
on the parts i cut out. the rest is on the car and back together.
sorry.

I`ll say it again... GREAT WRITE UP!!! this has to be one of the best that I have seen on this site in a while!! ... and thanks for all of the measurements... very usefull for a bunch of people!!
... and thanks for all of the measurements... very usefull for a bunch of people!!