
J's Racing Cat Delete

Thread Starter
|
Member
Joined: May 2014
Posts: 1,917
From: Delaware

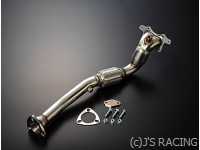
J's Racing GK5 Circuit Converter aka Cat Delete Downpipe
While trolling over on Japan sites, looky here -->
J'S RACING GK5 FIT3 SUS Circuit Converter
And a bad translation -->
If I did the conversion right, it's about $339.60.
**Update 12/10/14**
The JDM cat delete pipe has come in the mail.
***INSTALL WAS A SUCCESS. NO ISSUES WITH INSTALL***
I apologize for the pics if they are too dark. My phone camera's battery was low and I could not use the flash.
It weighed 5.2lbs
Stock cats and pipe weigh 16lbs.
10.8lbs in weight reduction.
Comes with a EGR delete 'cap'. Check engine code did come on.
Check Engine Code Read --> P0401 - Powertrain, Exhaust Gas Recirculation Flow Insufficient Detected
Check engine code read --> P0135 - Powertrain, O2 Sensor Heater Circuit (Bank 1, Sensor 1)
^^P0135 Originally came on but is now off. 2nd Trip to the shop and mechanic stated he forgot to connect the plug on the O2 sensor. Car ran fine though. P0135 code no longer comes up.


Inlet to the J's Racing Circuit Converter

Outlet of the J's Racing Circuit Converter

It was difficult to measure the outlet of the pipe's inner diameter due to the piping being recessed inside. It looks like the pipe ends and opens up to the flange. So I measured the outside diameter of the pipe and it measures 2" (50.80mm) exactly.
More Pics!!!!
**Please excuse my picture quality**
It bolted right up without any fitment issues at all.

J's Racing Pipe Flange to 'B' Pipe (Mid Pipe) Flange connection. Notice that the 'B' Pipe flange has been flared up to 2.5" rather than starting with 2" then flaring up like it was previously. This was done to prevent the 2" pipe from becoming a potential bottleneck.

My old cat converters in their resting place, along with the EGR tube

1st Cat Converter Inlet. The EGR connection is to the bottom left of the cat.

A closer look.

2nd Cat piping inlet

2nd Cat piping discharge

Short video revving it a little in the shop. Exhaust is now 2" J's Racing Cat Delete Piping, 2.5" piping to 2.25" piping, 2.25" Vibrant Ultra Quiet Resonator, 2.25" Hi Flow Pro Max Muffler.
J'S RACING GK5 FIT3 SUS Circuit Converter
And a bad translation -->
Dramatic and power up in realizing the full straight structure!
GK5 FIT3 RS Circuit Converter
GK5 fitting 3 is to improve the environmental performance, the catalyst has been mounted two, has become a big exhaust resistance to exchange and clean the exhaust gases.
By making the two catalysts in a straight structure and is competition only parts can be greatly power up.
Unlike other products, it has a full straight structure of the first catalyst, to ensure the torque in the low rotation region by providing the expanded portion near the entrance section.
By the exhaust resistance is greatly reduced, providing the power and torque up in all rpm range of the low rpm range to high rpm range. The GK5 fit EX Mani has been built into the engine head, it is especially high power-up effect parts. Material adopts a hard stainless steel (SUS304) that rust has improved durability. It can be mounted in a completely bolt-on using the supplied gasket and bolt. Please use a closed course such as circuit.
**Update 12/10/14**
The JDM cat delete pipe has come in the mail.
***INSTALL WAS A SUCCESS. NO ISSUES WITH INSTALL***
I apologize for the pics if they are too dark. My phone camera's battery was low and I could not use the flash.
It weighed 5.2lbs
Stock cats and pipe weigh 16lbs.
10.8lbs in weight reduction.
Comes with a EGR delete 'cap'. Check engine code did come on.
Check Engine Code Read --> P0401 - Powertrain, Exhaust Gas Recirculation Flow Insufficient Detected
Check engine code read --> P0135 - Powertrain, O2 Sensor Heater Circuit (Bank 1, Sensor 1)
^^P0135 Originally came on but is now off. 2nd Trip to the shop and mechanic stated he forgot to connect the plug on the O2 sensor. Car ran fine though. P0135 code no longer comes up.
Inlet to the J's Racing Circuit Converter
Outlet of the J's Racing Circuit Converter
It was difficult to measure the outlet of the pipe's inner diameter due to the piping being recessed inside. It looks like the pipe ends and opens up to the flange. So I measured the outside diameter of the pipe and it measures 2" (50.80mm) exactly.
More Pics!!!!
**Please excuse my picture quality**
It bolted right up without any fitment issues at all.
J's Racing Pipe Flange to 'B' Pipe (Mid Pipe) Flange connection. Notice that the 'B' Pipe flange has been flared up to 2.5" rather than starting with 2" then flaring up like it was previously. This was done to prevent the 2" pipe from becoming a potential bottleneck.
My old cat converters in their resting place, along with the EGR tube
1st Cat Converter Inlet. The EGR connection is to the bottom left of the cat.
A closer look.
2nd Cat piping inlet
2nd Cat piping discharge
Short video revving it a little in the shop. Exhaust is now 2" J's Racing Cat Delete Piping, 2.5" piping to 2.25" piping, 2.25" Vibrant Ultra Quiet Resonator, 2.25" Hi Flow Pro Max Muffler.
Last edited by Myxalplyx; Mar 11, 2016 at 04:42 PM.

Thread Starter
|
Member
Joined: May 2014
Posts: 1,917
From: Delaware


I'm just awaiting for a few $$$ to come in and I'll probably make a move on it. I can see installing another resonator (or two) downstream somewhere in the 'B' pipe section and perhaps muffler section since the cats appear to act as a semi-resonator themselves (Looking at their shapes).
Last edited by Myxalplyx; Nov 10, 2014 at 03:52 PM.
I wouldn't bother adding an extra 1 or 2 resonators. You'll effect the flow and have no sound. It's healthly yo be able to hear the car perform so you know when you need to shift or just be able to listen to what's happening.
Thread Starter
|
Member
Joined: May 2014
Posts: 1,917
From: Delaware
From J's Racing USA -->
So I told them I'm willing to be the guinea pig. Currently waiting for information on how to order directly from J's Racing Japan since on the Japanese site, it seems they only ship locally (Japan).
And if it doesn't fit.......well....I'll make it fit somehow. No sense wasting away nice metal pipe.
Price $330.00 + air shipping from J's Racing Japan $67 Total $397
However, we never sold this item to the U.S market. We are not sure if this
fits U.S FIT.
However, we never sold this item to the U.S market. We are not sure if this
fits U.S FIT.
And if it doesn't fit.......well....I'll make it fit somehow. No sense wasting away nice metal pipe.
Last edited by Myxalplyx; Nov 12, 2014 at 02:48 PM.

The lx is pretty loud for what it is in stock form when you are WOT. People I talk on Bluetooth can hear it too
Why go with a bigger diameter pipe for power to only restrict flow with multiple resonators. Is always a give and take with exhausts.
Thread Starter
|
Member
Joined: May 2014
Posts: 1,917
From: Delaware
If a resonator being used is the same diameter (or larger if someone was to do that) as the inlet and outlet piping, how does it restrict flow?
I've always assumed that a resonator does slow down the flow causing a loss in HP.
Thread Starter
|
Member
Joined: May 2014
Posts: 1,917
From: Delaware
I guess the Vibrant resonators claim they're "true straight through" design doesn't hurt flow. In that case they also make one thats even a quieter design which i'm sure you could just run one.
I've always assumed that a resonator does slow down the flow causing a loss in HP.
I've always assumed that a resonator does slow down the flow causing a loss in HP.
Here is a picture of the Vibrant resonator I have on my car now.

That was why I asked. If I can't see straight through from one end to the other I won't buy it. Also, if I see metal obstructions in the way of the airflow, I won't purchase it either. I'd consider adding an extra resonator like this, muffler or anything else to quiet down the exhaust. I'm not looking for any more noise, only a performance increase. It doesn't necessarily have to be quiet though, just not loud and obnoxious.
Last edited by Myxalplyx; Nov 16, 2014 at 02:55 PM.
Here is a picture of the Vibrant resonator I have on my car now.
That was why I asked. If I can't see straight through from one end to the other I won't buy it. Also, if I see metal obstructions in the way of the airflow, I won't purchase it either. I'd consider adding an extra resonator like this, muffler or anything else to quiet down the exhaust. I'm not looking for any more noise, only a performance increase. It doesn't necessarily have to be quiet though, just not loud and obnoxious.
That was why I asked. If I can't see straight through from one end to the other I won't buy it. Also, if I see metal obstructions in the way of the airflow, I won't purchase it either. I'd consider adding an extra resonator like this, muffler or anything else to quiet down the exhaust. I'm not looking for any more noise, only a performance increase. It doesn't necessarily have to be quiet though, just not loud and obnoxious.
For me I want noise. I want to be able to hear the car when racing it.
From J's Racing USA -->
So I told them I'm willing to be the guinea pig. Currently waiting for information on how to order directly from J's Racing Japan since on the Japanese site, it seems they only ship locally (Japan).
And if it doesn't fit.......well....I'll make it fit somehow. No sense wasting away nice metal pipe.
So I told them I'm willing to be the guinea pig. Currently waiting for information on how to order directly from J's Racing Japan since on the Japanese site, it seems they only ship locally (Japan).
And if it doesn't fit.......well....I'll make it fit somehow. No sense wasting away nice metal pipe.
u can have them ship it to a forwarder like Tenso or even Streeter. Air is mucho dinero. Sea is cheaper but hella slow.
Look again at the pictures, you would have to seal off your EGR. The Japanese Fit doesn't have that excess EGR piping and fitting. On the parts sheet, look below the 12, that flange and the parts 6~8. This is the main reason they state about not sure if it would fit. I'm sure it would fit, but you would still need to do something to close off the EGR on the engine side.
Thread Starter
|
Member
Joined: May 2014
Posts: 1,917
From: Delaware
Look again at the pictures, you would have to seal off your EGR. The Japanese Fit doesn't have that excess EGR piping and fitting. On the parts sheet, look below the 12, that flange and the parts 6~8. This is the main reason they state about not sure if it would fit. I'm sure it would fit, but you would still need to do something to close off the EGR on the engine side.
That's interesting! Not sure why I didn't notice that pipe before. Maybe an EGR Block plate like here --> EGR Block Plate.
This would actually takes some 'back pressure' off of the exhaust piping. I have some more reading to do around this.
Removal of EGR (Performance Gain or Loss)
Last edited by Myxalplyx; Nov 17, 2014 at 10:48 PM.


Thread Starter
|
Member
Joined: May 2014
Posts: 1,917
From: Delaware
Look again at the pictures, you would have to seal off your EGR. The Japanese Fit doesn't have that excess EGR piping and fitting. On the parts sheet, look below the 12, that flange and the parts 6~8. This is the main reason they state about not sure if it would fit. I'm sure it would fit, but you would still need to do something to close off the EGR on the engine side.
I've read a lot about issues regarding the (EGR valve) Exhaust Gas recirculation Valve.
Firstly I'll explain what it is... This little nuisance is designed to lower the emissions that you car produces by feeding in some of your exhaust fumes back into the inlet manifold to be re-burnt thus reducing the emissions. The obvious bad points to this are you are basically putting hot dirty gases into the engine!!! Thus comprimising combustion and performance and ultimately life of the engine.
The issues that people have spoken about are that if you blank it off then you get engine warning lights and some rubbish about lowered engine pressure. This is not my experience as I'm assuming those that have blanked it off in the past have just removed the valve and added a plate, by doing this there is nowhere for the electrical connector to connect to and the electrical circuit is broken and this will inevitably throw a CEL (Check Engine Light) error.
To overcome this what I propose is simply slipping a blanking plate under the valve and maintaining the circuit thus the valve is manually over-ridden and the ECU will have no electrical issues.
The EGR Valve is located on the left of the engine at the front (will try to find a picture/link)
1.) Parts needed:
EGRV Gasket (or appropiate equivalent)
Thin metal plate about 2mm thick is enough
2.) Having assembled all you parts you'll need the right tools and a good sense of what you are doing.
3.) Tools needed
12mm socket wrench possibly with extention (accessing the bolts is annoying)
11mm or 10mm spanner/socket to remove a plate that holds the wire that runs to the valve that gets in the way of the bolts that hold the valve on.
A wide bladed chisel if you are planning to re-use the existing gasket.
metal cutters/angle grinder
File
Pencil
Drill with metallic bits sizes 2mm, 5mm, 8mm
Metal tap
4.) Now you've got your stuff together
remove the plate to the right of the EGR Valve that holds the wire running to the valve as this gets in the way of the bolts that hold the valve on.
Remove the connector at the top of the valve by simply unclipping this.
remove the first 12mm bolt at the front before the one at the back as the bolt at the back was harder to access and when removing this it actually removed the EGR Valve as my socket was stuck between the bolt head and the valve.
Now carefully remove the valve especially careful if you intend to reuse the gasket (three layer construction) I found that the top of the three layers of the gasket had stuck in part to the base of the EGR Valve so using the wide chisel head I carefully scrapped the metallic substance off and put this back with the rest of the gasket providing a flat smooth top.
Take the EGR Valve place on your metal sheet draw round this with a pencil marking the centre holes with the tap.
Now drill with the 2mm then the 5mm then the 8mm, by going up in small increments the finish is better.
Quick tip the 12mm bolts that you have removed can be use if you have the apprpiate nuts to not hold the EGR Vlave to the metal plate.
Use a file or angle grinder to go round and create the shape of the plate you need.
now just put it all back together, Sorted!!!
This should sort out everything and you'll have no engine errors and smoother starts.
I'm going to need this information for later. It's easier for me to find here.
The RS Circuit Converter (Cat Delete) is on its way. Will update with pics, etc when it gets here.
Last edited by Myxalplyx; Dec 7, 2014 at 11:58 AM.
Thread Starter
|
Member
Joined: May 2014
Posts: 1,917
From: Delaware
**Update**
Updated 1st post with pictures of the GK5 FIT3 RS Circuit Converter. It arrived in the mail only 5 days after Jesse Streeter shipped it from Japan (Huge thanks). Please do not ask me of costs. You'd want to ask Jesse for that info.
Updated 1st post with pictures of the GK5 FIT3 RS Circuit Converter. It arrived in the mail only 5 days after Jesse Streeter shipped it from Japan (Huge thanks). Please do not ask me of costs. You'd want to ask Jesse for that info.
Last edited by Myxalplyx; Dec 10, 2014 at 10:54 AM.